
Elasticsearch MCP 服务器:与你的 Index 聊天
文章摘要:ModelContextProtocol(MCP)作为AI模型与外部数据源之间的开放标准,通过建立安全双向连接来提升LLM响应能力。本文重点介绍了如何构建MCP服务器与Elasticsearch集成,实现语义搜索功能。具体步骤包括:1)安装Elasticsearch及Kibana;2)使用ELSER模型进行数据向量化;3)通过Elastic OpenCrawler采集博客数据;4)开发不
访问外部知识在提升 LLM 响应能力的现代 AI 工作流中起着关键作用。但高效管理 context、确保 AI agents 之间的通信,以及扩展工具以协同工作并非易事。这就是 Model Context Protocol (MCP) 的作用所在。
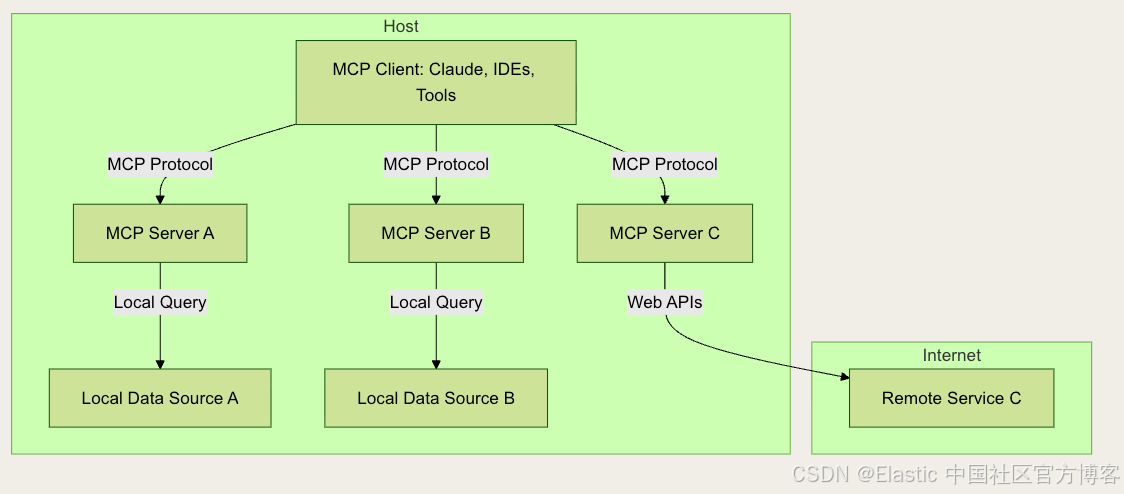
Model Context Protocol 是一个开放标准,使开发者能够在他们的数据源和 AI 驱动的工具之间建立安全的双向连接。其架构非常直接:开发者可以通过 MCP servers 暴露他们的数据,或者构建连接这些服务器的 AI 应用(MCP clients)。MCP server 充当 AI 模型与外部存储的数据之间的桥梁,例如存储在 Elasticsearch vector store 中的数据。
在这篇文章中,我们将探讨:
- MCP server 是什么以及它如何工作。
- MCP 如何简化 RAG 并支持 agentic workflows。
- 构建 MCP server 以从 Elasticsearch 语义搜索数据的指南。
- 使用 MCP Inspector 和 Claude Desktop App(实现 MCP client 协议)的动手演示。
安装
Elasticsearch 及 Kibana
如果你还没有安装好自己的 Elasticsearch 及 Kibana,那么请参考一下的文章来进行安装:
在安装的时候,请选择 Elastic Stack 8.x/9.x 进行安装。在安装的时候,我们可以看到如下的安装信息:
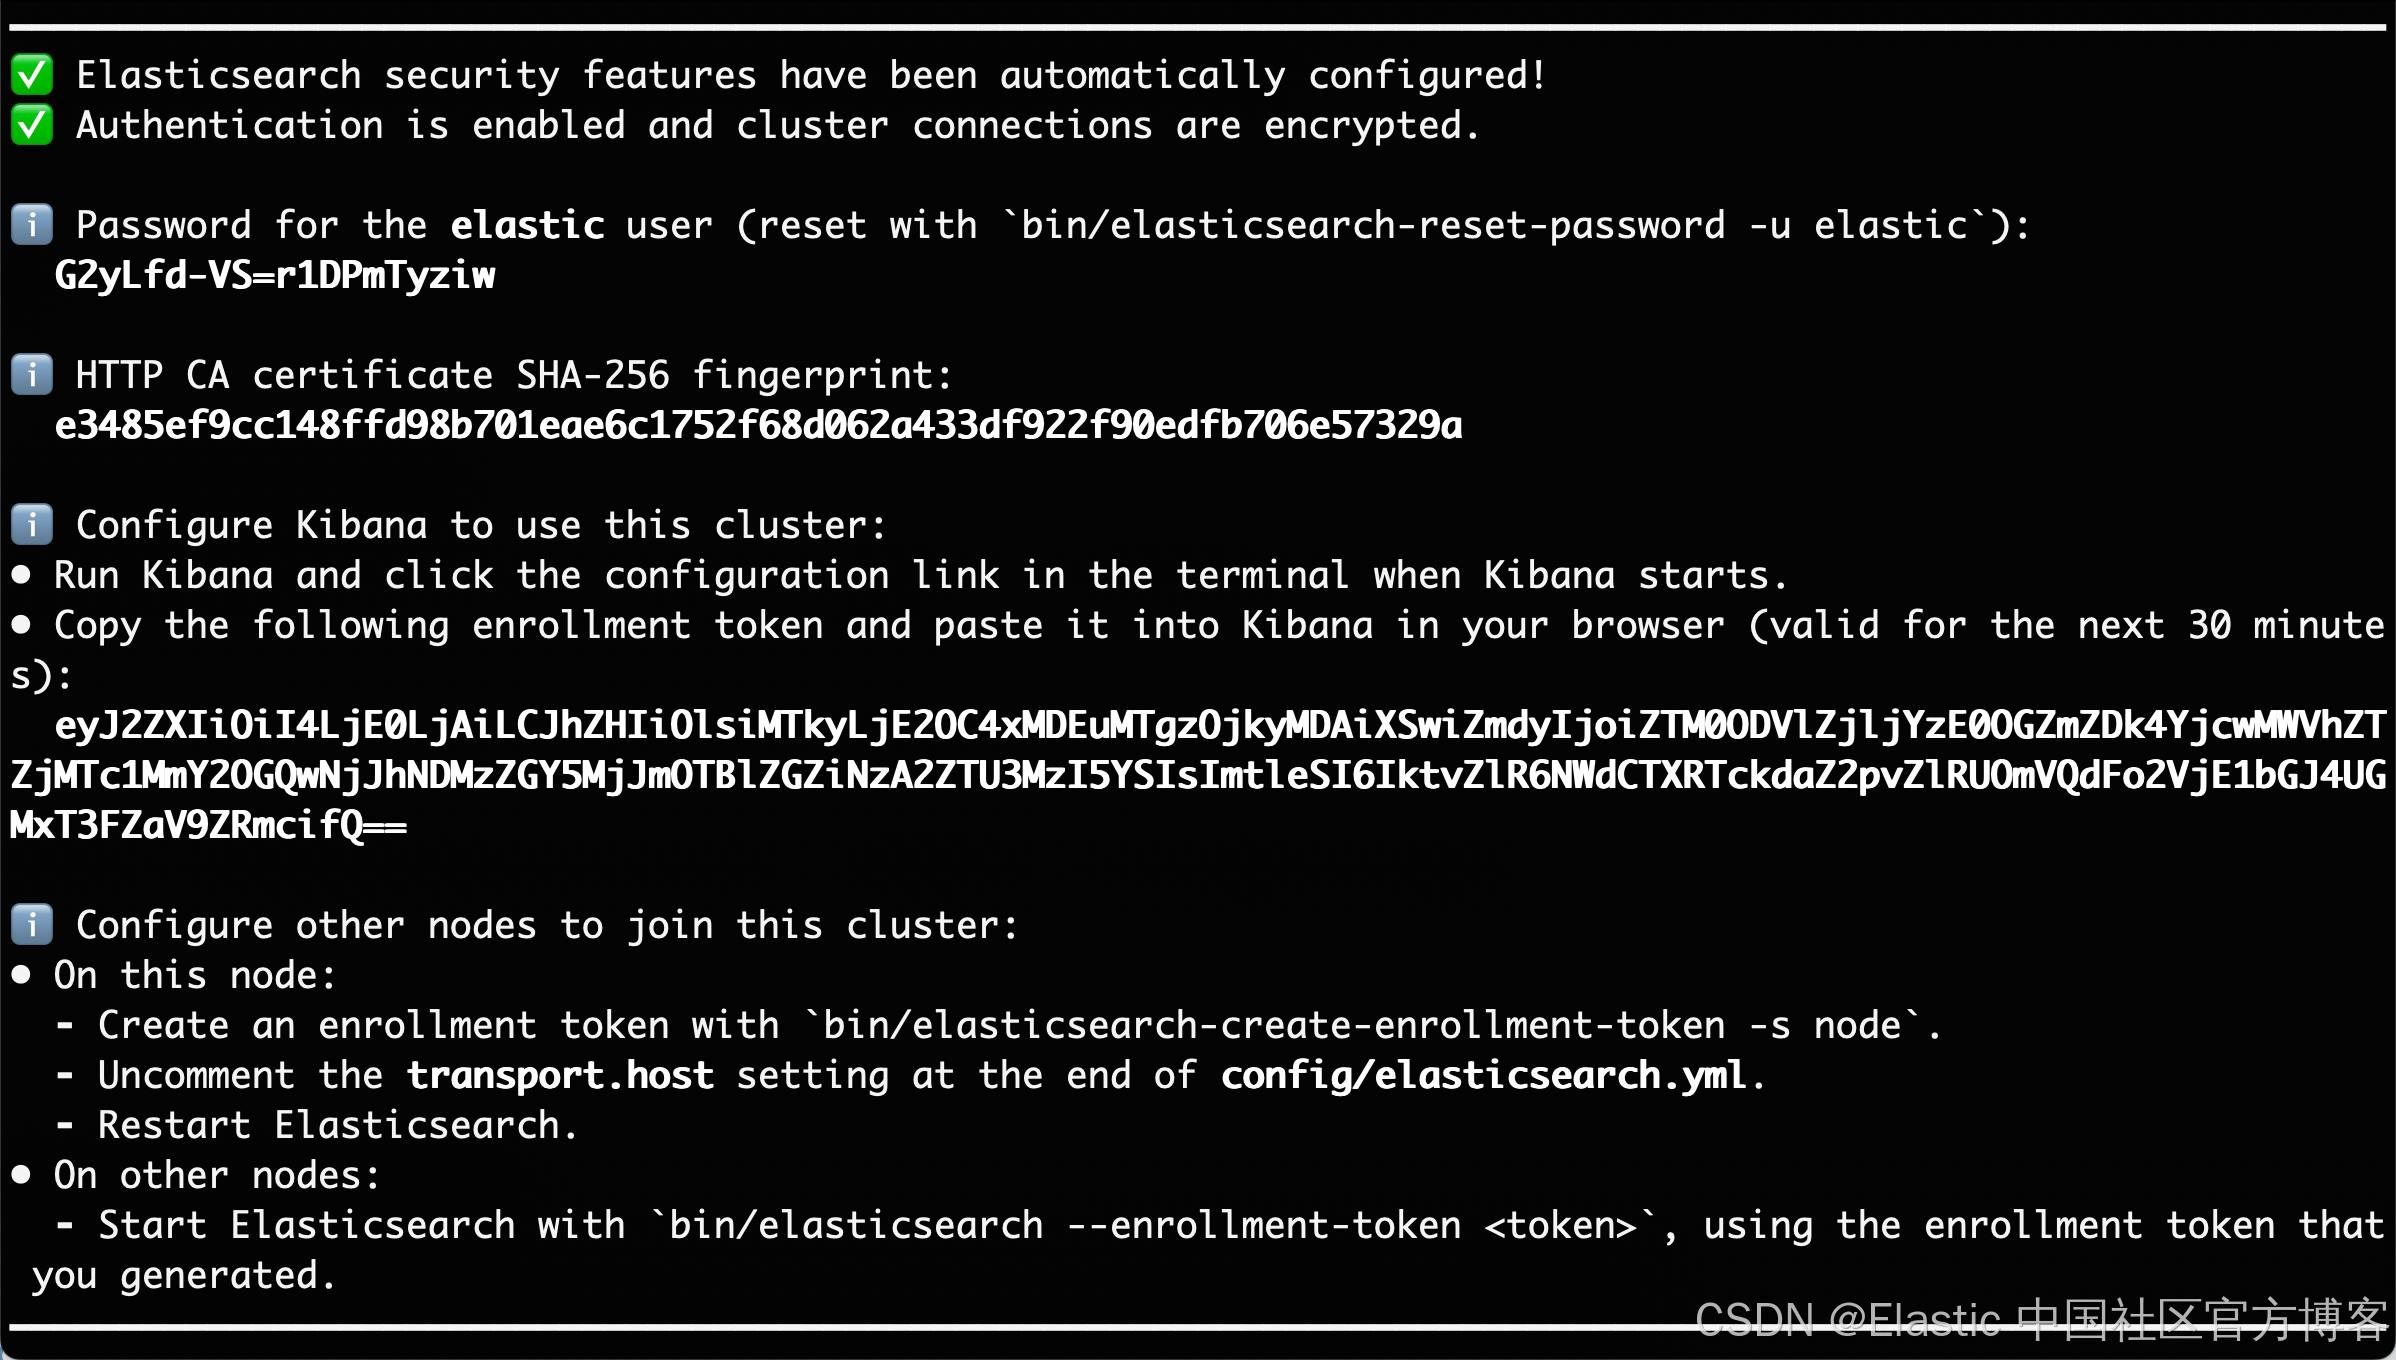
在本文中,我们使用 Elastic Stack 9.1.2 来进行展示。
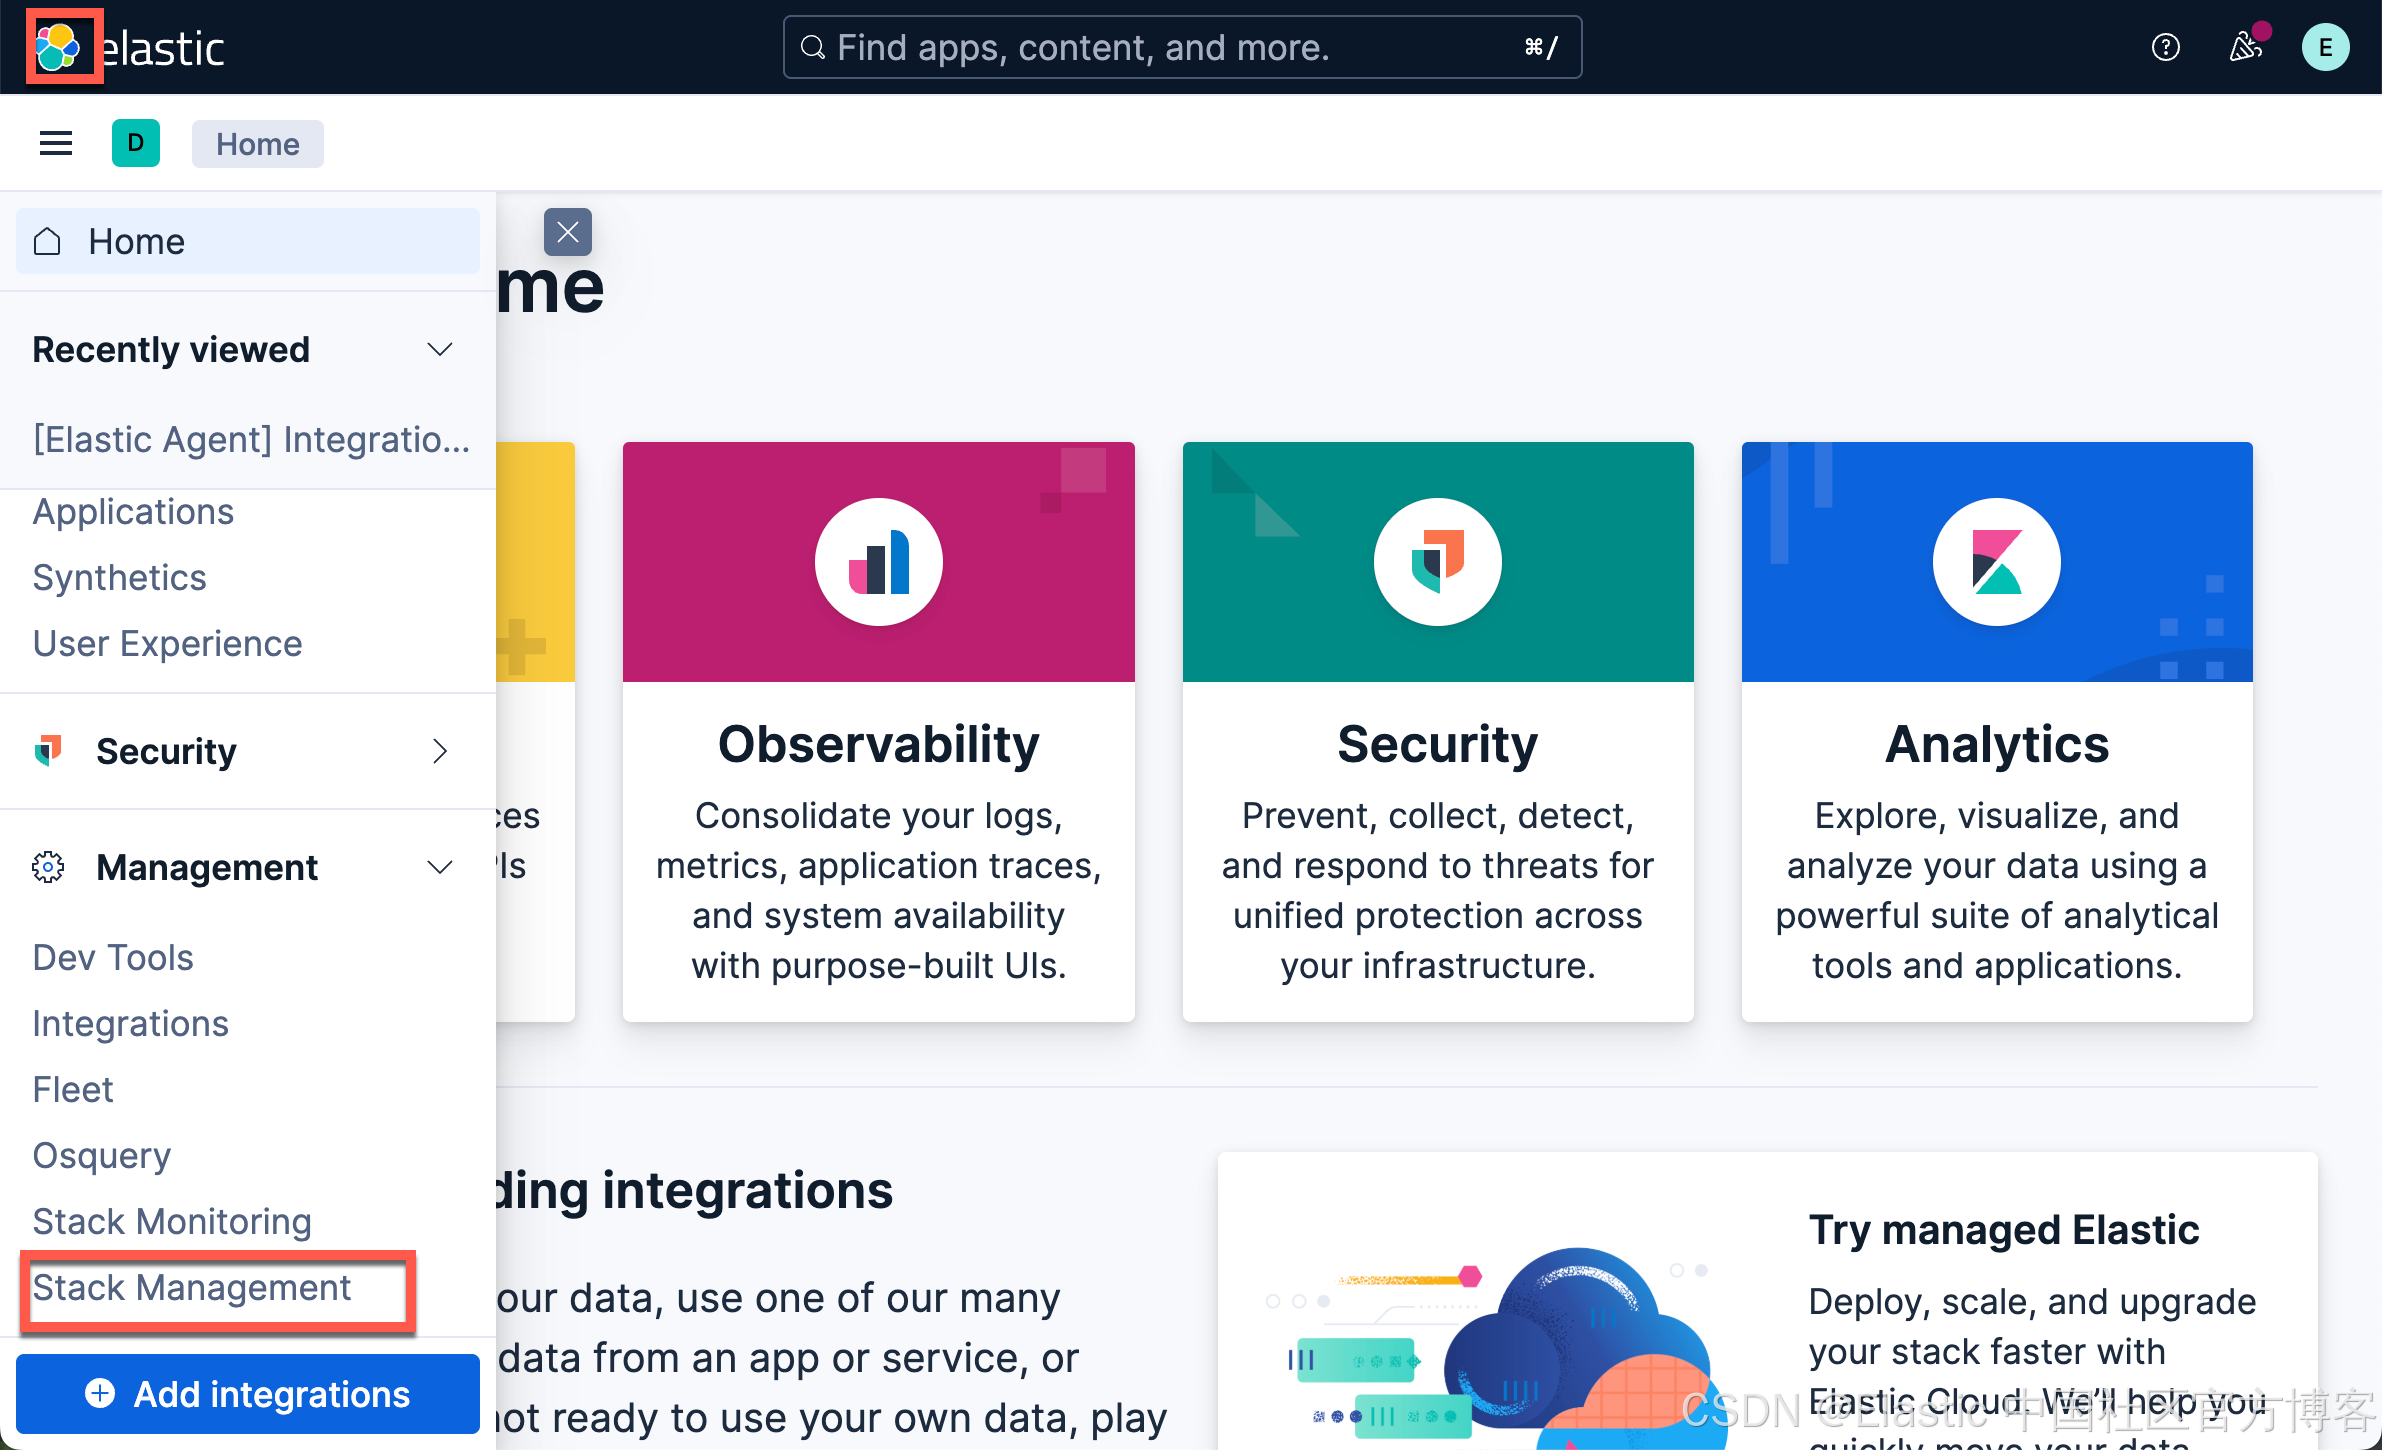
启动白金试用
我们需要使用到内置的 ELSER 模型来向量化我们的数据。我们需要启动白金试用:
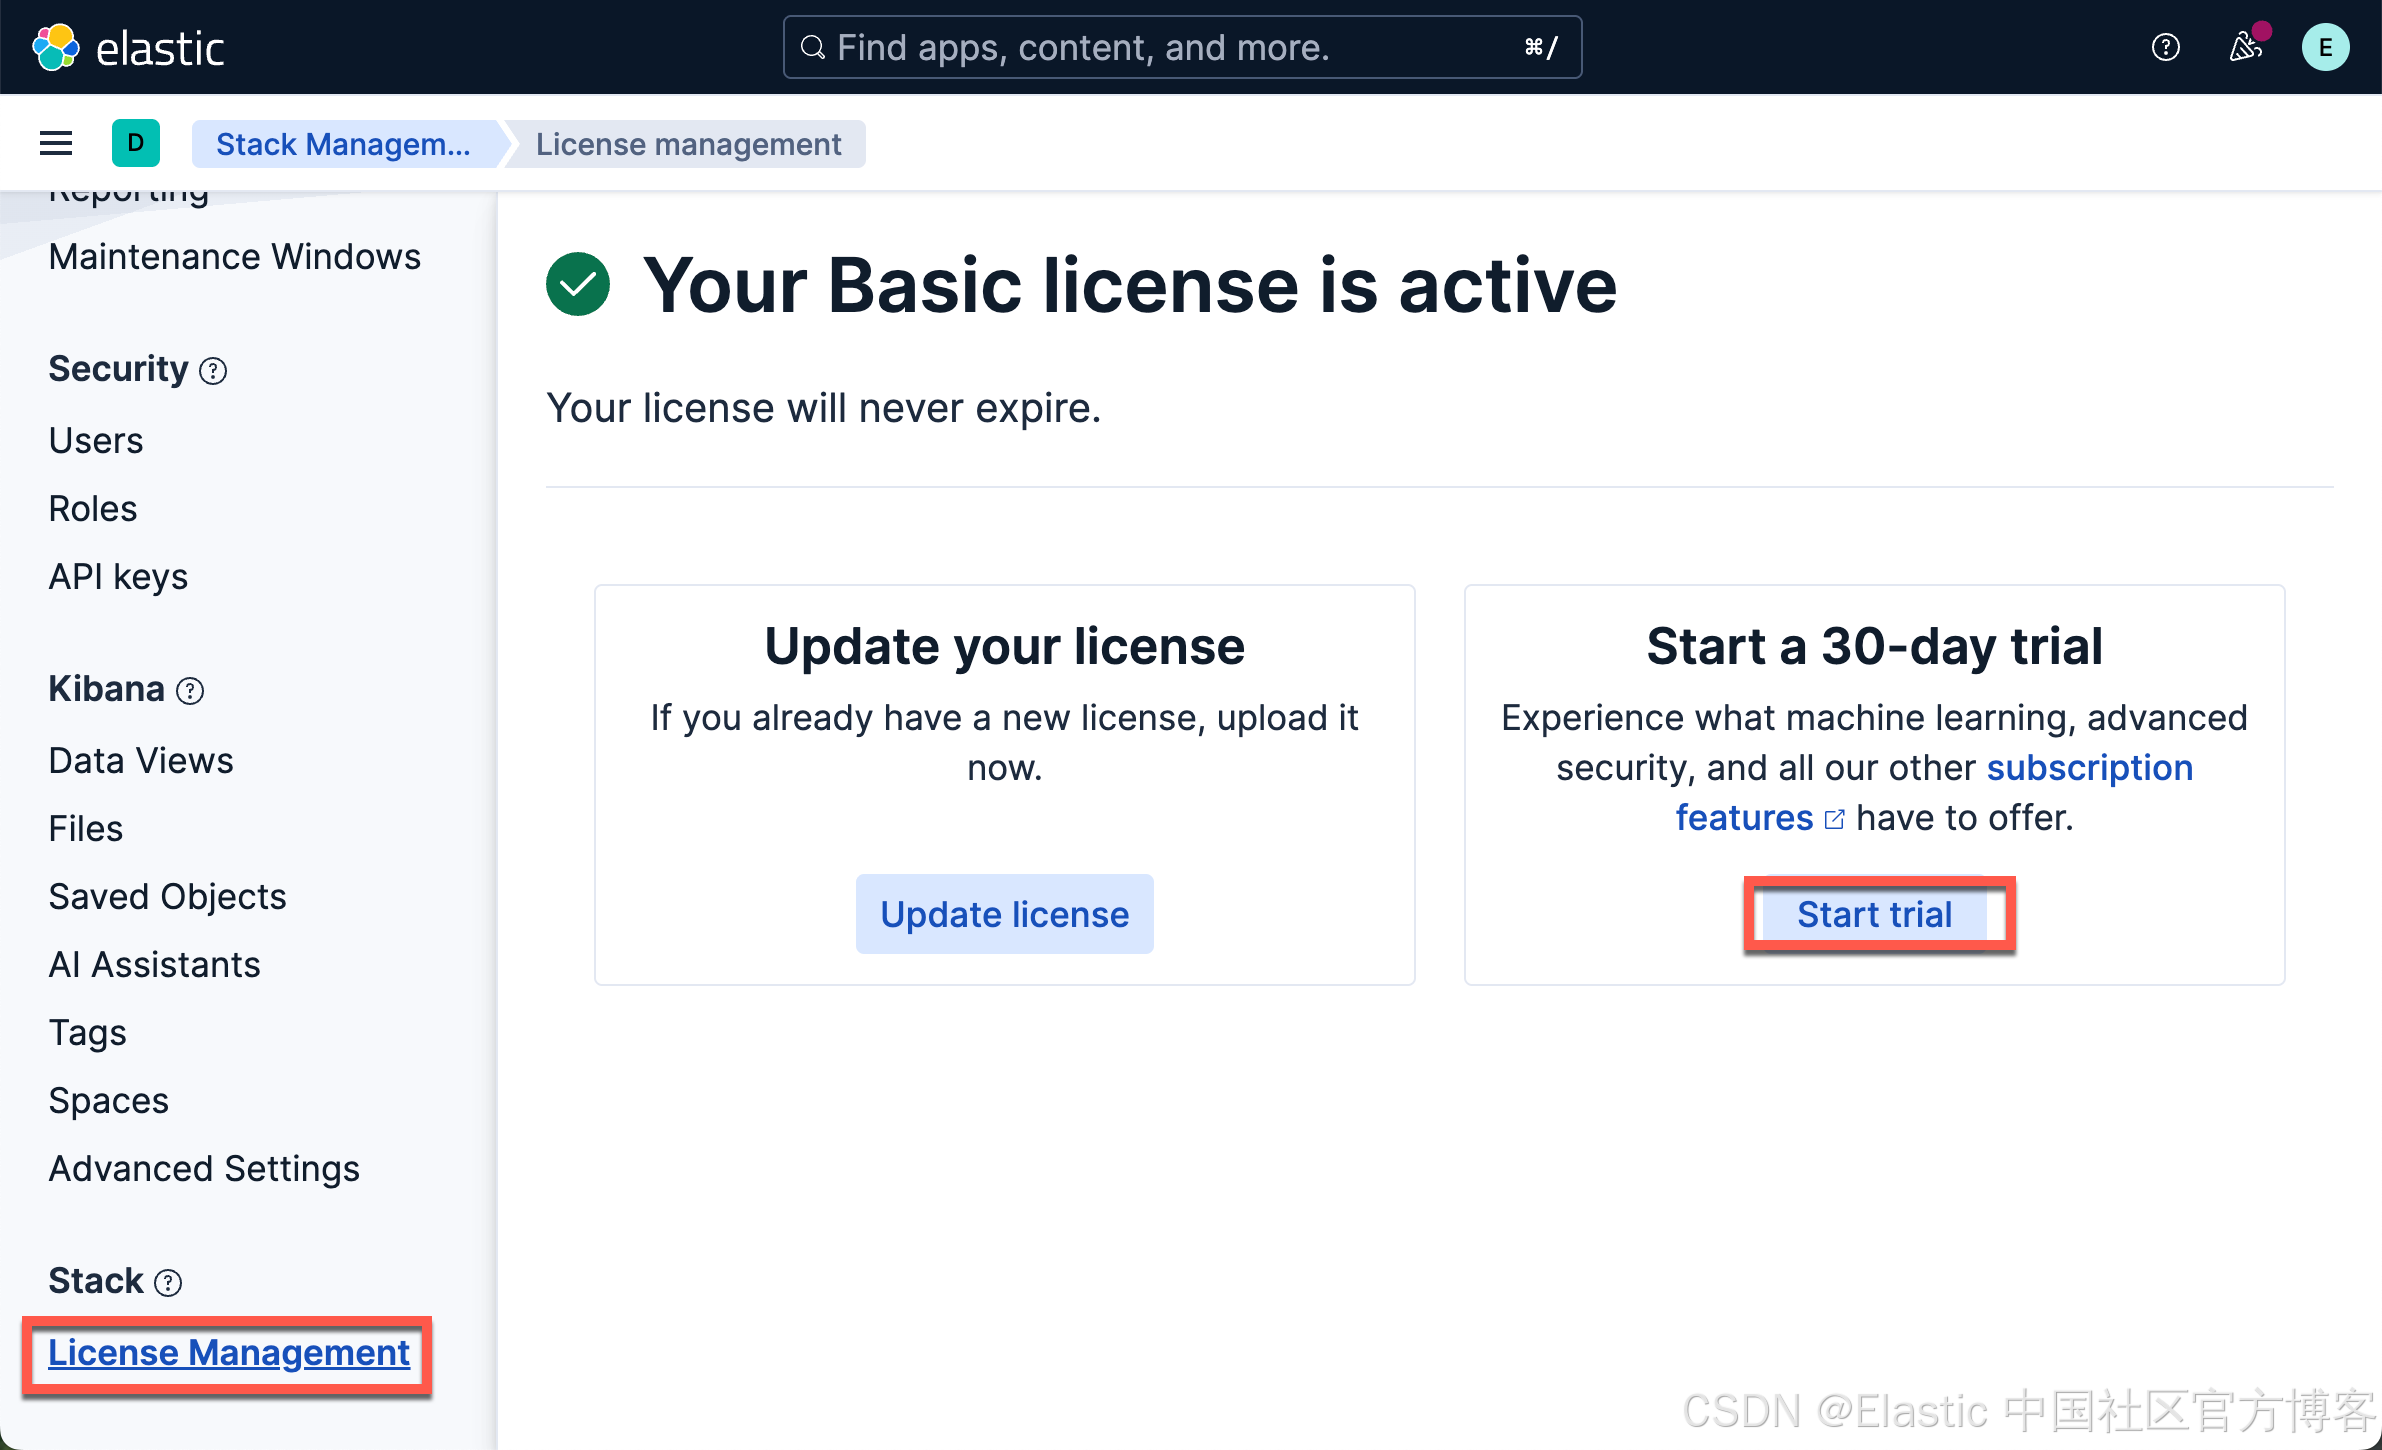
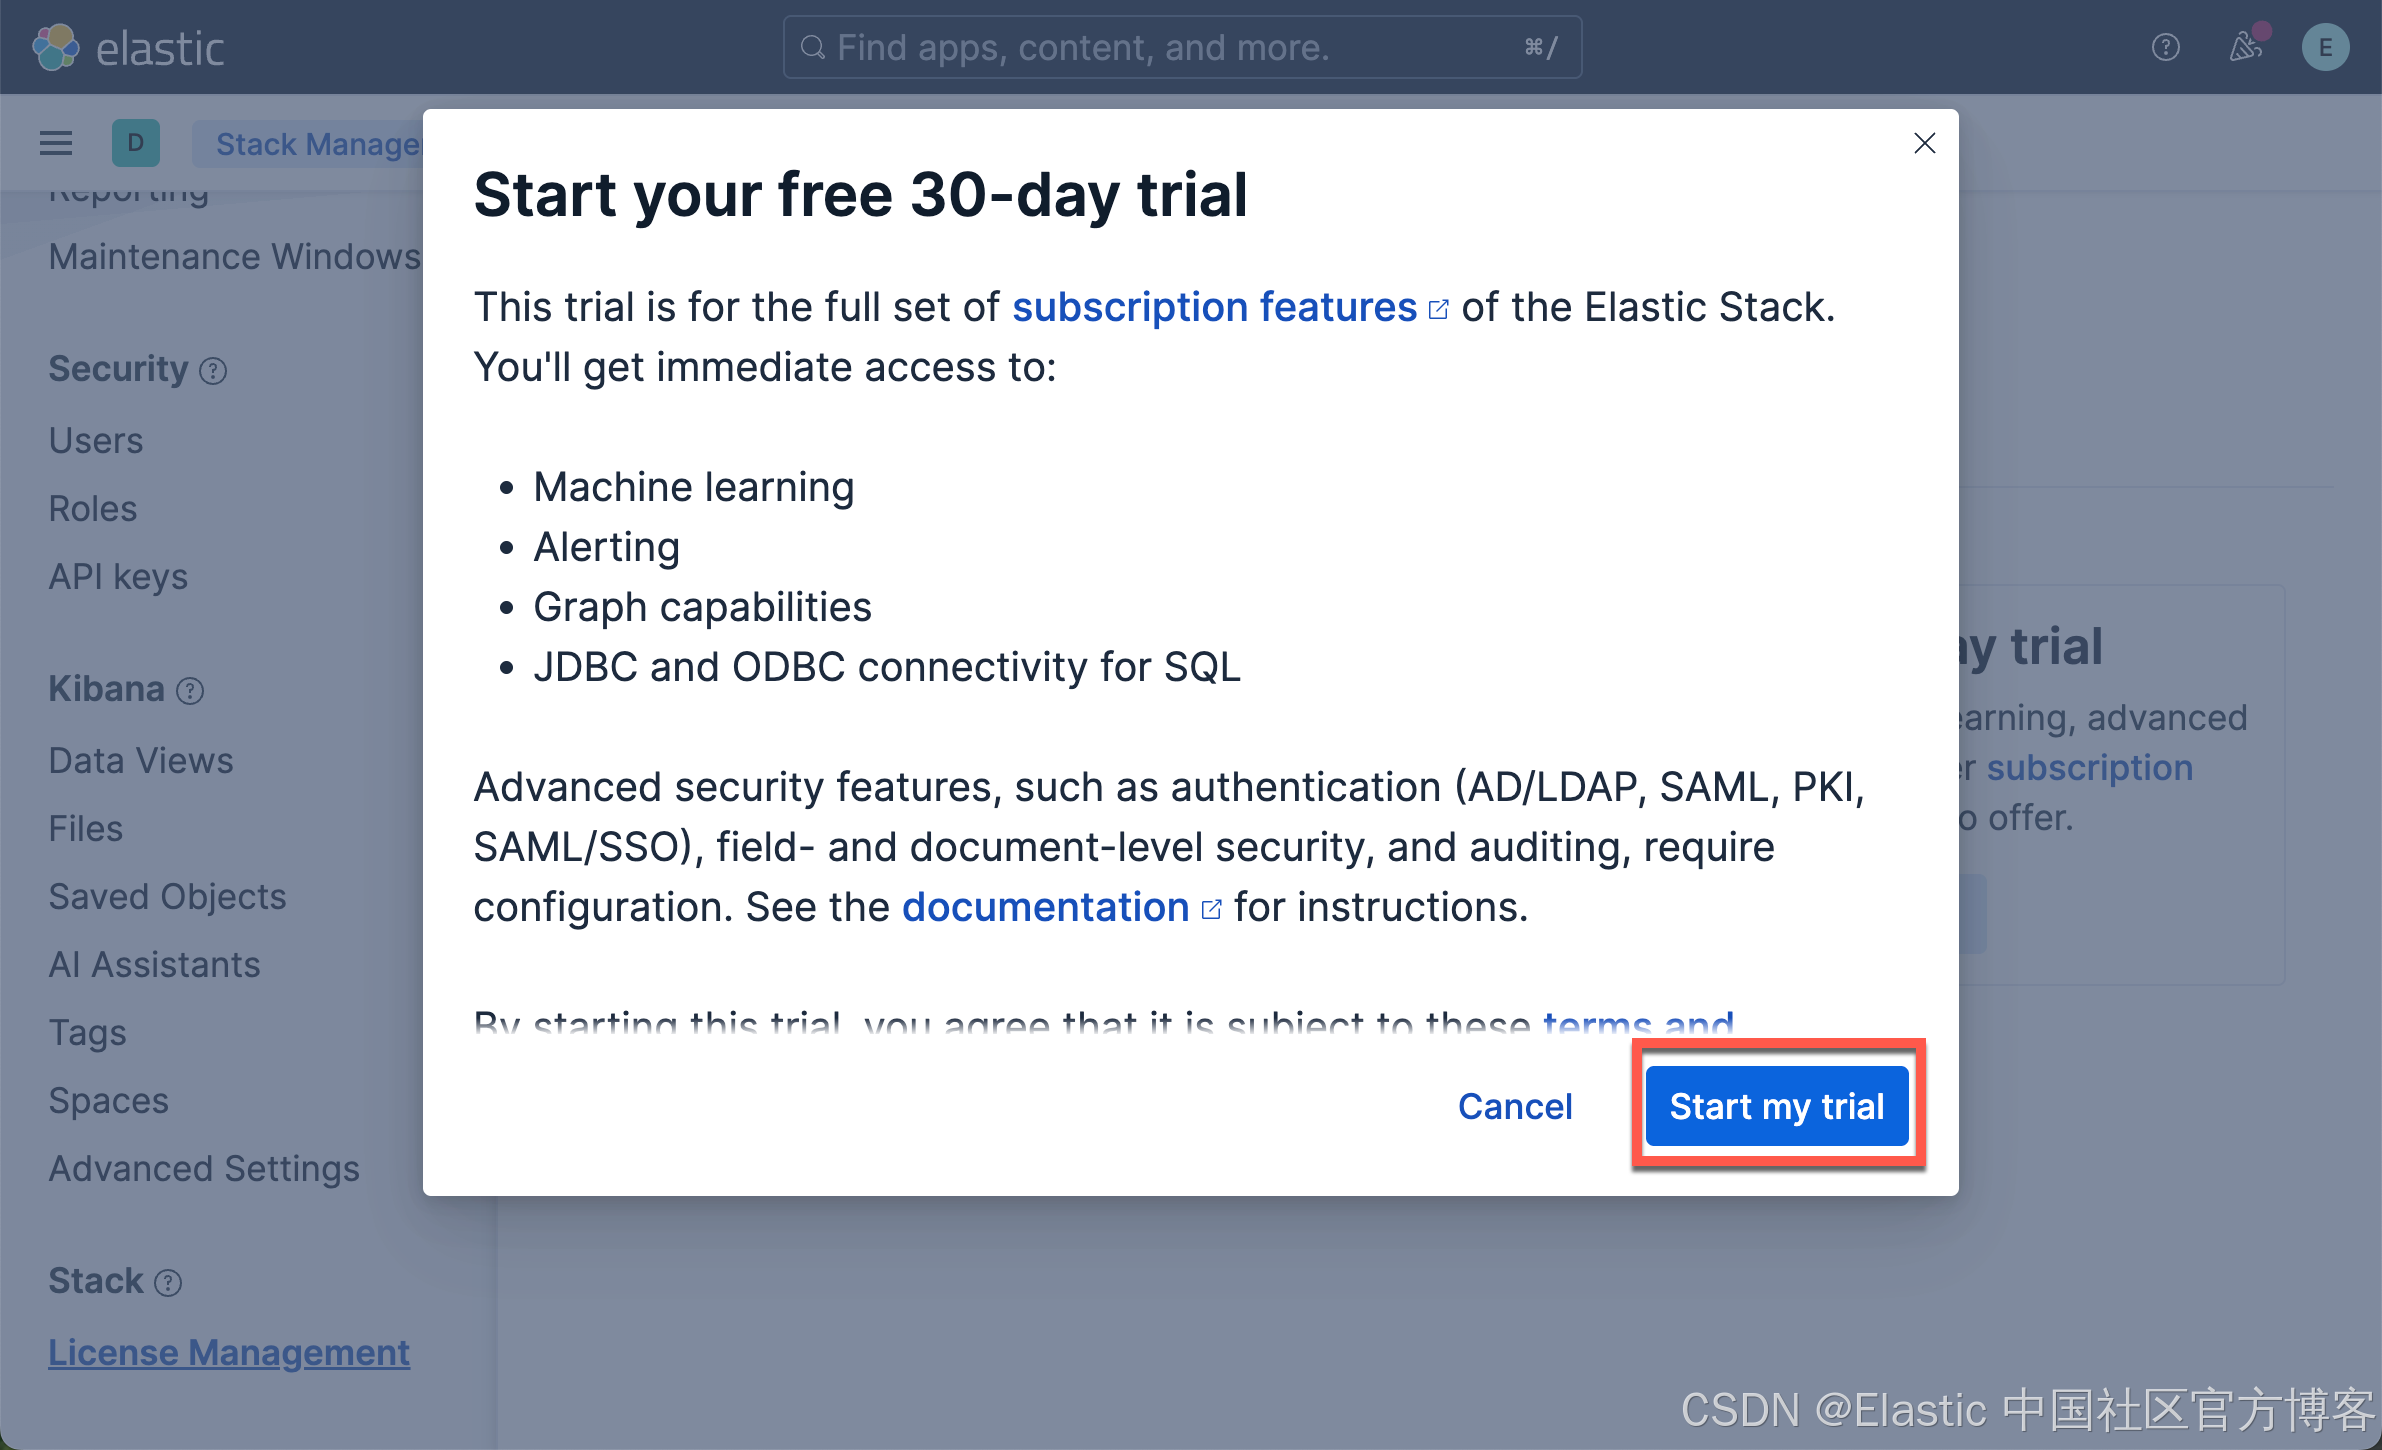
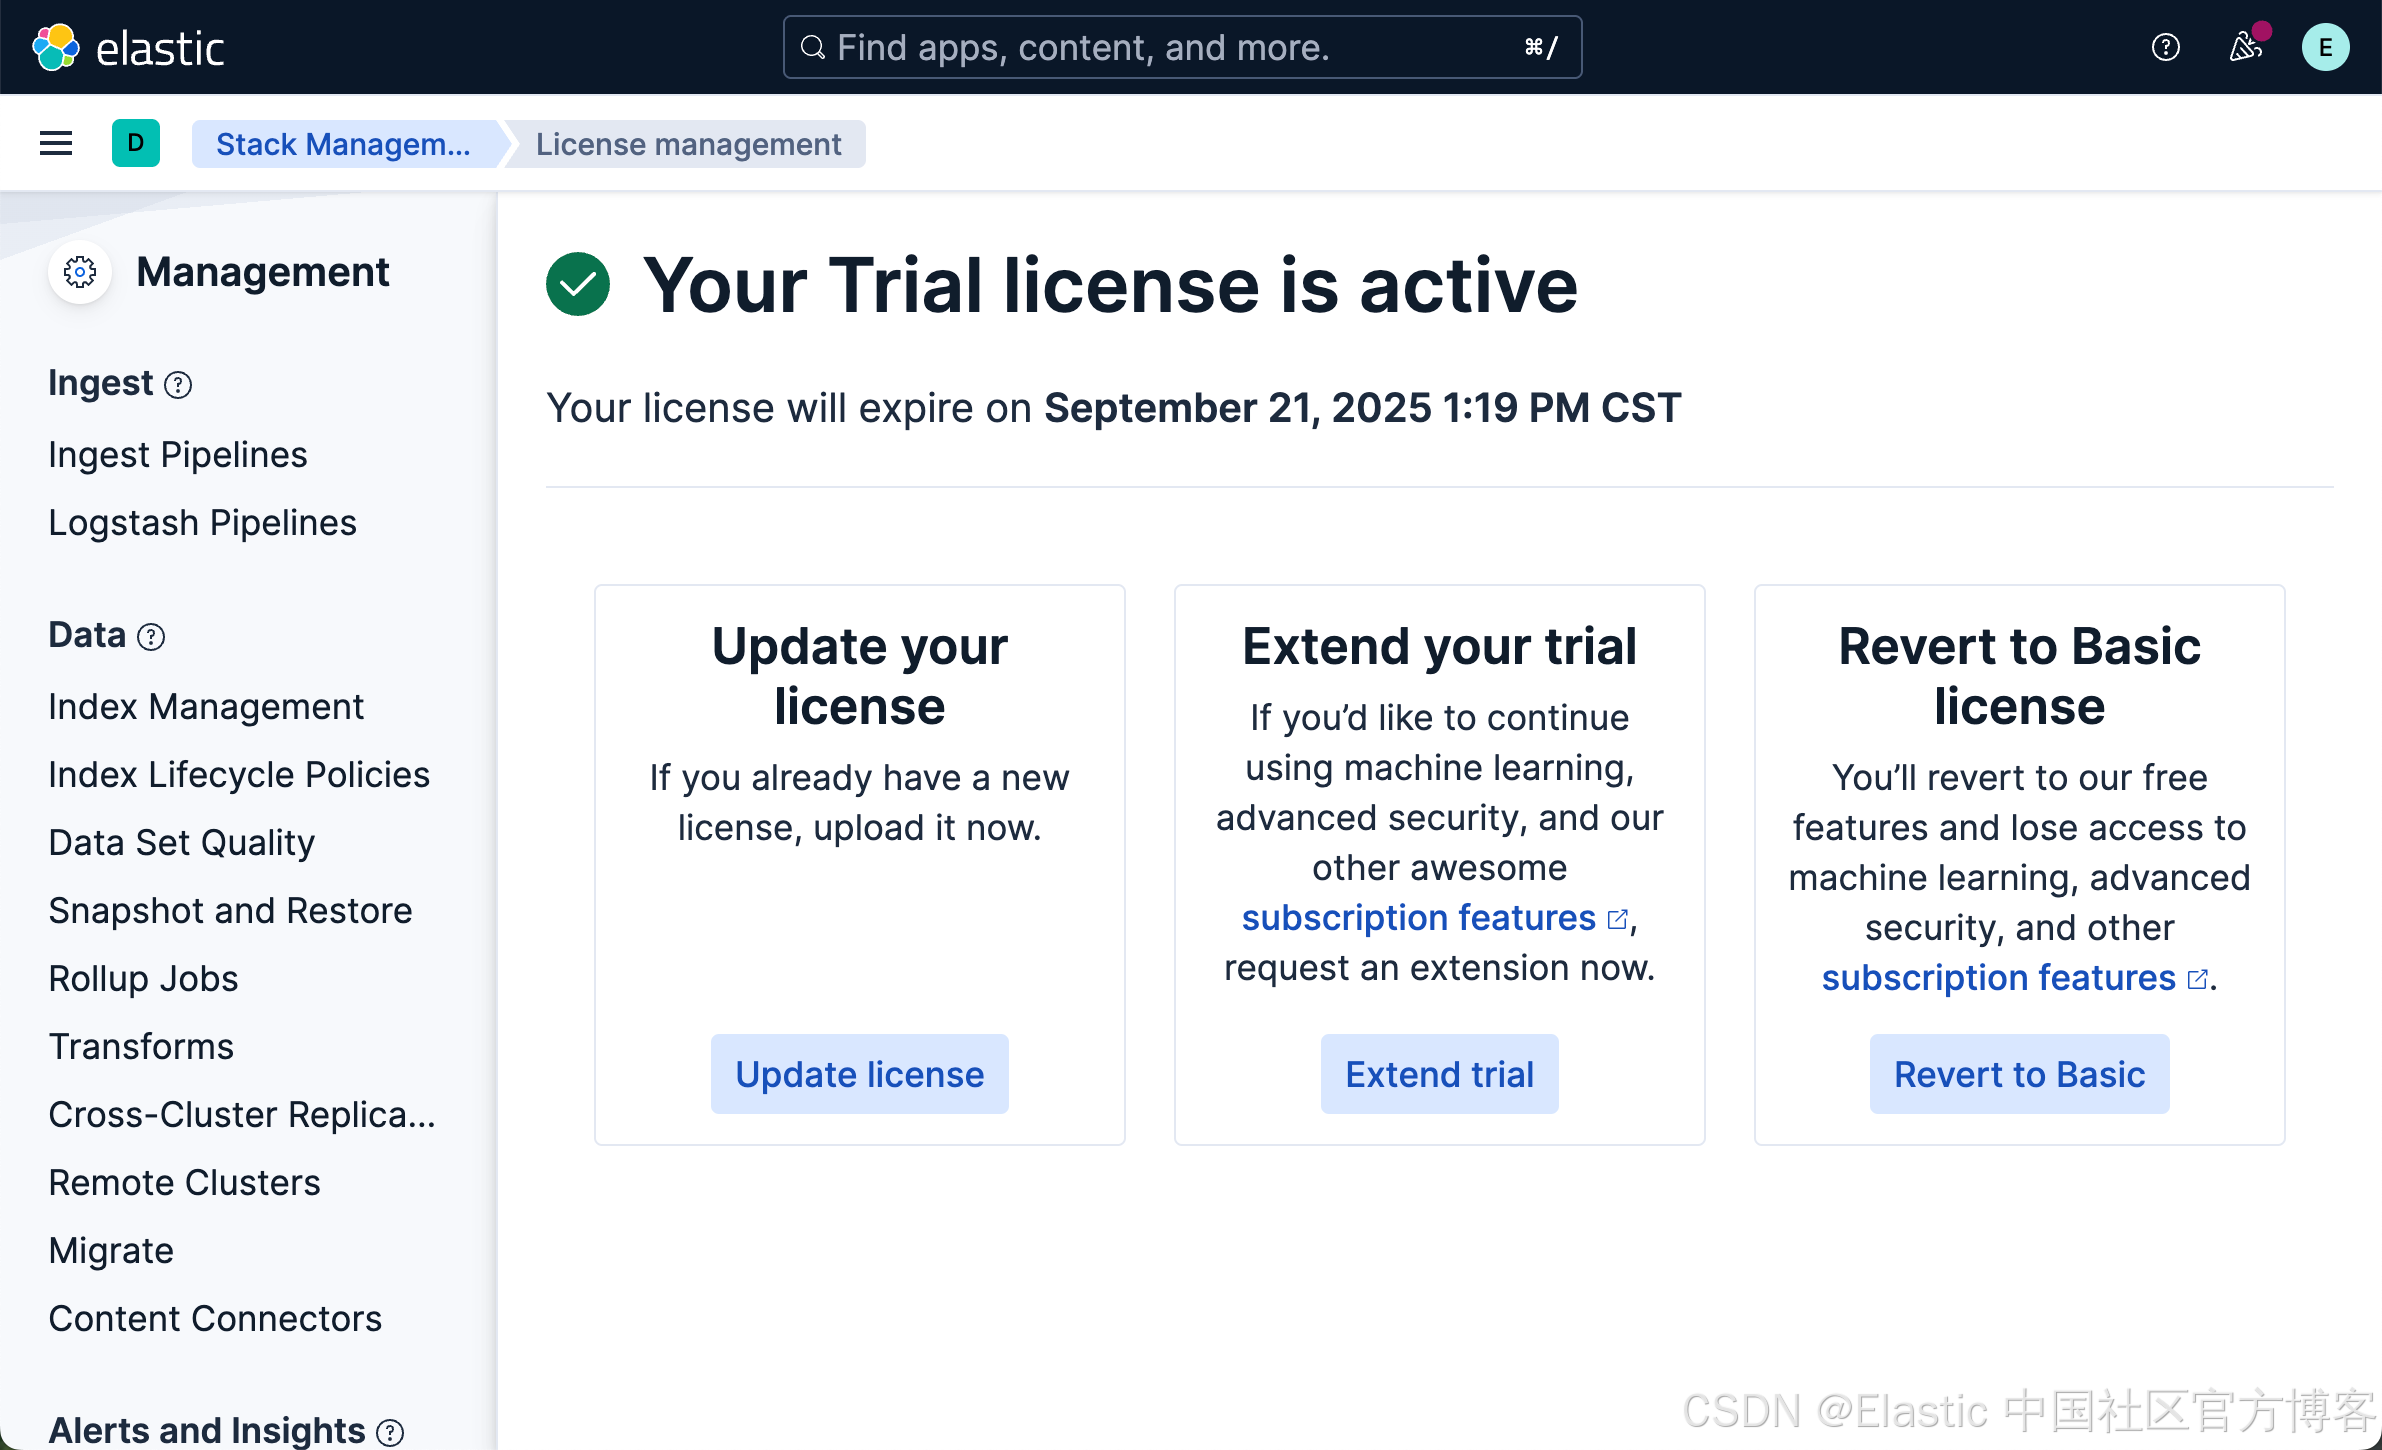
这样就启动了白金试用。
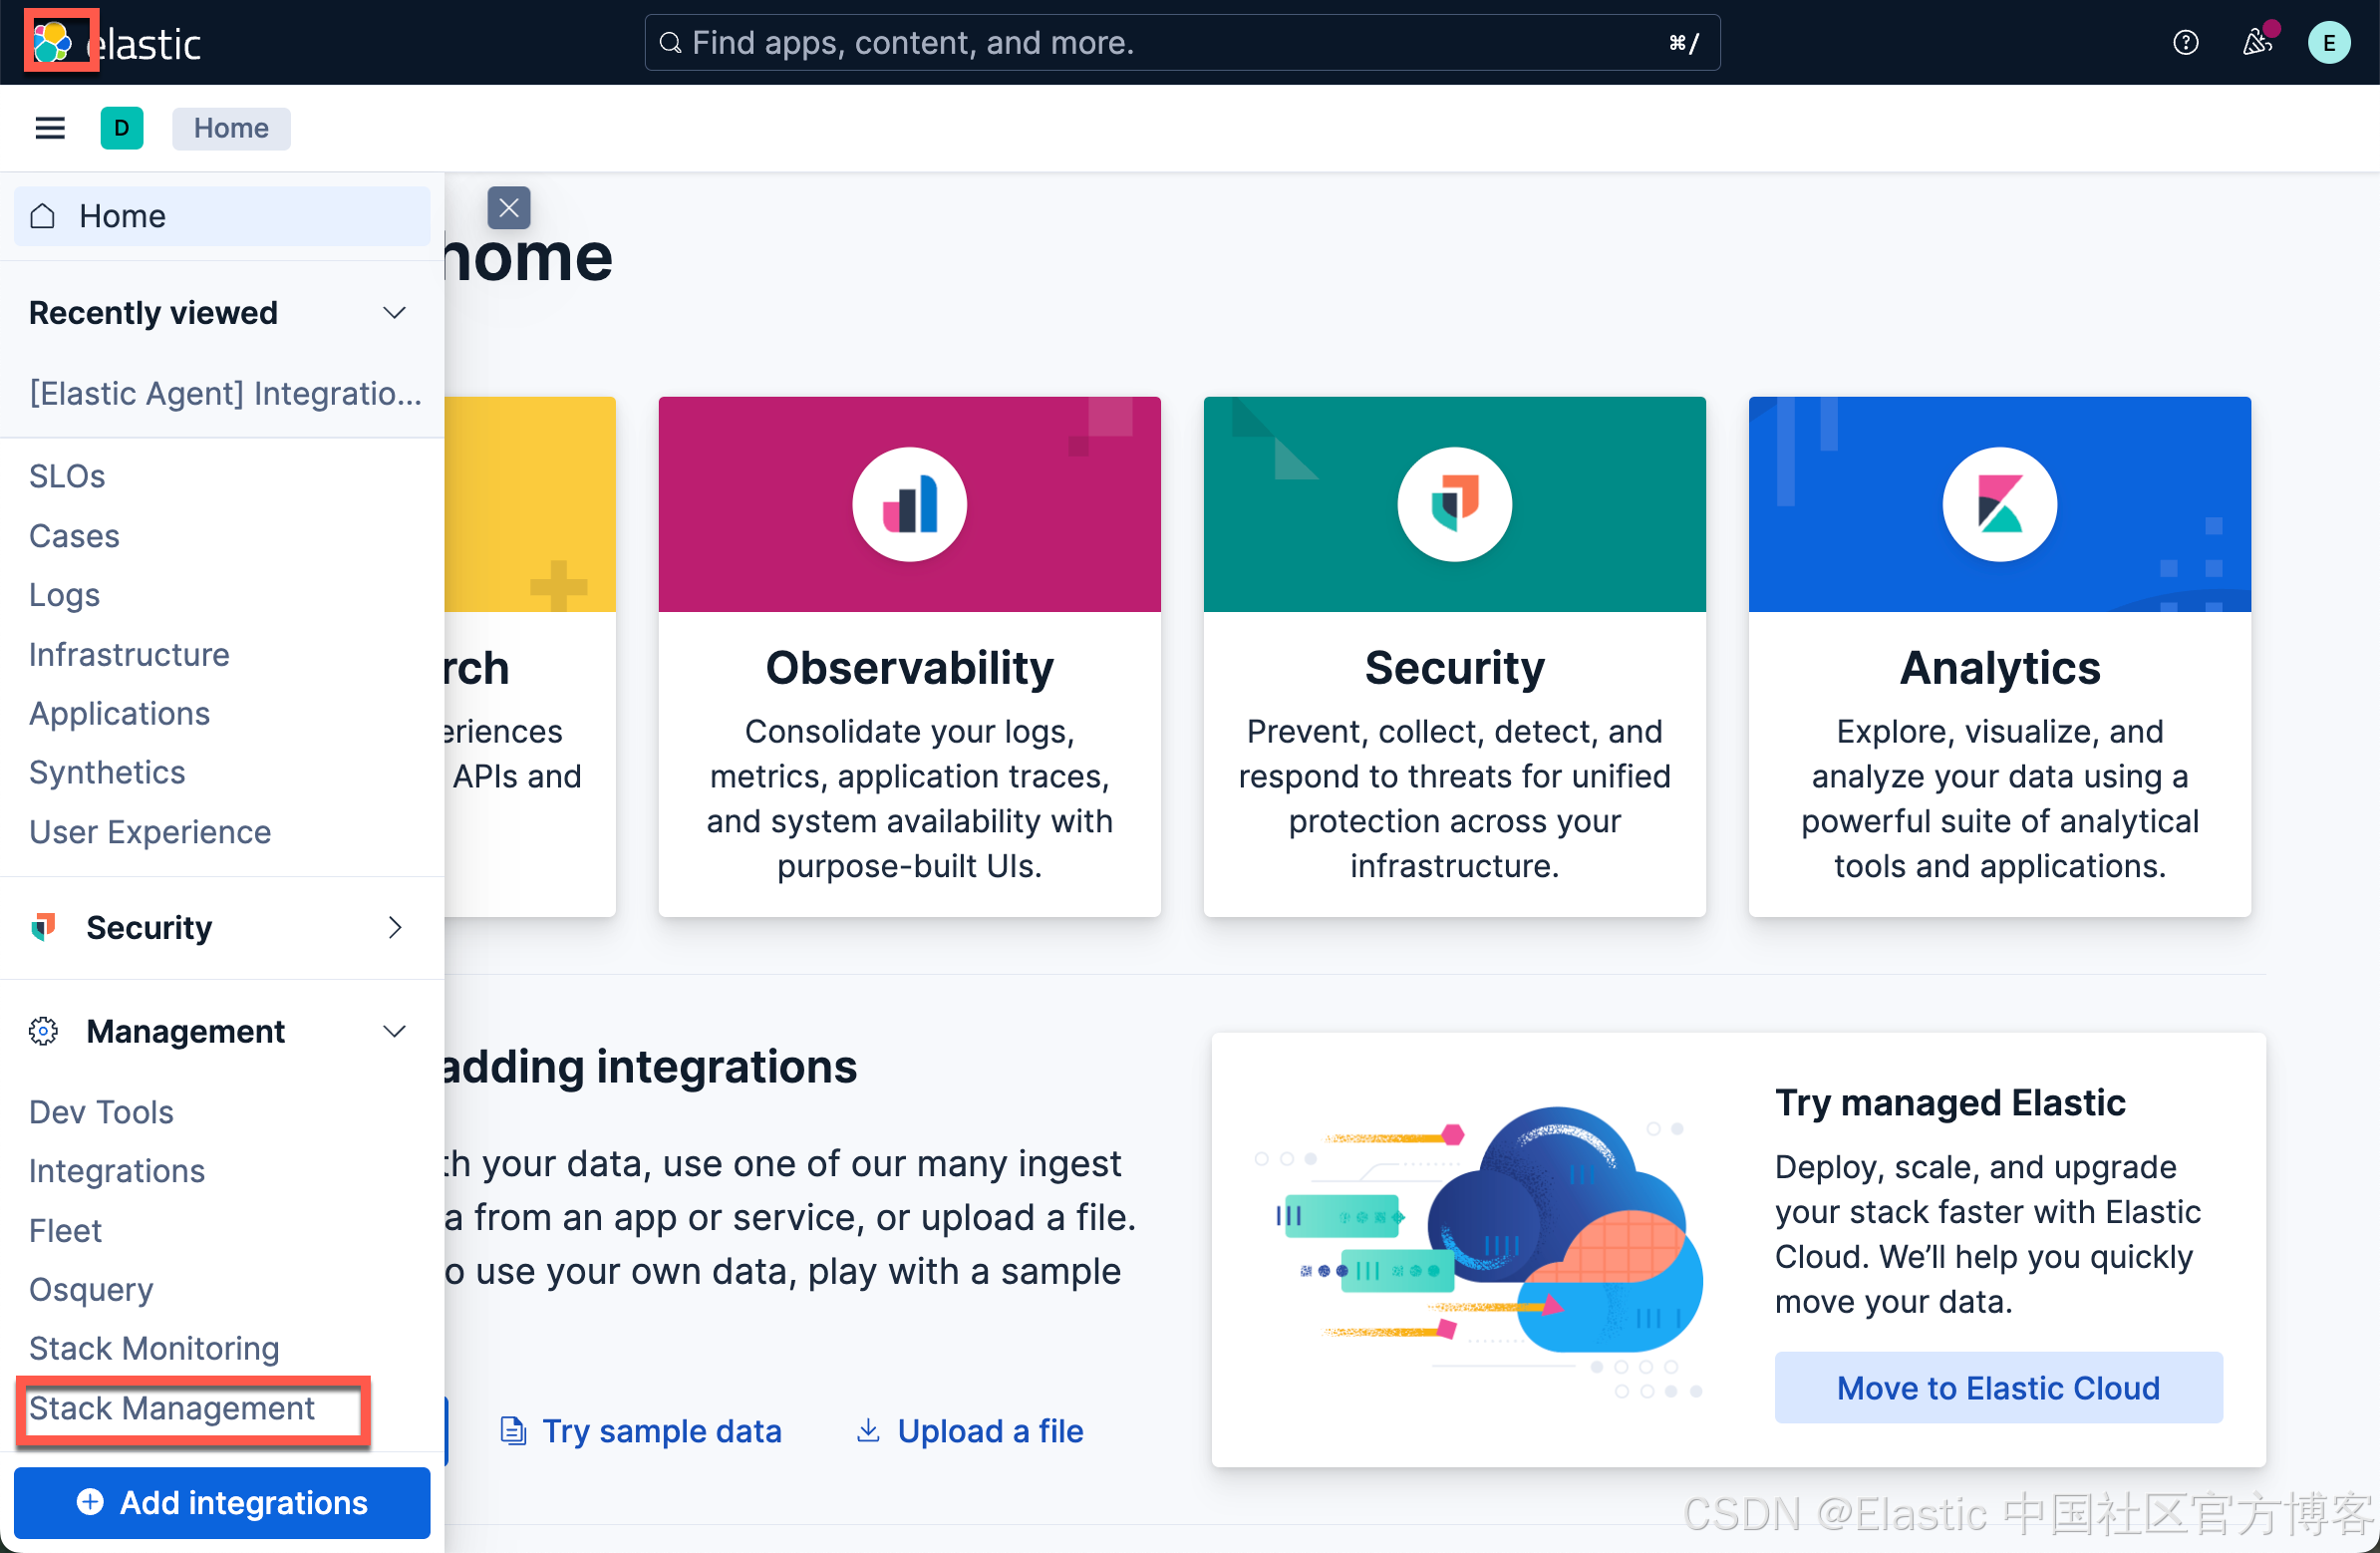
下载 ELSER 模型

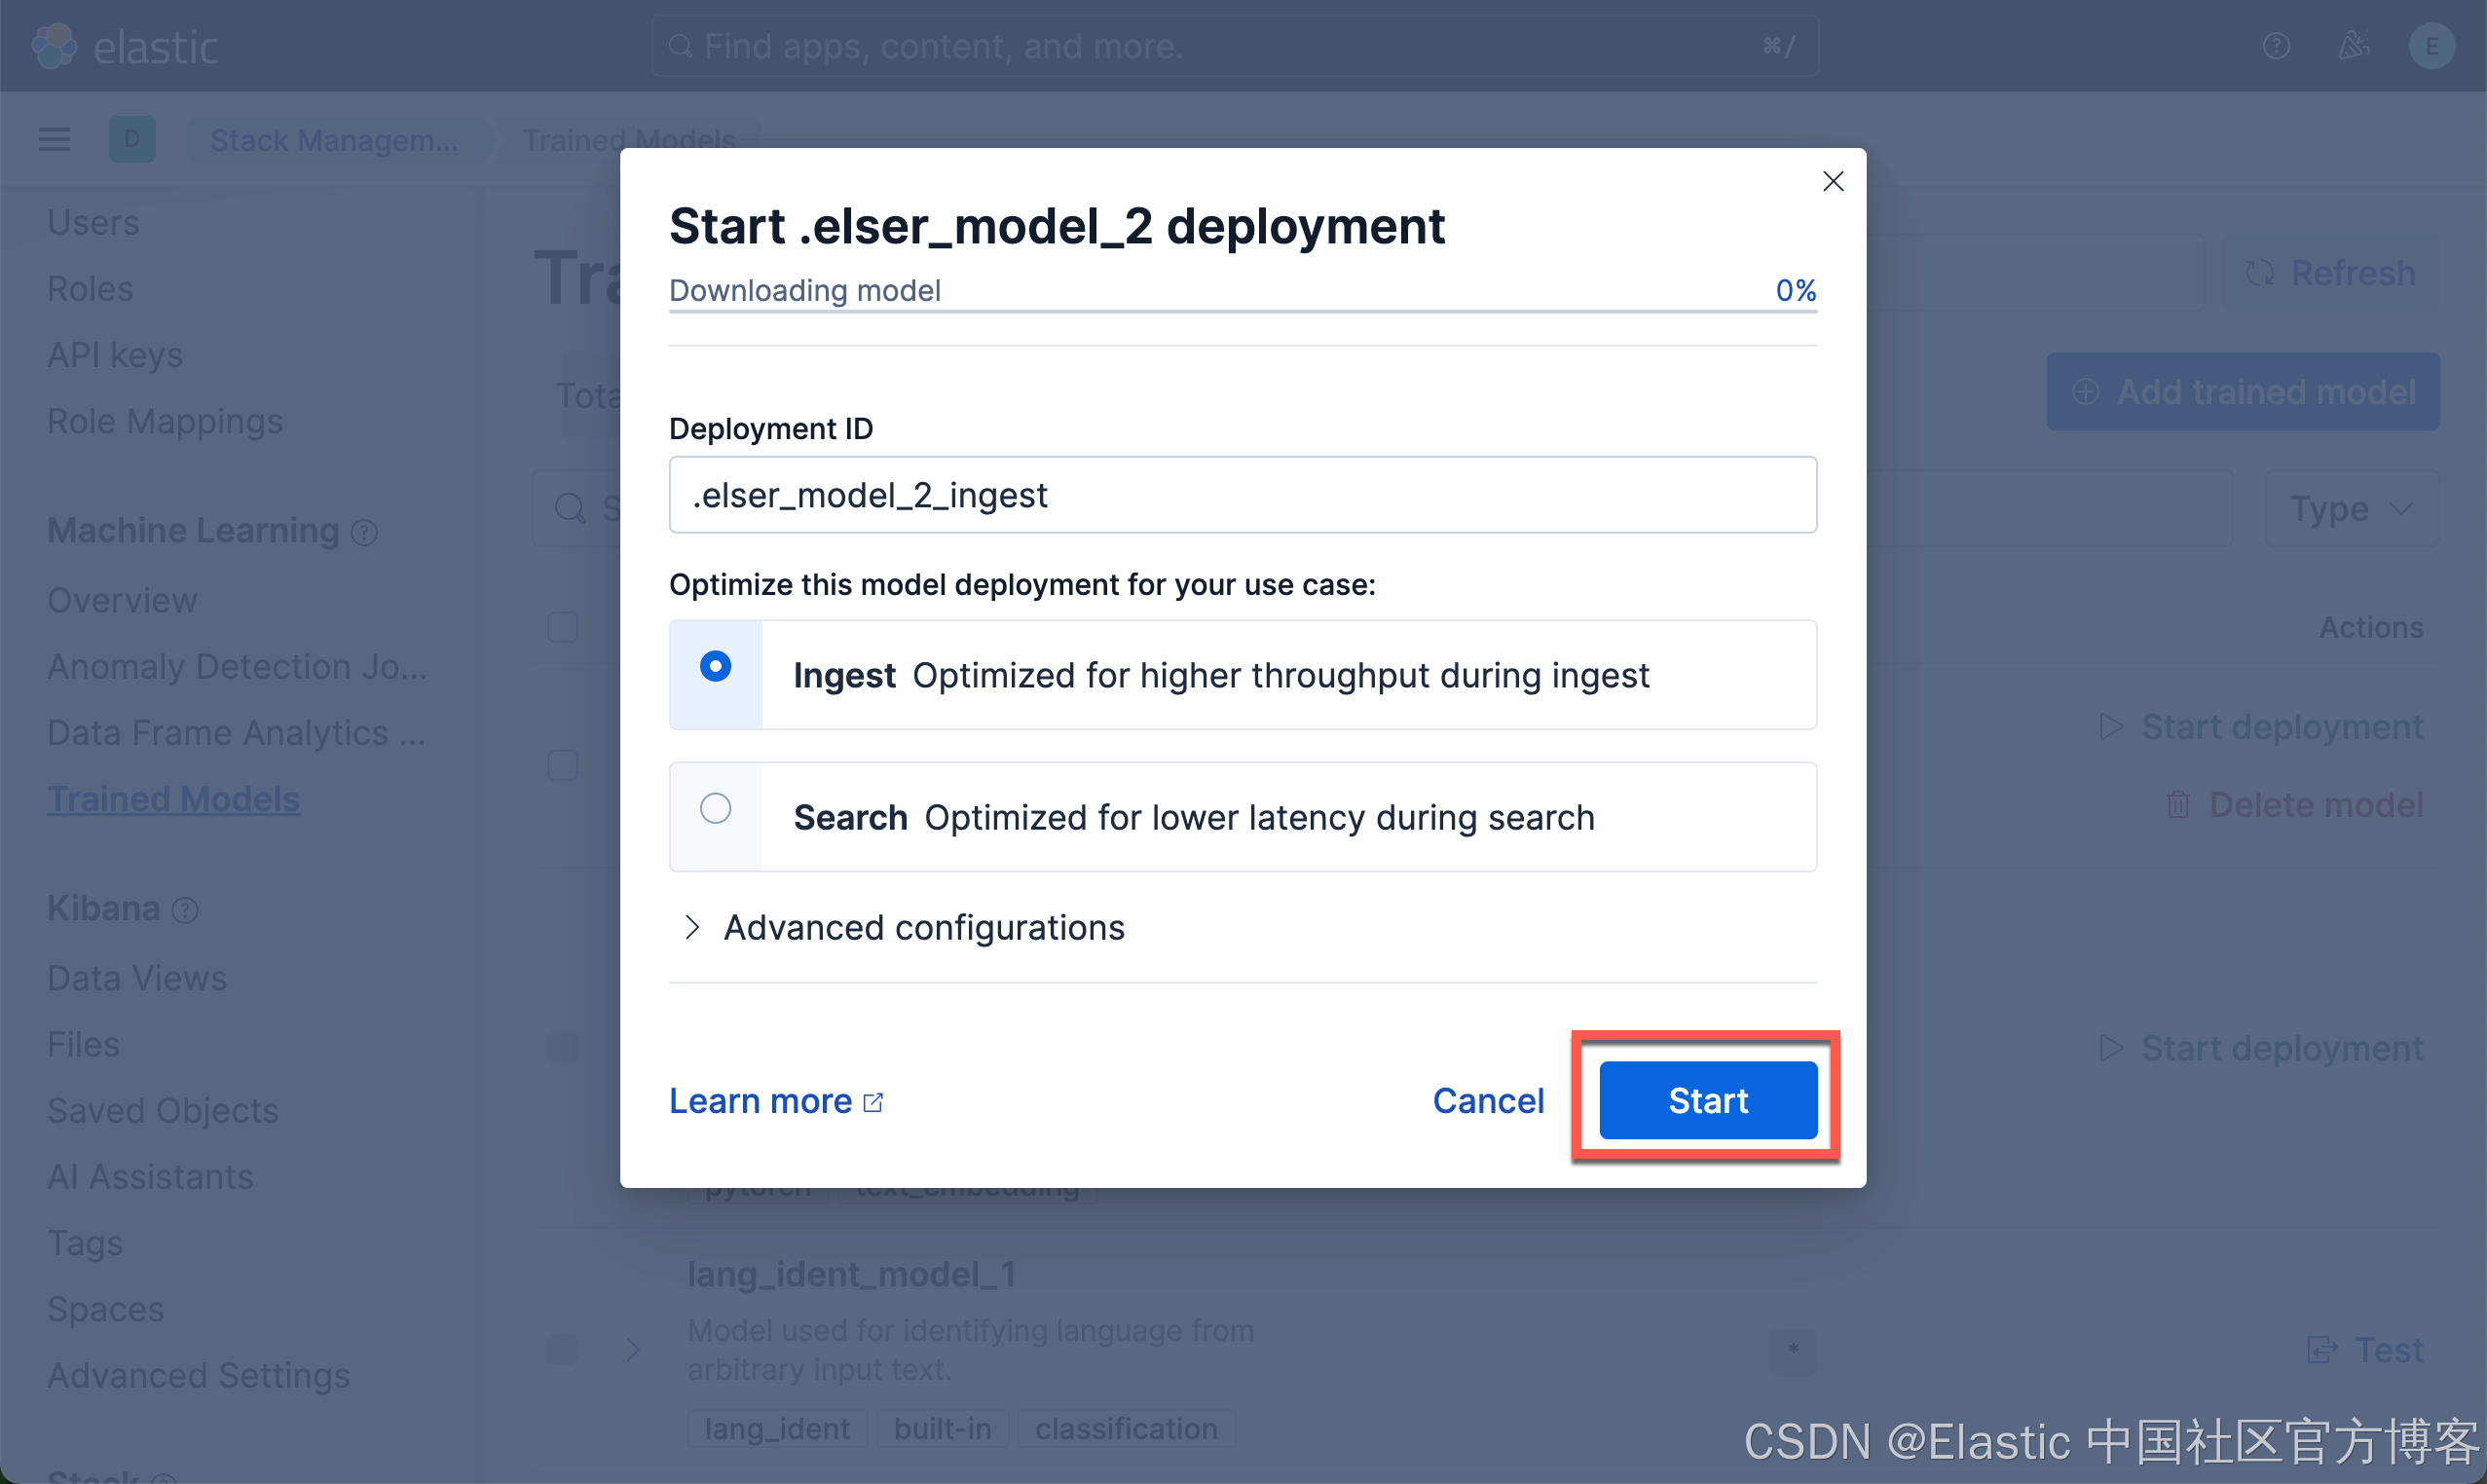
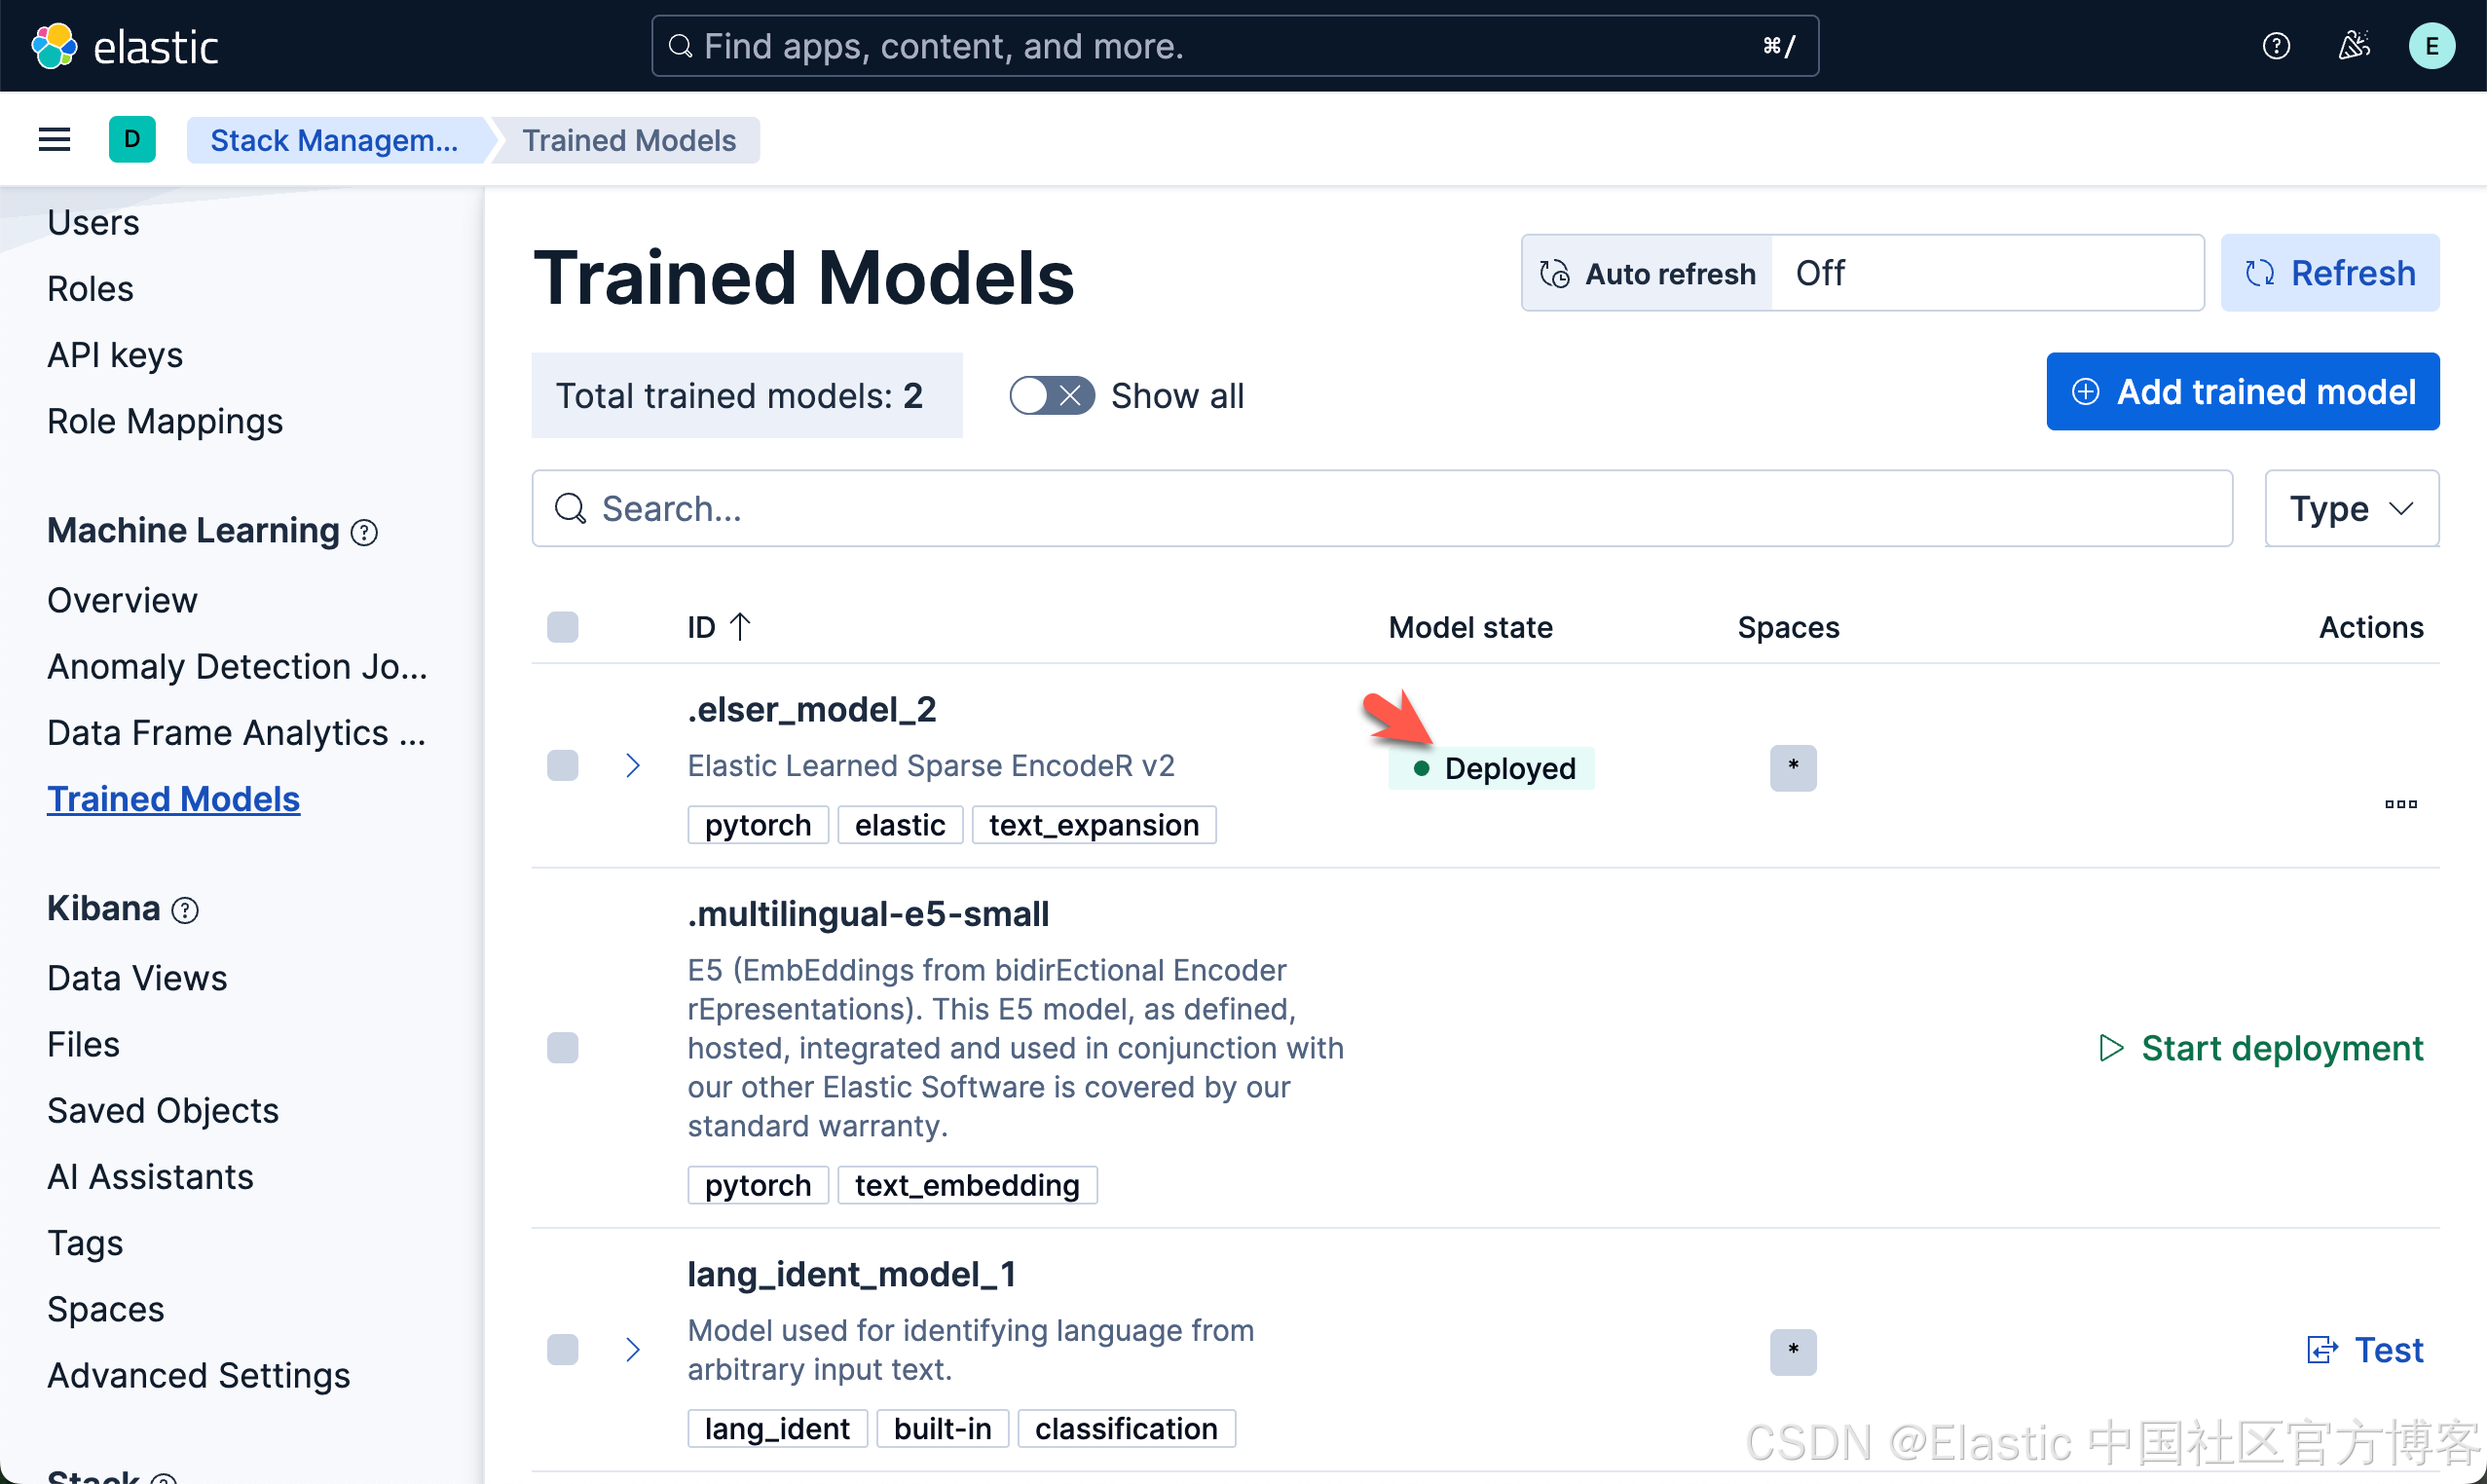
如果我们看到 Deployed,则表面我们已经成功地部署了 ELSER 模型。我们可以看到如下的 inference id 已经被生成:
GET _inference/_all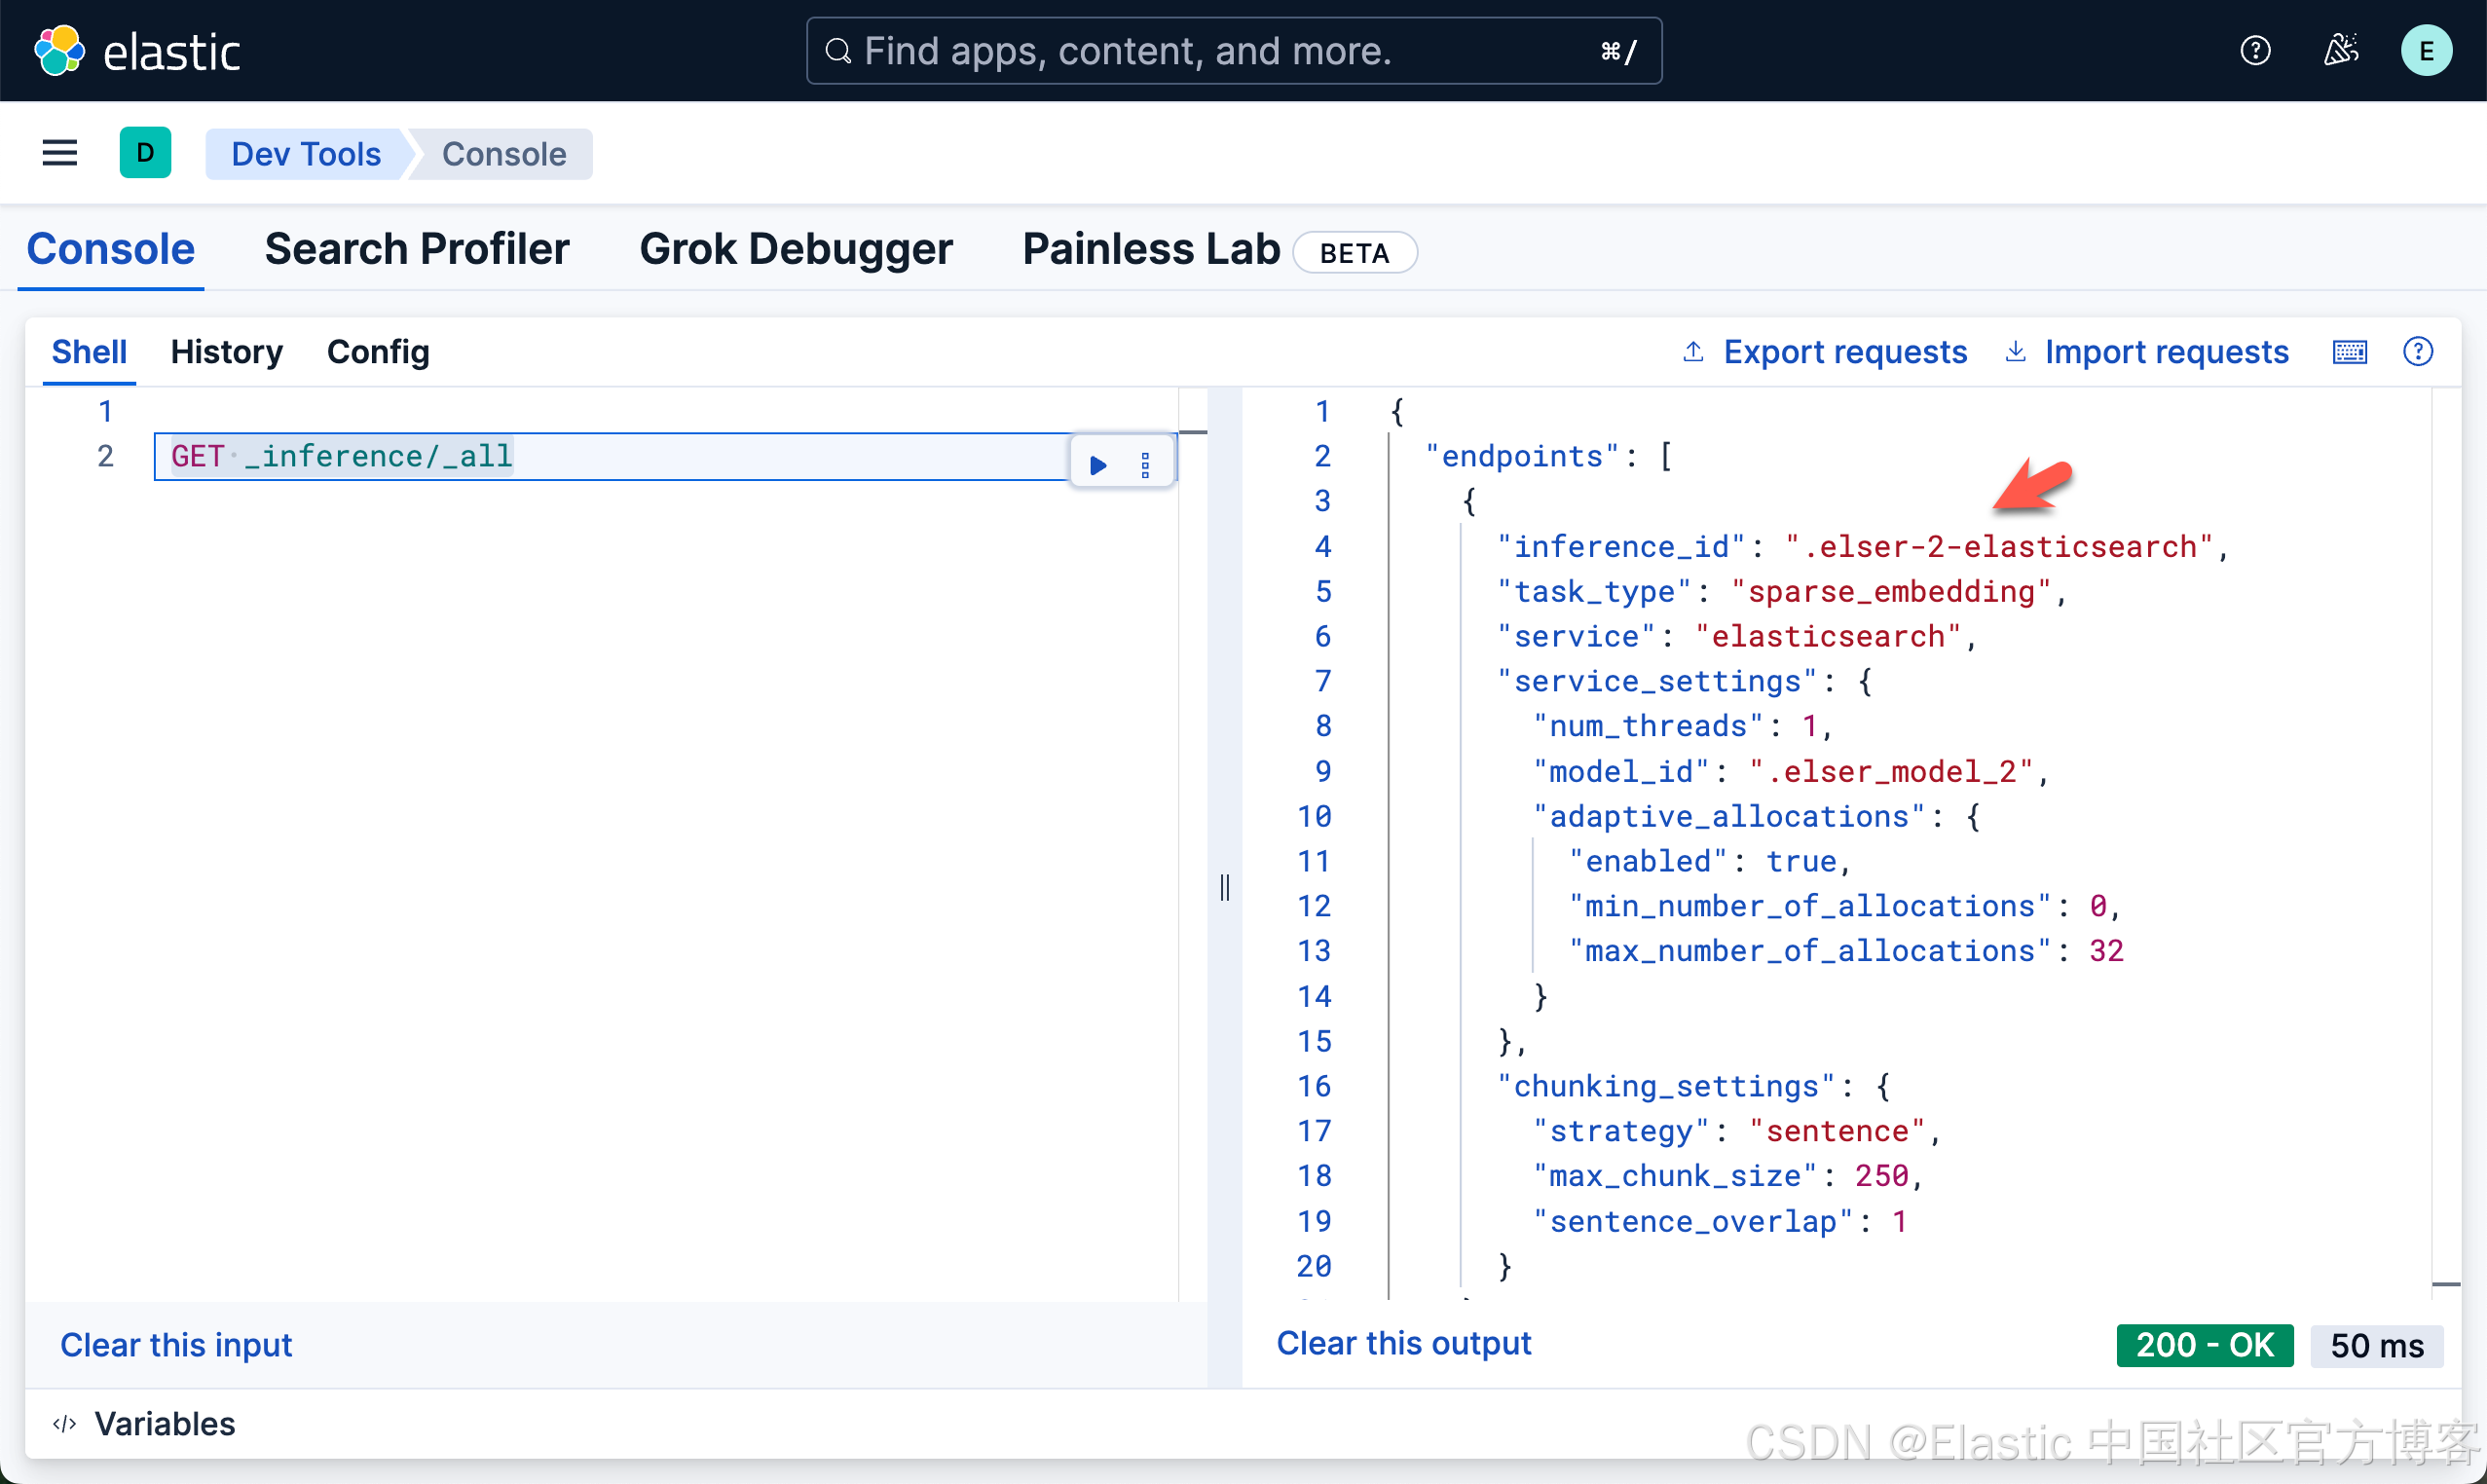
在下面,我们将使用如上所示的 .elser-2-elasticsearch inference id。
Elasticsearch MCP 服务器更新
自从发布这篇博客以来,我们推出了 elastic/mcp-server-elasticsearch。你可以在博客文章中了解更多信息:Connect Agents to Elasticsearch with Model Context Protocol。对于最新的 mcp-server-elasticsearch,你需要参考文章 “将 agents 连接到 Elasticsearch 使用模型上下文协议 - docker” 来拿进行连接。
什么是 Model Context Protocol (MCP)?
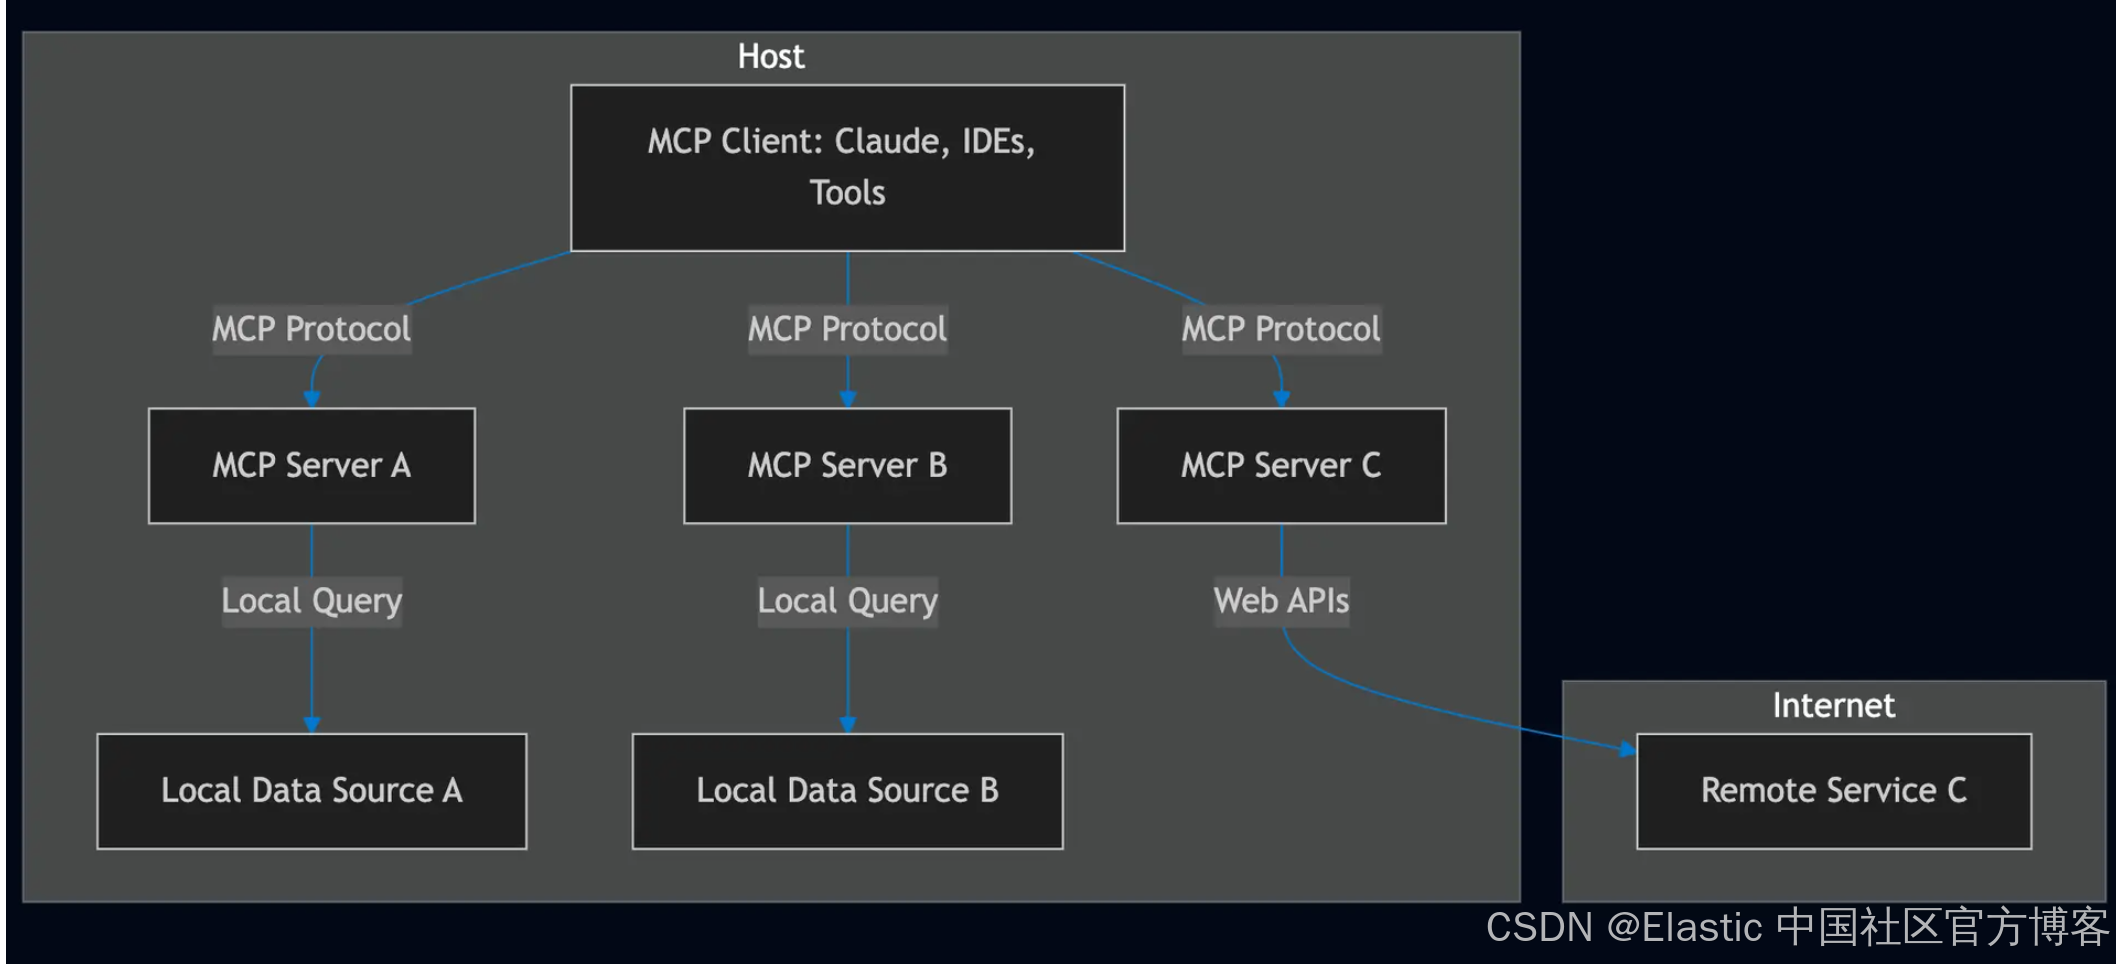
Model Context Protocol 定义了一种结构化方式,让 AI models 可以请求信息、执行工具,并在多次交互中保持 context(详细内容请参阅官方文档)。它规范了以下之间的通信:
- MCP Clients(聊天应用、AI assistants),代表用户请求信息或调用工具。
- MCP Servers(搜索工具、数据库、外部 APIs),响应相关数据或执行操作。
与传统的基于 RAG 的设置仅检索文档不同,MCP 使 AI 能够通过调用一个或多个 MCP servers 暴露的多个工具来编排和执行 workflows。
MCP 架构
为什么在 RAG 中使用 MCP Server 与 Elasticsearch?
语义搜索通过理解 context 和 intent 提升了传统基于关键词的搜索。将 MCP server 与 Elasticsearch 集成,我们可以实现:
- 更准确的搜索结果 – MCP 允许 AI models 选择专用的搜索工具,甚至动态创建超越简单关键词匹配的结构化查询。
- 动态 agent workflows – AI 可以根据实时数据调用 APIs、过滤响应并触发操作。
- 多工具集成 – MCP 让 AI 与多个数据源交互,将搜索与实时洞察结合。
构建 MCP Server
让我们构建一个 MCP Tool,使你能够在 Elastic Search Labs 的博客中进行语义搜索。助手将根据用户的意图使用此工具。
我准备了一个 demo repo,这是抓取示例数据集、使用 semantic_text 映射嵌入抓取内容,并通过 MCP server 暴露工具进行语义搜索的良好起点。
你可以通过以下步骤轻松将其适配到你自己的用例,或查看 repo 的 README 获取更多细节。
抓取博客数据并在 Elasticsearch 中生成 Embeddings
为了支持语义查询,我们将使用 semantic_text,这是一种专门的 mapping,在数据被写入索引后会自动执行分块和 embedding。
创建一个用于存储数据的索引:
PUT search-labs-posts更新 mappings。Elastic Open Crawler 默认会将网站内容填充到 body 字段中:
PUT search-labs-posts/_mappings
{
  "properties": {
    "body": {
      "type": "text",
      "copy_to": "semantic_body"
    },
    "semantic_body": {
      "type": "semantic_text",
      "inference_id": ".elser-2-elasticsearch"
    }
  }
}注意:.elser-2-elasticsearch 是 ES 中预配置的推理端点。它将被 semantic_text mapping 用来为自动分块的内容生成稀疏 embeddings。
我正在使用 Elastic Open Crawler 快速将数据填充到 Elasticsearch 中。
你应该按照 demo repo 中列出的步骤操作。它会指导你把正确的 ES 凭证放入 crawler-config/elastic-search-labs-crawler.yml 中的爬虫配置里。
$ pwd
/Users/liuxg/python
$ git clone https://github.com/liu-xiao-guo/elastic-semantic-search-mcp-server
Cloning into 'elastic-semantic-search-mcp-server'...
remote: Enumerating objects: 28, done.
remote: Counting objects: 100% (28/28), done.
remote: Compressing objects: 100% (19/19), done.
remote: Total 28 (delta 8), reused 20 (delta 4), pack-reused 0 (from 0)
Receiving objects: 100% (28/28), 15.62 KiB | 3.90 MiB/s, done.
Resolving deltas: 100% (8/8), done.
$ cd elastic-semantic-search-mcp-server/
$ ls
Makefile       README.md      crawler-config pyproject.toml server.py      uv.lock
我们首先把 env.example 拷贝到 .env 文件中,并做相应的配置:
.env
ES_URL="https://192.168.101.192:9200"
API_KEY="b2Nac21aa0I5NnpZa1ZqREJRWU46Q2lBZmU3aFNwMWVqZmtLMENLSE13QQ=="注意:请在上面根据自己的 ES 配置做相应的修改。为了能够让 docker 能正确访问我们的 ES,我们的 ES 不能使用 localhost。
对于我们的 ES 安装,我们使用的是自签名证书。我们使用如下的命令把 ES 的证书拷贝到当前的目录下:
$ pwd
/Users/liuxg/python/elastic-semantic-search-mcp-server
$ cp ~/elastic/elasticsearch-9.1.4/config/certs/http_ca.crt ./crawler-config/
$ ls ./crawler-config/
elastic-search-labs-crawler.yml http_ca.crt                     test-crawler.yml
由于我们是自签名的证书,我们需要重新修改一下 elastic-search-labs-crawler.yml 文件:
elastic-search-labs-crawler.yml
domains:
  - url: https://www.elastic.co
    seed_urls:
      - https://www.elastic.co/search-labs
    crawl_rules:
      - policy: allow
        type: begins
        pattern: /search-labs
      - policy: deny
        type: regex
        pattern: .*

output_sink: elasticsearch
output_index: search-labs-posts

max_crawl_depth: 10
max_title_size: 500
max_body_size: 5_242_880
max_keywords_size: 512
max_description_size: 512
max_indexed_links_count: 10
max_headings_count: 10

elasticsearch:
  host:  https://192.168.101.192
  port: 9200
  # username: elastic
  # password: GK1JT0+tbYQV02R9jVP*
  api_key: bzhZRW1wa0I5NnpZa1ZqRGhRYl86akdfMExCSkZzUUh2QVRsd2UtQ2tHUQ==
  bulk_api:
    max_items: 10
    max_size_bytes: 1_048_576
  ca_file: /app/config/http_ca.crt
请注意上面的 ca_file 配置。我们把证书配置进去。更多配置,请参阅文档。
一旦爬虫配置完成,运行单次爬取只需:
我们接下来启动 docker,并运行如下的命令:
docker run --rm \
  --entrypoint /bin/bash \
  -v "$(pwd)/crawler-config:/app/config" \
  --network host \
  docker.elastic.co/integrations/crawler:latest \
  -c "bin/crawler crawl /app/config/elastic-search-labs-crawler.yml"
$ docker run --rm \
> --entrypoint /bin/bash \
> -v "$(pwd)/crawler-config:/app/config" \
> --network host \
> docker.elastic.co/integrations/crawler:latest \
> -c "bin/crawler crawl /app/config/elastic-search-labs-crawler.yml"
[2025-09-30T10:22:25.034Z] [crawl:68dbaf6069537f8689a2bd20] [primary] Initialized an in-memory URL queue for up to 10000 URLs
[2025-09-30T10:22:25.038Z] [crawl:68dbaf6069537f8689a2bd20] [primary] ES connections will be authorized with configured API key
[2025-09-30T10:22:25.544Z] [crawl:68dbaf6069537f8689a2bd20] [primary] Connected to ES at https://192.168.101.192:9200 - version: 9.1.4; build flavor: default
[2025-09-30T10:22:25.583Z] [crawl:68dbaf6069537f8689a2bd20] [primary] Index [search-labs-posts] was found!
[2025-09-30T10:22:25.583Z] [crawl:68dbaf6069537f8689a2bd20] [primary] Elasticsearch sink initialized for index [search-labs-posts] with pipeline [search-default-ingestion]
[2025-09-30T10:22:25.590Z] [crawl:68dbaf6069537f8689a2bd20] [primary] Starting the primary crawl with up to 10 parallel thread(s)...
[2025-09-30T10:22:26.903Z] [crawl:68dbaf6069537f8689a2bd20] [primary] Crawl status: queue_size=14, pages_visited=1, urls_allowed=15, urls_denied={}, crawl_duration_msec=1314, crawling_time_msec=1194.0, avg_response_time_msec=1194.0, active_threads=1, http_client={:max_connections=>100, :used_connections=>1}, status_codes={"200"=>1}
[2025-09-30T10:22:34.467Z] [crawl:68dbaf6069537f8689a2bd20] [primary] Sending bulk request with 10 items and resetting queue...
[2025-09-30T10:22:36.935Z] [crawl:68dbaf6069537f8689a2bd20] [primary] Crawl status: queue_size=706, pages_我们可以在 Kibana 中查看被爬进的文档:
GET search-labs-posts/_search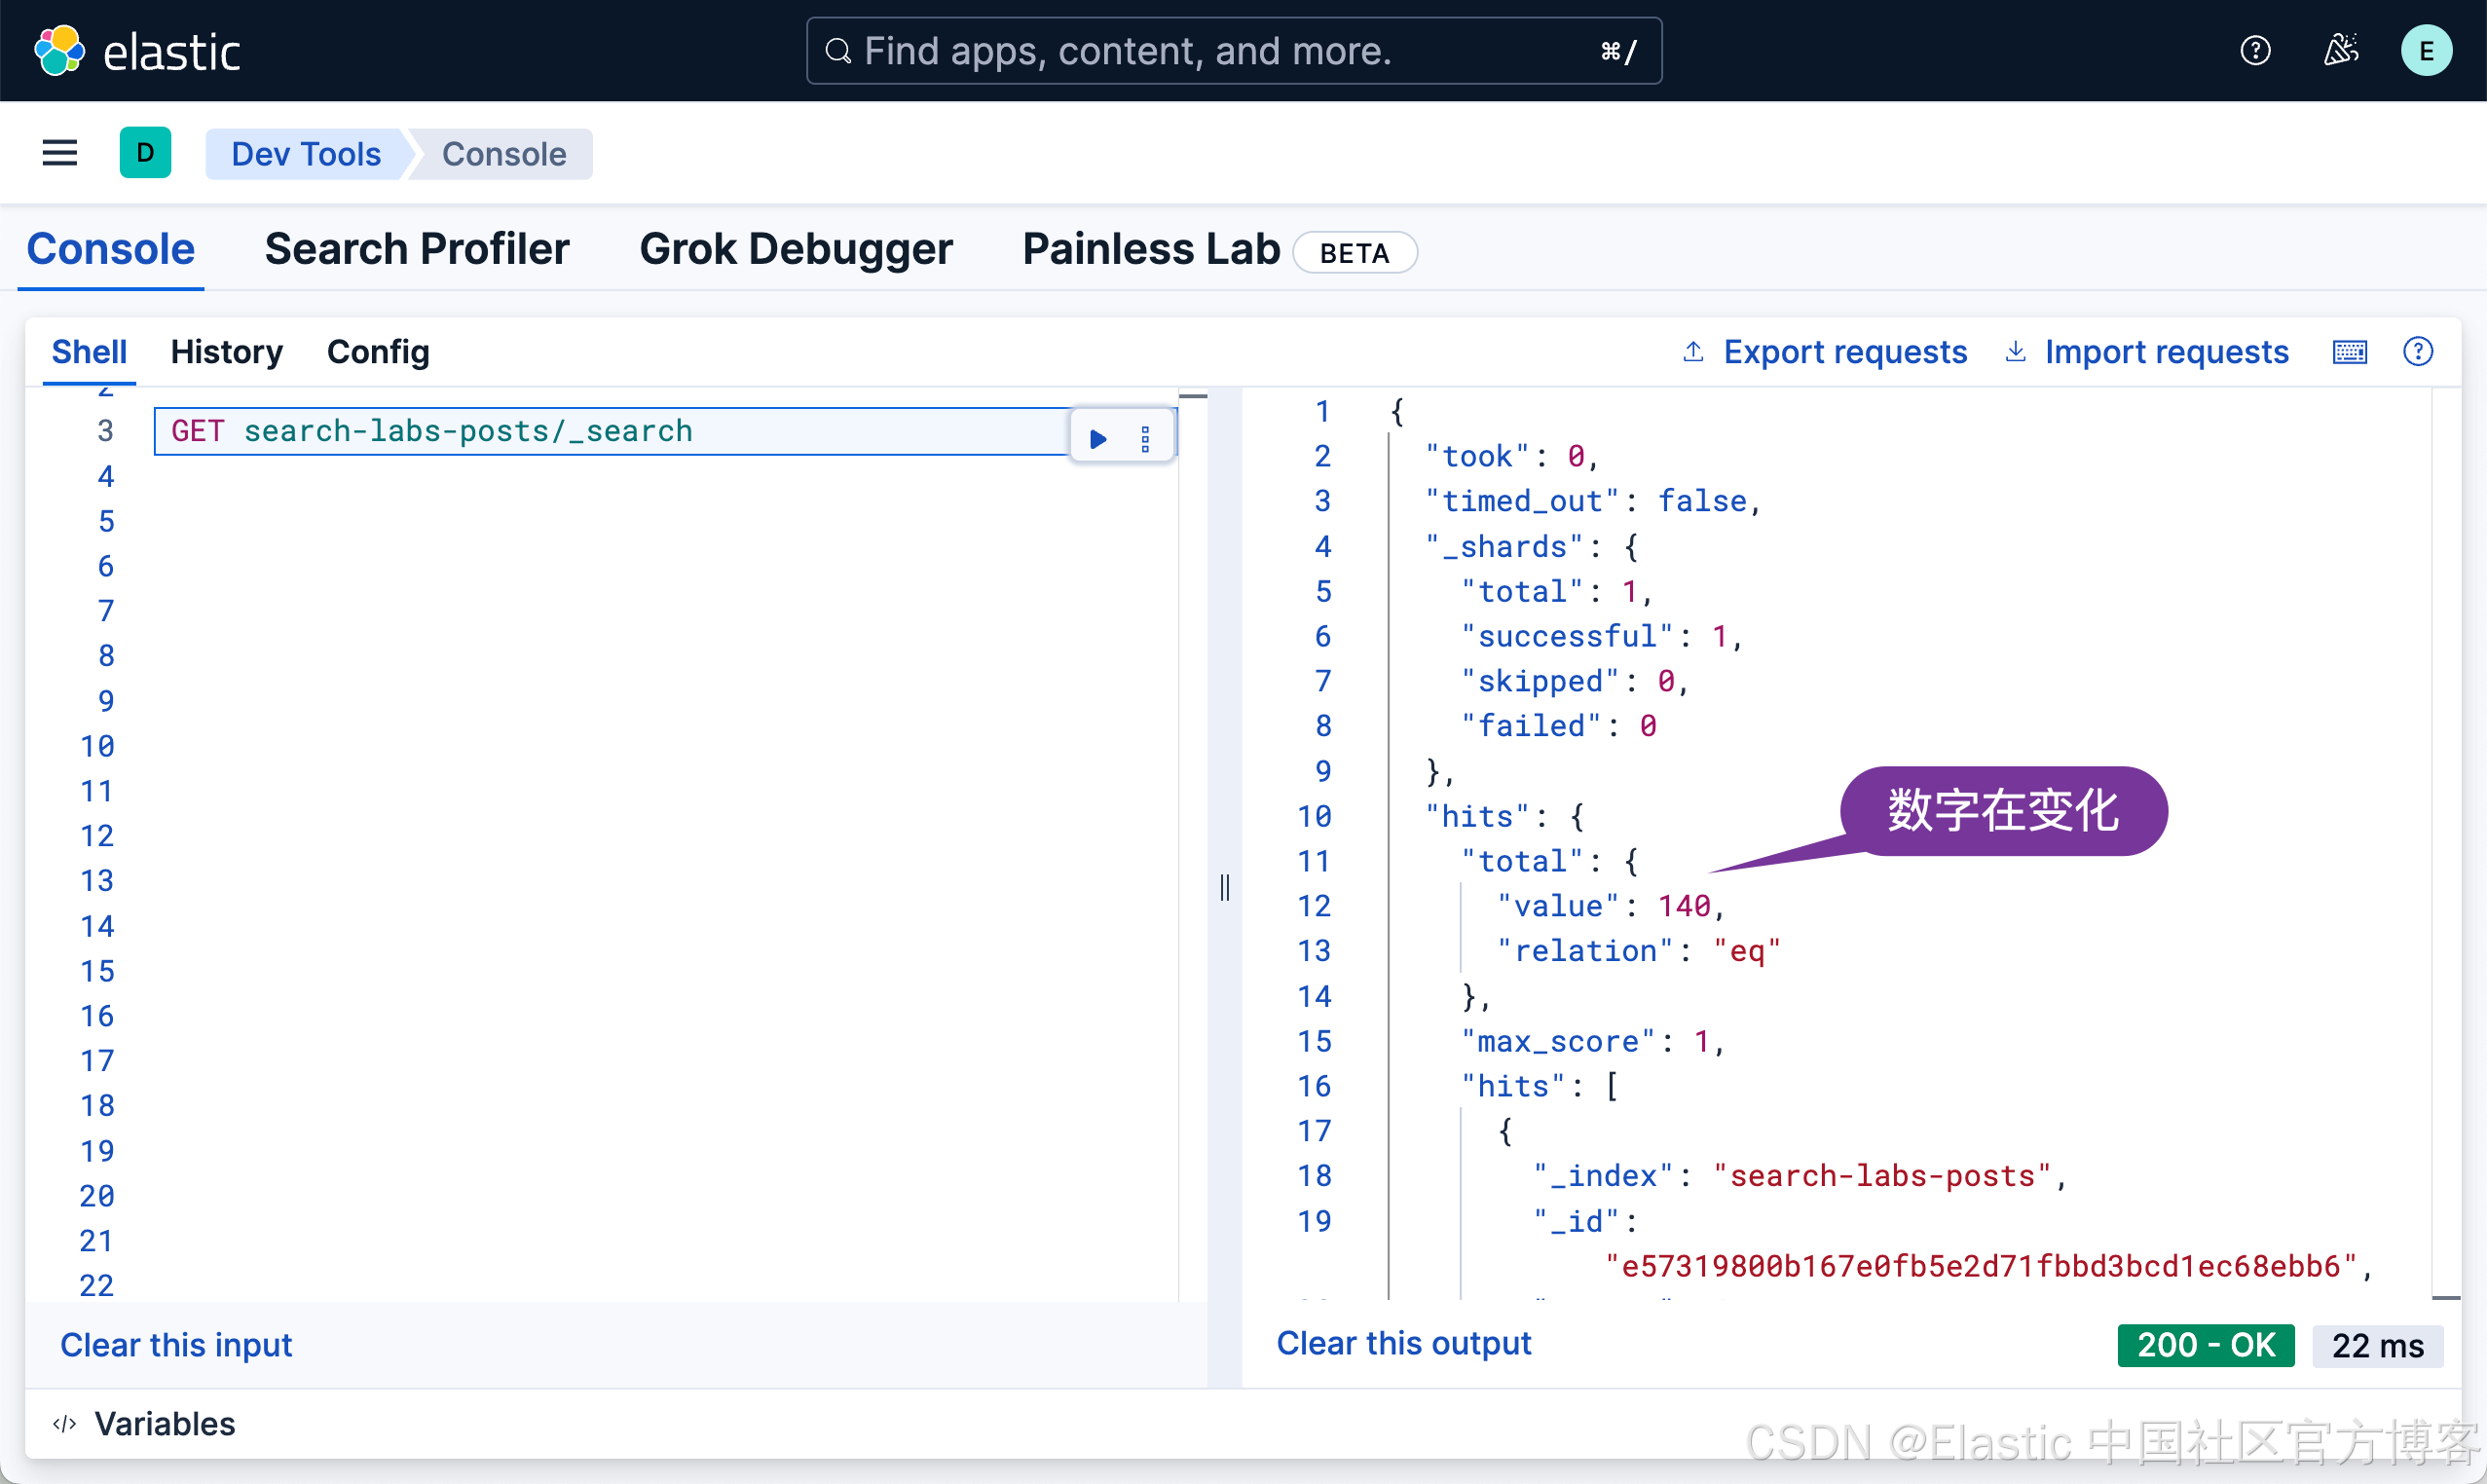
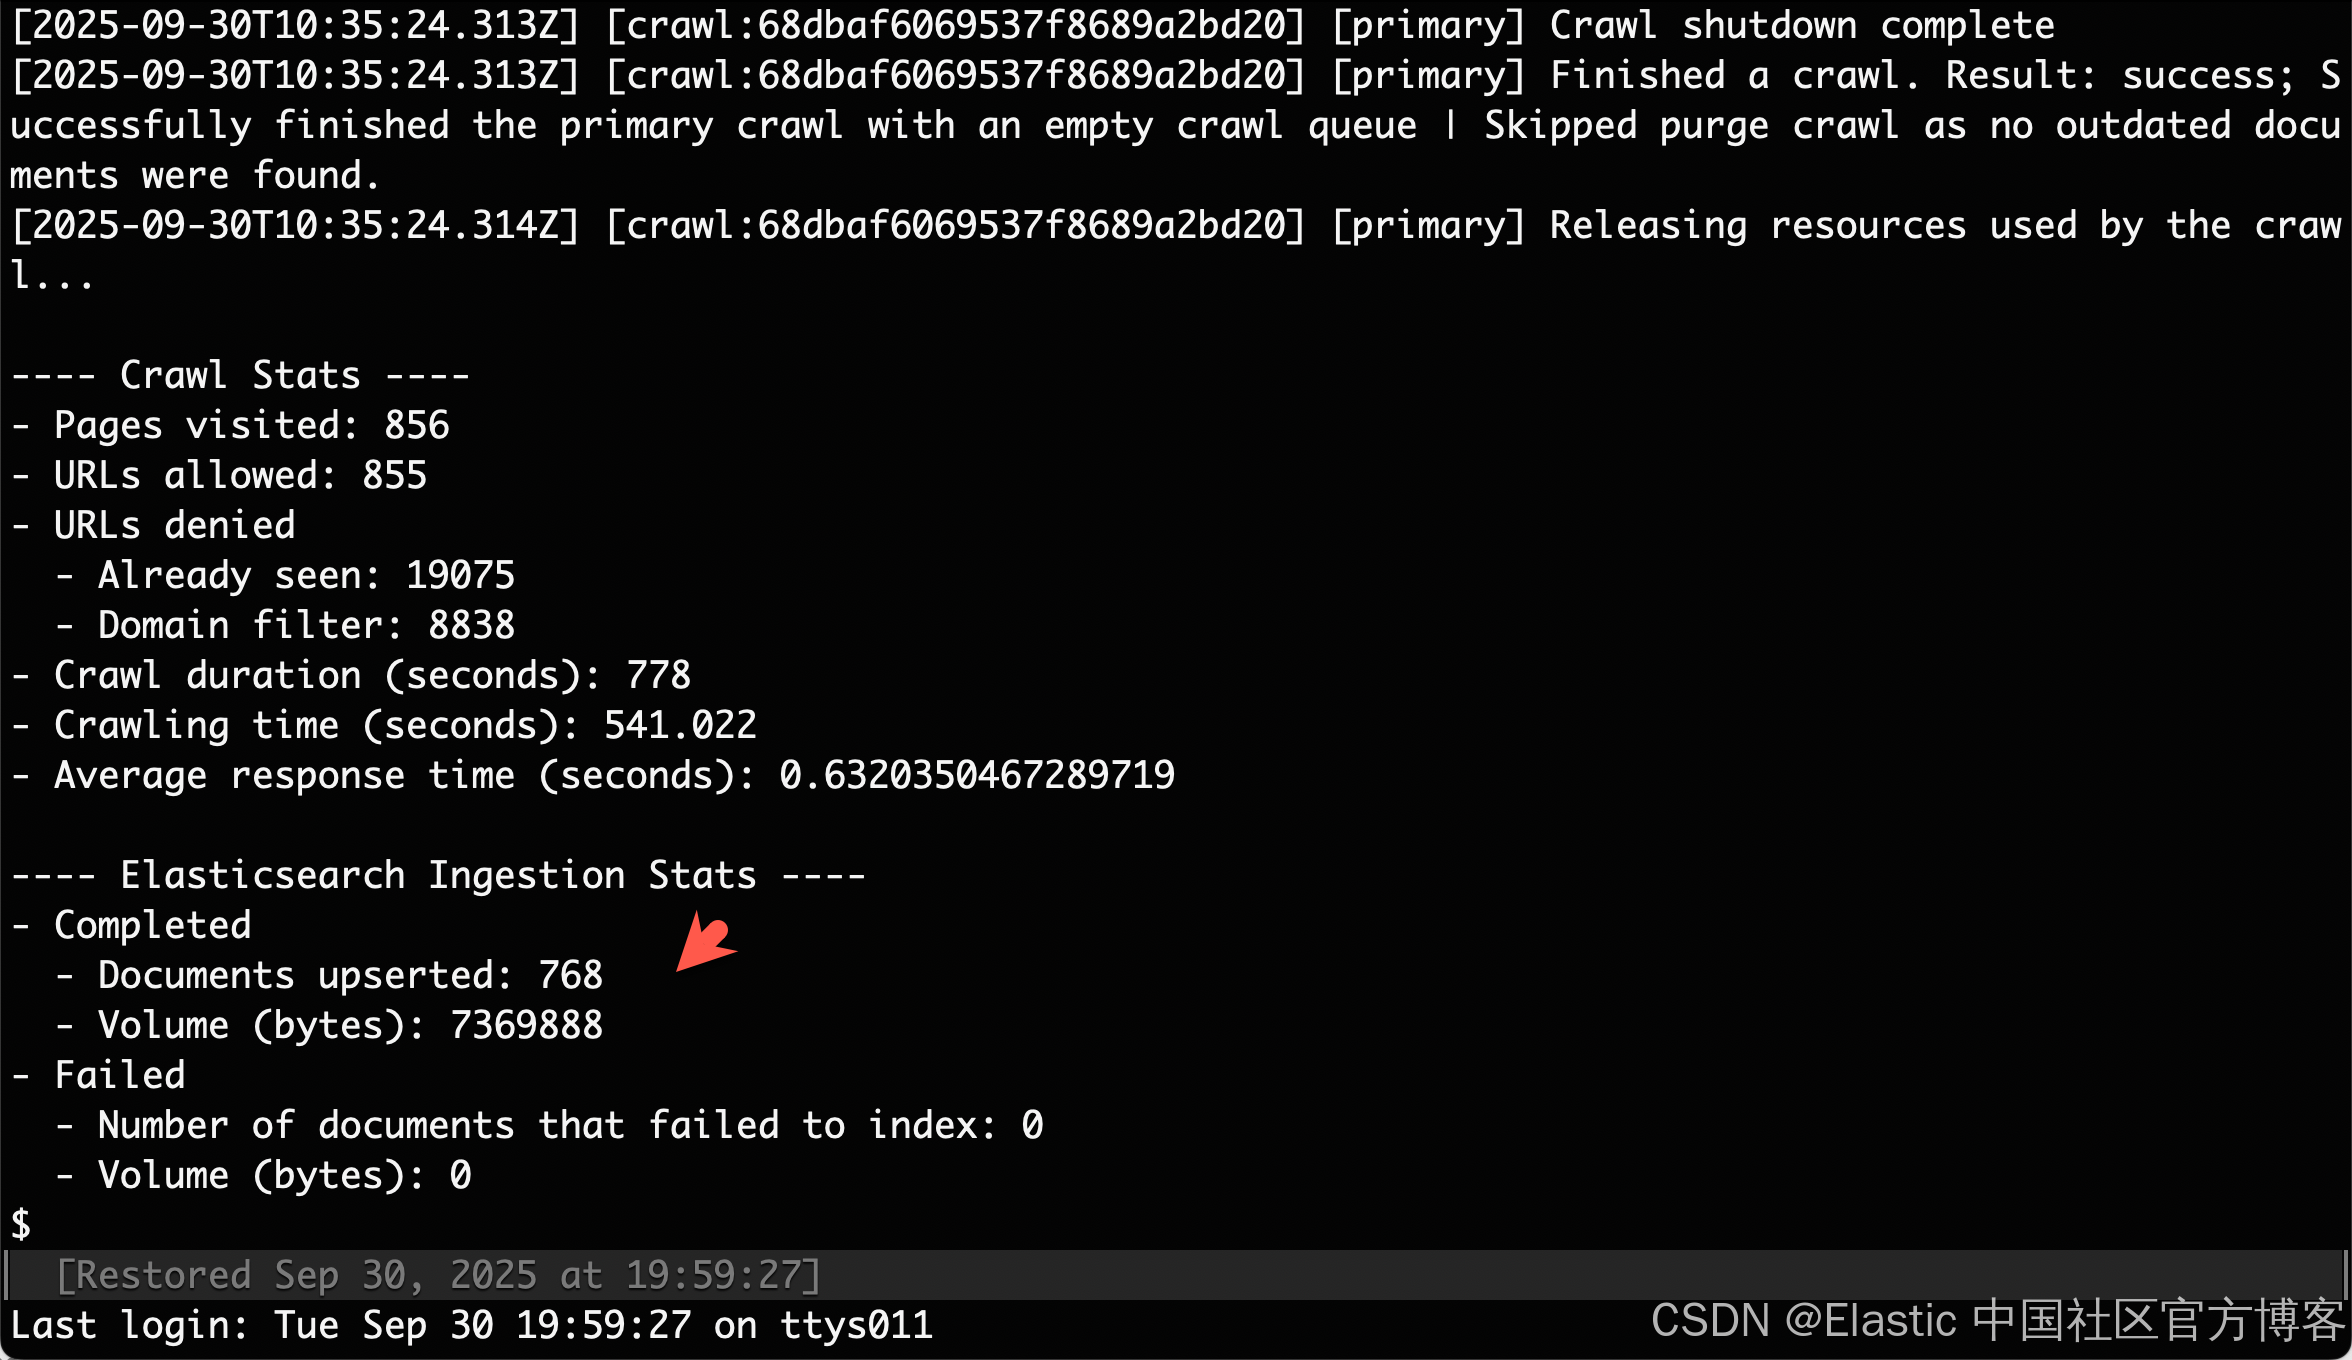
我们需要等待一定的时间来完成所有的文档写入。
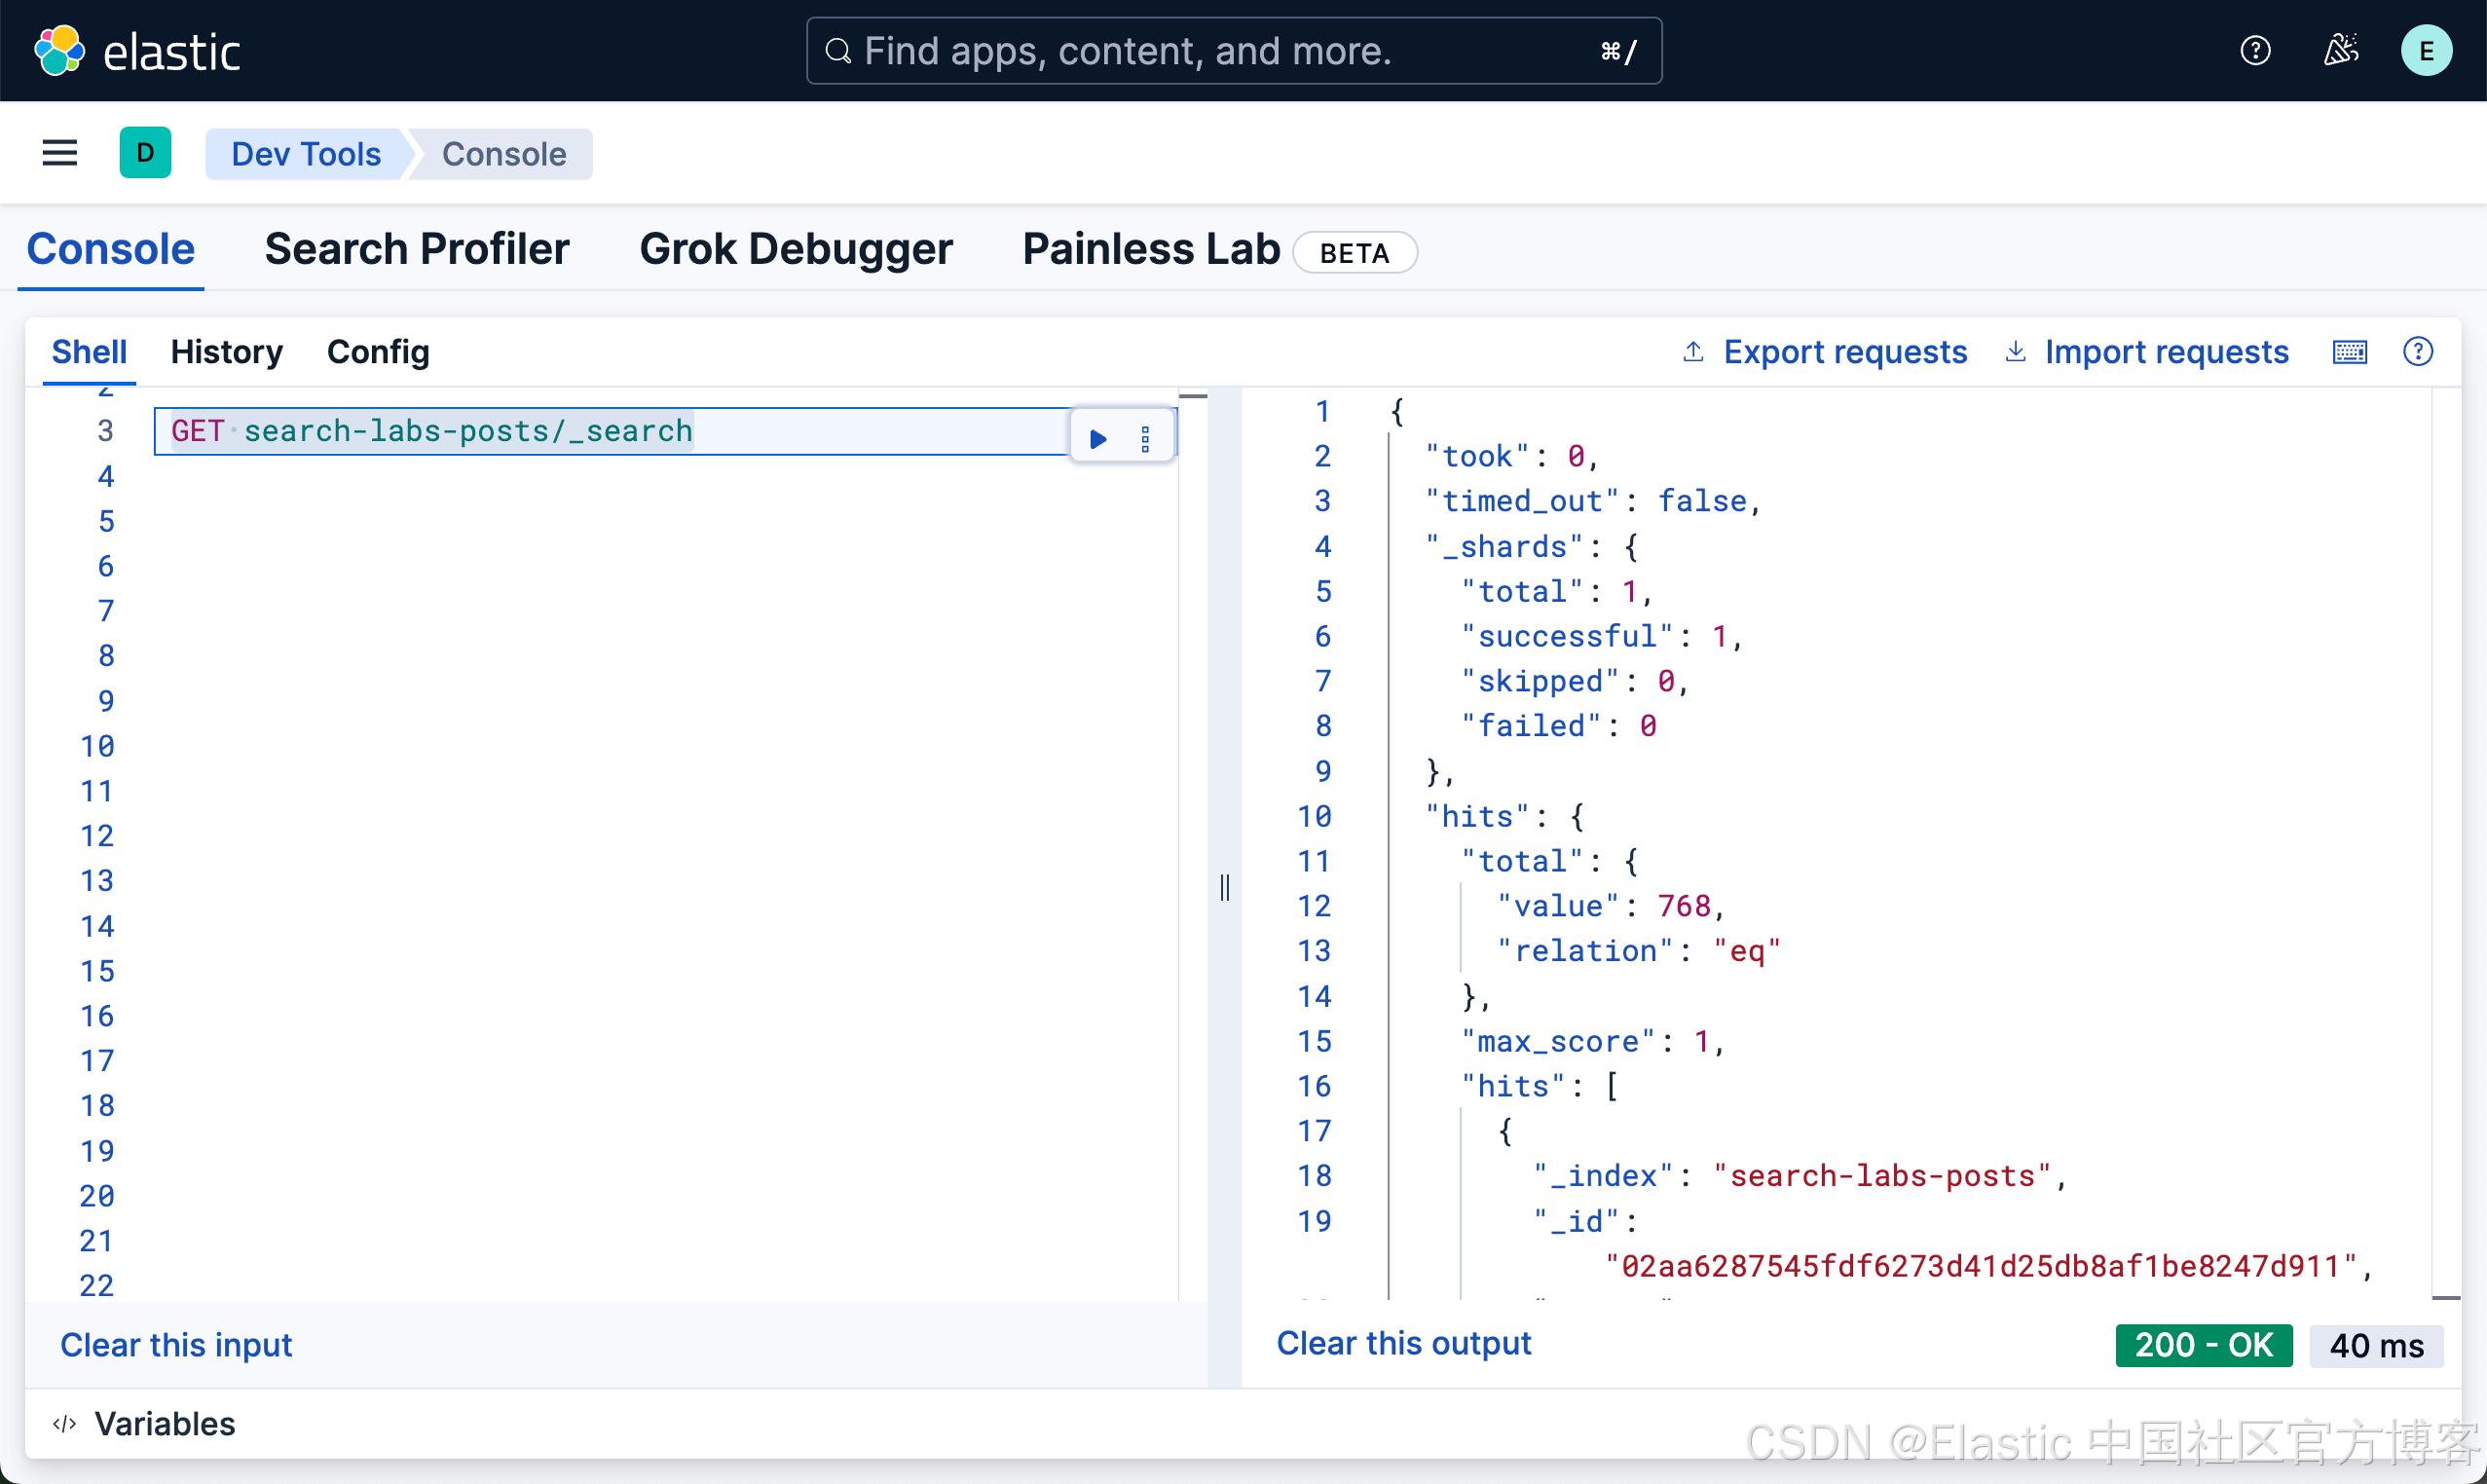
我们可以看到有 768 篇文章被写入。
MCP Server 工具用于搜索相关博客文章
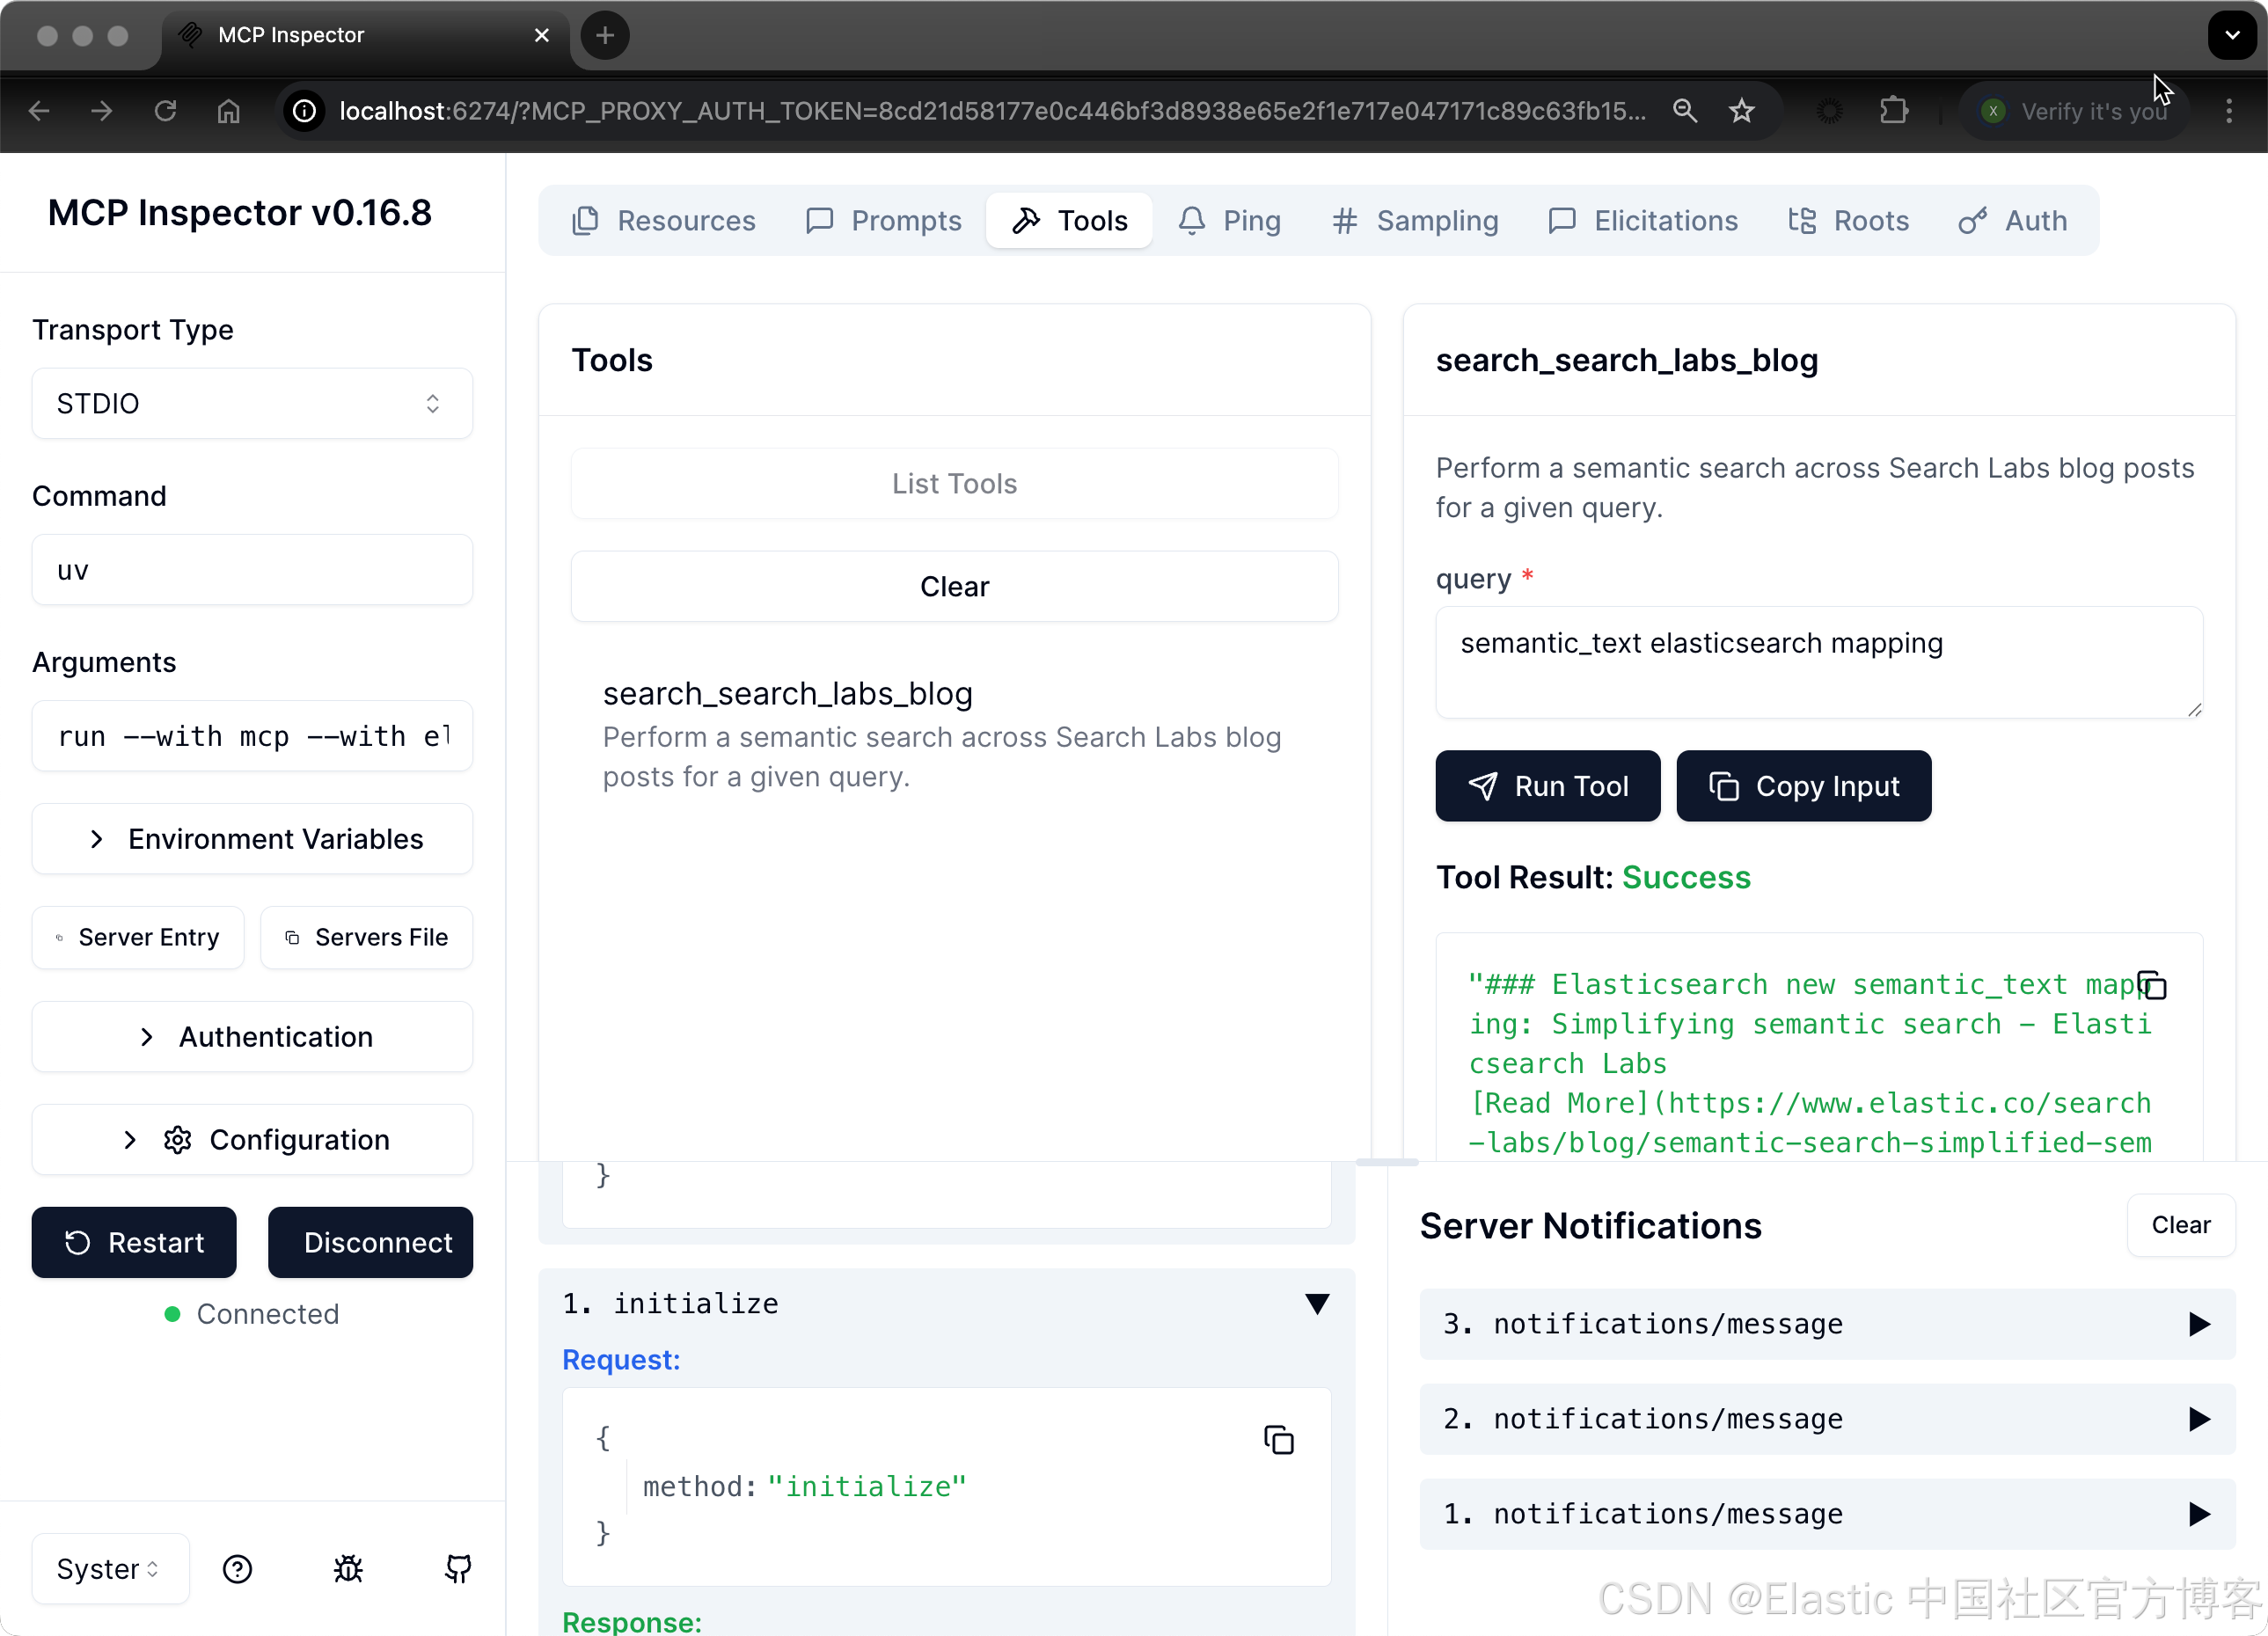
一旦你在 .env 文件中填入 ES_URL 和 API_KEY,就可以通过 MCP Inspector 工具开始与我们的 MCP server 交互。
开发非常直接,多亏了 MCP Python SDK。这里是我们所需的全部内容,不到 50 行代码!
import os
import sys
from dotenv import load_dotenv
from elasticsearch import Elasticsearch
from mcp.server.fastmcp import FastMCP

# Load environment variables
load_dotenv()
print("Beginning", file=sys.stderr)

ELASTCSEARCH_CERT_PATH = "/Users/liuxg/python/elastic-semantic-search-mcp-server/crawler-config/http_ca.crt"
ES_URL = os.getenv("ES_URL")
API_KEY = os.getenv("API_KEY")

# We can use the following method to output some logs to help debug
print(ES_URL, file=sys.stderr)
print(API_KEY, file=sys.stderr)
# ES_URL = "https://192.168.101.192:9200"
# API_KEY = "bzhZRW1wa0I5NnpZa1ZqRGhRYl86akdfMExCSkZzUUh2QVRsd2UtQ2tHUQ=="

# Setup Elasticsearch client
es_client = Elasticsearch(ES_URL, api_key= API_KEY,
                          ca_certs = ELASTCSEARCH_CERT_PATH, verify_certs = True)
print(es_client.info())

mcp = FastMCP("Search Labs Blog Search MCP", dependencies=["elasticsearch"])


# Elasticsearch search function
def search_search_labs(query: str) -> list[dict]:
    """Perform semantic search on Search Labs blog posts."""
    try:
        results = es_client.search(
            index="search-labs-posts",
            body={
                "query": {
                    "semantic": {"query": query, "field": "semantic_body"},
                },
                "_source": [
                    "title",
                    "url",
                    "semantic_body.inference.chunks.text",
                ],
                "size": 5,
            },
        )
        return [
            {
                "title": hit["_source"].get("title", ""),
                "url": hit["_source"].get("url", ""),
                "content": [
                    chunk.get("text", "")
                    for chunk in hit["_source"]
                    .get("semantic_body", {})
                    .get("inference", {})
                    .get("chunks", [])[:3]
                ],
            }
            for hit in results.get("hits", {}).get("hits", [])
        ]
    except Exception as e:
        return [{"error": f"Search failed: {str(e)}"}]


# MCP tool for documentation search
@mcp.tool(
    name="search_search_labs_blog",
    description="Perform a semantic search across Search Labs blog posts for a given query.",
)
def search_search_labs_blog(query: str) -> str:
    """Returns formatted search results from Search Labs blog posts."""
    results = search_search_labs(query)
    return (
        "\n\n".join(
            [
                f"### {hit['title']}\n[Read More]({hit['url']})\n- {hit['content']}"
                for hit in results
            ]
        )
        if results
        else "No results found."
    )


# Start MCP server
if __name__ == "__main__":
    print(f"MCP server '{mcp.name}' is running...")
    mcp.run()
要运行开发版 inspector,只需调用:
make dev$ pwd
/Users/liuxg/python/elastic-semantic-search-mcp-server
$ ls
Makefile __pycache__ node_modules package.json server.py
README.md crawler-config package-lock.json pyproject.toml uv.lock
$ sudo npm install @modelcontextprotocol/inspector@0.16.8
up to date, audited 232 packages in 2s
40 packages are looking for funding
run `npm fund` for details
found 0 vulnerabilities
$ make dev
uv run mcp dev server.py
https://192.168.101.192:9200 bzhZRW1wa0I5NnpZa1ZqRGhRYl86akdfMExCSkZzUUh2QVRsd2UtQ2tHUQ==
{'name': 'liuxgn.local', 'cluster_name': 'elasticsearch', 'cluster_uuid': 'i0uJkyoLRT-M01FTEeGwMg', 'version': {'number': '9.1.4', 'build_flavor': 'default', 'build_type': 'tar', 'build_hash': '0b7fe68d2e369469ff9e9f344ab6df64ab9c5293', 'build_date': '2025-09-16T22:05:19.073893347Z', 'build_snapshot': False, 'lucene_version': '10.2.2', 'minimum_wire_compatibility_version': '8.19.0', 'minimum_index_compatibility_version': '8.0.0'}, 'tagline': 'You Know, for Search'}
Starting MCP inspector...
⚙️ Proxy server listening on localhost:6277
🔑 Session token: 8cd21d58177e0c446bf3d8938e65e2f1e717e047171c89c63fb155dae7c1011e
Use this token to authenticate requests or set DANGEROUSLY_OMIT_AUTH=true to disable auth
🚀 MCP Inspector is up and running at:
http://localhost:6274/?MCP_PROXY_AUTH_TOKEN=8cd21d58177e0c446bf3d8938e65e2f1e717e047171c89c63fb155dae7c1011e
🌐 Opening browser...
它会在 http://localhost:5173 打开 inspector,你可以通过 UI 中的协议与 MCP server 交互。
Claude Desktop 应用端到端演示
Claude Desktop App 实现了 MCP Client 接口。你可以通过运行以下命令将我们的 MCP server 添加到本地 Claude Desktop:
$ pwd
/Users/liuxg/python/elastic-semantic-search-mcp-server
$ ls
Makefile          __pycache__       node_modules      package.json      server.py
README.md         crawler-config    package-lock.json pyproject.toml    uv.lock
$ make install-claude-config
uv run mcp install server.py --with elasticsearch
https://192.168.101.192:9200 bzhZRW1wa0I5NnpZa1ZqRGhRYl86akdfMExCSkZzUUh2QVRsd2UtQ2tHUQ==
{'name': 'liuxgn.local', 'cluster_name': 'elasticsearch', 'cluster_uuid': 'i0uJkyoLRT-M01FTEeGwMg', 'version': {'number': '9.1.4', 'build_flavor': 'default', 'build_type': 'tar', 'build_hash': '0b7fe68d2e369469ff9e9f344ab6df64ab9c5293', 'build_date': '2025-09-16T22:05:19.073893347Z', 'build_snapshot': False, 'lucene_version': '10.2.2', 'minimum_wire_compatibility_version': '8.19.0', 'minimum_index_compatibility_version': '8.0.0'}, 'tagline': 'You Know, for Search'}
[10/01/25 12:22:48] INFO     Added server 'Search Labs Blog Search MCP' to Claude config     claude.py:126
                    INFO     Successfully installed Search Labs Blog Search MCP in Claude app   cli.py:468
这会更新你主目录下的 claude_desktop_config.json。在下一次重启时,Claude 应用会检测到该 server 并加载声明的工具。我们可以在 Claude Desktop 的设置中进行查看:
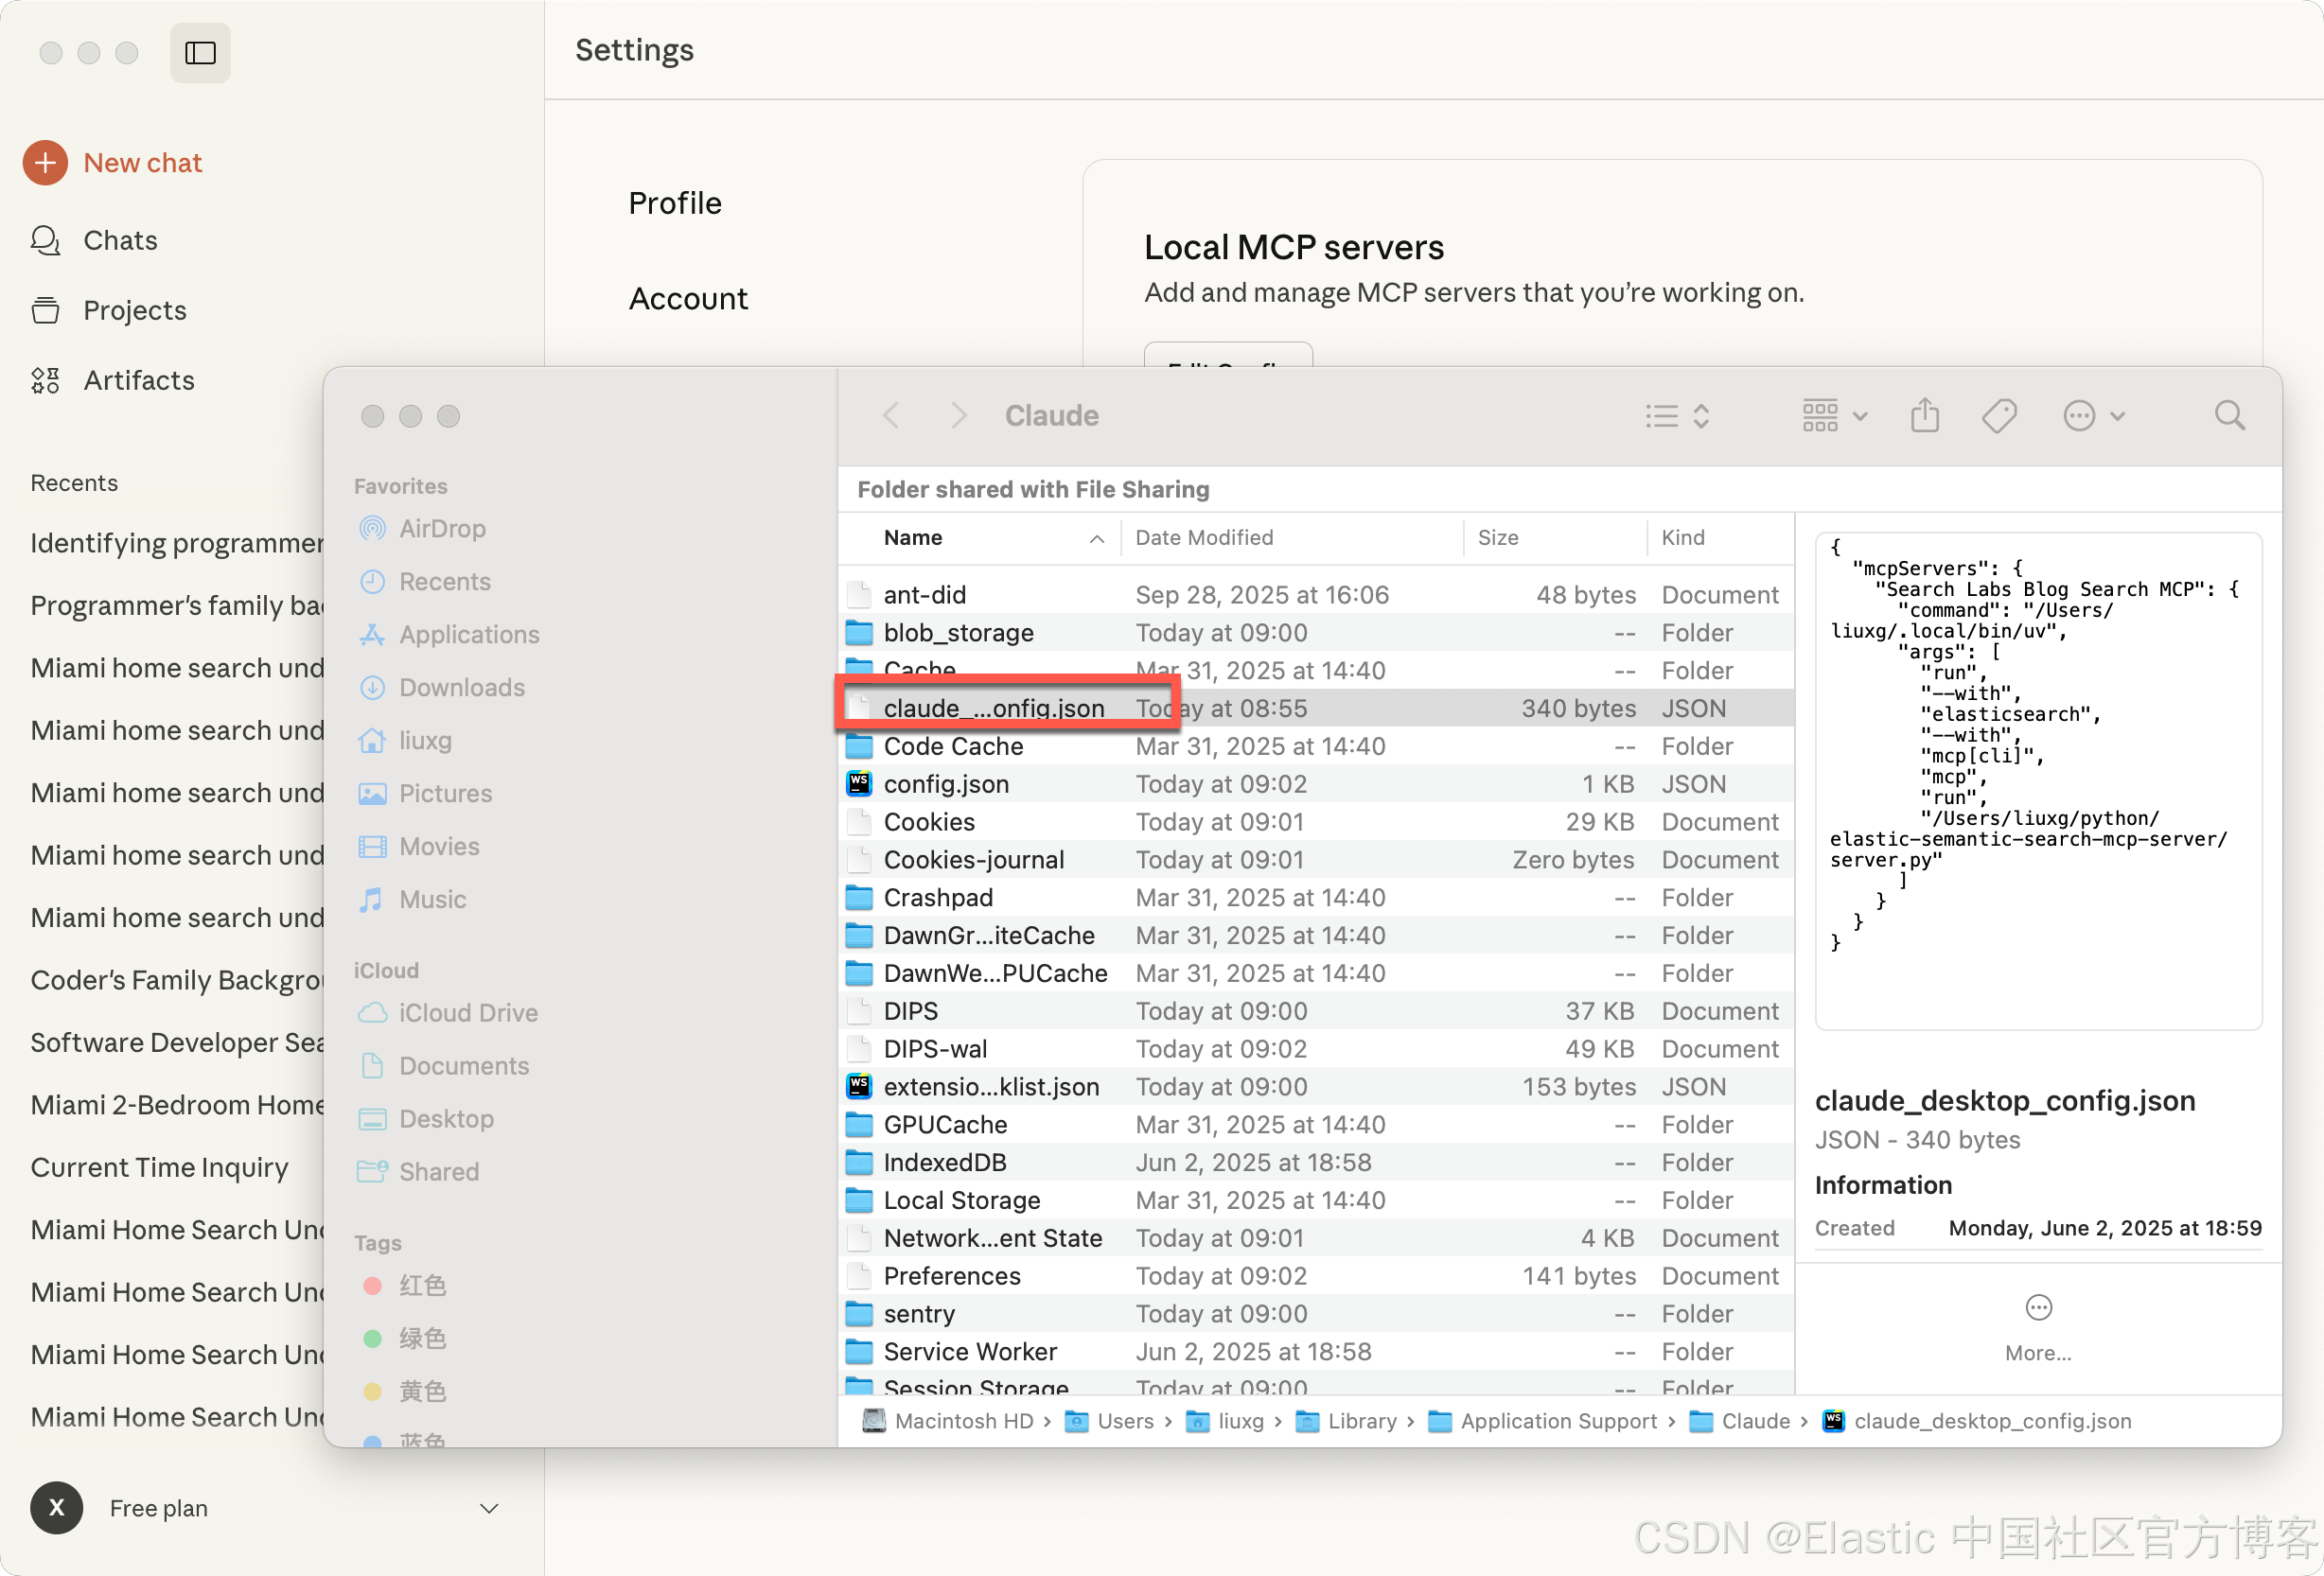
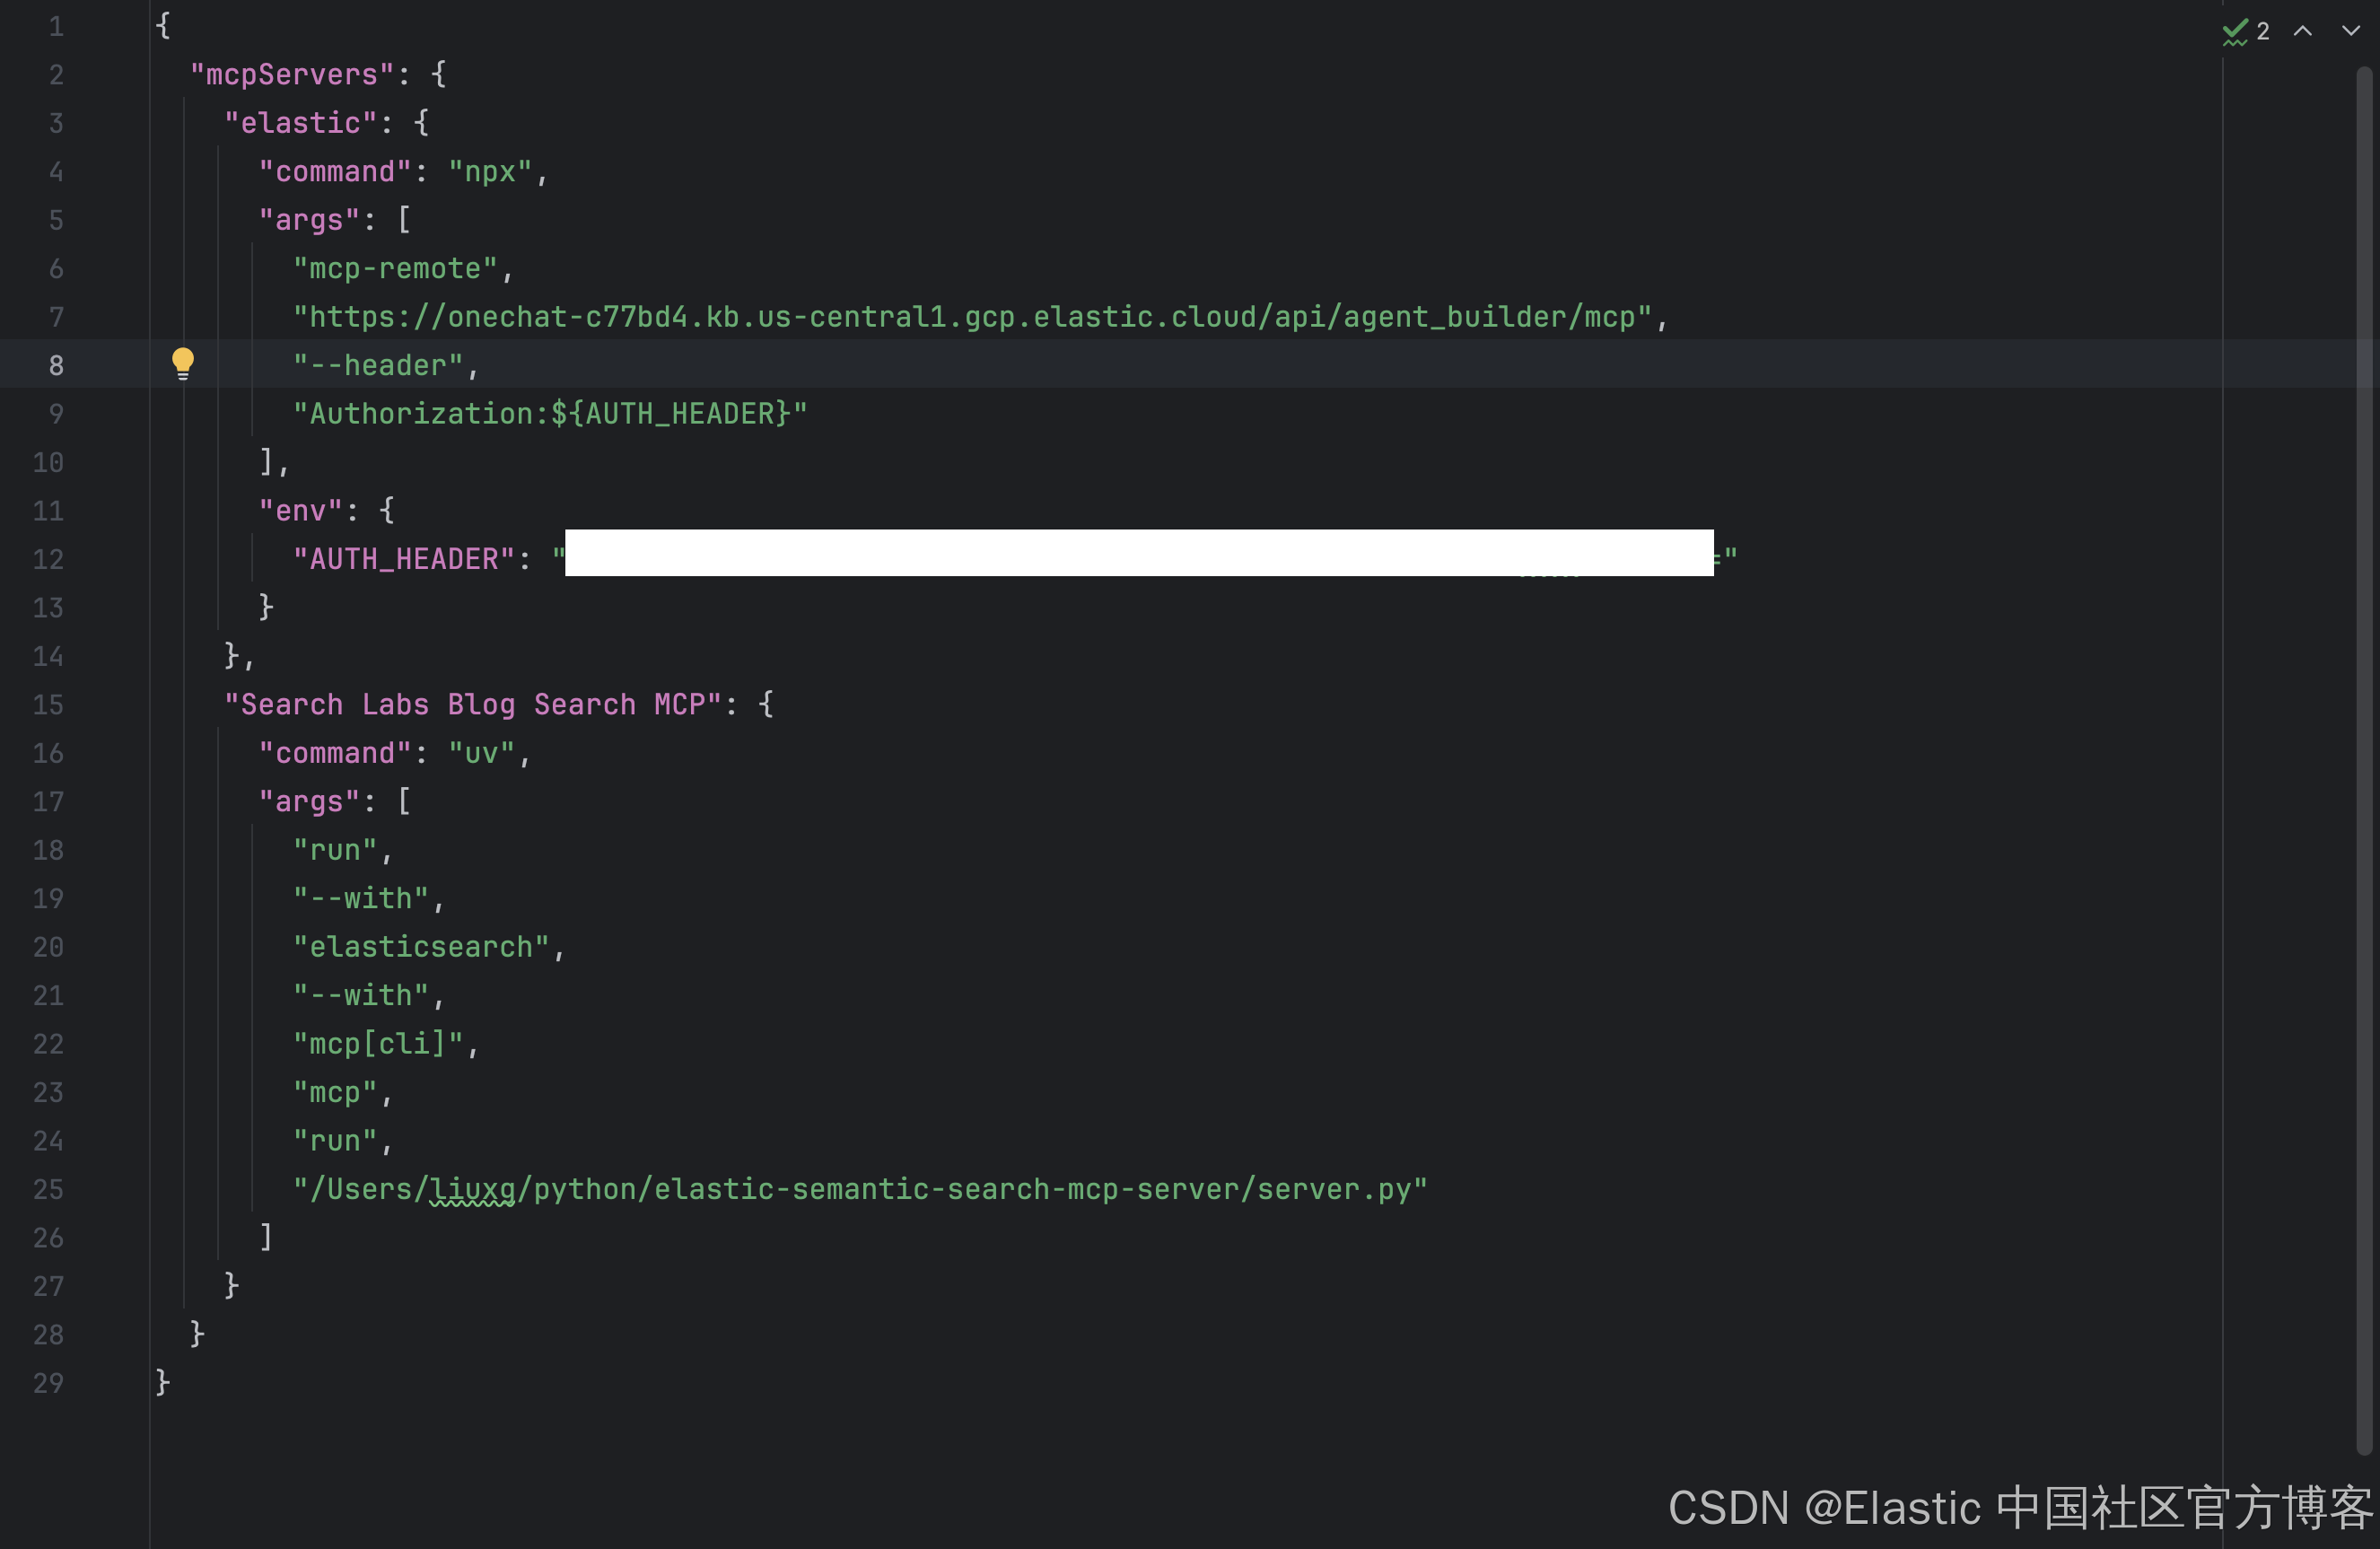
在配置文件里,我们可以看到 Search Labs Blog Search MCP 的配置。由于一些原因,我们需要修改上面的 command 字段为:
$ which uv
/Users/liuxg/.local/bin/uv
{
"mcpServers": {
"Search Labs Blog Search MCP": {
"command": "/Users/liuxg/.local/bin/uv",
"args": [
"run",
"--with",
"elasticsearch",
"--with",
"mcp[cli]",
"mcp",
"run",
"/Users/liuxg/python/elastic-semantic-search-mcp-server/server.py"
]
}
}
}否则,我们会出现如下的错误信息:
2025-10-02T00:50:22.532Z [Search Labs Blog Search MCP] [error] spawn uv ENOENT {
  metadata: {
    stack: 'Error: spawn uv ENOENT\n' +
      '    at ChildProcess._handle.onexit (node:internal/child_process:285:19)\n' +
      '    at onErrorNT (node:internal/child_process:483:16)\n' +
      '    at process.processTicksAndRejections (node:internal/process/task_queues:90:21)'
  }
}
2025-10-02T00:50:22.534Z [Search Labs Blog Search MCP] [info] Server transport closed { metadata: undefined }
2025-10-02T00:50:22.534Z [Search Labs Blog Search MCP] [info] Client transport closed { metadata: undefined }
2025-10-02T00:50:22.534Z [Search Labs Blog Search MCP] [info] Server transport closed unexpectedly, this is likely due to the process exiting early. If you are developing this MCP server you can add output to stderr (i.e. `console.error('...')` in JavaScript, `print('...', file=sys.stderr)` in python) and it will appear in this log. { metadata: undefined }
2025-10-02T00:50:22.534Z [Search Labs Blog Search MCP] [error] Server disconnected. For troubleshooting guidance, please visit our [debugging documentation](https://modelcontextprotocol.io/docs/tools/debugging) { metadata: { context: 'connection', stack: undefined } }
2025-10-02T00:55:18.336Z [Search Labs Blog Search MCP] [info] Initializing server... { metadata: undefined }
2025-10-02T00:55:18.343Z [Search Labs Blog Search MCP] [info] Using MCP server command: /Users/liuxg/.local/bin/uv with args and path: {
  metadata: {
    args: [
      'run',
      '--with',
      'elasticsearch',
      '--with',
      'mcp[cli]',
      'mcp',
      'run',
      '/Users/liuxg/python/elastic-semantic-search-mcp-server/server.py',
      [length]: 8
    ],
    paths: [
      '/Users/liuxg/.nvm/versions/node/v22.14.0/bin',
      '/usr/local/bin',
      '/opt/homebrew/bin',
      '/opt/local/bin',
      '/usr/bin',
      '/usr/bin',
      '/bin',
      '/usr/sbin',
      '/sbin',
      [length]: 9
    ]
  }
} %o
如果你不想修改那个 command 项,你可以使用如下的软链接命令:
sudo ln -s ~/.local/bin/uv /usr/local/bin/uv我们可以在如下的位置找到 Claude Desktop 的运行信息:
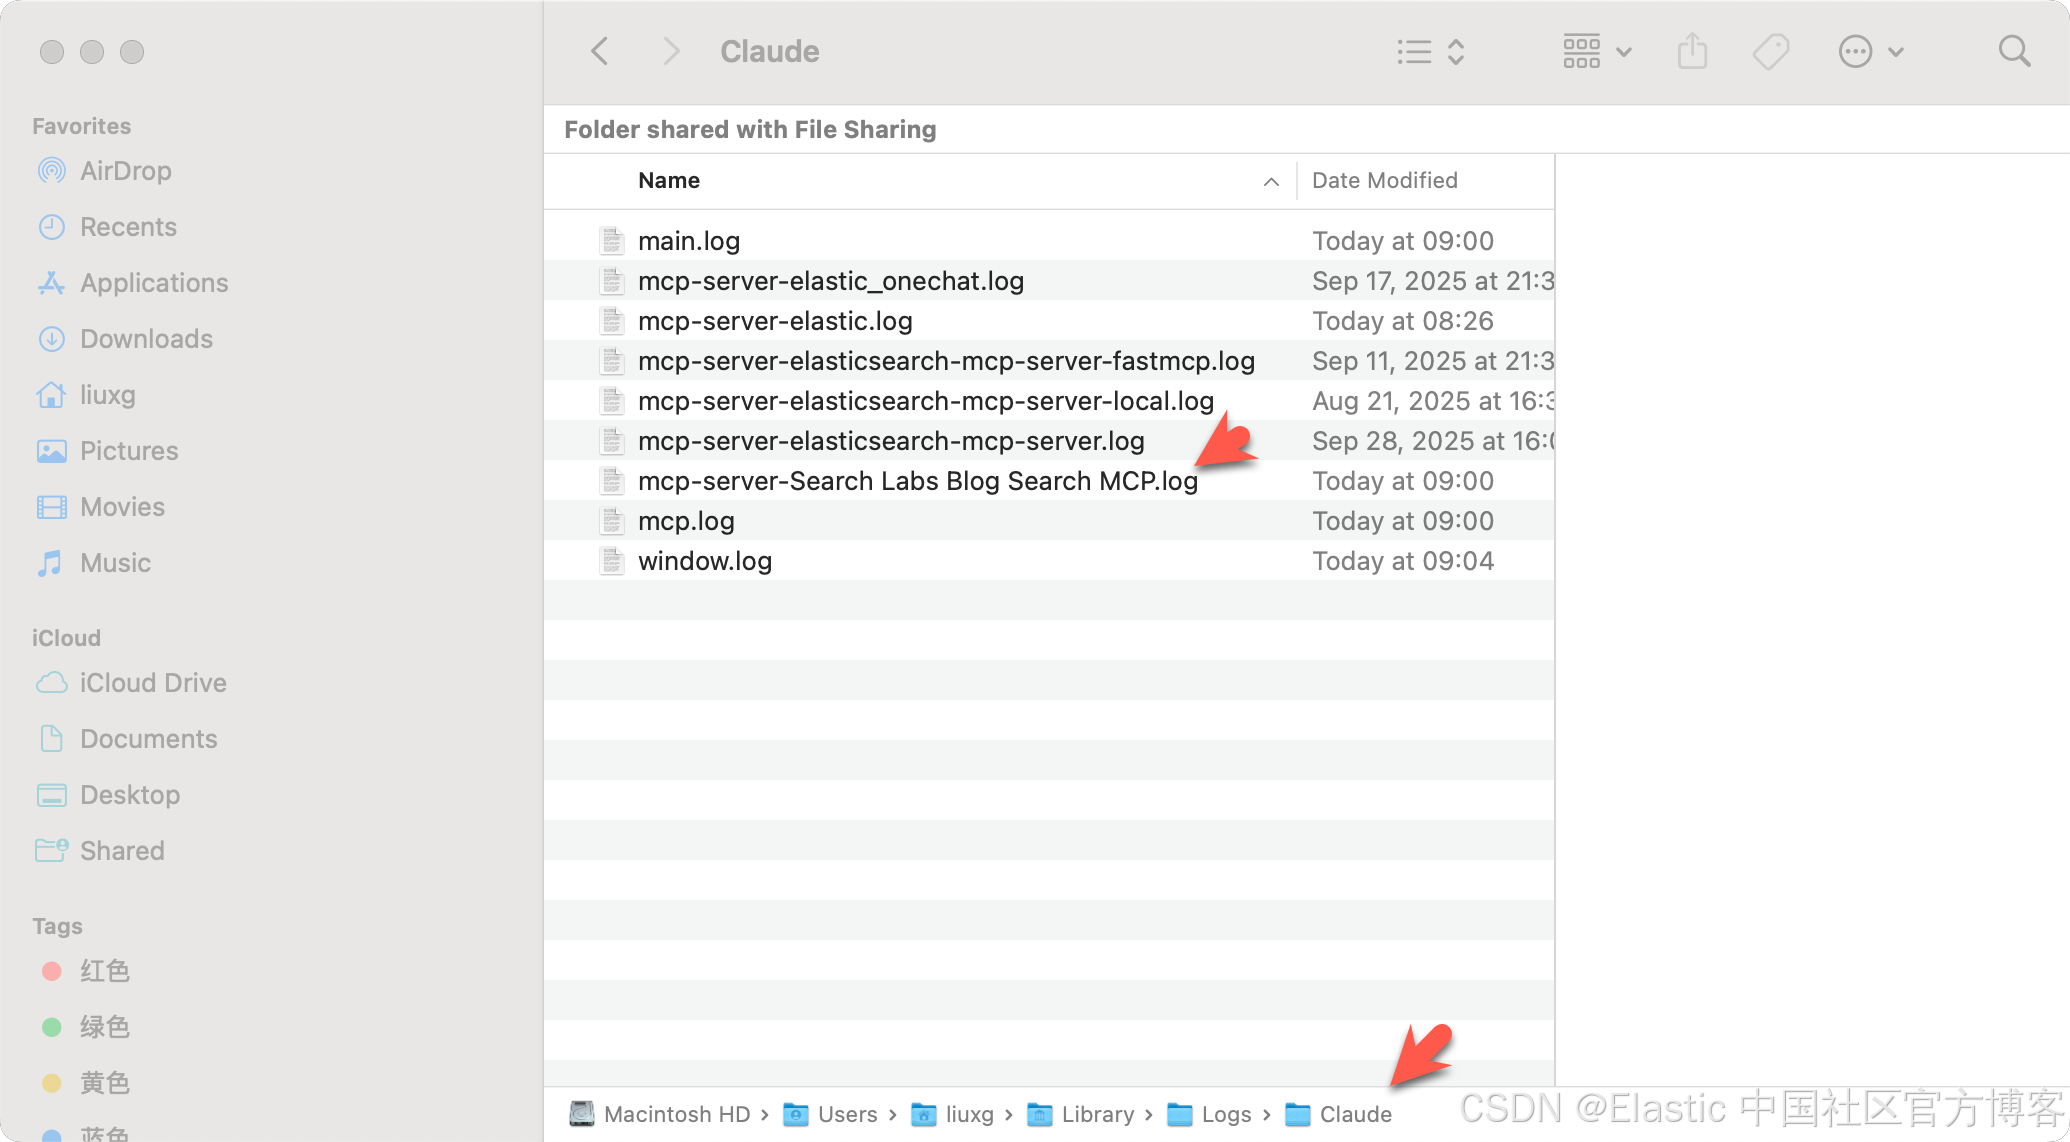
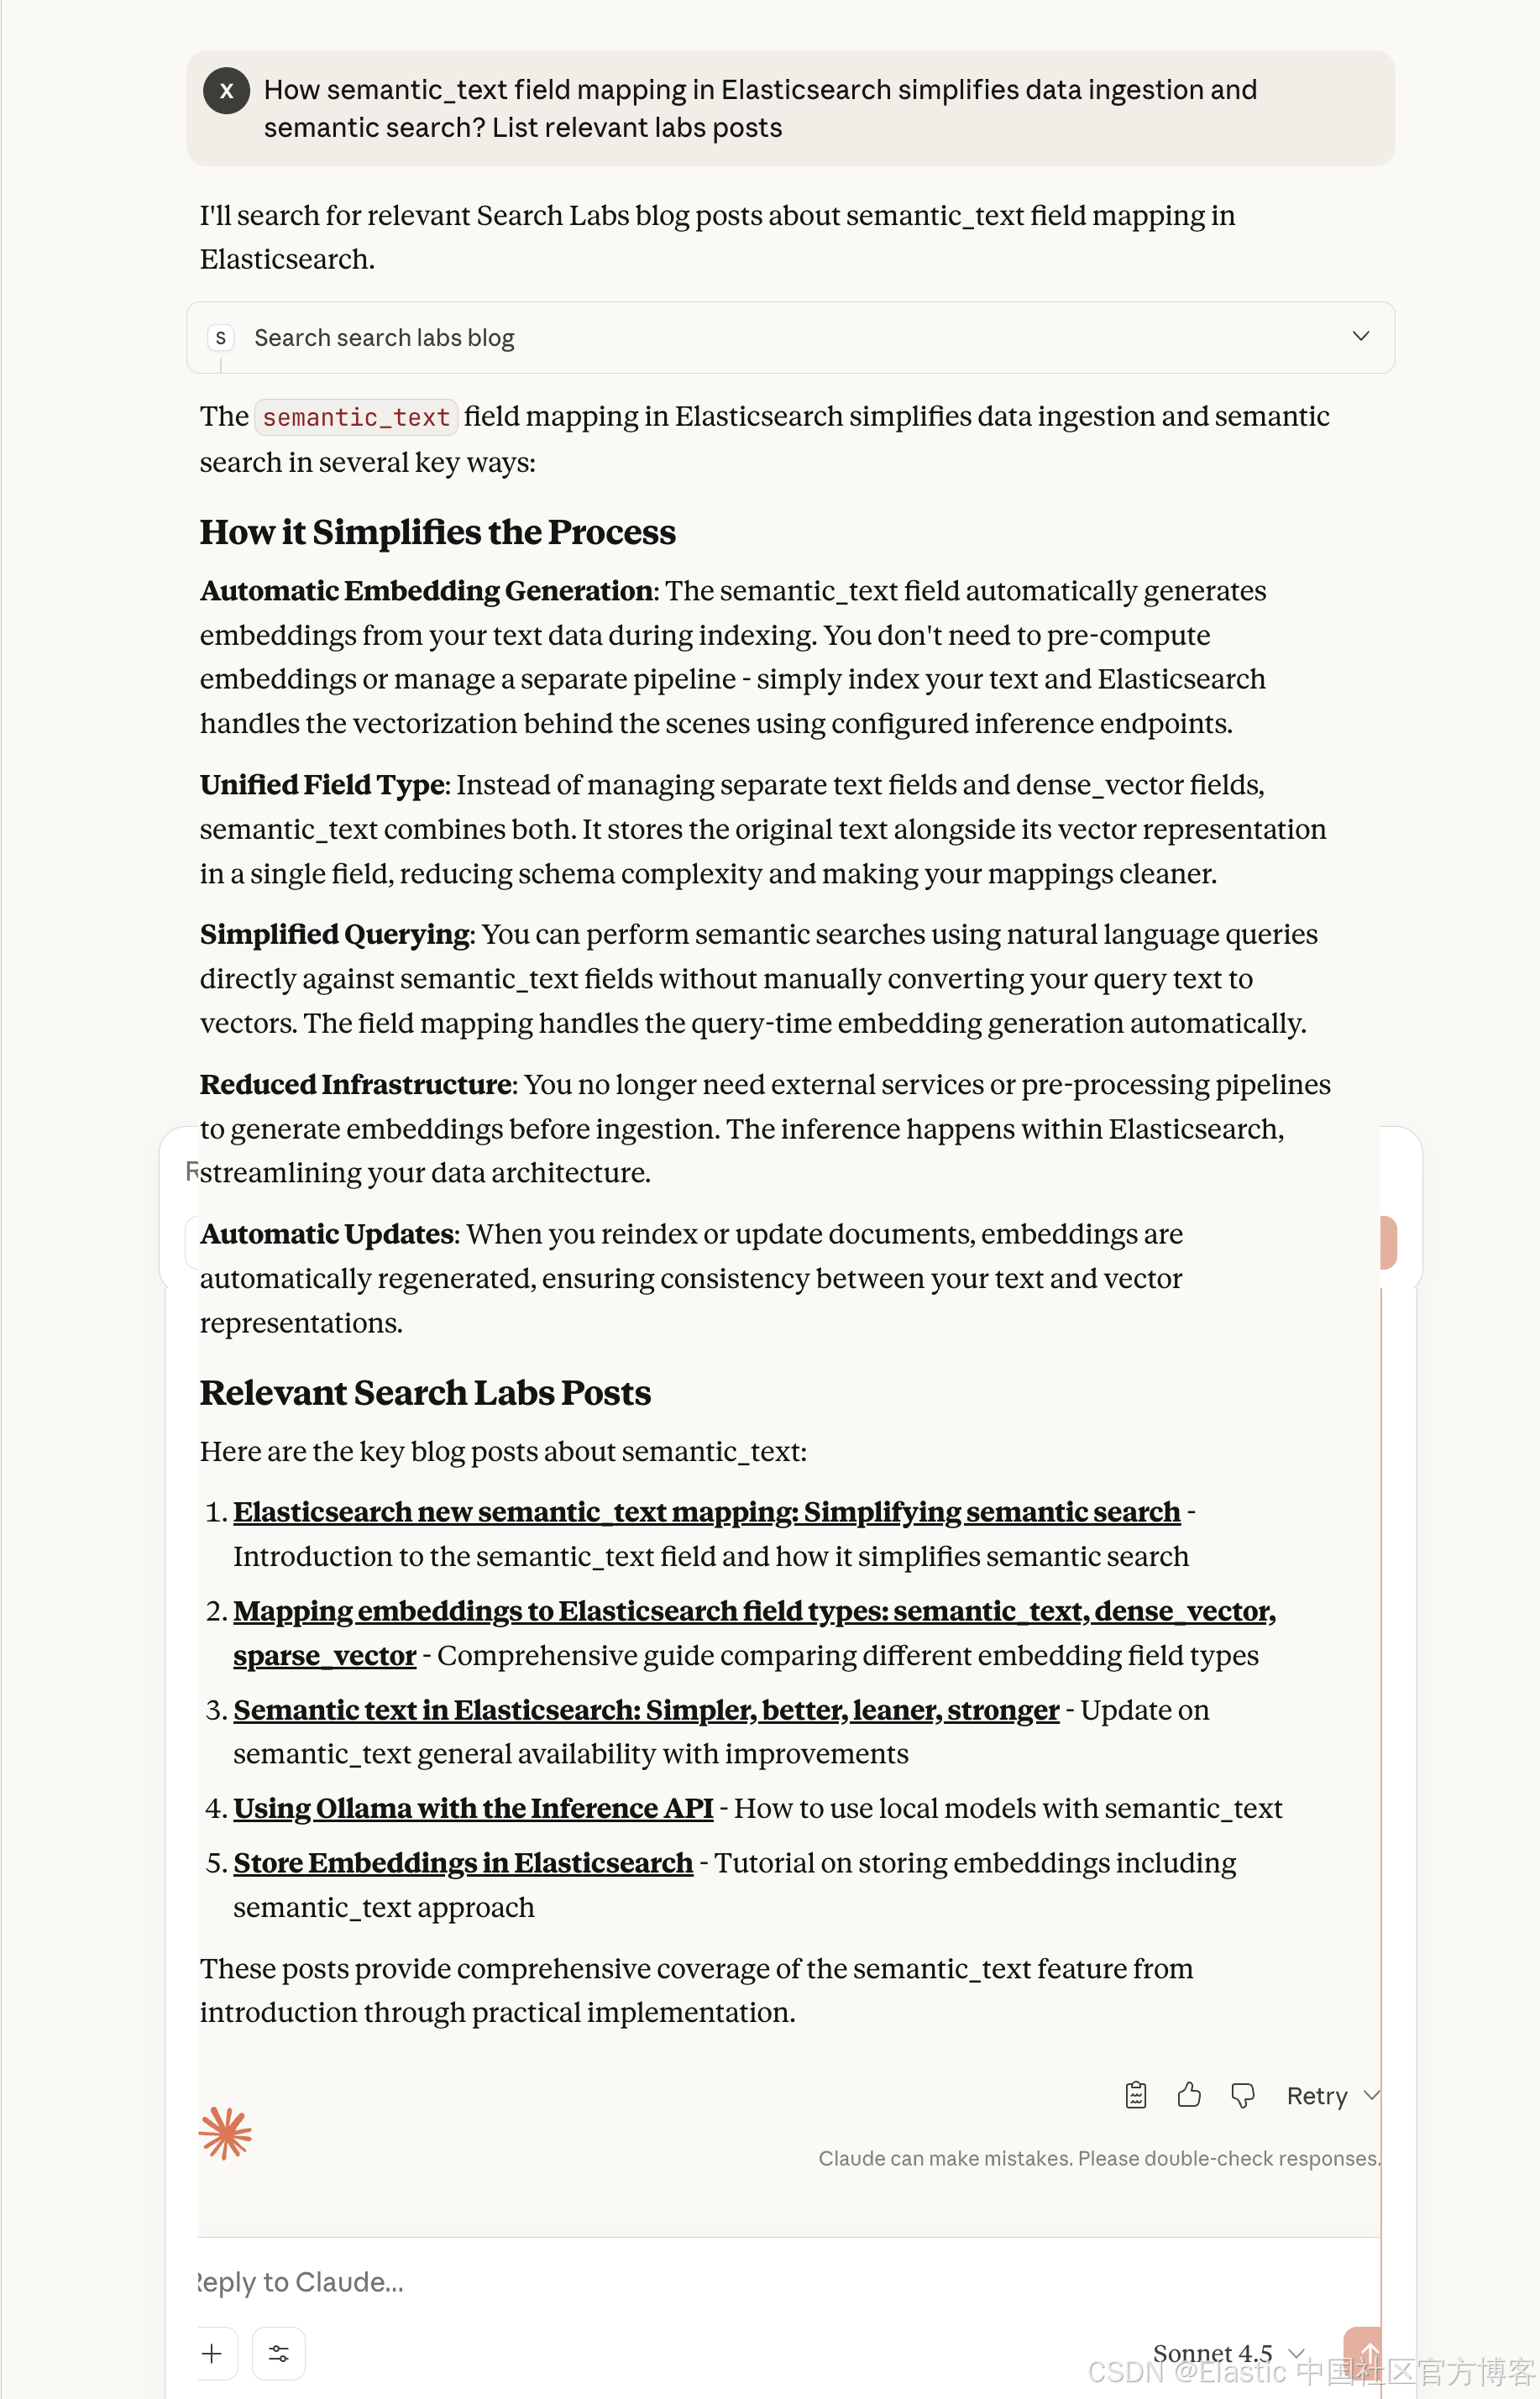
下面是 Claude 动态查找关于 semantic_text 博客文章的示例:
How semantic_text field mapping in Elasticsearch simplifies data ingestion and semantic search? List relevant labs posts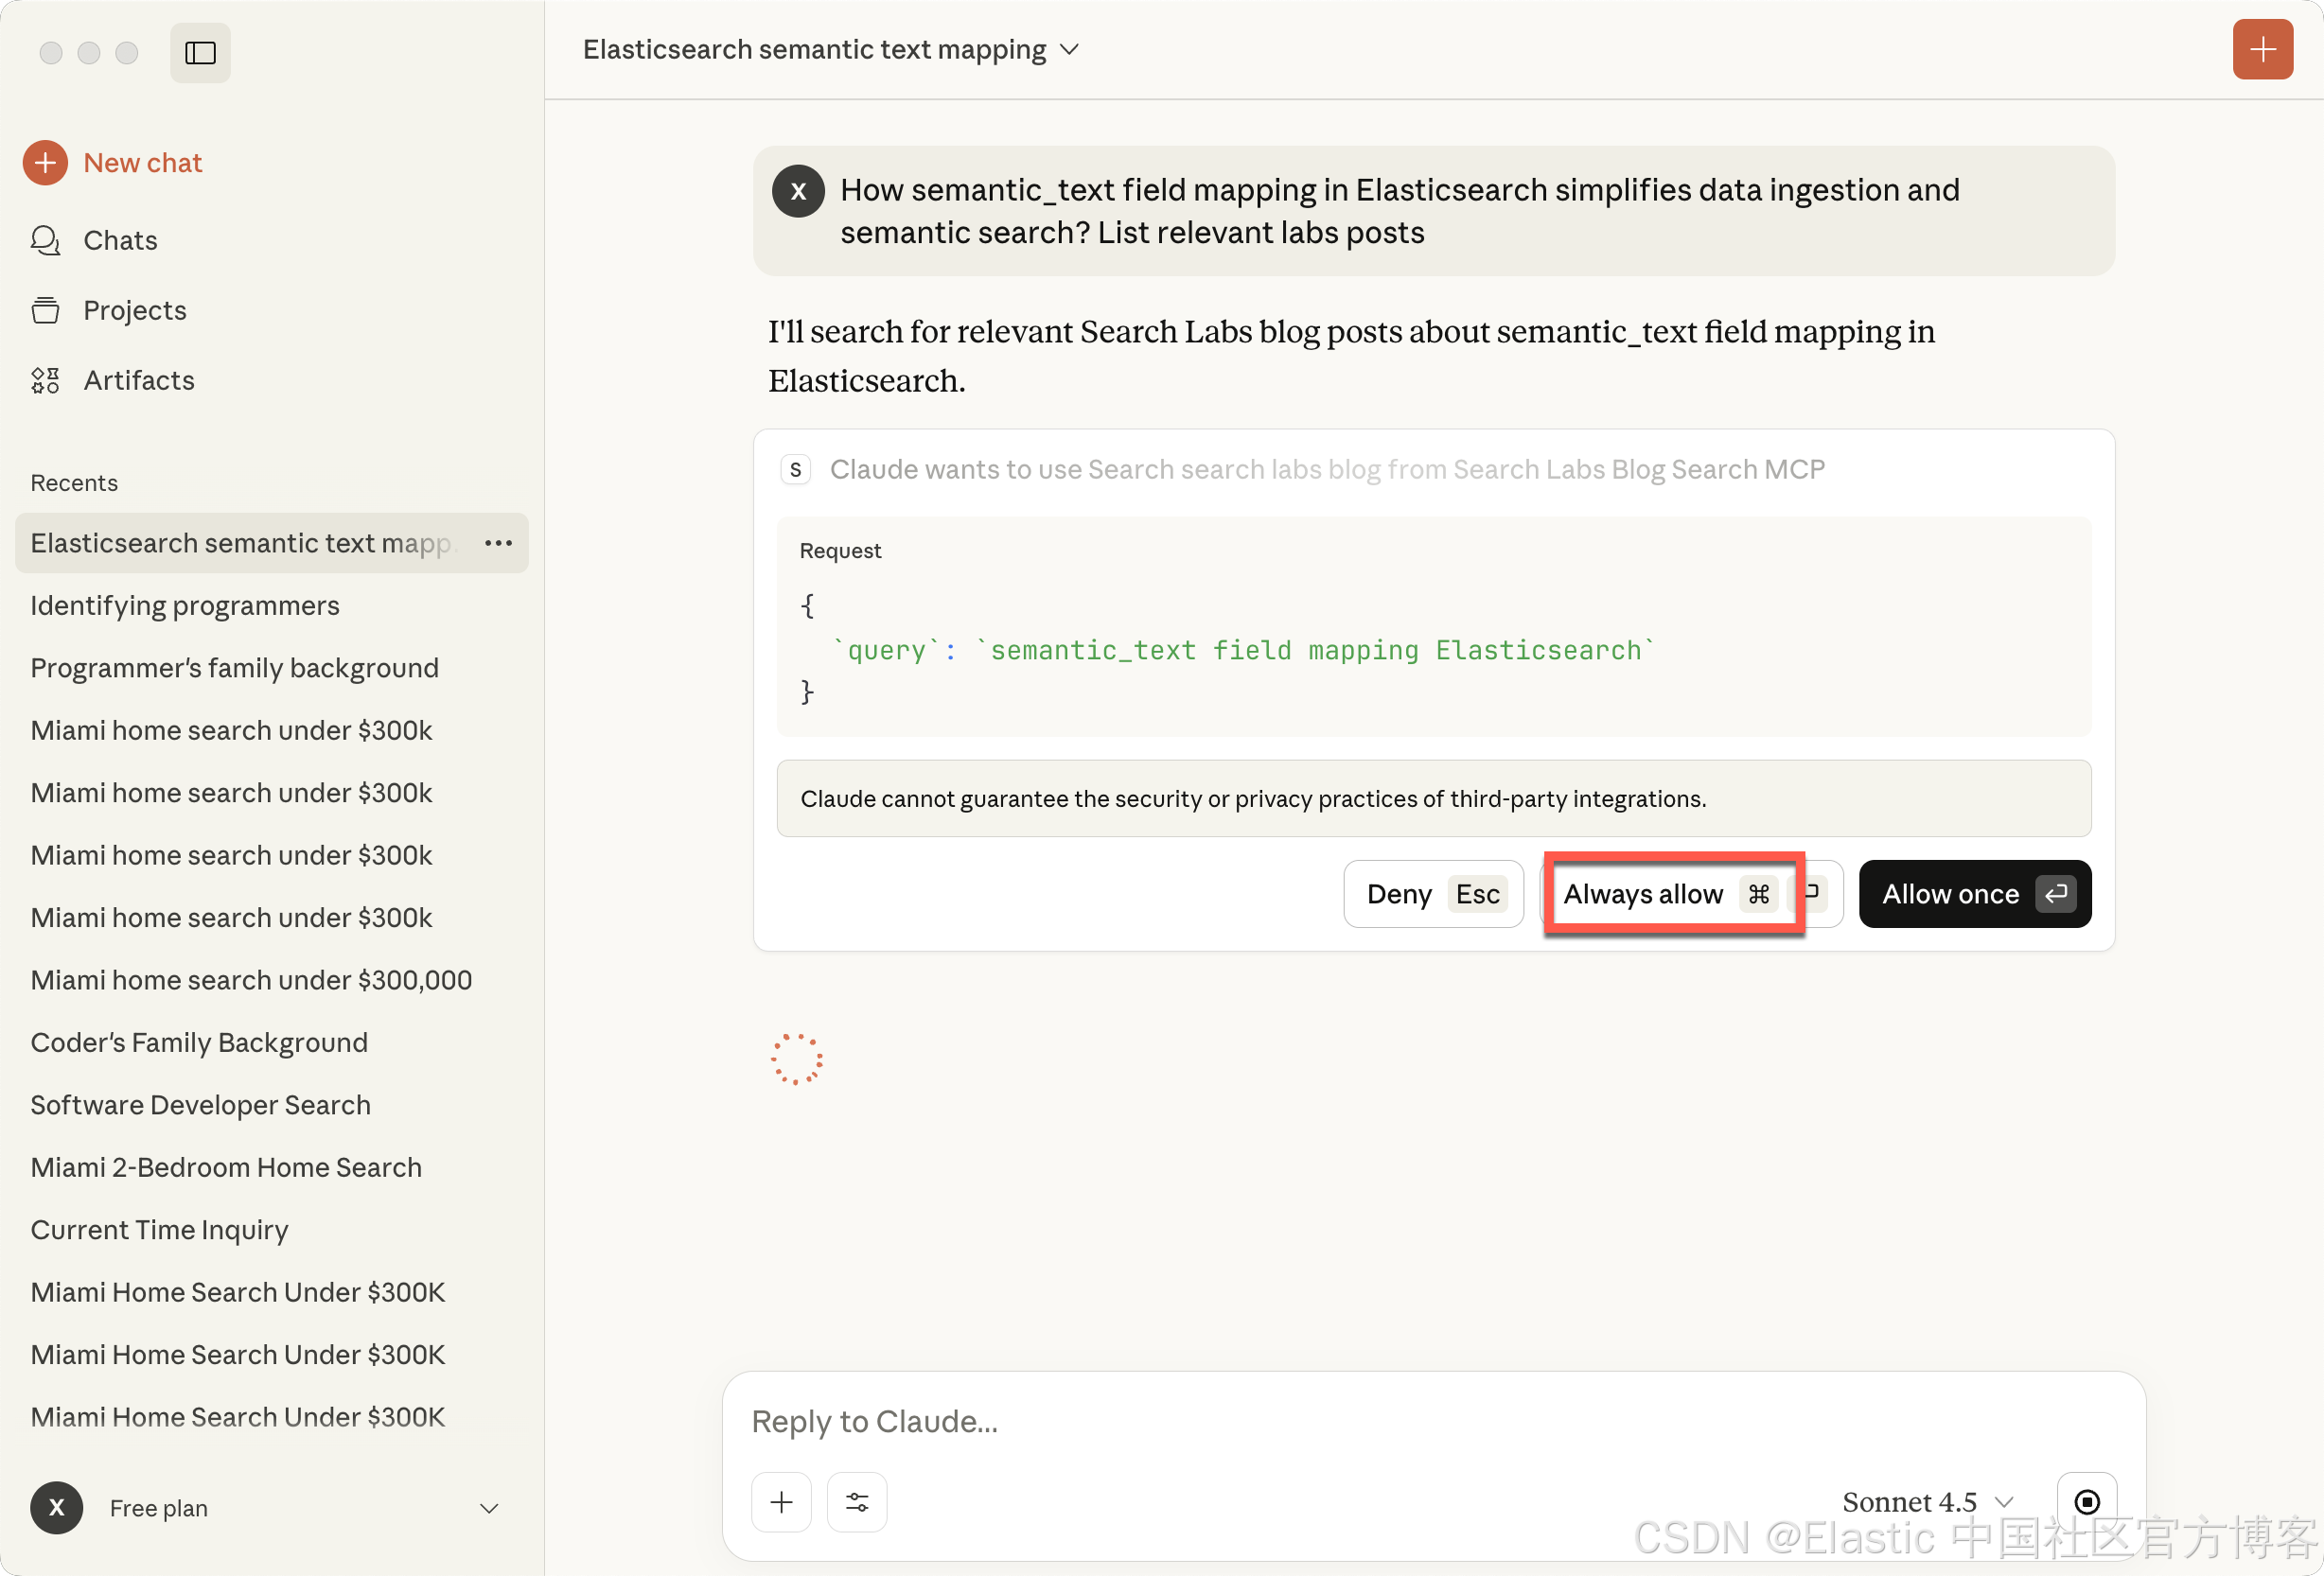
这只是一个起点。我们可以添加更多工具,比如一个通用的 Elasticsearch 查询工具,甚至启动更多 MCP 服务器来暴露额外的功能。真正的力量来自于把它们编排在一起。
更多推荐

 9
9 0
0- 0


 已为社区贡献9条内容

所有评论(0)