字节开源:UI-TARS多模态AI重塑GUI自动化
ui-tars/sdk是一个功能强大的跨平台(任何设备/平台)工具包,用于构建GUI自动化代理。它提供了一个灵活的框架来创建可以通过各种运算符与图形用户界面交互的代理。它支持在Node.js和Web浏览器上运行输入UI-TARS模型服务配置(baseURL、apiKey、Model),然后可以使用CLI控制计算机。代理执行过程。
引言
传统UI测试工具在面对动态界面、跨平台适配、复杂交互场景时往往力不从心。字节跳动开源的UI-TARS(UI Testing and Reasoning System)通过融合多模态感知、系统化推理和自动化执行能力,正在重塑GUI自动化测试领域的技术范式。
环境准备与安装部署
系统要求
- 操作系统:支持macOS(10.15+)、Windows(10/11)及Linux主流发行版
- 依赖环境:
- Node.js ≥16.0(推荐LTS版本)
- Python ≥3.8(用于部分插件开发)
- Git(用于代码克隆与版本管理)
- 硬件建议:
- 本地部署需NVIDIA GPU支持(推荐RTX 3090/A100级别)
- 云端部署支持CPU/GPU实例(推荐AWS g4dn系列)
安装步骤
方式一:本地部署
# 克隆仓库
git clone https://github.com/bytedance/UI-TARS-desktop.git
cd UI-TARS-desktop

# 安装依赖
npm install

# 构建项目
npm run build

# 启动应用
npm run start
方式二:云端部署
-
访问Hugging Face模型库选择预训练模型
-
创建Inference Endpoint:
huggingface-cli login huggingface-cli endpoint create --model bytedance-research/UI-TARS-72B-DPO -
获取API密钥并配置到本地环境变量:
export HF_API_KEY='your_api_key_here'
macOS安全设置:
# 若出现"应用已损坏"提示
sudo xattr -dr com.apple.quarantine /Applications/UI\ TARS.app
核心功能
多模态感知引擎
| 感知维度 | 技术实现 | 典型场景 |
|---|---|---|
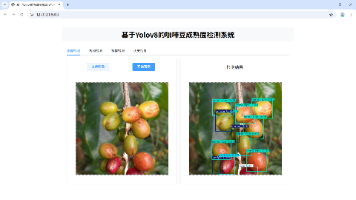
| 视觉理解 | 基于YOLOv8的像素级元素解析 | 动态分辨率下的元素定位(精度>98%) |
| 语义解析 | UI-XRay技术转化DOM-Lite结构树 | 跨平台界面元素映射(Android/iOS/Web) |
| 交互逻辑 | 强化学习虚拟用户模型 | 模拟21类用户操作模式(滑动/长按/拖拽) |
| 上下文感知 | 场景图谱运行时建模 | 动态感知网络状态、设备性能等50+环境变量 |
实战案例:在某短视频App测试中,通过时空注意力机制在720p-4K分辨率动态调整时,元素定位精度较传统方案提升3倍。
自进化测试策略
- 需求理解模块:将自然语言需求转化为AST抽象语法树
- 路径规划算法:结合蒙特卡洛树搜索与符号执行技术,覆盖率提升47%
- 异常预测网络:通过历史缺陷模式分析,提前拦截88.6%潜在缺陷
系统化推理能力
- 多步任务分解:支持15+步复杂操作链
- 反思思维机制:通过
call_user()指令请求人工干预 - 里程碑识别:自动划分任务阶段并生成检查点
SDK介绍
@ui-tars/sdk是一个功能强大的跨平台(任何设备/平台)工具包,用于构建GUI自动化代理。
它提供了一个灵活的框架来创建可以通过各种运算符与图形用户界面交互的代理。它支持在Node.js和Web浏览器上运行
npx @ui-tars/cli start
输入UI-TARS模型服务配置(baseURL、apiKey、Model),然后可以使用CLI控制计算机。
代理执行过程
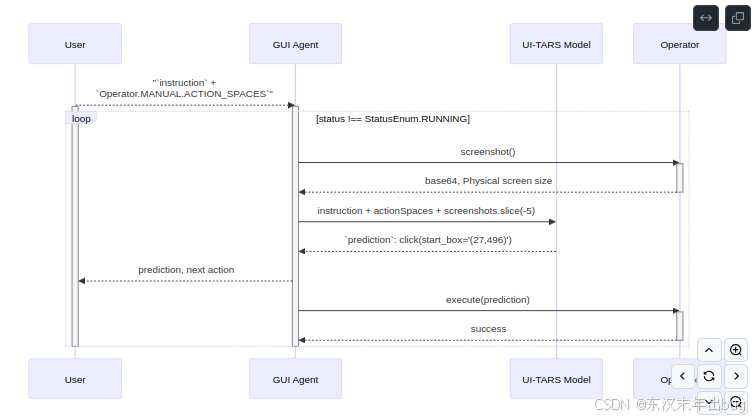
基本用法
基本用法主要来源于package@ui-tars/sdk,下面是一个使用sdk的基本示例:
import { GUIAgent } from '@ui-tars/sdk';
import { NutJSOperator } from '@ui-tars/operator-nut-js';

const guiAgent = new GUIAgent({
  model: {
    baseURL: config.baseURL,
    apiKey: config.apiKey,
    model: config.model,
  },
  operator: new NutJSOperator(),
  onData: ({ data }) => {
    console.log(data)
  },
  onError: ({ data, error }) => {
    console.error(error, data);
  },
});

await guiAgent.run('send "hello world" to x.com');
处理中止信号
可以通过向GUIAgent信号选项传递AbortSignal来中止代理。
const abortController = new AbortController();

const guiAgent = new GUIAgent({
  // ... other config
  signal: abortController.signal,
});

// ctrl/cmd + c to cancel operation
process.on('SIGINT', () => {
  abortController.abort();
});
配置选项
GUI Agent构造函数接受以下配置选项:
- model:模型配置(与OpenAI兼容的API)或自定义模型实例
- baseURL: API端点URL
- apiKey:API身份验证密钥
- model:要使用的模型名称
- operator:实现所需接口的运算符类的实例
- signal:取消操作的AbortController信号
- onData:用于接收代理数据/状态更新的回调
- data.conversions是一个对象数组,重要提示:它是增量,而不是整个对话历史,每个对象都包含:
- from:消息的角色,可以是以下之一:
- human:人类信息
- gpt:代理响应
- screenshotBase64:屏幕截图base64
- value:消息的内容
- from:消息的角色,可以是以下之一:
- data.status是代理的当前状态,它可以是以下之一:
- StatusEnum.INIT:初始状态
- StatusEnum.RUNNING:代理正在积极执行
- StatusEnum.END:操作完成
- StatusEnum.MAX_LOOP:已达到最大循环计数
- data.conversions是一个对象数组,重要提示:它是增量,而不是整个对话历史,每个对象都包含:
- onError:用于错误处理的回调
- systemPrompt:可选的自定义系统提示
- maxLoopCount:交互循环的最大数量(默认值:25)
高级用法
Operator接口
在实现自定义运算符时,需要实现两个核心方法:screenshot()和execute()。
npm init创建一个Operator,配置如下:
{
  "name": "your-operator-tool",
  "version": "1.0.0",
  "main": "./dist/index.js",
  "module": "./dist/index.mjs",
  "types": "./dist/index.d.ts",
  "scripts": {
    "dev": "rslib build --watch",
    "prepare": "npm run build",
    "build": "rsbuild",
    "test": "vitest"
  },
  "files": [
    "dist"
  ],
  "publishConfig": {
    "access": "public",
    "registry": "https://registry.npmjs.org"
  },
  "dependencies": {
    "jimp": "^1.6.0"
  },
  "peerDependencies": {
    "@ui-tars/sdk": "^1.2.0-beta.17"
  },
  "devDependencies": {
    "@ui-tars/sdk": "^1.2.0-beta.17",
    "@rslib/core": "^0.5.4",
    "typescript": "^5.7.2",
    "vitest": "^3.0.2"
  }
}
screenshot()
此方法捕获当前屏幕状态并返回 ScreenshotOutput:
interface ScreenshotOutput {
  // Base64 encoded image string
  base64: string;
  // Device pixel ratio (DPR)
  scaleFactor: number;
}
execute()
此方法基于模型预测执行操作。接收一个ExecuteParams对象:
interface ExecuteParams {
  /** Raw prediction string from the model */
  prediction: string;
  /** Parsed prediction object */
  parsedPrediction: {
    action_type: string;
    action_inputs: Record<string, any>;
    reflection: string | null;
    thought: string;
  };
  /** Device Physical Resolution */
  screenWidth: number;
  /** Device Physical Resolution */
  screenHeight: number;
  /** Device DPR */
  scaleFactor: number;
  /** model coordinates scaling factor [widthFactor, heightFactor] */
  factors: Factors;
}
高级sdk用法主要来自包@ui-tars/sdk/core,可以通过扩展基本的Operator类来创建自定义运算符:
import {
  Operator,
  type ScreenshotOutput,
  type ExecuteParams
  type ExecuteOutput,
} from '@ui-tars/sdk/core';
import { Jimp } from 'jimp';

export class CustomOperator extends Operator {
  // Define the action spaces and description for UI-TARS System Prompt splice
  static MANUAL = {
    ACTION_SPACES: [
      'click(start_box="") # click on the element at the specified coordinates',
      'type(content="") # type the specified content into the current input field',
      'scroll(direction="") # scroll the page in the specified direction',
      'finished() # finish the task',
      // ...more_actions
    ],
  };

  public async screenshot(): Promise<ScreenshotOutput> {
    // Implement screenshot functionality
    const base64 = 'base64-encoded-image';
    const buffer = Buffer.from(base64, 'base64');
    const image = await sharp(buffer).toBuffer();

    return {
      base64: 'base64-encoded-image',
      scaleFactor: 1
    };
  }

  async execute(params: ExecuteParams): Promise<ExecuteOutput> {
    const { parsedPrediction, screenWidth, screenHeight, scaleFactor } = params;
    // Implement action execution logic

    // if click action, get coordinates from parsedPrediction
    const [startX, startY] = parsedPrediction?.action_inputs?.start_coords || '';

    if (parsedPrediction?.action_type === 'finished') {
      // finish the GUIAgent task
      return { status: StatusEnum.END };
    }
  }
}
所需方法:
screenshot():捕获当前屏幕状态execute():根据模型预测执行请求的操作
可选静态属性:
MANUAL:定义UI-TARS模型理解的动作空间和描述ACTION_SPACES:定义UI-TARS模型理解的动作空间和描述
加载到 GUIAgent:
const guiAgent = new GUIAgent({
  // ... other config
  systemPrompt: `
  // ... other system prompt
  ${CustomOperator.MANUAL.ACTION_SPACES.join('\n')}
  `,
  operator: new CustomOperator(),
});
自定义模型实现
可以通过扩展UITarsModel类来实现自定义模型:
class CustomUITarsModel extends UITarsModel {
  constructor(modelConfig: { model: string }) {
    super(modelConfig);
  }

  async invoke(params: any) {
    // Implement custom model logic
    return {
      prediction: 'action description',
      parsedPredictions: [{
        action_type: 'click',
        action_inputs: { /* ... */ },
        reflection: null,
        thought: 'reasoning'
      }]
    };
  }
}

const agent = new GUIAgent({
  model: new CustomUITarsModel({ model: 'custom-model' }),
  // ... other config
});
注意:但是,不建议实现自定义模型,因为它包含大量数据处理逻辑(包括图像转换、缩放因子等)。
规划过程
可以通过组合规划/推理模型(如OpenAI-o1、DeepSeek-R1)来实现用于规划、推理和执行的复杂GUIAgent逻辑:
const guiAgent = new GUIAgent({
  // ... other config
});

const planningList = await reasoningModel.invoke({
  conversations: [
    {
      role: 'user',
      content: 'buy a ticket from beijing to shanghai',
    }
  ]
})
/**
 * [
 *  'open chrome',
 *  'open trip.com',
 *  'click "search" button',
 *  'select "beijing" in "from" input',
 *  'select "shanghai" in "to" input',
 *  'click "search" button',
 * ]
 */

for (const planning of planningList) {
  await guiAgent.run(planning);
}

纵情码海钱塘涌,杭州开发者创新动! 属于杭州的开发者社区!致力于为杭州地区的开发者提供学习、合作和成长的机会;同时也为企业交流招聘提供舞台!
更多推荐

 7
7 0
0- 0


 已为社区贡献1条内容

所有评论(0)