
Elastic AI agent builder 介绍
本文介绍了Elastic AI Agent Builder的功能,这是一个即将在9.2版本发布的新特性,用于简化AI agent的创建过程。通过示例展示了如何构建不同功能的agent,包括查询特定职业人员、计算年龄平均值以及关联查询父母信息等。文章详细说明了从创建索引、定义工具到构建agent的完整流程,并演示了中英文查询效果。与传统RAG相比,这种agentic RAG可以访问多个服务,进行多步

最近在我的博客里发布了两篇关于 Elastic AI agent builder 文章:
可能很多开发者阅读后还是有一点懵。不知道它到底是什么东西。这是一个目前在 Serverless 里发布的一个功能。在未来的 9.2 版本中也会有这样的一个功能。它的目的是让我们更加方便地创建 AI agents。
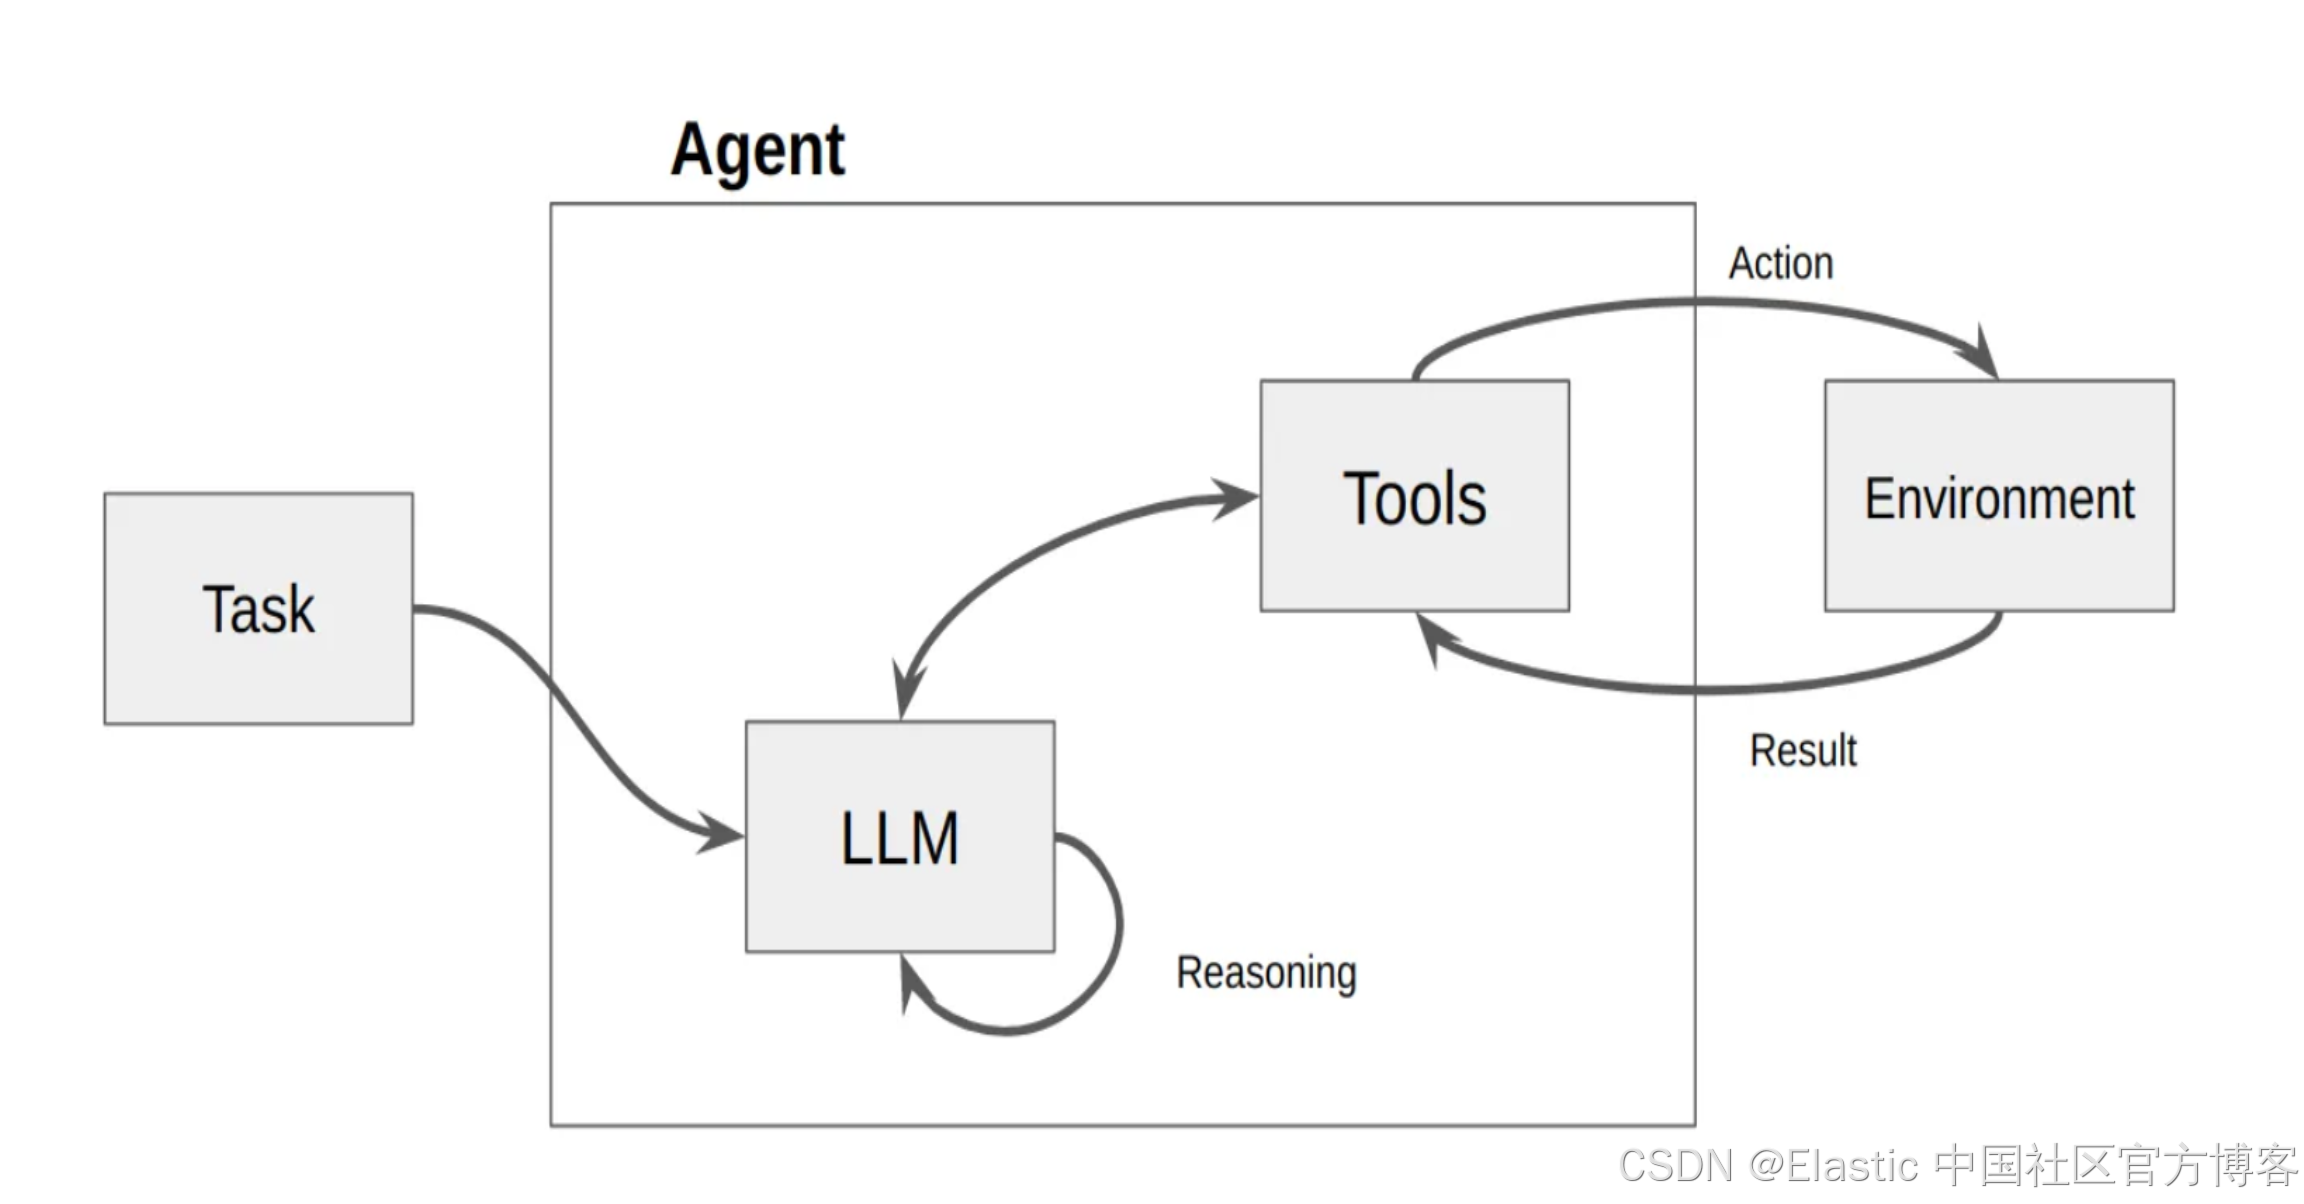
如上所示,AI agents 由 LLM 及 Tools 组成。当我们向 agent 发送一个任务时,LLM 会根据 task 里的提示,匹配相应的 tools,并进行调用。这个 task 可能需要多个工具,多个步骤,逐步完成,并最终返回结果。这个和我们传统的 RAG 有所不同。传统的 RAG 只访问一次 LLM。而对于由 agent 组成的 RAG,我们也通常称之为 agentic RAG。它可以访问多个服务(比如返回天气,位置,日历等等),数据库(数据库的多个表格的访问,聚合,lookup 等),多次使用 LLM 进行推理,并生成相应的图表及结果等。
在今天的文章中,我们将一个一个简单而浅显的例子来展示 AI agent builder 的强大功能。AI agent builder 是基于 one-chat plugin 来完成的。
Elastic AI Agent builder
安装
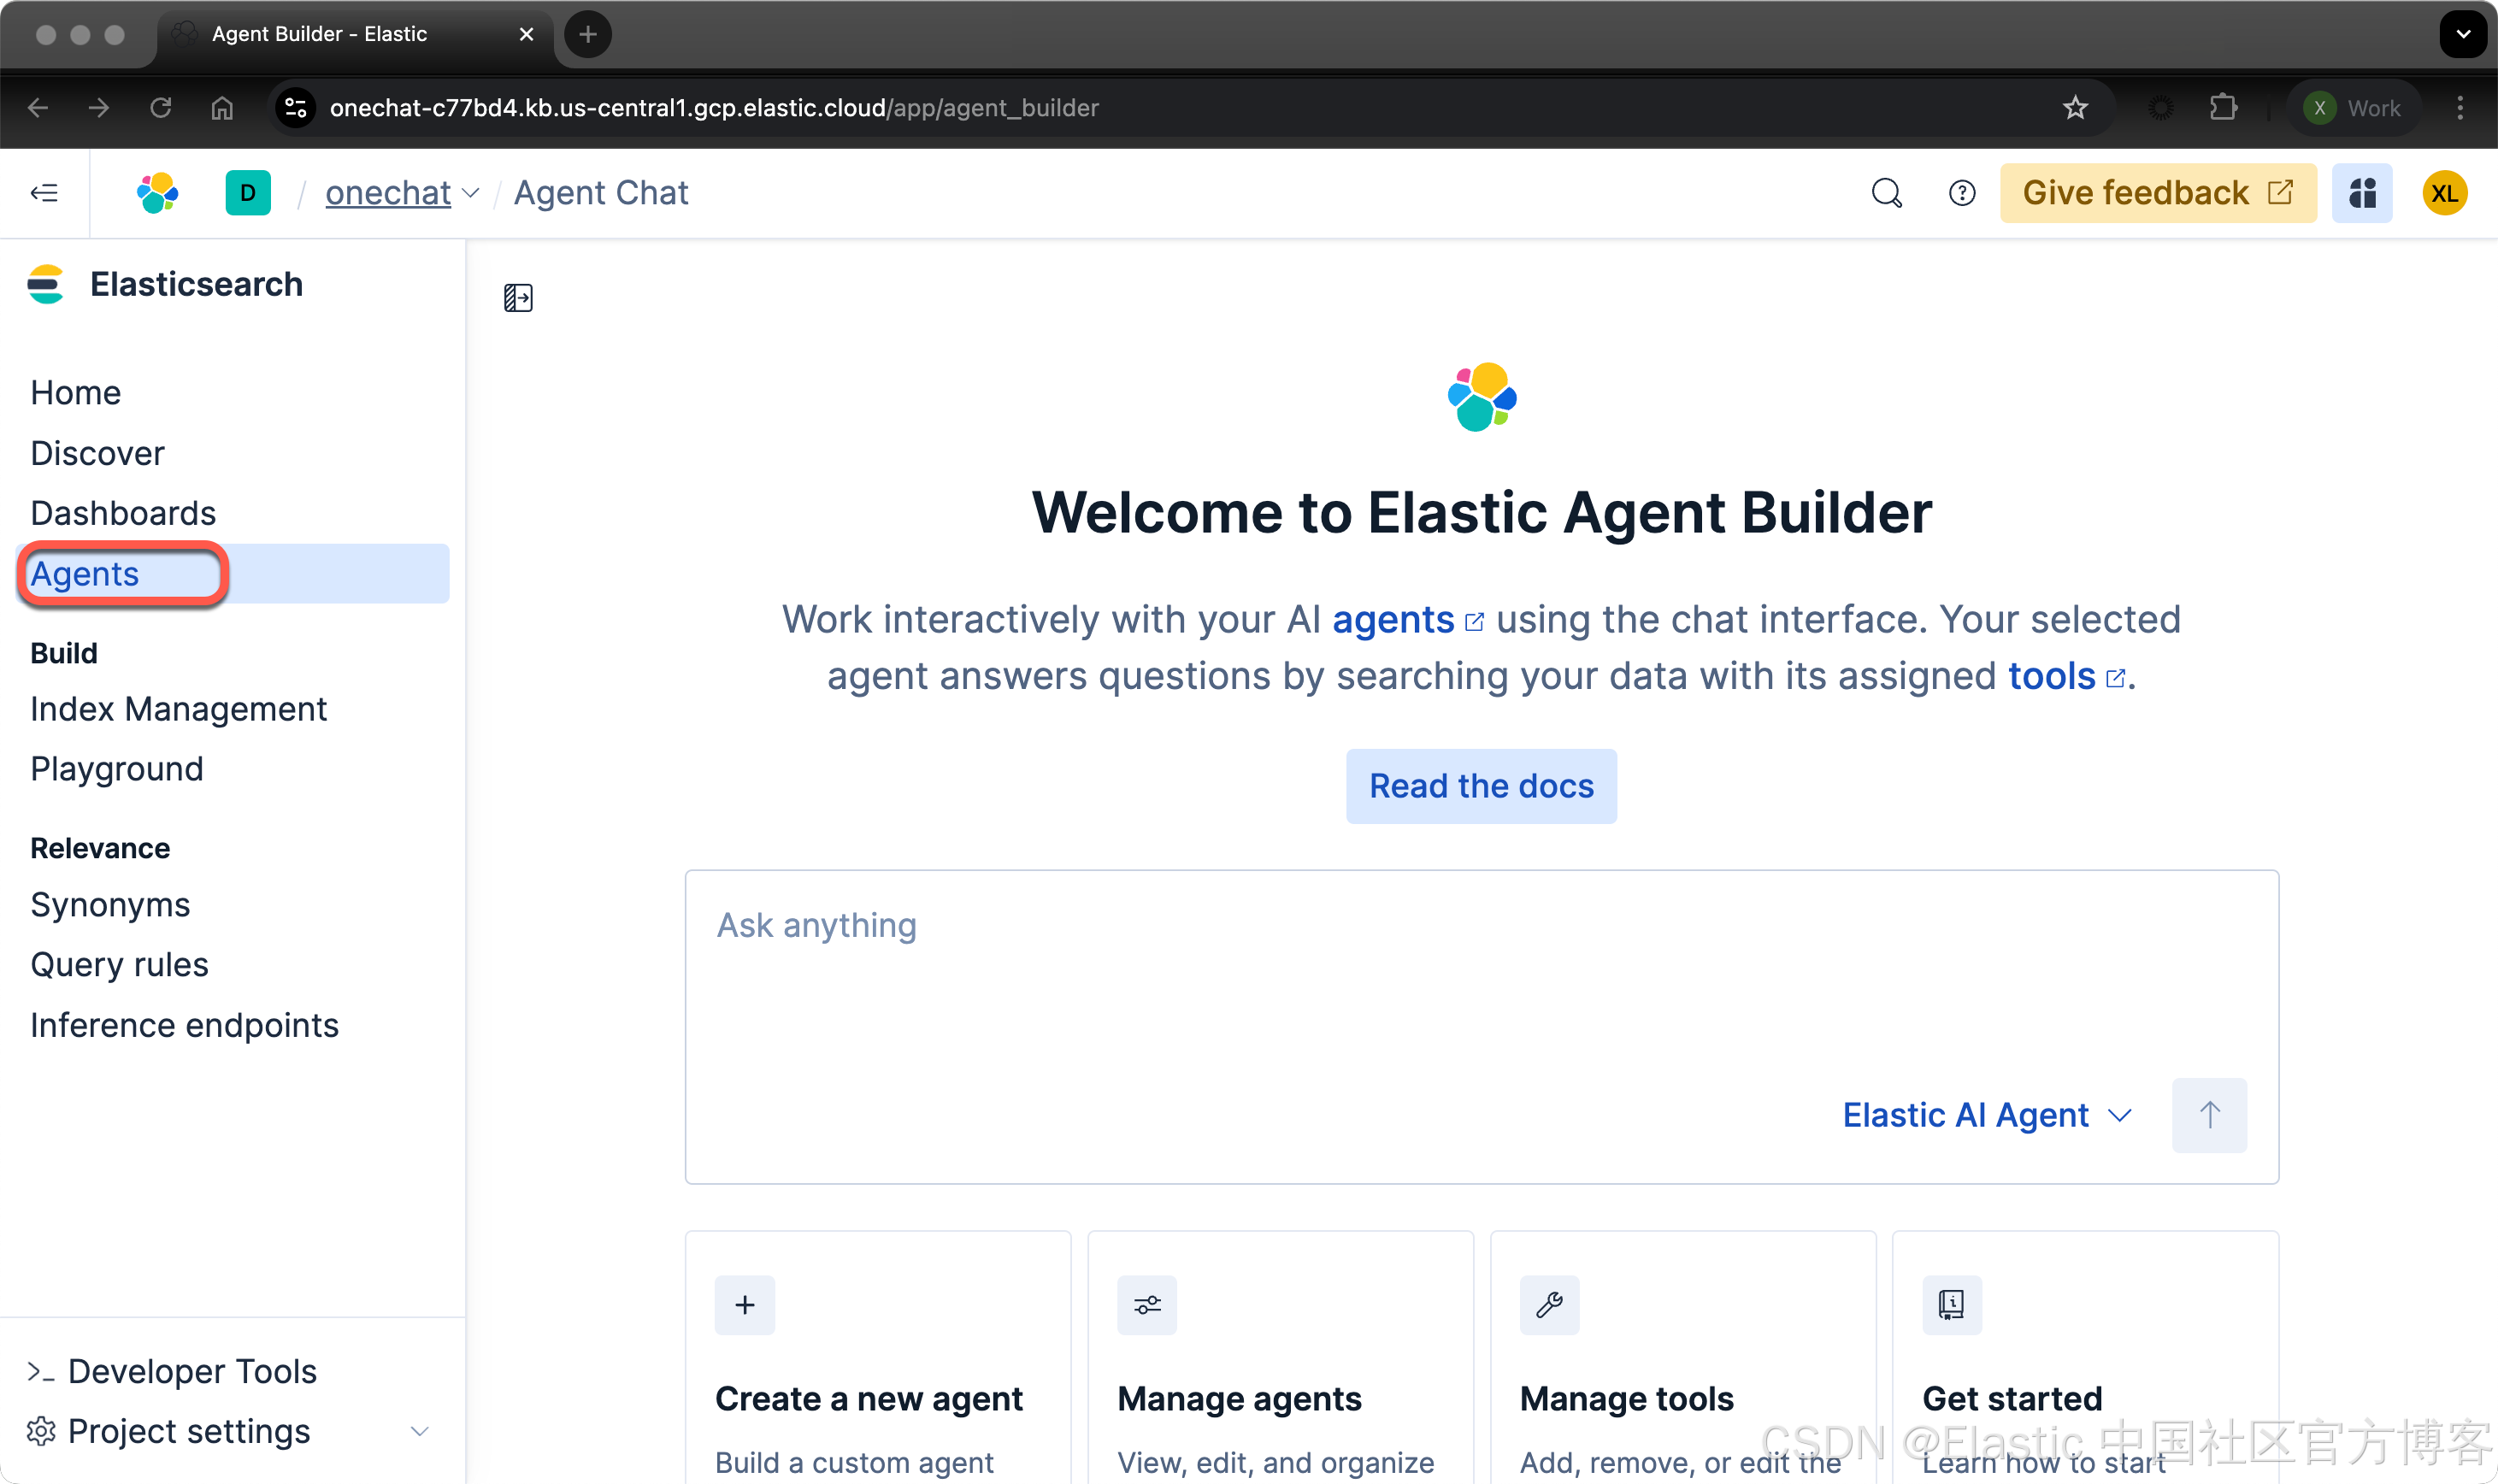
你可以在 Elastic clould 里直接创建一个实例来进行测试。你也可使用 Elastic Stack 9.2 的 snapshot 版本进行安装来进行测试。UI 在不断地演进。各个版本的界面可能有所不同,但是最主要的功能还是一样的。在 Serverless 上的界面如下:
如果由于某种原因,你不能看到 Agents 这个菜单,那么你可以运行如下的两个命令:
POST kbn://internal/kibana/settings
{
   "changes": {
      "agentBuilder:enabled": true
   }
}

POST kbn://internal/kibana/settings
{
   "changes": {
      "onechat:mcp:enabled": true,
      "onechat:a2a:enabled": true,
      "onechat:api:enabled": true,
      "onechat:ui:enabled": true
   }
}
同时,为了能够支持语义搜索,我们也需要下载 ELSER 模型:
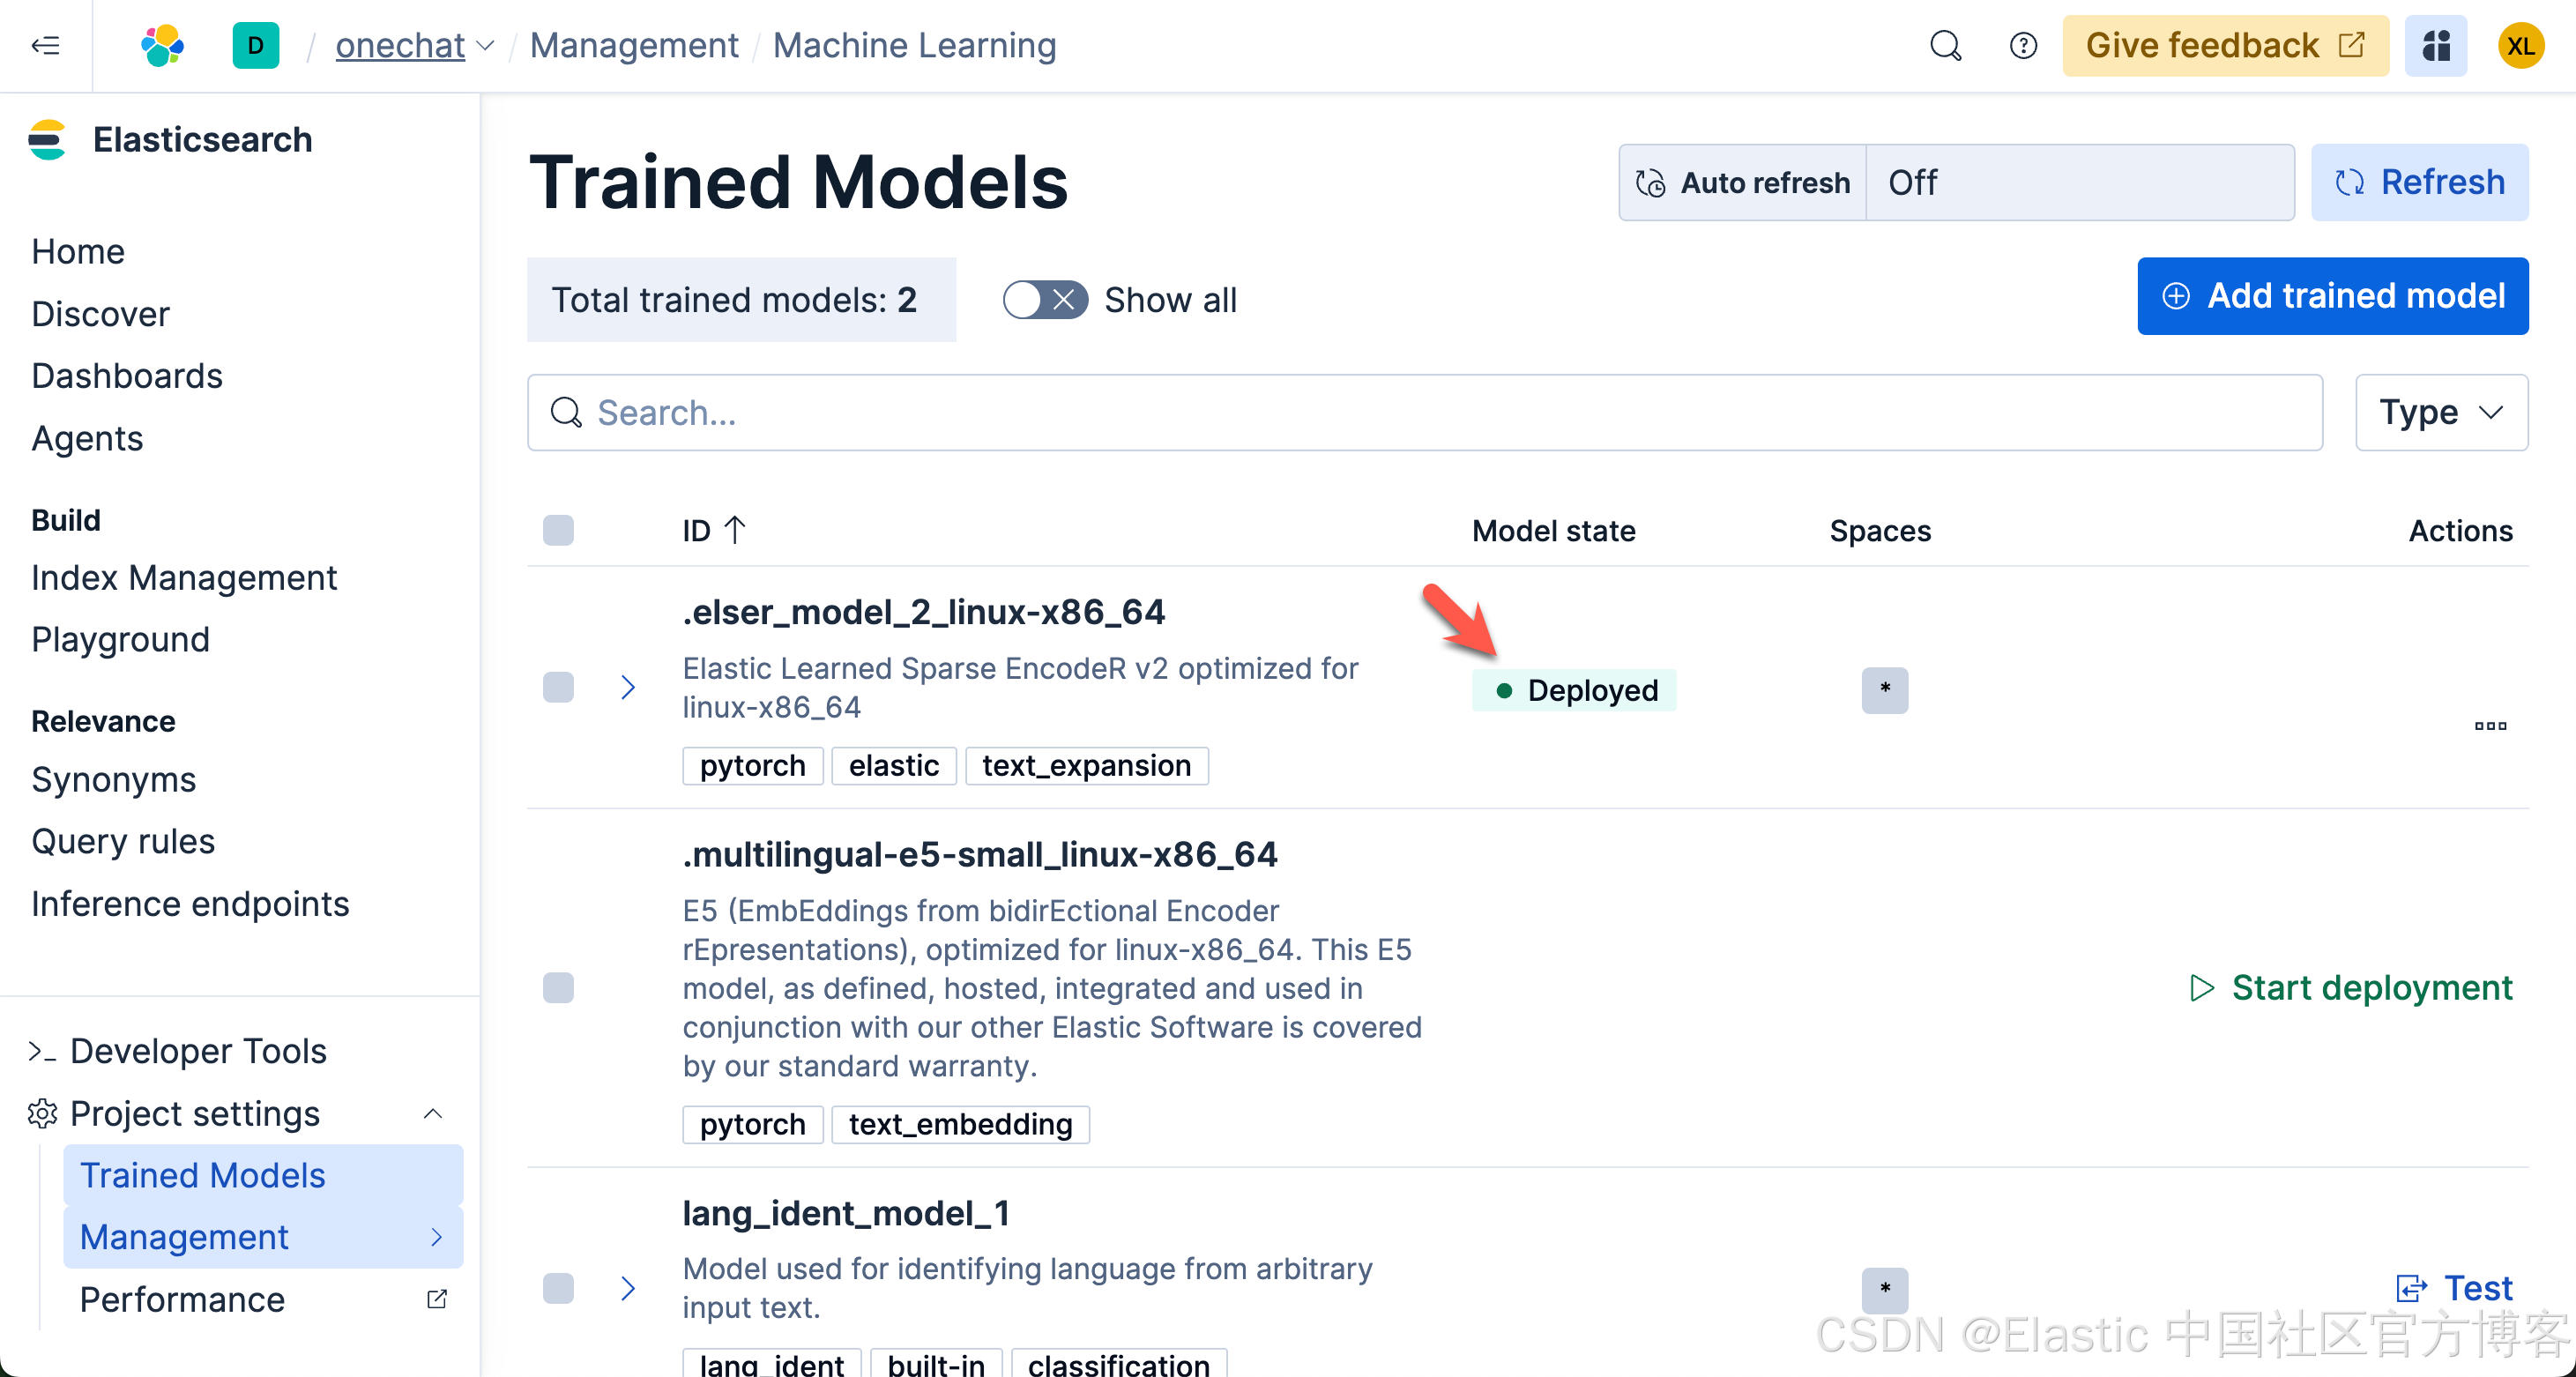
请注意,由于 ELSER 模型目前只支持英文,对于使用中文的开发者来说,你可以选择上面的 .multilingual-e5-small_linux-x86_64 模型。
准备数据
我们的数据不用多复杂。为了展示的方便,我们使用较少的数据及简单的数据集来进行展示。这样大家能看得更加清楚一些。我们在 Kibana 中的 Dev Tools 打入如下的命令:
PUT /people
{
  "mappings": {
    "properties": {
      "id": {
        "type": "integer"
      },
      "name": {
        "type": "text"
      },
      "description": {
        "type": "text",
        "copy_to": "des_semantic"
      },
      "des_semantic": {
        "type": "semantic_text"
      },
      "sex": {
        "type": "keyword"
      },
      "age": {
        "type": "integer"
      },
      "address": {
        "type": "text"
      },
      "location": {
        "type": "geo_point"
      }
    }
  }
}
POST /_bulk
{ "index" : { "_index" : "people", "_id" : "1" } }
{ "id": 1, "name" : "John Doe", "description" : "A software developer", "sex" : "Male", "age" : 30, "address" : "123 Elm Street, Springfield", "location": {"lat": 37.7749, "lon": -122.4194} }
{ "index" : { "_index" : "people", "_id" : "2" } }
{ "id": 2, "name" : "Jane Smith", "description" : "A project manager", "sex" : "Female", "age" : 28, "address" : "456 Maple Avenue, Anytown", "location": {"lat": 40.7128, "lon": -74.0060} }
{ "index" : { "_index" : "people", "_id" : "3" } }
{ "id": 3, "name" : "Alice Johnson", "description" : "A graphic designer", "sex" : "Female", "age" : 26, "address" : "789 Oak Lane, Metropolis", "location": {"lat": 34.0522, "lon": -118.2437} }
{ "index" : { "_index" : "people", "_id" : "4" } }
{ "id": 4, "name" : "Bob Brown", "description" : "A marketing specialist", "sex" : "Male", "age" : 32, "address" : "321 Pine Street, Gotham", "location": {"lat": 41.8781, "lon": -87.6298} }
{ "index" : { "_index" : "people", "_id" : "5" } }
{ "id": 5, "name" : "Charlie Davis", "description" : "An IT analyst", "sex" : "Male", "age" : 29, "address" : "654 Cedar Blvd, Star City", "location": {"lat": 29.7604, "lon": -95.3698} }
{ "index" : { "_index" : "people", "_id" : "6" } }
{ "id": 6, "name" : "Diana Prince", "description" : "A diplomat", "sex" : "Female", "age" : 35, "address" : "987 Birch Road, Themyscira", "location": {"lat": 39.9526, "lon": -75.1652} }
{ "index" : { "_index" : "people", "_id" : "7" } }
{ "id": 7, "name" : "Evan Wright", "description" : "A journalist", "sex" : "Male", "age" : 27, "address" : "213 Willow Lane, Central City", "location": {"lat": 33.4484, "lon": -112.0740} }
{ "index" : { "_index" : "people", "_id" : "8" } }
{ "id": 8, "name" : "Fiona Gallagher", "description" : "A nurse", "sex" : "Female", "age" : 31, "address" : "546 Spruce Street, South Side", "location": {"lat": 32.7157, "lon": -117.1611} }
{ "index" : { "_index" : "people", "_id" : "9" } }
{ "id": 9, "name" : "George King", "description" : "A teacher", "sex" : "Male", "age" : 34, "address" : "879 Elm St, Smallville", "location": {"lat": 39.7392, "lon": -104.9903} }
{ "index" : { "_index" : "people", "_id" : "10" } }
{ "id": 10, "name" : "Helen Parr", "description" : "A full-time superhero", "sex" : "Female", "age": 37, "address" : "123 Metro Avenue, Metroville", "location": {"lat": 47.6062, "lon": -122.3321} }
我们使用上面的命令来创建一个叫做 people 的索引。为了展示的方便,我把 description 的字段也 copy_to 到 des_semantic 字段。这个是一个 semantic_text 字段。我们可以使用它来进行语义搜索。
另外,我们也使用如下的命令来生成一个叫做 parents 的索引:
PUT parents
{
 "settings": {
   "index.mode": "lookup"
 }
}
POST /_bulk
{ "index" : { "_index" : "parents", "_id" : "1" } }
{ "id": 1, "father": "Michael Doe", "mother": "Sarah Doe" }
{ "index" : { "_index" : "parents", "_id" : "2" } }
{ "id": 2, "father": "Robert Smith", "mother": "Laura Smith" }
{ "index" : { "_index" : "parents", "_id" : "3" } }
{ "id": 3, "father": "Thomas Johnson", "mother": "Emily Johnson" }
{ "index" : { "_index" : "parents", "_id" : "4" } }
{ "id": 4, "father": "William Brown", "mother": "Nancy Brown" }
{ "index" : { "_index" : "parents", "_id" : "5" } }
{ "id": 5, "father": "David Davis", "mother": "Jennifer Davis" }
{ "index" : { "_index" : "parents", "_id" : "6" } }
{ "id": 6, "father": "Charles Prince", "mother": "Diana Prince Sr." }
{ "index" : { "_index" : "parents", "_id" : "7" } }
{ "id": 7, "father": "Edward Wright", "mother": "Linda Wright" }
{ "index" : { "_index" : "parents", "_id" : "8" } }
{ "id": 8, "father": "Frank Gallagher", "mother": "Patricia Gallagher" }
{ "index" : { "_index" : "parents", "_id" : "9" } }
{ "id": 9, "father": "George King Sr.", "mother": "Helen King" }
{ "index" : { "_index" : "parents", "_id" : "10" } }
{ "id": 10, "father": "Robert Parr", "mother": "Eliza Parr" }如上所示,我们在 people 及 parents 两个索引中都定义了一个叫做 id 的字段。我们可以使用这个字段来查询在 people 索引中的人的父母。
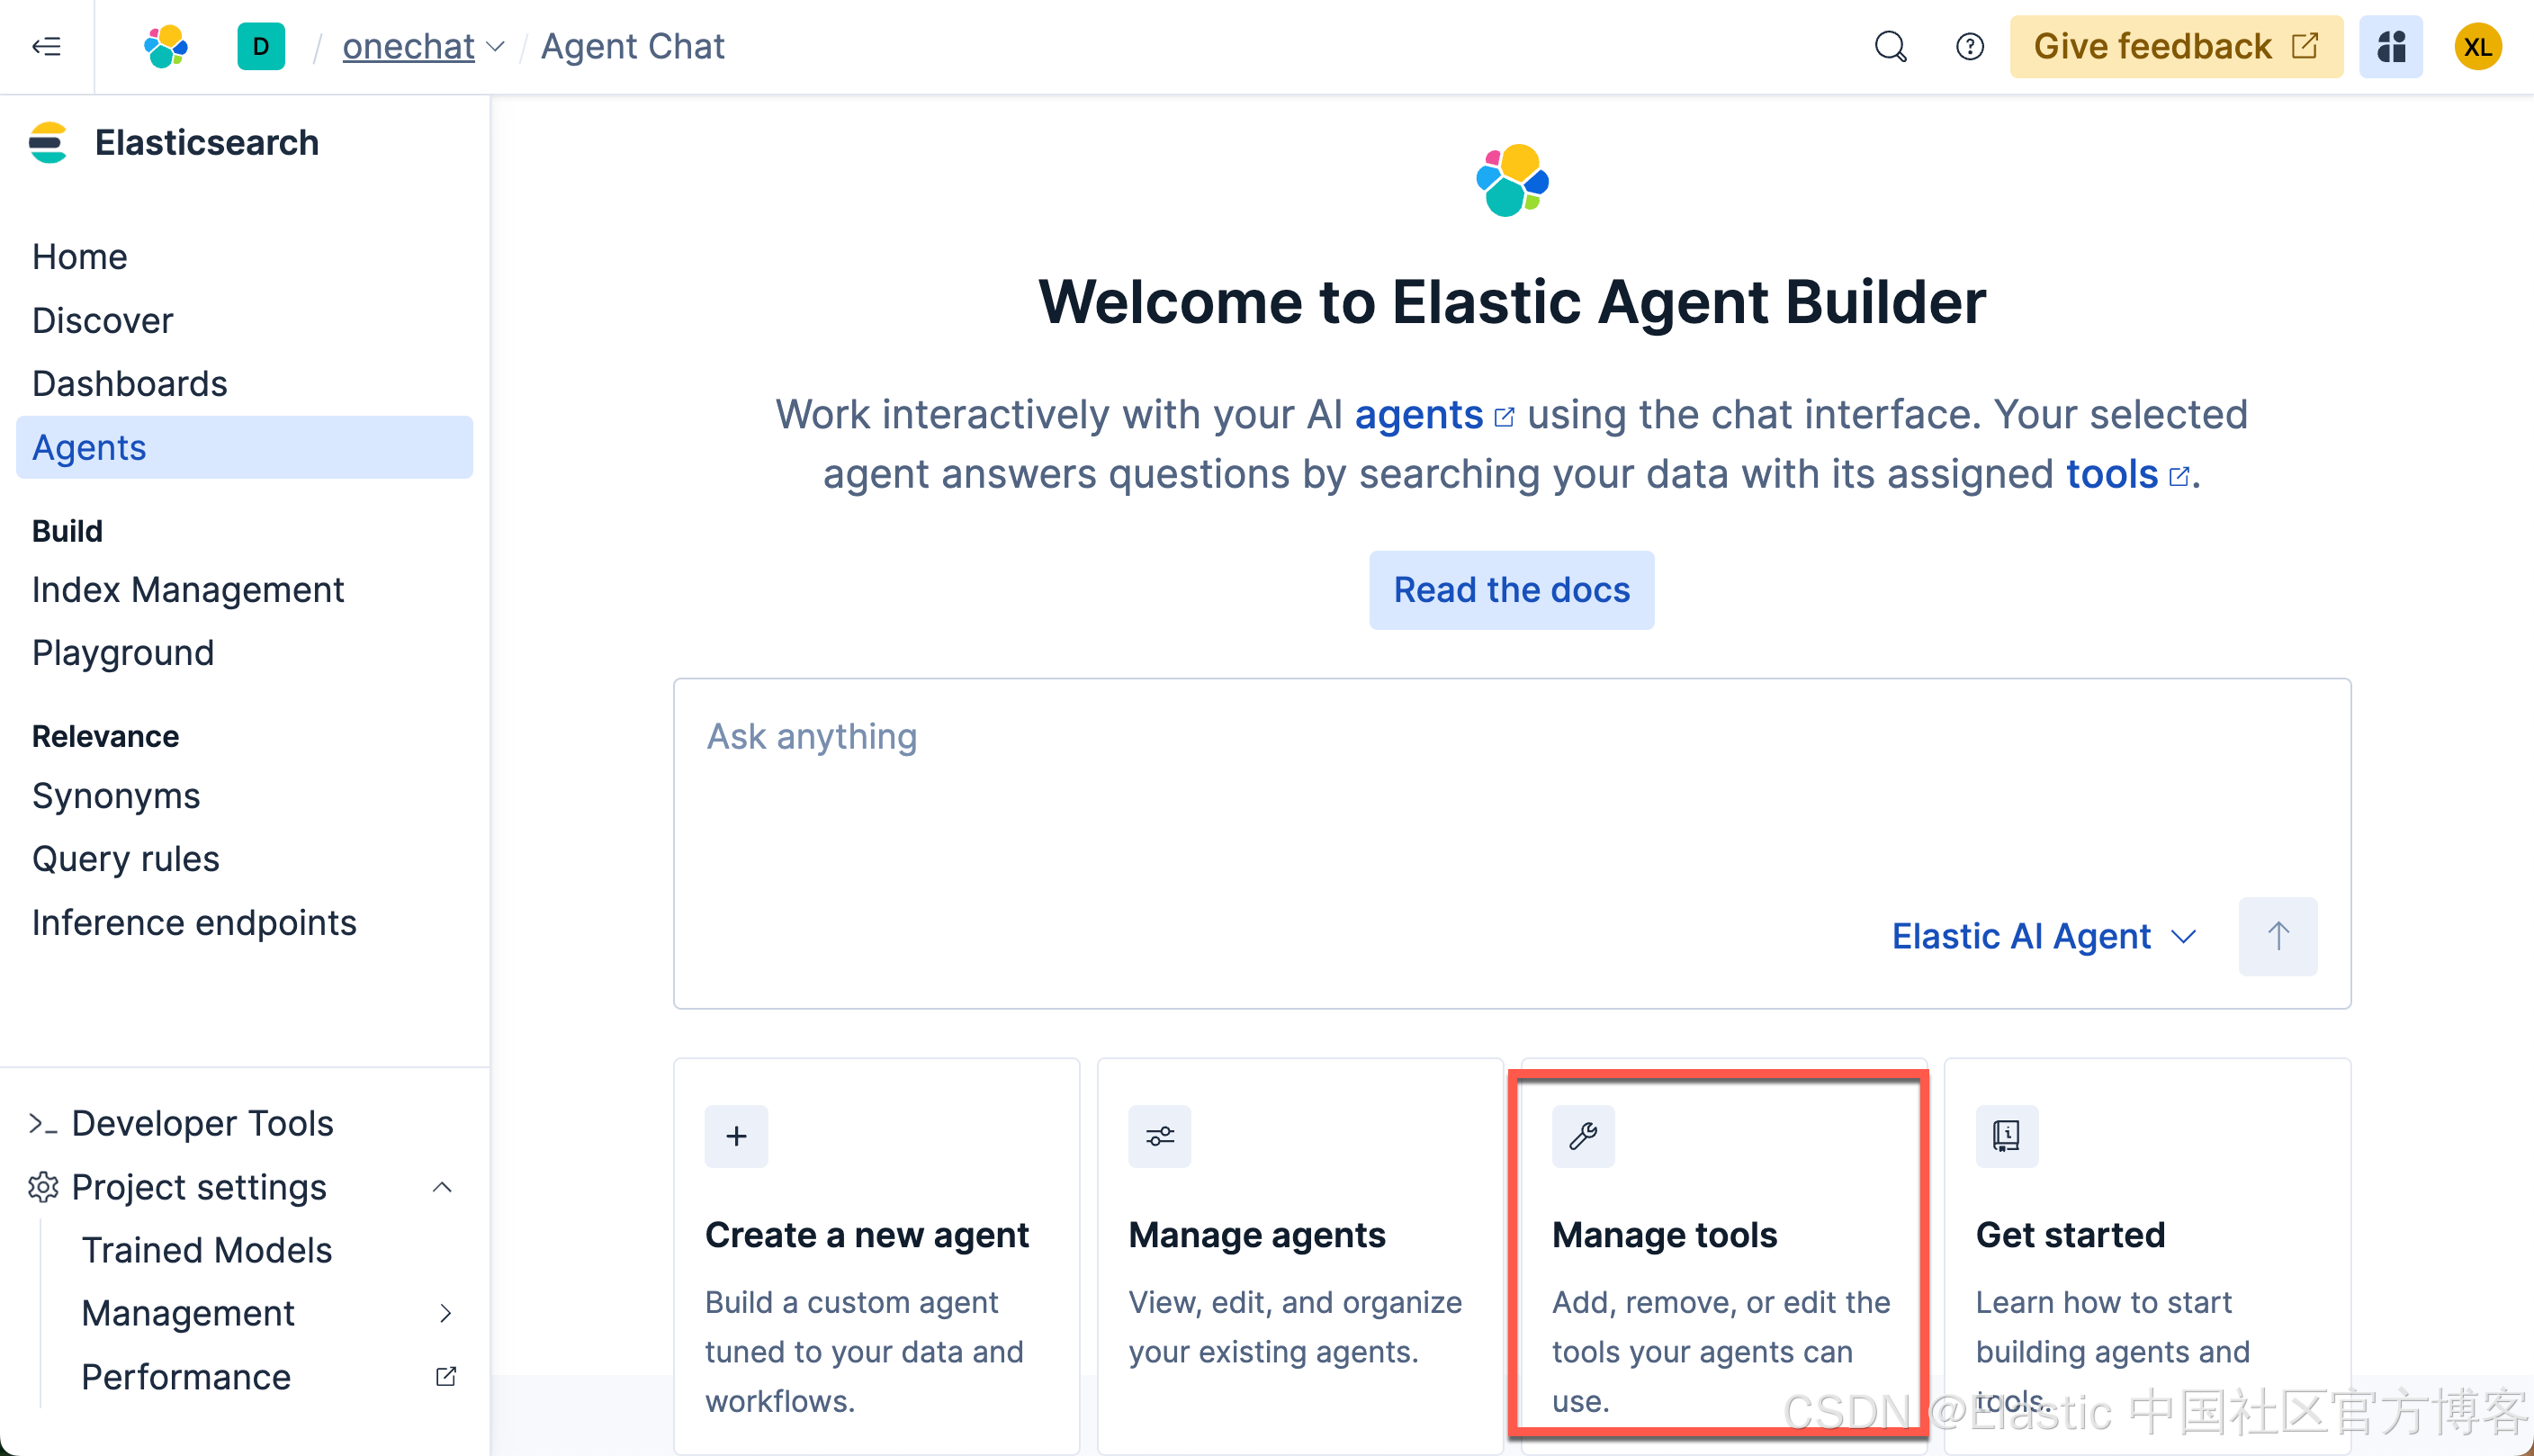
创建 agents
创建 software developers agent
接下来,我们分别来创建适合我们搜索的不同 agents。在没有任何定制 agent 的情况下,我们打入如下的查询:
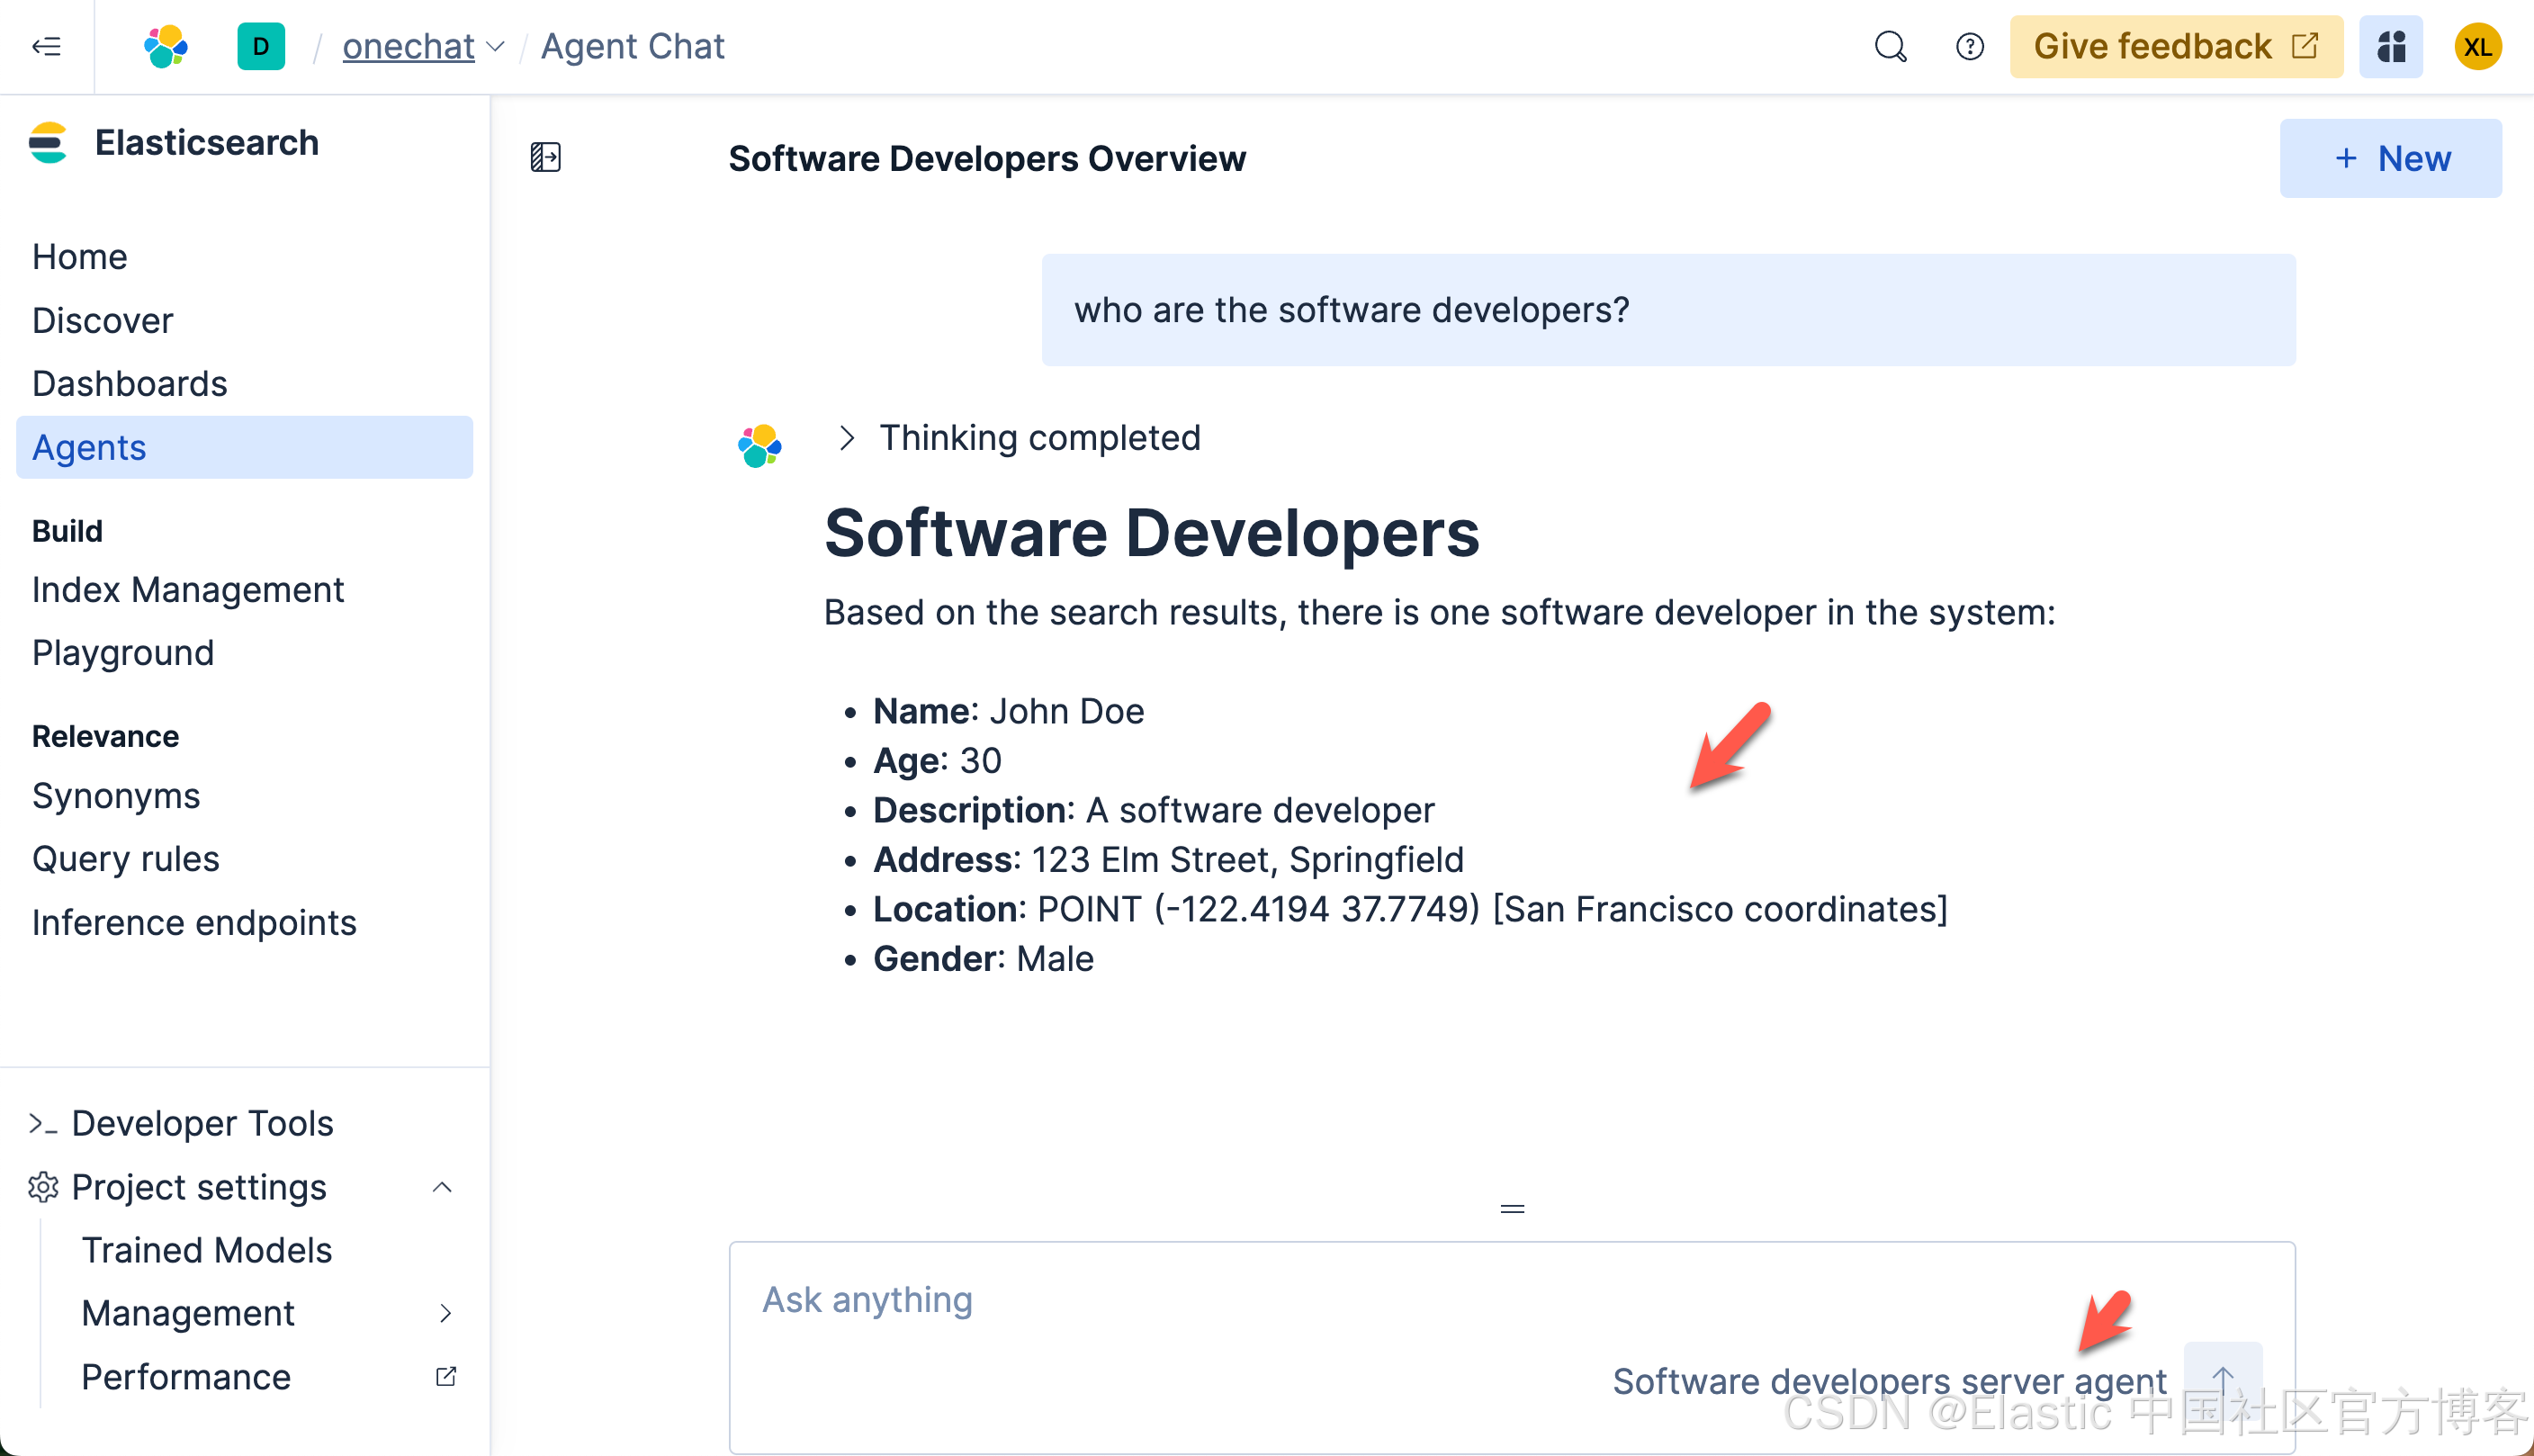
who are the software developers?我们在搜索框里输入上面的搜索:
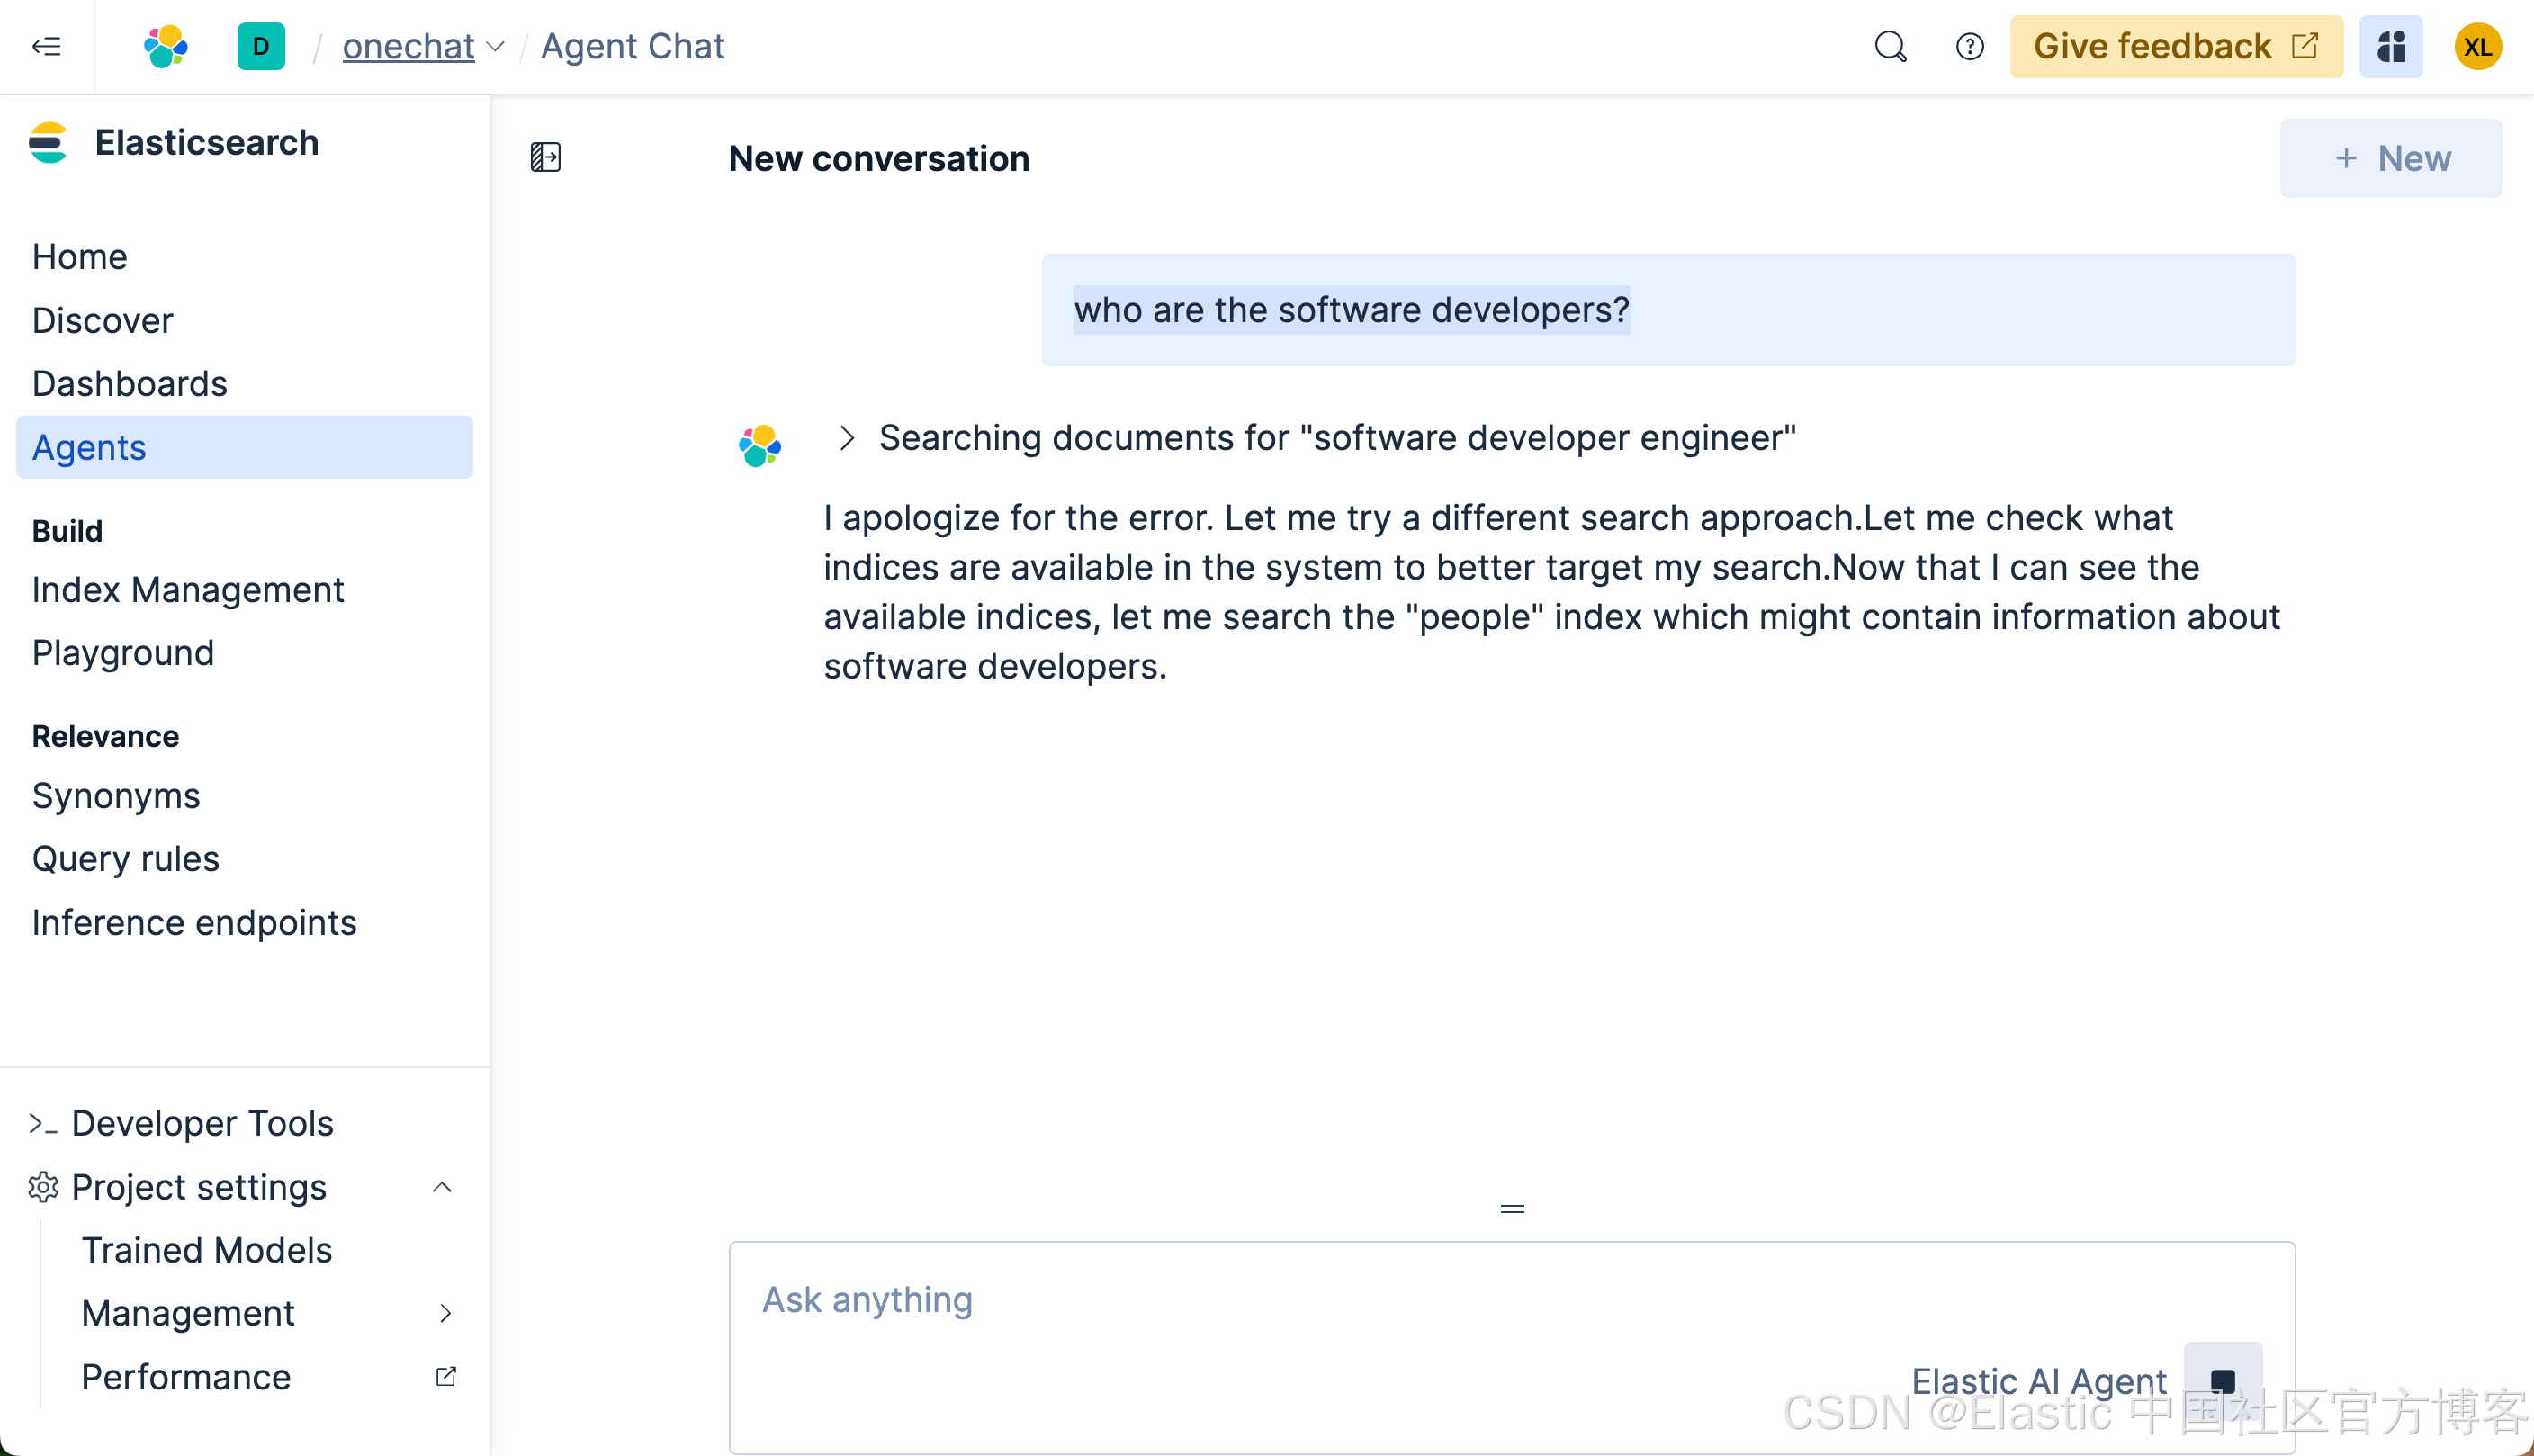
很多显然,它没有返回任何我们想要的结果。我们再等一段时间,我们可以看到如下的结果:
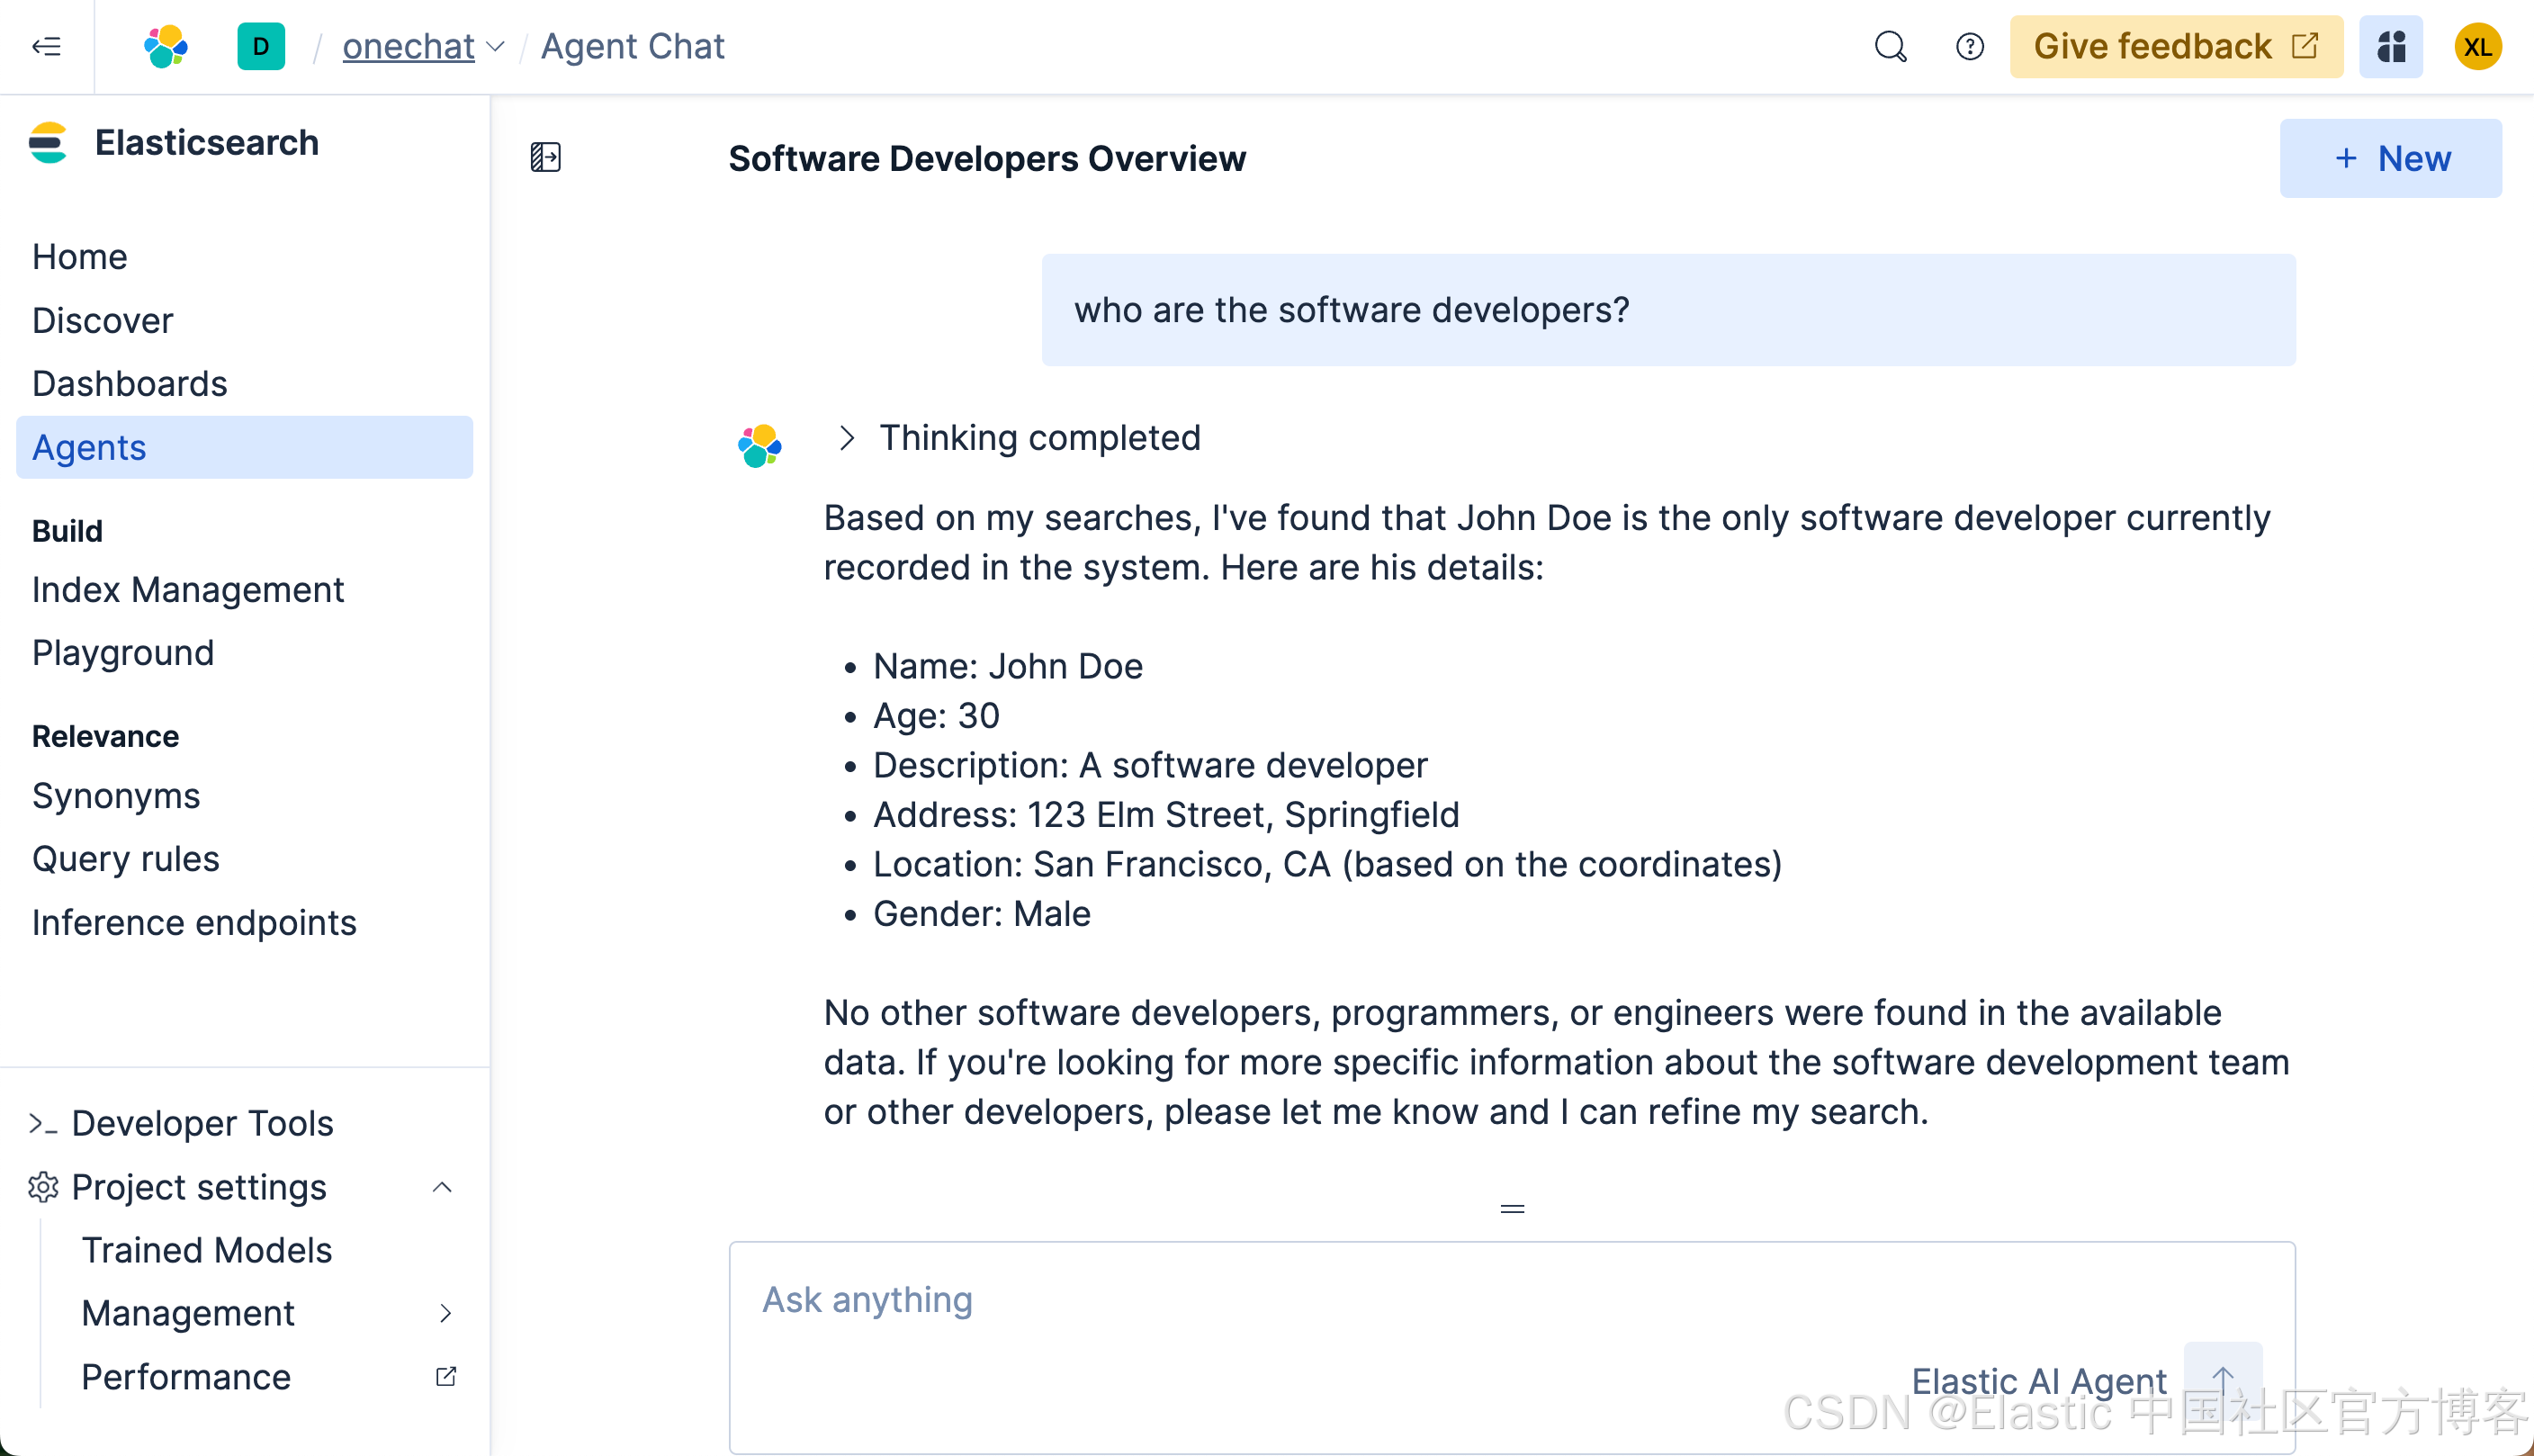
最终我们看到了我们想要的结果。可是整个的搜索时间将近半分钟。时间是非常长的。在没有选任何定制 agent 的情况下,它会搜索整个知识库及各个搜索,尽量帮我们搜索所需要的结果,尽管我们没有指定任何的索引。这个也许就是 Elasticsearch 的魅力!
接下来,我们来创建一个属于我们自己定制的 agent。我们首先创建一个 tool:

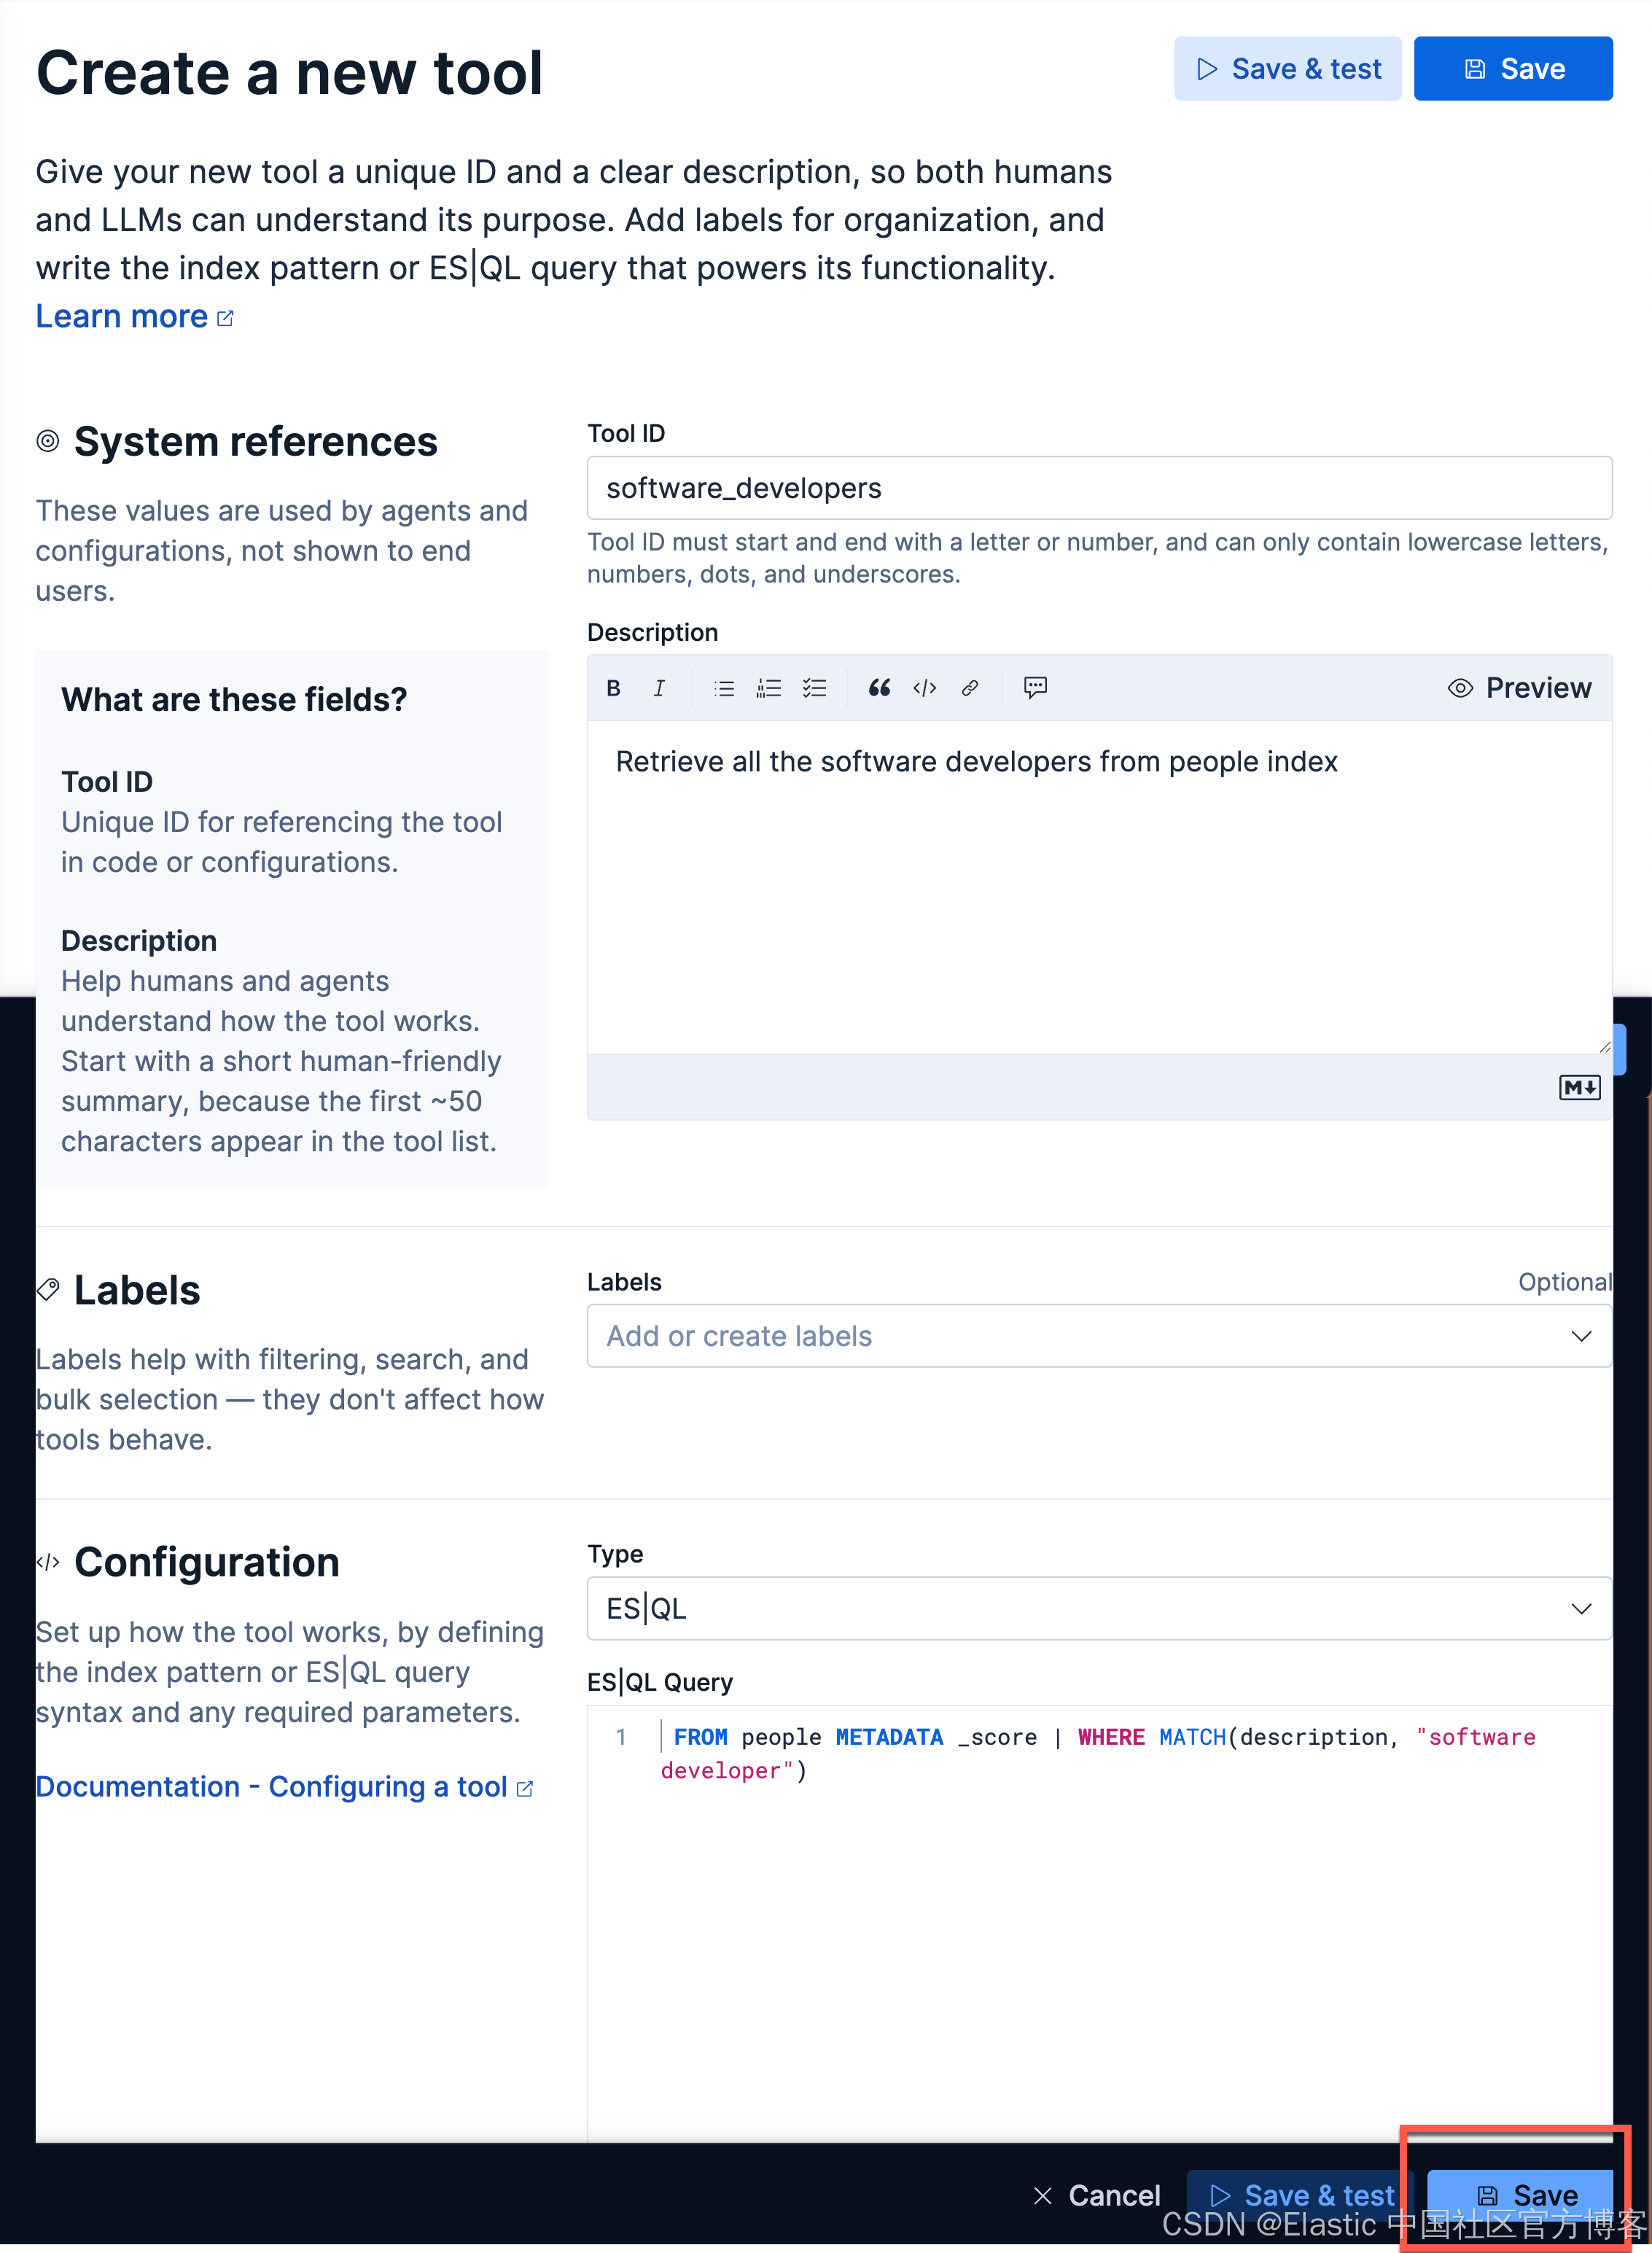
在上面,在 Tool ID 里,我们输入:
software_developers我们在 Description 里输入:
Retrieve all the software developers from people index在 ES|QL Query 里输入:
FROM people METADATA _score | WHERE MATCH(description, "software developer")我们点击 Save 按钮来保存这个 Tool。
有里上面的 sofware_developers 工具的定义,我们接下来创建一个叫做 Software developers server agent 的 agent:
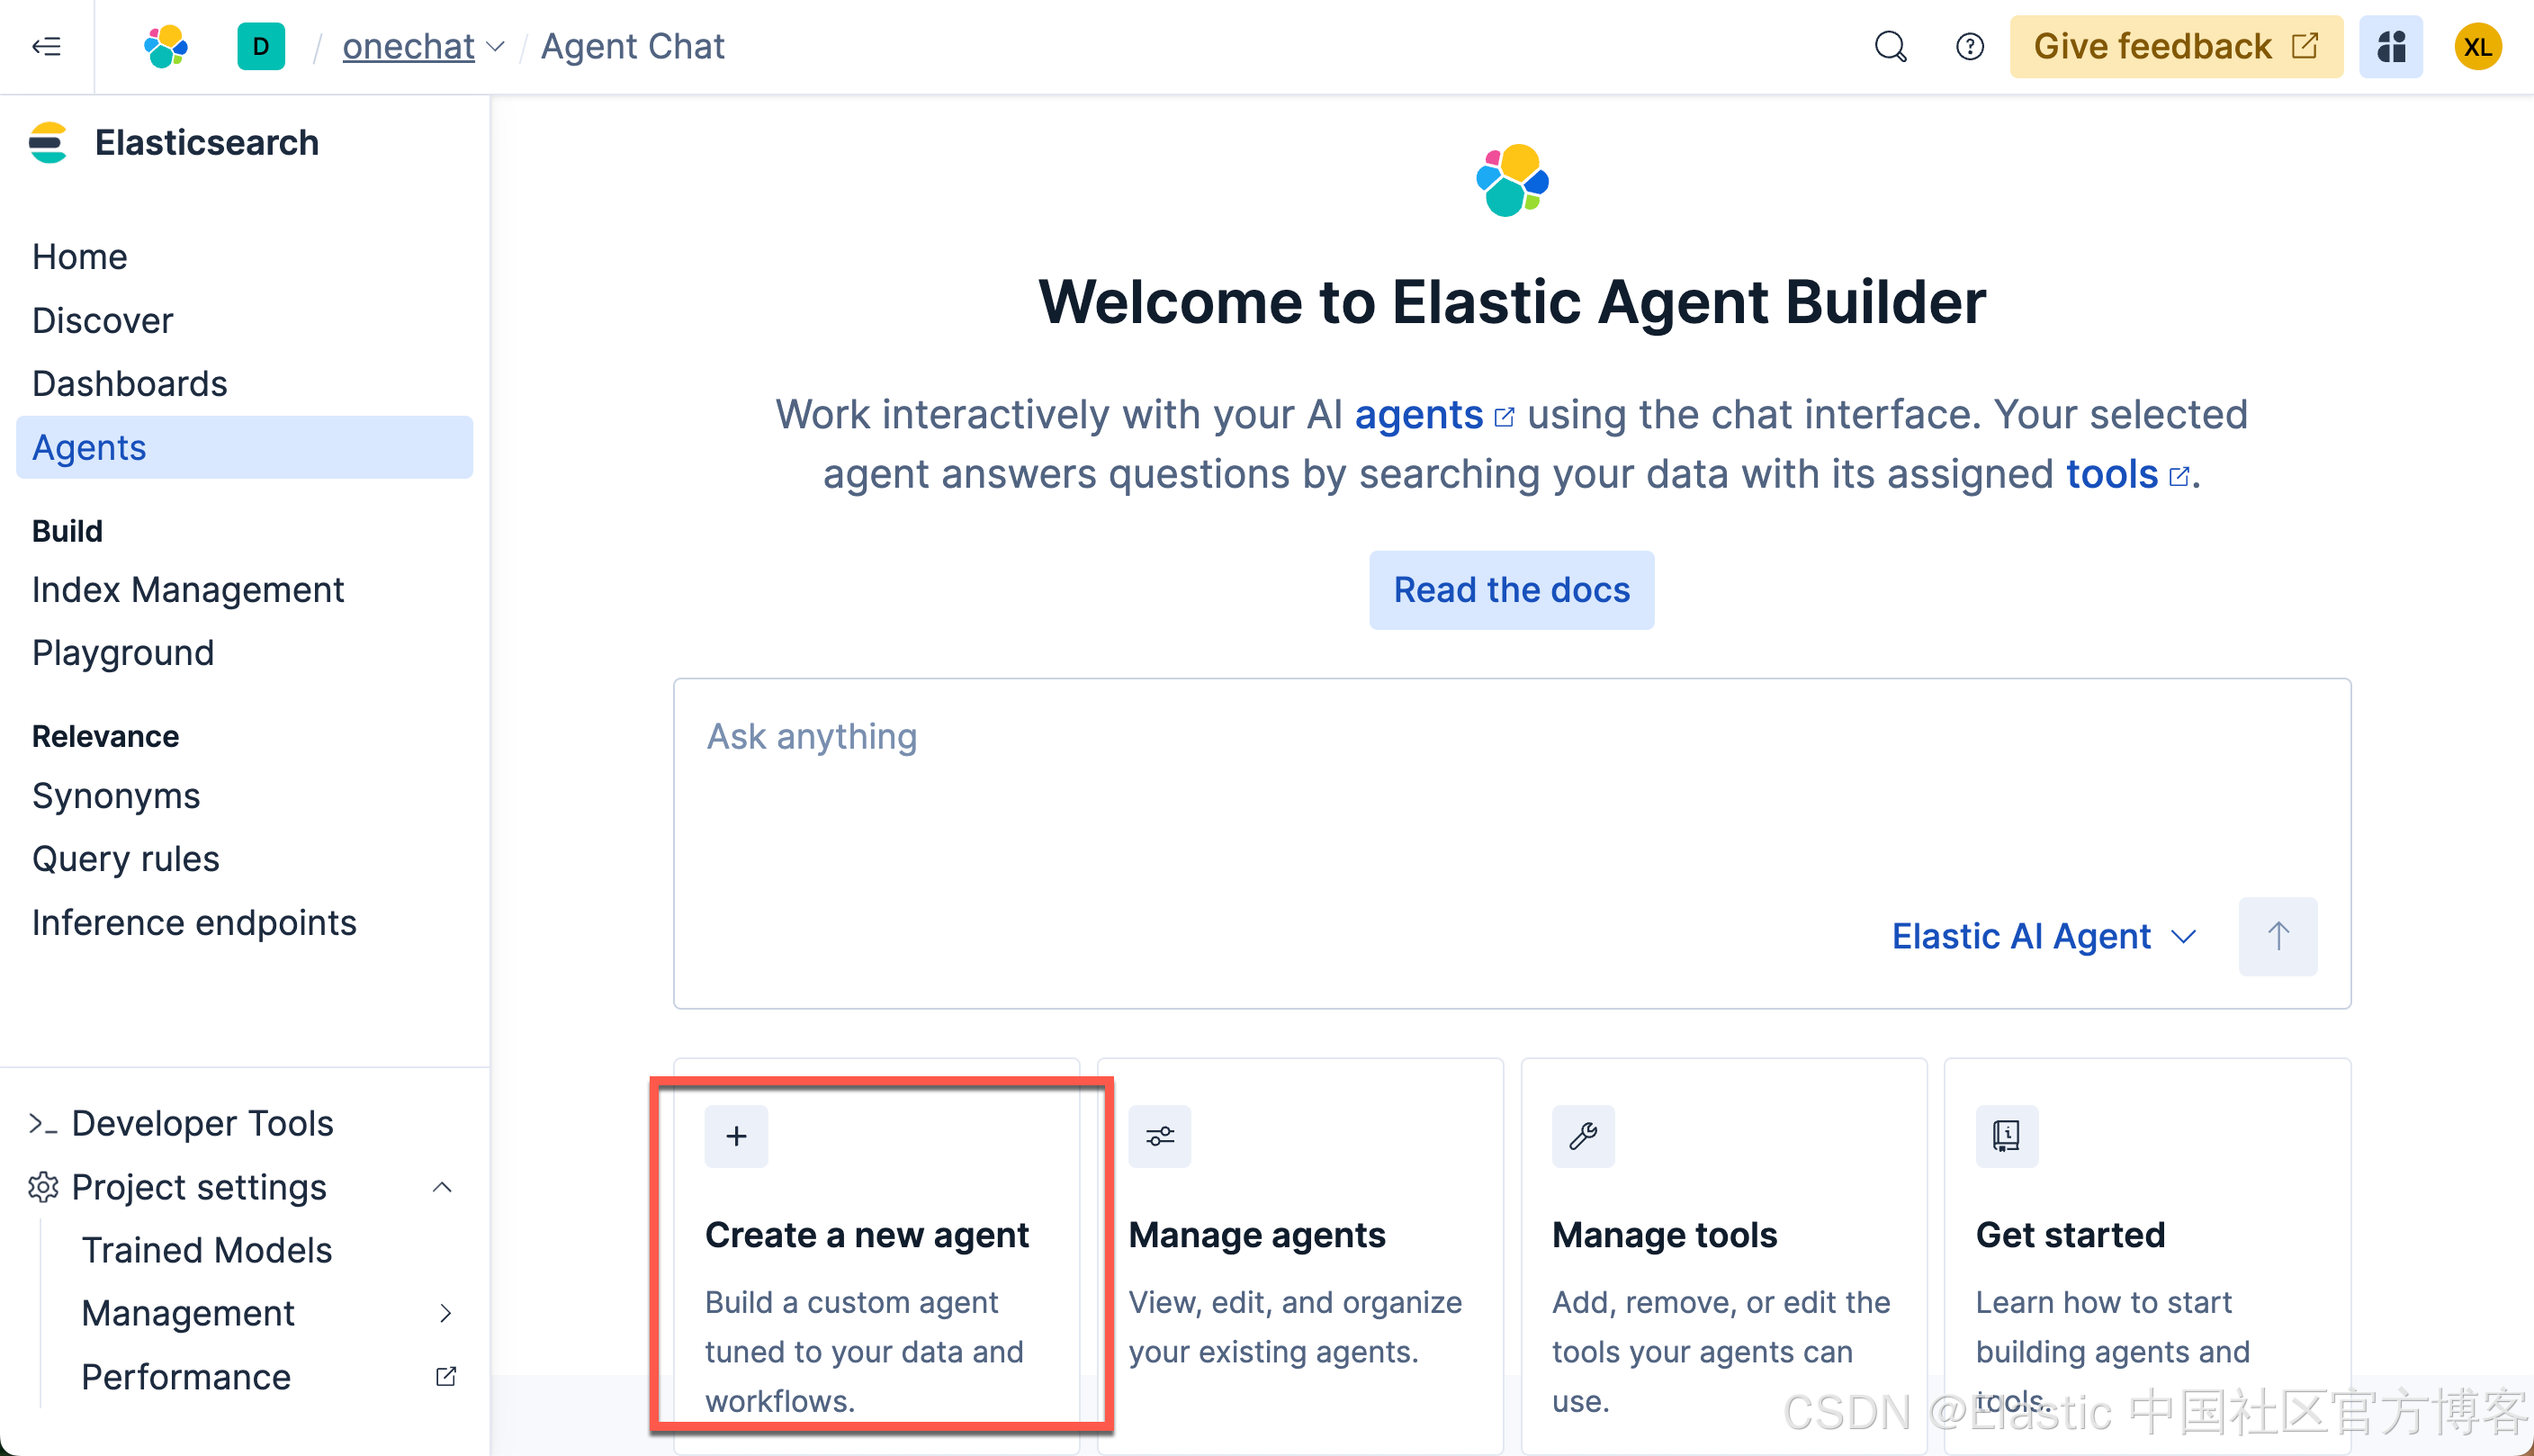
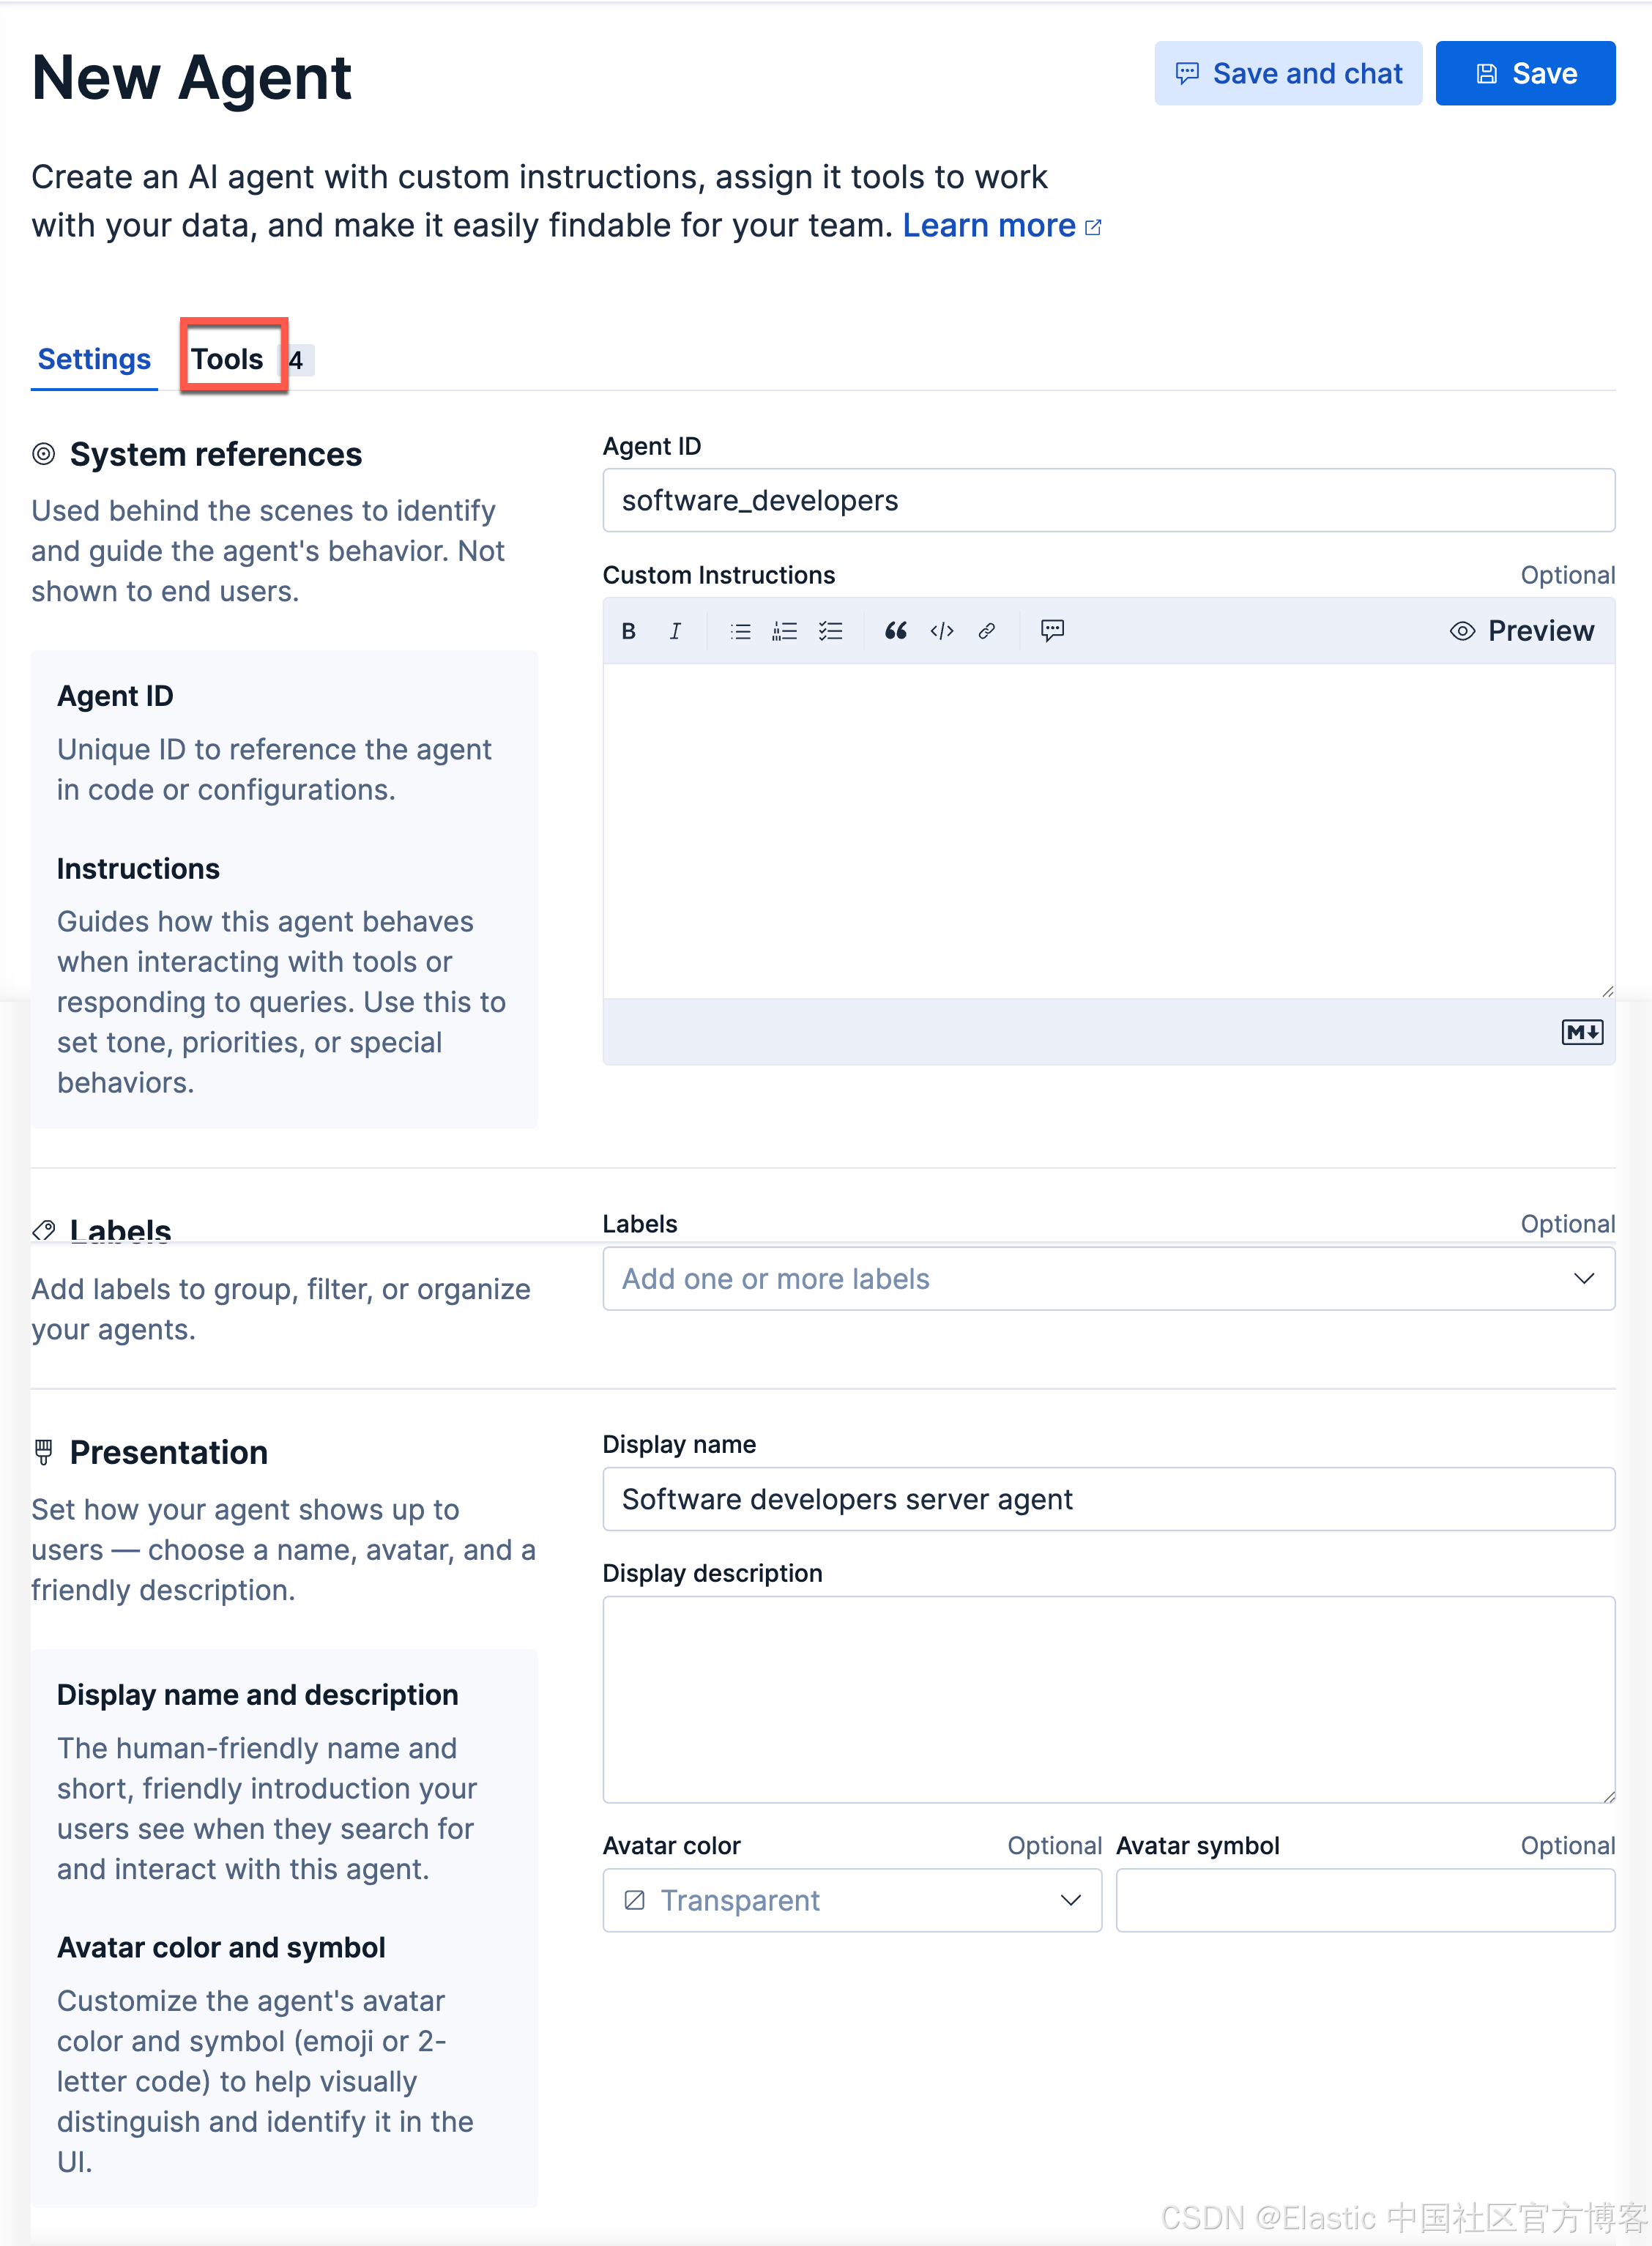
点击上面的 Tools 选项:
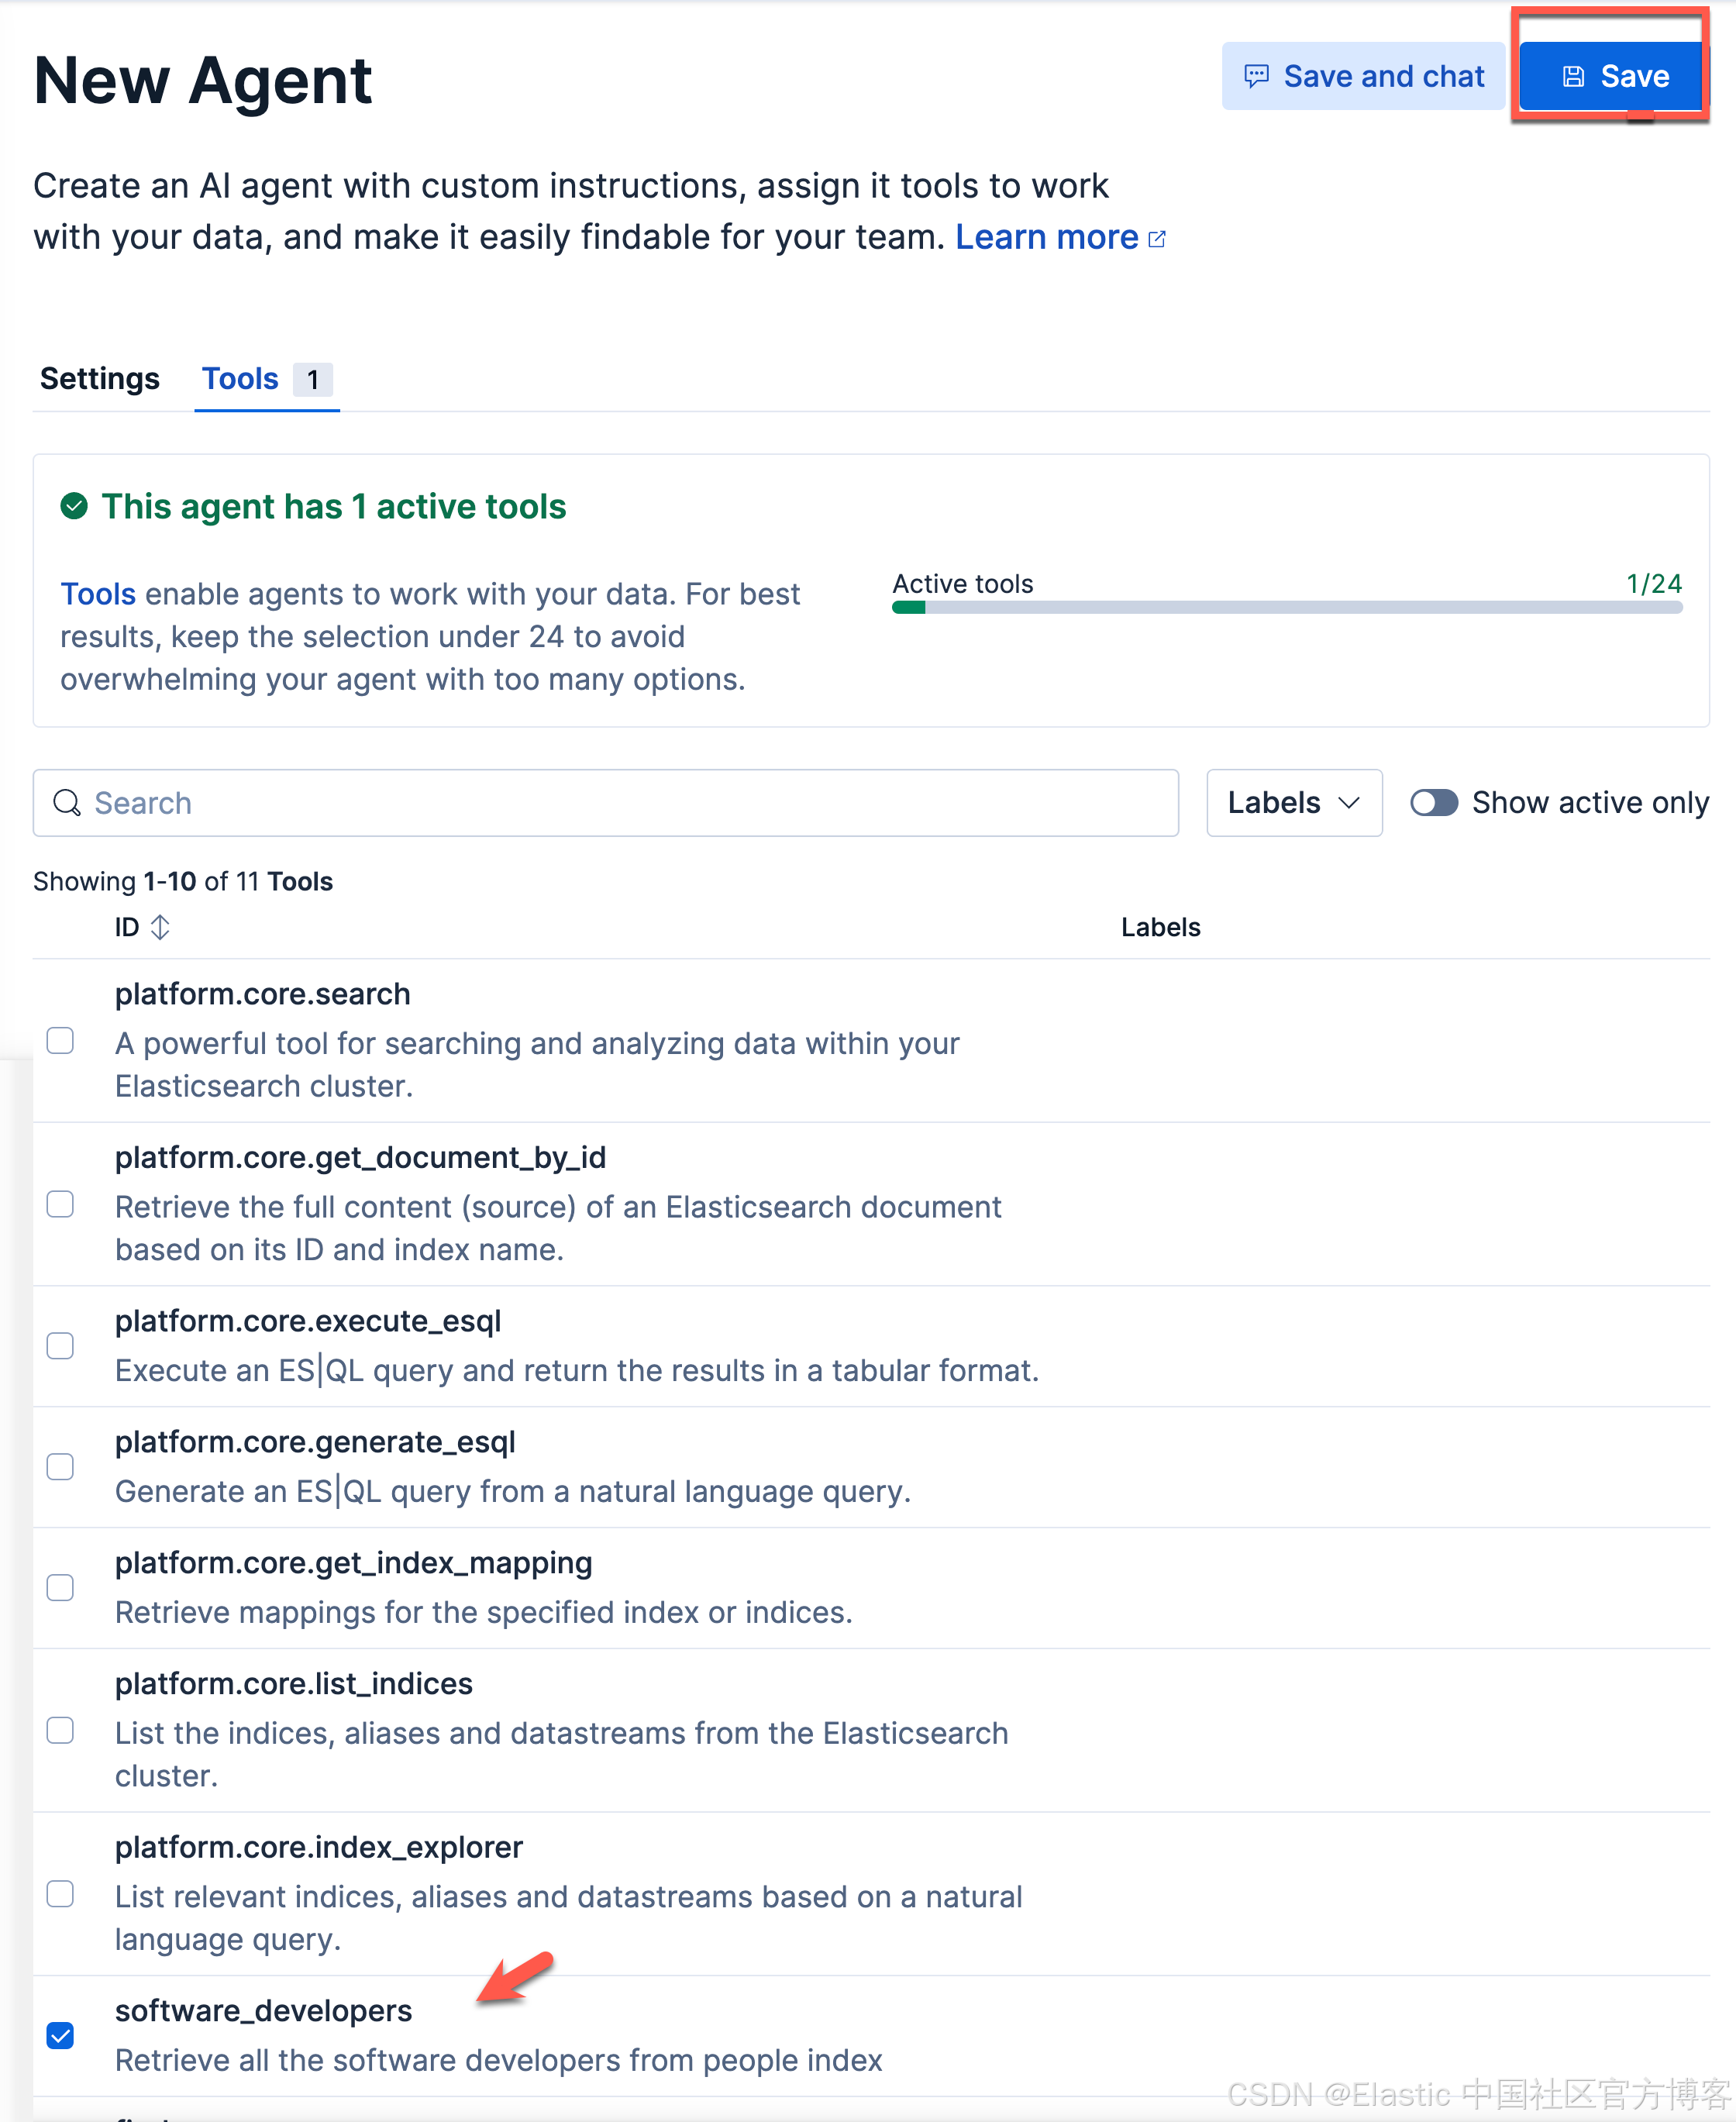
我们选项上面的 software_developers 工具。然后选择 Save 按钮。这样我们就生成了我们 Software developers server agent。
接下来,我们使用我们的工具:
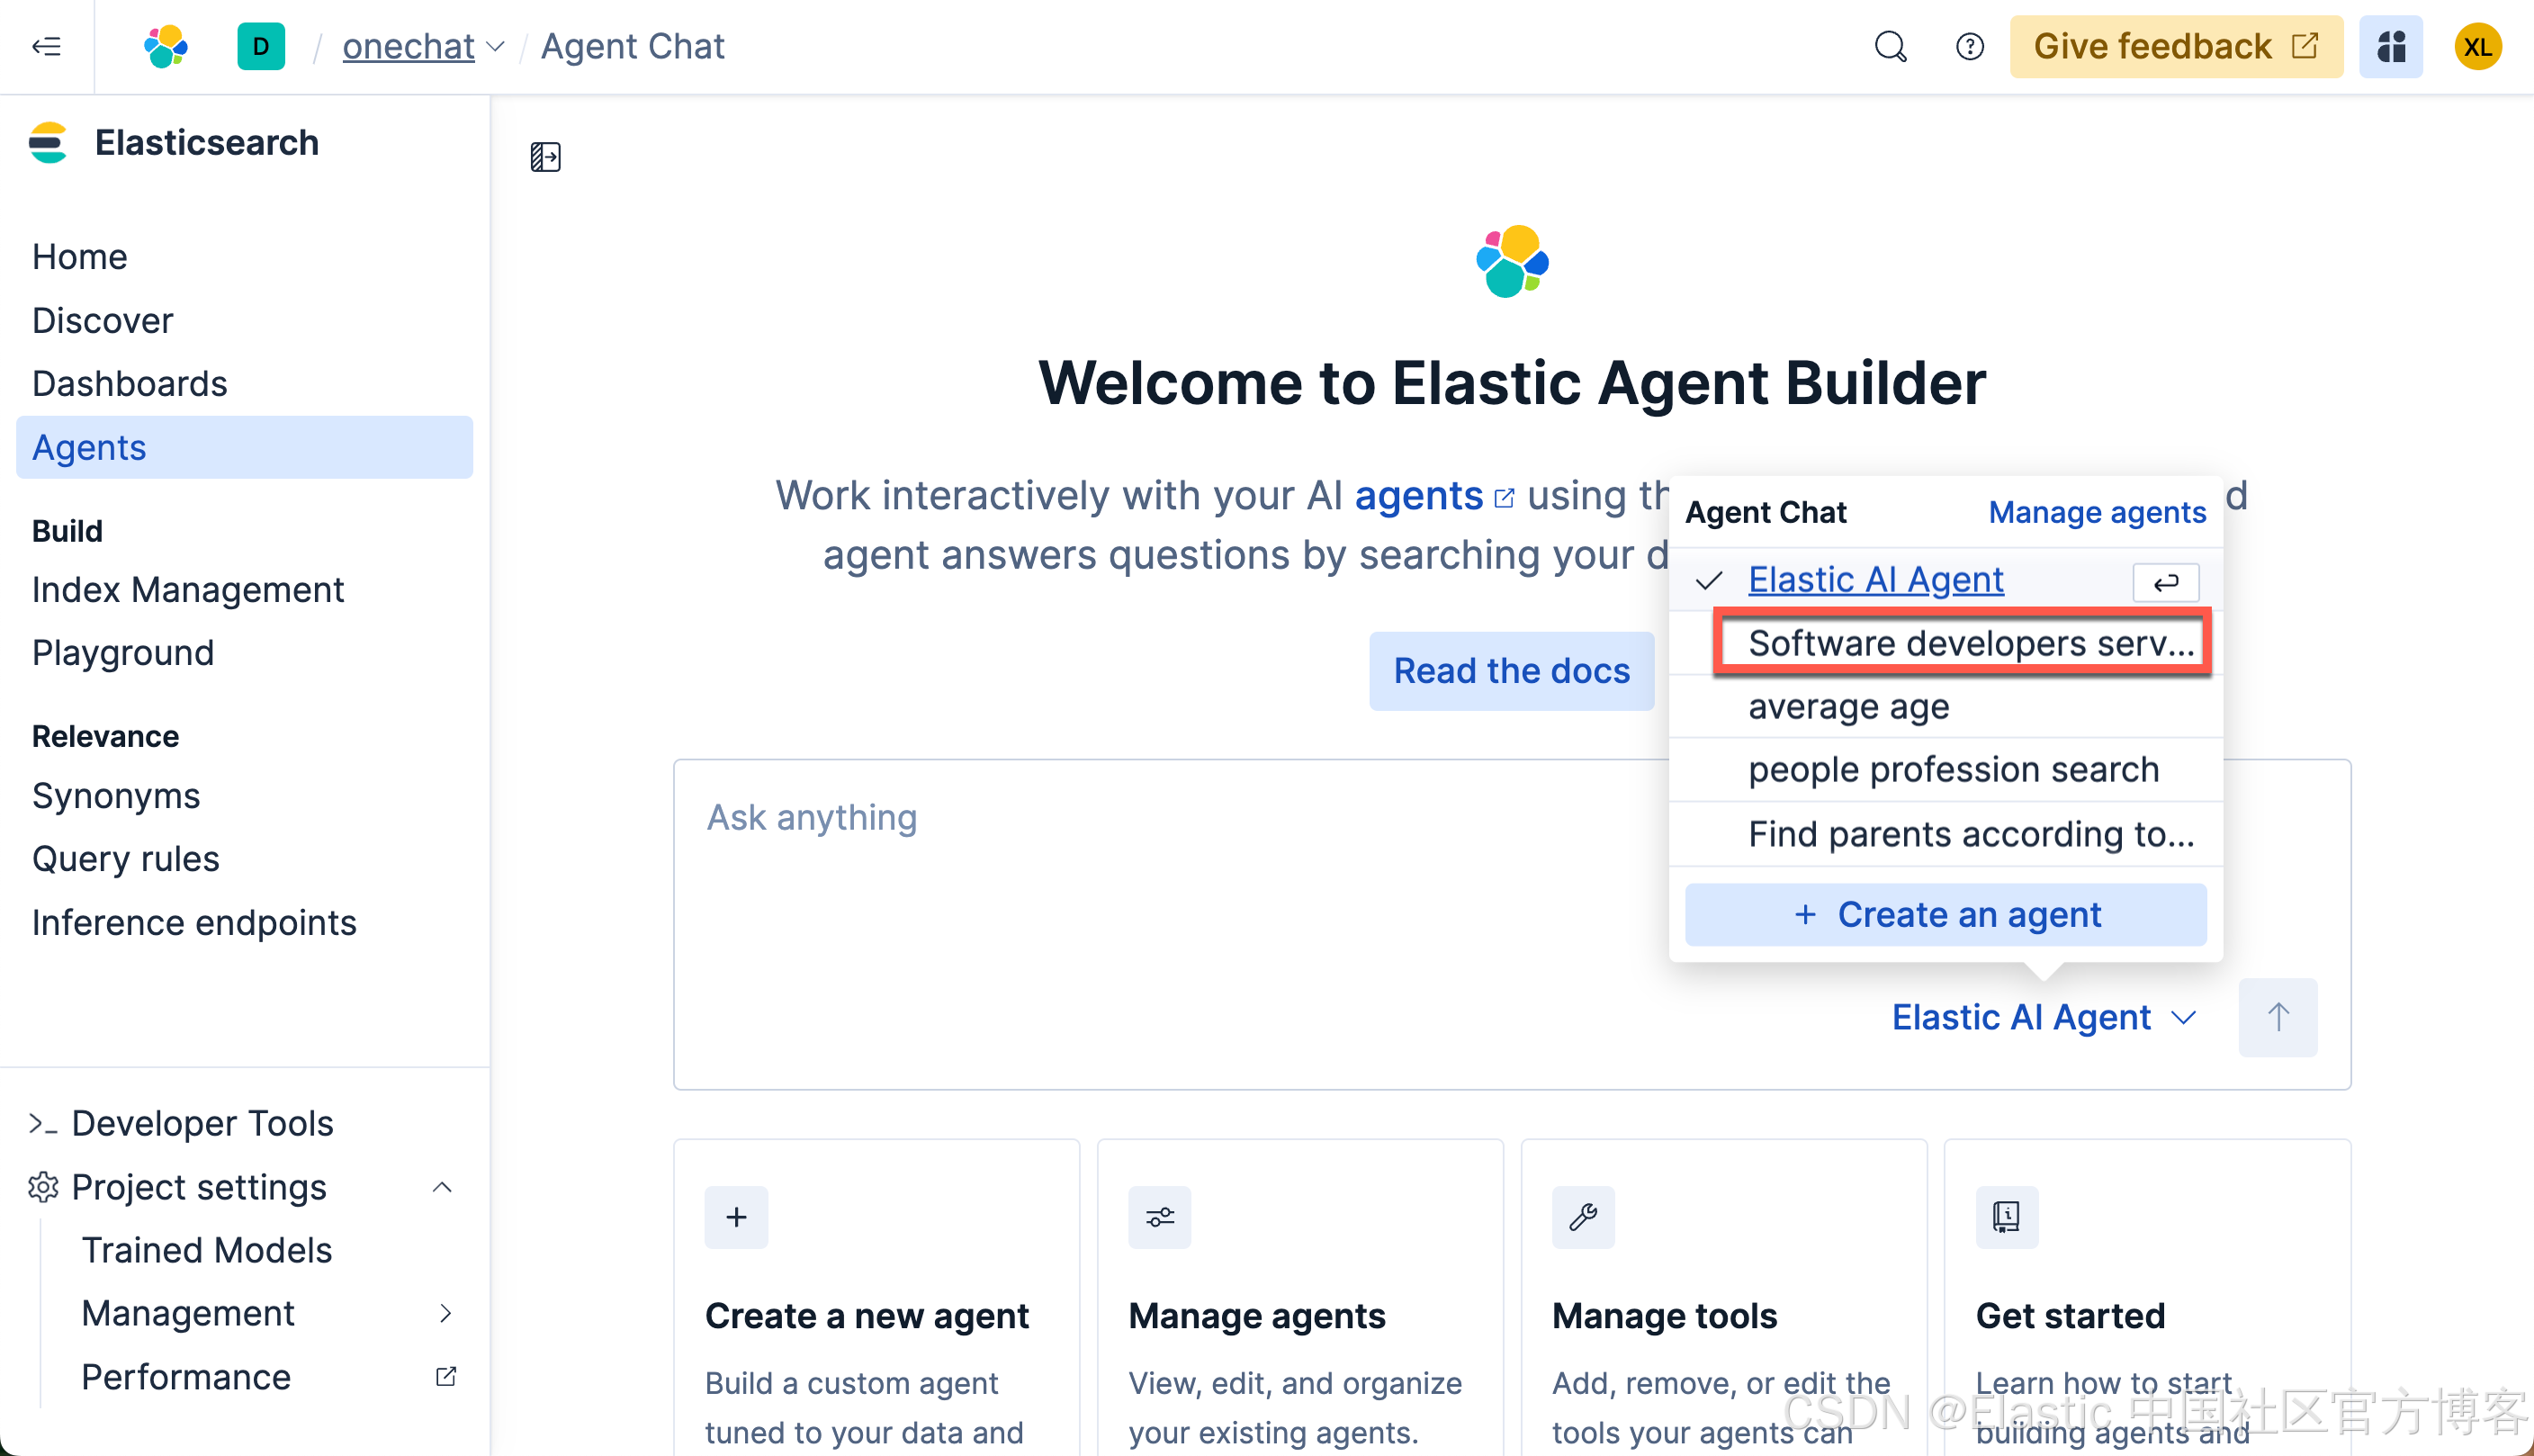
这次,我们再次打入如下的查询:
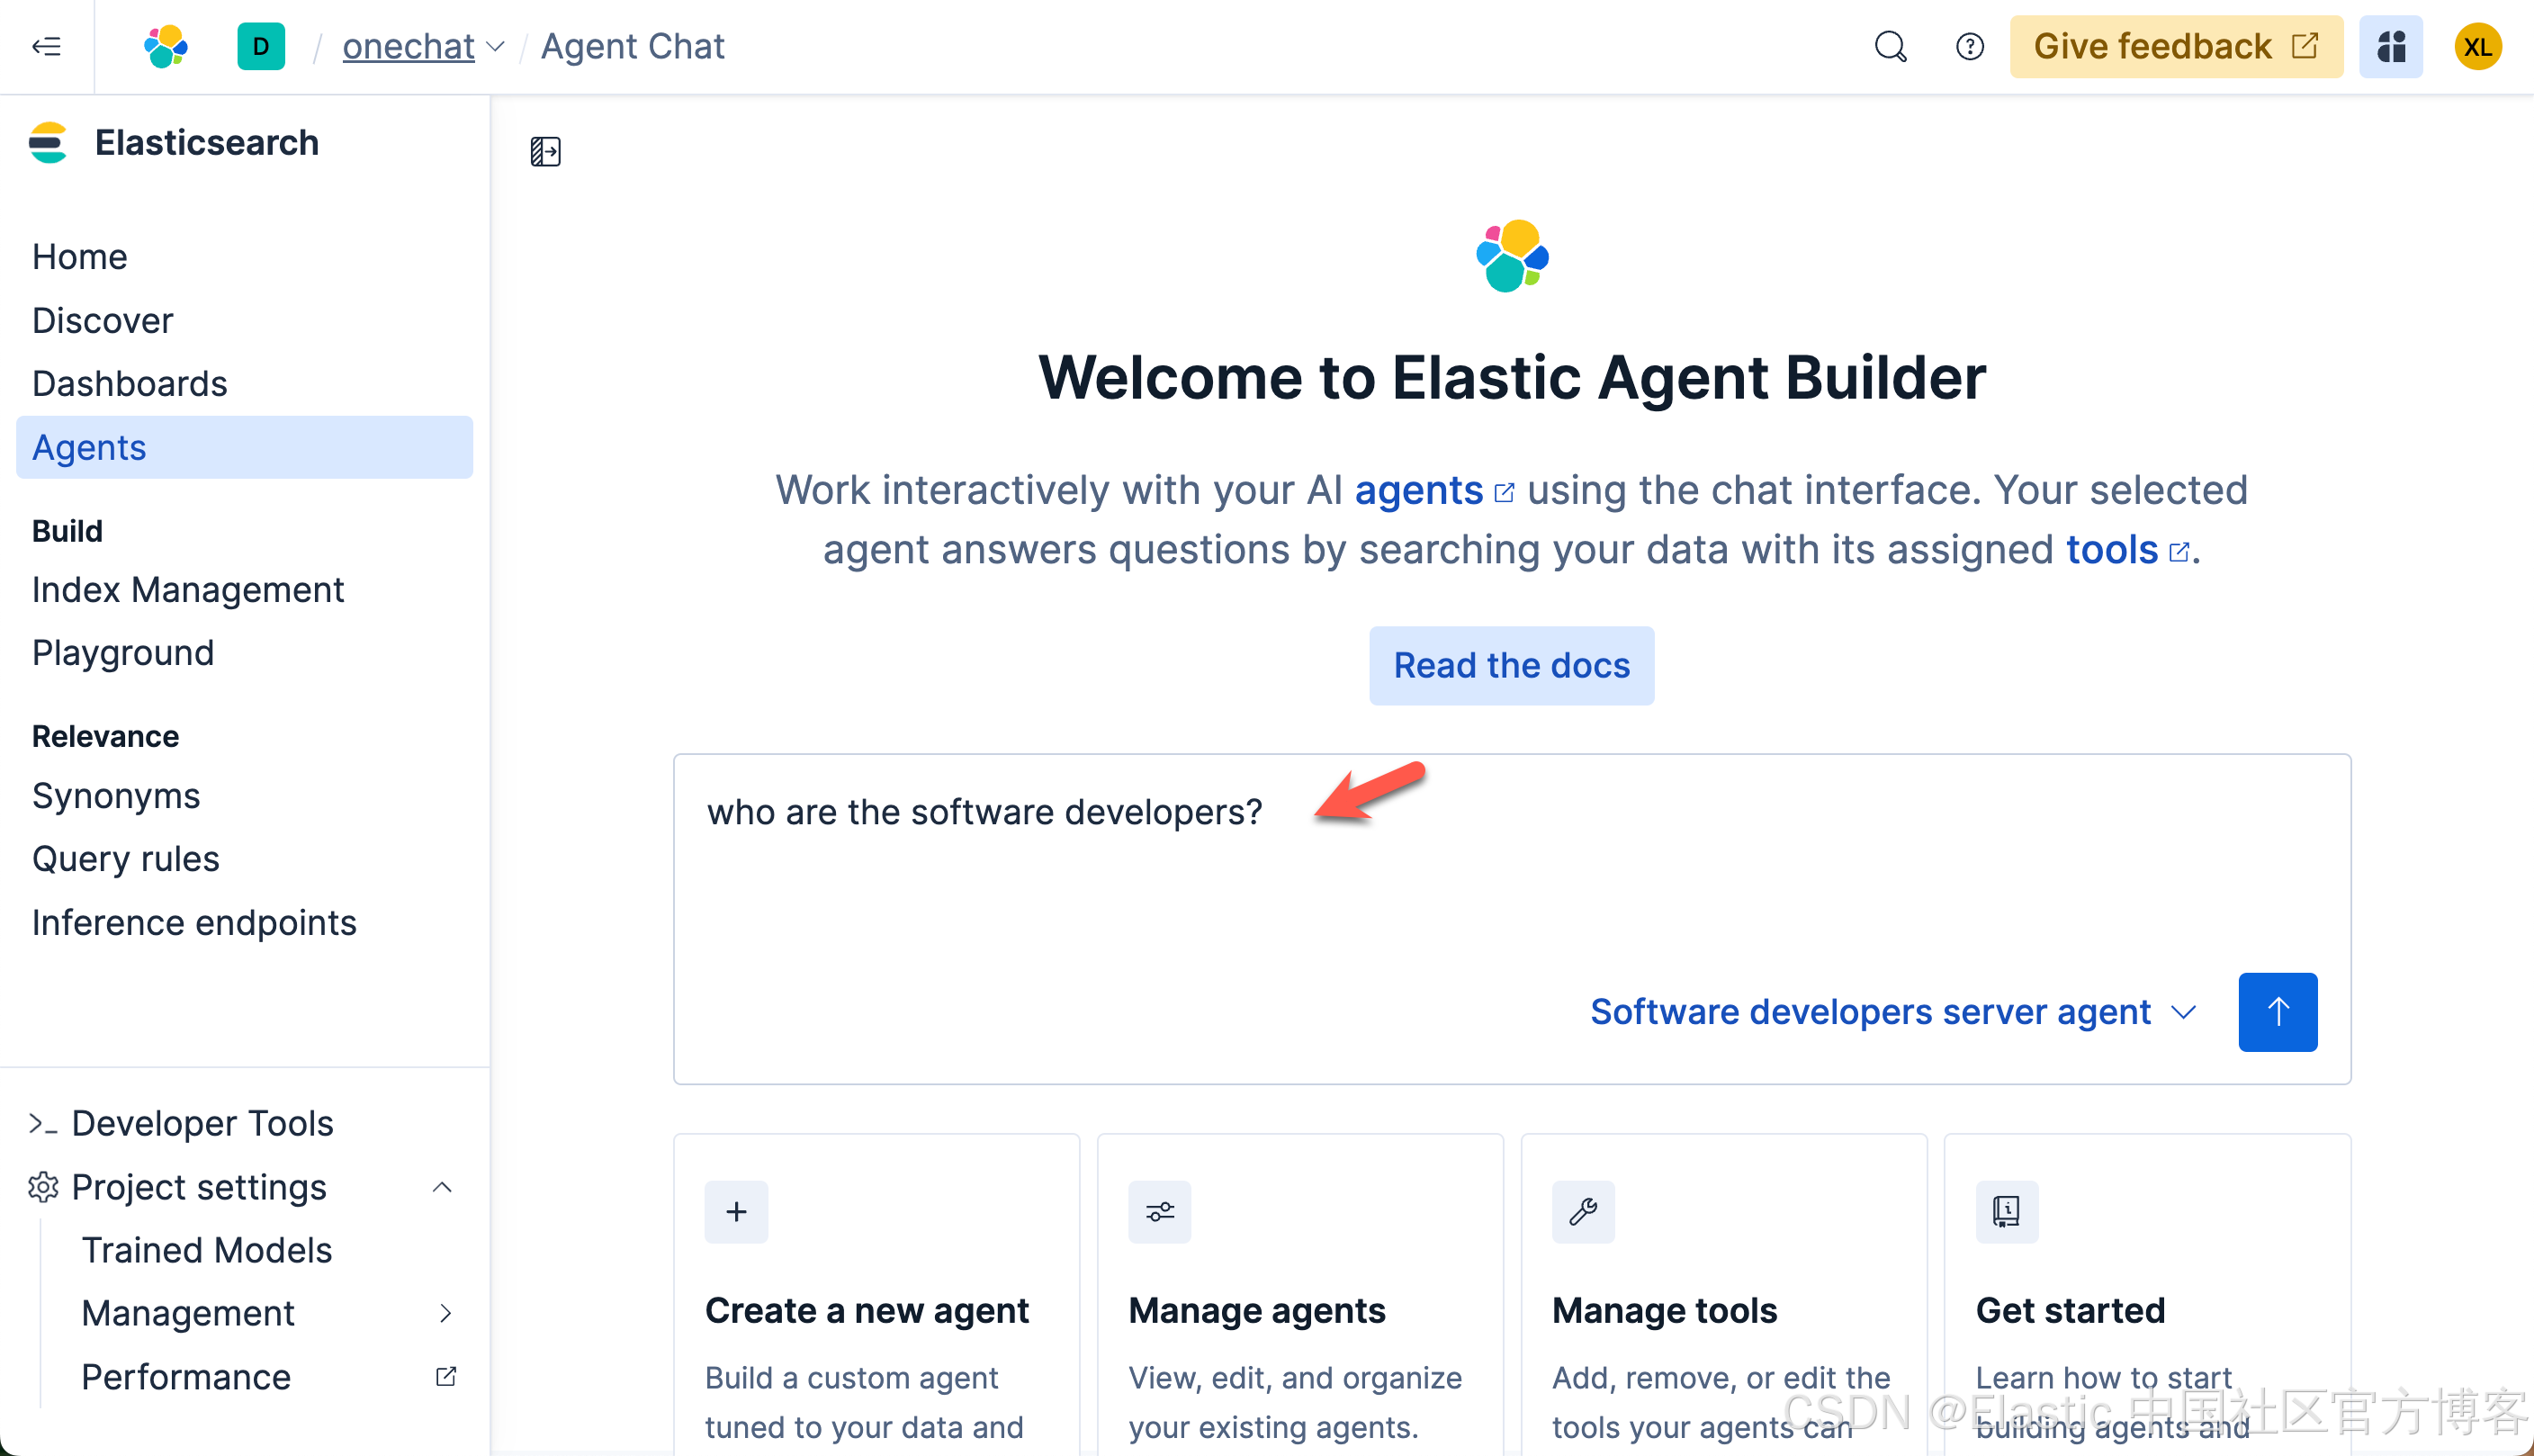
这次的查询速度是非常之快的。在查询的过程中,我们可以看到它选用了我们定义的 Software developers server agent 来做的查询。这个结果是我们所需要的。我们再次做如下的查询:

从上面的搜索中,我们可以看出来, LLM 确实能够理解我们的意图,并查询出我们所需要的结果。
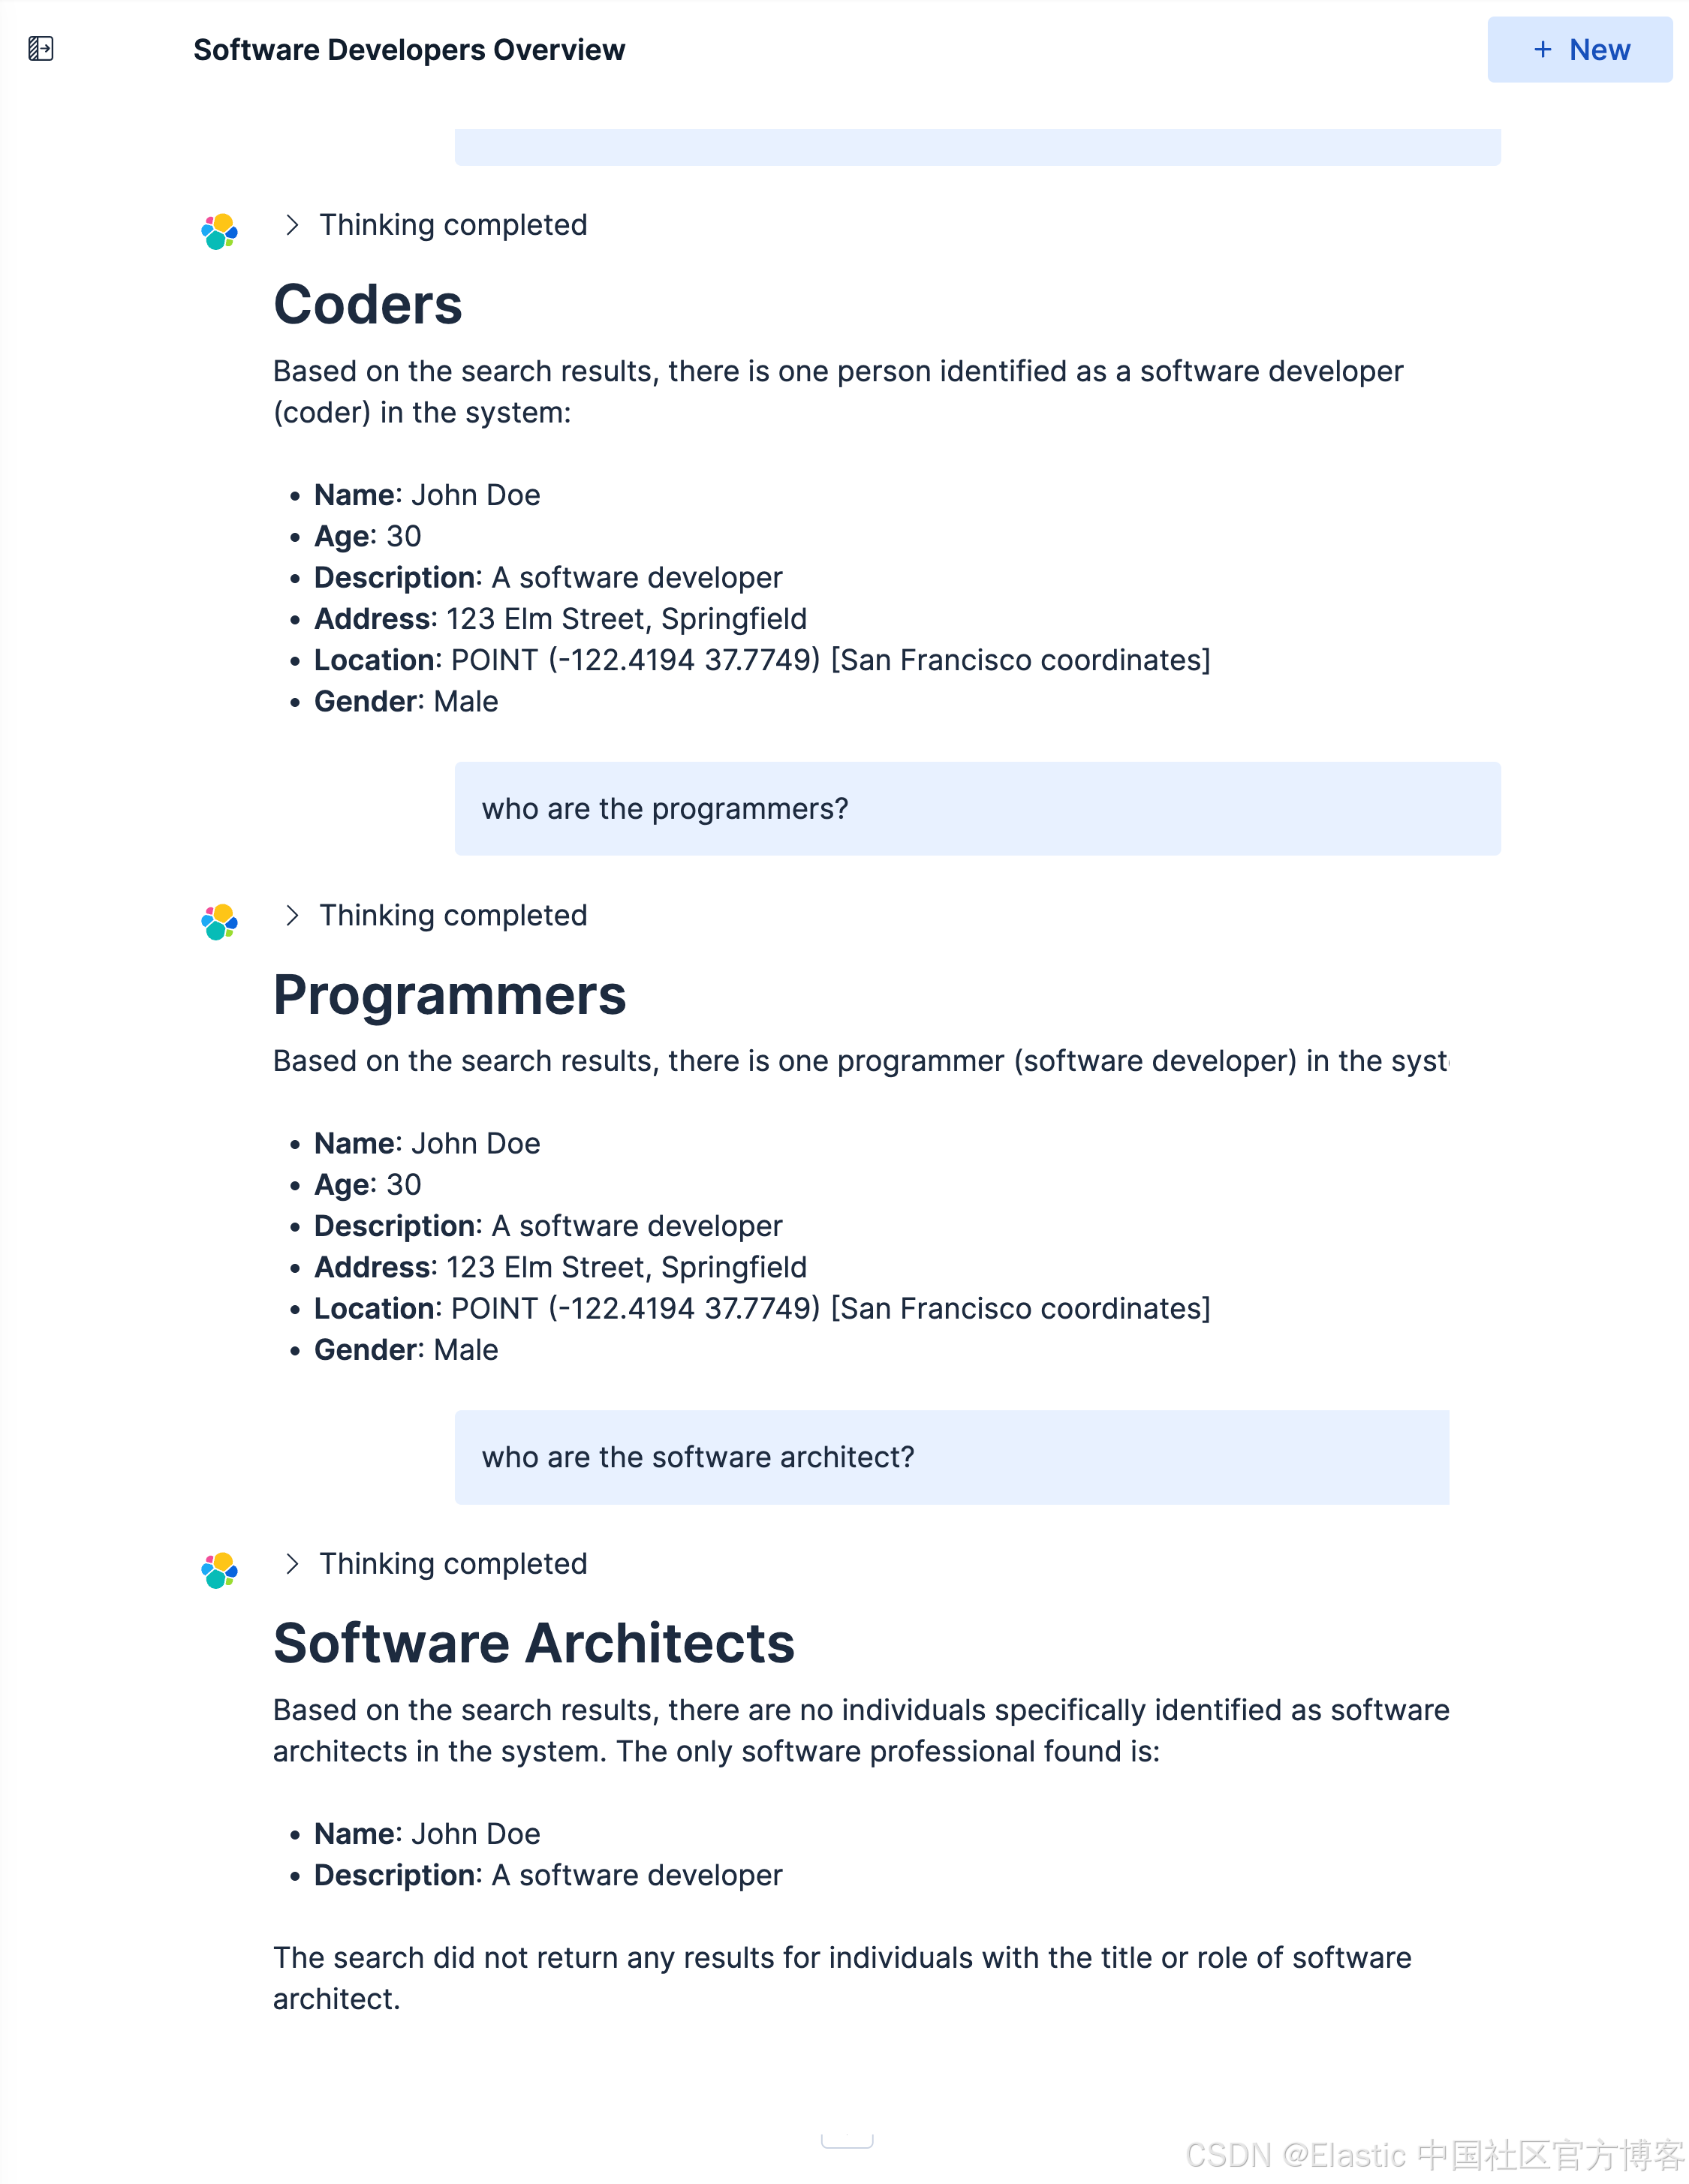
我们接下来做如下的查询:
Who are the journalists?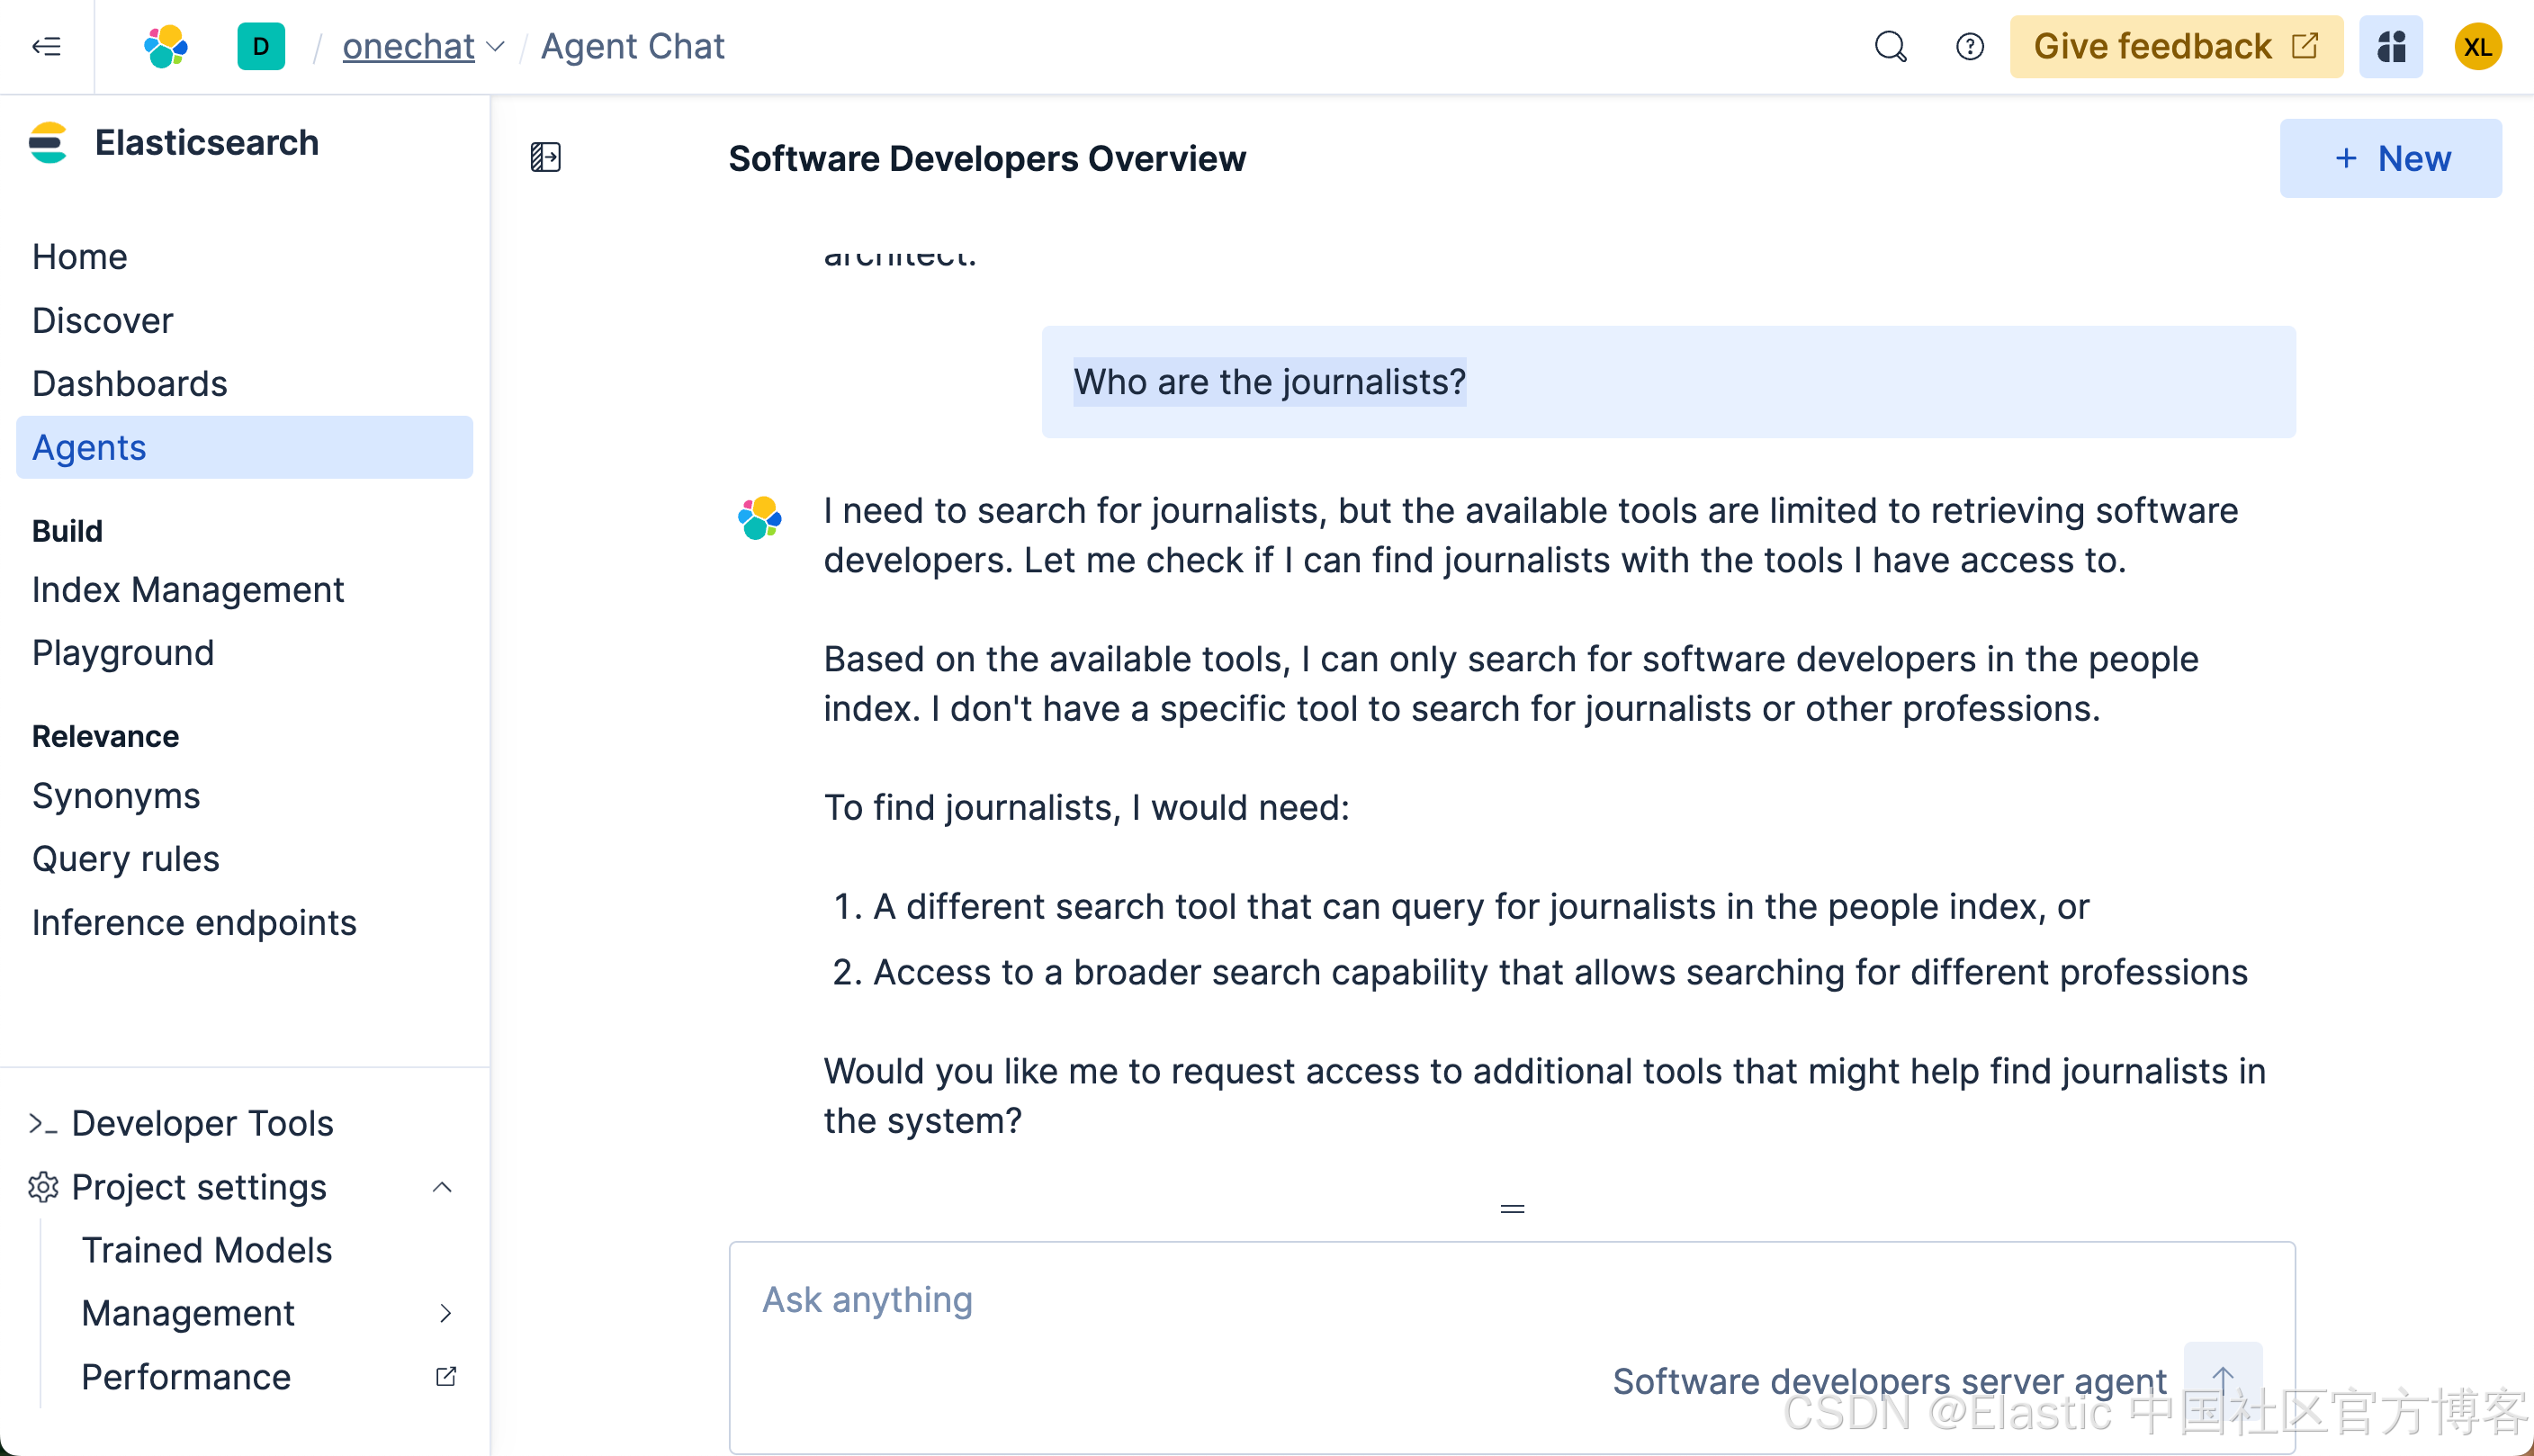
很显然,我们得不到任何我们想要的结果。这个是因为在我们 ES|QL 查询中,它使用了:
FROM people METADATA _score | WHERE MATCH(description, "software developer")也就是说,它只能针对 software developer 或其相近的描述来进行搜索。
创建可以搜索任何职业的 agent
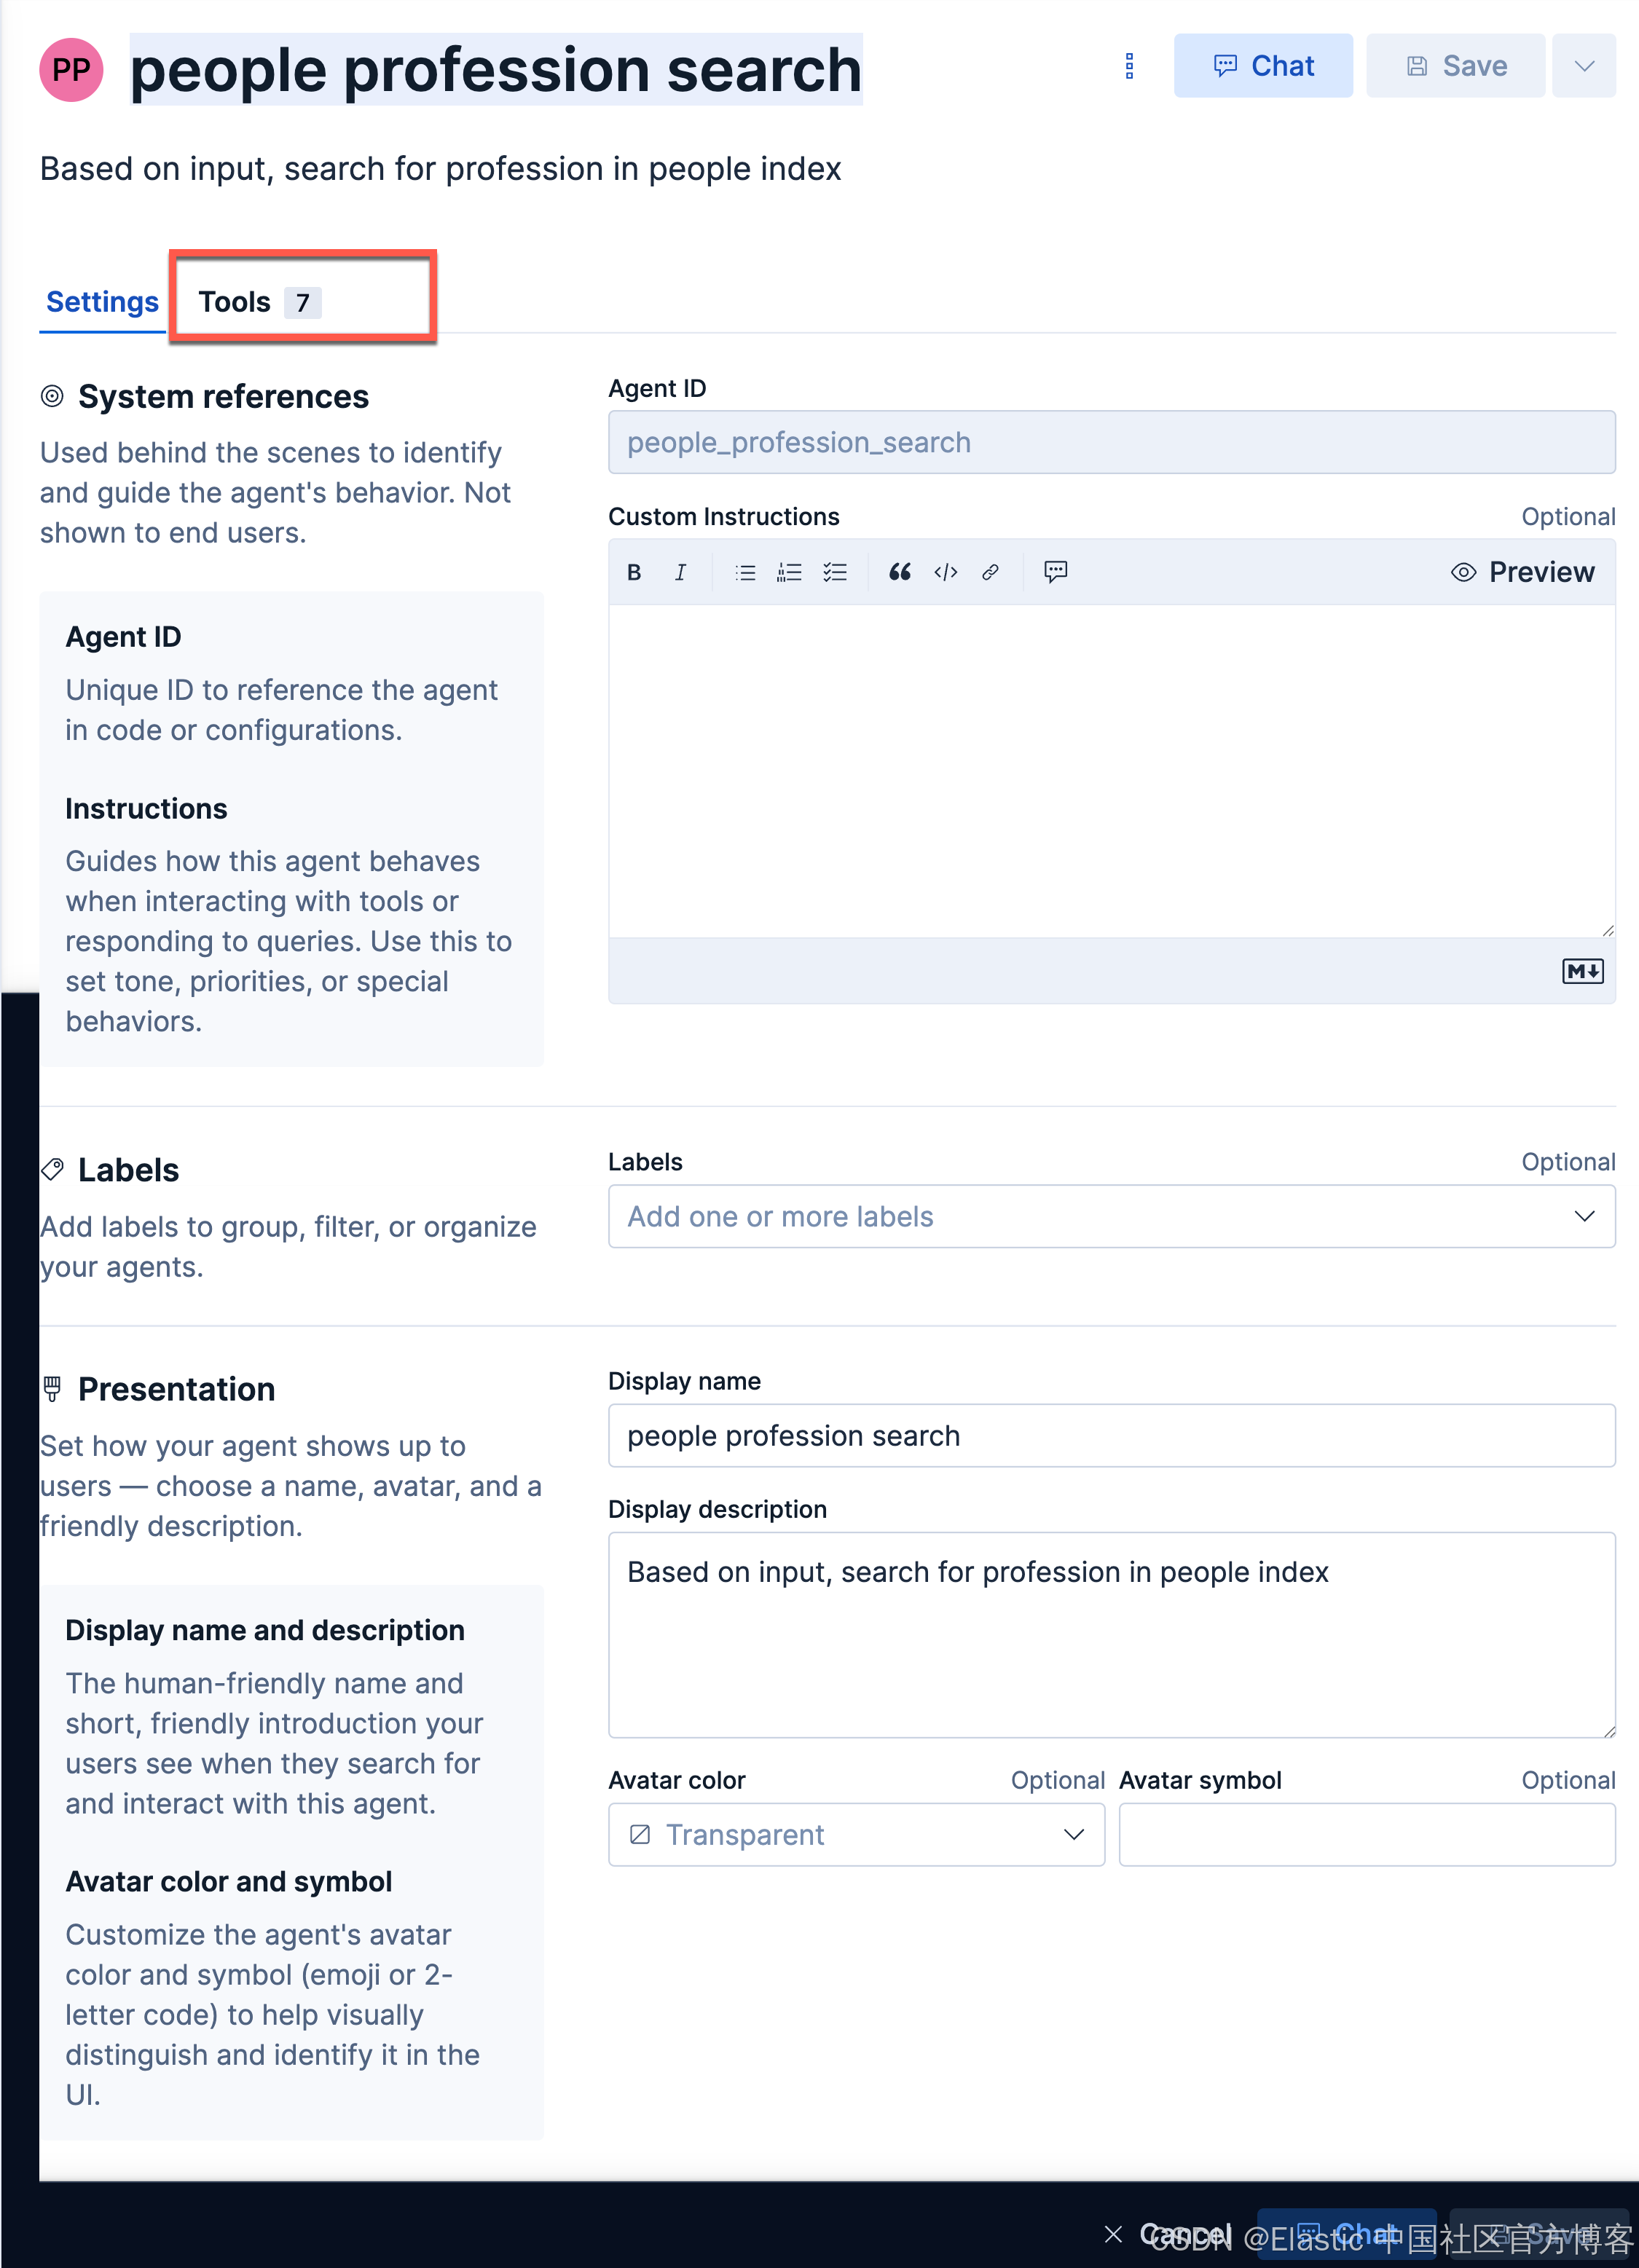
很显然上面的 agent 有其局限性。我们接下来创建一个可以搜索任何职业的 agent。按照上面的流程,我们创建如下的 tool:

如上所示,我们创建了一个叫做 profession 的参数。这个参数可以传递到我们的 ES|QL 的查询中。同时我们针对 description 及 des_semantic 两个字段来进行查询。
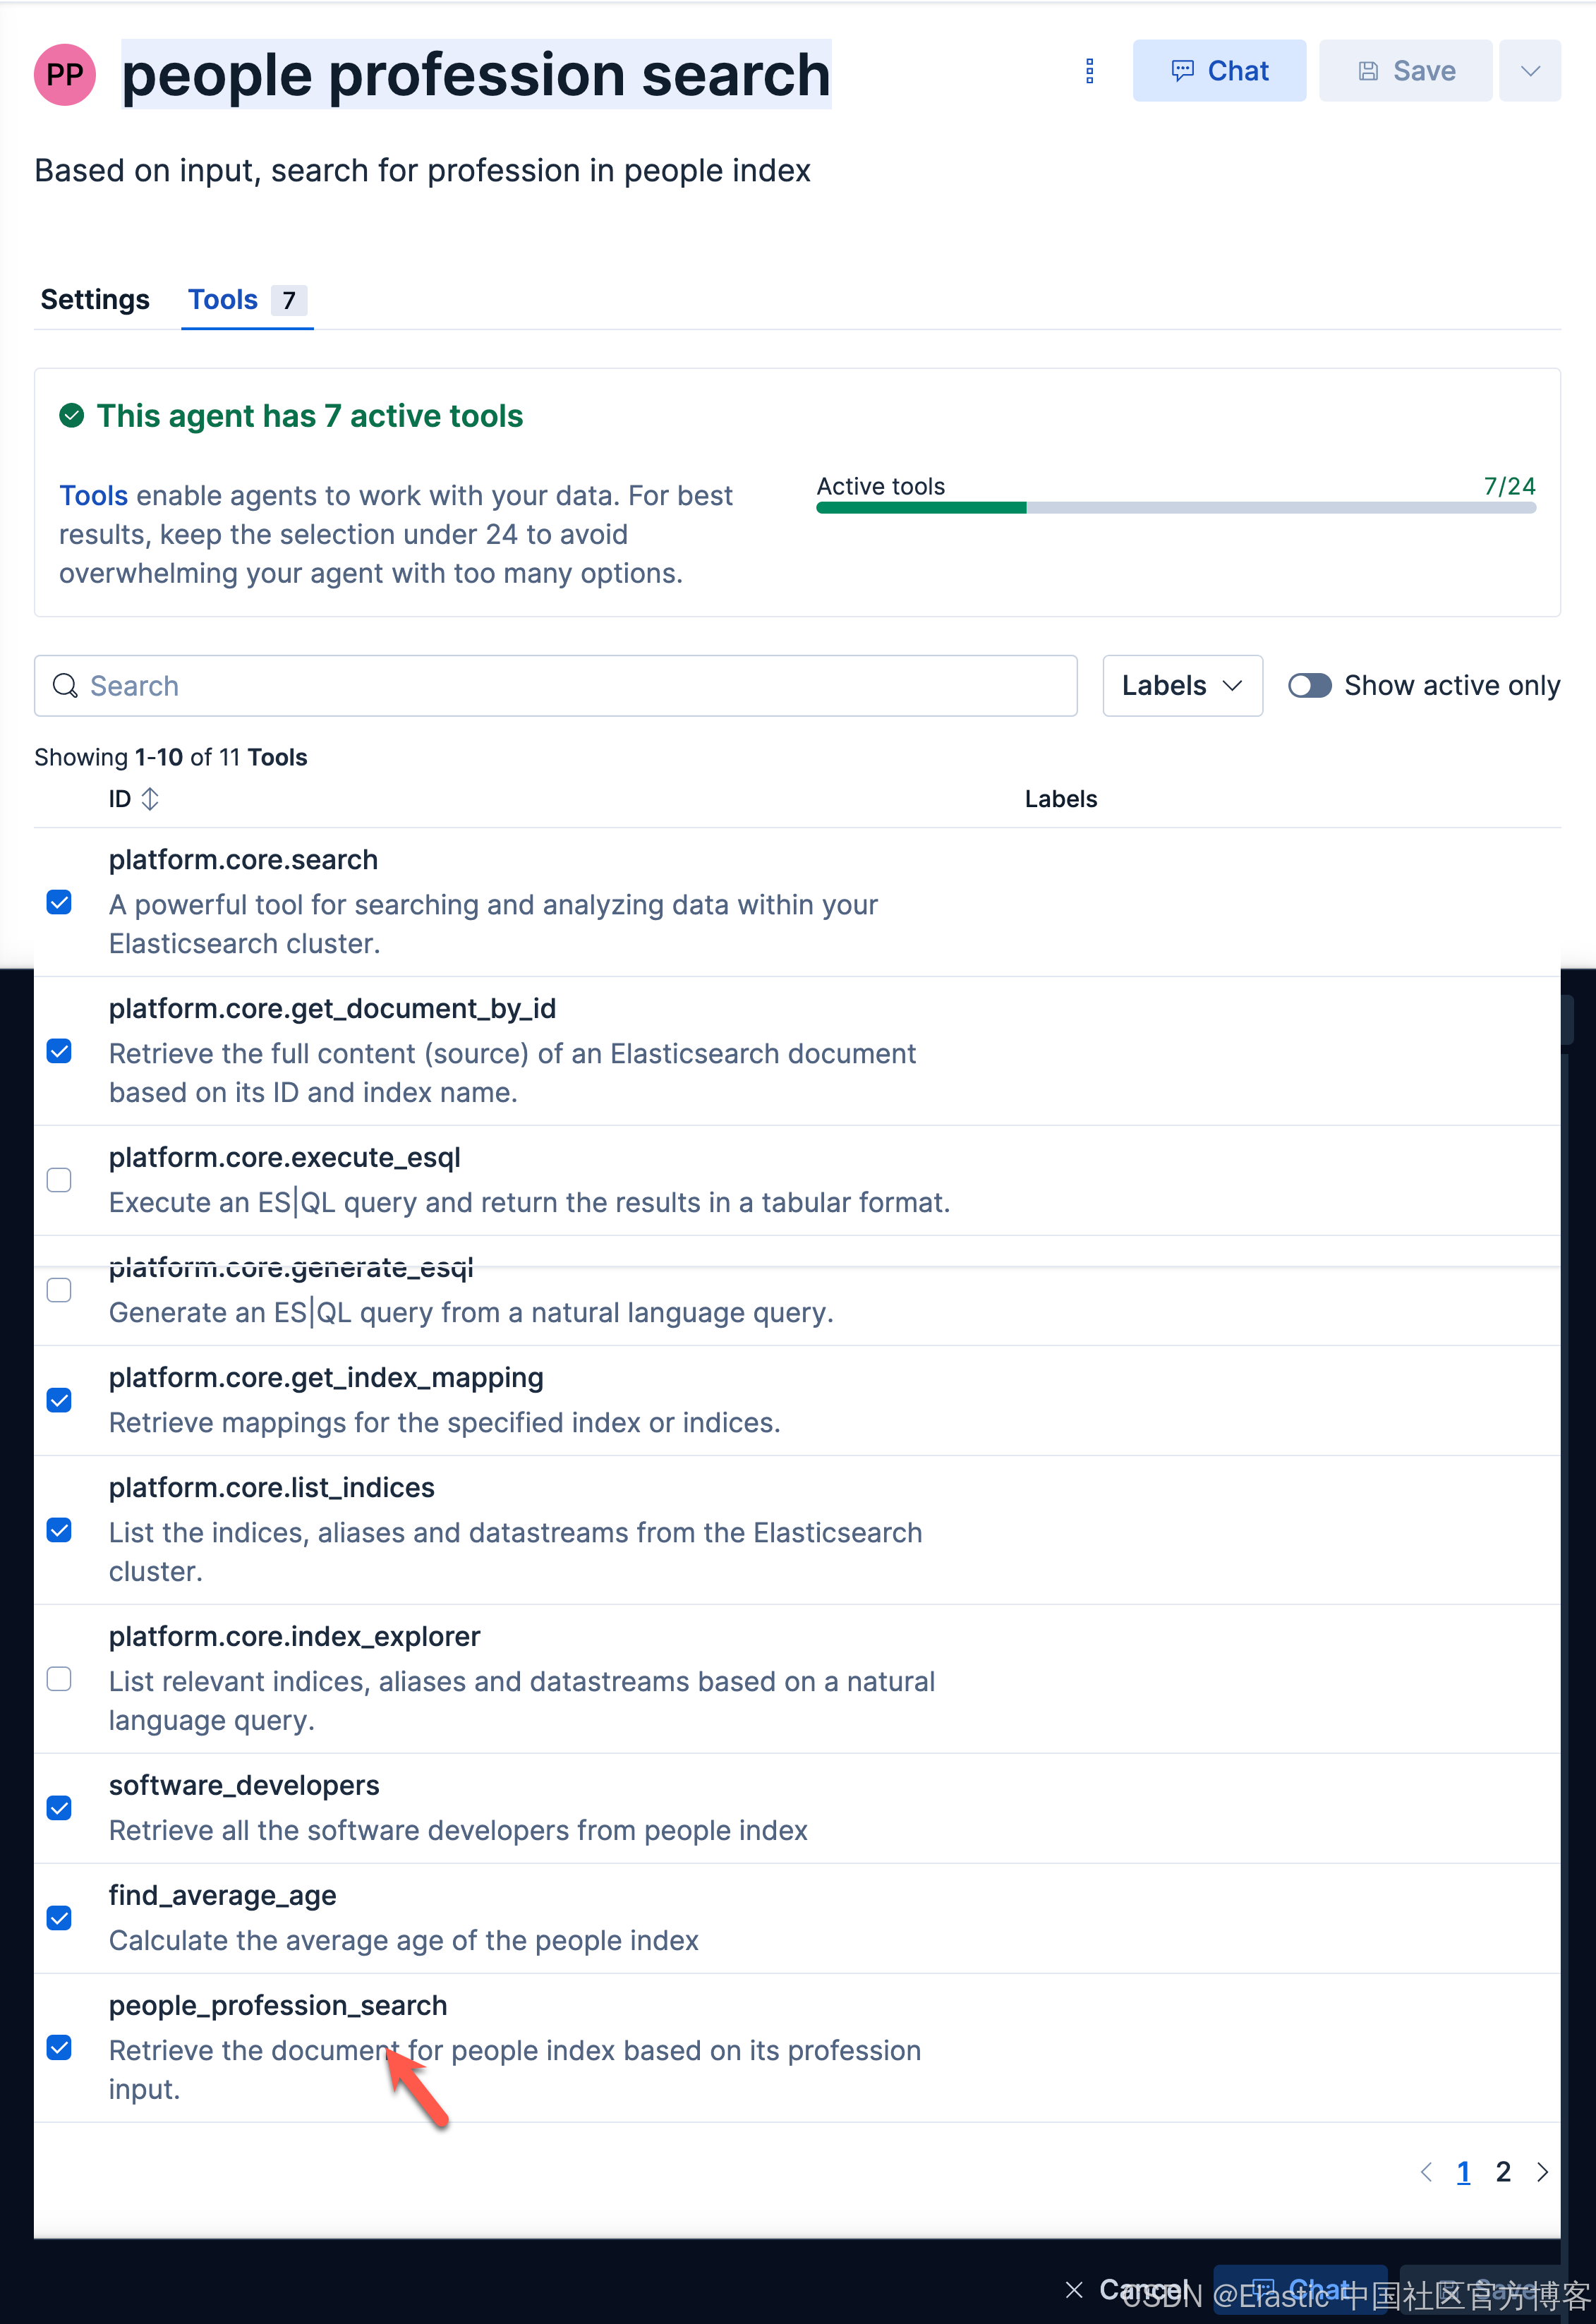
接下来,我们创建一个叫做 people profession search 的 agent:
我们在她的 Tools 选择我们刚才创建的 tool:
接下来,我们使用这个 agent 来进行查询:
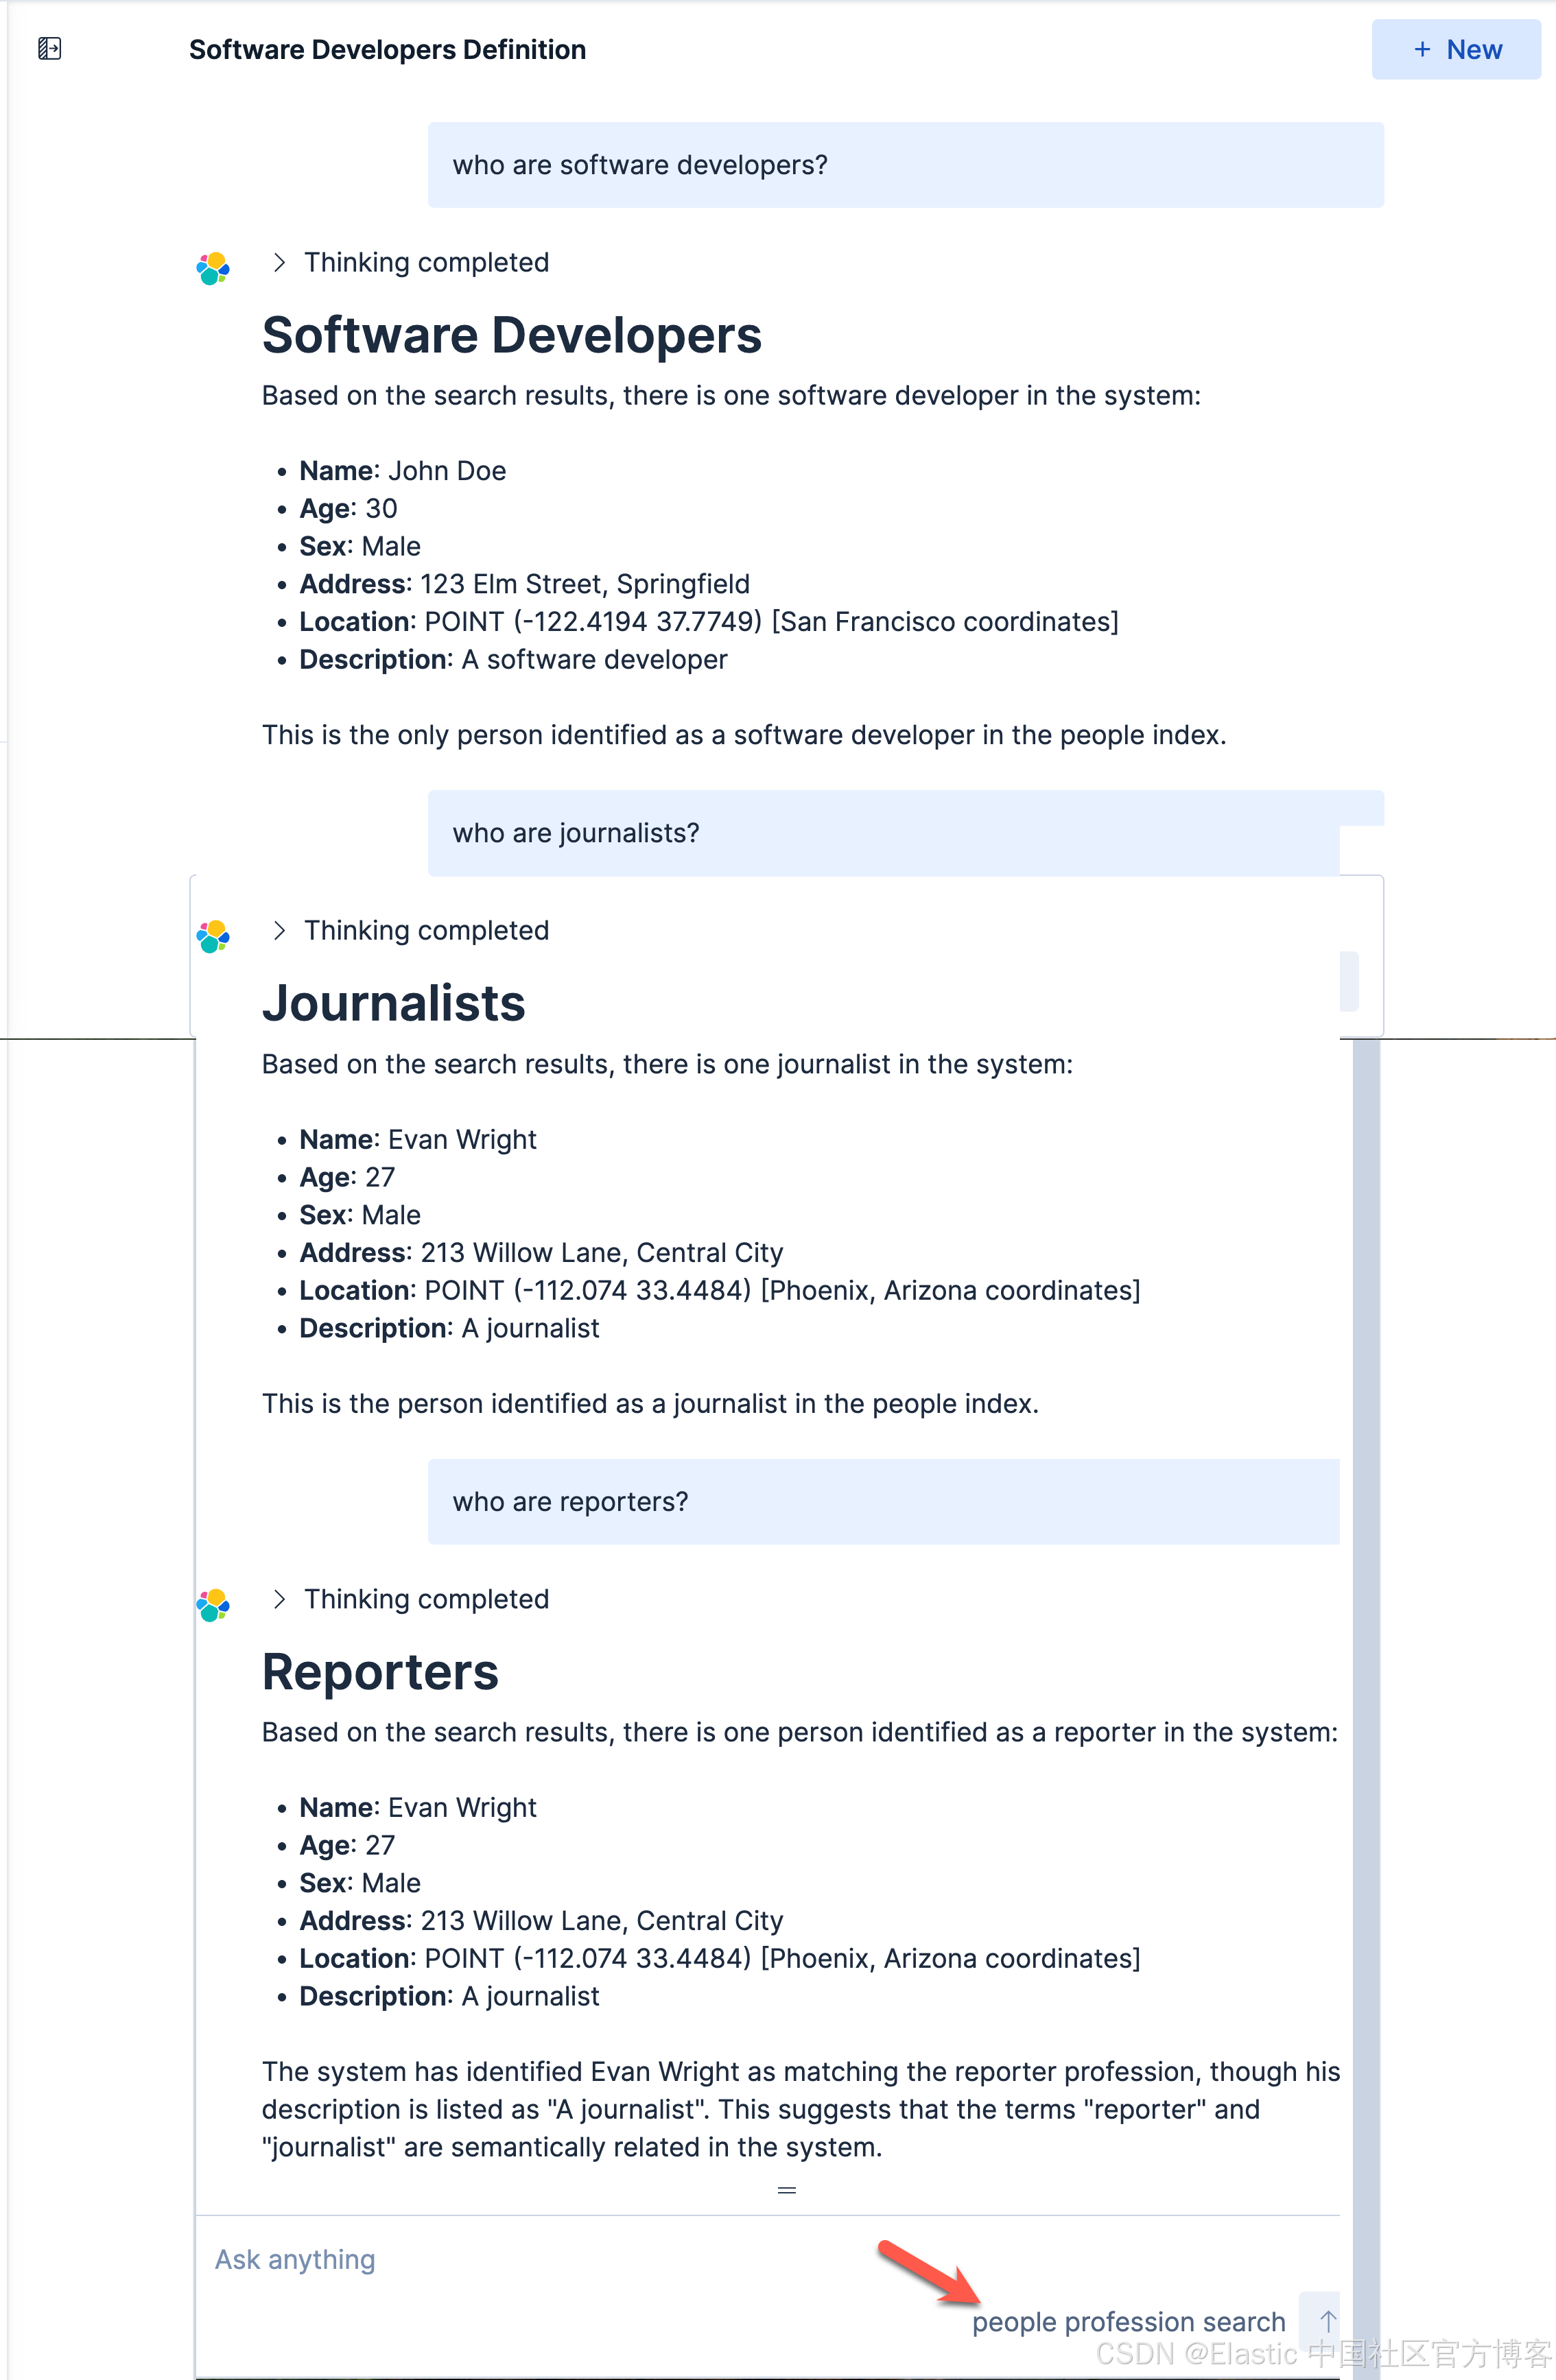
很显然,这次它能帮我们查询 journalist 了。
创建查找年龄平均值的 agent
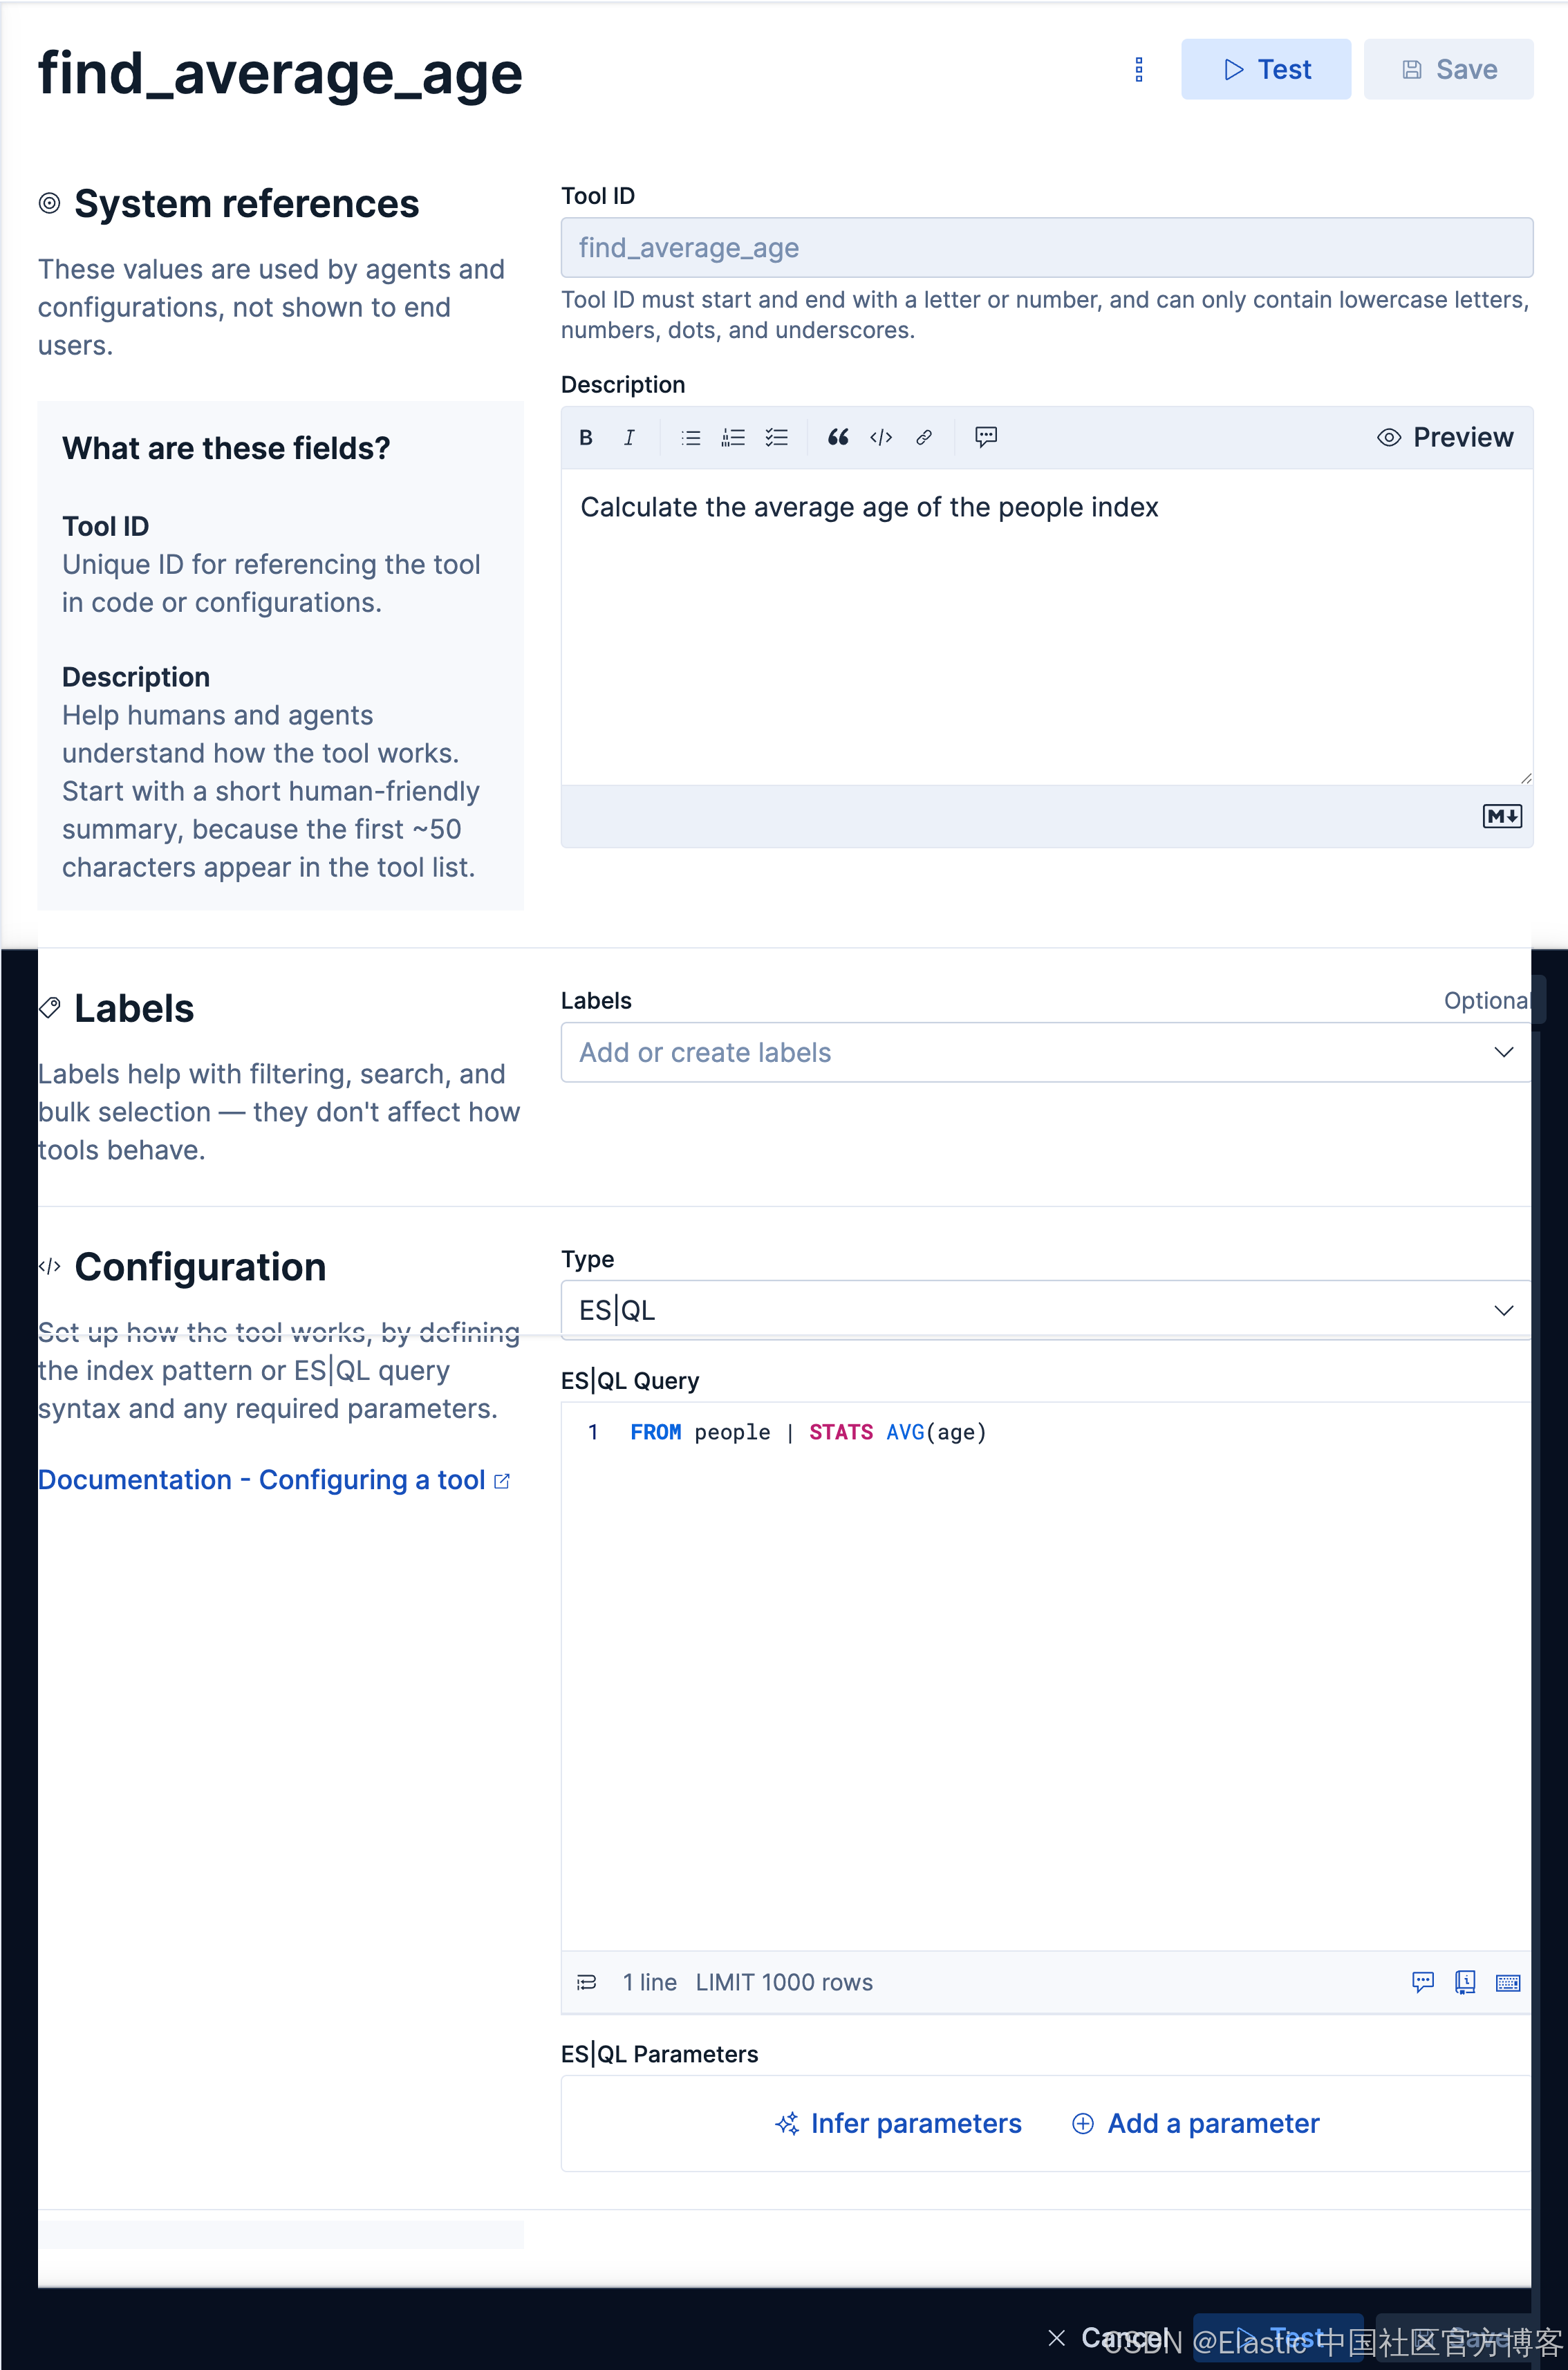
如法炮制,我们创建如下的一个 tool:
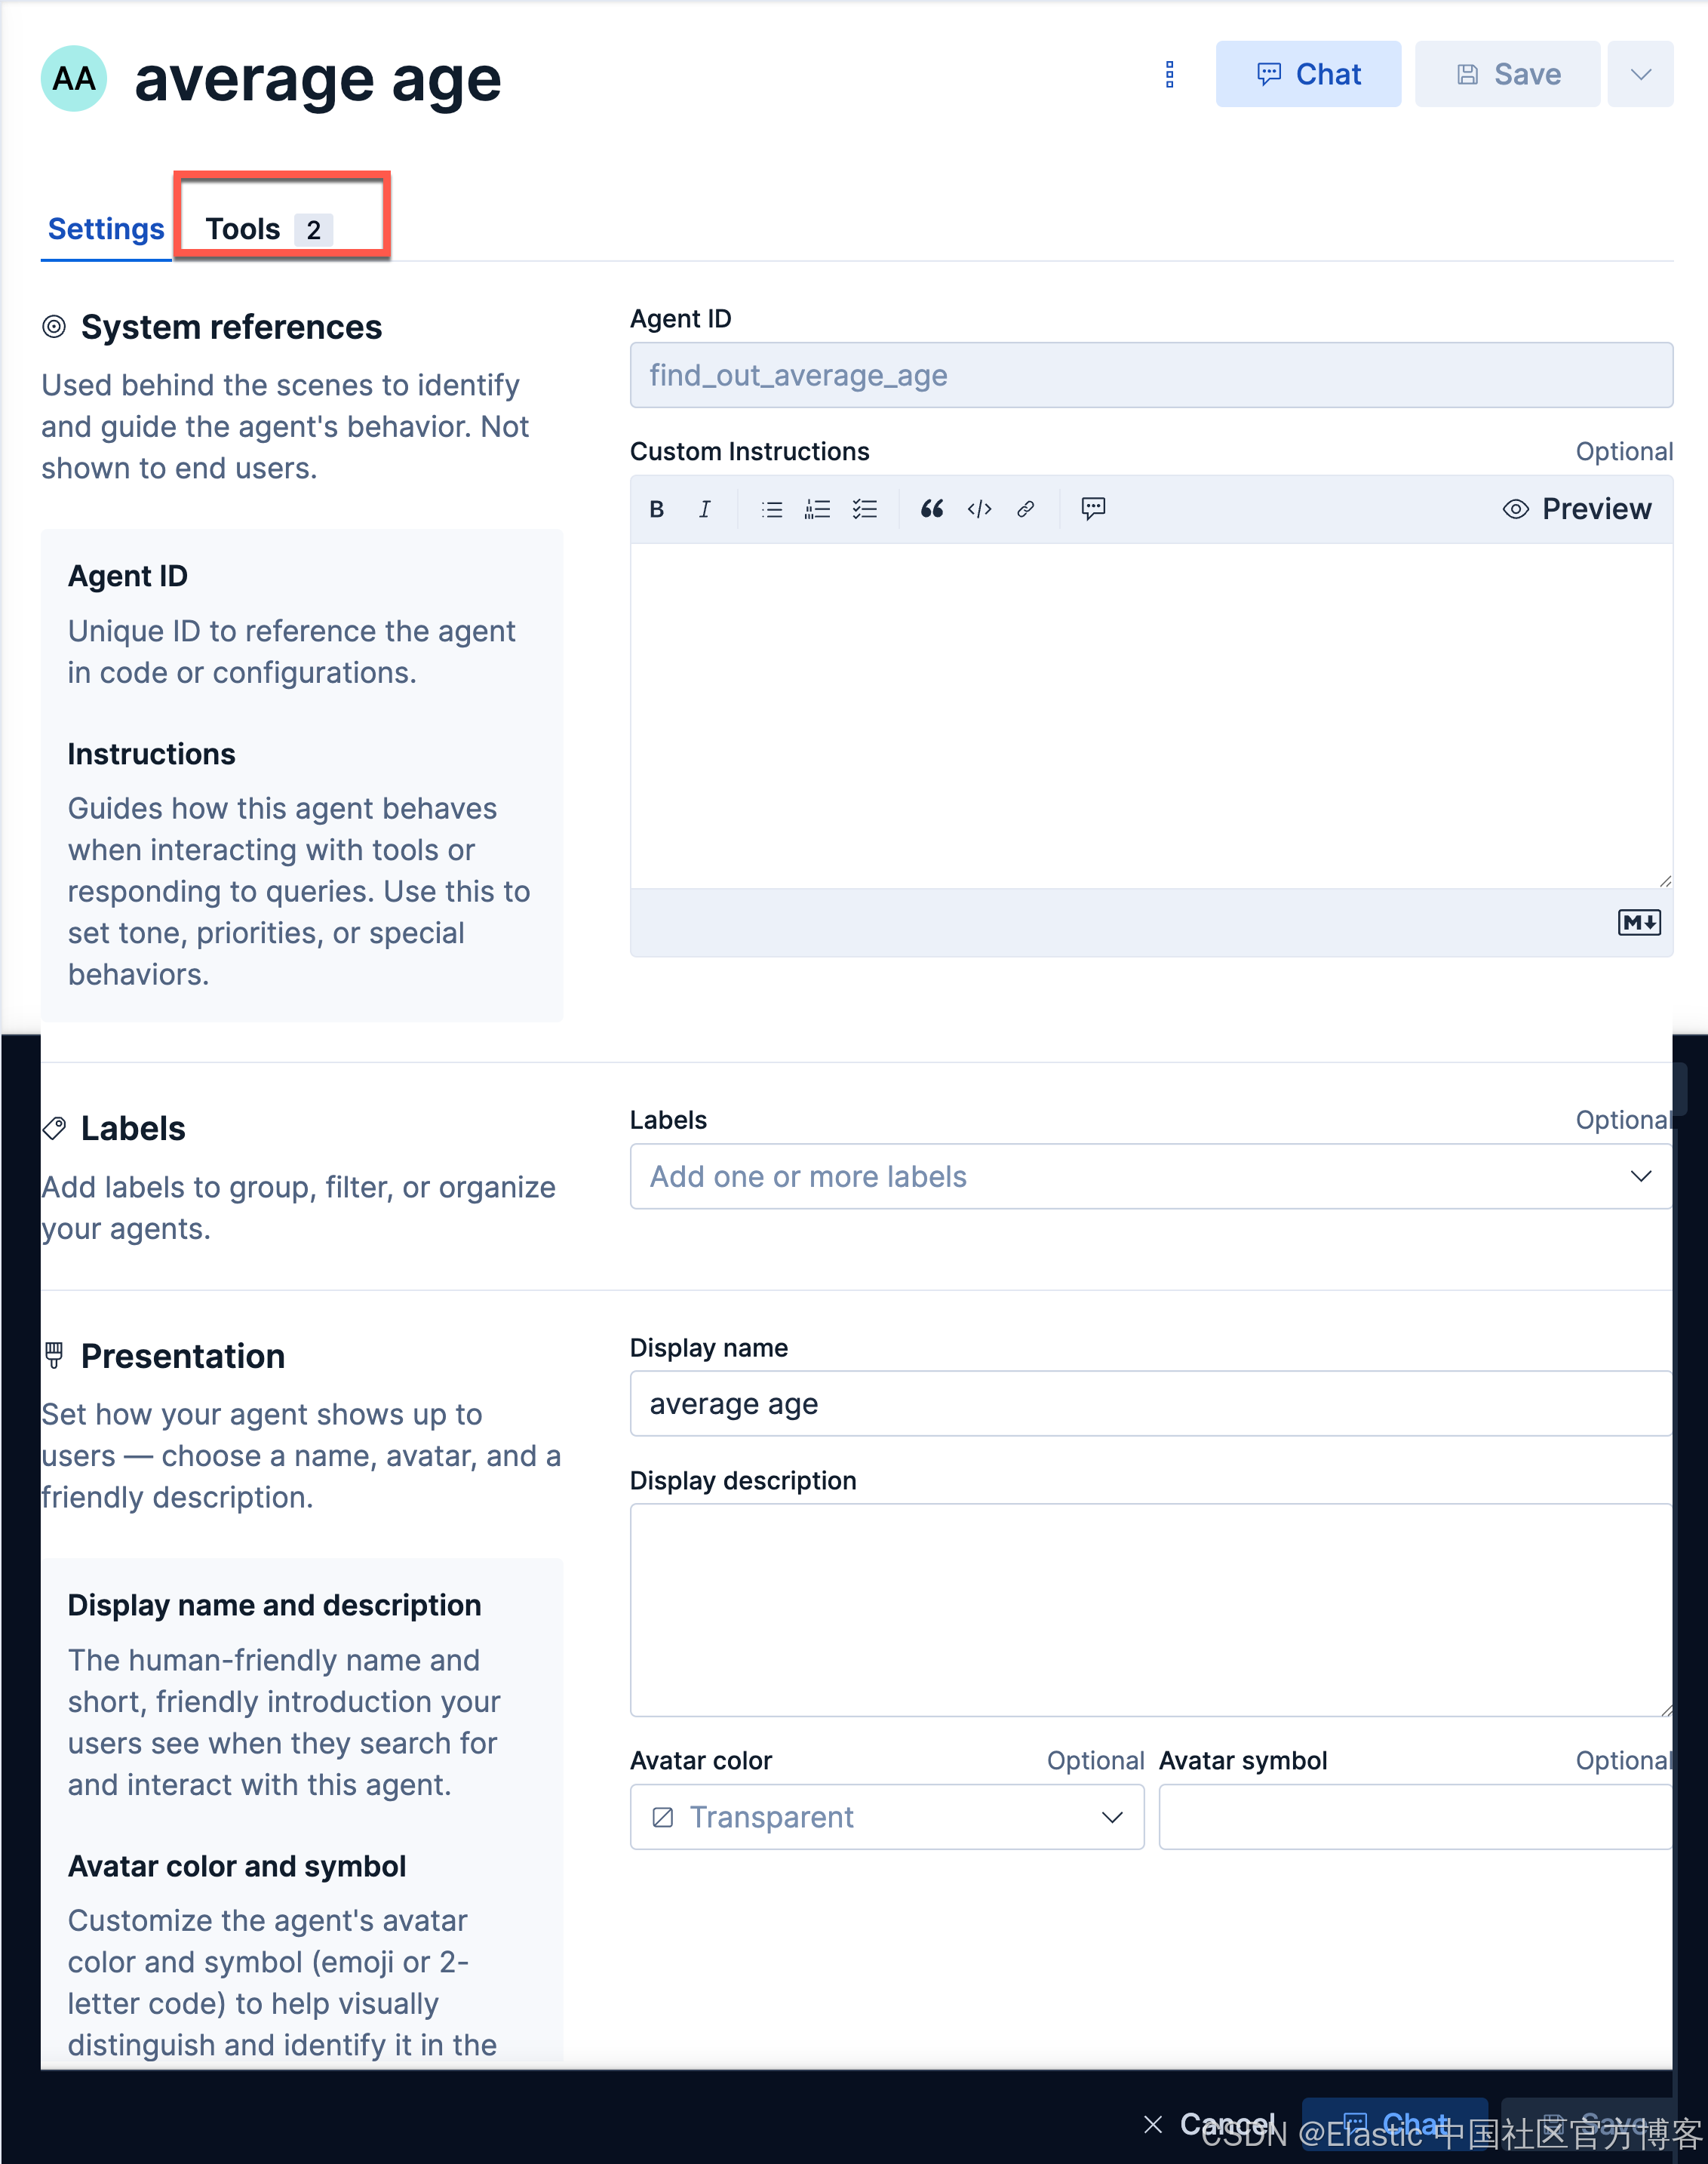
我们创建如下的一个 agent:
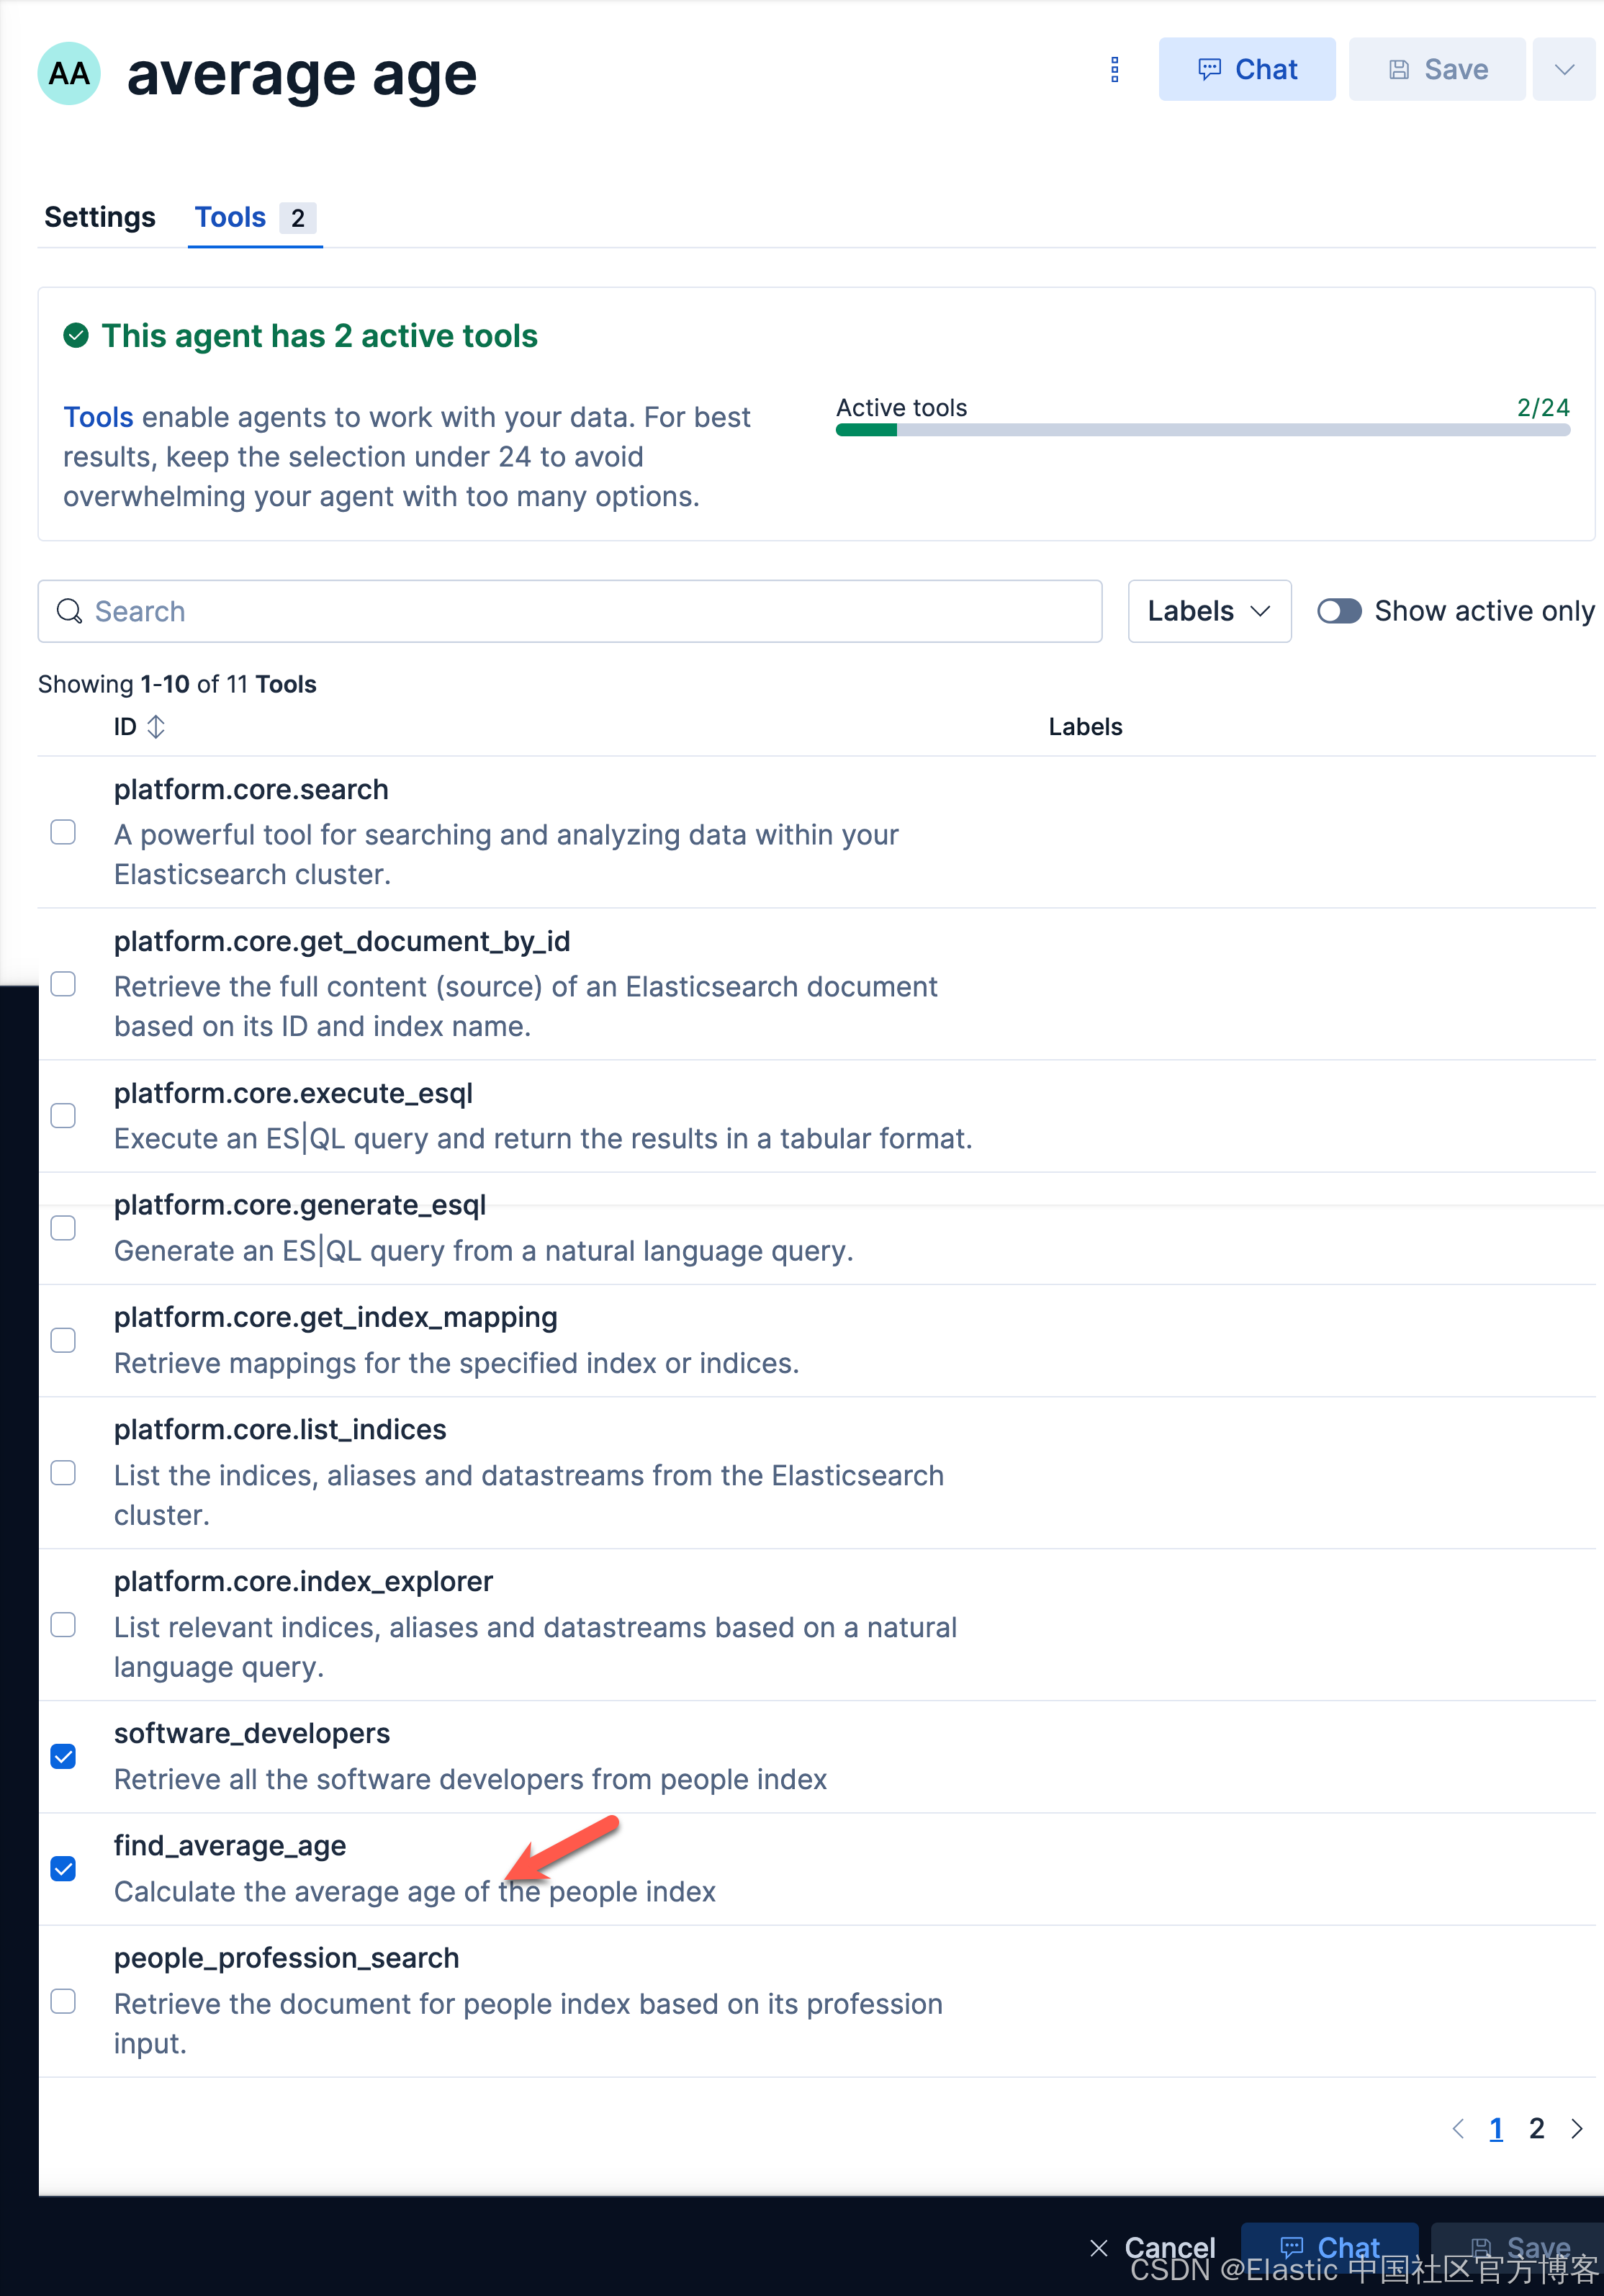
我们来查询一下:
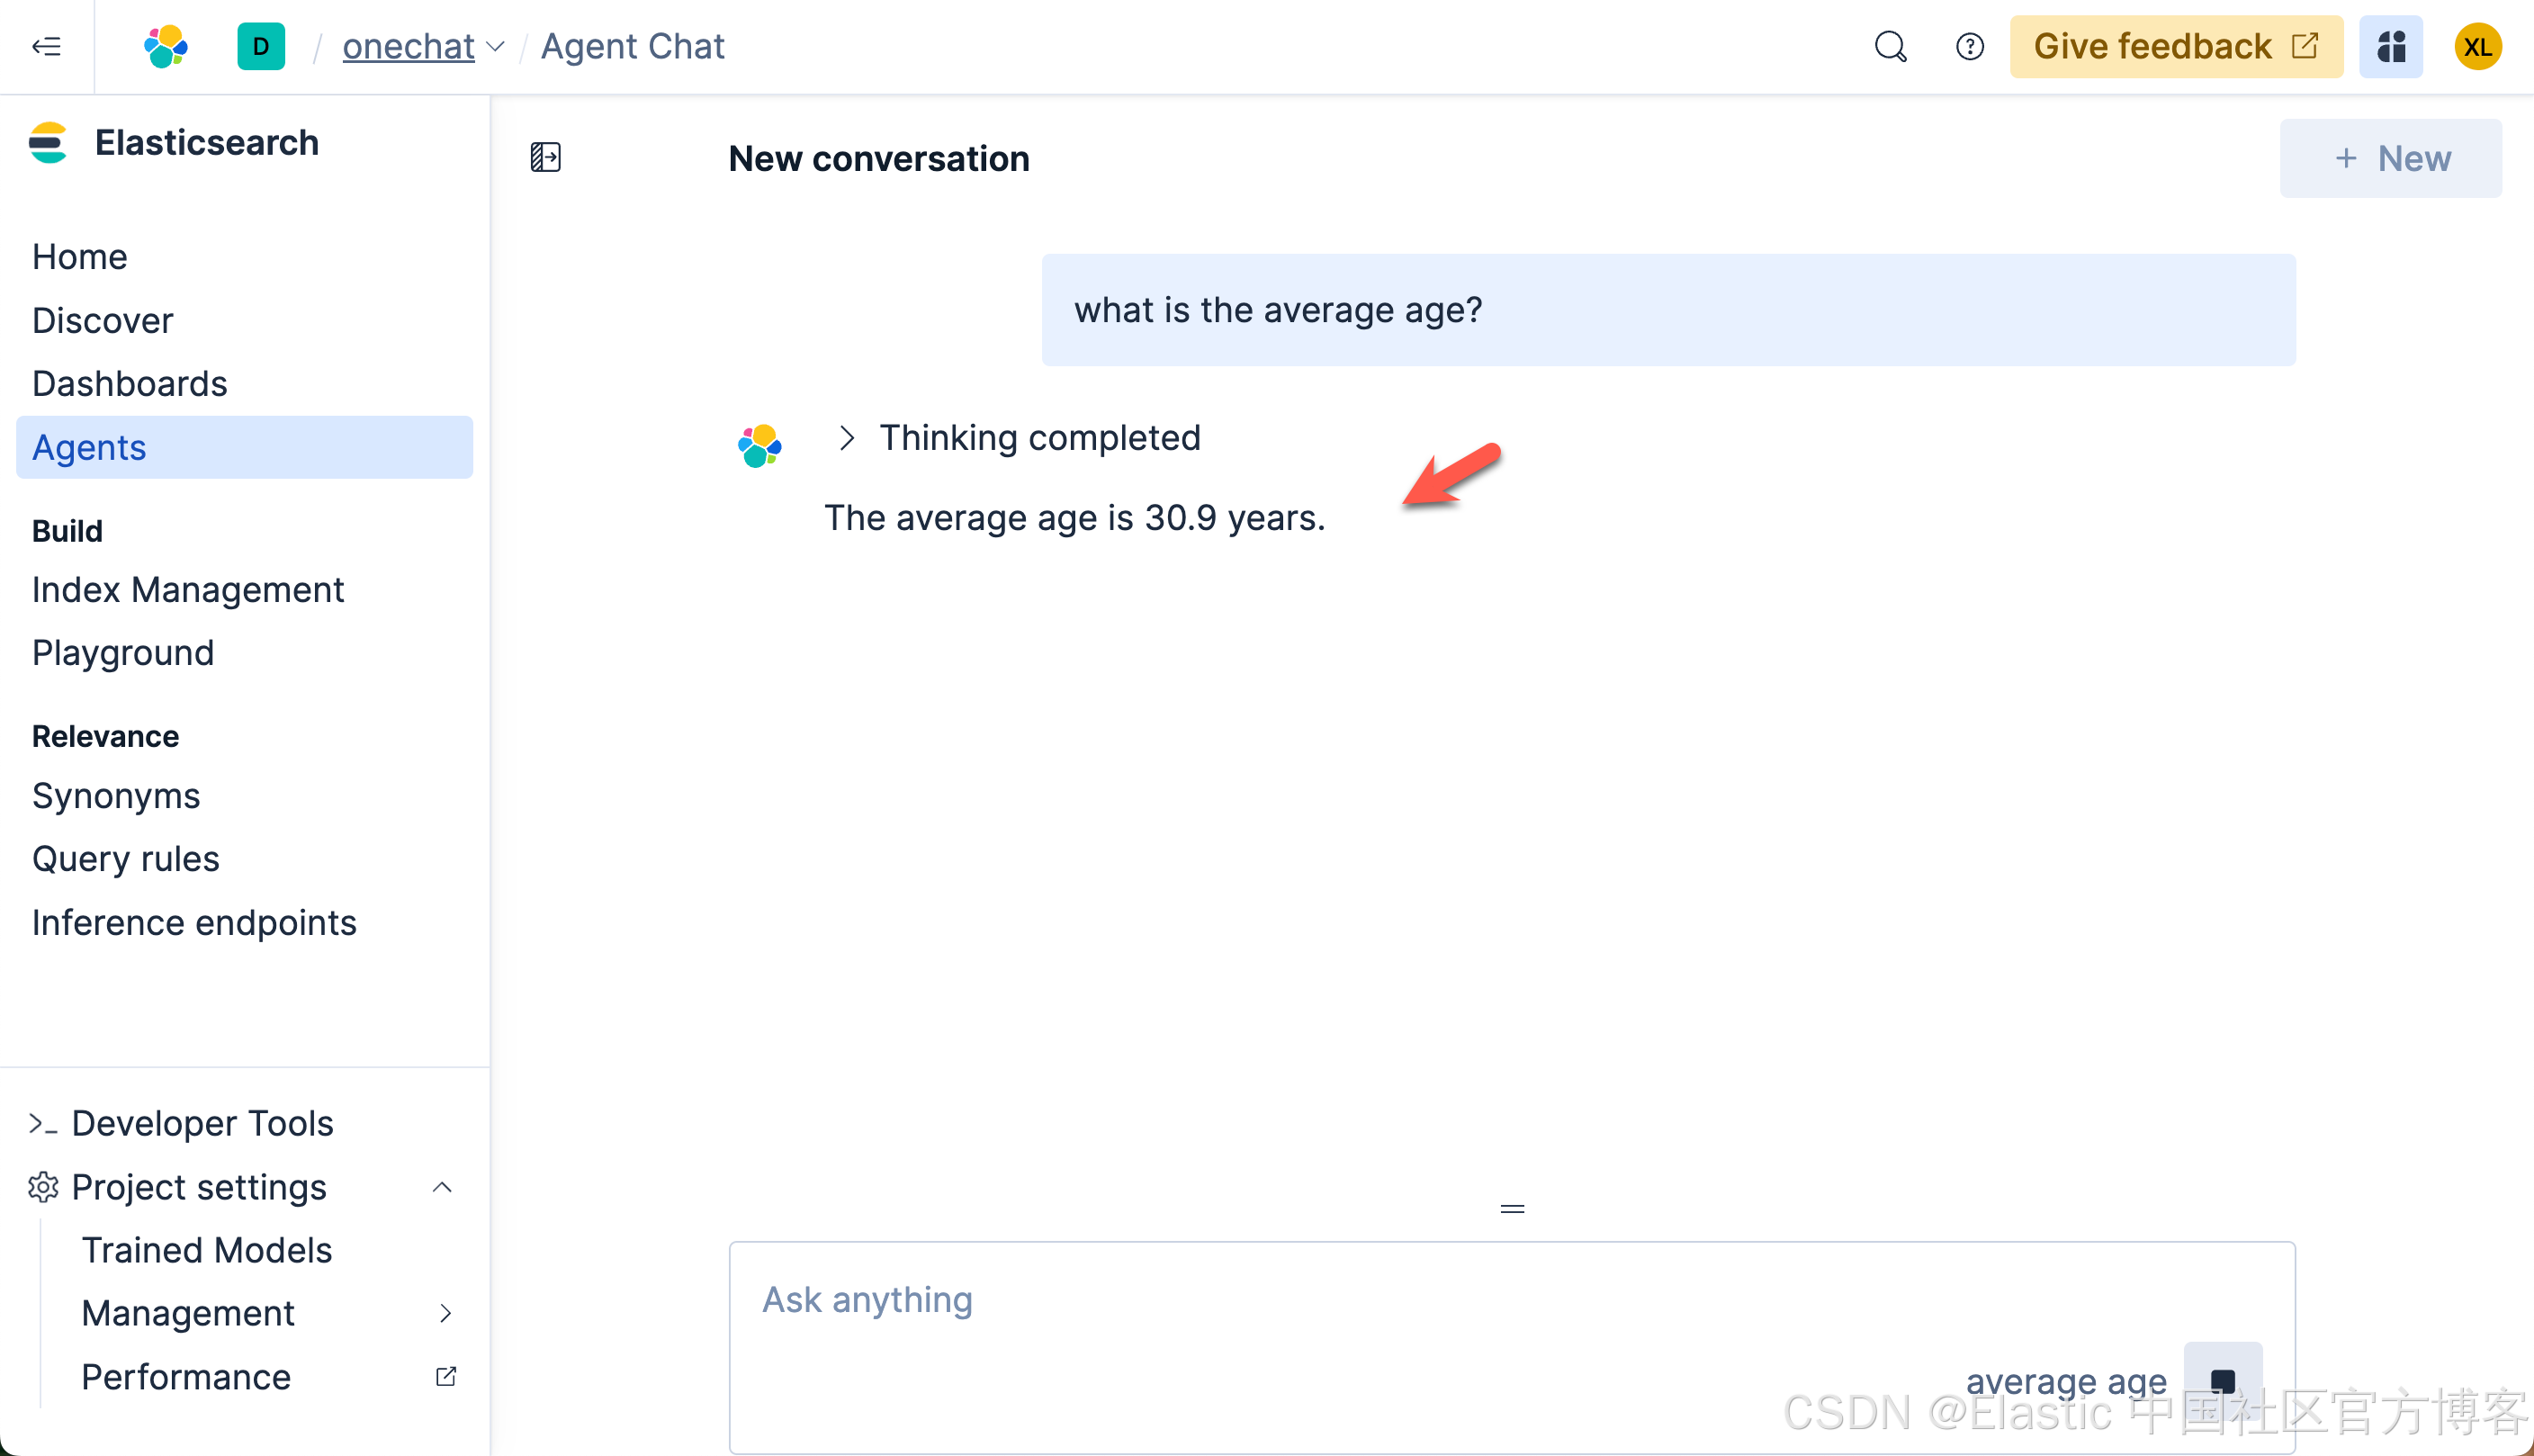
我们很快就可以得到结果。
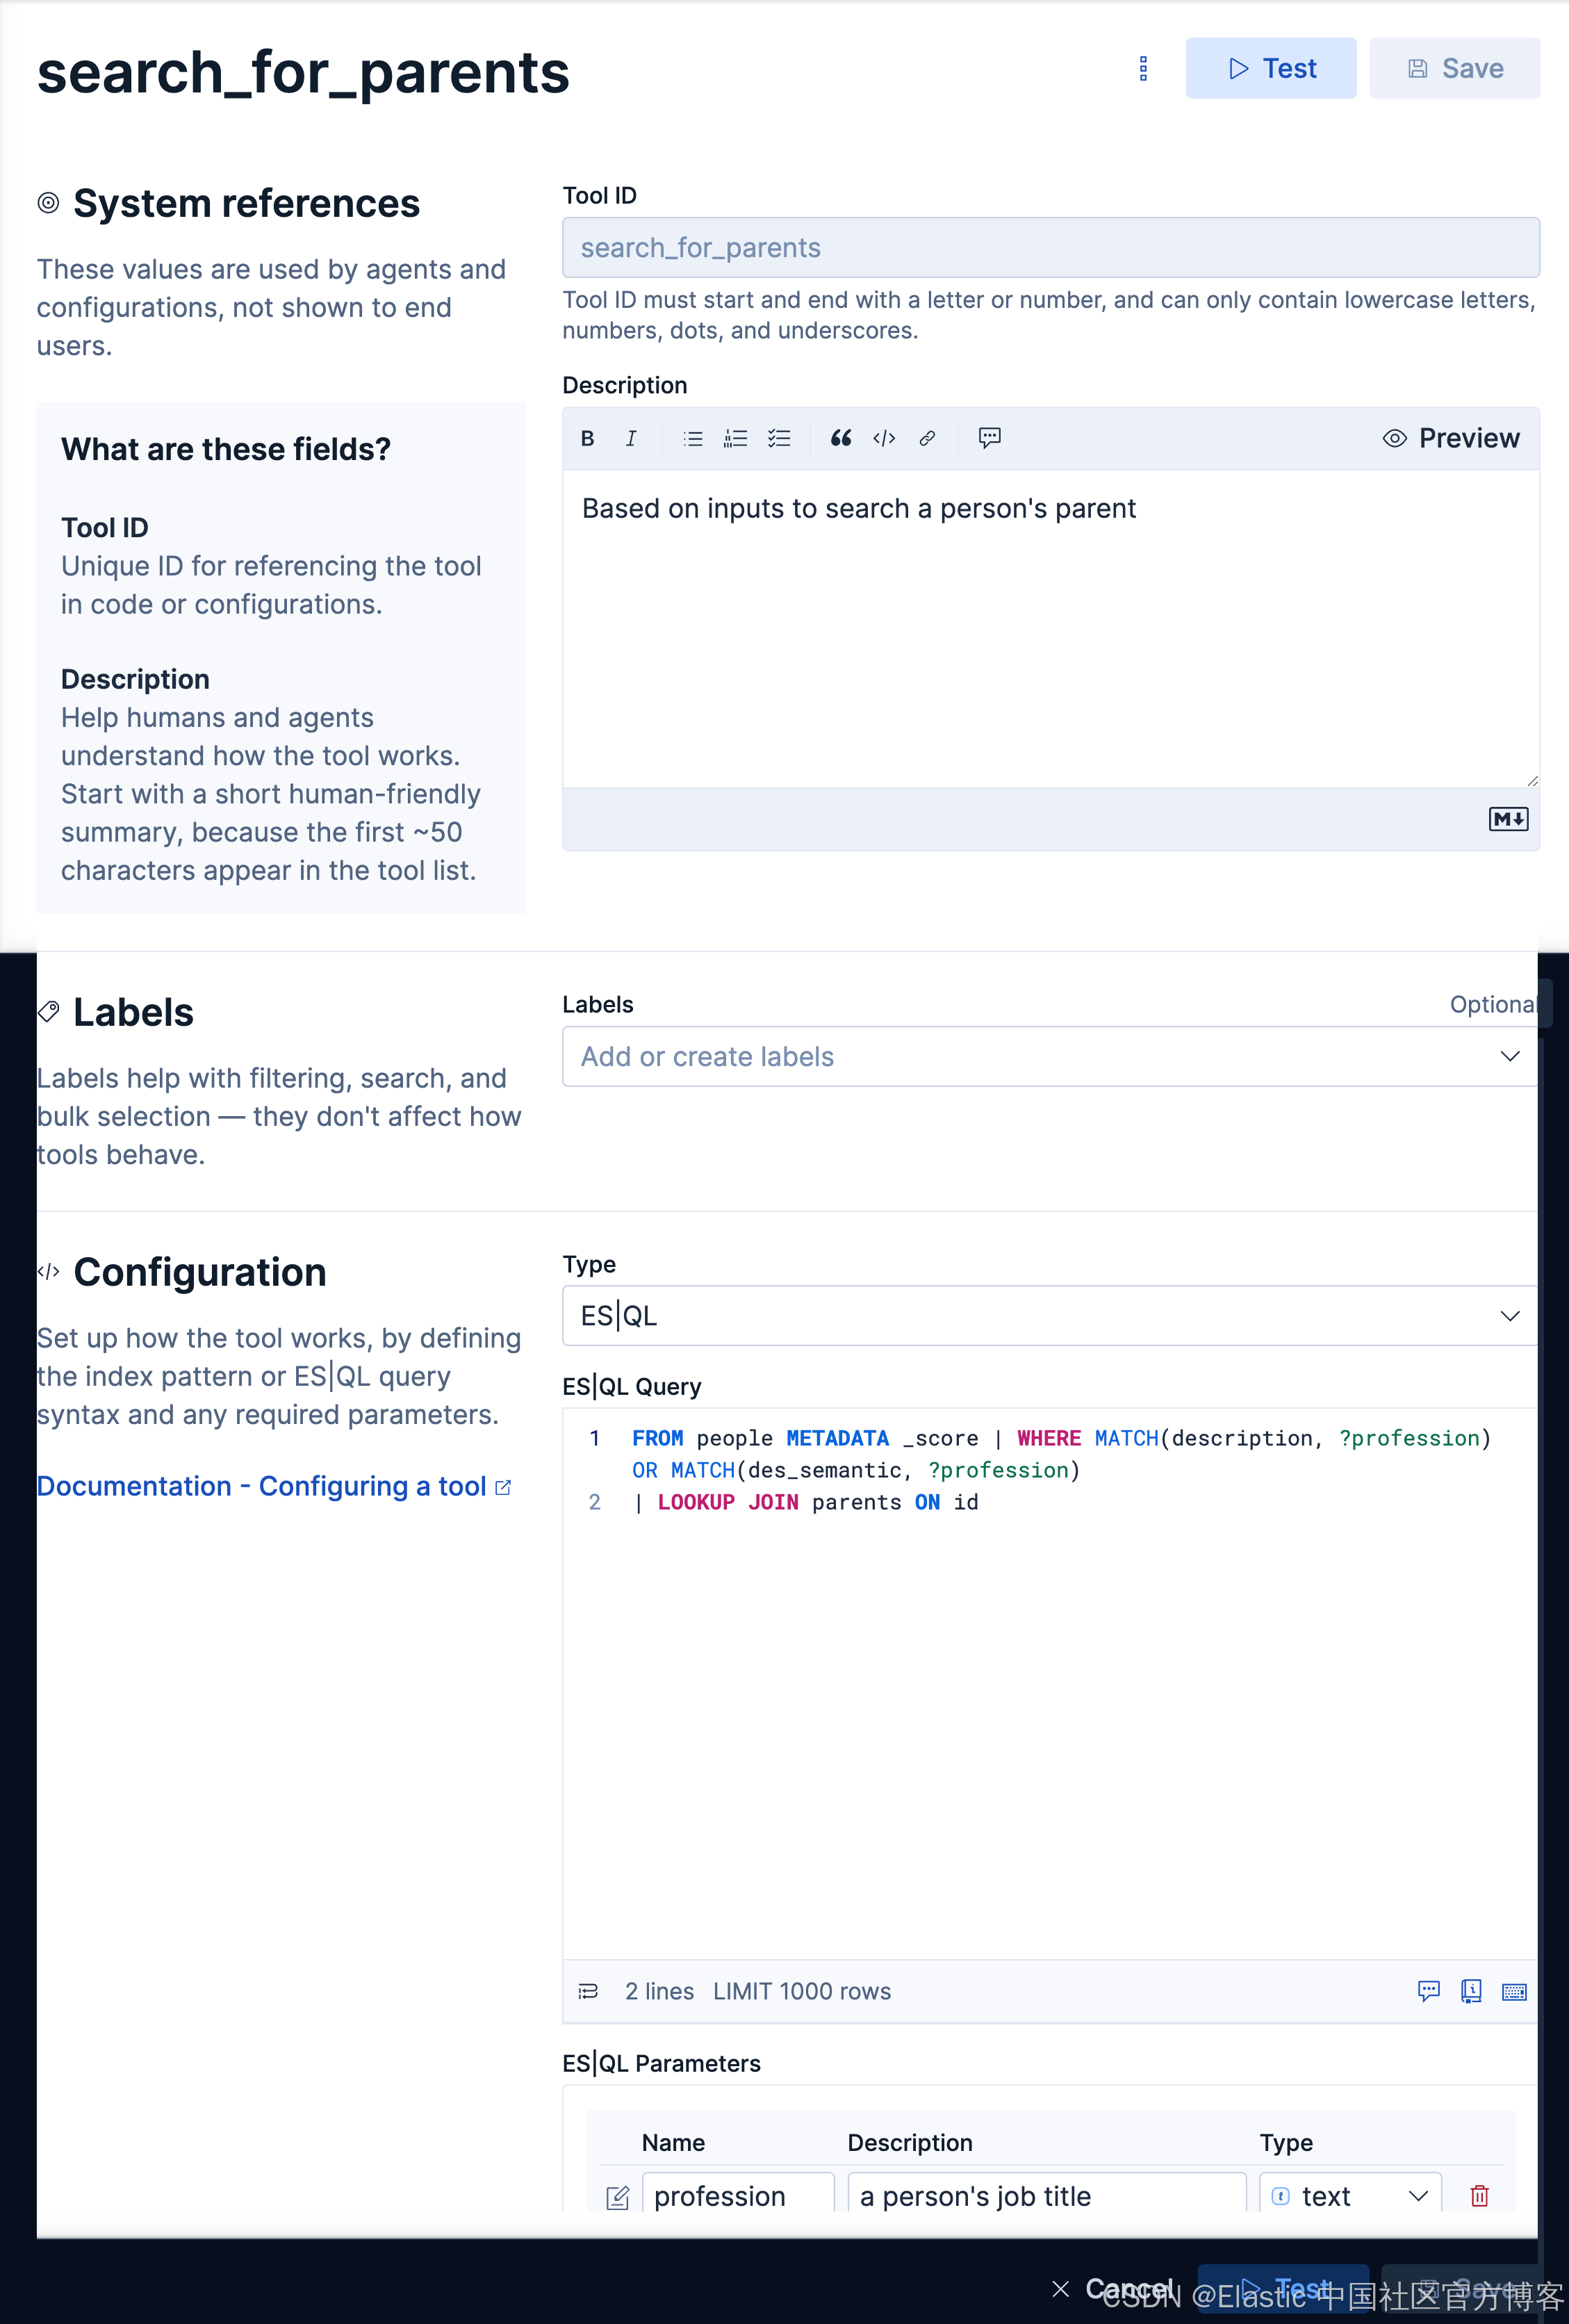
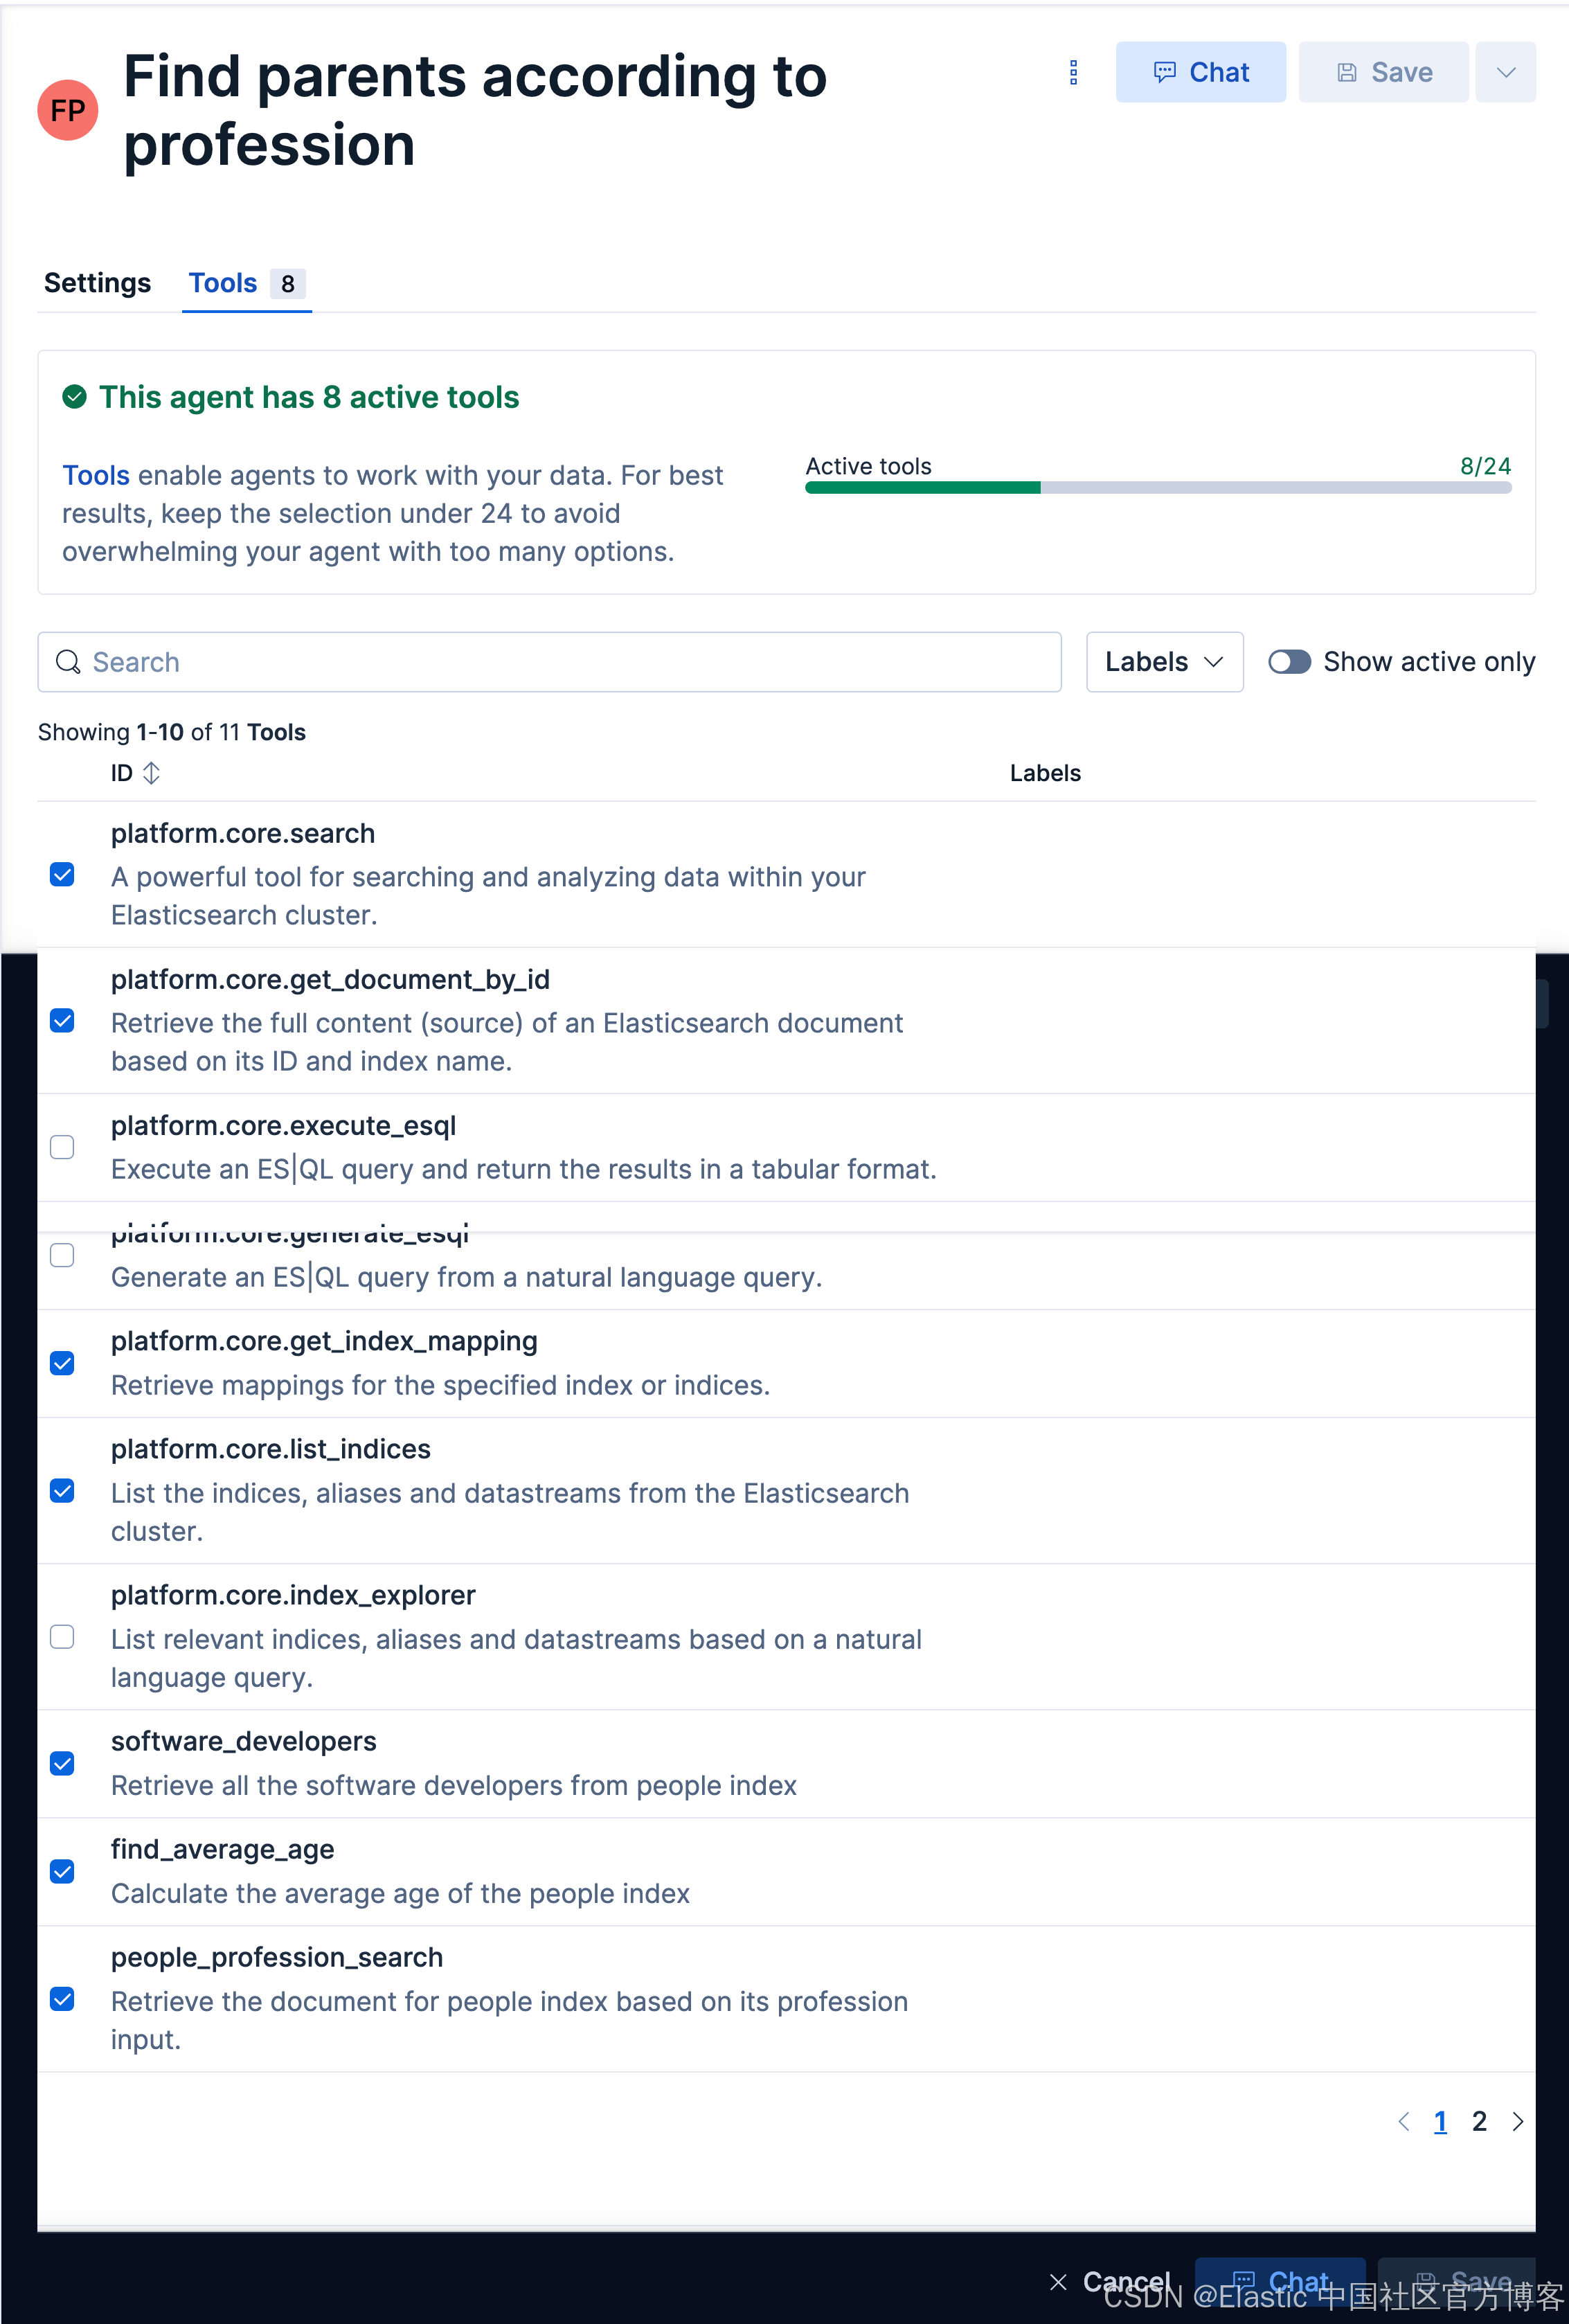
创建查询父母的 agent
查询父母,我们需要用到两个表格,并使它们利用 id 字段来进行关联。我们创建如下的 tool:
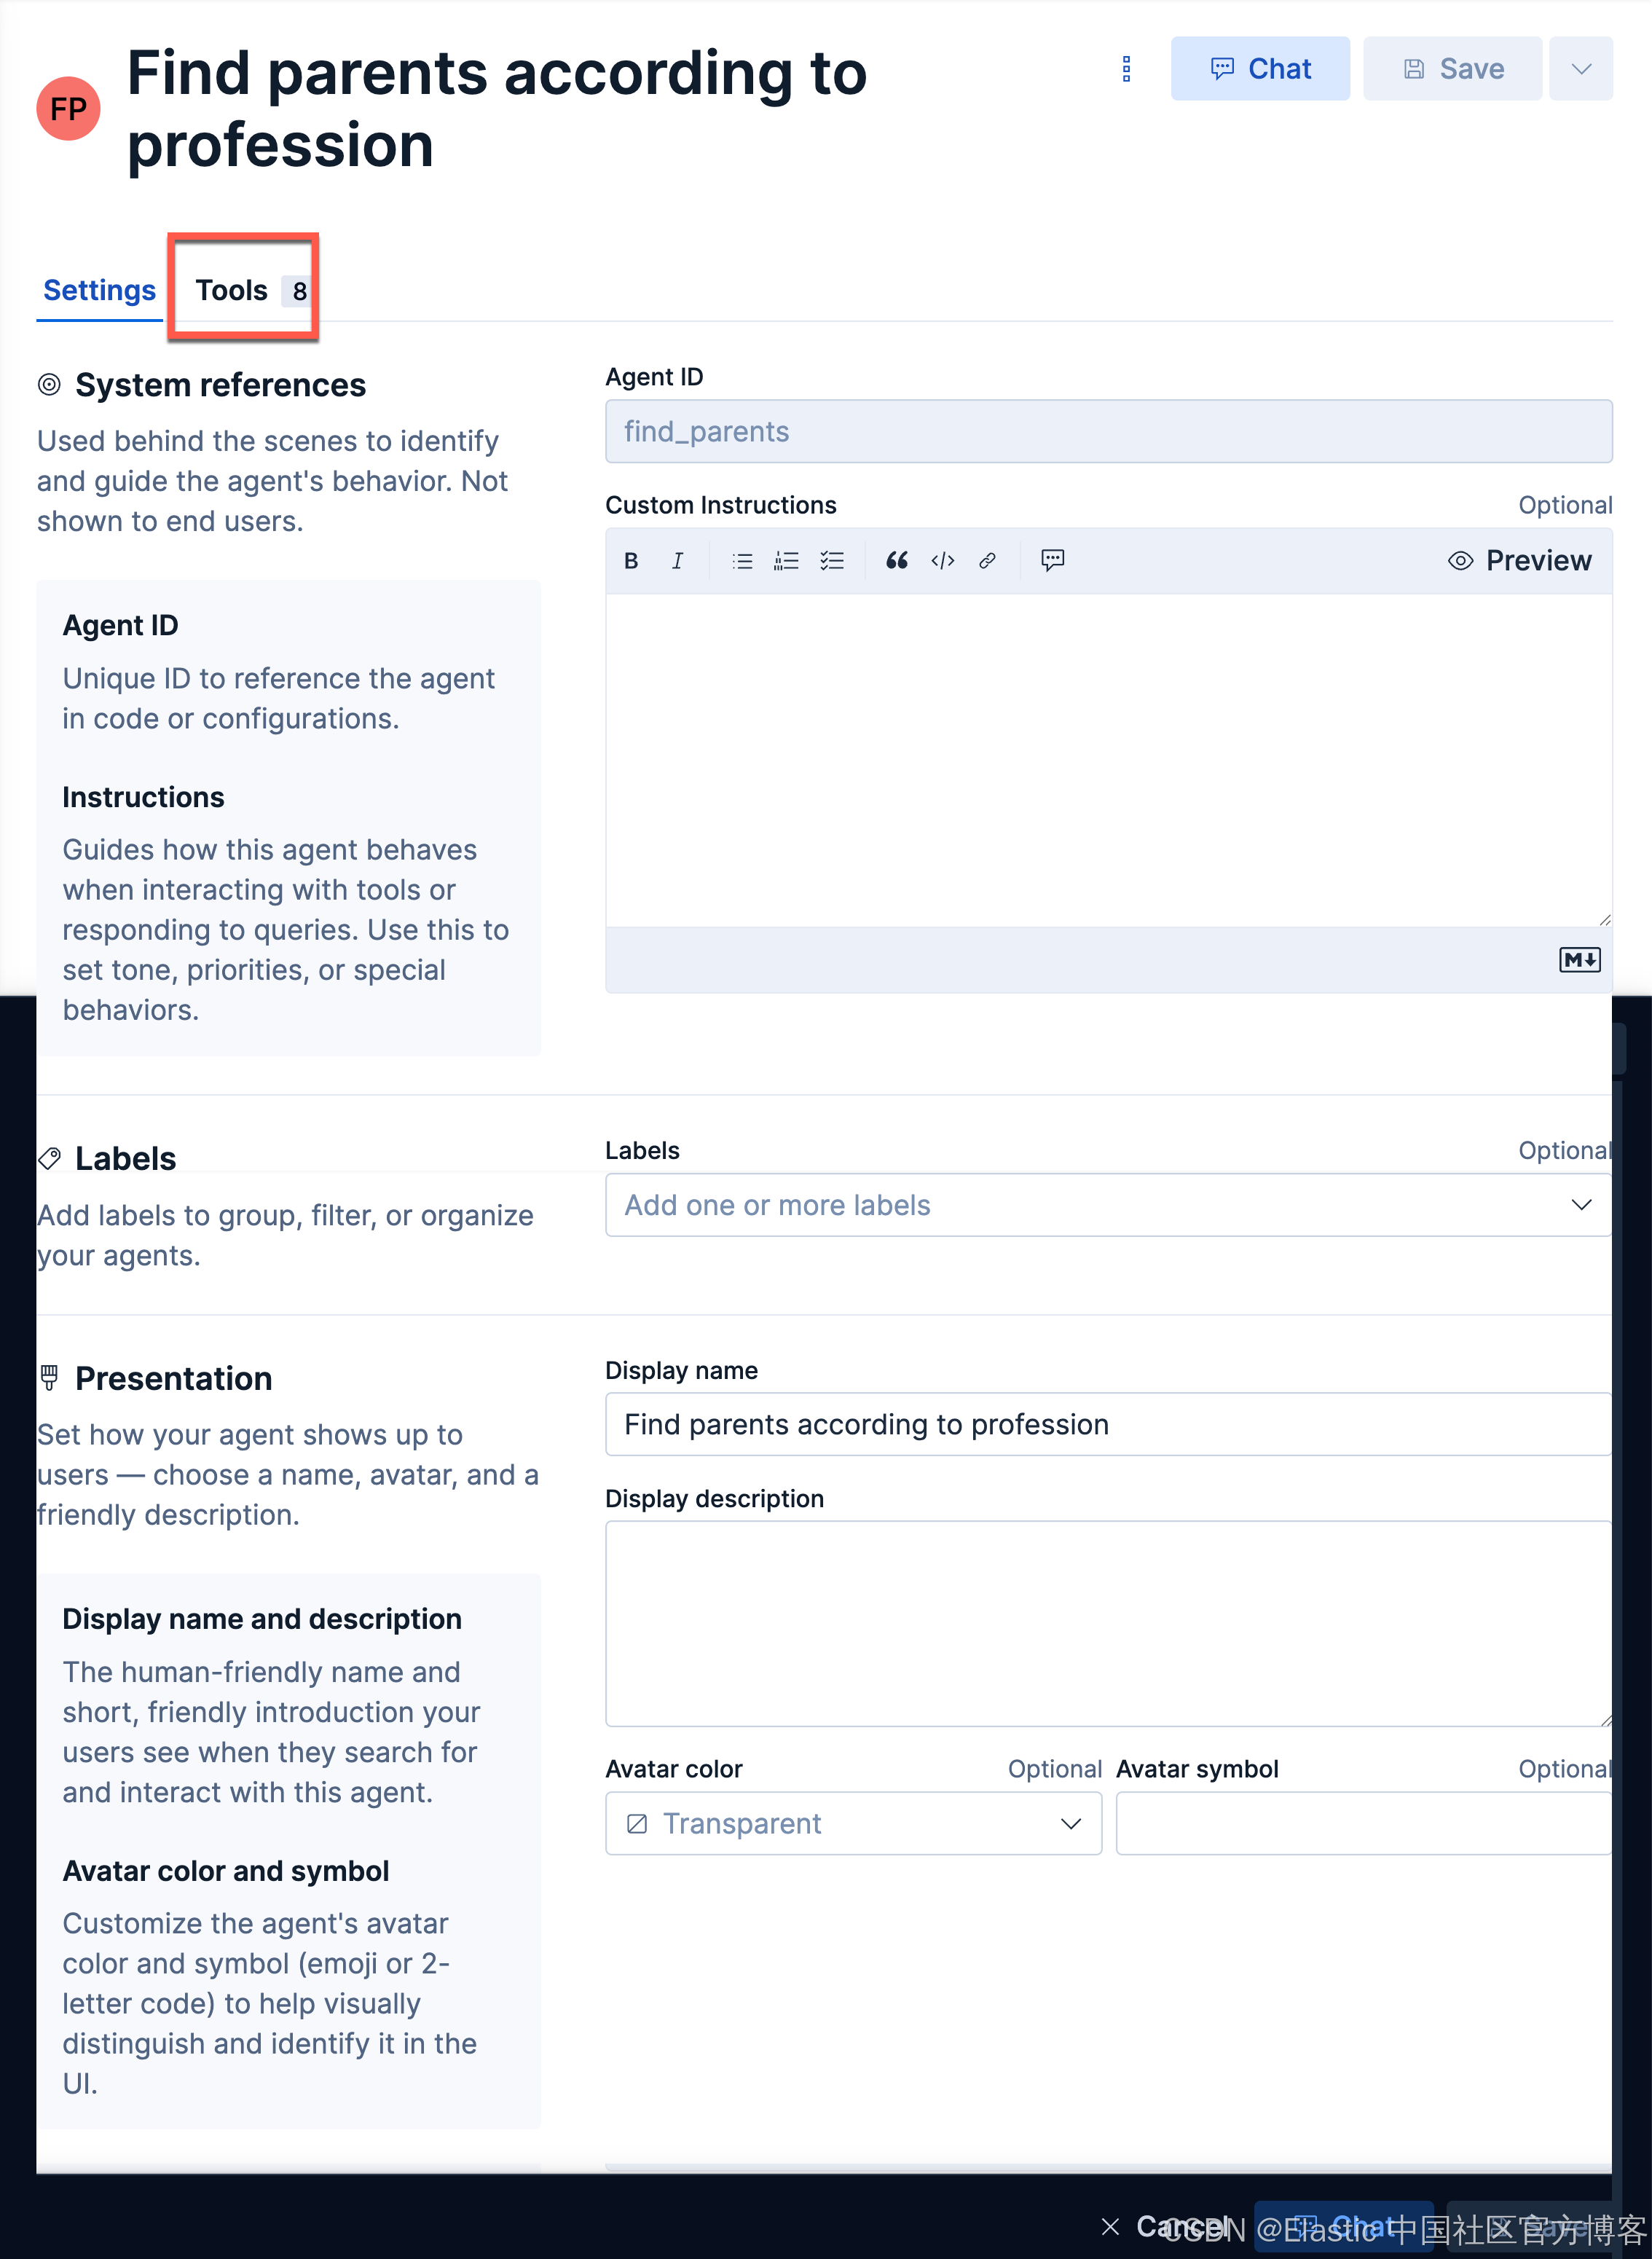
我们接下来创建如下的一个 agent:
我们来做如下的查询:
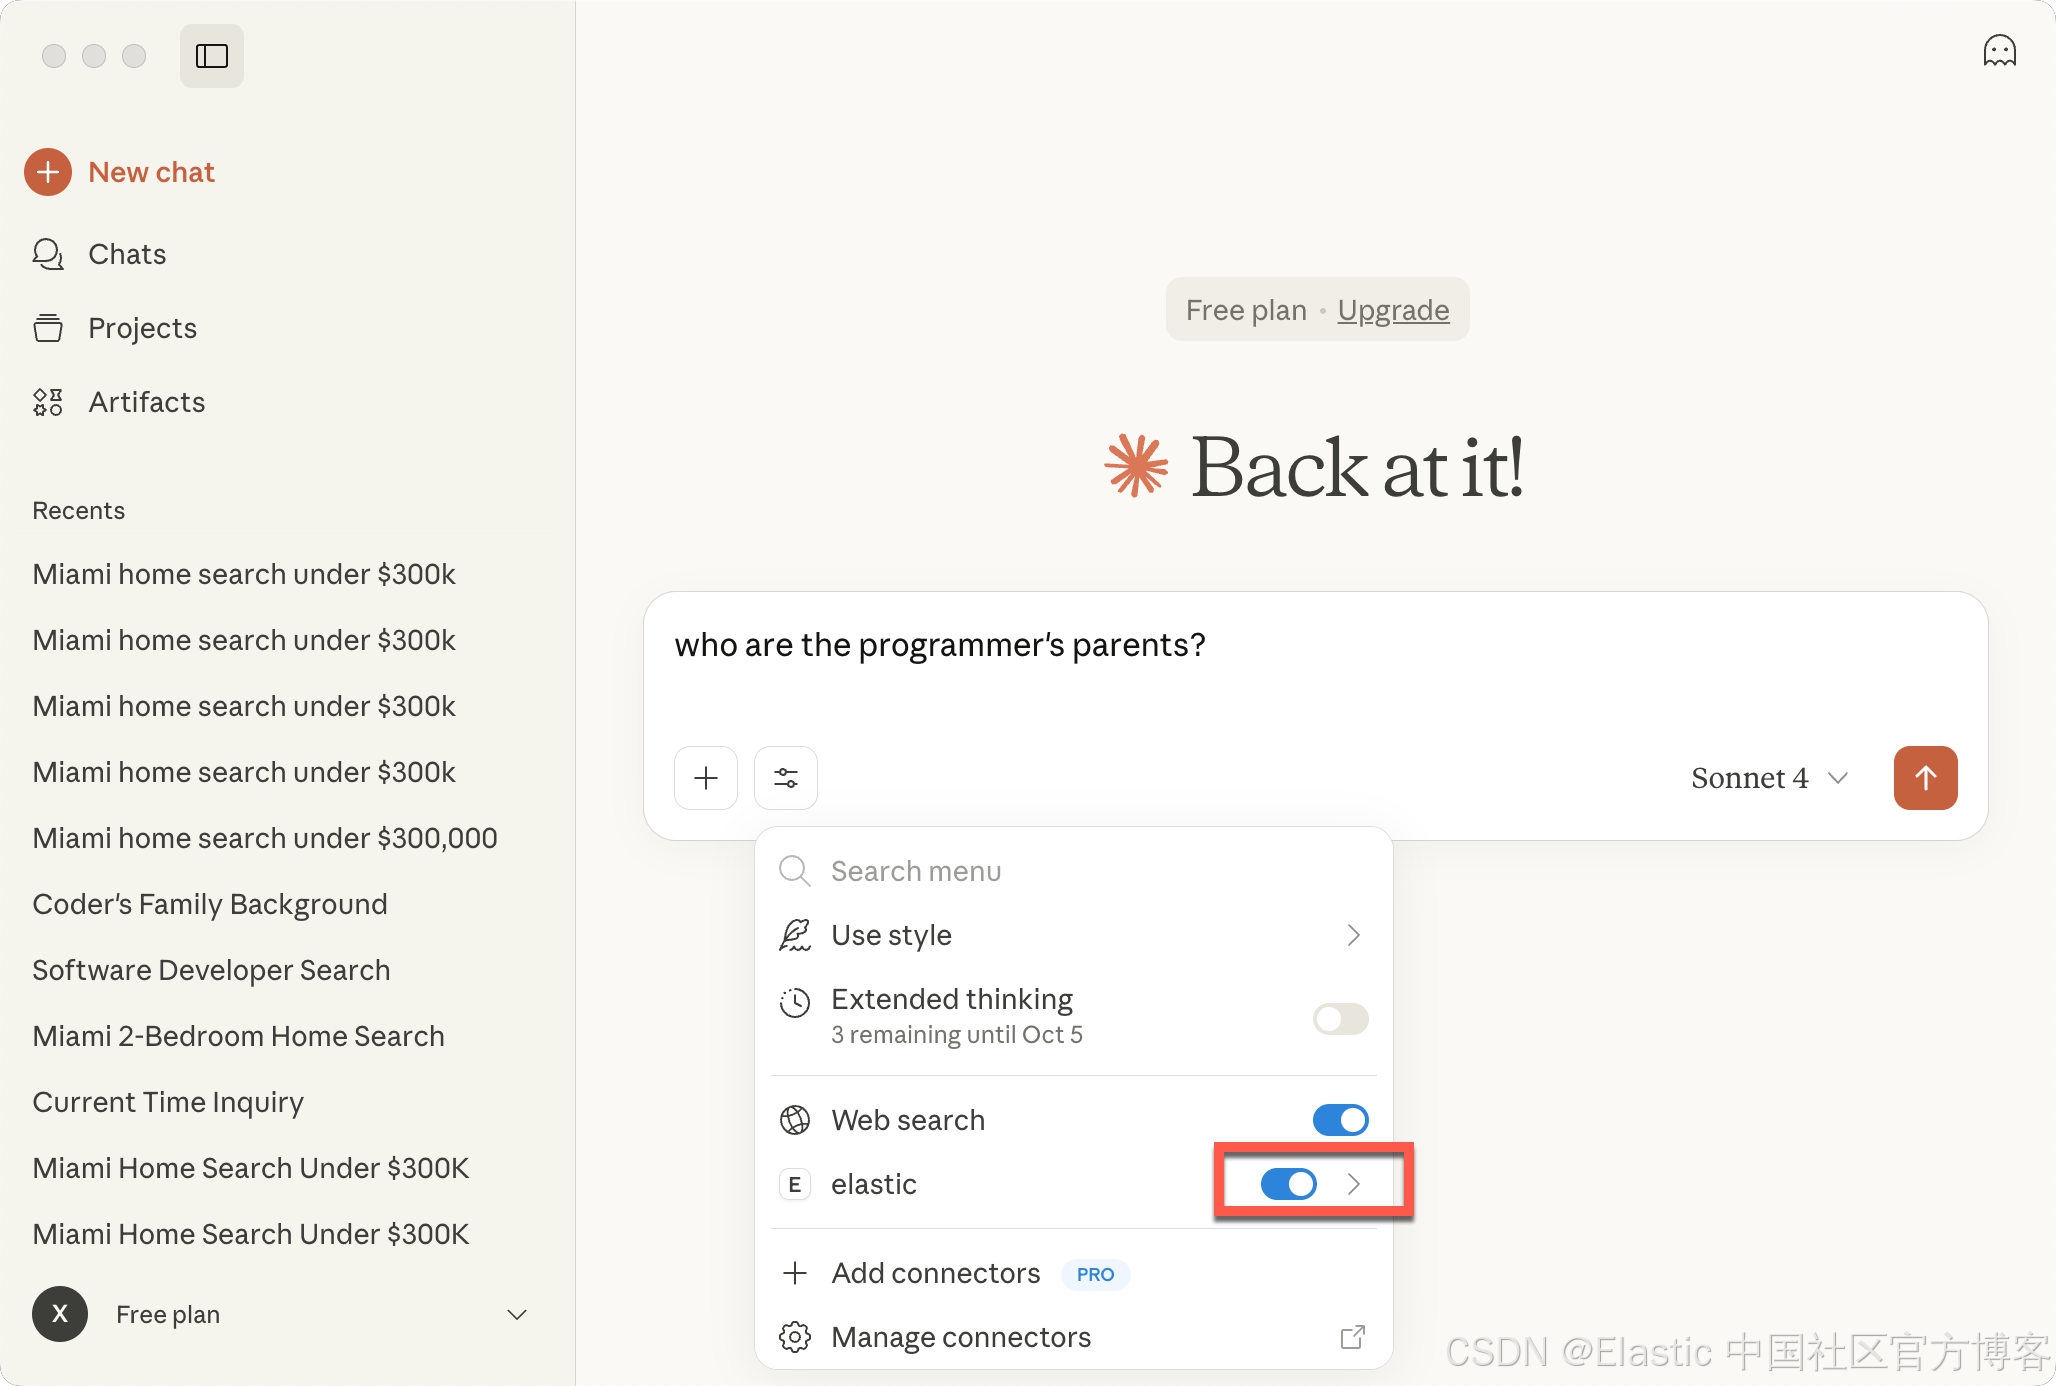
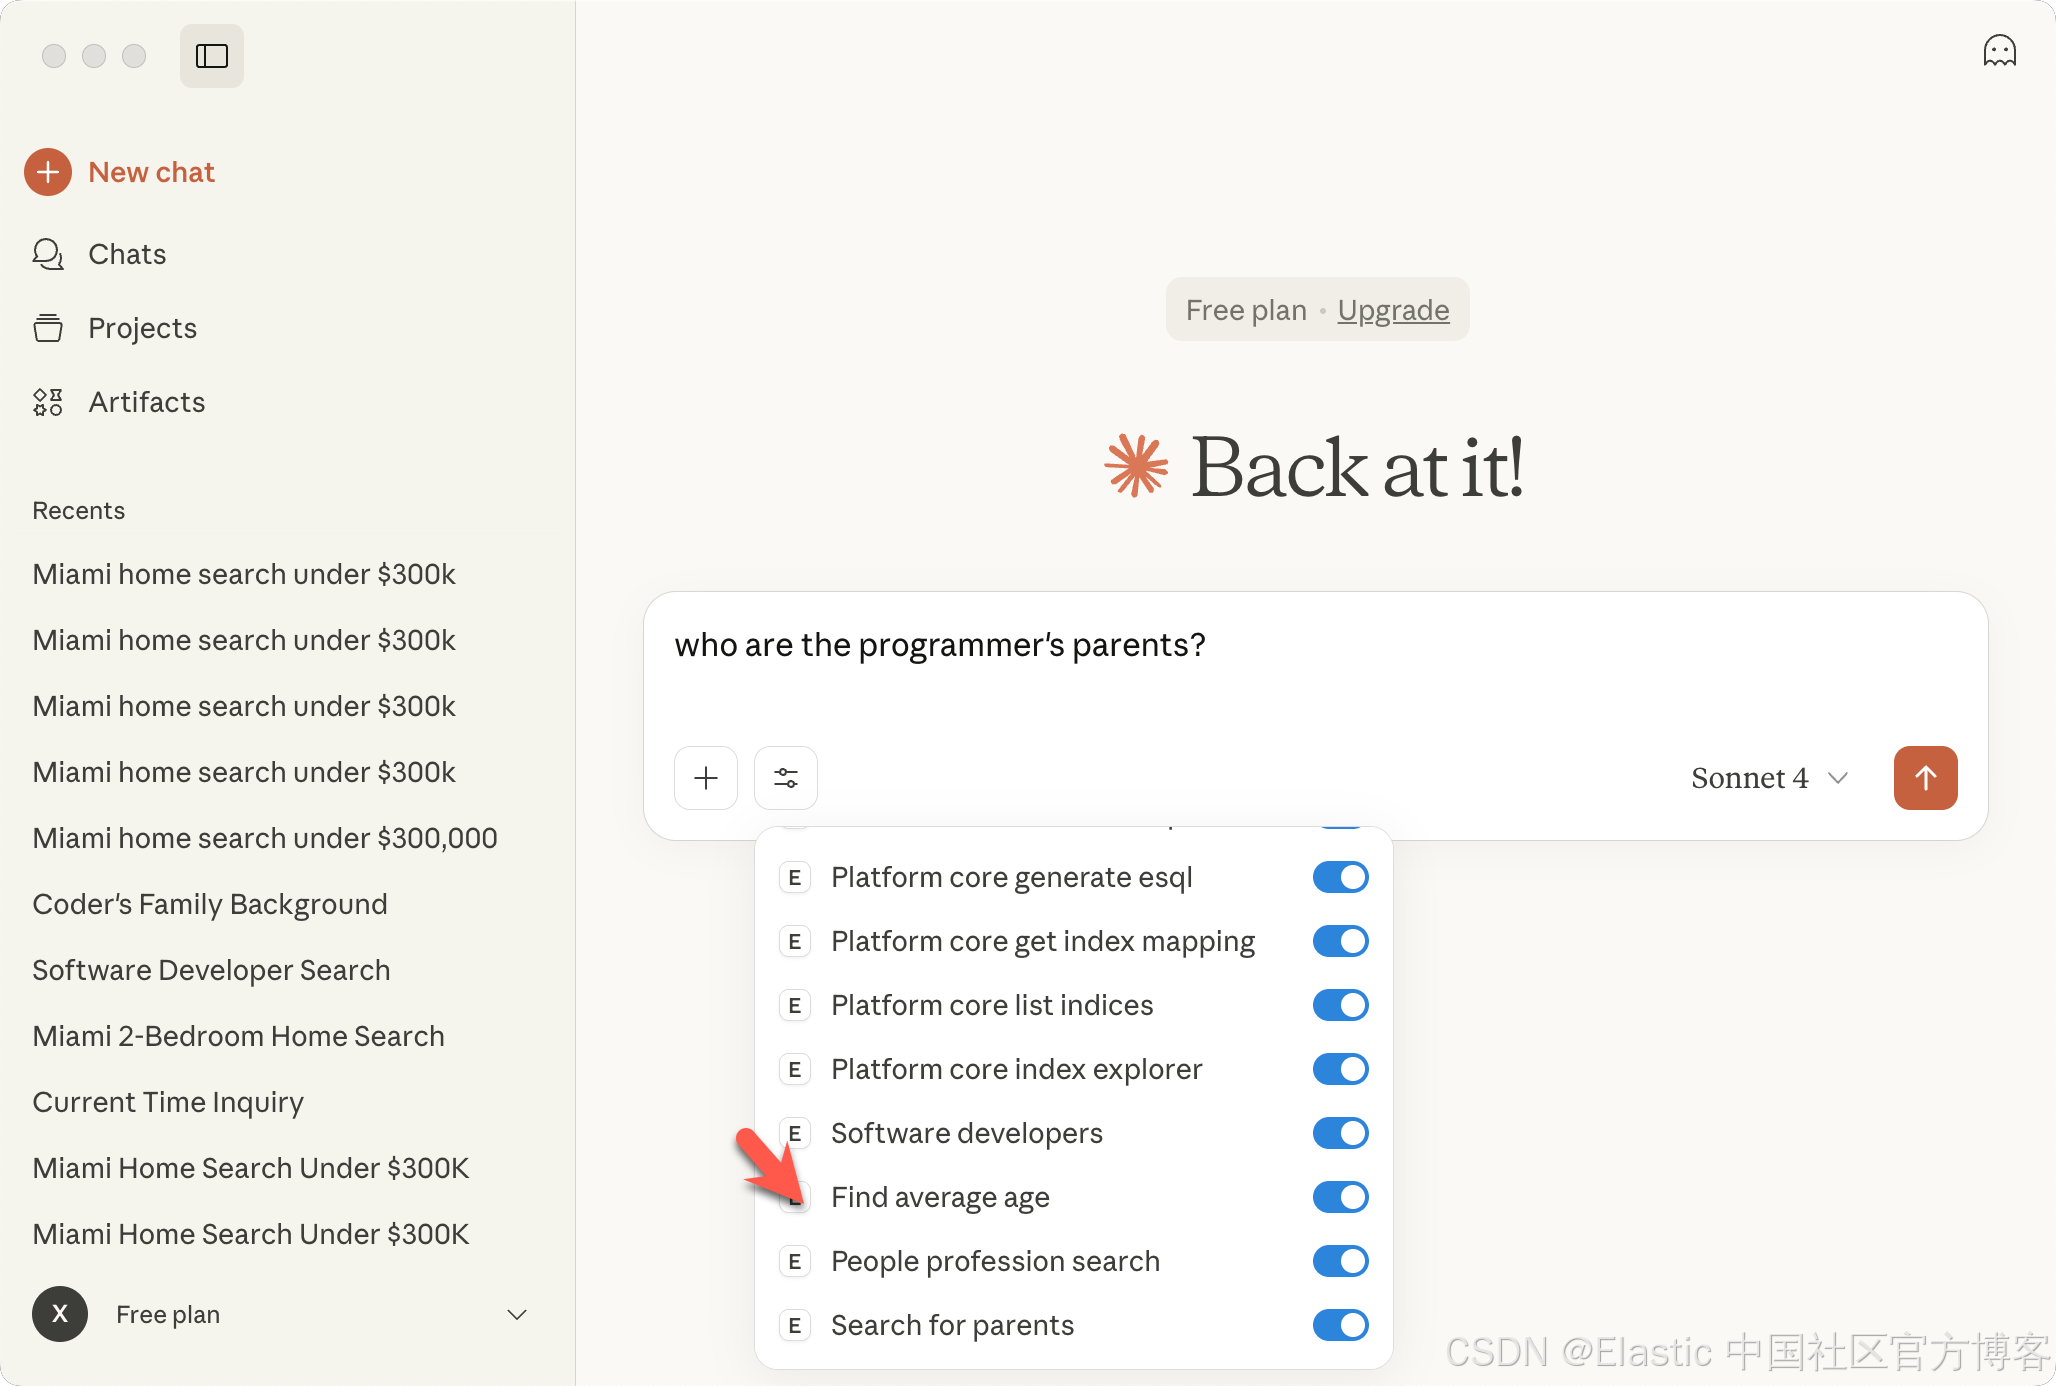
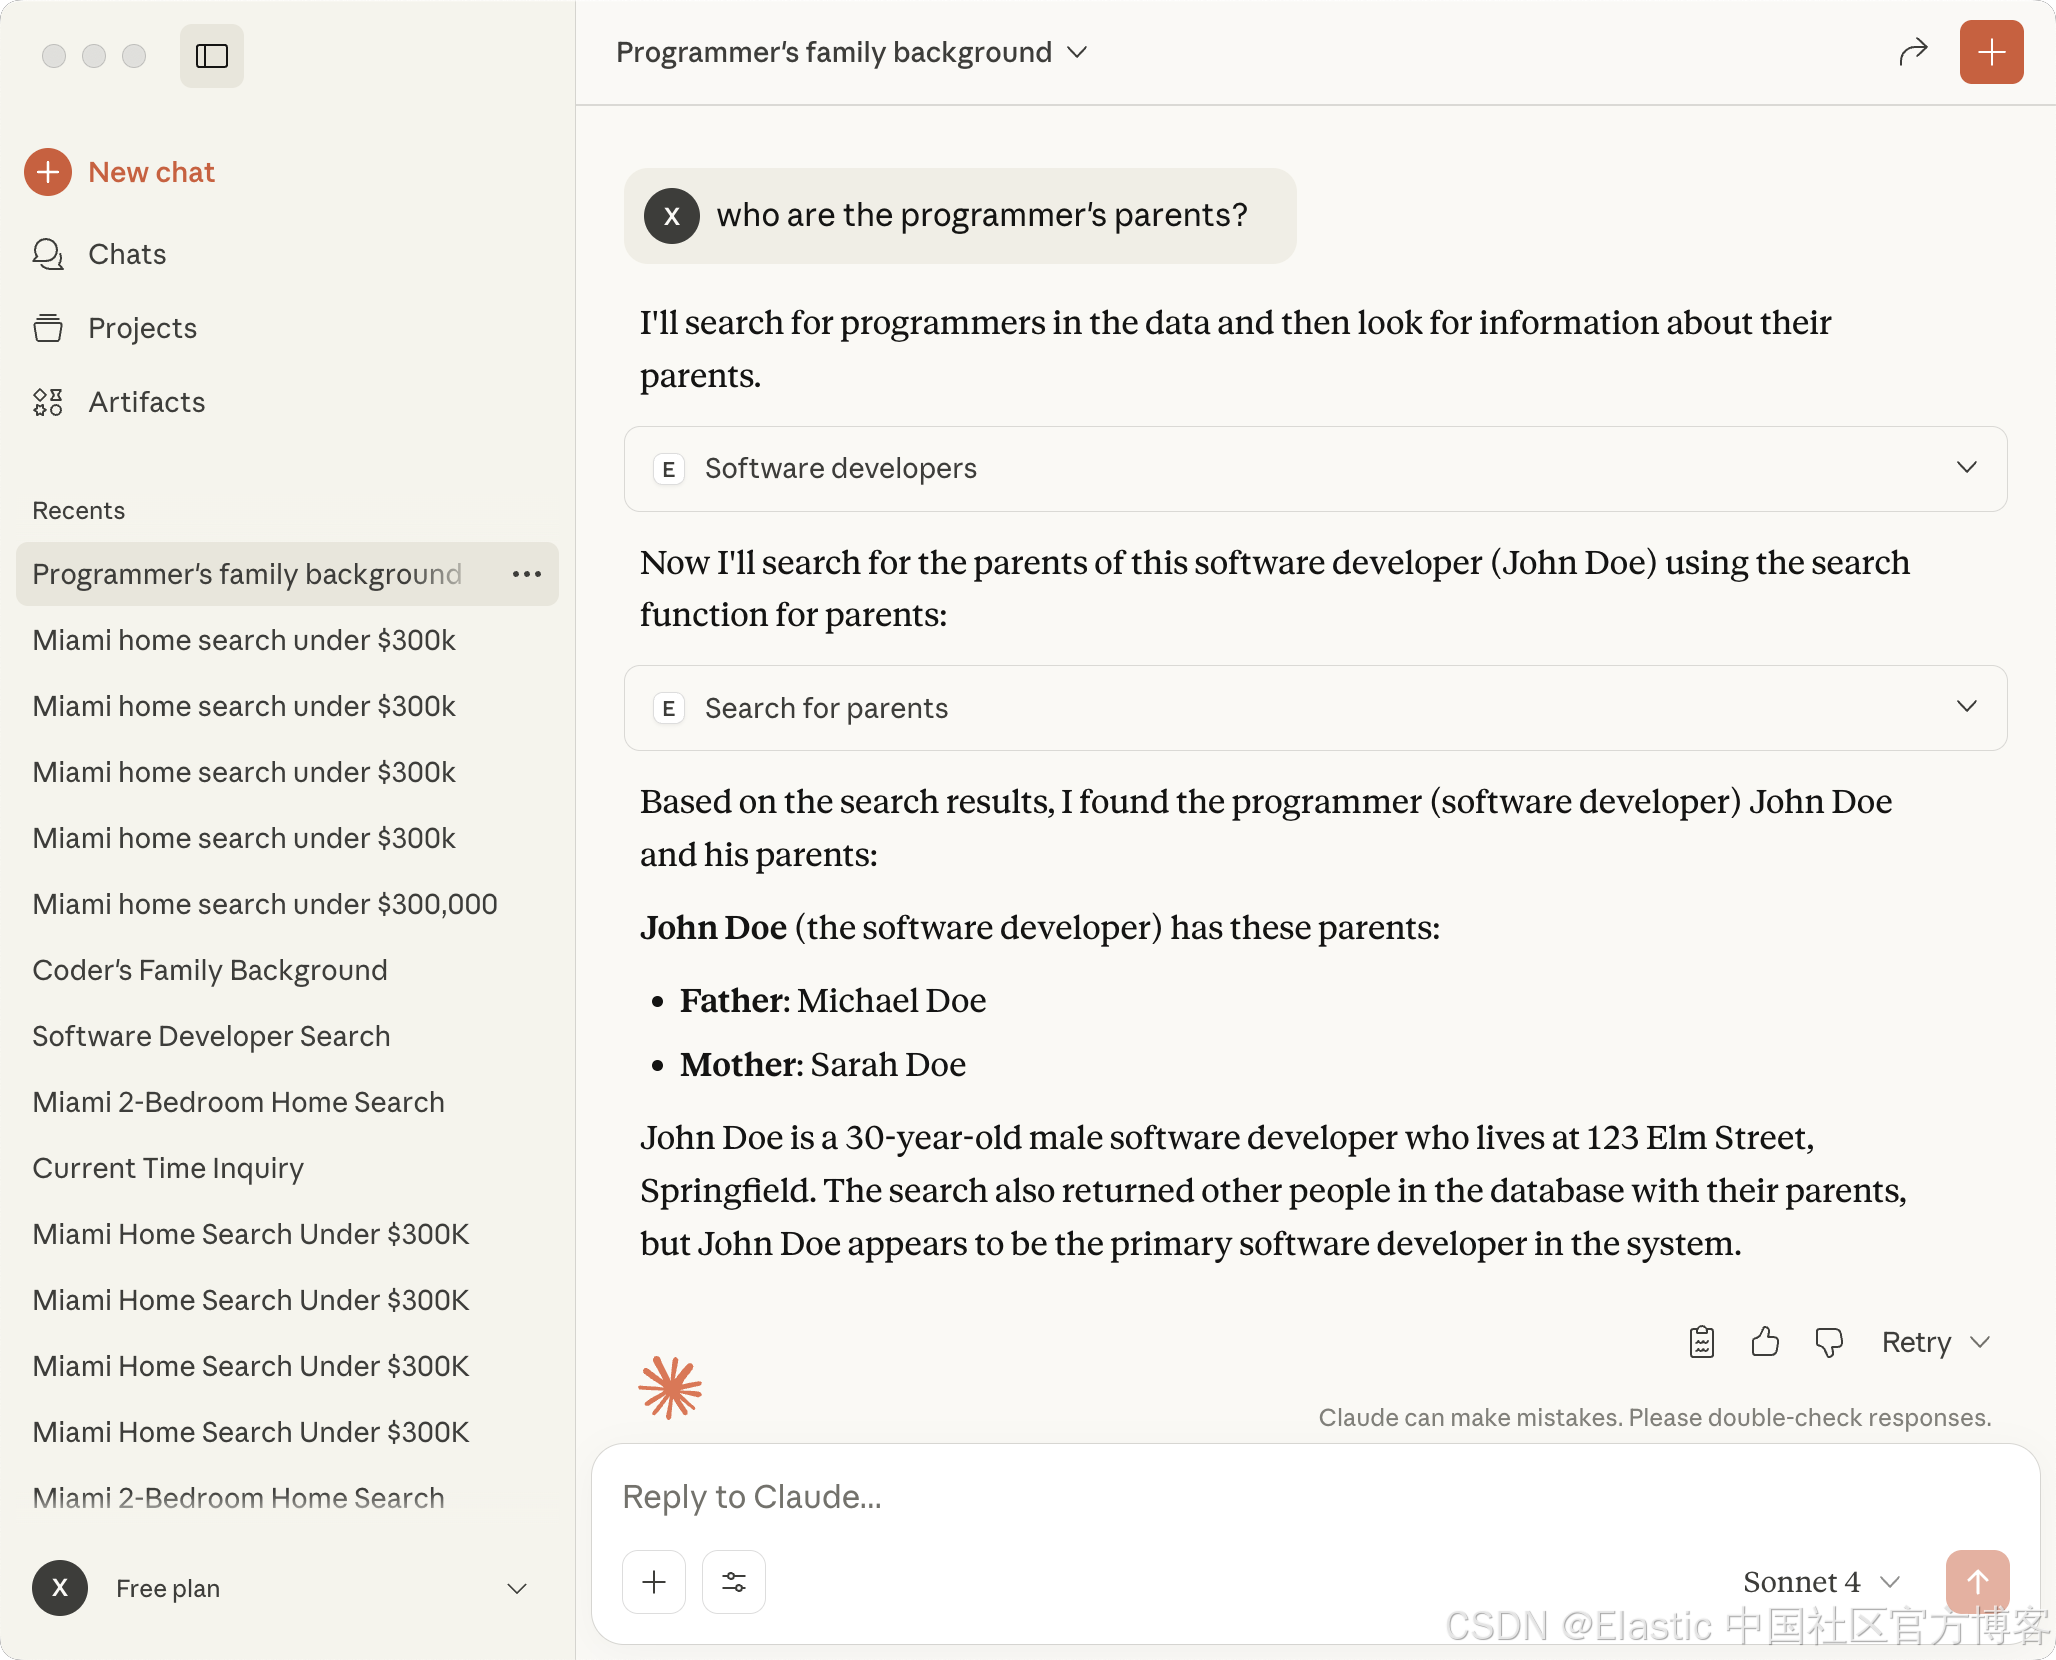
who are the programmer's parents?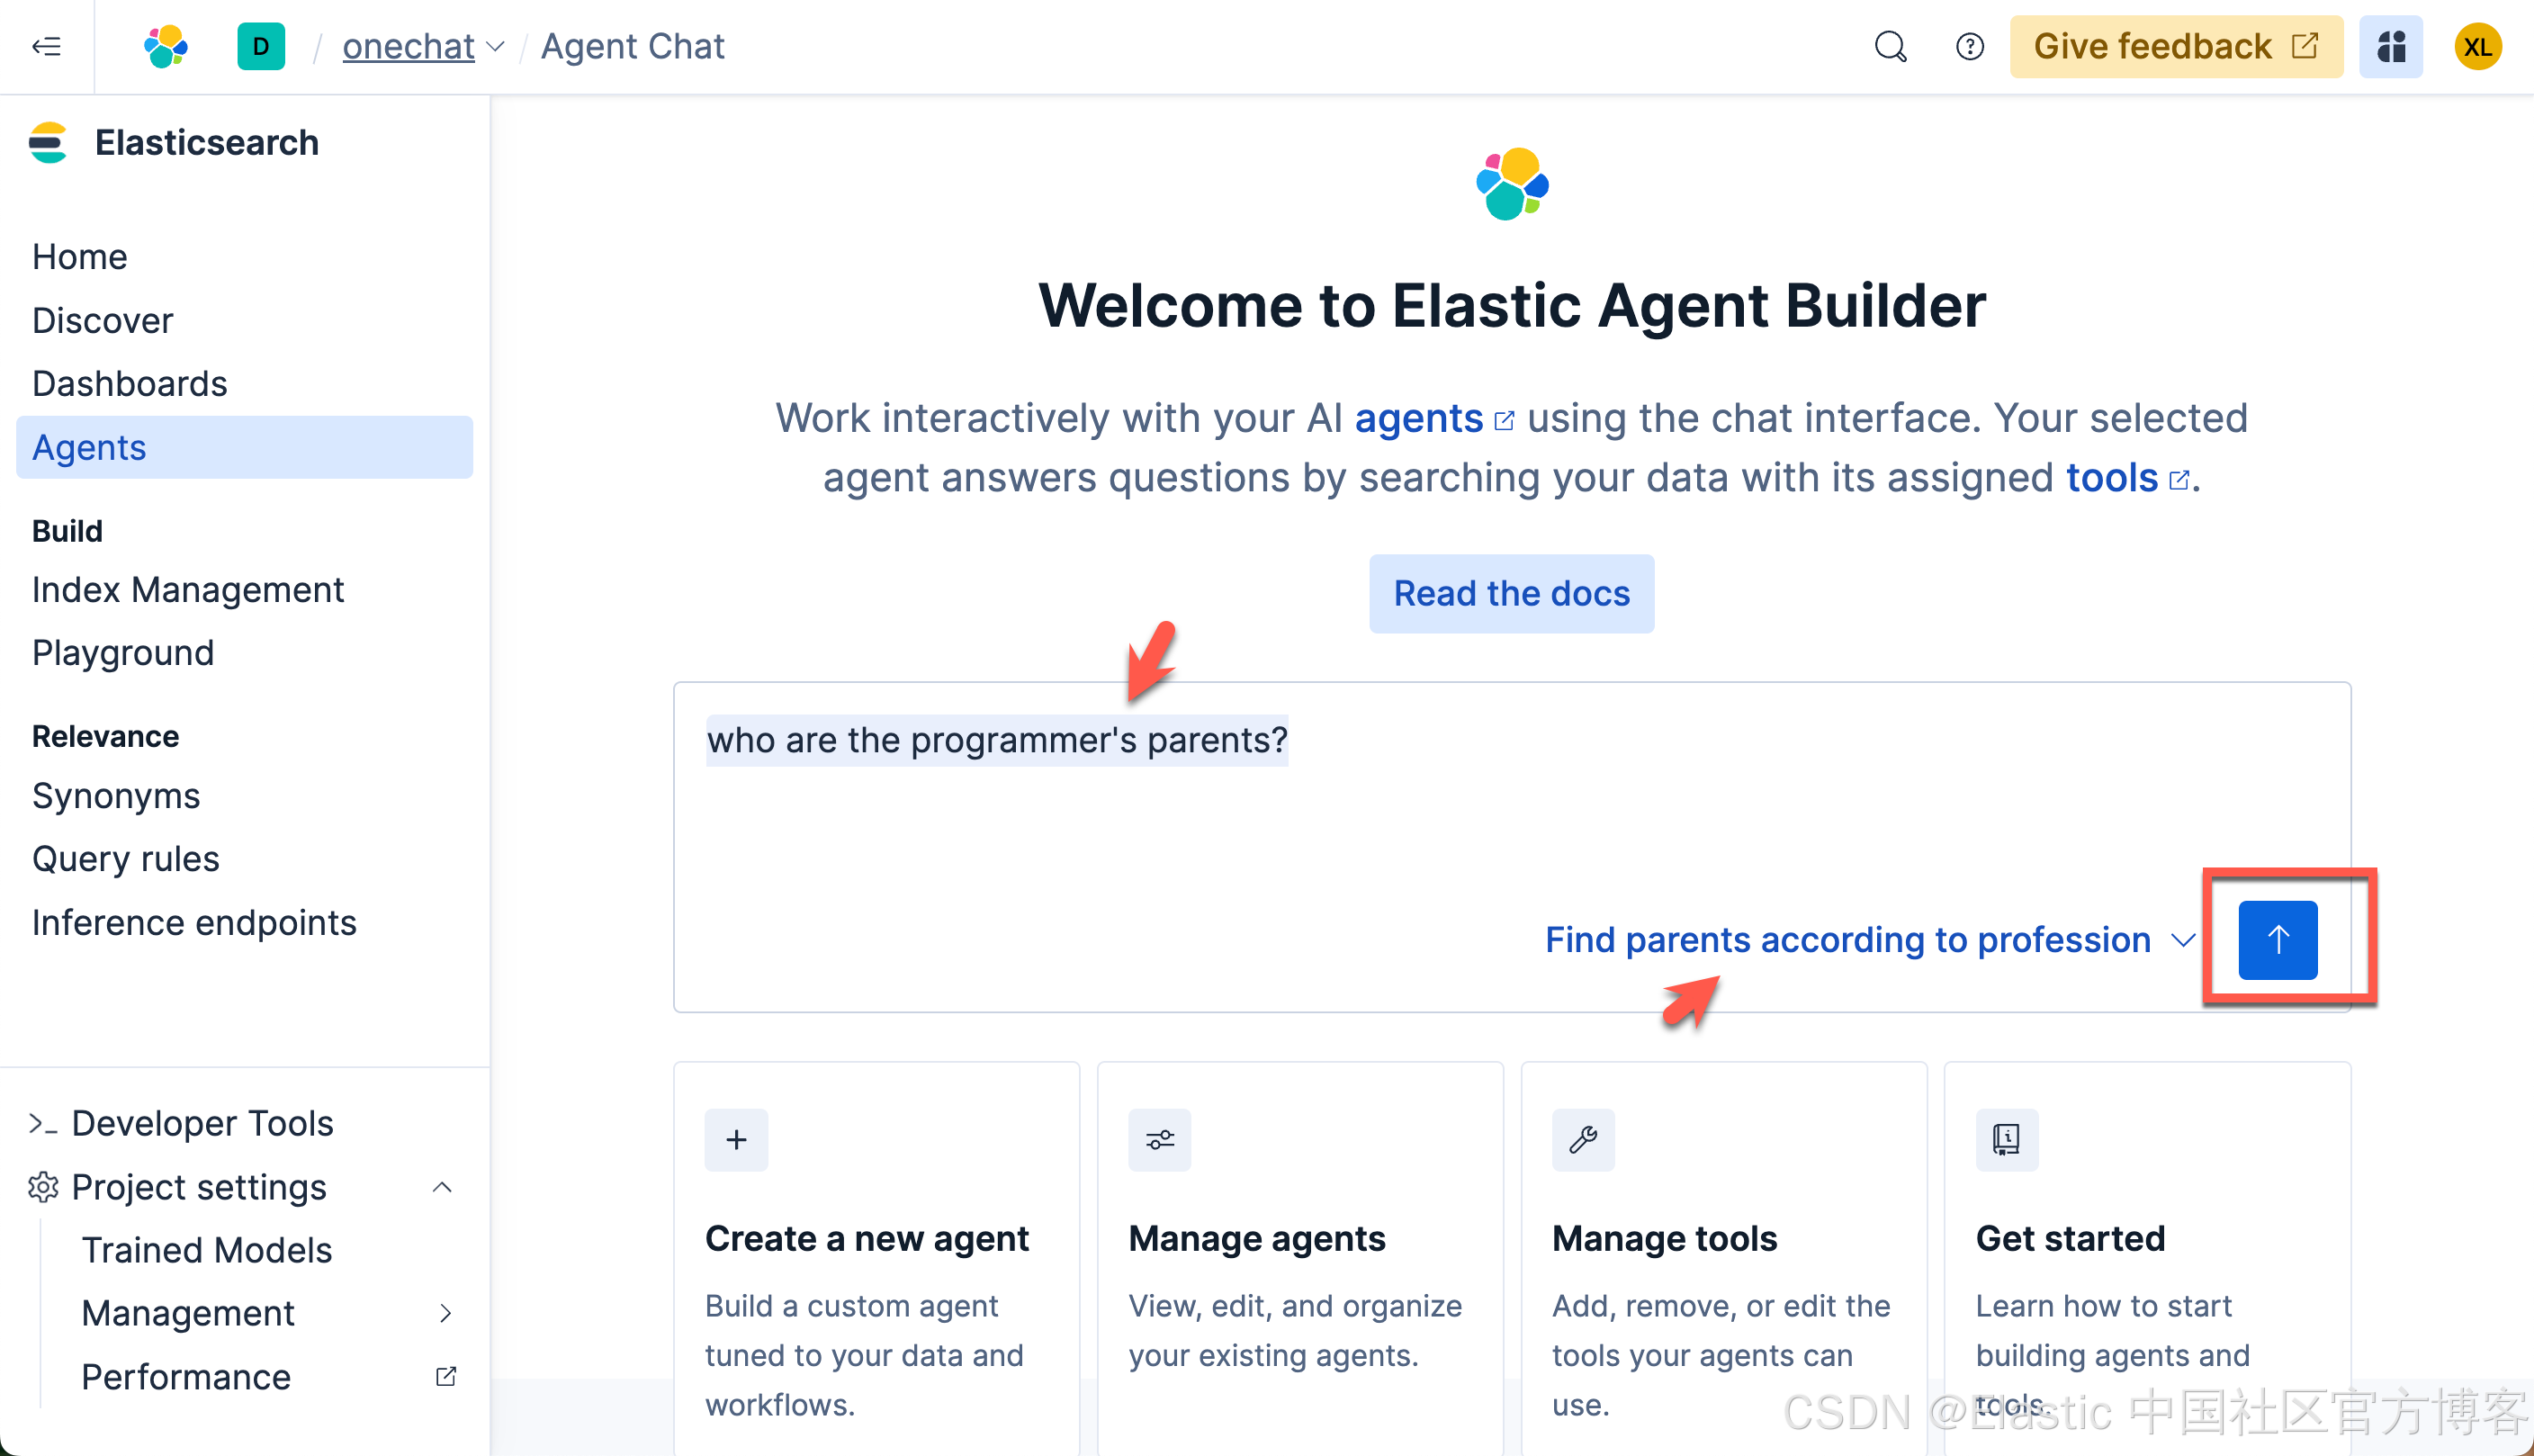
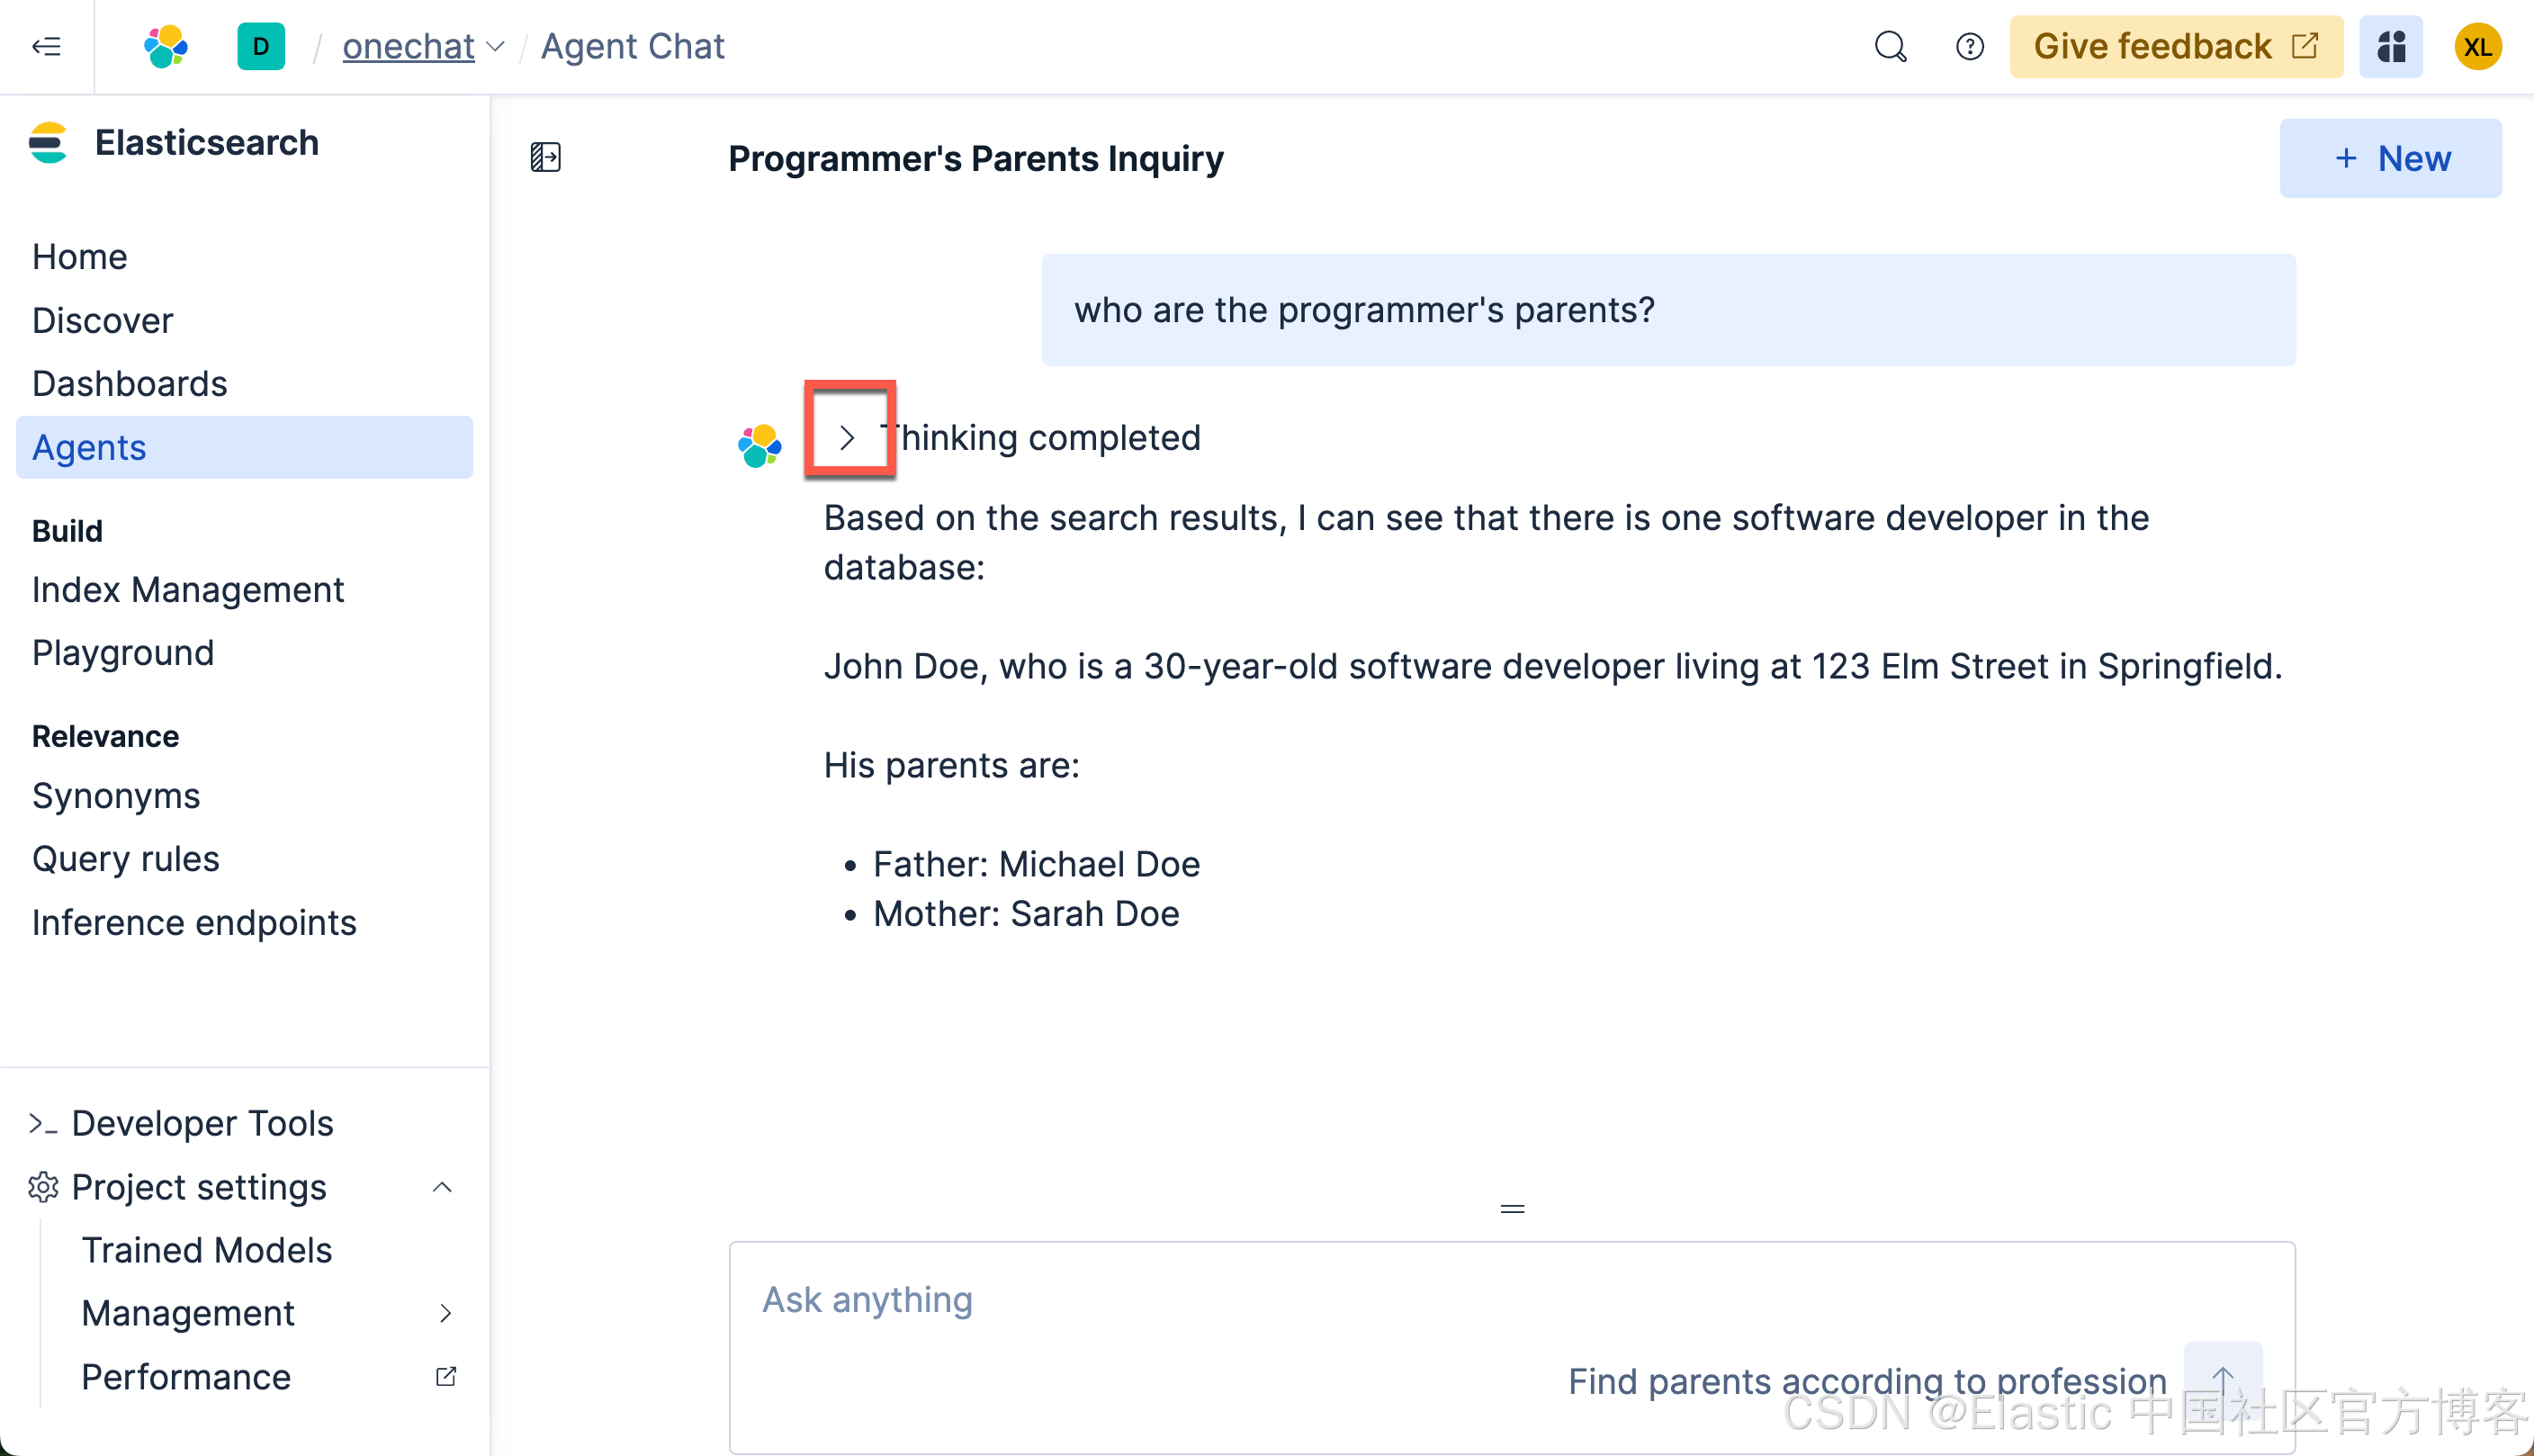
我们得到我们想要的结果。我们可以点击上面的 < 符号来查看有那些步骤被使用:

我们再来查看如下的查询:
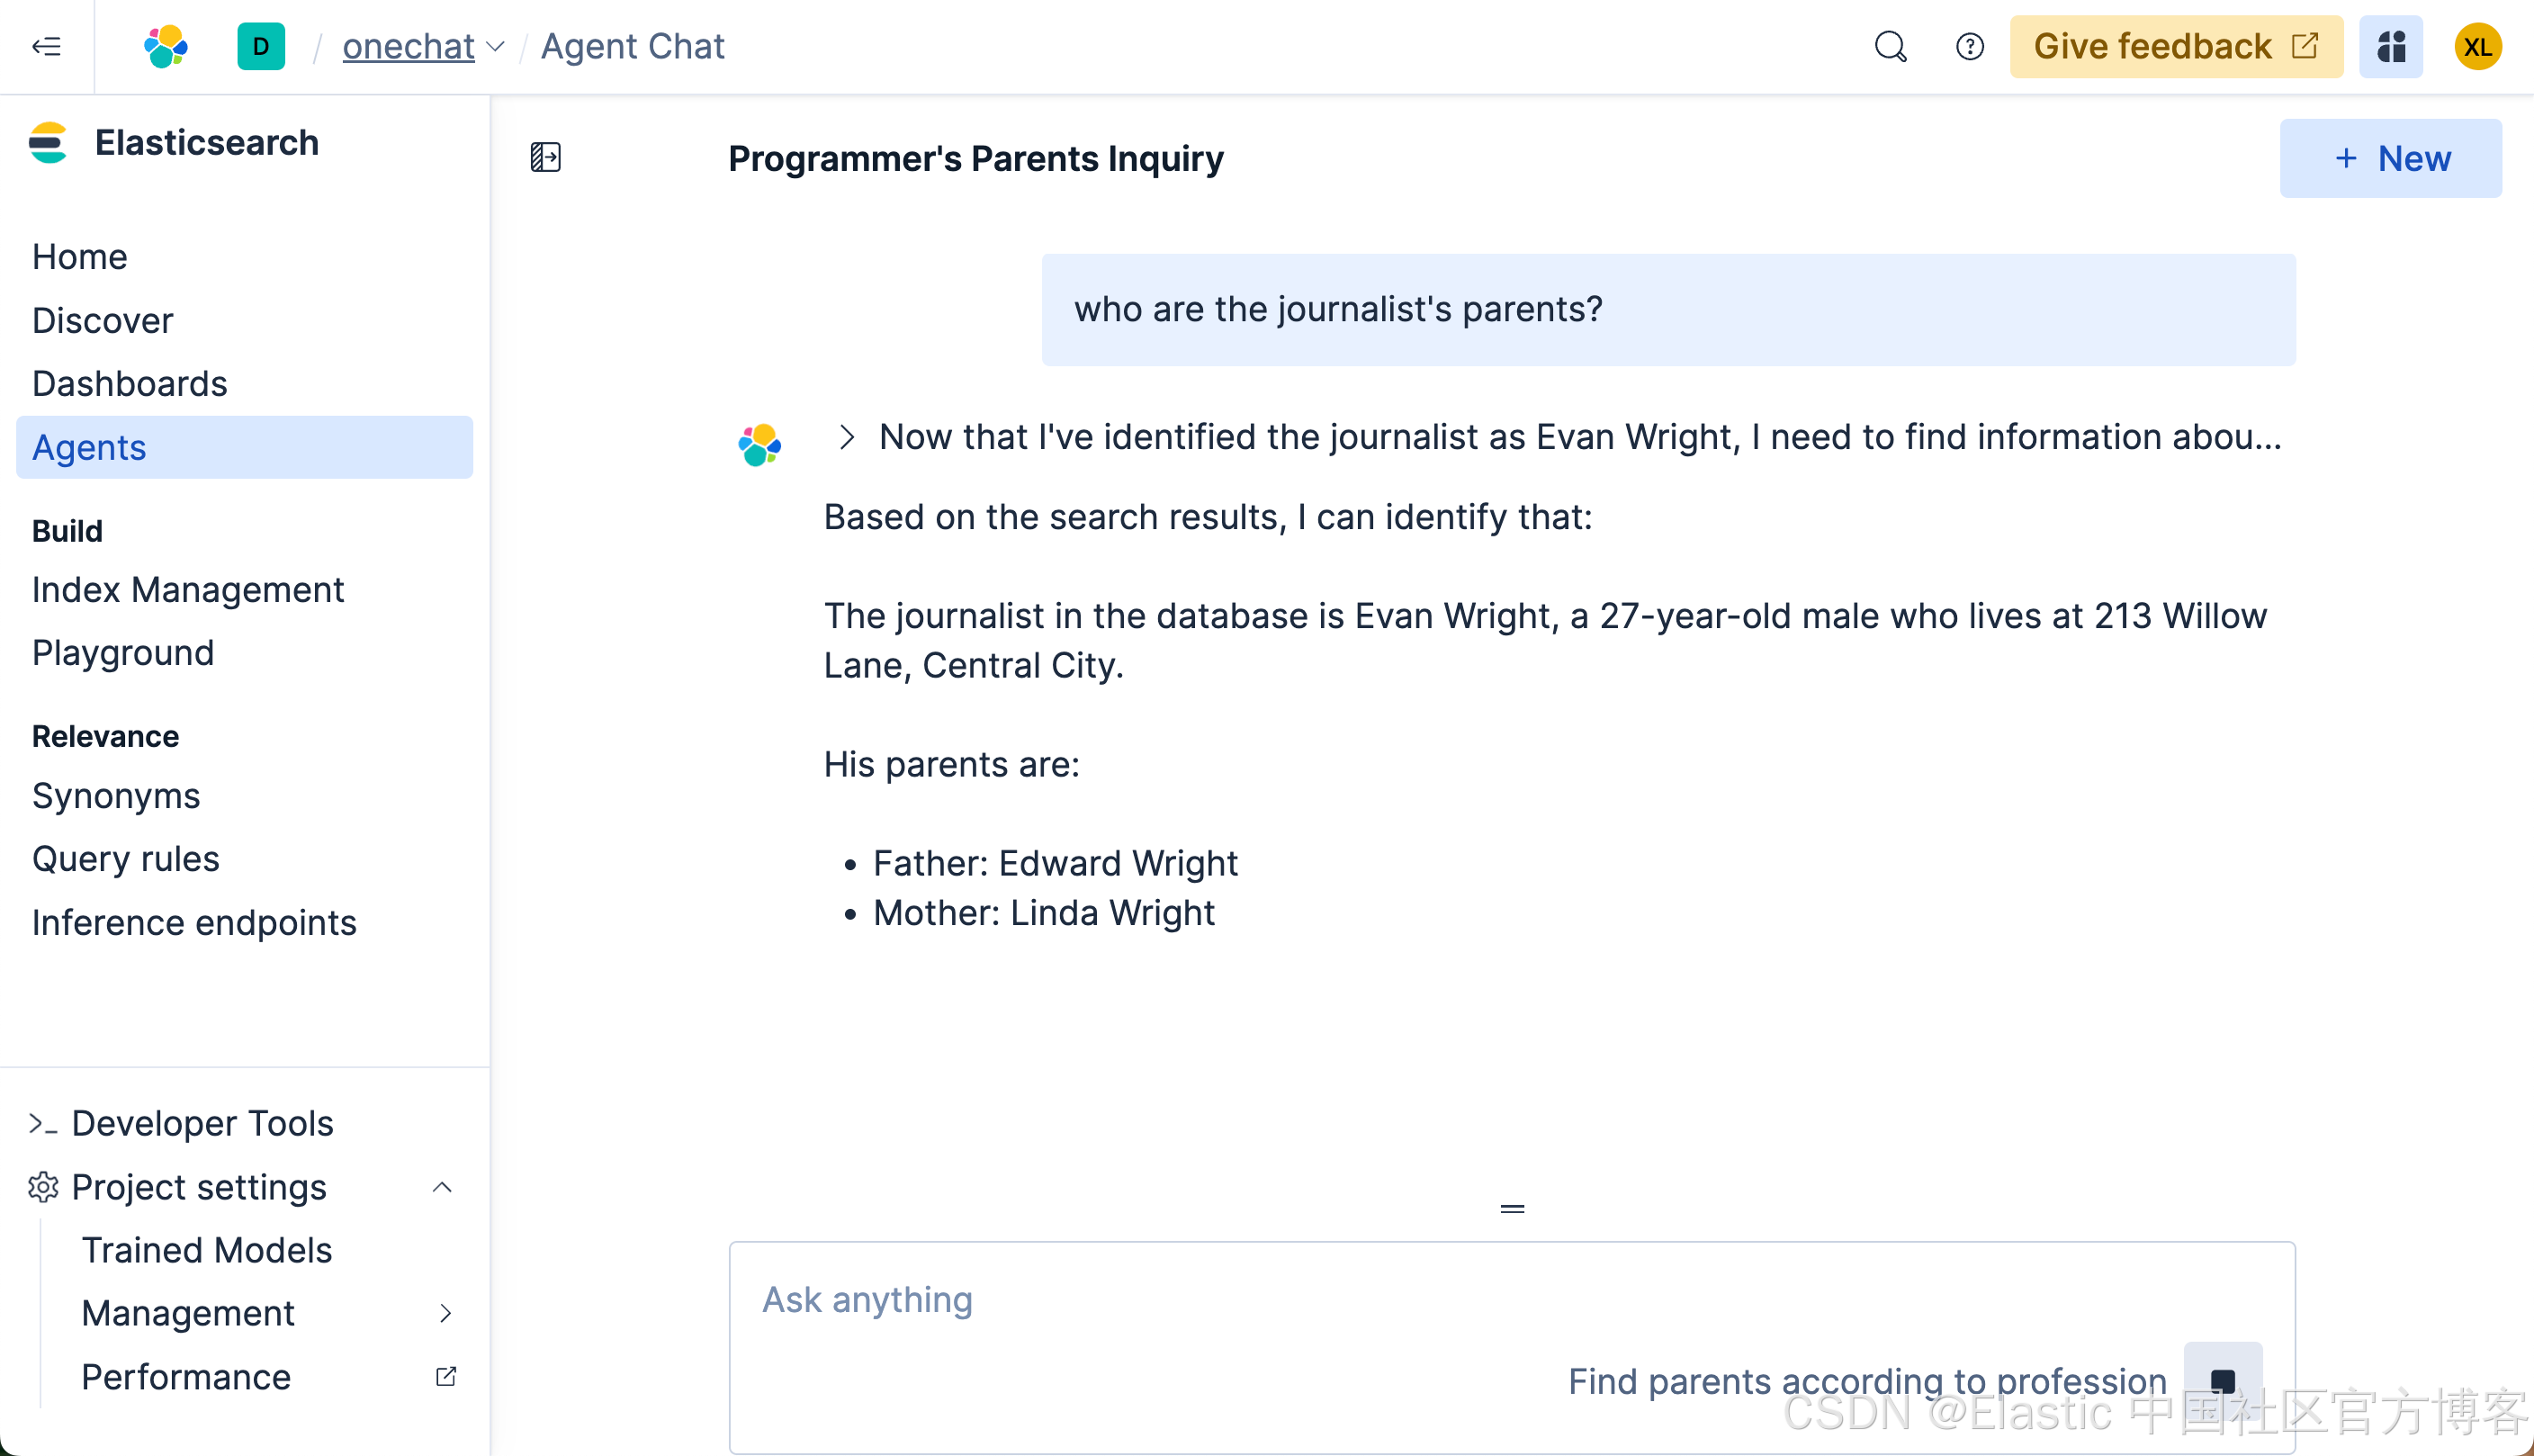
我们使用中文来进行搜索一下:
记者的父母是谁?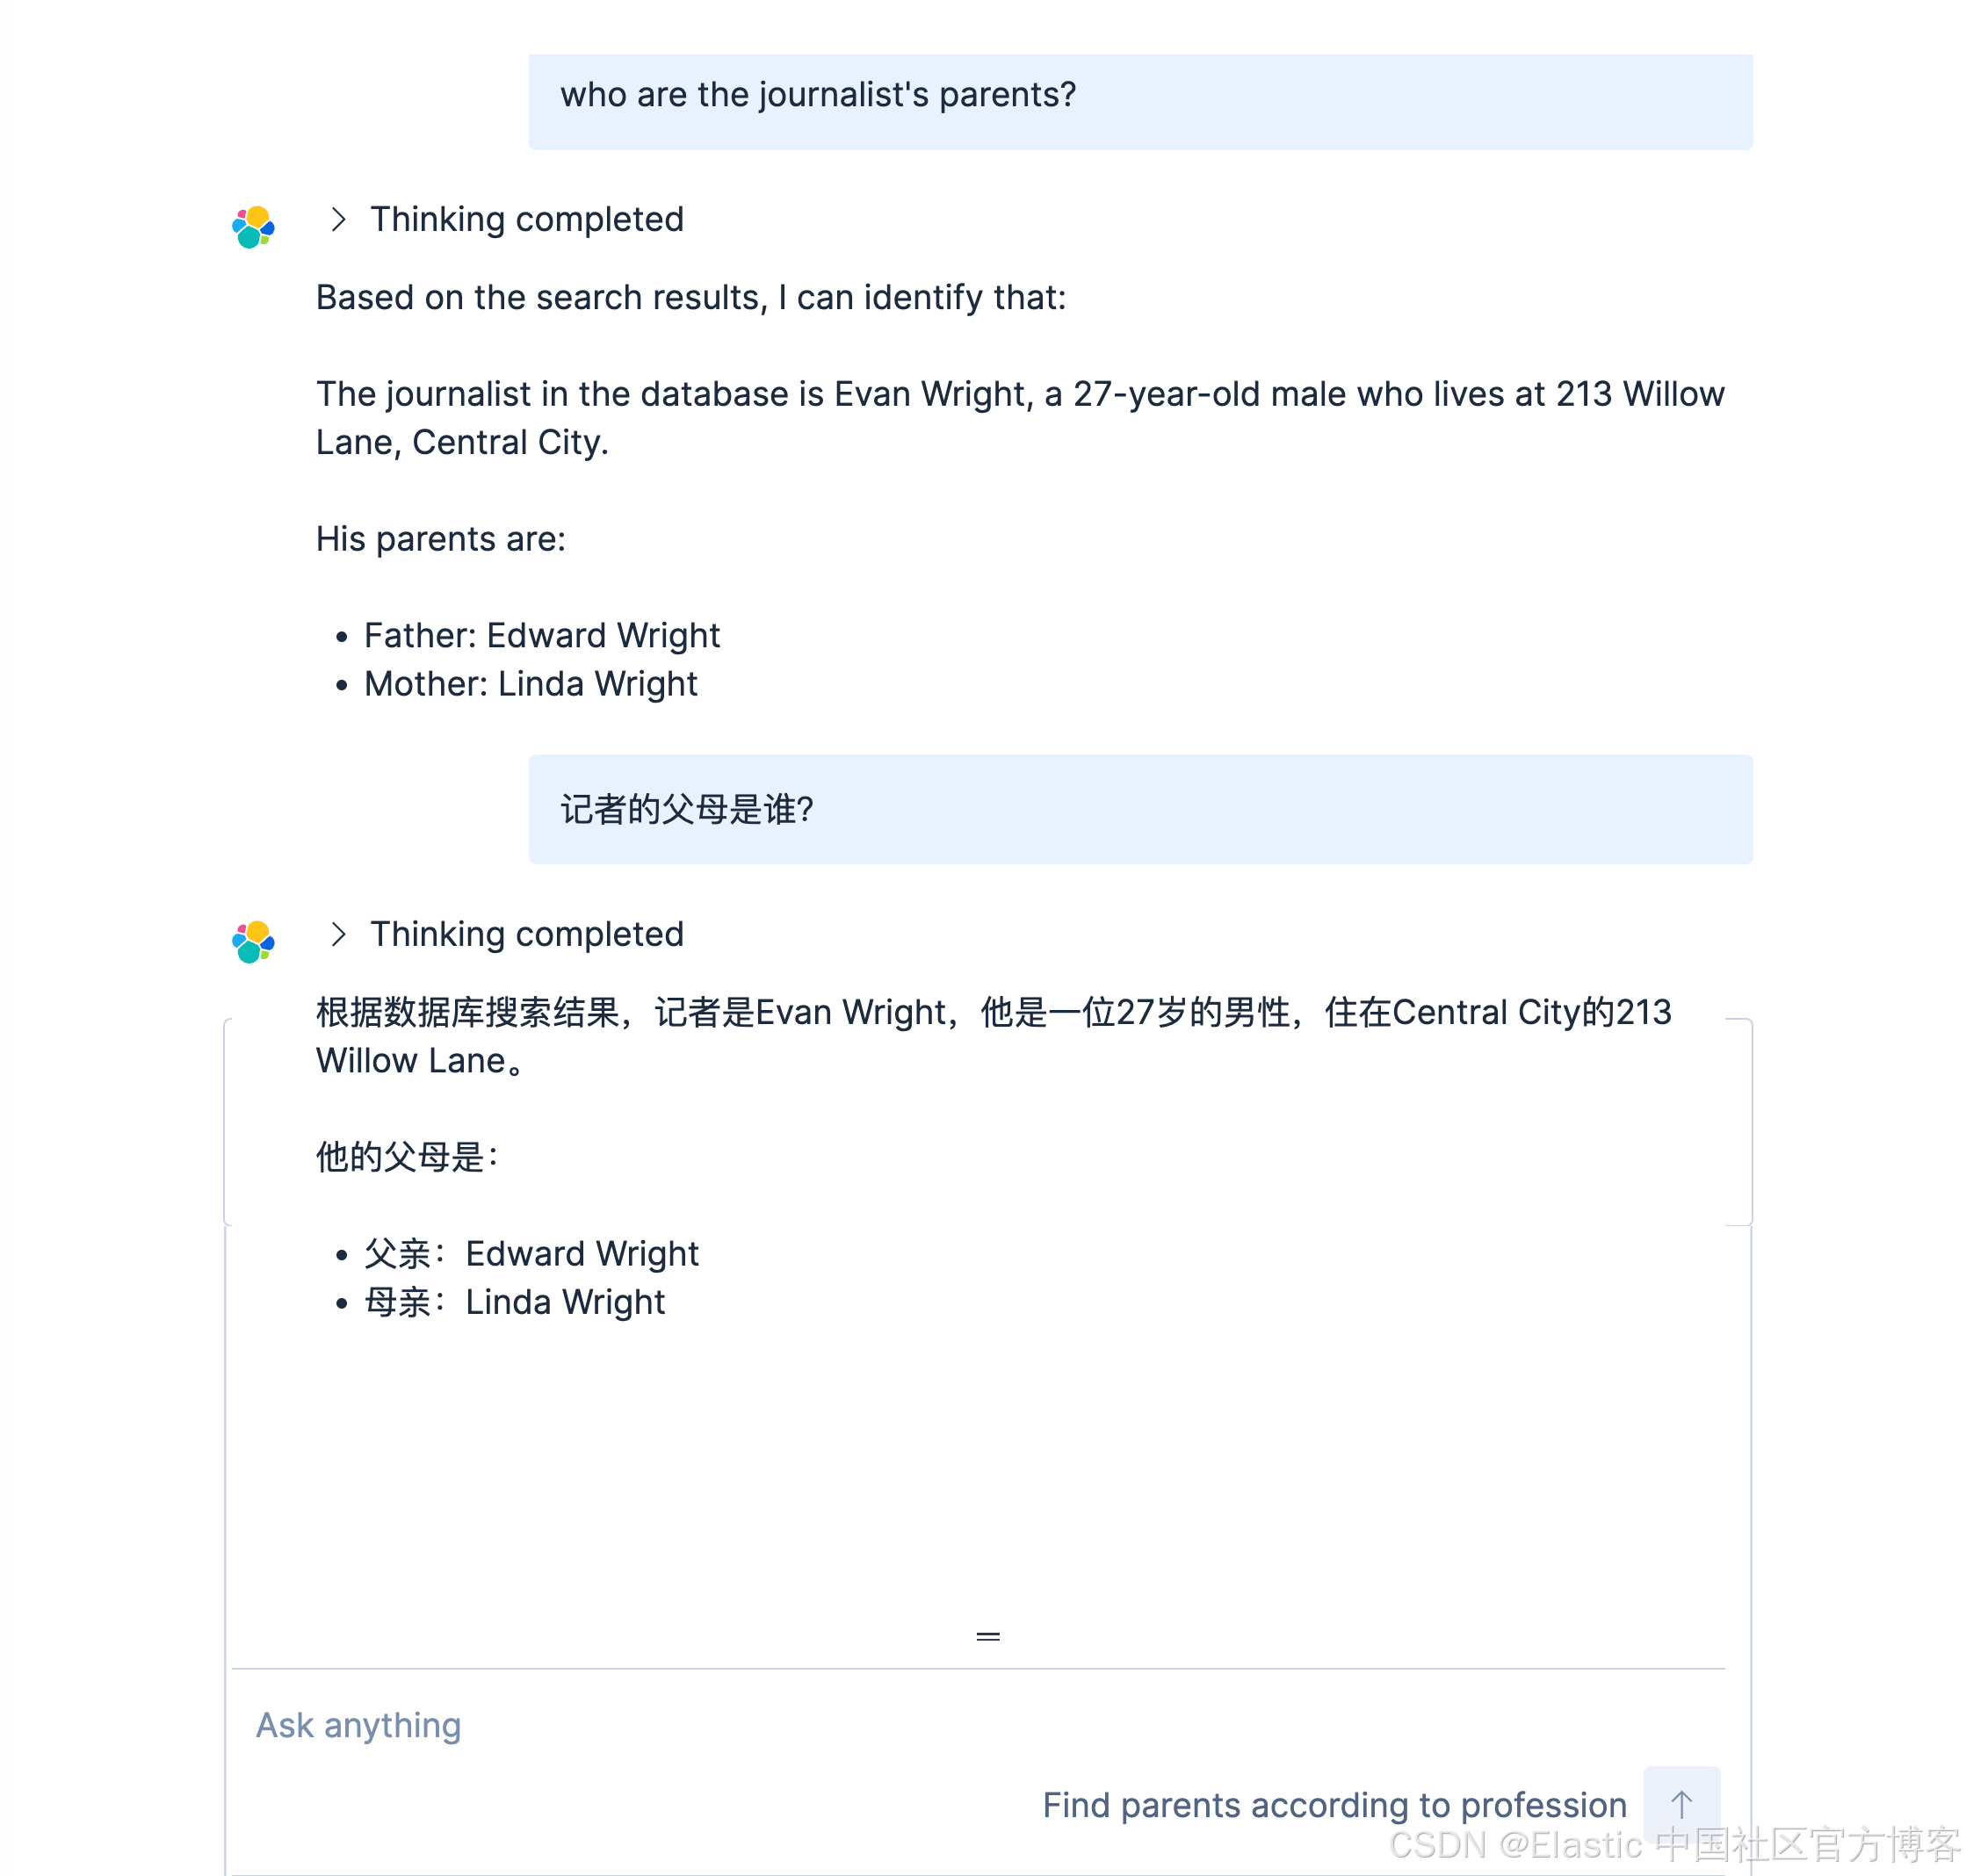
MCP 连接
我们可以把我们创建的 agents 直接连接到一些 MCP 的客户端,比如 Claude Desktop。我们可以参考链接。通过在配置中添加这个来配置 Claude Desktop:
{
  "mcpServers": {
    "elastic": {
      "command": "npx",
      "args": [
        "mcp-remote",
        "http://localhost:5601/api/agent_builder/mcp",
        "--header",
        "Authorization:${AUTH_HEADER}"
      ],
      "env": {
        "AUTH_HEADER": "ApiKey {...}"
      }
    }
  }
}
你可以参考我之前的文章 “使用 MCP 将代理连接到 Elasticsearch 并对索引进行查询” 来了解如何配置 Claude Desktop 的配置。
在运行时,你可能会出现 permission 错误。你可以使用如下的命令来进行安装:
sudo npm install -g mcp-remote针对我的 Serverless 配置:
{
 "mcpServers": {
   "elastic_onechat": {
     "command": "npx",
     "args": [
       "mcp-remote",
       "https://onechat-c77bd4.kb.us-central1.gcp.elastic.cloud/api/agent_builder/mcp",
       "--header",
       "Authorization:${AUTH_HEADER}"
     ],
     "env": {
       "AUTH_HEADER": "ApiKey {YourAPIkey}"
     }
   }
 }
}
好了。今天的展示就到这里。之后,我们继续更新这篇文章,特别是如何使用 API 的方法来使用这个。祝大家阅读愉快!
更多推荐
 8
8 0
0- 0


 已为社区贡献7条内容

所有评论(0)