
基于yolo的口罩识别系统(深度学习、计算机专业、高质量、源代码)
目 录
1. 设计目的
1.1 项目说明
2019年12月以来,湖北省武汉市陆续出现因新型冠状病毒感染的确诊肺炎患者,随后在全国范围内也陆续确诊了新发病例。在此之前,研究学者对新发现的冠状病毒起源知之甚少,同时世界卫生组织(WHO)将2019年湖北武汉的肺炎患者体内分离出的新型冠状病毒命名为“2019-nCoV”。新型冠状病毒目前己知的传播途径包括呼吸道传播和接触传播。阻止和切断传播途径是预防病毒传播最有效的关键一步,佩戴口罩作为目前全世界通用并且最有效的阻断病毒传播方式成为了预防新型冠状病毒的全球方案。人脸识别是基于人的脸部特征进行身份识别的方法,人脸识别技术在日常交通运输、门禁管理、信息安全等领域应用越来越广。传统神经网络算法也用于人脸识别技术,但存在人脸识别率偏低的问题。随着人工智能的不断发展,深度学习作为一个新的研究方向被引入机器学习,使其更接近人工智能目标。随着深度学习的发展,传统的神经网络人脸识别方法逐渐被基于卷积神经网络的方法所替代。
口罩佩戴检测在计算机视觉领域被拆分为人脸检测和口罩图像分类任务,人脸检测作为第一阶段任务,其输出人脸图像作为口罩图像分类的原始输入,进而判断该人脸图像是否佩戴好口罩。因此人脸检测任务决定着整体口罩佩戴检测的检测效果。在口罩佩戴场景下,既要兼顾检测实时性要求,又要满足检测准确率和召回率。的较高水平,成为口罩佩戴检测算法的评价标准。本文将深度学习技术应用到人脸检测的过程中,同时结合传统图像处理技术来识别人脸佩戴口罩的状态,解决口罩佩戴检测的日常需求,有效的提升了检测效率同时避免人员交叉感染的风险。
1.2 设计目标
本系统针对人脸图像进行检测,从中提取特征来预测人脸是否佩戴口罩。
(1)人脸图像中各类预识别对象的标注和数据增强;
(2)yolov5算法的实现;
(3)基于yolov5进行人脸图像的训练和预测;
(4)将识别出的数据保存为矢量数据;
(5)图形用户界面的实现。
2. 需求分析
2.1 项目需求
本系统采用了yolov5模型,Darknet深度学习框架,操作系统为Windows 10,环境为Pytorch。这些技术目前都已经很成熟,而且技术含量很高,使用起来很方便,安全性也有较大保障。目前高性能的网络组建大量涌现,他们速度快、用量大、可靠性高、价格低,完全可以满足本系统的需要。
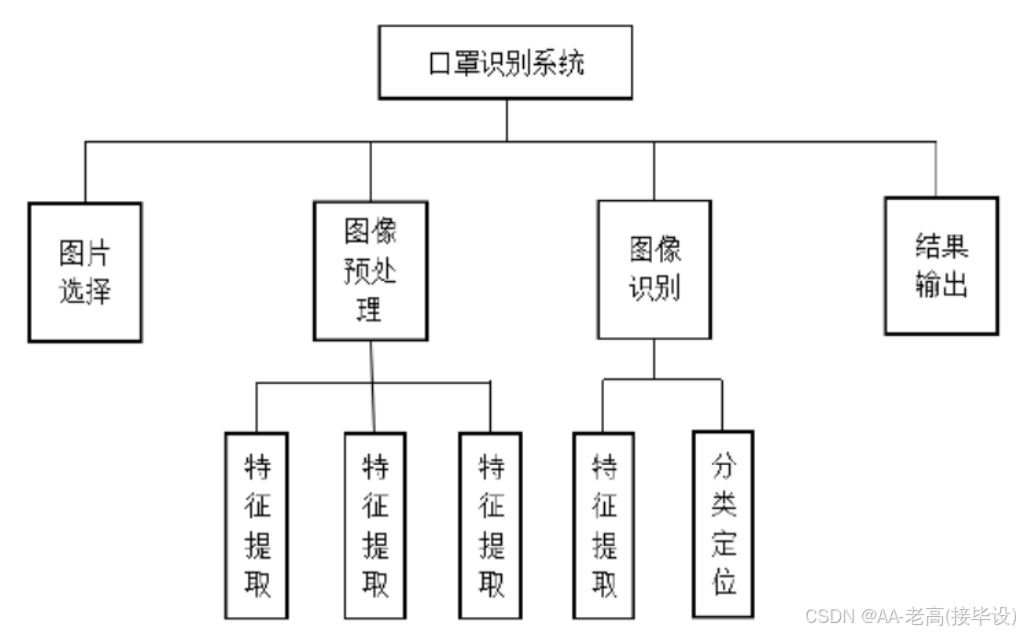
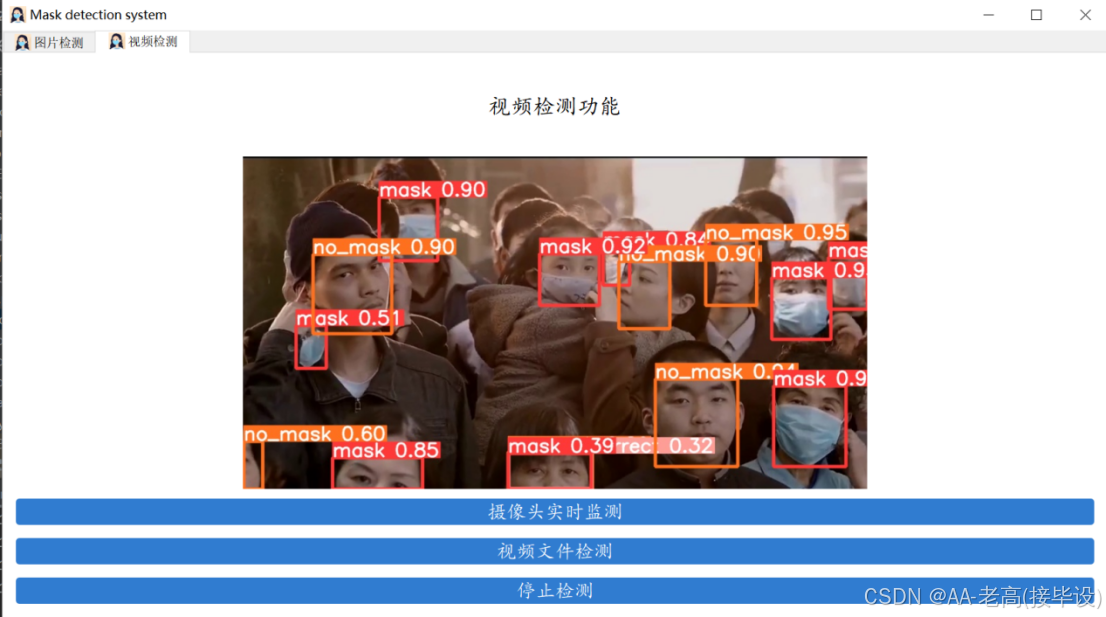
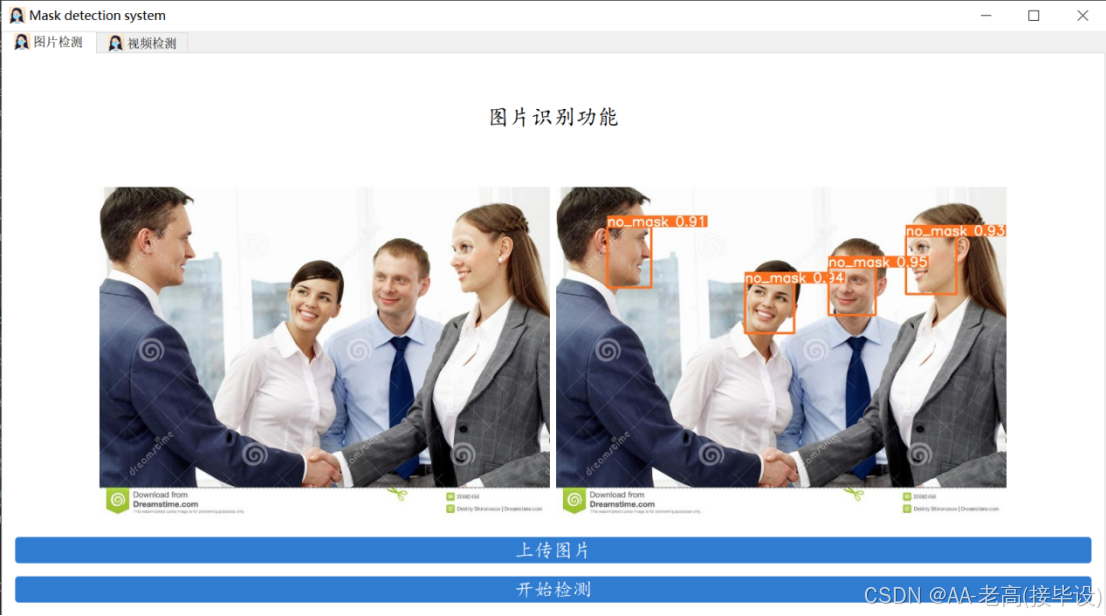
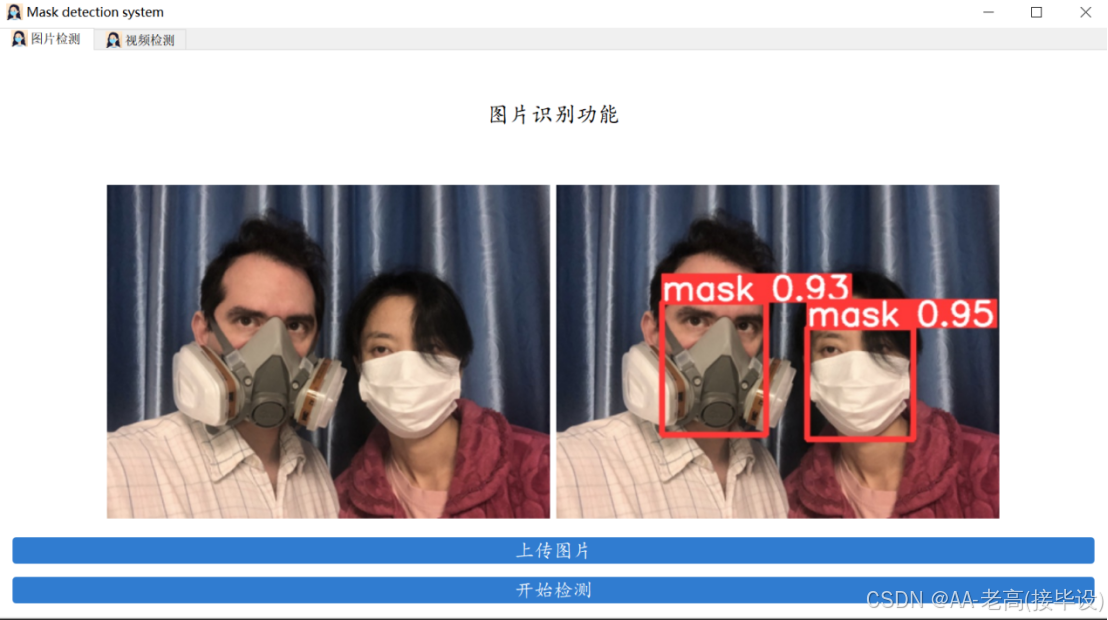
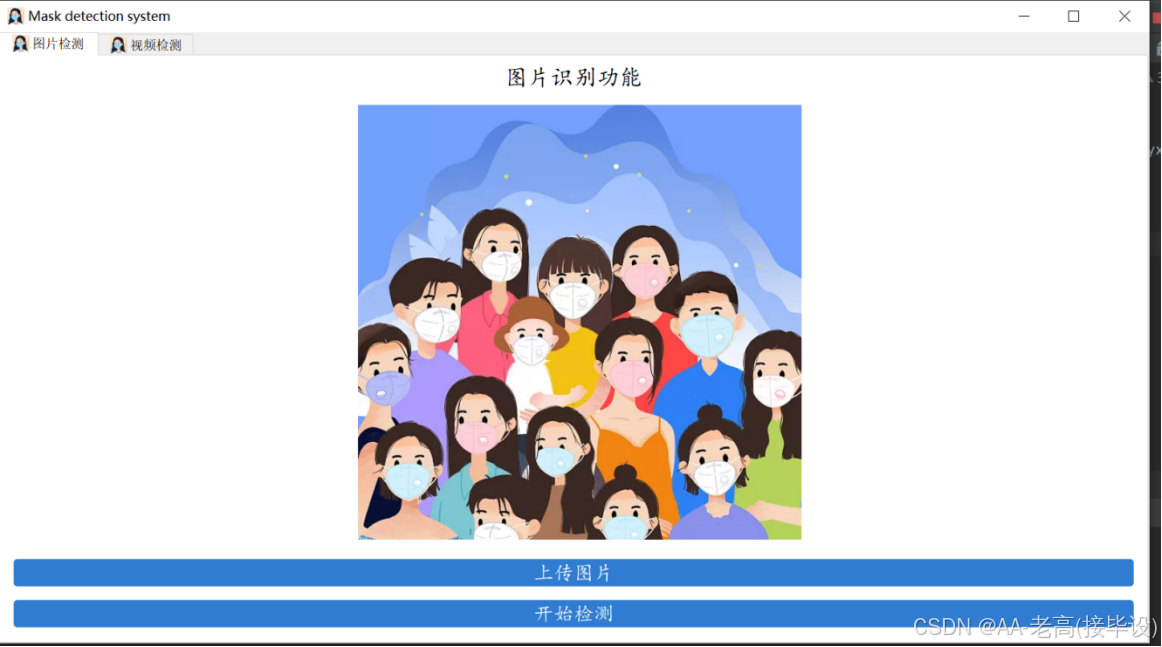
在使用本系统时,用户首先需要选择本地图片或视频并传入系统,系统对图片进行预处理后再对目标人脸的区域进行定位,然后对定位后的人脸区域进行是否佩戴口罩的识别,最后将识别结果输出。
根据上述描述,本系统应具备以下四个功能:
(1)图片选择:提供从本地文件夹中选择待识别图片的功能。用户可以从本地文件夹中获取想要识别的图片并传入系统。
(2)图像预处理:提供对传入的图片进行预处理的功能。该功能可以对传入的图片进行灰度校正和平滑处理,为之后对图像进行进一步分析和识别做准备。
(3)图像识别:该功能是对已经预计处理的图像进行再一次进一步的分析,并通过如此方式对于图像特征提取,对于目标进行定位以及预处理之后的图像进行进一步分析,对图像进行特征提取、目标定位和目标识别。
(4)结果输出:该功能可以将已经完成识别的图像的结果进行输出。+
2.2 项目业务要求
数据格式要求:支持png、jpg、jpeg、tiff等多种格式类型、多种大小的图片数据的读入和预测;界面要求:运行流畅,响应快,交互性良好,能够在有限的时间内对目标数据进行识别并保存结果。
2.3 项目环境要求
2.3.1 硬件环境
本项目使用cpu解决复杂的计算问题。
2.3.2 软件环境
使用Anaconda来构建Python环境;其中各软件库环境要求如下表2.1所示。
表2.1 各软件环境对应表
| python环境 | 版本要求 | 目的 |
| torch | >= 1.8.0 | 搭建、训练网络并进行预测 |
| torchvision | >= 0.9.0 | 用来生成图片数据集和加载一些预训练模型 |
| torchsummary | >= 1.5.1 | 输出、可视化网络结果 |
| TensorboardX | >= 2.5.1 | 网络结构、训练过程参数可视化 |
| PyQt | >= 5.15.7 | 构建软件界面 |
| Matplotlib | >=3.2.2 | 数据可视化,二维、三维绘图 |
| numpy | >=1.18.5 | 提供数据结构以及相应高效的处理函数 |
| Opencv-python | >=4.1.2 | 基于开源发行的跨平台计算机视觉库 |
| pillow | ==8.4.0 | 用于图像的基本处理 |
| pyyaml | >=5.3.1 | Python的YAML解析器和生成器。 |
| requests | >=2.23.0 | 用作发送网络请求 |
| scipy | >=1.4.1 | 高级的科学计算库 |
| tqdm | >=4.41.0 | 方便且易于扩展的Python进度条 |
| Tensorboard | >=2.11.1 | 用于数据可视化的工具 |
| pandas | >=1.1.4 | 用于管理数据集,数据分析和探索工具 |
| seaborn | >=0.11.0 | 用于生成统计图形 |
| pycocotools-windows | >=2.0.0 | 大型的图像数据集 |
3. 数据获取与增强
3.1 数据来源
此次作业本人使用的是mask_data数据集。mask_data是一个自定义数据集,在网上爬取了大约850张佩戴口罩、未正确佩戴口罩和未佩戴口罩的人脸图片,(由于无英伟达显卡,所以只查找了850张图片)。然后使用labeling标注图片,将图片分为了三类,其中标签0表示mask佩戴口罩,标签1表示mask_incorrect未正确佩戴口罩,标签2表示未佩戴口罩。再利用代码将VOC格式(xml格式)转为yolo格式(txt格式),并按80%的比例划分为训练集和验证集,即850张图片中680张为训练图片、170张为测试图片。在每一次同时数据之中,存在着许许多多的不同,口罩角度,颜色各不相同,这样的训练有利于提升我们的检测佩戴情况的准确性。数据集样张如图3.1所示。转化为txt格式如图3.2所示。
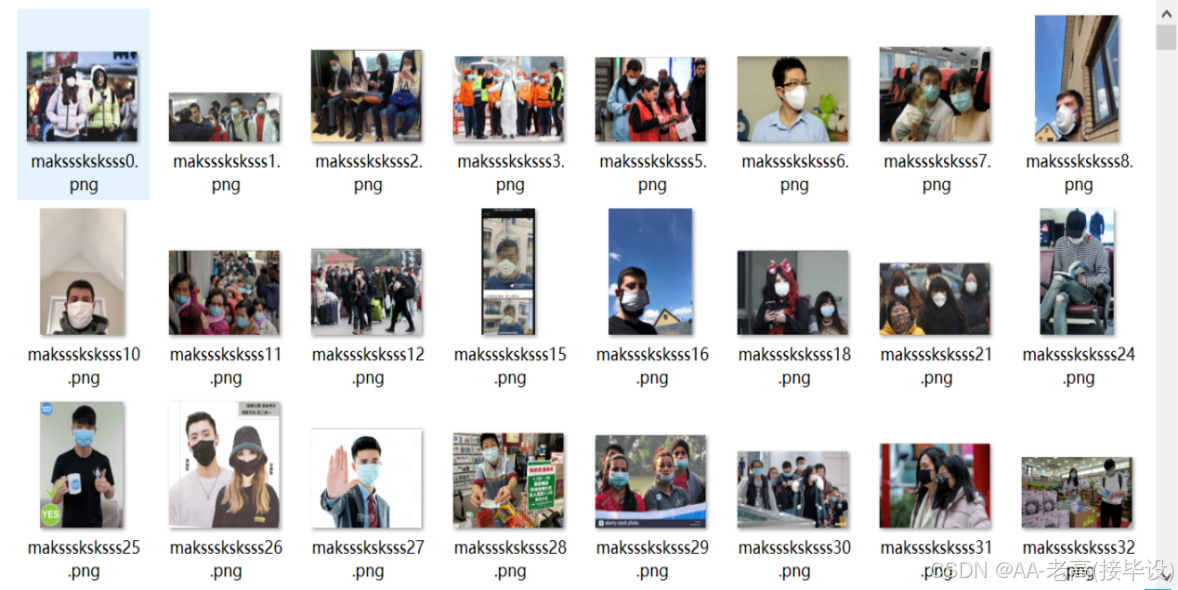
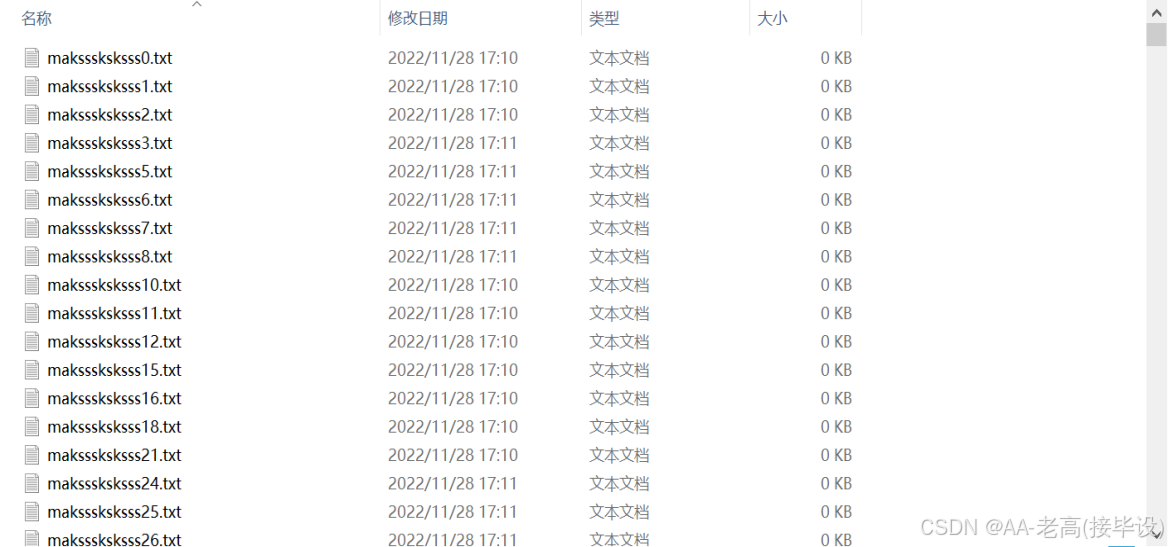
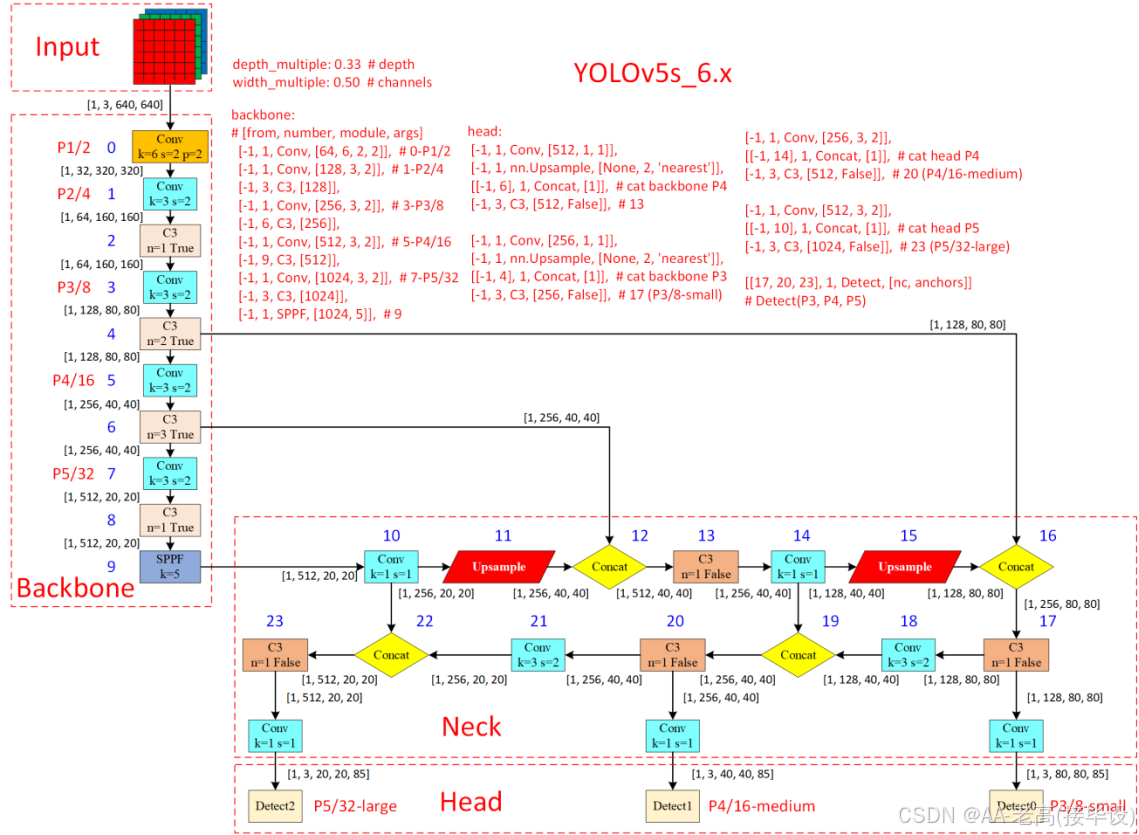
表4-1 yolov5s.yaml解析表
| 层数 | form | moudule | arguments | input | output |
| 0 | -1 | Conv | [3, 32, 6, 2, 2] | [3, 640, 640] | [32, 320, 320] |
| 1 | -1 | Conv | [32, 64, 3, 2] | [32, 320, 320] | [64, 160, 160] |
| 2 | -1 | C3 | [64, 64, 1] | [64, 160, 160] | [64, 160, 160] |
| 3 | -1 | Conv | [64, 128, 3, 2] | [64, 160, 160] | [128, 80, 80] |
| 4 | -1 | C3 | [128, 128, 2] | [128, 80, 80] | [128, 80, 80] |
| 5 | -1 | Conv | [128, 256, 3, 2] | [128, 80, 80] | [256, 40, 40] |
| 6 | -1 | C3 | [256, 256, 3] | [256, 40, 40] | [256, 40, 40] |
| 7 | -1 | Conv | [256, 512, 3, 2] | [256, 40, 40] | [512, 20, 20] |
| 8 | -1 | C3 | [512, 512, 1] | [512, 20, 20] | [512, 20, 20] |
| 9 | -1 | SPPF | [512, 512, 5] | [512, 20, 20] | [512, 20, 20] |
| 10 | -1 | Conv | [512, 256, 1, 1] | [512, 20, 20] | [256, 20, 20] |
| 11 | -1 | Upsample | [None, 2, 'nearest'] | [256, 20, 20] | [256, 40, 40] |
| 12 | [-1, 6] | Concat | [1] | [1, 256, 40, 40],[1, 256, 40, 40] | [512, 40, 40] |
| 13 | -1 | C3 | [512, 256, 1, False] | [512, 40, 40] | [256, 40, 40] |
| 14 | -1 | Conv | [256, 128, 1, 1] | [256, 40, 40] | [128, 40, 40] |
| 15 | -1 | Upsample | [None, 2, 'nearest'] | [128, 40, 40] | [128, 80, 80] |
| 16 | [-1, 4] | Concat | [1] | [1, 128, 80, 80],[1, 128, 80, 80] | [256, 80, 80] |
| 17 | -1 | C3 | [256, 128, 1, False] | [256, 80, 80] | [128, 80, 80] |
| 18 | -1 | Conv | [128, 128, 3, 2] | [128, 80, 80] | [128, 40, 40] |
| 19 | [-1, 14] | Concat | [1] | [1, 128, 40, 40],[1, 128, 40, 40] | [256, 40, 40] |
| 20 | -1 | C3 | [256, 256, 1, False] | [256, 40, 40] | [256, 40, 40] |
| 21 | -1 | Conv | [256, 256, 3, 2] | [256, 40, 40] | [256, 20, 20] |
| 22 | [-1, 10] | Concat | [1] | [1, 256, 20, 20],[1, 256, 20, 20] | [512, 20, 20] |
| 23 | -1 | C3 | [512, 512, 1, False] | [512, 20, 20] | [512, 20, 20] |
| 24 | [17, 20, 23] | Detect | [80, [[10, 13, 16, 30, 33, 23], [30, 61, 62, 45, 59, 119], [116, 90, 156, 198, 373, 326]], [128, 256, 512]] | [1, 128, 80, 80],[1, 256, 40, 40],[1, 512, 20, 20] | [1, 3, 80, 80, 85],[1, 3, 40, 40, 85],[1, 3, 20, 20, 85] |
图4-14中[from, number, module, args] 参数的意义分别是:
第一个参数 from :从哪一层获得输入,-1表示从上一层获得,[-1, 6]表示从上层和第6层两层获得。
第二个参数 number:表示有几个相同的模块,如果为9则表示有9个相同的模块。
第三个参数 module:模块的名称,这些模块写在common.py中。
第四个参数 args:类的初始化参数,用于解析作为 moudle 的传入参数。
4.4 yolov5算法实现
| class Model(nn.Module): def __init__(self, cfg='yolov5s.yaml', ch=3, nc=None, anchors=None): # model, input channels, number of classes super().__init__() if isinstance(cfg, dict): self.yaml = cfg # model dict else: # is *.yaml import yaml # for torch hub self.yaml_file = Path(cfg).name with open(cfg, encoding='ascii', errors='ignore') as f: self.yaml = yaml.safe_load(f) # model dict # Define model ch = self.yaml['ch'] = self.yaml.get('ch', ch) # input channels if nc and nc != self.yaml['nc']: LOGGER.info(f"Overriding model.yaml nc={self.yaml['nc']} with nc={nc}") self.yaml['nc'] = nc # override yaml value if anchors: LOGGER.info(f'Overriding model.yaml anchors with anchors={anchors}') self.yaml['anchors'] = round(anchors) # override yaml value self.model, self.save = parse_model(deepcopy(self.yaml), ch=[ch]) # model, savelist self.names = [str(i) for i in range(self.yaml['nc'])] # default names self.inplace = self.yaml.get('inplace', True) # Build strides, anchors m = self.model[-1] # Detect() if isinstance(m, Detect): s = 256 # 2x min stride m.inplace = self.inplace m.stride = torch.tensor([s / x.shape[-2] for x in self.forward(torch.zeros(1, ch, s, s))]) # forward m.anchors /= m.stride.view(-1, 1, 1) check_anchor_order(m) self.stride = m.stride self._initialize_biases() # only run once # Init weights, biases initialize_weights(self) self.info() LOGGER.info('') def forward(self, x, augment=False, profile=False, visualize=False): if augment: return self._forward_augment(x) # augmented inference, None return self._forward_once(x, profile, visualize) # single-scale inference, train def _forward_augment(self, x): img_size = x.shape[-2:] # height, width s = [1, 0.83, 0.67] # scales f = [None, 3, None] # flips (2-ud, 3-lr) y = [] # outputs for si, fi in zip(s, f): xi = scale_img(x.flip(fi) if fi else x, si, gs=int(self.stride.max())) yi = self._forward_once(xi)[0] # forward # cv2.imwrite(f'img_{si}.jpg', 255 * xi[0].cpu().numpy().transpose((1, 2, 0))[:, :, ::-1]) # save yi = self._descale_pred(yi, fi, si, img_size) y.append(yi) y = self._clip_augmented(y) # clip augmented tails return torch.cat(y, 1), None # augmented inference, train def _forward_once(self, x, profile=False, visualize=False): y, dt = [], [] # outputs for m in self.model: if m.f != -1: # if not from previous layer x = y[m.f] if isinstance(m.f, int) else [x if j == -1 else y[j] for j in m.f] # from earlier layers if profile: self._profile_one_layer(m, x, dt) x = m(x) # run y.append(x if m.i in self.save else None) # save output if visualize: feature_visualization(x, m.type, m.i, save_dir=visualize) return x |
4.5 模型的训练与预测
4.5.1 训练过程
将标注后的数据集划分为训练集和验证集后,开始对我们搭建的网络进行训练。一般为了缩短网络的训练时间,并达到更好的精度,我们一般加载预训练权重进行网络的训练。而yolov5给我们提供了几个预训练权重,我们可以对应我们不同的需求选择不同的版本的预训练权重。预训练权重越大,训练出来的精度就会相对来说越高,但是其检测的速度就会越慢。本次训练自己的数据集用的预训练权重为yolov5s.pt。其中主要的代码如下:
| for epoch in range(start_epoch, epochs): # epoch model.train() if opt.image_weights: cw = model.class_weights.cpu().numpy() * (1 - maps) ** 2 / nc # class weights iw = labels_to_image_weights(dataset.labels, nc=nc, class_weights=cw) dataset.indices = random.choices(range(dataset.n), weights=iw, k=dataset.n) mloss = torch.zeros(3, device=device) # mean losses if RANK != -1: train_loader.sampler.set_epoch(epoch) pbar = enumerate(train_loader) LOGGER.info(('\n' + '%10s' * 7) % ('Epoch', 'gpu_mem', 'box', 'obj', 'cls', 'labels', 'img_size')) if RANK in [-1, 0]: pbar = tqdm(pbar, total=nb, ncols=NCOLS, bar_format='{l_bar}{bar:10}{r_bar}{bar:-10b}') # progress bar optimizer.zero_grad() for i, (imgs, targets, paths, _) in pbar: # batch ni = i + nb * epoch # number integrated batches (since train start) imgs = imgs.to(device, non_blocking=True).float() / 255 if ni <= nw: xi = [0, nw] # x interp accumulate = max(1, np.interp(ni, xi, [1, nbs / batch_size]).round()) for j, x in enumerate(optimizer.param_groups): x['lr'] = np.interp(ni, xi, [hyp['warmup_bias_lr'] if j == 2 else 0.0, x['initial_lr'] * lf(epoch)]) if 'momentum' in x: x['momentum'] = np.interp(ni, xi, [hyp['warmup_momentum'], hyp['momentum']]) if opt.multi_scale: sz = random.randrange(imgsz * 0.5, imgsz * 1.5 + gs) // gs * gs # size sf = sz / max(imgs.shape[2:]) # scale factor if sf != 1: ns = [math.ceil(x * sf / gs) * gs for x in imgs.shape[2:]] imgs = nn.functional.interpolate(imgs, size=ns, mode='bilinear', align_corners=False) # Forward with amp.autocast(enabled=cuda): pred = model(imgs) # forward loss, loss_items = compute_loss(pred, targets.to(device)) if RANK != -1: loss *= WORLD_SIZE # gradient averaged between devices in DDP mode if opt.quad: loss *= 4. # Backward scaler.scale(loss).backward() # Optimize if ni - last_opt_step >= accumulate: scaler.step(optimizer) # optimizer.step scaler.update() optimizer.zero_grad() if ema: ema.update(model) last_opt_step = ni # Log if RANK in [-1, 0]: mloss = (mloss * i + loss_items) / (i + 1) # update mean losses mem = f'{torch.cuda.memory_reserved() / 1E9 if torch.cuda.is_available() else 0:.3g}G' # (GB) pbar.set_description(('%10s' * 2 + '%10.4g' * 5) % ( f'{epoch}/{epochs - 1}', mem, *mloss, targets.shape[0], imgs.shape[-1])) callbacks.run('on_train_batch_end', ni, model, imgs, targets, paths, plots, opt.sync_bn) # Scheduler lr = [x['lr'] for x in optimizer.param_groups] # for loggers scheduler.step() |
4.5.2 预测过程
等到数据训练好了以后,就会在主目录下产生一个run文件夹,在run/train/exp/weights目录下会产生两个权重文件,一个是最后一轮的权重文件,一个是最好的权重文件,一会我们就要利用这个最好的权重文件来做推理测试。将刚刚训练好的最好的权重传入到推理函数中去。然后就可以对图像视频进行预测。预测的代码如下:
| def run(weights=ROOT / 'yolov5s.pt', # model.pt path(s) source=ROOT / 'data/images', # file/dir/URL/glob, 0 for webcam imgsz=640, # inference size (pixels) conf_thres=0.25, # confidence threshold iou_thres=0.45, # NMS IOU threshold max_det=1000, # maximum detections per image device='', # cuda device, i.e. 0 or 0,1,2,3 or cpu view_img=False, # show results save_txt=False, # save results to *.txt save_conf=False, # save confidences in --save-txt labels save_crop=False, # save cropped prediction boxes nosave=False, # do not save images/videos classes=None, # filter by class: --class 0, or --class 0 2 3 agnostic_nms=False, # class-agnostic NMS augment=False, # augmented inference visualize=False, # visualize features update=False, # update all models project=ROOT / 'runs/detect', # save results to project/name name='exp', # save results to project/name exist_ok=False, # existing project/name ok, do not increment line_thickness=3, # bounding box thickness (pixels) hide_labels=False, # hide labels hide_conf=False, # hide confidences half=False, # use FP16 half-precision inference dnn=False, # use OpenCV DNN for ONNX inference ): source = str(source) save_img = not nosave and not source.endswith('.txt') # save inference images is_file = Path(source).suffix[1:] in (IMG_FORMATS + VID_FORMATS) is_url = source.lower().startswith(('rtsp://', 'rtmp://', 'http://', 'https://')) webcam = source.isnumeric() or source.endswith('.txt') or (is_url and not is_file) if is_url and is_file: source = check_file(source) # download # Directories save_dir = increment_path(Path(project) / name, exist_ok=exist_ok) (save_dir / 'labels' if save_txt else save_dir).mkdir(parents=True, exist_ok=True) # make dir # Load model device = select_device(device) model = DetectMultiBackend(weights, device=device, dnn=dnn) stride, names, pt, jit, onnx = model.stride, model.names, model.pt, model.jit, model.onnx imgsz = check_img_size(imgsz, s=stride) # check image size # Half half &= pt and device.type != 'cpu' # half precision only supported by PyTorch on CUDA if pt: model.model.half() if half else model.model.float() # Dataloader if webcam: view_img = check_imshow() cudnn.benchmark = True # set True to speed up constant image size inference dataset = LoadStreams(source, img_size=imgsz, stride=stride, auto=pt and not jit) bs = len(dataset) # batch_size else: dataset = LoadImages(source, img_size=imgsz, stride=stride, auto=pt and not jit) bs = 1 # batch_size vid_path, vid_writer = [None] * bs, [None] * bs # Run inference if pt and device.type != 'cpu': model(torch.zeros(1, 3, *imgsz).to(device).type_as(next(model.model.parameters()))) # warmup dt, seen = [0.0, 0.0, 0.0], 0 for path, im, im0s, vid_cap, s in dataset: t1 = time_sync() im = torch.from_numpy(im).to(device) im = im.half() if half else im.float() # uint8 to fp16/32 im /= 255 # 0 - 255 to 0.0 - 1.0 if len(im.shape) == 3: im = im[None] # expand for batch dim t2 = time_sync() dt[0] += t2 - t1 # Inference visualize = increment_path(save_dir / Path(path).stem, mkdir=True) if visualize else False pred = model(im, augment=augment, visualize=visualize) t3 = time_sync() dt[1] += t3 - t2 # NMS pred = non_max_suppression(pred, conf_thres, iou_thres, classes, agnostic_nms, max_det=max_det) dt[2] += time_sync() - t3 # Process predictions for i, det in enumerate(pred): # per image seen += 1 if webcam: # batch_size >= 1 p, im0, frame = path[i], im0s[i].copy(), dataset.count s += f'{i}: ' else: p, im0, frame = path, im0s.copy(), getattr(dataset, 'frame', 0) p = Path(p) # to Path save_path = str(save_dir / p.name) # im.jpg txt_path = str(save_dir / 'labels' / p.stem) + ('' if dataset.mode == 'image' else f'_{frame}') # im.txt s += '%gx%g ' % im.shape[2:] # print string gn = torch.tensor(im0.shape)[[1, 0, 1, 0]] # normalization gain whwh imc = im0.copy() if save_crop else im0 # for save_crop annotator = Annotator(im0, line_width=line_thickness, example=str(names)) if len(det): det[:, :4] = scale_coords(im.shape[2:], det[:, :4], im0.shape).round() # Print results for c in det[:, -1].unique(): n = (det[:, -1] == c).sum() # detections per class s += f"{n} {names[int(c)]}{'s' * (n > 1)}, " # add to string # Write results for *xyxy, conf, cls in reversed(det): if save_txt: # Write to file xywh = (xyxy2xywh(torch.tensor(xyxy).view(1, 4)) / gn).view(-1).tolist() # normalized xywh line = (cls, *xywh, conf) if save_conf else (cls, *xywh) with open(txt_path + '.txt', 'a') as f: f.write(('%g ' * len(line)).rstrip() % line + '\n') if save_img or save_crop or view_img: # Add bbox to image c = int(cls) # integer class label = None if hide_labels else (names[c] if hide_conf else f'{names[c]} {conf:.2f}') annotator.box_label(xyxy, label, color=colors(c, True)) if save_crop: save_one_box(xyxy, imc, file=save_dir / 'crops' / names[c] / f'{p.stem}.jpg', BGR=True) # Print time (inference-only) LOGGER.info(f'{s}Done. ({t3 - t2:.3f}s)') # Stream results im0 = annotator.result() if view_img: cv2.imshow(str(p), im0) cv2.waitKey(1) # 1 millisecond # Save results (image with detections) if save_img: if dataset.mode == 'image': cv2.imwrite(save_path, im0) else: # 'video' or 'stream' if vid_path[i] != save_path: # new video vid_path[i] = save_path if isinstance(vid_writer[i], cv2.VideoWriter): vid_writer[i].release() # release previous video writer if vid_cap: # video fps = vid_cap.get(cv2.CAP_PROP_FPS) w = int(vid_cap.get(cv2.CAP_PROP_FRAME_WIDTH)) h = int(vid_cap.get(cv2.CAP_PROP_FRAME_HEIGHT)) else: # stream fps, w, h = 30, im0.shape[1], im0.shape[0] save_path += '.mp4' vid_writer[i] = cv2.VideoWriter(save_path, cv2.VideoWriter_fourcc(*'mp4v'), fps, (w, h)) vid_writer[i].write(im0) # Print results t = tuple(x / seen * 1E3 for x in dt) # speeds per image LOGGER.info(f'Speed: %.1fms pre-process, %.1fms inference, %.1fms NMS per image at shape {(1, 3, *imgsz)}' % t) if save_txt or save_img: s = f"\n{len(list(save_dir.glob('labels/*.txt')))} labels saved to {save_dir / 'labels'}" if save_txt else '' LOGGER.info(f"Results saved to {colorstr('bold', save_dir)}{s}") if update: strip_optimizer(weights) # update model (to fix SourceChangeWarning) |
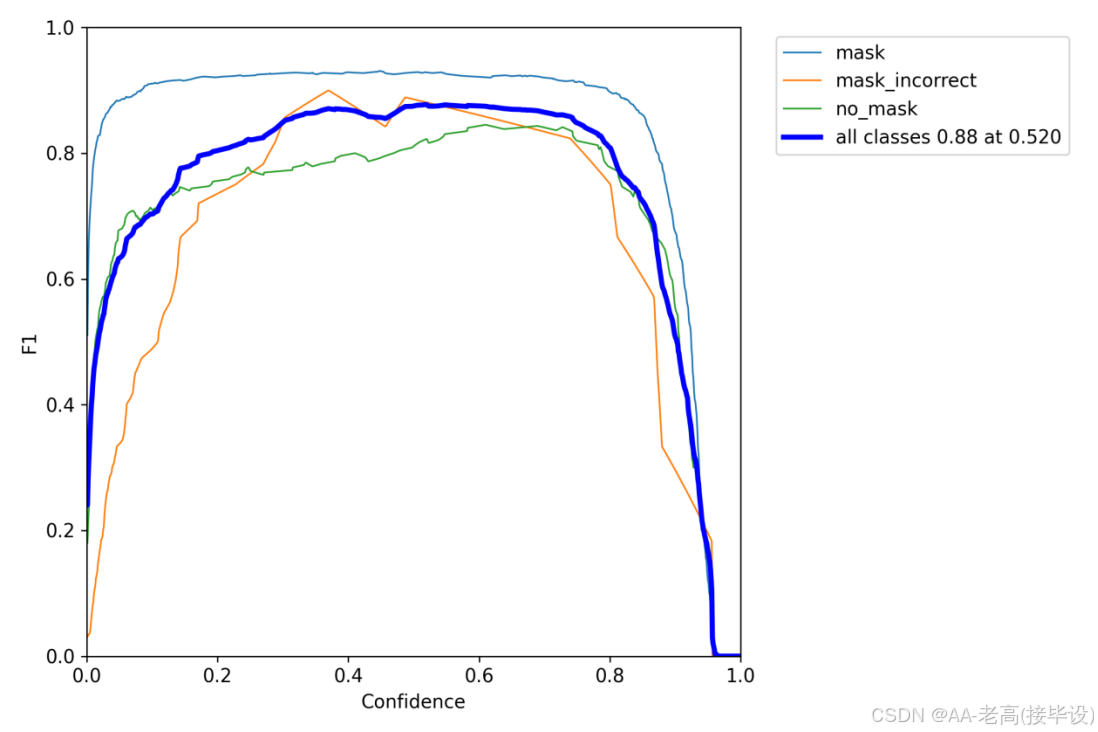
7. 参考文献
[1]李海. 基于卷积神经网络的目标识别算法研究[D].安徽工程大学,2021.DOI:10.27763/d.cnki.gahgc.2021.000003.
[2]李炳臻,姜文志,顾佼佼,刘克.基于卷积神经网络的目标检测算法综述[J].计算机与数字工程,2022,50(05):1010-1017.
[3]左湘华,罗昊.基于深度学习实现口罩佩戴检测方法研究与实现[J].电脑编程技巧与维护,2022(11):122-124+165.DOI:10.16184/j.cnki.comprg.2022.11.022.
[4]詹可强,林建辉,朱天宝.基于卷积神经网络的人脸口罩检测系统设计与实现[J].哈尔滨师范大学自然科学学报,2022,38(05):58-63.
[5]朱瑞. 基于深度学习的公共场景下口罩佩戴检测算法[D].电子科技大学,2022.DOI:10.27005/d.cnki.gdzku.2022.002873.
[6]管军霖,智鑫.基于yolov4卷积神经网络的口罩佩戴检测方法[J].现代信息科技,2020,4(11):9-12.DOI:10.19850/j.cnki.2096-4706.2020.11.002.
[7]樊钦睿,李丹.基于YOLO5Face的口罩人脸检测[J].电子制作,2021(19):61-63+8.DOI:10.16589/j.cnki.cn11-3571/tn.2021.19.019.
[8]Tan Jiannan,Oyekan John. Attention Augmented Convolutional Neural Network for acoustics based machine state estimation[J]. Applied Soft Computing Journal,2021,110.
[9]Koyama Akira,Miyauchi Shoko,Morooka Ken'ichi,Hojo Hajime,Einaga Hisahiro,Murakami Yasukazu. Analysis of TEM images of metallic nanoparticles using convolutional neural networks and transfer learning[J]. Journal of Magnetism and Magnetic Materials,2021,538.
[10]Wu Zhenghong,Jiang Hongkai,Liu Shaowei,Zhao Ke. A deep ensemble dense convolutional neural network for rolling bearing fault diagnosis[J]. Measurement Science and Technology,2021,32(10).
[11]薛均晓,程君进,张其斌,郭毅博,鲁爱国,李鉴,万曦,徐静.改进轻量级卷积神经网络的复杂场景口罩佩戴检测方法[J].计算机辅助设计与图形学学报,2021,33(07):1045-1054.

免费领 150 小时云算力,进群参与显卡、AI PC 幸运抽奖
更多推荐

 2
2 0
0- 0



 已为社区贡献1条内容

所有评论(0)