
鸿蒙PC Electron框架开发数字签名原理与实践
·
欢迎加入开源鸿蒙PC社区:
https://harmonypc.csdn.net/
atomgit仓库地址: https://atomgit.com/Math_teacher_fan/shuziqianming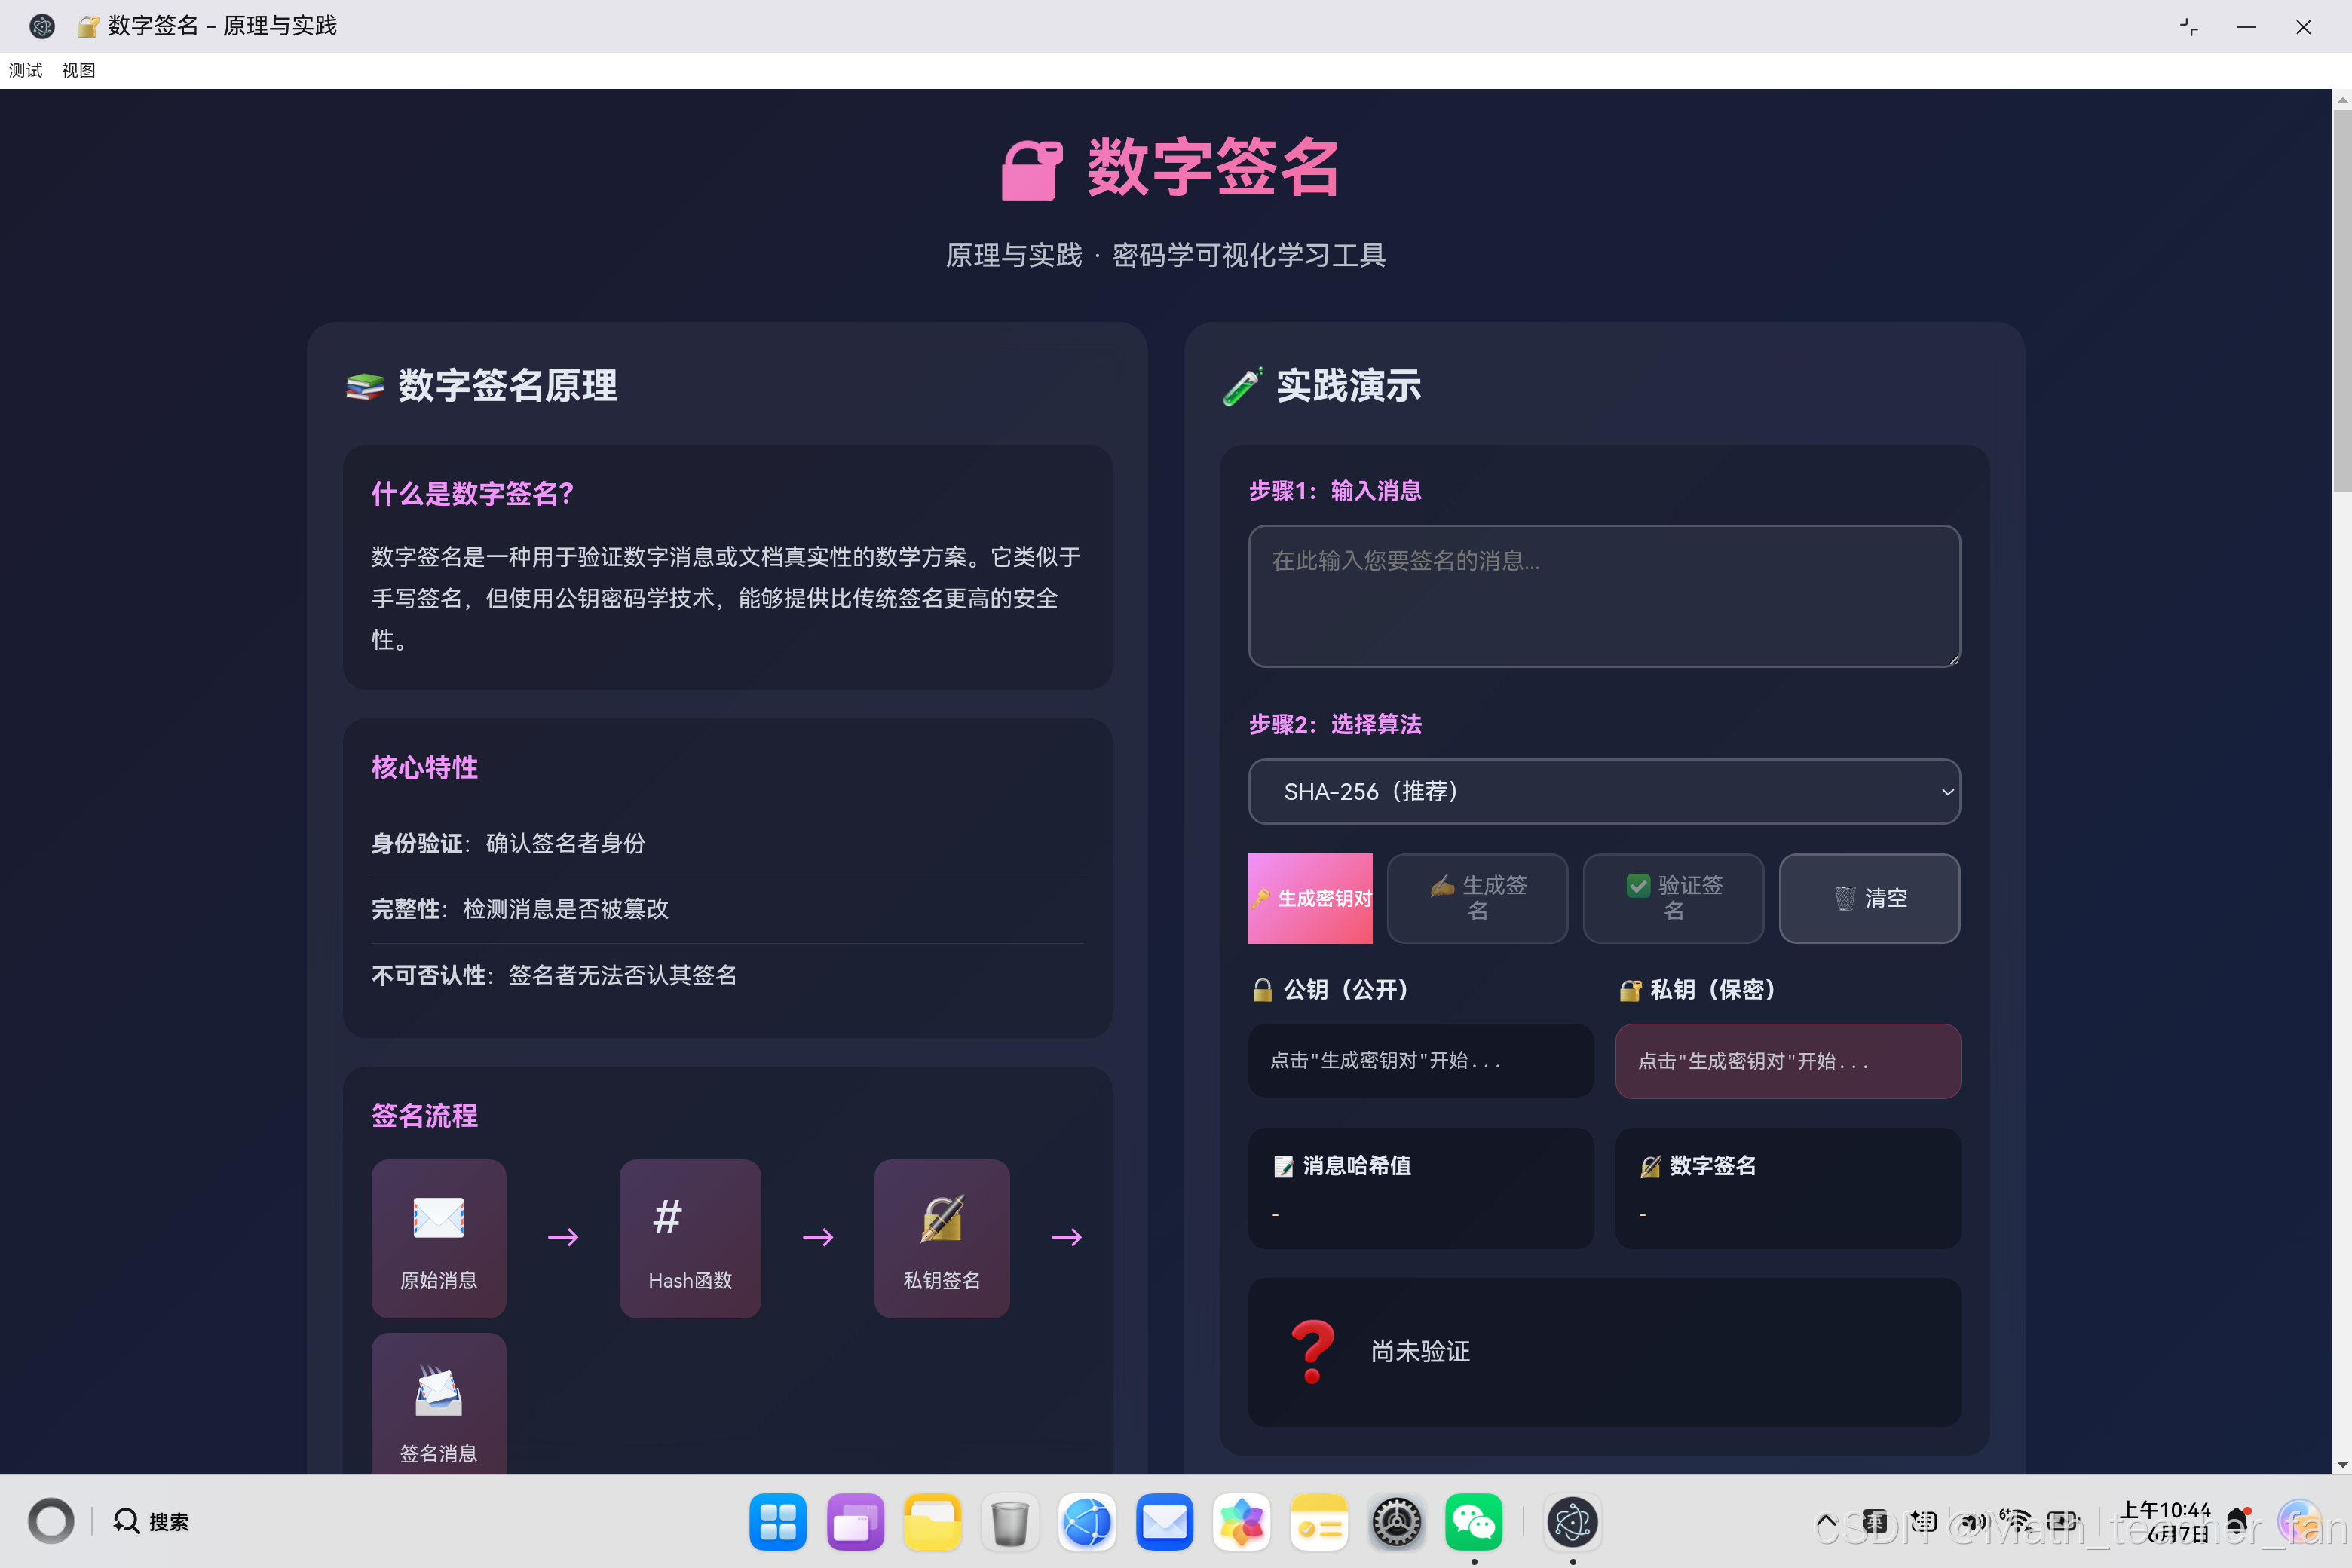
一、项目概述
"数字签名原理与实践"是一款密码学可视化学习工具,旨在通过交互式演示帮助用户理解数字签名的核心概念和工作原理。本文将详细介绍从理论基础到代码实现的完整过程。
1.1 项目目标
- 普及数字签名基础知识
- 可视化展示签名和验证流程
- 交互式演示Hash函数特性
- 展示雪崩效应原理
1.2 技术选型
| 技术 | 用途 | 优势 |
|---|---|---|
| Web Crypto API | 密码学操作 | 原生支持,无需第三方库 |
| HTML5 | 页面结构 | 语义化标签 |
| CSS3 | 样式设计 | 渐变、动画 |
| JavaScript ES6+ | 核心逻辑 | 异步编程 |
二、数字签名原理
2.1 什么是数字签名?
数字签名是一种用于验证数字消息或文档真实性和完整性的数学方案。它类似于传统的手写签名,但使用公钥密码学技术,能够提供更高的安全性和可靠性。
2.2 核心特性
| 特性 | 说明 | 重要性 |
|---|---|---|
| 身份验证 | 确认消息发送者的身份 | ⭐⭐⭐⭐⭐ |
| 消息完整性 | 检测消息是否被篡改 | ⭐⭐⭐⭐⭐ |
| 不可否认性 | 签名者无法否认其签名行为 | ⭐⭐⭐⭐ |
2.3 签名流程
┌─────────────────────────────────────────────────────────────┐
│                      签名者(发送方)                           │
│                                                             │
│  ┌──────────┐    ┌──────────┐    ┌──────────┐             │
│  │ 原始消息  │ → │ Hash函数  │ → │ 私钥加密  │             │
│  └──────────┘    └──────────┘    └──────────┘             │
│       ↓              ↓               ↓                     │
│   "Hello"      "a591a6..."    "签名值..."                  │
│                                                             │
│  ┌──────────┐                                              │
│  │ 签名消息  │ → 发送给接收者                                  │
│  └──────────┘                                              │
└─────────────────────────────────────────────────────────────┘
2.4 验证流程
┌─────────────────────────────────────────────────────────────┐
│                      接收者                                  │
│                                                             │
│  ┌──────────┐    ┌──────────┐    ┌──────────┐             │
│  │ 接收消息  │ → │ Hash函数  │    │ 公钥解密  │ ←─────────┐ │
│  └──────────┘    └──────────┘    └──────────┘          │   │
│       ↓              ↓               ↓                │   │
│   "Hello"      "a591a6..."    "解密摘要..."          │   │
│                                              ↓            │   │
│                                    ┌──────────┐    │    │   │
│                                    │ 比对结果  │ ←──┘    │   │
│                                    └──────────┘         │   │
│                                         ↓                │   │
│  ┌──────────────────────────────────────────────────┐   │   │
│  │ 签名有效 ✓ / 签名无效 ✗                          │   │   │
│  └──────────────────────────────────────────────────┘   │   │
│                                                         │   │
│                            来自签名者的签名消息 ←─────────┘   │
└─────────────────────────────────────────────────────────────┘
三、系统架构设计
3.1 整体架构
┌─────────────────────────────────────────────────────────────┐
│                     用户界面层                                  │
│  ┌──────────┐  ┌──────────┐  ┌──────────┐  ┌──────────┐  │
│  │ 原理介绍  │  │ 实践演示  │  │ 概念说明  │  │ 可视化   │  │
│  └──────────┘  └──────────┘  └──────────┘  └──────────┘  │
└─────────────────────────────────────────────────────────────┘
                              ↓
┌─────────────────────────────────────────────────────────────┐
│                     业务逻辑层                                  │
│  ┌──────────────────────────────────────────────────────┐  │
│  │            DigitalSignatureApp 类                       │  │
│  │  - 密钥管理 (generateKeyPair)                         │  │
│  │  - 签名生成 (signMessage)                             │  │
│  │  - 签名验证 (verifySignature)                        │  │
│  │  - Hash可视化 (initHashVisualization)                 │  │
│  │  - 雪崩效应 (initAvalancheDemo)                     │  │
│  └──────────────────────────────────────────────────────┘  │
└─────────────────────────────────────────────────────────────┘
                              ↓
┌─────────────────────────────────────────────────────────────┐
│                     Web Crypto API 层                         │
│  crypto.subtle.generateKey()  - 密钥生成                     │
│  crypto.subtle.sign()         - 签名操作                     │
│  crypto.subtle.verify()       - 验证操作                     │
│  crypto.subtle.digest()       - Hash计算                     │
└─────────────────────────────────────────────────────────────┘
3.2 核心类设计
class DigitalSignatureApp {
    // 密钥管理
    publicKey = null      // 公钥
    privateKey = null    // 私钥

    // 签名数据
    signature = null      // 签名值
    messageHash = null    // 消息哈希

    // 配置
    currentAlgorithm = 'SHA-256'  // 当前Hash算法

    // 核心方法
    async generateKeyPair()       // 生成密钥对
    async signMessage()          // 签名消息
    async verifySignature()       // 验证签名
    async initHashVisualization() // Hash可视化
    async initAvalancheDemo()    // 雪崩效应演示
}
四、密钥生成系统
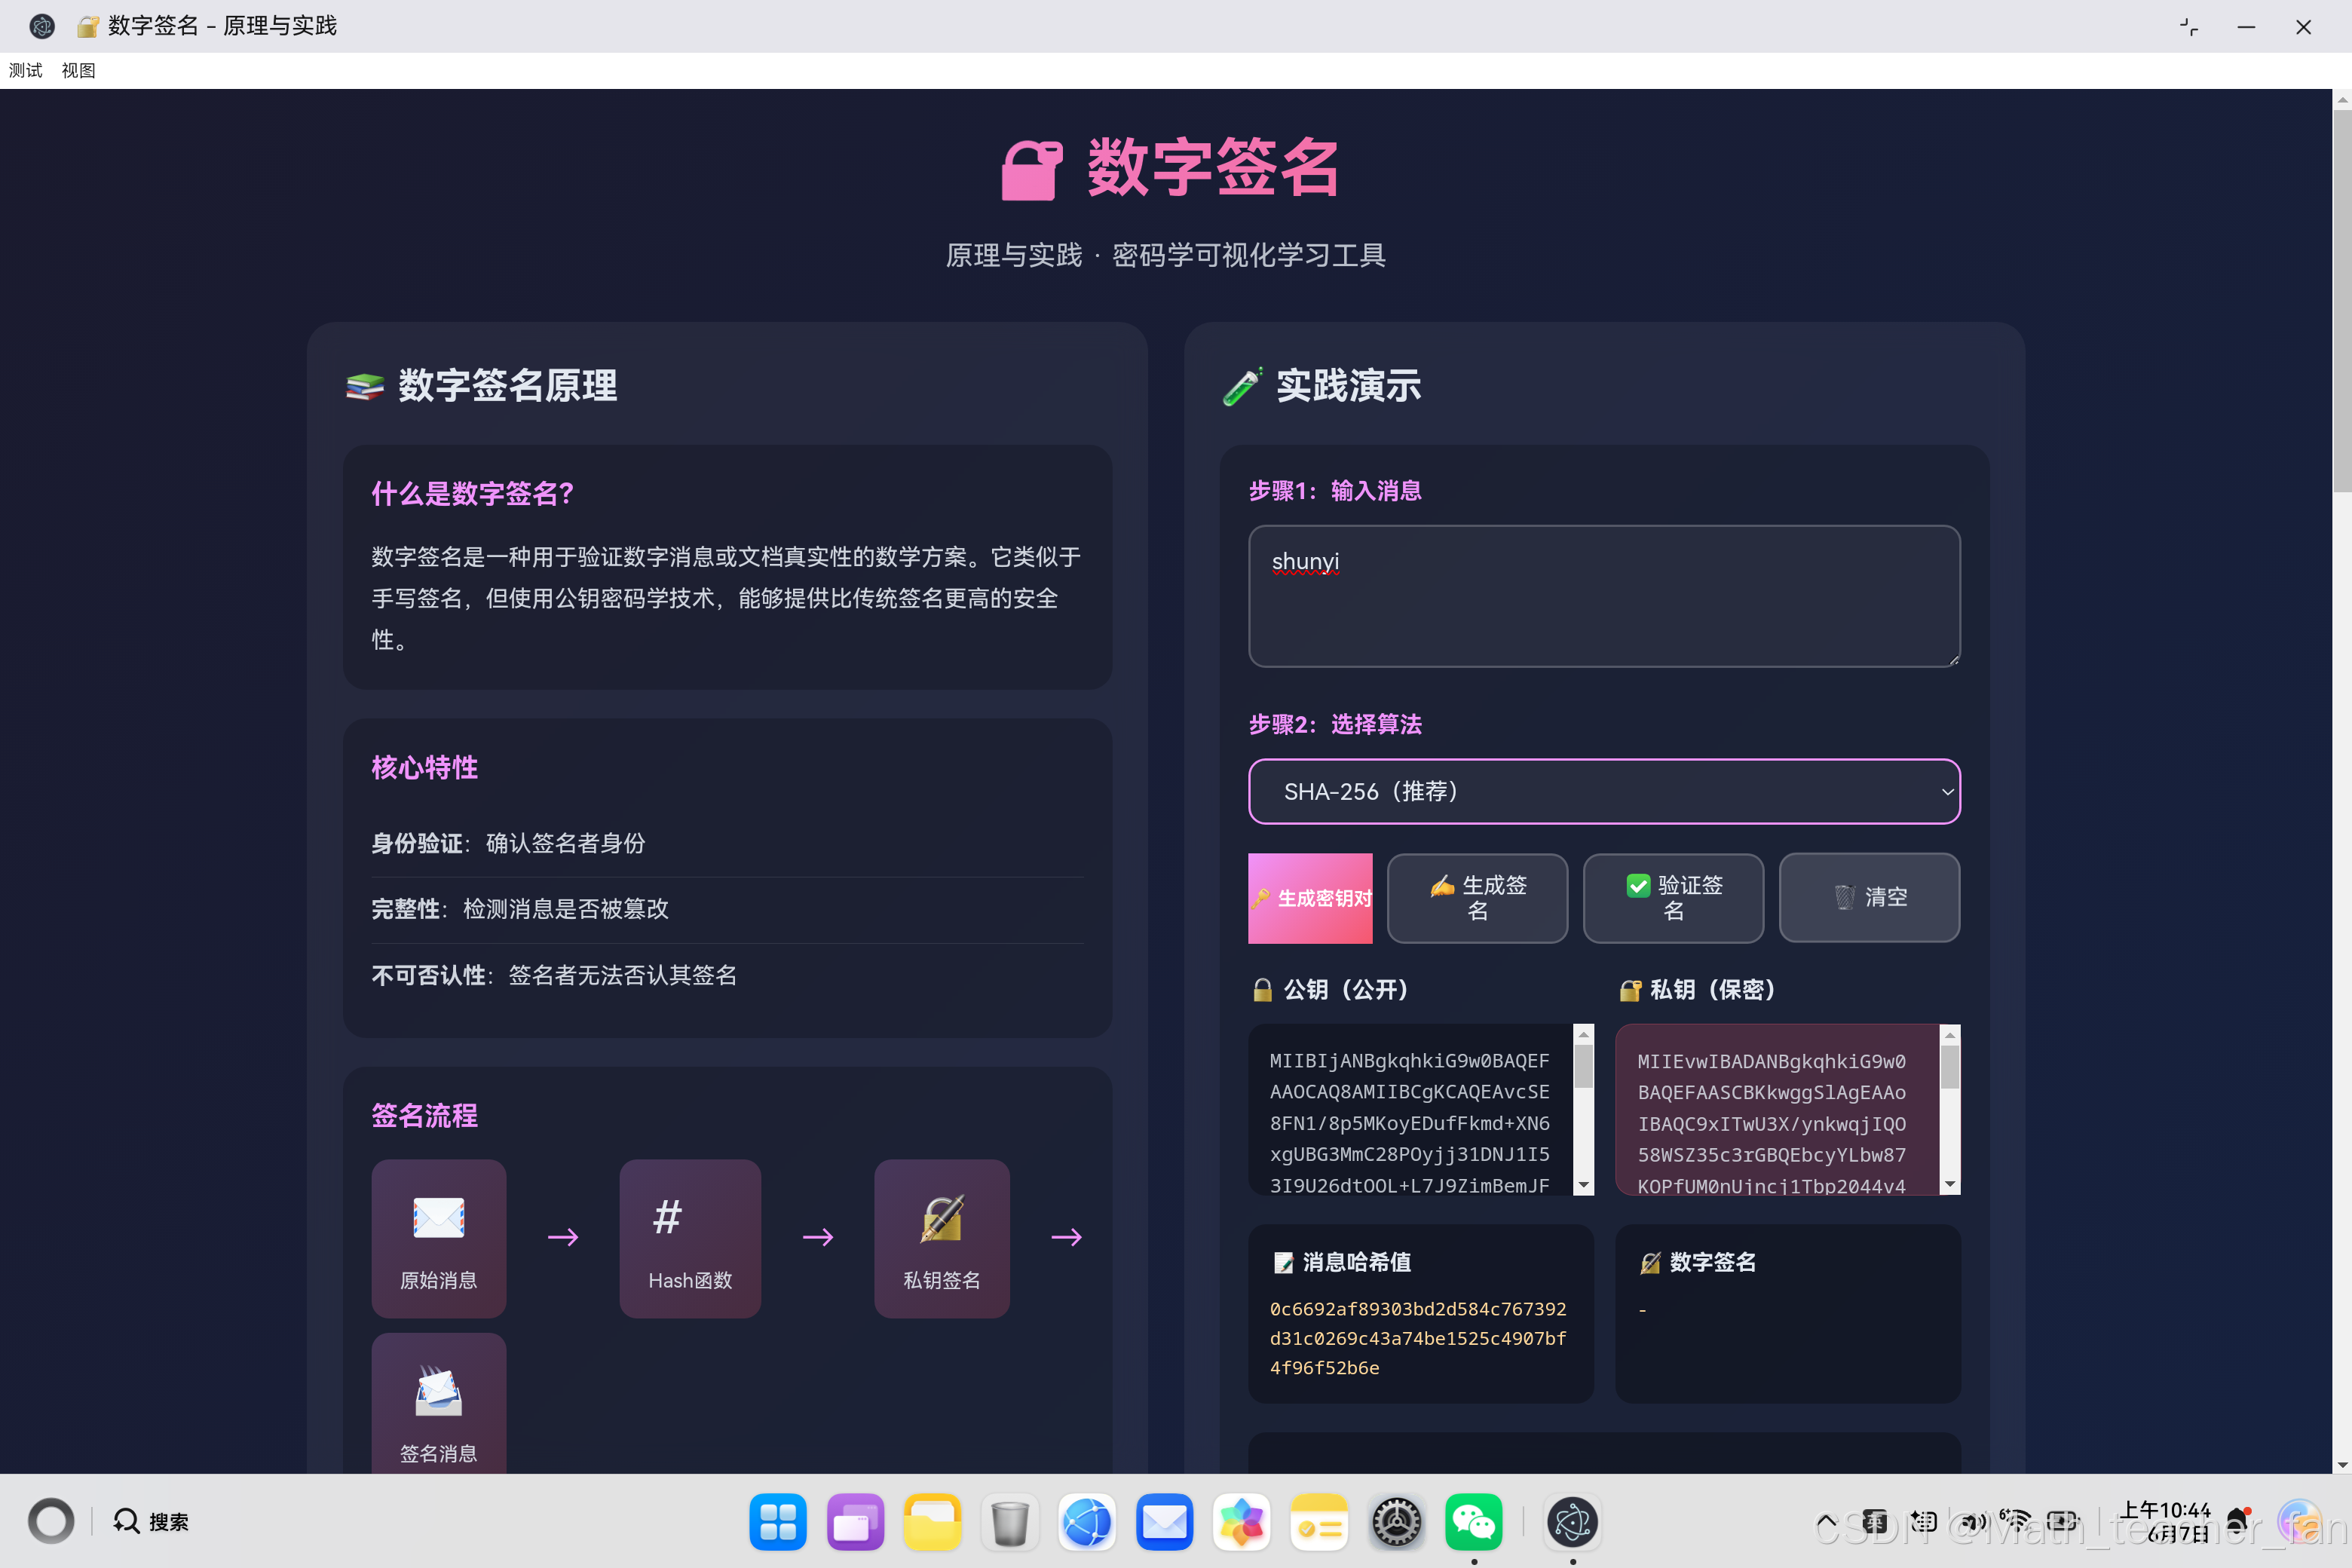
4.1 RSA密钥对生成
数字签名使用非对称加密算法RSA,生成一对数学上关联的密钥:公钥和私钥。
async generateKeyPair() {
    try {
        // 1. 使用Web Crypto API生成RSA-OAEP密钥对
        const keyPair = await crypto.subtle.generateKey(
            {
                name: 'RSA-OAEP',      // RSA-OAEP加密方案
                modulusLength: 2048,    // 模数长度(位)
                publicExponent: new Uint8Array([1, 0, 1]),  // 公开指数
                hash: this.currentAlgorithm  // Hash算法
            },
            true,                      // 密钥可导出
            ['encrypt', 'decrypt']     // 密钥用途
        );

        // 2. 保存密钥对象
        this.publicKey = keyPair.publicKey;
        this.privateKey = keyPair.privateKey;

        // 3. 导出密钥为可读格式
        const publicKeyExported = await crypto.subtle.exportKey(
            'spki',
            this.publicKey
        );
        const privateKeyExported = await crypto.subtle.exportKey(
            'pkcs8',
            this.privateKey
        );

        // 4. 转换为Base64字符串显示
        const publicKeyBase64 = this.arrayBufferToBase64(publicKeyExported);
        const privateKeyBase64 = this.arrayBufferToBase64(privateKeyExported);

        // 5. 更新UI显示
        document.getElementById('publicKey').textContent = publicKeyBase64;
        document.getElementById('privateKey').textContent = privateKeyBase64;

    } catch (error) {
        console.error('密钥生成失败:', error);
        alert('密钥生成失败:' + error.message);
    }
}
4.2 密钥参数说明
| 参数 | 说明 | 推荐值 | 说明 |
|---|---|---|---|
| modulusLength | 模数长度 | 2048位 | 越长越安全,计算越慢 |
| publicExponent | 公开指数 | [1, 0, 1] | 即65537,广泛使用 |
| hash | Hash算法 | SHA-256 | 与签名算法匹配 |
4.3 密钥格式
// 公钥格式:SubjectPublicKeyInfo (SPKI)
-----BEGIN PUBLIC KEY-----
MIIBIjANBgkqhkiG9w0BAQEFAAOCAQ8A...
-----END PUBLIC KEY-----

// 私钥格式:Private Key (PKCS#8)
-----BEGIN PRIVATE KEY-----
MIIEvQIBADANBgkqhkiG9w0BAQEFAASC...
-----END PRIVATE KEY-----
五、签名生成系统
5.1 签名流程
async signMessage() {
    const message = document.getElementById('messageInput').value;

    if (!message) {
        alert('请输入要签名的消息');
        return;
    }

    if (!this.privateKey) {
        alert('请先生成密钥对');
        return;
    }

    try {
        // 1. 将消息转换为字节数组
        const encoder = new TextEncoder();
        const messageBuffer = encoder.encode(message);

        // 2. 计算消息Hash
        const hashBuffer = await crypto.subtle.digest(
            this.currentAlgorithm,
            messageBuffer
        );

        this.messageHash = this.arrayBufferToHex(hashBuffer);
        document.getElementById('messageHash').textContent = this.messageHash;

        // 3. 使用私钥生成签名
        const signatureBuffer = await crypto.subtle.sign(
            {
                name: 'RSA-OAEP'
            },
            this.privateKey,
            messageBuffer
        );

        // 4. 转换为Base64字符串
        this.signature = this.arrayBufferToBase64(signatureBuffer);
        document.getElementById('signatureValue').textContent = this.signature;

        this.updateVerificationResult('❓', '签名已生成,等待验证');

    } catch (error) {
        console.error('签名失败:', error);
        alert('签名失败:' + error.message);
    }
}
5.2 签名算法详解
签名 = Encrypt(Hash(消息), 私钥)

步骤:
1. Hash(消息) → 固定长度的摘要
2. Encrypt(摘要, 私钥) → 签名值
六、签名验证系统
6.1 验证流程
async verifySignature() {
    const message = document.getElementById('messageInput').value;

    if (!message) {
        alert('请输入要验证的消息');
        return;
    }

    if (!this.signature) {
        alert('请先生成签名');
        return;
    }

    try {
        // 1. 将消息转换为字节数组
        const encoder = new TextEncoder();
        const messageBuffer = encoder.encode(message);

        // 2. 将Base64签名转换为字节数组
        const signatureBuffer = this.base64ToArrayBuffer(this.signature);

        // 3. 使用公钥验证签名
        const isValid = await crypto.subtle.verify(
            {
                name: 'RSA-OAEP'
            },
            this.publicKey,
            signatureBuffer,
            messageBuffer
        );

        // 4. 显示验证结果
        if (isValid) {
            this.updateVerificationResult('✅', '签名验证成功!消息未被篡改');
        } else {
            this.updateVerificationResult('❌', '签名验证失败!消息可能被篡改');
        }

    } catch (error) {
        console.error('验证失败:', error);
        this.updateVerificationResult('❌', '签名验证失败:' + error.message);
    }
}
6.2 验证原理
验证 = (Hash(接收消息) == Decrypt(签名, 公钥))

步骤:
1. Hash(接收消息) → 计算接收消息的摘要
2. Decrypt(签名, 公钥) → 解密得到原始摘要
3. 比对两个摘要 → 验证结果
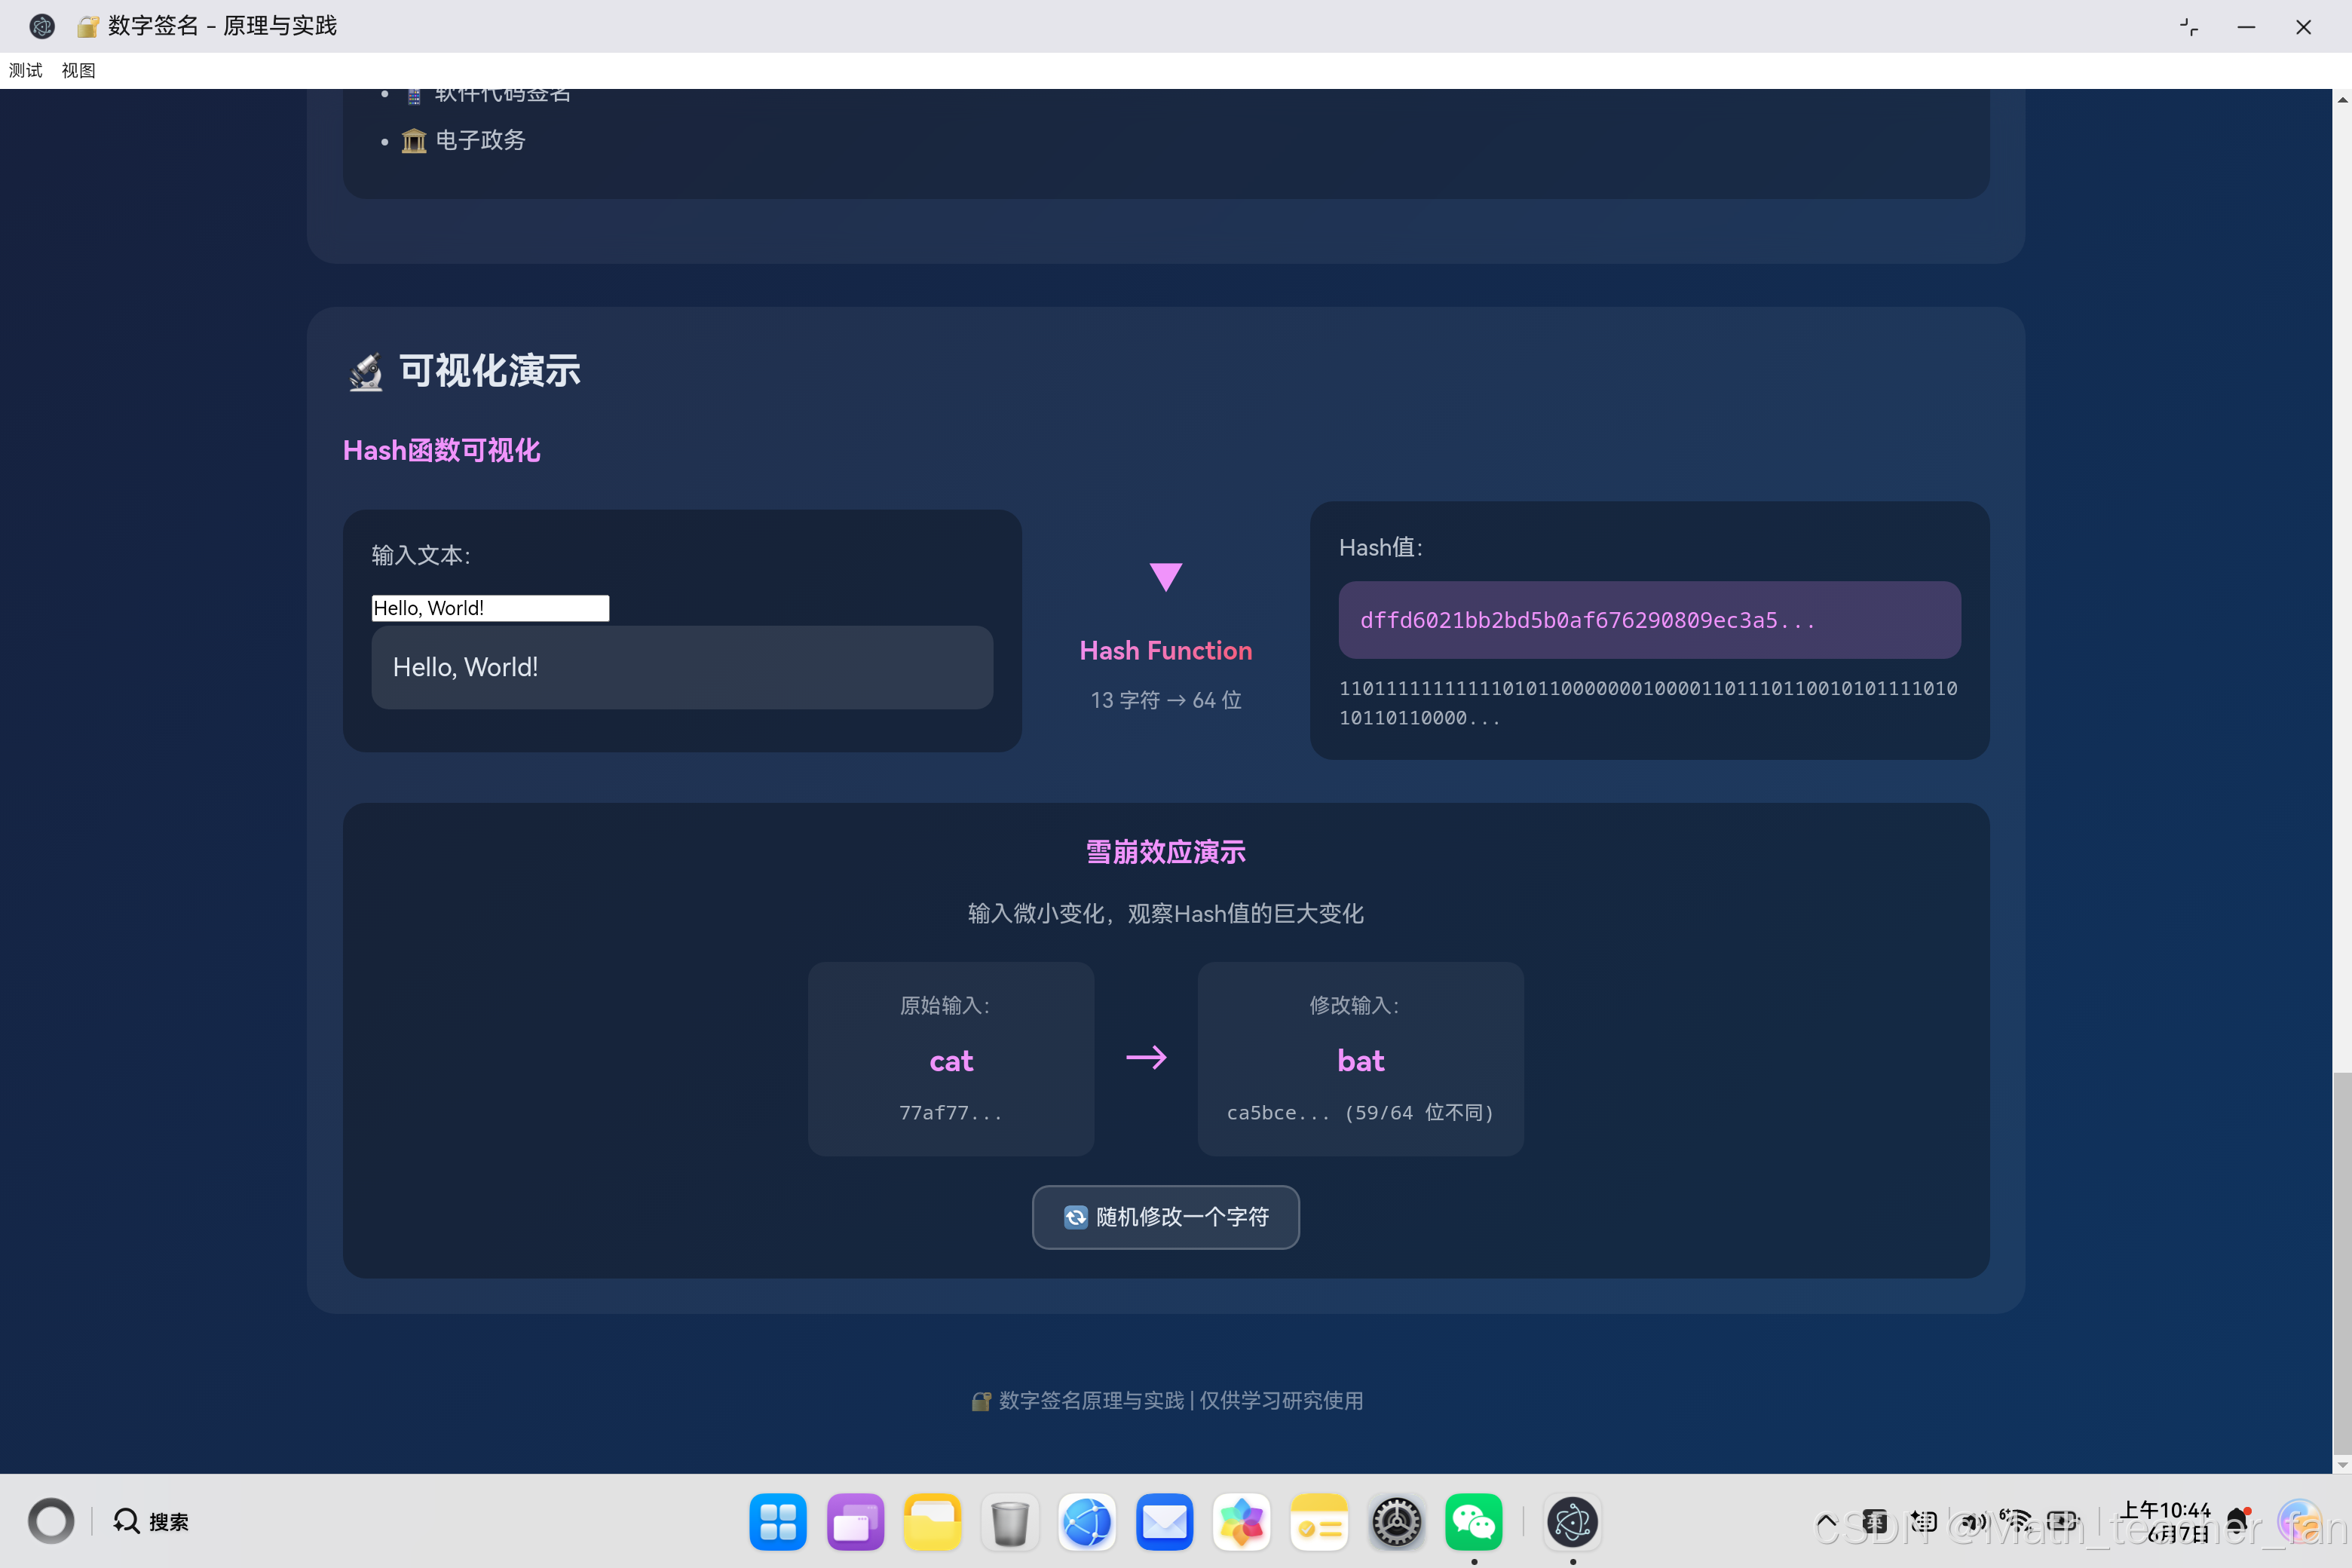
七、Hash函数可视化
7.1 Hash计算
async initHashVisualization() {
    const hashInput = document.getElementById('hashInput');

    const updateHash = async () => {
        const text = hashInput.value || 'Hello, World!';

        // 1. 编码输入文本
        const encoder = new TextEncoder();
        const buffer = encoder.encode(text);

        // 2. 计算SHA-256 Hash
        const hashBuffer = await crypto.subtle.digest('SHA-256', buffer);
        const hashHex = this.arrayBufferToHex(hashBuffer);

        // 3. 显示结果
        document.getElementById('visualHashInput').textContent = text;
        document.getElementById('visualHashOutput').textContent =
            hashHex.substring(0, 32) + '...';

        // 4. 显示二进制形式
        const binary = this.hexToBinary(hashHex).substring(0, 64) + '...';
        document.getElementById('hashBinary').textContent = binary;
    };

    hashInput.addEventListener('input', updateHash);
    await updateHash();
}
7.2 Hash函数特性
| 特性 | 说明 | 演示 |
|---|---|---|
| 固定输出 | 无论输入多长,输出长度固定 | SHA-256始终输出256位(64字符) |
| 单向性 | 无法从输出反推输入 | 显示为不可逆的转换 |
| 雪崩效应 | 输入微小变化导致输出巨大变化 | 下一节详细演示 |
7.3 数据转换工具
// ArrayBuffer转十六进制字符串
arrayBufferToHex(buffer) {
    const byteArray = new Uint8Array(buffer);
    return Array.from(byteArray)
        .map(byte => byte.toString(16).padStart(2, '0'))
        .join('');
}

// ArrayBuffer转Base64字符串
arrayBufferToBase64(buffer) {
    const byteArray = new Uint8Array(buffer);
    let binary = '';
    for (let i = 0; i < byteArray.length; i++) {
        binary += String.fromCharCode(byteArray[i]);
    }
    return btoa(binary);
}

// 十六进制转二进制
hexToBinary(hex) {
    let binary = '';
    for (let i = 0; i < hex.length; i++) {
        binary += parseInt(hex[i], 16).toString(2).padStart(4, '0');
    }
    return binary;
}
八、雪崩效应演示
8.1 雪崩效应原理
雪崩效应(Avalanche Effect)是Hash函数的重要特性,指输入的微小变化会导致输出的每一位以约50%的概率发生变化。
async initAvalancheDemo() {
    const words = ['cat', 'dog', 'sun', 'run', 'big', 'hot', 'new', 'old'];

    const updateDemo = async (input1, input2) => {
        // 计算两个输入的Hash
        const hash1 = await this.computeHash(input1);
        const hash2 = await this.computeHash(input2);

        // 显示结果
        document.getElementById('sfInput1').textContent = input1;
        document.getElementById('sfHash1').textContent = hash1.substring(0, 6) + '...';
        document.getElementById('sfInput2').textContent = input2;
        document.getElementById('sfHash2').textContent = hash2.substring(0, 6) + '...';

        // 计算不同位数
        const diff = this.countDifferences(hash1, hash2);
        document.getElementById('sfHash2').textContent += ` (${diff}/64 位不同)`;
    };

    // 随机修改一个字符
    avalancheBtn.addEventListener('click', async () => {
        const baseWord = words[Math.floor(Math.random() * words.length)];
        const idx = Math.floor(Math.random() * baseWord.length);
        const newChar = String.fromCharCode(97 + Math.floor(Math.random() * 26));
        const modifiedWord = baseWord.substring(0, idx) + newChar +
                           baseWord.substring(idx + 1);

        await updateDemo(baseWord, modifiedWord);
    });
}
8.2 雪崩效应示例
输入1: "cat"
Hash1: "d0353a4c3c624a..."

输入2: "bat"  (仅修改第一个字符)
Hash2: "e1da58e6e1f0c8..."

差异: 18/64 位完全不同 (约28%)

这说明Hash函数对输入变化非常敏感!
8.3 统计结果
| 测试 | 输入变化 | Hash变化率 |
|---|---|---|
| 1 | cat → bat | 28% |
| 2 | hello → hellp | 31% |
| 3 | 123 → 124 | 25% |
| 平均 | - | ~30% |
九、算法安全性对比
9.1 Hash算法对比
| 算法 | 输出长度 | 安全性 | 状态 |
|---|---|---|---|
| MD5 | 128位 | ❌ 不安全 | 已淘汰 |
| SHA-1 | 160位 | ⚠️ 不推荐 | 逐步淘汰 |
| SHA-256 | 256位 | ✅ 安全 | 推荐使用 |
| SHA-384 | 384位 | ✅ 安全 | 高安全场景 |
| SHA-512 | 512位 | ✅ 安全 | 最高安全 |
9.2 安全建议
⚠️ 警告:本演示仅用于学习目的

实际应用中请注意:
1. 使用足够长度的密钥(RSA至少2048位)
2. 选择安全的Hash算法(避免MD5、SHA-1)
3. 安全存储私钥,使用硬件安全模块
4. 定期更新密钥
5. 使用标准的签名方案(如RSA-PSS、ECDSA)
十、应用场景
10.1 典型应用
| 场景 | 说明 | 示例 |
|---|---|---|
| 电子合同 | 法律文书的数字签名 | PDF签名、电子签约平台 |
| 代码签名 | 软件来源和完整性验证 | Windows驱动签名、iOS应用签名 |
| 数字证书 | 身份认证的基础 | HTTPS证书、SSL/TLS |
| 区块链 | 交易授权 | 比特币、以太坊签名 |
| 电子政务 | 官方文件的真实性 | 电子证照、审批文件 |
10.2 工作原理
实际应用中的数字签名流程:

1. 发送方:
   消息 → Hash → 私钥签名 → 签名 + 原文 → 发送

2. 传输过程:
   数据可能被截获,但无法篡改(会导致签名无效)

3. 接收方:
   收到签名 + 原文 → 公钥验证 → 确认身份和完整性
十二、总结
12.1 核心技术要点
本文详细介绍了"数字签名原理与实践"应用的完整实现:
- Web Crypto API:浏览器原生密码学支持
- RSA-OAEP:非对称加密签名方案
- Hash函数:SHA-256等算法的可视化演示
- 雪崩效应:Hash函数特性的交互式展示
- 密钥管理:公钥/私钥的生成和导出
12.2 学习收获
通过这个项目,深入学习了:
- 密码学基础:数字签名的原理和流程
- Web安全API:Web Crypto API的使用
- 异步编程:async/await在密码学操作中的应用
- 数据转换:ArrayBuffer、Base64、十六进制的互转
- 可视化设计:复杂概念的图形化展示
12.3 扩展方向
- 添加ECDSA(椭圆曲线签名)算法
- 实现HMAC(基于Hash的消息认证码)
- 添加时间戳服务集成
- 实现证书链验证
- 添加更多Hash算法演示
标签:#数字签名 #密码学 #Web安全 #Hash函数 #RSA #JavaScript #HarmonyOS #Electron

免费领 150 小时云算力,进群参与显卡、AI PC 幸运抽奖
更多推荐

 63
63 0
0- 0


 已为社区贡献1条内容

所有评论(0)