
vLLM-Omni: 全模态推理框架技术详解
关于UCloud(优刻得)旗下的compshare算力共享平台
UCloud(优刻得)是中国知名的中立云计算服务商,科创板上市,中国云计算第一股。
Compshare GPU算力平台隶属于UCloud,专注于提供高性价4090算力资源,配备独立IP,支持按时、按天、按月灵活计费,支持github、huggingface访问加速。
使用下方链接注册可获得20元算力金,免费体验10小时4090云算力,此外还有5090, 3090和P40,价格每小时只需要8毛,赠送的算礼金够用一整天。
https://www.compshare.cn/?ytag=GPU_lovelyyoshino_Lcsdn_csdn_display
1. 引言:多模态AI的推理挑战
近年来,生成式人工智能领域经历了从单一文本生成向多模态融合的根本性转变。以GPT-4o、Qwen-Omni为代表的新一代模型,已经具备了同时理解和生成文本、图像、音频、视频的能力。这种能力的背后是模型架构的根本性变革:从单一的自回归Transformer,演变为由编码器、语言模型、扩散模型等多个异构组件组成的复杂系统。
传统的推理引擎在面对这类多模态模型时暴露出明显的局限性。首先,它们通常假设输入输出均为文本序列,无法有效处理图像张量、音频波形等异构数据类型。其次,自回归模型的调度策略并不适用于扩散模型等并行生成架构,导致GPU资源利用率低下。更为关键的是,当一次推理请求需要经过"视觉编码-语言理解-图像生成"等多个阶段时,缺乏统一的调度机制会使整个流水线难以优化。

针对上述挑战,vLLM项目团队推出了vLLM-Omni框架,这是一个专门为全模态模型设计的高性能推理系统,旨在将vLLM在文本推理领域积累的性能优势,扩展到包含图像、音频、视频在内的完整多模态生态。
目前相关镜像已经存入vLLM-Omni自动生成项目中了。
2. vLLM-Omni 项目概述
vLLM-Omni是vLLM生态系统向全模态推理迈出的关键一步。该项目于2025年11月正式发布,其设计目标是为新一代能够"看、听、说、生成"的AI模型提供统一且高效的推理基础设施。
从技术定位来看,vLLM-Omni并非简单地在vLLM外层包装一个多模态接口,而是从数据流(Data Flow)的角度对整个推理路径进行了重新设计。它引入了完全解耦的流水线架构,使不同推理阶段能够独立扩缩容,并通过统一的调度机制实现高效协同。
vLLM-Omni的设计围绕三个核心原则展开:
简单性(Simplicity):框架保持与vLLM一致的使用体验,已熟悉vLLM的开发者可以在几乎不改变心智模型的情况下迁移到vLLM-Omni。同时继续支持Hugging Face模型格式,并提供OpenAI兼容的API接口。
灵活性(Flexibility):通过OmniStage抽象机制,开发者可以灵活定义和组合各类模态处理组件,包括视觉编码器、音频编码器、语言模型核心、扩散生成头等,从而快速适配不同的模型架构。
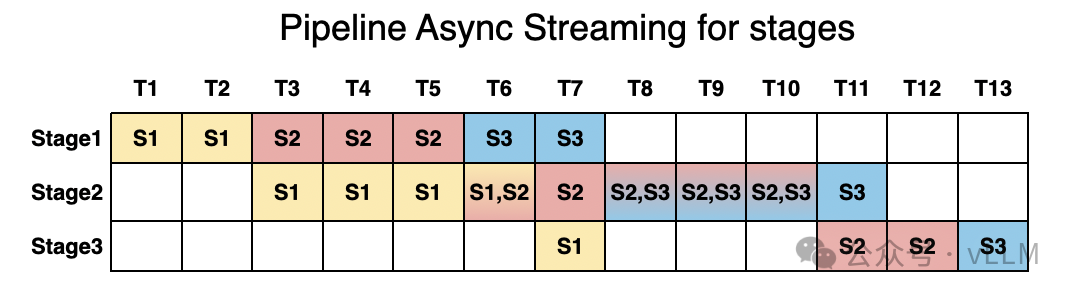
高性能(Performance):框架采用流水线分阶段执行策略,当某个Stage处理一批请求时,其他Stage可以并行处理其他批次,最大程度减少GPU空闲时间。
3. 核心技术原理
3.1 PagedAttention 内存管理机制
理解vLLM-Omni的性能优势,需要首先了解其底层vLLM引擎所采用的PagedAttention技术。在大语言模型推理过程中,KV Cache(键值缓存)是存储先前token计算结果的关键数据结构,用于避免在生成后续token时重复计算注意力权重。
传统推理系统采用预分配策略,为每个请求预留可能需要的最大KV Cache空间。以13B参数模型为例,每个token的KV Cache约占用800KB显存,一个完整对话可能预留1.6GB空间,但实际使用率往往不足40%。研究表明,传统系统的KV Cache浪费率高达60%-80%。
PagedAttention借鉴了操作系统内存分页的设计思想,将KV Cache划分为固定大小的内存块(Block),通过块表(Block Table)动态管理这些非连续的内存区域。其核心机制如下:
┌─────────────────────────────────────────────────────────────┐
│                    传统KV Cache分配方式                        │
├─────────────────────────────────────────────────────────────┤
│  请求1: [████████████░░░░░░░░░░░░░░░░░░░░]  使用率: 40%      │
│  请求2: [██████░░░░░░░░░░░░░░░░░░░░░░░░░░]  使用率: 20%      │
│  请求3: [████████████████░░░░░░░░░░░░░░░░]  使用率: 50%      │
│                                                             │
│  █ = 已使用   ░ = 预留但未使用(浪费)                         │
└─────────────────────────────────────────────────────────────┘

┌─────────────────────────────────────────────────────────────┐
│                  PagedAttention 分页管理                      │
├─────────────────────────────────────────────────────────────┤
│  Block Pool: [B1][B2][B3][B4][B5][B6][B7][B8][B9]...        │
│                                                             │
│  请求1 Block Table: [B1→B3→B7]     (按需分配)                 │
│  请求2 Block Table: [B2→B5]        (按需分配)                 │
│  请求3 Block Table: [B4→B6→B8→B9]  (按需分配)                 │
│                                                             │
│  空闲池: [B10][B11][B12]... (可立即分配给新请求)              │
└─────────────────────────────────────────────────────────────┘
通过这种设计,vLLM将KV Cache浪费率降低到4%以下,吞吐量相比传统Hugging Face Transformers提升可达24倍,GPU内存使用量减少约50%。
3.2 异构流水线架构
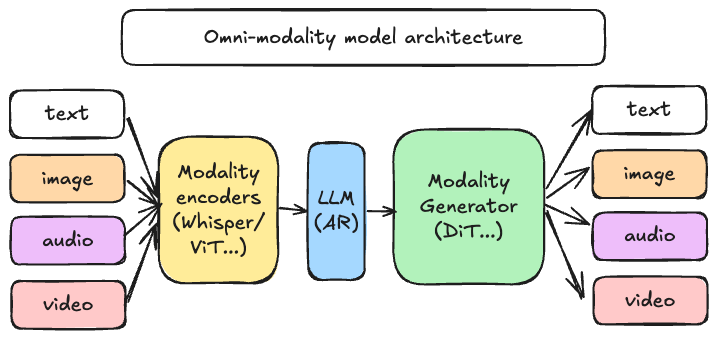
vLLM-Omni针对多模态推理场景设计了异构流水线架构。一个典型的全模态推理请求会经过以下三类处理组件:
模态编码器(Modality Encoders):负责将多模态输入转换为模型可处理的向量表示。对于图像输入,通常采用Vision Transformer(ViT)进行编码;对于音频输入,则使用Whisper等语音编码器。编码器的输出是固定维度的特征向量,作为后续语言模型的输入。
语言模型核心(LLM Core):基于vLLM的自回归文本生成模块,负责理解多模态上下文并生成响应。这一阶段充分利用了vLLM在文本推理方面的优化成果,包括PagedAttention、连续批处理等技术。
模态生成器(Modality Generators):用于生成非文本输出的解码组件。对于图像生成,通常采用扩散模型(Diffusion Model)或扩散Transformer(DiT);对于音频生成,则使用神经声码器将语义token转换为音频波形。
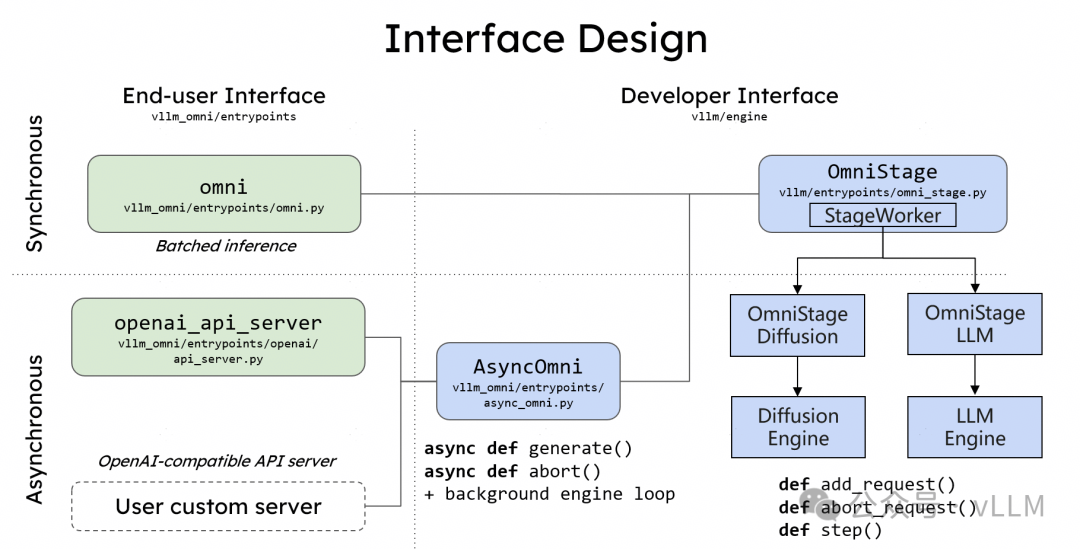
3.3 OmniStage 抽象层
OmniStage是vLLM-Omni提供的核心抽象机制,用于描述和组合各类多模态处理组件。每个Stage代表推理流水线中的一个独立处理阶段,开发者可以通过配置文件或代码定义Stage之间的数据流向和依赖关系。
# OmniStage 概念示意
from vllm_omni.entrypoints.omni import Omni

# 初始化Omni推理引擎,指定模型和阶段配置
# 可选模型:Qwen/Qwen2.5-Omni-7B (小) 或 Qwen/Qwen3-Omni-30B-A3B-Instruct (大)
omni_llm = Omni(
    model="Qwen/Qwen2.5-Omni-7B",  # 7B模型显存需求约14-16GB
    stage_configs_path="configs/qwen_omni_stages.yaml"
)

# 每个Stage可以有独立的采样参数
# Stage 1: Thinker (语言模型理解和推理)
# Stage 2: Talker (语音token预测)
# Stage 3: Code2Wav (音频波形生成)
当前vLLM-Omni已支持Qwen-Omni、Qwen-Image等代表性全模态模型,后续将持续扩展对更多模型架构的支持。
4. 系统架构详解
vLLM-Omni的系统架构可以从数据流视角划分为输入处理层、推理调度层和输出生成层三个主要层次。
4.1 数据流架构
┌─────────────────────────────────────────────────────────────────┐
│                        用户请求入口                              │
│         (文本 / 图像 / 音频 / 视频 混合输入)                       │
└─────────────────────────────────────────────────────────────────┘
                              │
                              ▼
┌─────────────────────────────────────────────────────────────────┐
│                      输入处理层 (Encoders)                       │
├─────────────────┬─────────────────┬─────────────────────────────┤
│   Vision Encoder │  Audio Encoder  │     Video Encoder           │
│   (ViT/CLIP)     │  (Whisper)      │     (帧采样+ViT)            │
└─────────────────┴─────────────────┴─────────────────────────────┘
                              │
                              ▼ (多模态特征向量)
┌─────────────────────────────────────────────────────────────────┐
│                      LLM 推理核心层                              │
├─────────────────────────────────────────────────────────────────┤
│  ┌─────────────┐  ┌─────────────┐  ┌─────────────────────────┐  │
│  │ PagedAttn   │  │ Continuous  │  │   Multi-Modal           │  │
│  │ KV Cache    │  │ Batching    │  │   Context Fusion        │  │
│  └─────────────┘  └─────────────┘  └─────────────────────────┘  │
└─────────────────────────────────────────────────────────────────┘
                              │
                              ▼ (文本token / 语义token)
┌─────────────────────────────────────────────────────────────────┐
│                     输出生成层 (Generators)                      │
├─────────────────┬─────────────────┬─────────────────────────────┤
│   Text Output   │  Audio Gen      │     Image Gen               │
│   (直接输出)     │  (Code2Wav)     │     (DiT/Diffusion)        │
└─────────────────┴─────────────────┴─────────────────────────────┘
                              │
                              ▼
┌─────────────────────────────────────────────────────────────────┐
│                        最终输出                                  │
│           (文本响应 / 音频文件 / 生成图像)                         │
└─────────────────────────────────────────────────────────────────┘
4.2 流水线调度机制
vLLM-Omni的流水线调度器采用分阶段执行策略,核心目标是最大化各阶段的GPU利用率。当请求进入系统后,调度器会:
- 将请求按模态类型路由到相应的编码器队列
- 编码完成后,将特征向量注入LLM推理队列
- LLM生成的输出token根据类型分发到对应的生成器
- 各阶段独立维护批处理队列,支持跨请求的动态批处理
这种设计使得当LLM正在处理第N批请求时,编码器可以预处理第N+1批的输入,生成器可以并行处理第N-1批的输出,从而形成高效的流水线并行。
5. 环境准备与安装
5.1 安装前准备
这是最简单快速的安装方式,适合大多数用户:
# 安装 uv 环境管理器
curl -LsSf https://astral.sh/uv/install.sh | sh

# 创建并激活Python 3.12虚拟环境
uv venv --python 3.12 --seed
source .venv/bin/activate

# 安装 vLLM v0.11.0 (vLLM-Omni的依赖基础)
uv pip install vllm==0.11.0 --torch-backend=auto

# 安装 vLLM-Omni
uv pip install vllm-omni
5.2 方式二:从源码构建
如果需要修改源码或进行调试,可以选择从源码构建:
# 克隆 vLLM-Omni 仓库
git clone https://github.com/vllm-project/vllm-omni.git
cd vllm-omni
# 安装 vLLM 基础依赖
uv pip install vllm==0.11.0 --torch-backend=auto
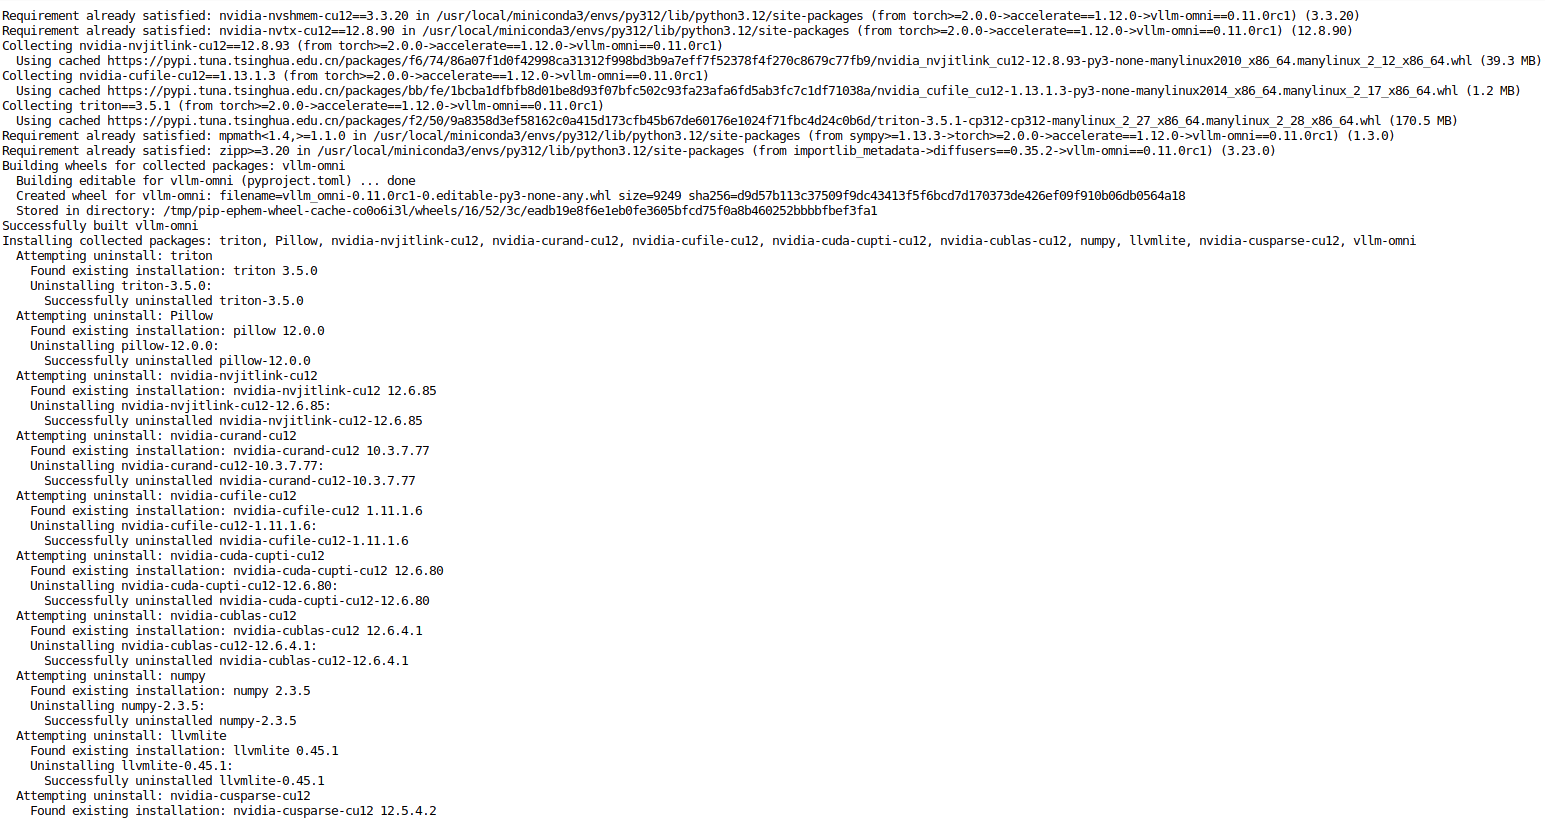
# 以可编辑模式安装 vLLM-Omni
uv pip install -e .
5.3 验证安装
安装完成后,可以通过以下命令验证:
from vllm_omni.entrypoints.omni import Omni
print("vLLM-Omni 安装成功")
6. 代码实践:多模态推理示例
vLLM-Omni 提供两种主要的使用方式:离线推理(Offline Inference) 和 在线服务(Online Serving)。本节将分别介绍这两种方式的完整使用流程。
6.1 API Client
源码: https://github.com/vllm-project/vllm/blob/main/examples/online_serving/api_client.py
启动演示服务器:
python -m vllm.entrypoints.api_server --model <model_name>
注意: API 服务器仅用于演示和简单性能基准测试,不适用于生产环境。生产环境推荐使用
vllm serve和 OpenAI 客户端 API。
# SPDX-License-Identifier: Apache-2.0
# SPDX-FileCopyrightText: Copyright contributors to the vLLM project
"""Example Python client for `vllm.entrypoints.api_server`"""

import argparse
import json
from argparse import Namespace
from collections.abc import Iterable

import requests

def clear_line(n: int = 1) -> None:
    LINE_UP = "\033[1A"
    LINE_CLEAR = "\x1b[2K"
    for _ in range(n):
        print(LINE_UP, end=LINE_CLEAR, flush=True)

def post_http_request(
    prompt: str, api_url: str, n: int = 1, stream: bool = False
) -> requests.Response:
    headers = {"User-Agent": "Test Client"}
    pload = {
        "prompt": prompt,
        "n": n,
        "temperature": 0.0,
        "max_tokens": 16,
        "stream": stream,
    }
    response = requests.post(api_url, headers=headers, json=pload, stream=stream)
    return response

def get_streaming_response(response: requests.Response) -> Iterable[list[str]]:
    for chunk in response.iter_lines(
        chunk_size=8192, decode_unicode=False, delimiter=b"\n"
    ):
        if chunk:
            data = json.loads(chunk.decode("utf-8"))
            output = data["text"]
            yield output

def get_response(response: requests.Response) -> list[str]:
    data = json.loads(response.content)
    output = data["text"]
    return output

def parse_args():
    parser = argparse.ArgumentParser()
    parser.add_argument("--host", type=str, default="localhost")
    parser.add_argument("--port", type=int, default=8000)
    parser.add_argument("--n", type=int, default=1)
    parser.add_argument("--prompt", type=str, default="San Francisco is a")
    parser.add_argument("--stream", action="store_true")
    return parser.parse_args()

def main(args: Namespace):
    prompt = args.prompt
    api_url = f"http://{args.host}:{args.port}/generate"
    n = args.n
    stream = args.stream

    print(f"Prompt: {prompt!r}\n", flush=True)
    response = post_http_request(prompt, api_url, n, stream)

    if stream:
        num_printed_lines = 0
        for h in get_streaming_response(response):
            clear_line(num_printed_lines)
            num_printed_lines = 0
            for i, line in enumerate(h):
                num_printed_lines += 1
                print(f"Beam candidate {i}: {line!r}", flush=True)
    else:
        output = get_response(response)
        for i, line in enumerate(output):
            print(f"Beam candidate {i}: {line!r}", flush=True)

if __name__ == "__main__":
    args = parse_args()
    main(args)
6.2 OpenAI Responses Client With MCP Tools
本示例展示如何使用 MCP (Model Context Protocol) 工具与 Responses API 配合使用,支持不同的 allowed_tools 配置:
- 无过滤器 (允许 MCP 服务器的所有工具)
- 通配符
"*"(显式允许所有工具) - 指定工具名称 (仅过滤到这些工具)
启动服务:
vllm serve openai/gpt-oss-20b --enforce-eager --tool-server demo
环境变量:
VLLM_ENABLE_RESPONSES_API_STORE=1VLLM_GPT_OSS_SYSTEM_TOOL_MCP_LABELS=code_interpreter,containerVLLM_GPT_OSS_HARMONY_SYSTEM_INSTRUCTIONS=1
# SPDX-License-Identifier: Apache-2.0
# SPDX-FileCopyrightText: Copyright contributors to the vLLM project
"""Example demonstrating MCP (Model Context Protocol) tools with the Responses API."""

from openai import OpenAI

def get_first_model(client):
    """获取服务器上第一个可用模型"""
    models = client.models.list()
    return models.data[0].id

def example_no_filter():
    """Example with no allowed_tools filter - allows all tools."""
    print("=" * 60)
    print("Example 1: No allowed_tools filter (allows all tools)")
    print("=" * 60)

    base_url = "http://0.0.0.0:8000/v1"
    client = OpenAI(base_url=base_url, api_key="empty")
    model = get_first_model(client)

    response = client.responses.create(
        model=model,
        input="Execute this code: print('Hello from Python!')",
        instructions="Use the Python tool to execute code.",
        tools=[
            {
                "type": "mcp",
                "server_label": "code_interpreter",
                "server_url": "http://localhost:8888",
                # No allowed_tools specified - all tools are available
            }
        ],
    )

    print(f"Status: {response.status}")
    print(f"Output: {response.output_text}")
    print()

def example_wildcard():
    """Example with allowed_tools=['*'] - explicitly allows all tools."""
    print("=" * 60)
    print("Example 2: allowed_tools=['*'] (select all tools)")
    print("=" * 60)

    base_url = "http://0.0.0.0:8000/v1"
    client = OpenAI(base_url=base_url, api_key="empty")
    model = get_first_model(client)

    response = client.responses.create(
        model=model,
        input="Execute this code: print('Hello from Python with wildcard!')",
        instructions="Use the Python tool to execute code.",
        tools=[
            {
                "type": "mcp",
                "server_label": "code_interpreter",
                "server_url": "http://localhost:8888",
                # Using "*" to explicitly allow all tools from this MCP server
                # This is equivalent to not specifying allowed_tools
                "allowed_tools": ["*"],
            }
        ],
    )

    print(f"Status: {response.status}")
    print(f"Output: {response.output_text}")
    print()

def example_specific_tools():
    """Example with specific allowed_tools list - filters available tools.

    Note: This example uses 'web_search_preview' (browser) which has multiple
    sub-tools: 'search', 'open', 'find'. The code_interpreter (python) doesn't
    have sub-tools, so filtering doesn't apply there.
    """
    print("=" * 60)
    print("Example 3: allowed_tools=['search'] (filter browser to specific tools)")
    print("=" * 60)

    base_url = "http://0.0.0.0:8000/v1"
    client = OpenAI(base_url=base_url, api_key="empty")
    model = get_first_model(client)

    response = client.responses.create(
        model=model,
        input="Search for 'Python programming tutorials'",
        instructions="Use the browser tool to search.",
        tools=[
            {
                "type": "mcp",
                "server_label": "web_search_preview",
                "server_url": "http://localhost:8888",
                # Browser has tools: 'search', 'open', 'find'
                # Only allow 'search' - blocks 'open' and 'find'
                "allowed_tools": ["search"],
            }
        ],
    )

    print(f"Status: {response.status}")
    print(f"Output: {response.output_text}")
    print()

def example_object_format():
    """Example using object format for allowed_tools with browser tools."""
    print("=" * 60)
    print("Example 4: allowed_tools with object format")
    print("=" * 60)

    base_url = "http://0.0.0.0:8000/v1"
    client = OpenAI(base_url=base_url, api_key="empty")
    model = get_first_model(client)

    response = client.responses.create(
        model=model,
        input="Search for 'machine learning' and open the first result",
        instructions="Use the browser tool.",
        tools=[
            {
                "type": "mcp",
                "server_label": "web_search_preview",
                "server_url": "http://localhost:8888",
                # Object format with tool_names field
                # Can also include read_only and other fields
                # Browser has tools: 'search', 'open', 'find'
                "allowed_tools": {
                    "tool_names": [
                        "search",
                        "open",
                    ],  # Allow search and open, block find
                    "read_only": False,
                },
            }
        ],
    )

    print(f"Status: {response.status}")
    print(f"Output: {response.output_text}")
    print()

def main():
    """Run all examples."""
    print("\n" + "=" * 60)
    print("MCP Tools with allowed_tools Examples")
    print("=" * 60 + "\n")

    # Run all examples
    example_no_filter()
    example_wildcard()
    example_specific_tools()
    example_object_format()

    print("=" * 60)
    print("Summary:")
    print("  - No filter or '*' → All tools available from server")
    print("  - Specific list → Only those sub-tools available")
    print("  - Object format → More control with tool_names field")
    print("")
    print("Note: allowed_tools filters SUB-TOOLS within an MCP server:")
    print("  - code_interpreter (python): No sub-tools to filter")
    print("  - web_search_preview (browser): Has 'search', 'open', 'find'")
    print("=" * 60)

if __name__ == "__main__":
    main()
6.3 官方示例
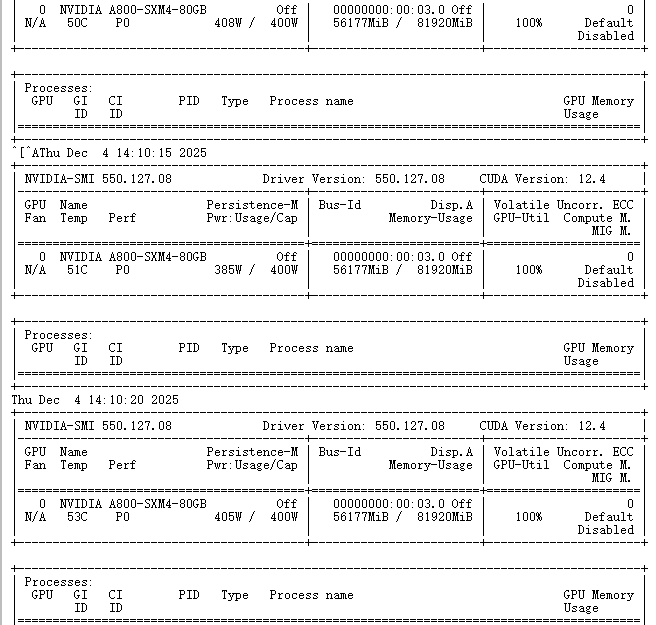
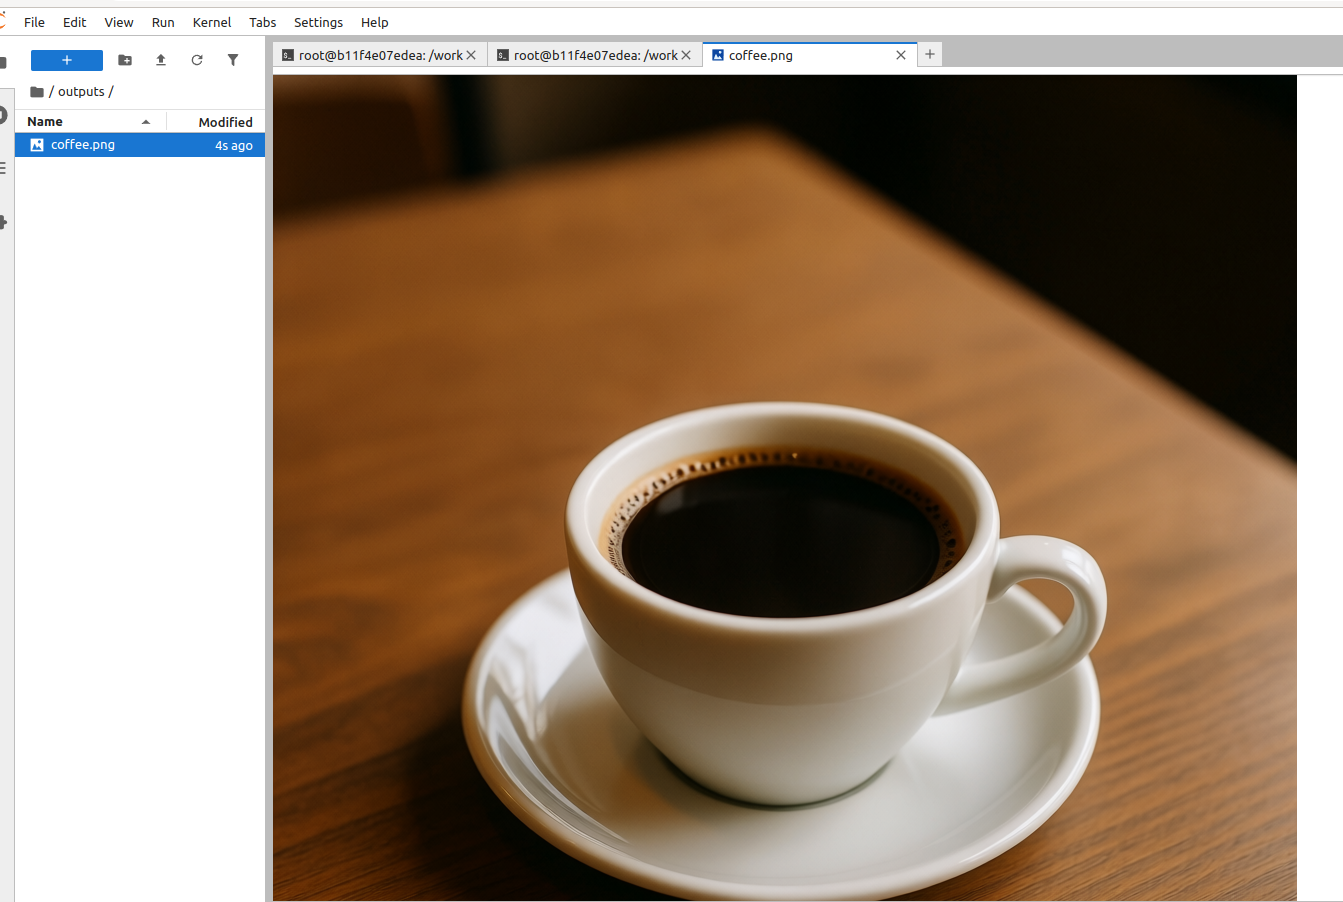
该文件夹为使用 vLLM-Omni 进行 Qwen/Qwen-Image 实验提供了两个简单的入口,使用下面内容可以用于单一图像生成的命令行脚本。值得一提这类示例代码模型都是比较大的,作者使用A800作为示例,当然用户可以自定义模型后续
python vllm_omni_gradio_app.py --prompt "a cup of coffee on the table" --seed 42 --cfg_scale 4.0 --num_images_per_prompt 1 --num_inference_steps 50 --height 1024 --width 1024 --output outputs/coffee.png

7. 总结
vLLM-Omni作为vLLM生态向全模态推理迈出的关键一步,为新一代多模态AI模型提供了高效、灵活的推理基础设施。其核心价值在于:
- 统一的推理框架:将文本、图像、音频、视频的输入理解和输出生成整合到单一服务中
- 高性能设计:通过PagedAttention、流水线并行等技术实现高吞吐、低延迟的推理服务
- 工程友好:保持与vLLM一致的使用体验,降低多模态推理系统的落地门槛
对于正在构建多模态AI应用的开发团队,vLLM-Omni提供了一条从研究原型到生产部署的清晰路径,值得深入研究和实践。
8. 参考资料
https://blog.vllm.ai/2025/11/30/vllm-omni.html
https://github.com/vllm-project/vllm
https://docs.vllm.ai/projects/vllm-omni
https://arxiv.org/abs/2503.20215
https://docs.vllm.ai/projects/vllm-omni/en/latest/user_guide/examples/offline_inference/qwen3_omni/#single-prompt

免费领 200 小时云算力,进群参与显卡、AI PC 幸运抽奖
更多推荐

 24
24 0
0- 0


 已为社区贡献2条内容

所有评论(0)