
技术赋能求职——基于Bright Data与DeepSeek构建LinkedInAI助手,实现职位智能匹配与打分
本文介绍了一个基于BrightData和DeepSeek构建的LinkedIn AI求职助手系统。该系统通过BrightData合规采集LinkedIn职位数据,利用DeepSeek大模型对职位与用户简历进行智能匹配分析,生成0-100分的匹配度评分及个性化建议。文章详细讲解了技术选型、核心工具特点、系统架构设计和完整实现代码,包括数据采集、AI分析、结果导出等关键模块。该助手能有效解决求职过程中

🤵♂️ 个人主页:@艾派森的个人主页
✍🏻作者简介:Python学习者
🐋 希望大家多多支持,我们一起进步!😄
如果文章对你有帮助的话,
欢迎评论 💬点赞👍🏻 收藏 📂加关注+
目录
2.1 Bright Data:合规、稳定的全球数据采集基石

一、引言
为什么我们需要一个AI求职助手?
在当今竞争激烈的职场环境中,求职仿佛是一场信息战和心理战的双重考验。作为一名技术从业者,我们或许都经历过这样的场景:
深夜,你打开LinkedIn,满怀希望地在搜索框输入“Python 后端 远程”等关键词。瞬间,成百上千的职位推荐扑面而来。你感到一丝兴奋,但随之而来的是巨大的疲惫和迷茫。“海投” 成了不得已的策略,但结果往往是石沉大海,回应寥寥。这并非因为你不够优秀,而是因为:
-
信息过载,效率低下: 手动浏览、筛选、阅读每一个职位描述(JD)是一项极其耗时且重复的劳动。每天花一两个小时,也只能看完寥寥数十个职位,效率极低,且容易因疲劳而错过优质机会。
-
匹配度难以量化,决策困难: 面对一段段冗长的职位描述,仅靠肉眼判断与自身简历的匹配度非常主观。“我到底有多符合这个职位?”“我的技能栈是对方最看重的吗?”“这个机会是不是最好的选择?”这些问题很难有清晰的答案,导致决策瘫痪和机会成本飙升。
-
个性化缺失,投递盲目: LinkedIn的推荐算法更多是基于标签和热度,无法深入理解你独特的技能组合、项目经验和职业抱负。这导致你收到的推荐可能“看起来相关”,但实则并不精准,投递的简历也缺乏针对性,成功率自然难以提升。
我们渴望一种更智能、更高效的方式——一个不知疲倦的“数字猎头”,它能7x24小时地帮我们监控市场动态,能像一位经验丰富的行业专家一样深度剖析职位背后的要求,并能将我们自身的优势与机会进行精准的量化匹配,最终只将最优质、最合适的机会呈现给我们。
幸运的是,作为开发者,我们拥有将这一愿景变为现实的能力。本文将手把手带你利用两大尖端技术利器——全球领先的数据采集平台 Bright Data 与强大国产大模型 DeepSeek,构建一个专属于你个人的 LinkedIn AI求职助手。
通过本教程,你将实现一个能够自动搜索职位、智能解析JD、并基于你的简历进行AI匹配打分与评论的系统,彻底将你从繁琐的信息筛选中解放出来,让你能聚焦于更关键的面试准备与技能提升,真正提效整个求职流程。
现在,就让我们开始这场技术赋能求职的奇妙之旅吧!
二、技术选型与核心工具介绍
工欲善其事,必先利其器。在开始构建我们的AI求职助手之前,我们需要深入了解并准备好两个最为核心的技术组件:Bright Data(负责数据的“采”)和 DeepSeek(负责数据的“析”)。它们的分工与组合,构成了我们整个项目的坚实基石。
2.1 Bright Data:合规、稳定的全球数据采集基石
为什么选择Bright Data而不是自己编写爬虫?对于LinkedIn这样的专业社交平台,直接编写爬虫会面临IP限制、反爬虫机制(如行为验证、请求频率检测)等诸多技术挑战,维护成本极高且容易失效。
-
核心优势:
-
合规性与可靠性: Bright Data作为行业领导者,提供合规的数据采集解决方案,其庞大的代理IP网络(住宅代理、数据中心代理等)能有效绕过反爬限制,确保数据采集的稳定性和连续性。
-
易用性: 其提供的 Web Scraper IDE 是一个可视化爬虫构建工具,即使不那么精通爬虫技术的开发者,也可以通过图形化界面配置提取规则,大大降低了开发门槛。
-
结构化数据输出: 爬取的数据直接以整洁的JSON格式返回,省去了大量数据清洗和解析的麻烦。
-
-
本项目中的应用:
我们将使用Bright Data的 LinkedIn Jobs Scraper API 来创建一个针对LinkedIn职位搜索页面的爬虫任务。只需配置好目标URL(例如:https://www.linkedin.com/jobs/search/?keywords=python),Bright Data便会自动处理翻页、渲染和数据提取,最终为我们输出一个结构化的职位列表数据集。 -
准备工作:
-
访问Bright Data官网注册账号。
-
进入控制台,了解和配置所需的代理类型(如住宅代理)。
-
熟悉 Web Scraper IDE 的界面,为下一章的实战做好准备。
-
2.2 DeepSeek:强大而经济的国产AI大脑
数据采集只是第一步,如何让机器理解职位描述并与你的简历进行智能匹配,才是本项目的“智能”所在。这里我们选择DeepSeek-V3这款强大的国产大语言模型。
-
核心优势:
-
卓越的性能: 支持128K超长上下文,这意味着它可以一次性处理极其冗长的职位描述和你的完整简历内容,并进行深入分析,不会丢失关键信息。
-
精准的文本理解与生成: 在文本总结、推理、对比和内容生成方面表现优异,非常适合用于分析JD(职位描述)和CV(简历)的匹配度。
-
开发者友好: 提供清晰简洁的API接口,文档易懂,调用方便,并且为新用户提供了免费的API额度,非常适合个人项目开发和实验。
-
-
本项目中的应用:
DeepSeek将扮演一位“不知疲倦的职业顾问”。我们将把从Bright Data获取的职位描述和我们预先准备好的个人简历信息组合成一个清晰的指令(Prompt),通过API发送给DeepSeek。模型会据此进行深度分析,并输出包括匹配分数、优势劣势分析以及个性化建议在内的结构化报告。 -
准备工作:
-
访问DeepSeek官网,注册并登录API控制台。
-
在个人设置中获取你的 API Key,这是调用接口的凭证。
-
浏览官方API文档,了解如何构造请求和解析响应。
-
2.3技术步骤
实现 LinkedIn 求职 AI 工作流所需的步骤如下:
- 加载 CLI 参数:解析命令行参数以获取运行时参数。这样无需改动代码即可灵活执行与个性化配置。
- 从 LinkedIn 抓取职位:调用 LinkedIn Jobs Scraper API,按照配置过滤并获取职位列表。
- 通过 AI 为职位打分:将每一职位发送给 DeepSeek。AI 会基于你的资料与目标职位为每个岗位打出
0到100的分数,并附上简短说明,帮助理解匹配质量。 - 用 AI 评分与评论扩展职位数据:将 AI 生成的分数和评论并回合并到原始职位数据中,为每条职位记录新增这些 AI 字段。
- 导出带分数的职位数据:将富化后的职位数据导出为 CSV,便于进一步分析与处理。
三、实战开发
3.1前期准备
在开始实战之前,请确保你具备以下条件:
- 本地安装 Python 3.8 或更高版本(推荐使用最新版)。
- 一个 Bright Data API Key。
- 一个 DeepSeek API Key。
如果你还没有 Bright Data API Key,请创建 Bright Data 账号并按官方指南完成设置。类似地,按 DeepSeek 官方说明获取你的 DeepSeek API Key。
3.2创建项目
打开终端,为 LinkedIn 求职 AI 助手创建一个新目录:
mkdir linkedin-job-hunting-ai-assistantlinkedin-job-hunting-ai-assistant 文件夹将保存你的 AI 工作流的所有 Python 代码。
接着进入项目目录,并在其中初始化一个虚拟环境:
cd linkedin-job-hunting-ai-assistant/
python -m venv venv
现在,用你喜欢的 Python IDE 打开项目。推荐使用Visual Studio Code或者Pycharm。
在项目根目录下创建一个名为 assistant.py 的新文件。目录结构如下:
linkedin-job-hunting-ai-assistant/
├── venv/
└── assistant.py
在终端中激活虚拟环境。Windows:
.\venv\Scripts\activate.bat接着安装需要用到的第三方库,在已激活的虚拟环境中运行:
pip install python-dotenv requests openai pydantic具体依赖库包括:
python-dotenv:从.env文件加载环境变量,方便安全管理 API Key。pydantic:帮助校验并将配置文件解析为结构化的 Python 对象。requests:执行 HTTP 请求,调用 Bright Data 等 API 获取数据。openai:提供与 OpenAI 语言模型交互的客户端,用于 AI 职位打分。
DeepSeek API 使用与 OpenAI 兼容的 API 格式,通过修改配置,可以使用 OpenAI SDK 来访问 DeepSeek API。
我们可以使用以下样例脚本的来访问 DeepSeek API。
# Please install OpenAI SDK first: `pip3 install openai`

from openai import OpenAI

client = OpenAI(api_key="<DeepSeek API Key>", base_url="https://api.deepseek.com")

response = client.chat.completions.create(
    model="deepseek-chat",
    messages=[
        {"role": "system", "content": "You are a helpful assistant"},
        {"role": "user", "content": "Hello"},
    ],
    stream=False
)

print(response.choices[0].message.content)
加载 CLI 参数
该 LinkedIn 求职 AI 脚本需要一些参数。为了在不修改代码的情况下保持复用与自定义能力,建议通过 CLI 读取。
你将需要以下命令行参数:
--config_file:包含职位搜索参数、候选人资料与目标职位描述的 JSON 配置文件路径。默认config.json。--batch_size:每次发送给 AI 进行打分的职位数量。默认 5。--jobs_number:Bright Data LinkedIn Jobs Scraper 返回的职位条目最大数量。默认20。--output_csv:包含 AI 打分与评论的职位数据输出 CSV 文件名。默认jobs_scored.csv。
使用如下函数从命令行读取这些参数:
def parse_cli_args():
    # Parse command-line arguments for config and runtime options
    parser = argparse.ArgumentParser(description="LinkedIn Job Hunting Assistant")
    parser.add_argument("--config_file", type=str, default="config.json", help="Path to config JSON file")
    parser.add_argument("--jobs_number", type=int, default=20, help="Limit the number of jobs returned by Bright Data Scraper API")
    parser.add_argument("--batch_size", type=int, default=5, help="Number of jobs to score in each batch")
    parser.add_argument("--output_csv", type=str, default="jobs_scored.csv", help="Output CSV filename")

    return parser.parse_args()
加载环境变量
将脚本配置为从环境变量读取密钥。
from dotenv import load_dotenv
load_dotenv()
现在你的助手可以从本地 .env 文件读取变量了。在项目根目录添加 .env 文件:
linkedin-job-hunting-ai-assistant/
├── venv/
├── .env         # <-----------
└── assistant.py
打开 .env,添加 DEEPSEEK_API_KEY 与 BRIGHT_DATA_API_KEY:
DEEPSEEK_API_KEY="<YOUR_DEEPSEEK_API_KEY>"
BRIGHT_DATA_API_KEY="<YOUR_BRIGHT_DATA_API_KEY>"
然后在脚本中添加如下函数以读取这两个环境变量:
def load_env_vars():
    # Read required API keys from environment and verify presence
    openai_api_key = os.getenv("DEEPSEEK_API_KEY")
    brightdata_api_key = os.getenv("BRIGHT_DATA_API_KEY")

    missing = []
    if not openai_api_key:
        missing.append("DEEPSEEK_API_KEY")
    if not brightdata_api_key:
        missing.append("BRIGHT_DATA_API_KEY")
    if missing:
        raise EnvironmentError(
            f"Missing required environment variables: {', '.join(missing)}\n"
            "Please set them in your .env or environment."
        )

    return deepseek_api_key, brightdata_api_key
3.3加载配置文件
现在,你需要一种可编程的方式告诉AI助手你感兴趣的职位。为了输出准确,助手还需要了解你的工作经验以及你在寻找什么样的岗位。
为避免将这些信息硬编码到代码里,我们将从一个 JSON 配置文件读取。该文件应包含:
location:你想搜索职位的地理位置,定义职位收集的主要区域。keyword:与职位名称或角色相关的关键词,例如 “Python Developer”。使用引号可强制精确匹配。country:两位国家代码(如US表示美国、FR表示法国),用于限定国家范围。time_range:职位发布的时间范围,用于筛选近期或相关职位(如Past week、Past month等)。job_type:用来筛选的雇佣类型,如Full-time、Part-time等。experience_level:所需经验水平,如Entry level、Associate等。remote:按工作模式筛选(如Remote、On-site或Hybrid)。company:聚焦于特定公司或雇主的职位。selective_search:启用后,会排除职位标题不包含指定关键词的职位,以得到更精确结果。jobs_to_not_include:要从搜索结果中排除的特定职位 ID 列表,用于去重或过滤不需要的职位。location_radius:定义围绕指定位置的搜索半径,包含附近区域。profile_summary:你的职业概述。AI 将依据该信息评估职位匹配度。desired_job_summary:你所期望岗位的简要描述,帮助 AI 依据契合程度进行评分。
这些字段与 Bright Data LinkedIn 职位列表“按关键词发现”API(属于 LinkedIn Jobs Scraper 解决方案)所需参数完全一致:
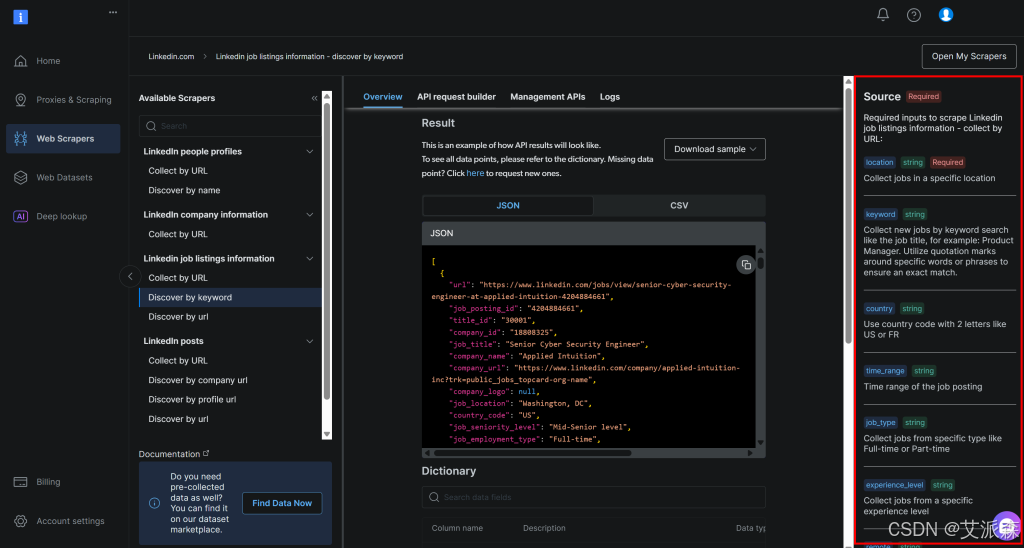
关于这些字段及其可取值的更多信息,请参考官方文档。
最后两个字段(profile_summary 与 desired_job_summary)描述了你的职业身份和目标岗位。它们会传给 AI,用于对 Bright Data 返回的每条职位进行评分。
然后定义映射 JSON 配置文件的 Pydantic 模型:
class JobSearchConfig(BaseModel):
    location: str
    keyword: Optional[str] = None
    country: Optional[str] = None
    time_range: Optional[str] = None
    job_type: Optional[str] = None
    experience_level: Optional[str] = None
    remote: Optional[str] = None
    company: Optional[str] = None
    selective_search: Optional[bool] = Field(default=False)
    jobs_to_not_include: Optional[List[str]] = Field(default_factory=list)
    location_radius: Optional[str] = None
    # Additional fields
    profile_summary: str  # Candidate's profile summary for AI scoring
    desired_job_summary: str  # Description of the desired job for AI scoring
注意,仅第一个字段和最后两个字段为必填。
接下来,创建一个函数,从 --config_file 指定的文件路径读取 JSON 配置,并反序列化为 JobSearchConfig 实例:
def load_and_validate_config(filename: str) -> JobSearchConfig:
    # Load JSON config file
    try:
        with open(filename, "r", encoding="utf-8") as f:
            data = json.load(f)
    except FileNotFoundError:
        raise FileNotFoundError(f"Config file '{filename}' not found.")

    try:
        # Deserialize the input JSON data to a JobSearchConfig instance
        config = JobSearchConfig(**data)
    except ValidationError as e:
        raise ValueError(f"Config deserialization error:\n{e}")

    return config
3.4抓取 LinkedIn 职位
现在,是时候使用前面加载的配置来调用 Bright Data 的 LinkedIn Jobs Scraper API 了。
如果你还不熟悉 Bright Data 的 Web Scraper API,建议先查看文档。
简单来说,Web Scraper API 提供可直接从特定站点检索公开数据的 API 端点。Bright Data 在后台初始化并运行一项现成的抓取任务。这些 API 处理 IP 轮换、验证码等措施,高效且合规地从网页收集公开数据。任务完成后,抓取数据会被解析为结构化格式并作为快照提供给你。
因此,一般工作流为:
- 触发 API 调用以启动网页抓取任务。
- 周期性检查包含抓取数据的快照是否就绪。
- 一旦可用,获取该快照中的数据。
你只需几行代码即可实现上述逻辑:
def trigger_and_poll_linkedin_jobs(config: JobSearchConfig, brightdata_api_key: str, jobs_number: int, polling_timeout=10):
    # Trigger the Bright Data LinkedIn job search
    url = "https://api.brightdata.com/datasets/v3/trigger"
    headers = {
        "Authorization": f"Bearer {brightdata_api_key}",
        "Content-Type": "application/json",
    }
    params = {
        "dataset_id": "gd_lpfll7v5hcqtkxl6l",  # Bright Data "Linkedin job listings information - discover by keyword" dataset ID
        "include_errors": "true",
        "type": "discover_new",
        "discover_by": "keyword",
        "limit_per_input": str(jobs_number),
    }

    # Prepare payload for Bright Data API based on user config
    data = [{
        "location": config.location,
        "keyword": config.keyword or "",
        "country": config.country or "",
        "time_range": config.time_range or "",
        "job_type": config.job_type or "",
        "experience_level": config.experience_level or "",
        "remote": config.remote or "",
        "company": config.company or "",
        "selective_search": config.selective_search,
        "jobs_to_not_include": config.jobs_to_not_include or "",
        "location_radius": config.location_radius or "",
    }]

    response = requests.post(url, headers=headers, params=params, json=data)
    if response.status_code != 200:
        raise RuntimeError(f"Trigger request failed: {response.status_code} - {response.text}")

    snapshot_id = response.json().get("snapshot_id")
    if not snapshot_id:
        raise RuntimeError("No snapshot_id returned from Bright Data trigger.")

    print(f"LinkedIn job search triggered! Snapshot ID: {snapshot_id}")

    # Poll snapshot endpoint until data is ready or timeout
    snapshot_url = f"https://api.brightdata.com/datasets/v3/snapshot/{snapshot_id}?format=json"
    headers = {"Authorization": f"Bearer {brightdata_api_key}"}

    print(f"Polling snapshot for ID: {snapshot_id}")

    while True:
        snap_resp = requests.get(snapshot_url, headers=headers)
        if snap_resp.status_code == 200:
            # Snapshot ready: return job postings JSON data
            print("Snapshot is ready")

            return snap_resp.json()
        elif snap_resp.status_code == 202:
            # Snapshot not ready yet: wait and retry
            print(f"Snapshot not ready yet. Retrying in {polling_timeout} seconds...")
            time.sleep(polling_timeout)
        else:
            raise RuntimeError(f"Snapshot polling failed: {snap_resp.status_code} - {snap_resp.text}")
该函数使用配置文件中的搜索参数触发 Bright Data 的 LinkedIn 职位抓取,确保你只获取符合条件的职位。随后轮询直到快照就绪,一旦可用即返回 JSON 格式的职位数据。请注意,认证由先前加载的 Bright Data API Key 处理。
由 LinkedIn Jobs Scraper 获取的快照将包含如下 JSON 格式的职位列表:
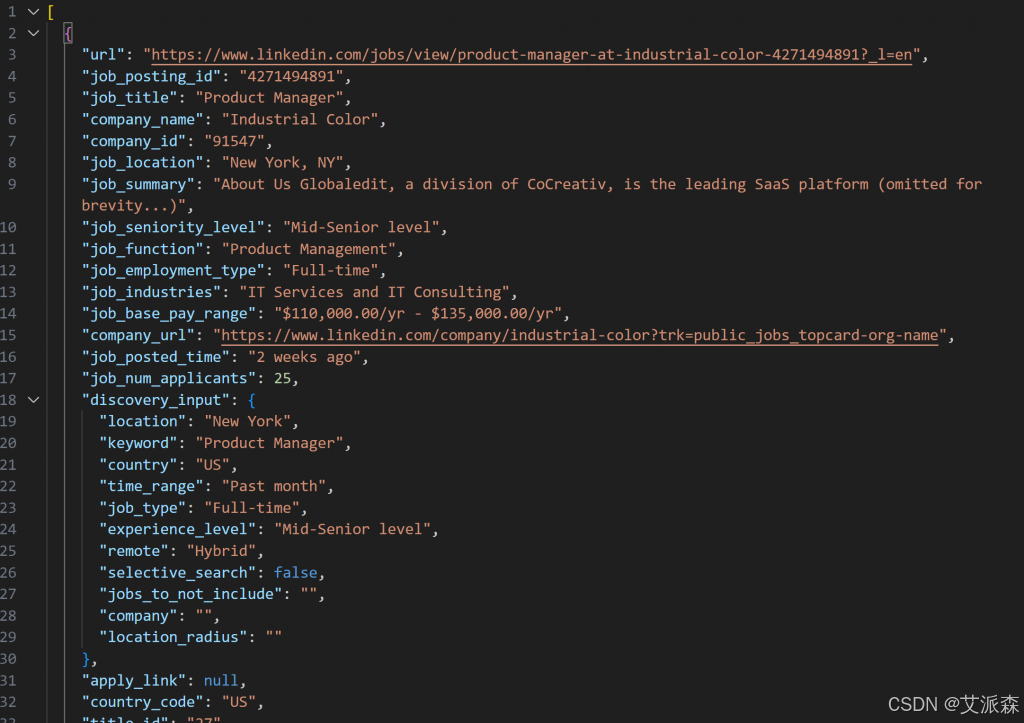
3.5AI 职位打分
现在,是时候让一个 LLM(例如 DeepSeek)来评估每条抓取到的职位了。目标是基于以下因素给出 0 到 100 的分数,并附上简短评论。为减少 API 往返并加速处理,建议按批处理职位。具体来说,每次评估 --batch_size 条职位。
导入 OpenAI 并初始化客户端:
from openai import OpenAI

# ...

# Initialize OpenAI client
client = OpenAI(api_key=DeepSeek_API_KEY, base_url="https://api.deepseek.com")
继续创建 AI 驱动的职位打分函数:
def score_jobs_batch(jobs_batch: List[dict], profile_summary: str, desired_job_summary: str) -> List[JobScore]:
    # Construct prompt for AI to score job matches based on candidate profile
    prompt = f"""
        "You are an expert recruiter. Given the following candidate profile:\n"
        "{profile_summary}\n\n"
        "Desired job description:\n{desired_job_summary}\n\n"
        "Score each job posting accurately from 0 to 100 on how well it matches the profile and desired job.\n"
        "For each job, add a short comment (max 50 words) explaining the score and match quality.\n"
        "Return an array of objects with keys 'score', and 'comment'.\n\n"
        "Jobs:\n{json.dumps(jobs_batch)}\n"
    """
    messages = [
        {"role": "system", "content": "You are a helpful job scoring assistant."},
        {"role": "user", "content": prompt},
    ]

    # Use OpenAI API to parse structured response into JobScoresResponse model
    response = client.responses.parse(
        model="deepseek-chat",
        input=messages,
        text_format=JobScoresResponse,
    )

    # Return list of scored jobs
    return response.output_parsed.scores
这里使用了DeepSeek模型来为每条职位从 0 到 100 打分,并给出简短解释性评论。
为确保响应始终符合所需的精确格式,我们调用了 parse() 方法。该方法强制结构化输出,其模型定义如下:
class JobScore(BaseModel):
    score: int = Field(..., ge=0, le=100)
    comment: str

class JobScoresResponse(BaseModel):
scores: List[JobScore]注意:如果你偏好其他 LLM 提供方,请相应调整上述代码。
3.6导出数据
使用 Python 内置的 csv 包将抓取并富化后的职位数据导出为 CSV 文件:
def export_extended_jobs(extended_jobs: List[dict], output_csv: str):
    # Dynamically get the field names from the first element in the array
    fieldnames = list(extended_jobs[0].keys())
    with open(output_csv, mode="w", newline="", encoding="utf-8") as csvfile:
         # Write extended job data with AI scores to CSV
        writer = csv.DictWriter(csvfile, fieldnames=fieldnames)
        writer.writeheader()
        for job in extended_jobs:
            writer.writerow(job)

    print(f"Exported {len(extended_jobs)} jobs to {output_csv}")
上述函数会用 --output_csv CLI 参数指定的文件名来保存。
四、总结
通过本教程,我们共同完成了一个从零到一、极具实用价值的AI项目实战。我们从求职者的真实痛点出发,巧妙地利用了 Bright Data 与 DeepSeek 这一“数据”加“智能”的黄金组合,构建了一个自动化、智能化的LinkedIn求职助手。
回顾整个项目,其核心价值在于成功地将两个原本孤立的技术领域——网络数据采集与大语言模型分析——无缝集成,创造出了一加一大于二的解决方案。Bright Data以其卓越的稳定性和合规性,为我们解决了数据来源的难题,高效地获取了纯净、结构化的职位信息。而DeepSeek-V3则以其强大的语义理解和推理能力,扮演了资深职业顾问的角色,为我们提供了精准的匹配度分析和极具参考价值的文本建议。
这不仅仅是技术工具的简单堆砌,更是一种解决问题的新思路:面对重复性高、信息量大的现实问题,我们可以通过自动化和智能化的手段,将人力从中解放出来,专注于更需要创造力和决策力的环节。从“人找信息”变为“信息找人并自我解读”,这正是技术赋能个人效率提升的完美体现。
当然,本项目只是一个起点,你所搭建的是一个拥有无限可能性的基础框架。你可以根据自己的需求,继续为其添加更多强大的功能,例如集成数据库来持久化存储历史职位、增加邮件或Telegram推送来实时通知高分职位、甚至进一步让AI为你自动生成定制化的求职信。
最后,技术应当用于创造价值、提升效率、照亮前路。希望这个项目不仅能成为你求职路上的得力助手,更能为你打开一扇窗,启发你利用手中技术去解决更多生活与工作中的实际问题。
重磅福利:亮数据 MCP 基础版免费使用:每月 5,000 次免费请求,足以满足日常使用和原 型开发代理式工作流的需求。如需使用免费MCP,需注册亮数据账号。点击链接进行注册
目前新客户,送30$试用金,感兴趣的小伙伴快快注册体验!
完整代码
import argparse
from dotenv import load_dotenv
import os
from pydantic import BaseModel, Field, ValidationError
from typing import Optional, List
import json
import requests
import time
from openai import OpenAI
import csv

# Load environment variables from .env file
load_dotenv()

# Pydantic models supporting the project
class JobSearchConfig(BaseModel):
    # Source: https://docs.brightdata.com/api-reference/web-scraper-api/social-media-apis/linkedin#discover-by-keyword
    location: str
    keyword: Optional[str] = None
    country: Optional[str] = None
    time_range: Optional[str] = None
    job_type: Optional[str] = None
    experience_level: Optional[str] = None
    remote: Optional[str] = None
    company: Optional[str] = None
    selective_search: Optional[bool] = Field(default=False)
    jobs_to_not_include: Optional[List[str]] = Field(default_factory=list)
    location_radius: Optional[str] = None
    # Additional fields
    profile_summary: str  # Candidate's profile summary for AI scoring
    desired_job_summary: str  # Description of the desired job for AI scoring

class JobScore(BaseModel):
    score: int = Field(..., ge=0, le=100)
    comment: str

class JobScoresResponse(BaseModel):
    scores: List[JobScore]

def parse_cli_args():
    # Parse command-line arguments for config and runtime options
    parser = argparse.ArgumentParser(description="LinkedIn Job Hunting Assistant")
    parser.add_argument("--config_file", type=str, default="config.json", help="Path to config JSON file")
    parser.add_argument("--jobs_number", type=int, default=20, help="Limit the number of jobs returned by Bright Data Scraper API")
    parser.add_argument("--batch_size", type=int, default=5, help="Number of jobs to score in each batch")
    parser.add_argument("--output_csv", type=str, default="jobs_scored.csv", help="Output CSV filename")

    return parser.parse_args()

def load_env_vars():
    # Read required API keys from environment and verify presence
    deepseek_api_key = os.getenv("DEEPSEEK_API_KEY")
    brightdata_api_key = os.getenv("BRIGHT_DATA_API_KEY")

    missing = []
    if not deepseek_api_key:
        missing.append("DEEPSEEK_API_KEY")
    if not brightdata_api_key:
        missing.append("BRIGHT_DATA_API_KEY")
    if missing:
        raise EnvironmentError(
            f"Missing required environment variables: {', '.join(missing)}\n"
            "Please set them in your .env or environment."
        )

    return deepseek_api_key, brightdata_api_key

def load_and_validate_config(filename: str) -> JobSearchConfig:
    # Load JSON config file
    try:
        with open(filename, "r", encoding="utf-8") as f:
            data = json.load(f)
    except FileNotFoundError:
        raise FileNotFoundError(f"Config file '{filename}' not found.")

    try:
        # Deserielizing the input JSON data to a JobSearchConfig instance
        config = JobSearchConfig(**data)
    except ValidationError as e:
        raise ValueError(f"Config deserialization error:\n{e}")

    return config

def trigger_and_poll_linkedin_jobs(config: JobSearchConfig, brightdata_api_key: str, jobs_number: int, polling_timeout=10):
    # Trigger the Bright Data LinkedIn job search
    url = "https://api.brightdata.com/datasets/v3/trigger"
    headers = {
        "Authorization": f"Bearer {brightdata_api_key}",
        "Content-Type": "application/json",
    }
    params = {
        "dataset_id": "gd_lpfll7v5hcqtkxl6l", # Bright Data "Linkedin job listings information - discover by keyword" dataset ID
        "include_errors": "true",
        "type": "discover_new",
        "discover_by": "keyword",
        "limit_per_input": str(jobs_number),
    }

    # Prepare payload for Bright Data API based on user config
    data = [{
        "location": config.location,
        "keyword": config.keyword or "",
        "country": config.country or "",
        "time_range": config.time_range or "",
        "job_type": config.job_type or "",
        "experience_level": config.experience_level or "",
        "remote": config.remote or "",
        "company": config.company or "",
        "selective_search": config.selective_search,
        "jobs_to_not_include": config.jobs_to_not_include or "",
        "location_radius": config.location_radius or "",
    }]

    response = requests.post(url, headers=headers, params=params, json=data)
    if response.status_code != 200:
        raise RuntimeError(f"Trigger request failed: {response.status_code} - {response.text}")

    snapshot_id = response.json().get("snapshot_id")
    if not snapshot_id:
        raise RuntimeError("No snapshot_id returned from Bright Data trigger.")

    print(f"LinkedIn job search triggered! Snapshot ID: {snapshot_id}")

    # Poll snapshot endpoint until data is ready or timeout
    snapshot_url = f"https://api.brightdata.com/datasets/v3/snapshot/{snapshot_id}?format=json"
    headers = {"Authorization": f"Bearer {brightdata_api_key}"}

    print(f"Polling snapshot for ID: {snapshot_id}")

    while True:
        snap_resp = requests.get(snapshot_url, headers=headers)
        if snap_resp.status_code == 200:
            # Snapshot ready: return job postings JSON data
            print("Snapshot is ready")

            return snap_resp.json()
        elif snap_resp.status_code == 202:
            # Snapshot not ready yet: wait and retry
            print(f"Snapshot not ready yet. Retrying in {polling_timeout} seconds...")
            time.sleep(polling_timeout)
        else:
            raise RuntimeError(f"Snapshot polling failed: {snap_resp.status_code} - {snap_resp.text}")

# Initialize OpenAI client
client = OpenAI()

def score_jobs_batch(jobs_batch: List[dict], profile_summary: str, desired_job_summary: str) -> List[JobScore]:
    # Construct prompt for AI to score job matches based on candidate profile
    prompt = f"""
        "You are an expert recruiter. Given the following candidate profile:\n"
        "{profile_summary}\n\n"
        "Desired job description:\n{desired_job_summary}\n\n"
        "Score each job posting accurately from 0 to 100 on how well it matches the profile and desired job.\n"
        "For each job, add a short comment (max 50 words) explaining the score and match quality.\n"
        "Return an array of objects with keys 'score', and 'comment'.\n\n"
        "Jobs:\n{json.dumps(jobs_batch)}\n"
    """
    messages = [
        {"role": "system", "content": "You are a helpful job scoring assistant."},
        {"role": "user", "content": prompt},
    ]

    # Use OpenAI API to parse structured response into JobScoresResponse model
    response = client.responses.parse(
        model="deepseek-chat",
        input=messages,
        text_format=JobScoresResponse,
    )

    # Return list of scored jobs
    return response.output_parsed.scores


def export_extended_jobs(extended_jobs: List[dict], output_csv: str):
    # Dynamically get the field names from the first element in the array
    fieldnames = list(extended_jobs[0].keys())
    with open(output_csv, mode="w", newline="", encoding="utf-8") as csvfile:
         # Write extended job data with AI scores to CSV
        writer = csv.DictWriter(csvfile, fieldnames=fieldnames)
        writer.writeheader()
        for job in extended_jobs:
            writer.writerow(job)

    print(f"Exported {len(extended_jobs)} jobs to {output_csv}")


def main():
    # Get runtime parameters from CLI
    args = parse_cli_args()

    try:
         # Load API keys from environment
        _, brightdata_api_key = load_env_vars()

         # Load job search config file
        config = load_and_validate_config(args.config_file)

        # Fetch jobs
        jobs_data = trigger_and_poll_linkedin_jobs(config, brightdata_api_key, args.jobs_number)
    except Exception as e:
        print(f"[Error] {e}")
        return

    all_scores = []
    # Process jobs in batches to avoid overloading API and to handle large datasets
    for i in range(0, len(jobs_data), args.batch_size):
        batch = jobs_data[i : i + args.batch_size]
        scores = score_jobs_batch(batch, config.profile_summary, config.desired_job_summary)
        all_scores.extend(scores)

        time.sleep(1) # To avoid triggering API rate limits

    # Save results to CSV
    export_extended_jobs(args.output_csv)


if __name__ == "__main__":
    main()
资料获取,更多粉丝福利,关注下方公众号获取

更多推荐


 55
55 0
0- 0


 已为社区贡献2条内容

所有评论(0)