
每天10分钟轻松掌握MCP(适合小白):Day 8 - MCP工具系统设计原理与实现机制(一)
每天10分钟轻松掌握MCP(适合小白):Day 8 - MCP工具系统设计原理与实现机制(一)!如果文章对你有帮助,还请给个三连好评,感谢感谢!
·
每天10分钟轻松掌握MCP 第8天:MCP工具系统设计原理与实现机制(一)
哈喽!欢迎来到第7天的学习!今天我们要深入MCP工具系统的内核,就像拆解一台精密的瑞士手表一样,看看每个齿轮是怎么完美配合的。别担心,我会用最通俗的话让你明白这些看似复杂的概念!
第一部分:MCP工具系统核心设计理念
1. 工具抽象:把复杂变简单的魔法
想象一下,你有一个万能遥控器,无论是电视、空调还是音响,都能用同样的方式操控。MCP工具系统的抽象就是这个道理!
核心理念:统一接口,多样实现
// MCP工具的抽象定义 - 就像定义遥控器的标准按钮
interface MCPTool {
  name: string;           // 工具名称(比如"计算器")
  description: string;    // 工具描述(告诉AI这工具干啥的)
  inputSchema: object;    // 输入参数格式(按哪些按钮)
  execute: (params: any) => Promise<any>; // 执行函数(按下去会发生什么)
}

// 具体的工具实现 - 就像不同品牌的遥控器
class CalculatorTool implements MCPTool {
  name = "calculator";
  description = "执行基础数学运算,支持加减乘除";

  inputSchema = {
    type: "object",
    properties: {
      operation: { type: "string", enum: ["add", "subtract", "multiply", "divide"] },
      a: { type: "number" },
      b: { type: "number" }
    },
    required: ["operation", "a", "b"]
  };

  async execute(params: { operation: string; a: number; b: number }) {
    const { operation, a, b } = params;

    switch (operation) {
      case "add": return { result: a + b };
      case "subtract": return { result: a - b };
      case "multiply": return { result: a * b };
      case "divide":
        if (b === 0) throw new Error("除数不能为零!数学老师会生气的!");
        return { result: a / b };
      default:
        throw new Error(`不支持的运算:${operation}`);
    }
  }
}
2. 接口标准化:让所有工具说同一种语言
就像全世界的USB接口都是标准化的一样,MCP工具也有统一的"接口规范"。
工具注册表结构:
| 字段名 | 类型 | 必需 | 说明 | 示例 |
|---|---|---|---|---|
| name | string | ✅ | 工具唯一标识符 | “weather_query” |
| description | string | ✅ | 工具功能描述 | “查询指定城市的天气信息” |
| inputSchema | object | ✅ | JSON Schema格式的参数定义 | 见下方示例 |
| outputSchema | object | ❌ | 返回值格式定义 | 可选,用于文档和验证 |
| metadata | object | ❌ | 额外元数据 | 版本、作者、标签等 |
// 天气查询工具的完整定义
const weatherTool = {
  name: "weather_query",
  description: "查询指定城市的实时天气信息,支持中英文城市名",

  // 输入参数的JSON Schema定义
  inputSchema: {
    type: "object",
    properties: {
      city: {
        type: "string",
        description: "城市名称",
        examples: ["北京", "Shanghai", "New York"]
      },
      unit: {
        type: "string",
        description: "温度单位",
        enum: ["celsius", "fahrenheit"],
        default: "celsius"
      }
    },
    required: ["city"]
  },

  // 输出格式定义(可选)
  outputSchema: {
    type: "object",
    properties: {
      temperature: { type: "number" },
      humidity: { type: "number" },
      description: { type: "string" },
      city: { type: "string" }
    }
  },

  // 元数据信息
  metadata: {
    version: "1.0.0",
    author: "Weather API Team",
    tags: ["weather", "api", "real-time"]
  }
};
3. 执行流程控制:工具运行的生命周期
想象工具执行就像做菜一样,有固定的步骤:准备食材(参数验证)→ 下锅炒制(业务逻辑)→ 装盘上桌(结果返回)。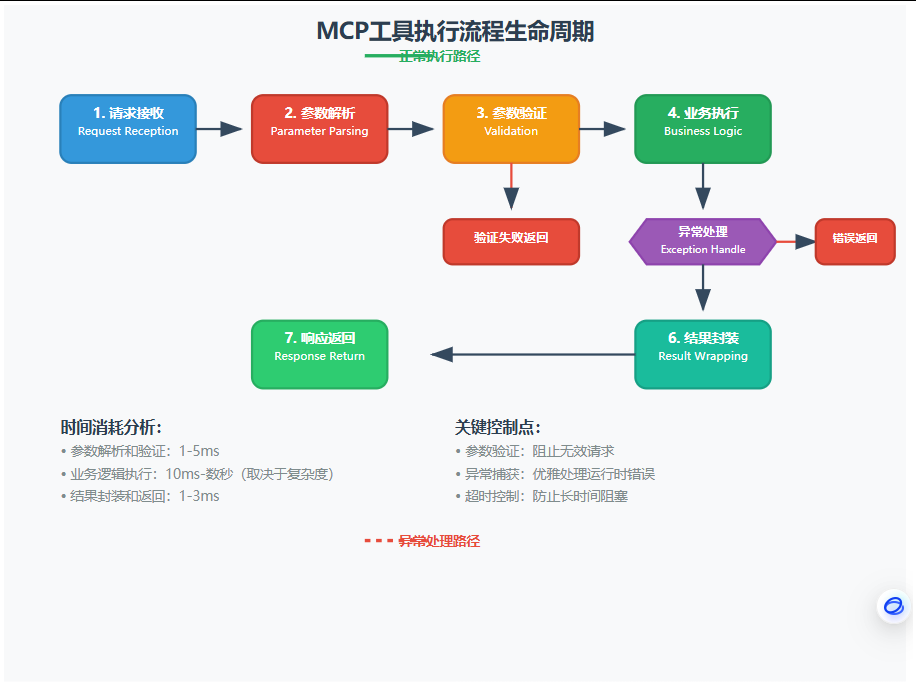
流程控制核心代码:
class MCPToolExecutor {
  async executeToolCall(toolName: string, params: any): Promise<any> {
    const startTime = Date.now();

    try {
      // 1. 请求接收 - 记录执行开始
      console.log(`🚀 开始执行工具: ${toolName}`);

      // 2. 参数解析 - 确保参数格式正确
      const parsedParams = this.parseParameters(params);

      // 3. 参数验证 - 这是第一道防线!
      const validationResult = await this.validateParameters(toolName, parsedParams);
      if (!validationResult.isValid) {
        throw new ValidationError(`参数验证失败: ${validationResult.errors.join(', ')}`);
      }

      // 4. 业务逻辑执行 - 这里是真正干活的地方
      const tool = this.getTool(toolName);
      const result = await this.executeWithTimeout(tool, parsedParams, 30000); // 30秒超时

      // 5. 结果封装 - 统一返回格式
      const wrappedResult = {
        success: true,
        data: result,
        executionTime: Date.now() - startTime,
        timestamp: new Date().toISOString()
      };

      console.log(`✅ 工具执行成功,耗时: ${wrappedResult.executionTime}ms`);
      return wrappedResult;

    } catch (error) {
      // 6. 异常处理 - 优雅地处理各种错误
      const errorResult = {
        success: false,
        error: {
          type: error.constructor.name,
          message: error.message,
          code: this.getErrorCode(error)
        },
        executionTime: Date.now() - startTime,
        timestamp: new Date().toISOString()
      };

      console.error(`❌ 工具执行失败: ${error.message}`);
      return errorResult;
    }
  }

  // 带超时的执行器 - 防止工具执行时间过长
  private async executeWithTimeout(tool: MCPTool, params: any, timeoutMs: number) {
    return new Promise((resolve, reject) => {
      const timer = setTimeout(() => {
        reject(new TimeoutError(`工具执行超时 (${timeoutMs}ms)`));
      }, timeoutMs);

      tool.execute(params)
        .then(result => {
          clearTimeout(timer);
          resolve(result);
        })
        .catch(error => {
          clearTimeout(timer);
          reject(error);
        });
    });
  }
}
4. 参数验证体系:多层防护的安全门
就像机场安检有多道关卡一样,MCP工具的参数验证也是多层次的。每一层都在守护系统的安全和稳定!
验证层级结构:
| 验证层级 | 验证内容 | 失败后果 | 示例 |
|---|---|---|---|
| 类型检查 | 数据类型是否正确 | 立即拒绝 | string传入了number |
| 格式验证 | 格式是否符合规范 | 立即拒绝 | 邮箱格式不正确 |
| 取值范围 | 值是否在允许范围内 | 立即拒绝 | 年龄传入-5 |
| 业务规则 | 是否符合业务逻辑 | 警告或拒绝 | 结束时间早于开始时间 |
class ParameterValidator {
  // 多层验证器
  async validateParameters(toolSchema: any, params: any): Promise<ValidationResult> {
    const errors: string[] = [];

    // 第一层:基础类型检查
    const typeErrors = this.validateTypes(toolSchema, params);
    errors.push(...typeErrors);

    // 第二层:格式验证
    const formatErrors = this.validateFormats(toolSchema, params);
    errors.push(...formatErrors);

    // 第三层:取值范围检查
    const rangeErrors = this.validateRanges(toolSchema, params);
    errors.push(...rangeErrors);

    // 第四层:复杂业务规则验证
    const businessErrors = await this.validateBusinessRules(toolSchema, params);
    errors.push(...businessErrors);

    return {
      isValid: errors.length === 0,
      errors: errors,
      warnings: this.generateWarnings(toolSchema, params)
    };
  }

  // 类型检查实现
  private validateTypes(schema: any, params: any): string[] {
    const errors: string[] = [];

    for (const [key, value] of Object.entries(params)) {
      const fieldSchema = schema.properties[key];
      if (!fieldSchema) continue;

      const expectedType = fieldSchema.type;
      const actualType = typeof value;

      // 类型映射检查
      const typeMap: { [key: string]: string } = {
        'string': 'string',
        'number': 'number',
        'boolean': 'boolean',
        'array': 'object',
        'object': 'object'
      };

      if (expectedType === 'array' && !Array.isArray(value)) {
        errors.push(`字段 '${key}' 应该是数组,但收到了 ${actualType}`);
      } else if (expectedType !== 'array' && typeMap[expectedType] !== actualType) {
        errors.push(`字段 '${key}' 应该是 ${expectedType},但收到了 ${actualType}`);
      }
    }

    return errors;
  }
}
看到这里,你可能会想:"哇,这么多验证,不会很慢吗?"别担心!这就像高速公路的ETC,看起来复杂,但实际上只需要几毫秒就能完成所有检查。而且这些验证能帮我们避免99%的运行时错误,绝对是物超所值的投资!
欢迎大家关注同名公众号《凡人的工具箱》:关注就送学习大礼包

更多推荐
 14
14 0
0- 0


 已为社区贡献7条内容

所有评论(0)