
springboot连接数据库的三种方式
转载自原链接使用数据库是开发应用的基本基础,那么,使用Spring Boot如何连接数据库呢?前提,需要知道如何建一个Spring Boot项目,可参照:https://www.jianshu.com/p/d6e6c84cd190一、准备工作:1、建一个简单的数据库,名为springboot_db,在其下建一个表,名为t_author,脚本如下:2、添加配置文件,可用使用yaml配置,即appli
转载自原链接
使用数据库是开发应用的基本基础,那么,使用Spring Boot如何连接数据库呢?
前提,需要知道如何建一个Spring Boot项目,可参照:https://www.jianshu.com/p/d6e6c84cd190
一、准备工作:
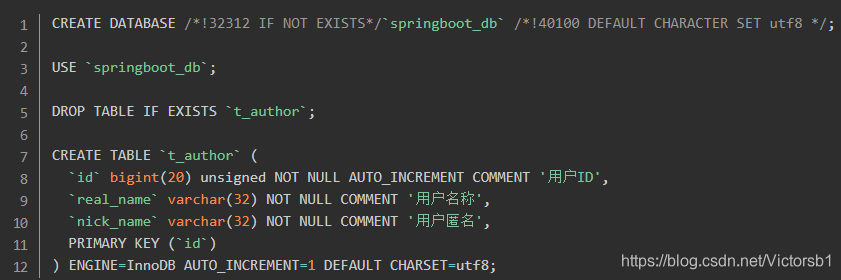
1、建一个简单的数据库,名为springboot_db,在其下建一个表,名为t_author,脚本如下:
2、添加配置文件,可用使用yaml配置,即application.yml(与application.properties配置文件,没什么太大的区别)连接池的配置如下:
spring:
datasource:
url: jdbc:mysql://127.0.0.1:3306/springboot_db?useUnicode=true&characterEncoding=UTF-8&useSSL=false
driverClassName: com.mysql.jdbc.Driver
username: root
password: root
type: com.alibaba.druid.pool.DruidDataSource
3、需要建立与数据库对应的POJO类,代码如下:
public class Author {
private Long id;
private String realName;
private String nickName;
// SET和GET方法略
}
二、方式一:与JdbcTemplate集成
通过JdbcTemplate来访问数据库,Spring boot提供了如下的starter来支撑:
package com.guxf.dao;
import java.util.List;
import com.guxf.domain.Author;
public interface AuthorDao {
int add(Author author);

int update(Author author);

int delete(Long id);

Author findAuthor(Long id);

List<Author> findAuthorList();
}
实现Dao接口代码(此处只写Add,其他方法略):
package com.guxf.impl;
import java.util.HashMap;
import java.util.List;
import java.util.Map;
import org.springframework.beans.factory.annotation.Autowired;
import org.springframework.jdbc.core.namedparam.NamedParameterJdbcTemplate;
import org.springframework.stereotype.Repository;
import com.guxf.dao.AuthorDao;
import com.guxf.domain.Author;
@Repository
public class AuthorDaoJdbcTemplateImpl implements AuthorDao{
@Autowired
private NamedParameterJdbcTemplate jdbcTemplate;

@Override
public int add(Author author) {
    String sql = "insert into t_author(id,real_name,nick_name) " +
            "values(:id,:realName,:nickName)";
    Map<String, Object> param = new HashMap<>();
    param.put("id",author.getId());
    param.put("realName", author.getRealName());
    param.put("nickName", author.getNickName());

    return (int) jdbcTemplate.update(sql, param);
}

@Override
public int update(Author author) {
    return 0;
}

@Override
public int delete(Long id) {
    return 0;
}

@Override
public Author findAuthor(Long id) {
    return null;
}

@Override
public List<Author> findAuthorList() {
      return null;
}
}
通过JUnit来测试上面的代码(需根据自己的实际Application名稍作修改):
package com.guxf.boot;
import org.junit.Test;
import org.junit.runner.RunWith;
import org.springframework.beans.factory.annotation.Autowired;
import org.springframework.boot.test.context.SpringBootTest;
import org.springframework.test.context.junit4.SpringJUnit4ClassRunner;
import com.guxf.BootApplication;
import com.guxf.dao.AuthorDao;
import com.guxf.domain.Author;
@RunWith(SpringJUnit4ClassRunner.class)
@SpringBootTest(classes = BootApplication.class)
public class AuthorDaoTest {
@Autowired
private AuthorDao authorDao;
@Test
public void testInsert() {
Author author = new Author();
author.setId(1L);
author.setRealName("莫言");
author.setNickName("疯子");
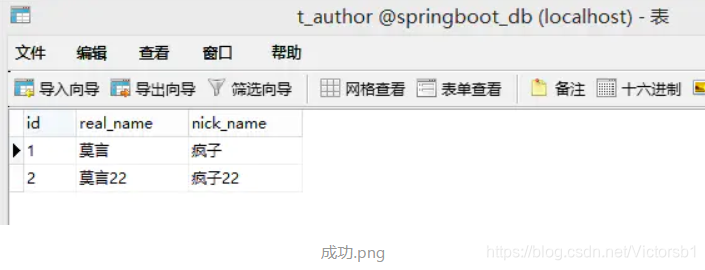
authorDao.add(author);
System.out.println("插入成功!");
}
}
插入成功:
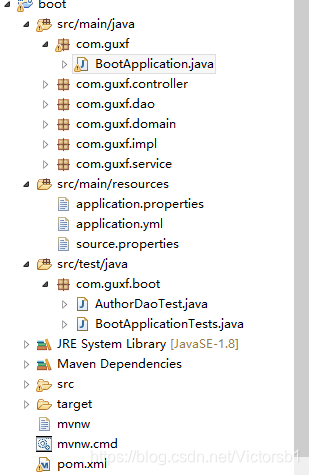
PS:需要注意的是,Application类所在的包必须是其他包的父包,@SpringBootApplication这个注解继承了@ComponentScan,其默认情况下只会扫描Application类所在的包及子包,结构图:
Application代码示例:
package com.guxf;
import org.springframework.boot.SpringApplication;
import org.springframework.boot.autoconfigure.SpringBootApplication;
@SpringBootApplication
public class BootApplication {
public static void main(String[] args) {
    SpringApplication.run(BootApplication.class, args);
}
}
三、方式二:与JPA集成
引入Starter:
    <dependency>
        <groupId>org.springframework.boot</groupId>
        <artifactId>spring-boot-starter-data-jpa</artifactId>
    </dependency>
对POJO类增加Entity的注解,并指定表名(如果不指定,默认的表名为author),然后指定ID的及其生成策略,这些都是JPA的知识,与Spring boot无关,代码:
package com.guxf.domain;
import javax.persistence.Entity;
import javax.persistence.GeneratedValue;
import javax.persistence.Id;
@Entity(name = “t_author”)
public class Author {
@Id
@GeneratedValue
private Long id;
private String realName;
private String nickName;
// SET和GET方法略
}
需要继承JpaRepository这个类,这里我们实现了两个查询方法,第一个是符合JPA命名规范的查询,JPA会自动帮我们完成查询语句的生成,另一种方式是我们自己实现JPQL(JPA支持的一种类SQL的查询):
package com.guxf.service;
import java.util.List;
import java.util.Optional;
import org.springframework.data.jpa.repository.JpaRepository;
import org.springframework.data.jpa.repository.Query;
import org.springframework.data.repository.query.Param;
import com.guxf.domain.Author;
public interface AuthorRepository extends JpaRepository<Author, Long> {
public Optional<Author> findById(Long userId);

@Query("select au from com.guxf.domain.Author au where nick_name=:nickName")
public List<Author> queryByNickName(@Param("nickName") String nickName);
}
测试代码:
package com.guxf.boot;
import static org.junit.Assert.*;
import java.util.List;
import org.junit.Test;
import org.junit.runner.RunWith;
import org.springframework.beans.factory.annotation.Autowired;
import org.springframework.boot.test.context.SpringBootTest;
import org.springframework.test.context.junit4.SpringJUnit4ClassRunner;
import com.guxf.BootApplication;
import com.guxf.domain.Author;
import com.guxf.service.AuthorRepository;
@RunWith(SpringJUnit4ClassRunner.class)
@SpringBootTest(classes = BootApplication.class)
public class AuthorDaoTestJPA {
@Autowired
private AuthorRepository authorRepository;

@Test
public void testQuery() {
    List<Author> authorList = authorRepository.queryByNickName("疯子");
    assertTrue(authorList.size() > 0);
    System.out.println("成功!");
}
}
四、方式三:与MyBatis集成
引入starter:
    <dependency>
        <groupId>org.mybatis.spring.boot</groupId>
        <artifactId>mybatis-spring-boot-starter</artifactId>
        <version>1.1.1</version>
    </dependency>
MyBatis一般可以通过XML或者注解的方式来指定操作数据库的SQL,首先,我们需要配置mapper的目录。我们在application.yml中进行配置:
spring:
datasource:
url: jdbc:mysql://127.0.0.1:3306/springboot_db?useUnicode=true&characterEncoding=UTF-8&useSSL=false
driverClassName: com.mysql.jdbc.Driver
username: root
password: root
type: com.alibaba.druid.pool.DruidDataSource
mybatis:
#config-locations: mybatis/mybatis-config.xml
mapper-locations: com/guxf/mapper/*.xml
type-aliases-package: com.guxf.mapper.AuthorMapper
编写mapper对应的接口:
package com.guxf.mapper;
import org.apache.ibatis.annotations.Mapper;
import com.baomidou.mybatisplus.mapper.BaseMapper;
import com.guxf.domain.Author;
@Mapper
public interface AuthorMapper extends BaseMapper {
public Long insertAuthor(Author author);

public void updateAuthor(Author author);

public Author queryById(Long id);
}
配置Mapper的XML文件:
<sql id="base_column">
    id,real_name,nick_name
</sql>

<insert id="insertAuthor" parameterType="com.guxf.domain.Author">
    INSERT INTO
    t_author(
    <include refid="base_column" />
    )
    VALUE
    (#{id},#{realName},#{nickName})
</insert>

<update id="updateAuthor" parameterType="com.guxf.domain.Author">
    UPDATE t_author
    <set>
        <if test="realName != null">
            real_name = #{realName},
        </if>
        <if test="nickName != null">
            nick_name = #{nickName},
        </if>
    </set>
    WHERE id = #{id}
</update>

<select id="queryById" parameterType="Long" resultMap="authorMap">
    SELECT id,
    <include refid="base_column"></include>
    FROM t_author
    WHERE id = #{id}
</select>
package com.guxf;
import static org.junit.Assert.*;
import org.junit.Test;
import org.junit.runner.RunWith;
import org.springframework.beans.factory.annotation.Autowired;
import org.springframework.boot.test.context.SpringBootTest;
import org.springframework.test.context.junit4.SpringJUnit4ClassRunner;
import com.guxf.BootApplication;
import com.guxf.domain.Author;
import com.guxf.mapper.AuthorMapper;
@RunWith(SpringJUnit4ClassRunner.class)
@SpringBootTest(classes = BootApplication.class)
public class AuthorDaoTestMybatis {
@Autowired
private AuthorMapper mapper;

@Test
public void testInsert() {
    Author author = new Author();
    author.setId(4L);
    author.setRealName("唐钰");
    author.setNickName("小宝");
    mapper.insertAuthor(author);
    System.out.println("成功!");
}

@Test
public void testMybatisQuery() {
    Author author = mapper.queryById(1L);
    assertNotNull(author);
    System.out.println(author);
}

@Test
public void testUpdate() {
    Author author = mapper.queryById(2L);
    author.setNickName("月儿");
    author.setRealName("林月如");
    mapper.updateAuthor(author);
}
}
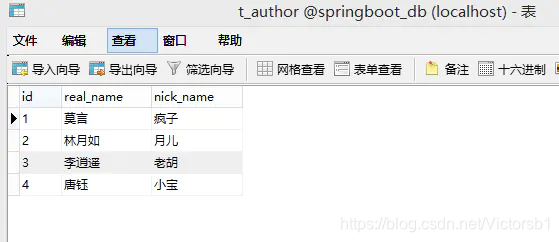
我们看测试结果:
测试结果.png
配置扫描,需要根据自己项目结构实际修改,下面贴上我的项目结构图:
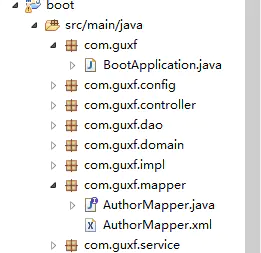
结构.png
更多推荐

 5
5 0
0- 0


 已为社区贡献1条内容

所有评论(0)