
Carla自动驾驶仿真五:opencv绘制运动车辆的boudingbox(代码详解)
1、opencv安装可以参照我上一篇文章:opencv安装教程 ,这一篇文章即将讲述如果在carla仿真中,将仿真世界中的车辆通过opencv将boudingbox绘制出来。1)该函数用于构建相机的投影矩阵:w:相机视图的宽度(单位:像素)h:相机视图的高度(单位:像素)fov:相机的视野角度(单位:度)函数首先计算焦距(focal),使用公式 focal = w / (2.0 * np.tan(
文章目录
提示:以下是本篇文章正文内容,下面案例可供参考
一、安装opencv
1、opencv安装可以参照我上一篇文章:opencv安装教程 ,这一篇文章即将讲述如果在carla仿真中,将仿真世界中的车辆通过opencv将boudingbox绘制出来。
二、opencv绘制车辆的boudingbox
1、构造相机投影矩阵函数
def build_projection_matrix(w, h, fov):
    focal = w / (2.0 * np.tan(fov * np.pi / 360.0))
    K = np.identity(3)
    K[0, 0] = K[1, 1] = focal
    K[0, 2] = w / 2.0
    K[1, 2] = h / 2.0
    return K
1)该函数用于构建相机的投影矩阵:
-
w:相机视图的宽度(单位:像素)
-
h:相机视图的高度(单位:像素)
-
fov:相机的视野角度(单位:度)
-
函数首先计算焦距(focal),使用公式 focal = w / (2.0 * np.tan(fov * np.pi / 360.0))。这里使用了 numpy 库中的 np.tan 函数来计算视角的正切值。
-
然后,函数创建一个 3x3 的单位矩阵 K,作为投影矩阵。投影矩阵的主要作用是将三维空间中的点投影到二维图像平面上。在这里,投影矩阵的第一行和第二行的对角元素设置为焦距值,即 K[0, 0] = K[1, 1] = focal。投影矩阵的第一行和第二行的第三列元素设置为视图宽度和高度的一半,即 K[0, 2] = w / 2.0 和 K[1, 2] = h / 2.0。
-
最后,函数返回构建的投影矩阵 K。
2)关于投影矩阵
-
对于相机投影矩阵,一个常见的3x3矩阵表示方式是使用齐次坐标(homogeneous coordinates):
| fx 0 cx |
| 0 fy cy |
| 0 0 1 |
其中,fx和fy表示焦距在x和y方向上的缩放因子,cx和cy表示图像中心的偏移量。这个矩阵描述了从相机坐标系到图像坐标系的投影变换。
2、定义将Carla世界坐标转换成相机坐标的函数
def get_image_point(loc, K, w2c):
    # 计算三维坐标的二维投影

    # 格式化输入坐标(loc 是一个 carla.Position 对象)
    point = np.array([loc.x, loc.y, loc.z, 1])

    # 转换到相机坐标系
    point_camera = np.dot(w2c, point)

    # 将坐标系从 UE4 的坐标系转换为标准坐标系(y, -z, x),同时移除第四个分量
    point_camera = [point_camera[1], -point_camera[2], point_camera[0]]

    # 使用相机矩阵进行三维到二维投影
    point_img = np.dot(K, point_camera)

    # 归一化
    point_img[0] /= point_img[2]
    point_img[1] /= point_img[2]

    return point_img[0:2]
1)该函数用于计算三维坐标的二维投影。下面是函数的解释:
-
loc:一个 carla.Position 对象,表示三维坐标点的位置。
-
K:相机的投影矩阵。
-
w2c:世界坐标系到相机坐标系的转换矩阵。
-
格式化输入坐标:将 loc 转换为一个包含 [x, y, z, 1] 的数组。
-
将坐标转换到相机坐标系:使用矩阵乘法将坐标点 point 与世界坐标到相机坐标的转换矩阵 w2c 相乘,得到 point_camera。
-
转换坐标系:将坐标点从 UE4 的坐标系转换为标准坐标系 (y, -z, x),同时移除第四个分量。
-
使用相机投影矩阵进行三维到二维投影:将 point_camera 与相机投影矩阵 K 相乘,得到投影后的二维坐标点 point_img。
-
归一化:将投影坐标点的 x 和 y 分量除以其 z 分量,以进行归一化。
-
返回归一化后的二维投影坐标点的前两个分量,即 point_img[0:2]。
-
通过调用这个函数,并传入相应的参数,您可以将三维坐标点投影到相机视图中的二维坐标点,并进行归一化处理。
3、设置Carla并生成主车和相机
这部分在前几篇文章都讲过,不细讲了
#连接Carla并获取世界
client = carla.Client('localhost', 2000)
world  = client.get_world()
bp_lib = world.get_blueprint_library()

# 生成车辆
vehicle_bp =bp_lib.find('vehicle.lincoln.mkz_2020')
spawn_points = world.get_map().get_spawn_points()
vehicle = world.try_spawn_actor(vehicle_bp, random.choice(spawn_points))

# 生成相机
camera_bp = bp_lib.find('sensor.camera.rgb')
camera_init_trans = carla.Transform(carla.Location(z=2))
camera = world.spawn_actor(camera_bp, camera_init_trans, attach_to=vehicle)
vehicle.set_autopilot(True)

#生成目标车辆
for i in range(50):
    vehicle_bp = random.choice(bp_lib.filter('vehicle'))
    npc = world.try_spawn_actor(vehicle_bp, random.choice(spawn_points))
    if npc:
        npc.set_autopilot(True)

# 设置仿真模式为同步模式
settings = world.get_settings()
settings.synchronous_mode = True # 启用同步模式
settings.fixed_delta_seconds = 0.05
world.apply_settings(settings)
4、使用队列接收相机的数据
# 创建对接接收相机数据
image_queue = queue.Queue()
camera.listen(image_queue.put)
1)这段代码使用了队列(Queue)来接收图像数据。
-
首先,创建了一个名为 image_queue 的队列对象,用于存储图像数据。
-
然后,使用 camera.listen(image_queue.put) 将 camera 对象设置为监听模式,并将接收到的图像数据放入 image_queue 队列中,在后续中使用。
5、计算相机投影矩阵
计算相机投影矩阵,用于从三维坐标投影到二维坐标
# 从相机获取属性
image_w = camera_bp.get_attribute("image_size_x").as_int()  # 图像宽度
image_h = camera_bp.get_attribute("image_size_y").as_int()  # 图像高度
fov = camera_bp.get_attribute("fov").as_float()  # 视场角

# 计算相机投影矩阵,用于从三维坐标投影到二维坐标
K = build_projection_matrix(image_w, image_h, fov)
6、定义顶点创建边的列表
为了在相机图像上绘制边界框,我们需要以适当的顺序连接顶点以创建边。为此,我们需要以下边缘对列表:
edges = [[0,1], [1,3], [3,2], [2,0], [0,4], [4,5], [5,1], [5,7], [7,6], [6,4], [6,2], [7,3]]
7、通过opencv显示相机的画面
# 获取第一张图像
world.tick()
image = image_queue.get()

# 将原始数据重新整形为 RGB 数组
img = np.reshape(np.copy(image.raw_data), (image.height, image.width, 4))

# 在 OpenCV 的显示窗口中显示图像
cv2.namedWindow('ImageWindowName', cv2.WINDOW_AUTOSIZE)
cv2.imshow('ImageWindowName', img)
cv2.waitKey(1)
1)通过以上代码,您可以完成以下操作:
- 调用 world.tick() 更新世界状态,确保获取到最新的图像数据。
- 使用 image_queue.get() 从图像队列中获取一张图像。
- 将图像的原始数据重新整形为 RGB 数组,并存储在 img 中。
- 使用 OpenCV 创建一个窗口,命名为 ‘ImageWindowName’,并将图像 img 显示在该窗口中。
- 调用 cv2.waitKey(1) 等待用户按下键盘上的任意键来关闭图像窗口。
8、通过opencv绘制boudingbox
while True:
    # 更新世界状态并获取图像
    world.tick()
    image = image_queue.get()

    img = np.reshape(np.copy(image.raw_data), (image.height, image.width, 4))

    # 获取相机投影矩阵
    world_2_camera = np.array(camera.get_transform().get_inverse_matrix())

    for npc in world.get_actors().filter('*vehicle*'):
        # 过滤掉自车
        if npc.id != vehicle.id:
            bb = npc.bounding_box
            dist = npc.get_transform().location.distance(vehicle.get_transform().location)

            # 筛选距离在50米以内的车辆
            if dist < 50:
                forward_vec = vehicle.get_transform().get_forward_vector()
                ray = npc.get_transform().location - vehicle.get_transform().location

                # 计算车辆前进方向与车辆之间的向量的点积,
                # 通过阈值判断是否在相机前方绘制边界框
                if forward_vec.dot(ray) > 1:
                    p1 = get_image_point(bb.location, K, world_2_camera)
                    verts = [v for v in bb.get_world_vertices(npc.get_transform())]

                    for edge in edges:
                        p1 = get_image_point(verts[edge[0]], K, world_2_camera)
                        p2 = get_image_point(verts[edge[1]], K, world_2_camera)
                        cv2.line(img, (int(p1[0]), int(p1[1])), (int(p2[0]), int(p2[1])), (255, 0, 0, 255), 1)

    cv2.imshow('ImageWindowName', img)
    if cv2.waitKey(1) == ord('q'):
        break

cv2.destroyAllWindows()
通过以上代码,实现了以下功能:
- 循环获取图像并进行处理。
- 将图像的原始数据重新整形为 RGB 数组,并存储在 img 中。
- 获取世界到相机的矩阵。
- 遍历世界中的车辆角色。
- 过滤掉自车,并筛选出距离在 50 米内的车辆。
- 计算车辆前向向量和车辆与其他车辆之间向量的点积,以判断是否在摄像头前方。
- 将车辆的顶点投影到图像平面,并绘制边界框的线段。
- 使用 OpenCV 显示处理后的图像。
- 按下键盘上的 ‘q’ 键时,结束循环。
二、运行Carla与Python
1、打开Carla客户端
- 运行carla客户端
./CarlaUE4.sh -prefernvidia

2、运行Python程序
import carla
import random
import queue
import numpy as np
import cv2

#构造相机投影矩阵函数
def build_projection_matrix(w, h, fov):
    focal = w / (2.0 * np.tan(fov * np.pi / 360.0))
    K = np.identity(3)
    K[0, 0] = K[1, 1] = focal
    K[0, 2] = w / 2.0
    K[1, 2] = h / 2.0
    return K

def get_image_point(loc, K, w2c):
    # 计算三维坐标的二维投影

    # 格式化输入坐标(loc 是一个 carla.Position 对象)
    point = np.array([loc.x, loc.y, loc.z, 1])

    # 转换到相机坐标系
    point_camera = np.dot(w2c, point)

    # 将坐标系从 UE4 的坐标系转换为标准坐标系(y, -z, x),同时移除第四个分量
    point_camera = [point_camera[1], -point_camera[2], point_camera[0]]

    # 使用相机矩阵进行三维到二维投影
    point_img = np.dot(K, point_camera)

    # 归一化
    point_img[0] /= point_img[2]
    point_img[1] /= point_img[2]

    return point_img[0:2]

#连接Carla并获取世界
client = carla.Client('localhost', 2000)
world  = client.get_world()
bp_lib = world.get_blueprint_library()

# 生成车辆
vehicle_bp =bp_lib.find('vehicle.lincoln.mkz_2020')
spawn_points = world.get_map().get_spawn_points()
vehicle = world.try_spawn_actor(vehicle_bp, random.choice(spawn_points))

# 生成相机
camera_bp = bp_lib.find('sensor.camera.rgb')
camera_init_trans = carla.Transform(carla.Location(z=2))
camera = world.spawn_actor(camera_bp, camera_init_trans, attach_to=vehicle)
vehicle.set_autopilot(True)

#生成目标车辆
for i in range(20):
    vehicle_bp = random.choice(bp_lib.filter('vehicle'))
    npc = world.try_spawn_actor(vehicle_bp, random.choice(spawn_points))
    if npc:
        npc.set_autopilot(True)

# 设置仿真模式为同步模式
settings = world.get_settings()
settings.synchronous_mode = True # 启用同步模式
settings.fixed_delta_seconds = 0.05
world.apply_settings(settings)

# 创建对接接收相机数据
image_queue = queue.Queue()
camera.listen(image_queue.put)

# 从相机获取属性
image_w = camera_bp.get_attribute("image_size_x").as_int()  # 图像宽度
image_h = camera_bp.get_attribute("image_size_y").as_int()  # 图像高度
fov = camera_bp.get_attribute("fov").as_float()  # 视场角

# 计算相机投影矩阵,用于从三维坐标投影到二维坐标
K = build_projection_matrix(image_w, image_h, fov)

edges = [[0,1], [1,3], [3,2], [2,0], [0,4], [4,5], [5,1], [5,7], [7,6], [6,4], [6,2], [7,3]]

# 获取第一张图像
world.tick()
image = image_queue.get()

# 将原始数据重新整形为 RGB 数组
img = np.reshape(np.copy(image.raw_data), (image.height, image.width, 4))

# 在 OpenCV 的显示窗口中显示图像
cv2.namedWindow('ImageWindowName', cv2.WINDOW_AUTOSIZE)
cv2.imshow('ImageWindowName', img)
cv2.waitKey(1)

while True:
    # 更新世界状态并获取图像
    world.tick()
    image = image_queue.get()

    img = np.reshape(np.copy(image.raw_data), (image.height, image.width, 4))

    # 获取相机投影矩阵
    world_2_camera = np.array(camera.get_transform().get_inverse_matrix())

    for npc in world.get_actors().filter('*vehicle*'):
        # 过滤掉自车
        if npc.id != vehicle.id:
            bb = npc.bounding_box
            dist = npc.get_transform().location.distance(vehicle.get_transform().location)

            # 筛选距离在50米以内的车辆
            if dist < 50:
                forward_vec = vehicle.get_transform().get_forward_vector()
                ray = npc.get_transform().location - vehicle.get_transform().location

                # 计算车辆前进方向与车辆之间的向量的点积,
                # 通过阈值判断是否在相机前方绘制边界框
                if forward_vec.dot(ray) > 1:
                    p1 = get_image_point(bb.location, K, world_2_camera)
                    verts = [v for v in bb.get_world_vertices(npc.get_transform())]

                    for edge in edges:
                        p1 = get_image_point(verts[edge[0]], K, world_2_camera)
                        p2 = get_image_point(verts[edge[1]], K, world_2_camera)
                        cv2.line(img, (int(p1[0]), int(p1[1])), (int(p2[0]), int(p2[1])), (255, 0, 0, 255), 1)

    cv2.imshow('ImageWindowName', img)
    if cv2.waitKey(1) == ord('q'):
        break

cv2.destroyAllWindows()
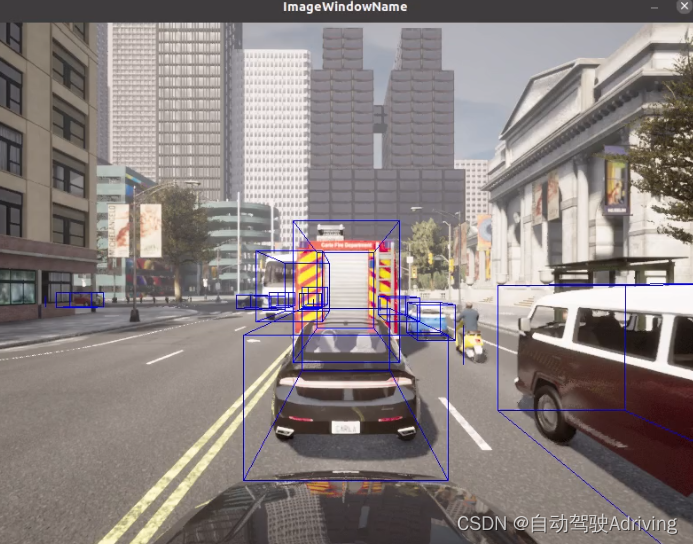
3、boudingbox效果展示


苏州本地的技术开发者社区,在这里可以交流本地的好吃好玩的,可以交流技术,可以交流招聘等等,没啥限制。
更多推荐

 12
12 0
0- 0


 已为社区贡献1条内容

所有评论(0)