

This blog post will deep dive into how Terraform handles output and how we can leverage and use output values efficiently across our Terraform projects. Output values allow us to share data between modules and workspaces while also providing us the flexibility to pass values to external systems for automation purposes.
You have come to the right place if you are new to Terraform! Spacelift has curated a ton of valuable material, tutorials, and blog posts around Terraform and how industry experts use it on its Spacelift blog.
Output vs Input Values
Input variables permit us to customize Terraform configurations without hardcoding any values. This way, we can reuse Terraform modules while assigning custom values based on our needs. Usually, we refer to them as just variables in the context of Terraform.
To define input variables, we must declare them using a variable block:
variable "aws_region" {
  description = "AWS region"
  type        = string
}

variable "ec2_instance_type" {
  description = "Instance type for EC2 instances"
  type        = string
  default     = "t2.small"
}
The variable’s name is the label we set following the variable keyword. For every variable, we have the option to set some arguments such as default, type, description, validation, sensitive, and nullable. Check the official documentation about these arguments and how to set them in detail here.
After declaring our input variables, we can utilize them in modules by referencing them like this var. where matches the label following the variable keyword. For example, to reference the variable ec2_instance_type that we defined above:
resource "aws_instance" "web_server" {
  ami           = data.aws_ami.amazon_linux.id
  instance_type = var.ec2_instance_type
}
On the other hand, output values empower us to export helpful information from our Terraform projects that we have defined and provisioned with Terraform. In the context of Terraform, we refer to output values as just outputs for simplicity.
Combining input and output variables, we get the flexibility to customize, automate, reuse and share our Terraform code easily. Input variables are similar to function arguments in traditional programming, while output variables work similarly to the return values of a function. Both are equally important to make our Terraform projects functional and facilitate data’s incoming and outgoing flow.
Terraform Outputs Use Cases
More specifically, output values are quite helpful in certain use cases:
- We can expose information from child modules to a parent module using outputs.
- Even more, from a root module, we can print outputs in the command line or pass these output values to external systems for automation purposes. When we use a remote state, we can access the root module outputs by other configurations using the terraform_remote_state data source. Output values from child modules aren’t accessible.
Declaring and Using Output Values
In order to define an output value, we have to use the output block:
output "instance_public_ip" {
  description = "Public IP of EC2 instance"
  value       = aws_instance.web_server.public_ip
}
In the above example, we define an output value with the name instance_public_ip. This way, we can pass the value to the parent module or display it to the end-user if it’s an output of the root module.
The value argument, which is the returned output value, takes an expression referencing other resources or module attributes. Terraform only renders and displays outputs when executing terraform apply and not when executing terraform plan.
To use outputs of nested modules from parent modules, we have to reference them as:
module.<module_name>.<output_value_name>
For example, to reference the output value instance_public_ip that we have declared above in a module named aws_web_server_instance from its parent module, we have to use:
module.aws_web_server_instance.instance_public_ip
Let’s examine how we can use all this in a real-world example. In this GitHub repository, we define the Terraform configuration for this example’s infrastructure. To follow along, you will need to install Terraform, have an AWS account ready, and authenticate with your AWS keys via the command line. Note that you might be charged a few dollars in your AWS account if you follow along.
In this example, we create the necessary infrastructure for a webserver. For the needs of this demo, we split our Terraform configuration into three modules, the root one and two child modules responsible for handling VPC-related resources and EC2 instance-related resources.
The project structure looks like this:
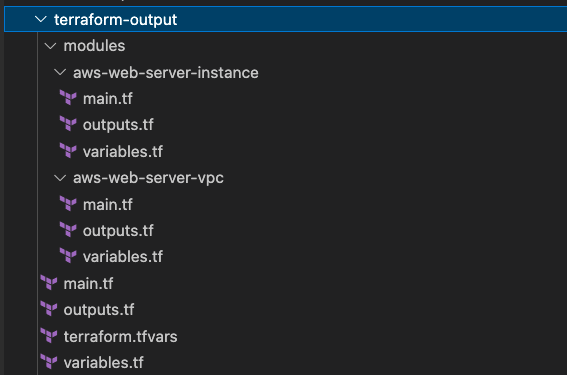
For each module, we define a main.tf file that handles the main functionality of the module.
Variable’s declarations and default values are populated in variables.tf files, while for the root module, we also use a terraform.tfvars file to set some variable values.
A good practice is to define our outputs in separate outputs.tf files, as you can see in the above example project structure. By declaring output values in an outputs.tf file per module, we improve the clarity of our modules as it’s easier for users to understand what outputs to expect from them quickly.
The root module utilizes and configures the aws provider and then just simply calls two child modules aws_web_server_vpc and aws_web_server_instance in main.tf of the top directory.
root module main.tf
terraform {
  required_providers {
    aws = {
      source  = "hashicorp/aws"
      version = "3.16.0"
    }
  }
}

provider "aws" {
  region = var.aws_region
}

module "aws_web_server_vpc" {
  source = "./modules/aws-web-server-vpc"
}

module "aws_web_server_instance" {
  source            = "./modules/aws-web-server-instance"
  ec2_instance_type = var.ec2_instance_type
  vpc_id            = module.aws_web_server_vpc.vpc_id
  subnet_id         = module.aws_web_server_vpc.subnet_id
}
We notice that when calling the module aws_web_server_instance, we are passing two expressions using output values from the aws_web_server_vpc module with the notation module.. we have seen earlier.
root module outputs.tf
output "vpc_id" {
  description = "ID of the vpc"
  value       = module.aws_web_server_vpc.vpc_id
}

output "instance_id" {
  description = "ID of EC2 instance"
  value       = module.aws_web_server_instance.instance_id
}

output "instance_public_ip" {
   description = "Public IP of EC2 instance"
   value       = module.aws_web_server_instance.instance_public_ip
}
We define three output values for our root module, and we expect to see them at the command line after our infrastructure is provisioned. Checking the value parameter of each block, we notice that all of them are coming from output values of the two child modules, and by declaring them as output values of the root module, we are able to pass them through to the command line.
root module variables.tf
variable "aws_region" {
  description = "AWS region"
  type        = string
}

variable "ec2_instance_type" {
  description = "Instance type for EC2 instances"
  type        = string
  default     = "t2.small"
}
root module terraform.tfvars
aws_region        = "us-east-1"
ec2_instance_type = "t2.nano"
Let’s examine next our two child modules and how we use output values to pass parameters between them.
aws-web-server-vpc module main.tf
resource "aws_vpc" "web_server" {
  cidr_block       = var.vpc_cidr_block
  instance_tenancy = "default"

  tags = {
    Name = var.vpc_name
  }
}

resource "aws_subnet" "web_server" {
  vpc_id                  = aws_vpc.web_server.id
  cidr_block              = var.subnet_cidr_block
  map_public_ip_on_launch = true
  availability_zone       = var.aws_az

  tags = {
    Name = var.subnet_name
  }
}

resource "aws_internet_gateway" "web_server" {
  vpc_id = aws_vpc.web_server.id

  tags = {
    Name = var.igw_name
  }
}

resource "aws_route_table" "web_server" {
  vpc_id = aws_vpc.web_server.id
  route {
    cidr_block = "0.0.0.0/0"
    gateway_id = aws_internet_gateway.web_server.id
  }

  tags = {
    Name = var.rt_name
  }
}

resource "aws_route_table_association" "web_server" {
  subnet_id      = aws_subnet.web_server.id
  route_table_id = aws_route_table.web_server.id
}
In the above module, we define some resources necessary for the networking layer of our infrastructure.
aws-web-server-vpc module variables.tf
variable "vpc_cidr_block" {
  description = "CIDR block for webserver VPC"
  type        = string
  default     = "10.0.0.0/16"
}

variable "vpc_name" {
  description = "Name of the vpc"
  type        = string
  default     = "web_server"
}

variable "subnet_cidr_block" {
  description = "CIDR block for the webserver subnet"
  type        = string
  default     = "10.0.0.0/24"
}

variable "subnet_name" {
  description = "Name for the webserver subnet"
  type        = string
  default     = "web_server"
}

variable "aws_az" {
  description = "Availability Zone for the webserver subnet"
  type        = string
  default     = "us-east-1a"
}

variable "igw_name" {
  description = "Name for the Internet Gateway of the webserver vpc"
  type        = string
  default     = "web_server"
}

variable "rt_name" {
  description = "Name for the route table of the webserver vpc"
  type        = string
  default     = "web_server"
}
aws-web-server-vpc module outputs.tf
output "vpc_id" {
  description = "ID of the VPC"
  value       = aws_vpc.web_server.id
}

output "subnet_id" {
  description = "ID of the VPC subnet"
  value       = aws_subnet.web_server.id
}
The two outputs we export here from this module are passed to the aws-web-server-instance module as parameters in order to create the EC2 instance inside the vpc and subnet that we have just created. We saw how this was handled in the main.tf file of the root module. The output value vpc_id is passed along as an output of the root module and should be printed in the command line after we apply the plan.
Finally, the Terraform configuration for the aws-web-server-instance module uses the passed info from the aws-web-server-vpc module. It creates and configures the web server instance accordingly.
aws-web-server-instance module main.tf
data "aws_ami" "amazon_linux" {
  most_recent = true
  owners      = ["amazon"]
  filter {
    name   = "name"
    values = ["amzn2-ami-hvm-*-x86_64-gp2"]
  }
}

resource "aws_security_group" "web_server" {
  name        = var.ec2_security_group_name
  description = var.ec2_security_group_description
  vpc_id      = var.vpc_id

  ingress {
    description      = "Allow traffic on port 80 from everywhere"
    from_port        = 80
    to_port          = 80
    protocol         = "tcp"
    cidr_blocks      = ["0.0.0.0/0"]
    ipv6_cidr_blocks = ["::/0"]
  }

  egress {
    from_port        = 0
    to_port          = 0
    protocol         = "-1"
    cidr_blocks      = ["0.0.0.0/0"]
    ipv6_cidr_blocks = ["::/0"]
  }

  tags = {
    Name = var.ec2_security_group_name
  }
}

resource "aws_instance" "web_server" {
  ami           = data.aws_ami.amazon_linux.id
  instance_type = var.ec2_instance_type

  subnet_id              = var.subnet_id
  vpc_security_group_ids = [aws_security_group.web_server.id]

  tags = {
    Name = var.ec2_instance_name
  }

  user_data = <<-EOF
   #!/bin/bash
   sudo yum update -y
   sudo yum install httpd -y
   sudo systemctl enable httpd
   sudo systemctl start httpd
   echo "<html><body><div>This is a test webserver!</div></body></html>" > /var/www/html/index.html
   EOF
}
aws-web-server-instance module variables.tf
variable "ec2_instance_name" {
  description = "Name for web server EC2 instance"
  type        = string
  default     = "web_server"
}

variable "ec2_instance_type" {
  description = "Instance type for web server EC2 instance"
  type        = string
  default     = "t2.micro"
}

variable "ec2_security_group_name" {
  description = "Security group name for web server EC2 instance"
  type        = string
  default     = "web_server"

}

variable "ec2_security_group_description" {
  description = "Security group description for web server EC2 instance"
  type        = string
  default     = "Allow traffic for webserver"
}

variable "vpc_id" {
  description = "VPC id for web server EC2 instance"
  type        = string
}

variable "subnet_id" {
  description = "Subnet id for web server EC2 instance"
  type        = string
}
The two output values that we pass through the root module are also defined in this module’s outputs.tf file.
output "instance_id" {
  description = "ID of EC2 instance"
  value       = aws_instance.web_server.id
}

output "instance_public_ip" {
  description = "Public IP of EC2 instance"
  value       = aws_instance.web_server.public_ip
}
Time to wrap up everything and execute the plan to provision our demo infrastructure.
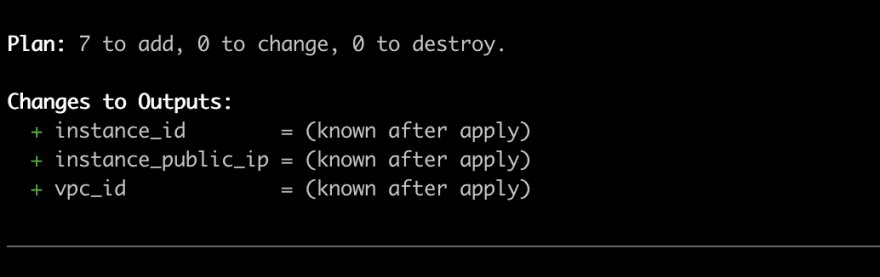
Our terraform plan shows 7 new resources to be added and displays the changes to our three output values declared in the root module. Let’s go ahead and apply the plan.

As expected, the three outputs declared in the root module are displayed at the command line, sweet!
We could use these values to automate other parts of our systems and process, but for now, we can get the value from instance_public_ip and head to http://, and we should see our demo web server up and running.
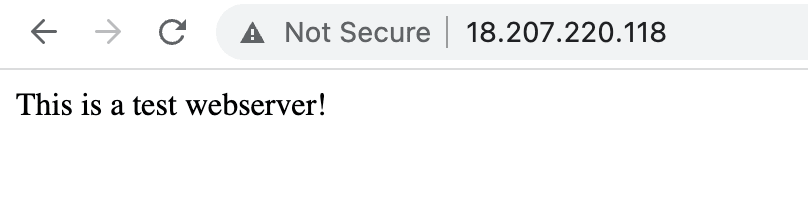
Great! Everything works as expected.
Terraform Output Command
Output values are stored in the state Terraform file. Since we have successfully applied our plan, we can now access these output values at will. We can leverage the terraform output command for this purpose.

Additionally, we can query individual output values by name like this
terraform output

To get the raw value without quotes, use the -raw flag.
_terraform output -raw _
To get the JSON-formatted output, we can use the -json flag.
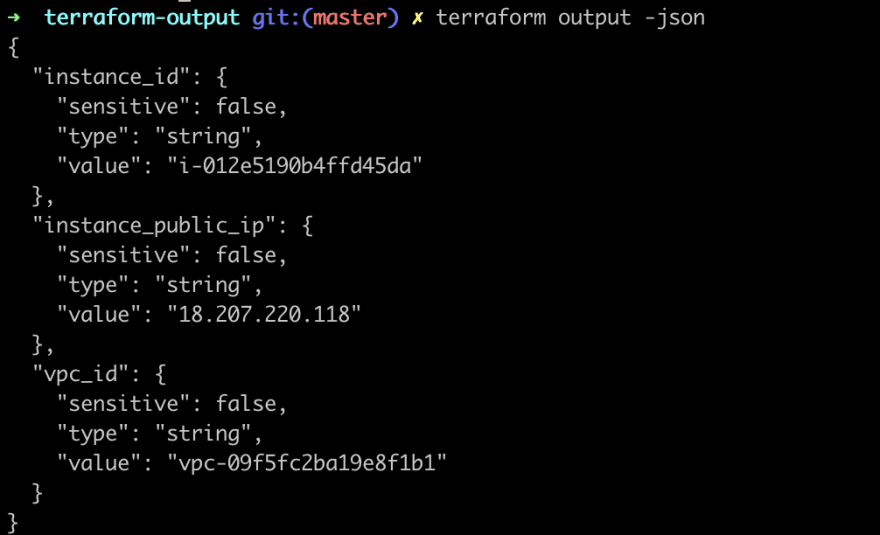
This is quite useful when we want to pass the outputs to other tools for automation since JSON is way easier to handle programmatically. Note that Terraform does not protect sensitive output values when using the -json flag.
When we are done, let’s go ahead and delete all these resources to avoid paying for them.
From the top of our repository, execute:
terraform destroy
Output Values Options & Arguments
When defining output values, we have a couple of options that might help us better define and organize them.
The argument description is optional, but it is always considered good practice to include it in our output declarations to document their purpose. This argument should briefly explain each output’s intent and should be used as a helper description for the users of the module. We have already seen examples like this since we defined the description argument in all our output block declarations in our previous demo.
In cases where we want to handle sensitive values and suppress them in command line output, we can declare an output value as sensitive. Terraform will redact the values of sensitive outputs when planning, applying, destroying, or querying outputs to avoid printing them to the console. In practice, this is a good use case when we would like to pass values to other Terraform modules or automation tools without exposing them to the intermediate users.
output "example_password" {
  description = "An example DB password"
  value       = aws_db_instance.database.password
  sensitive   = true
}
Note that Terraform won’t redact sensitive output values when you query a specific output by name. After we apply a plan with an output declared as sensitive, the console displays a message with the value redacted.

These values are still recorded in the state files, so anyone who can access them can also access any sensitive values of our Terraform configuration.
The depends_on argument on output declarations is used to define dependencies explicitly when this is necessary. Most of the time, Terraform handles this automatically, but there are some rare uses cases where you might find this option handy when it’s not the case. Consider including a comment when you use this option to explain why this is necessary.
Terraform Remote State Data Source
Occasionally, we might need to share data between different Terraform configurations with separate states. This is where the terraform_remote_state data sources come into play. We can retrieve the root module outputs from another Terraform configuration using this data source. This built-in data source is available without any extra configuration needed.
Following up on our previous example, let’s say that we would like to create a new subnet in the vpc of our aws-web-server-vpc module. This time, the new subnet needs to be defined in a completely separate Terraform configuration that has its own state. We can leverage the terraform_remote_state to get the value of the vpc_id defined as an output of our previous example’s root module. In this case, we use the local backend to reach the state of another configuration in the local machine. The backend could be any remote backend that points to a Terraform state in a real-world scenario.
terraform {
  required_providers {
    aws = {
      source  = "hashicorp/aws"
      version = "3.16.0"
    }
  }
}

provider "aws" {
  region = "us-east-1"
}

data "terraform_remote_state" "terraform_output" {
  backend = "local"

  config = {
    path = "../terraform-output/terraform.tfstate"
  }
}

resource "aws_subnet" "test_terraform_remote_state_subnet" {
  vpc_id            = data.terraform_remote_state.terraform_output.outputs.vpc_id
  cidr_block        = "10.0.1.0/24"
  availability_zone = "us-east-1b"

  tags = {
   Name = "test_terraform_remote_state_subnet"
  }
}
Note that only the output values of the root module are accessible from the remote state. If we want to pass values from nested modules, we have to configure a passthrough output value declaration as we defined earlier in the root module of our previous example.
Although this option is handy for some use cases, it also has some caveats. To use this data source, the user must have access to the entire state snapshot, which could potentially expose sensitive data. Check out the official docs to find alternative ways to share data between configurations.
Key Points
We have seen how Terraform handles and exports output values between modules and the different options for outputs configuration. Even more, we compared input and output variables and examined multiple use cases where the use of outputs is helpful. Finally, we went through a complete example of using output values in our Terraform configuration between different modules and printing them to the console.
Thank you for reading, and I hope you enjoyed this “Terraform Outputs” blog post as much as I did.


 已为社区贡献22908条内容

所有评论(0)