

Flask is a Python based micro-framework, which can be used to create dynamic websites, APIs, and many other applications.
Despite all Linux cloud options you might have a customer with a Windows environment, that would rather use their existing system than setting a Linux one. No problem, right? But how do we deploy a Flask app to production Windows?
As I faced many issues when I had this challenge, I thought listing the steps and some of the problems would be a good topic for my first post on Dev.to.
The official deployment documentation states "Flask’s built-in server is not suitable for production as it doesn’t scale well", so you need a WSGI server to deploy your Flask application to production.
I will start using Apache + mod_wsgi, and later add more posts to the series covering other options.
Flask deployment on Windows using Apache and mod_wsgi
1. Install Apache
Go with the recommended distribution from Apache Lounge. I downloaded version 2.4.43 Win64 as a zip file. There was a warning saying "Be sure you installed latest 14.xx Visual C++ Redistributable for Visual Studio 2015-2019", and they provide direct download links for it. Make sure to download the appropriate vc_redist x64 or x86, matching the Apache version you got, in my case x64.
Install the vc_redist and then unzip Apache to the default location C:\Apache24. If you select a different location take note as we'll need it later.
To test Apache, open a command prompt, cd C:\Apache24\bin. Then issue this command to start Apache:httpd.exe
After you press Enter, it will tell you if there are any errors. Open a browser and go to http://localhost. You should see a page saying "It works!". You can shut down Apache by pressing Ctrl+C (it may take a few seconds).
The ReadMe.txt file on Apache's zip file has more information and examples, including how to run it as a Windows service.
2. Install mod_wsgi
You need the mod_wsgi Python package as the middle man to show Apache how to handle Python applications.
Assuming you already have Python installed, mod_wsgi can be installed using pip install mod_wsgi on the command prompt. However, some of its dependencies might make it tricky.
2.1 Apache location
If you didn't install Apache on the default location, you might get this error after the pip install mod_wsgi:
RuntimeError: No Apache installation can be found. Set the MOD_WSGI_APACHE_ROOTDIR environment to its location.
If that's the case, use the set command. For example:
set "MOD_WSGI_APACHE_ROOTDIR=F:/Apache24"
Ensure you specify the path with a forward slash, like the example. This is only needed when doing the install.
2.2 Microsoft Visual C++ Build Tools
After that, if you try the pip install mod_wsgi again, you might receive a long error, but the most important part is this one:
    building 'mod_wsgi.server.mod_wsgi' extension
    error: Microsoft Visual C++ 14.0 is required. Get it with "Microsoft Visual
C++ Build Tools": https://visualstudio.microsoft.com/downloads/
mod_wsgi will be compiled on your Windows host, so it has a dependency on Microsoft Visual C++ Build Tools. Note the Build Tools are different than the Redistributable that you installed on step 1.
Go to the Visual Studio download page, expand Tools for Visual Studio, and click the download link for the Build Tools (currently 2019). Execute the installer, select C++ build tools, on the right side you can un-check some optional features, but you need at least MSVC v142 and Windows 10 SDK.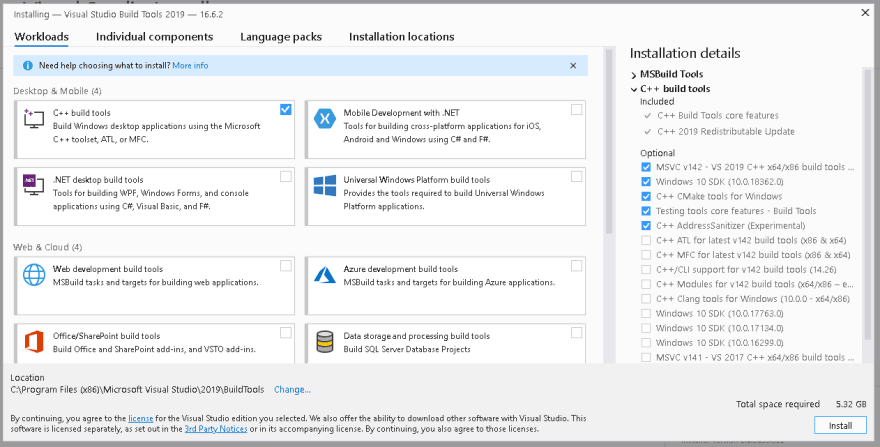
After the install is complete you will have to reboot Windows.
Finally, try the pip install mod_wsgi again and it should work.
If you still face errors, on the Start menu look for "Developer Command Prompt for VS 2019", and use it to issue the pip install mod_wsgi. It will have the correct PATH with the VC++ Build Tools and should avoid setup issues.
3. Flask app setup
Assuming you already know Flask, and installed it on your Windows using pip install flask, there a few considerations for structuring your app:
- The general recommendation is to set your app to act like a Python package, so create a folder containing at least a
__init__.pywith the main code. - Another option, is to use an empty
__init__.pyand the main code on another .py file on the same folder. - As a Python package, avoid using '-' on your folder name, otherwise you might face syntax errors when importing your app later. This StackOverflow question gives more details about it.
3.1 Sample app and structure
Here is the __init__.py sample I used for this article:
from flask import Flask
app = Flask(__name__)

@app.route('/')
def hello_world():
    return 'Hello Flask under Apache!'

if __name__ == "__main__":
    app.run()
Here is the project structure for this sample:
C:\git\
+-- yourapp
|   +-- __init__.py
+-- wsgi_scripts
|   +-- yourapp.wsgi
In this case my app 'package' is called yourapp.
3.2 Create your .wsgi file
To run your application you need a wsgi file. In my sample I have yourapp.wsgi. Note that I stored this file on a separate folder. Storing the wsgi file on the same folder as you Flask app works as well, but is not recommended.
A minimal wsgi file (which is Python code):
import sys
sys.path.insert(0, 'C:\\git')
from yourapp import app as application
- The
sys.path.insertshould point to the location that contains the folder with your app. - Use double backslashes on your
sys.path.insert.
4. Configure Apache httpd.conf
On the command prompt, issue: mod_wsgi-express module-config , the output should be similar to:
LoadFile "c:/program files/python37/python37.dll"
LoadModule wsgi_module "C:/Users/prod_deploy/AppData/Roaming/Python/Python37/site-packages/mod_wsgi/server/mod_wsgi.cp37-win_amd64.pyd"
WSGIPythonHome "c:/program files/python37"
Copy the output and paste it on your C:\Apache24\conf\httpd.conf. I suggest putting it after the existing LoadModule directives.
At the end of the same httpd.conf file, add:
# Include Flask file
Include conf/yourapp.conf
Replace yourapp with the name of the configuration file you want to use. With this, we will have the Flask VirtualHost configuration on a separate file, avoiding mistakes.
5. Create the yourapp.conf
On your Apache install folder, navigate to the conf subfolder, e.g. C:\Apache24\conf, and create the yourapp.conf file.
A minimal sample file:
<VirtualHost *:80>
    ServerName flaskwill.com
    WSGIScriptAlias / C:/git/wsgi_scripts/yourapp.wsgi
    <Directory C:/git/yourapp>
        Require all granted
    </Directory>
</VirtualHost>
- On VirtualHost, change 80 to a different port if needed.
- ServerName should list the server's IP address or a DNS name
- WSGIScriptAlias has two arguments, the first is the website path which will be associated with the wsgi file, in this example / or the root. The second argument is the absolute path to the wsgi file. In this example, when I access flaskwill.com/ it will execute my yourapp.wsgi.
- Directory should point to the folder with your Flask app files. Note the 'Require all granted' to give Apache (version 2.4 or later) access to the files and sub-folders. Older versions of Apache use a different syntax.
6. Start Apache and test your app
After covering all steps, start Apache (or restart it if already running), so it will read the conf files and load your app.
Open a browser and enter http://localhost and your Flask app should show up. If you set a DNS address like the flaskwill I used, you will have to update the real DNS to point to your server, or you could update your Windows hosts file to test it locally.
Closing
I hope this is useful for someone, but remember this is just one way of doing it, as I am sure there are other methods of deploying Flask.
I appreciate any feedback so I can improve this post and learn for the next ones.
Thank you for reading!
References:
https://flask.palletsprojects.com/en/1.1.x/deploying/mod_wsgi/
https://github.com/GrahamDumpleton/mod_wsgi
https://modwsgi.readthedocs.io/en/develop/index.html
http://httpd.apache.org/docs/2.4/


 已为社区贡献22908条内容

所有评论(0)