Datax同步MySQL到ES
Datax同步MySQL到ES
Datax同步MySQL到ES
1、在MySQL中建表
-
建表语句
-
CREATE TABLE `user` (
  `id` int(11) NOT NULL,
  `name` varchar(255) DEFAULT NULL,
  `age` varchar(255) DEFAULT NULL,
  `create_date` datetime DEFAULT NULL,
  PRIMARY KEY (`id`)
) ENGINE=InnoDB DEFAULT CHARSET=utf8;
-
-
插入数据
-
INSERT INTO `user`(`id`, `name`, `age`,`create_date`) VALUES (1, '小明1', '22','2023-06-02 11:26:04');
INSERT INTO `user`(`id`, `name`, `age`,`create_date`) VALUES (2, '小明2', '22','2023-06-02 11:26:04');
INSERT INTO `user`(`id`, `name`, `age`,`create_date`) VALUES (3, '小明3', '22','2023-06-02 11:26:04');
INSERT INTO `user`(`id`, `name`, `age`,`create_date`) VALUES (4, '小明4', '22','2023-06-02 11:26:04');
INSERT INTO `user`(`id`, `name`, `age`,`create_date`) VALUES (5, '小明5', '23','2023-06-02 11:26:04');
INSERT INTO `user`(`id`, `name`, `age`,`create_date`) VALUES (6, '小明6', '23','2023-06-02 11:26:05');
INSERT INTO `user`(`id`, `name`, `age`,`create_date`) VALUES (7, '小明7', '23','2023-06-02 11:26:05');
INSERT INTO `user`(`id`, `name`, `age`,`create_date`) VALUES (8, '小明8', '23','2023-06-02 11:26:05');
INSERT INTO `user`(`id`, `name`, `age`,`create_date`) VALUES (9, '小明9', '23','2023-06-02 11:26:05');
-
2、在ES建立索引
-
建立索引语句
-
我这里使用Kibana工具连接ES进行操作的,也可以使用Postman进行操作
-
Kibana操作语句
# 创建索引 PUT /user { "mappings" : { "properties" : { "id" : { "type" : "keyword" }, "name" : { "type" : "text" }, "age" : { "type" : "keyword" }, "create_date" : { "type" : "date", "format": "yyyy-MM-dd HH:mm:ss" } } } } -
Postman操作语句
- 地址输入
http://localhost:9200/user
-

Json文本输入
    {
        "mappings" : {
          "properties" : {
            "id" : {
              "type" : "keyword"
            },
            "name" : {
              "type" : "text"
            },
            "age" : {
              "type" : "keyword"
            },
            "create_date" : {
              "type" : "date",
              "format": "yyyy-MM-dd HH:mm:ss"
            }
    	}
      }
    }
- 当出现以下信息代表创建索引成功
{
    "acknowledged": true,
    "shards_acknowledged": true,
    "index": "user"
}
3、构建从MySQL到ES的Datax的Json任务
[root@hadoop101 ~]# vim mysql2es.json
# 添加以下内容
{
  "job": {
    "setting": {
      "speed": {
        "channel": 8
      }
    },
    "content": [
      {
        "reader": {
          "name": "mysqlreader",
          "parameter": {
            "column": [
              "id",
              "id",
              "name",
              "age",
              "date_format(create_date,'%Y-%m-%d %H:%I:%s')"
            ],
            "connection": [
              {
                "jdbcUrl": [
                  "jdbc:mysql://192.168.xx.xxx:3306/bigdata"
                ],
                "table": [
                  "user"
                ]
              }
            ],
            "password": "xxxxxx",
            "username": "root",
            "where": "",
            "splitPk": "id"
          }
        },
        "writer": {
          "name": "elasticsearchwriter",
          "parameter": {
            "endpoint": "http://192.168.xx.xxx:9200",
            "accessId": "root",
            "accessKey": "root",
            "index": "user",
            "type": "_doc",
            "settings": {"index" :{"number_of_shards": 5, "number_of_replicas": 1}},
            "batchSize": 5000,
            "splitter": ",",
            "column": [
              {
                "name": "pk",
                "type": "id"
              },
              {
                "name": "id",
                "type": "keyword"
              },
              {
                "name": "name",
                "type": "text"
              },
              {
                "name": "age",
                "type": "keyword"
              },
              {
                "name": "create_date",
                "type": "date",
                "format": "yyyy-MM-dd HH:mm:ss"
              }
            ]
          }
        }
      }
    ]
  }
}
-
参数介绍
- reader:datax的source(来源)端
- reader.cloumn::读取mysql的字段名
- reader.connection.jdbcUrl:MySQL连接的url
- reader.connection.table:读取MySQL的表名
- reader.password:连接MySQL的用户名
- reader.username:连接MySQL的密码
- reader.where:读取MySQL的过滤条件
- reader.splitPk:读取MySQL时按照哪个字段进行切分
- writer:datax的sink(去处)端
- writer.endpoint:ElasticSearch的连接地址
- writer.accessId:http auth中的user
- writer.accessKey:http auth中的password
注意:假如Elasticsearch没有设置用户名,也需要给accessId和accessKey值,不然就报错了,可以给赋值root,root
-
writer.index:Elasticsearch中的index名
-
writer.type:Elasticsearch中index的type名
-
writer.settings:创建index时候的settings, 与Elasticsearch官方相同
-
writer.batchSize:每次批量数据的条数
-
writer.splitter:如果插入数据是array,就使用指定分隔符
-
writer.column:Elasticsearch所支持的字段类型
- 下面是column样例字段类型
"column": [ # 使用数据库id作为es中记录的_id,业务主键(pk):_id 的值指定为某一个字段。 {"name": "pk", "type": "id"}, { "name": "col_ip","type": "ip" }, { "name": "col_double","type": "double" }, { "name": "col_long","type": "long" }, { "name": "col_integer","type": "integer" }, { "name": "col_keyword", "type": "keyword" }, { "name": "col_text", "type": "text", "analyzer": "ik_max_word"}, { "name": "col_geo_point", "type": "geo_point" }, # ES日期字段创建需指定格式 yyyy-MM-dd HH:mm:ss||yyyy-MM-dd||epoch_millis { "name": "col_date", "type": "date", "format": "yyyy-MM-dd HH:mm:ss"}, { "name": "col_nested1", "type": "nested" }, { "name": "col_nested2", "type": "nested" }, { "name": "col_object1", "type": "object" }, { "name": "col_object2", "type": "object" }, { "name": "col_integer_array", "type":"integer", "array":true}, { "name": "col_geo_shape", "type":"geo_shape", "tree": "quadtree", "precision": "10m"} ] -
如果时间类型需要精细到yyyy-MM-dd HH:mm:ss.SSSSSS,比如时间为:2023-06-02 13:39:57.000000
- MySQL的cloumn端填写
"date_format(create_date,'%Y-%m-%d %H:%I:%s.%f')"- Elasticsearch的cloumn填写
{ "name": "create_date", "type": "text"}- Elasticsearch创建索引时修改如下
{ "name": "create_date","type": "text"}
4、运行mysql2es.json脚本
-
问题1: ConfigParser - 插件[mysqlreader,elasticsearchwriter]加载失败

-
解决问题:
下面是编译好的elasticsearchwriter插件,放在DATAX_HOME/plugin/writer目录下面,就可以运行成功了,也可以自己从官网下载,然后自己编译好也可以用的
- elasticsearchwriter百度网盘资源下载链接:
链接:https://pan.baidu.com/s/1C_OeXWf_t5iVNiLquvEhjw 提取码:tutu -
问题2:在运行从MySQL抽取500万条数据到Elasticsearch时,出现了datax传输200多万条数据卡住的情况,报错日志:I/O Exception … Broken pipe (write failed)

-
解决问题:
datax传输mysql到es卡在200多万这个问题和channel: 8和es的oom有一定的关系
-
测试样例
-
1、es batchsize为5000,不开启mysql切分"splitPk": “id”,卡住
-
2、es batchsize为1000,不开启mysql切分"splitPk": “id”,不卡住
-
3、es batchsize为5000,开启mysql切分"splitPk": “id”,不卡住
-
-
总结:这个问题和mysql读取速率,es 写入速率有关,开启切分提高一下读取速率就不会卡住了
-
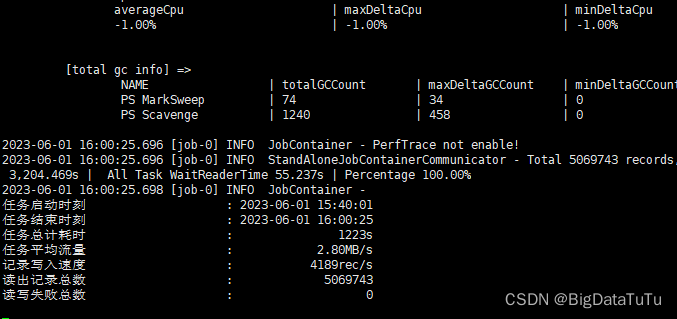
成功运行截图:

以下是工作中做过的ETL,如有需要,可以私信沟通交流,互相学习,一起进步

更多推荐
 已为社区贡献1条内容


所有评论(0)