
【Java】【JDBC】【Mybatis】技术详解
一、JDBC
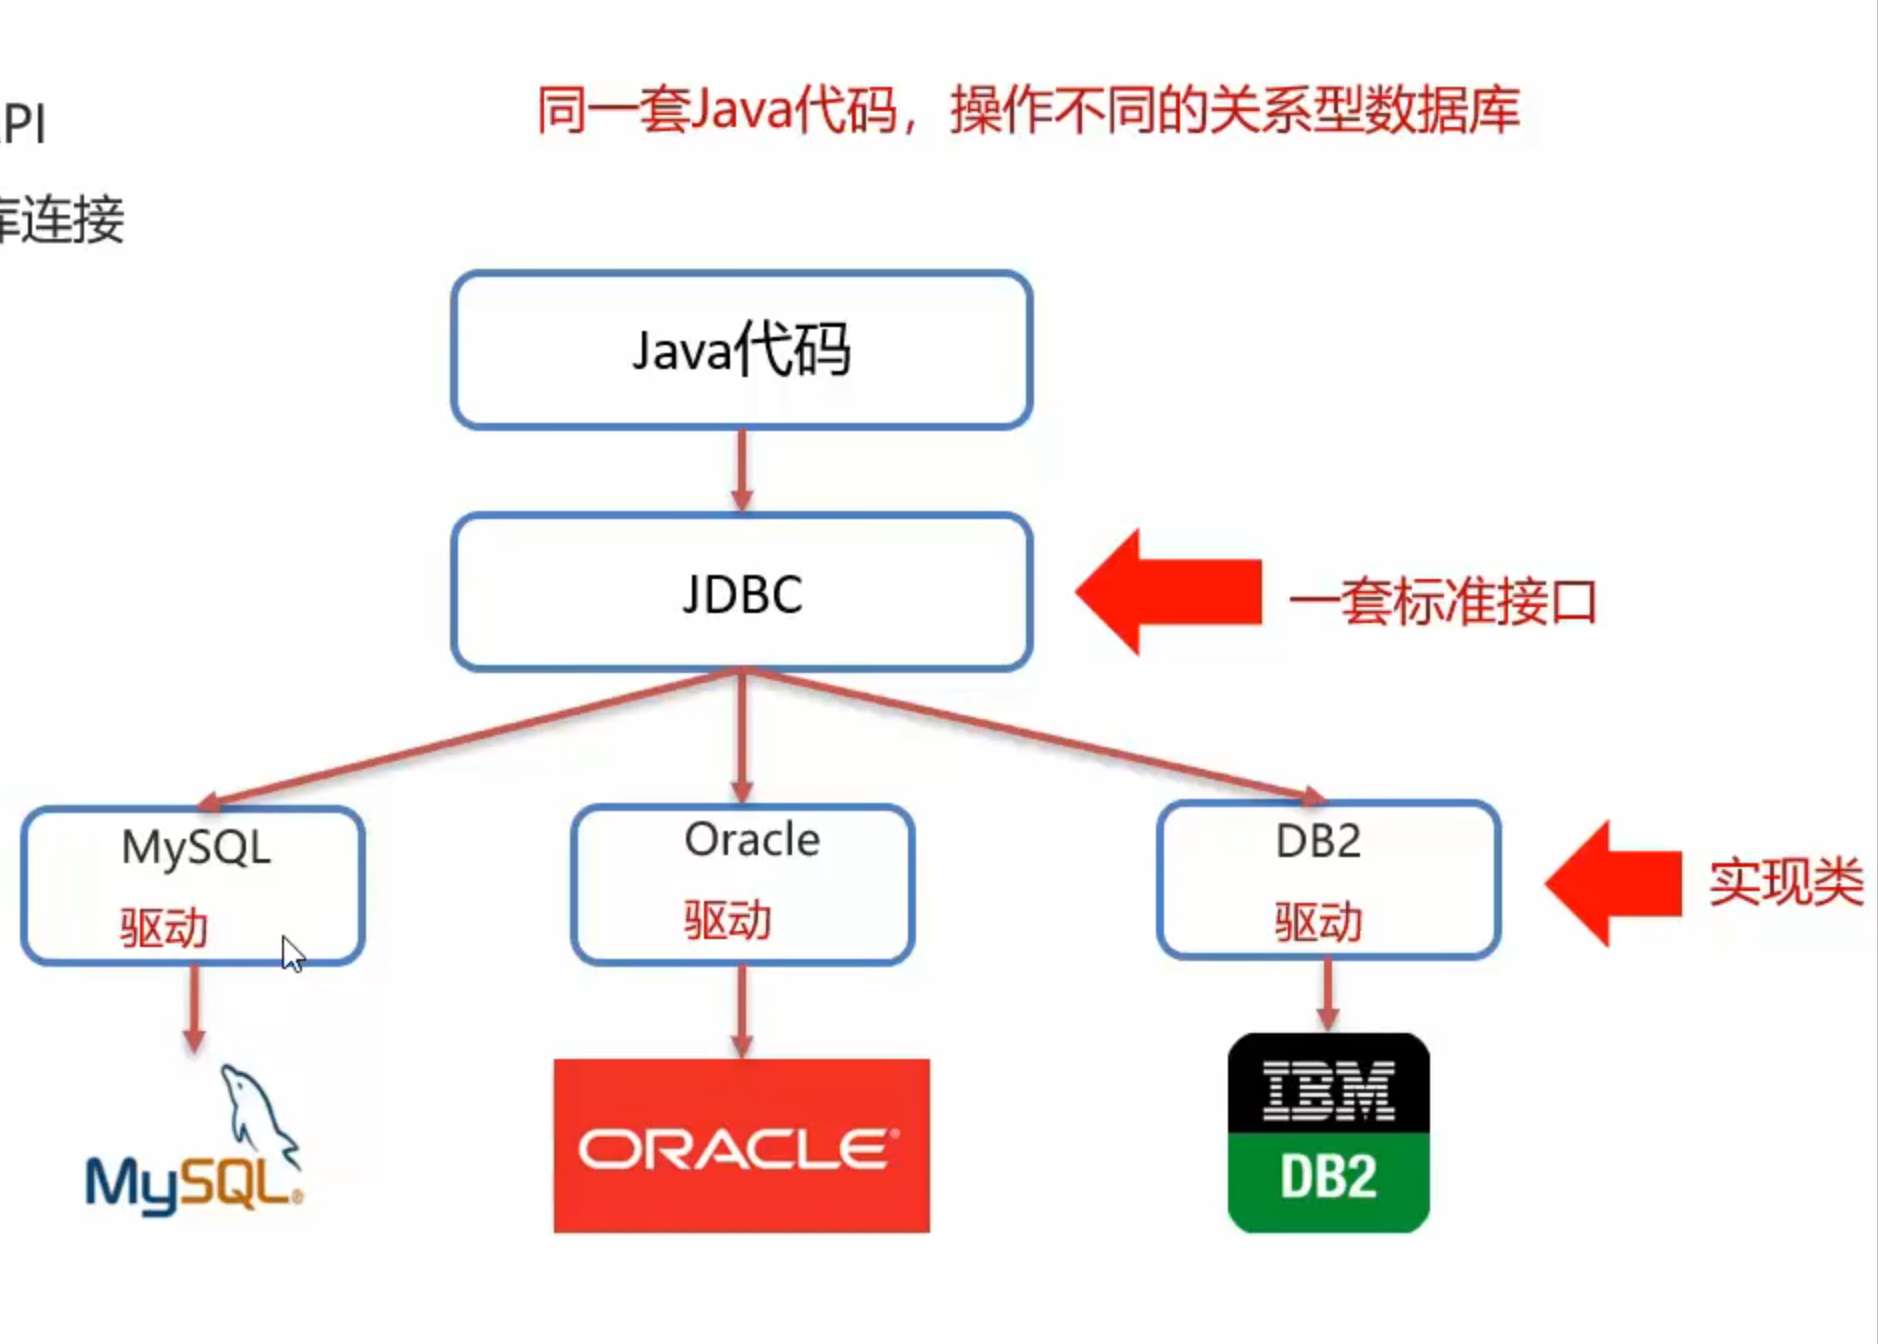
- Java DataBase Connectivity : JDBC 是使用Java语言对关系型数据库操作的一套API
- 本质:
- 官方定义的一套操作所有关系型数据库的规则,即接口
- 各个数据库厂商去实现这套接口,提高数据库驱动jar包
- 我们使用这套接口(JDBC)编程,真正执行的代码是驱动jar包中的实现类(面向接口编程)
JDBC好处:
- 各个数据库厂商使用相同的接口,Java代码不需要针对不同数据库分别开发
- 可以随时替换底层数据库,访问数据库的Java代码基本不变
1.快速入门
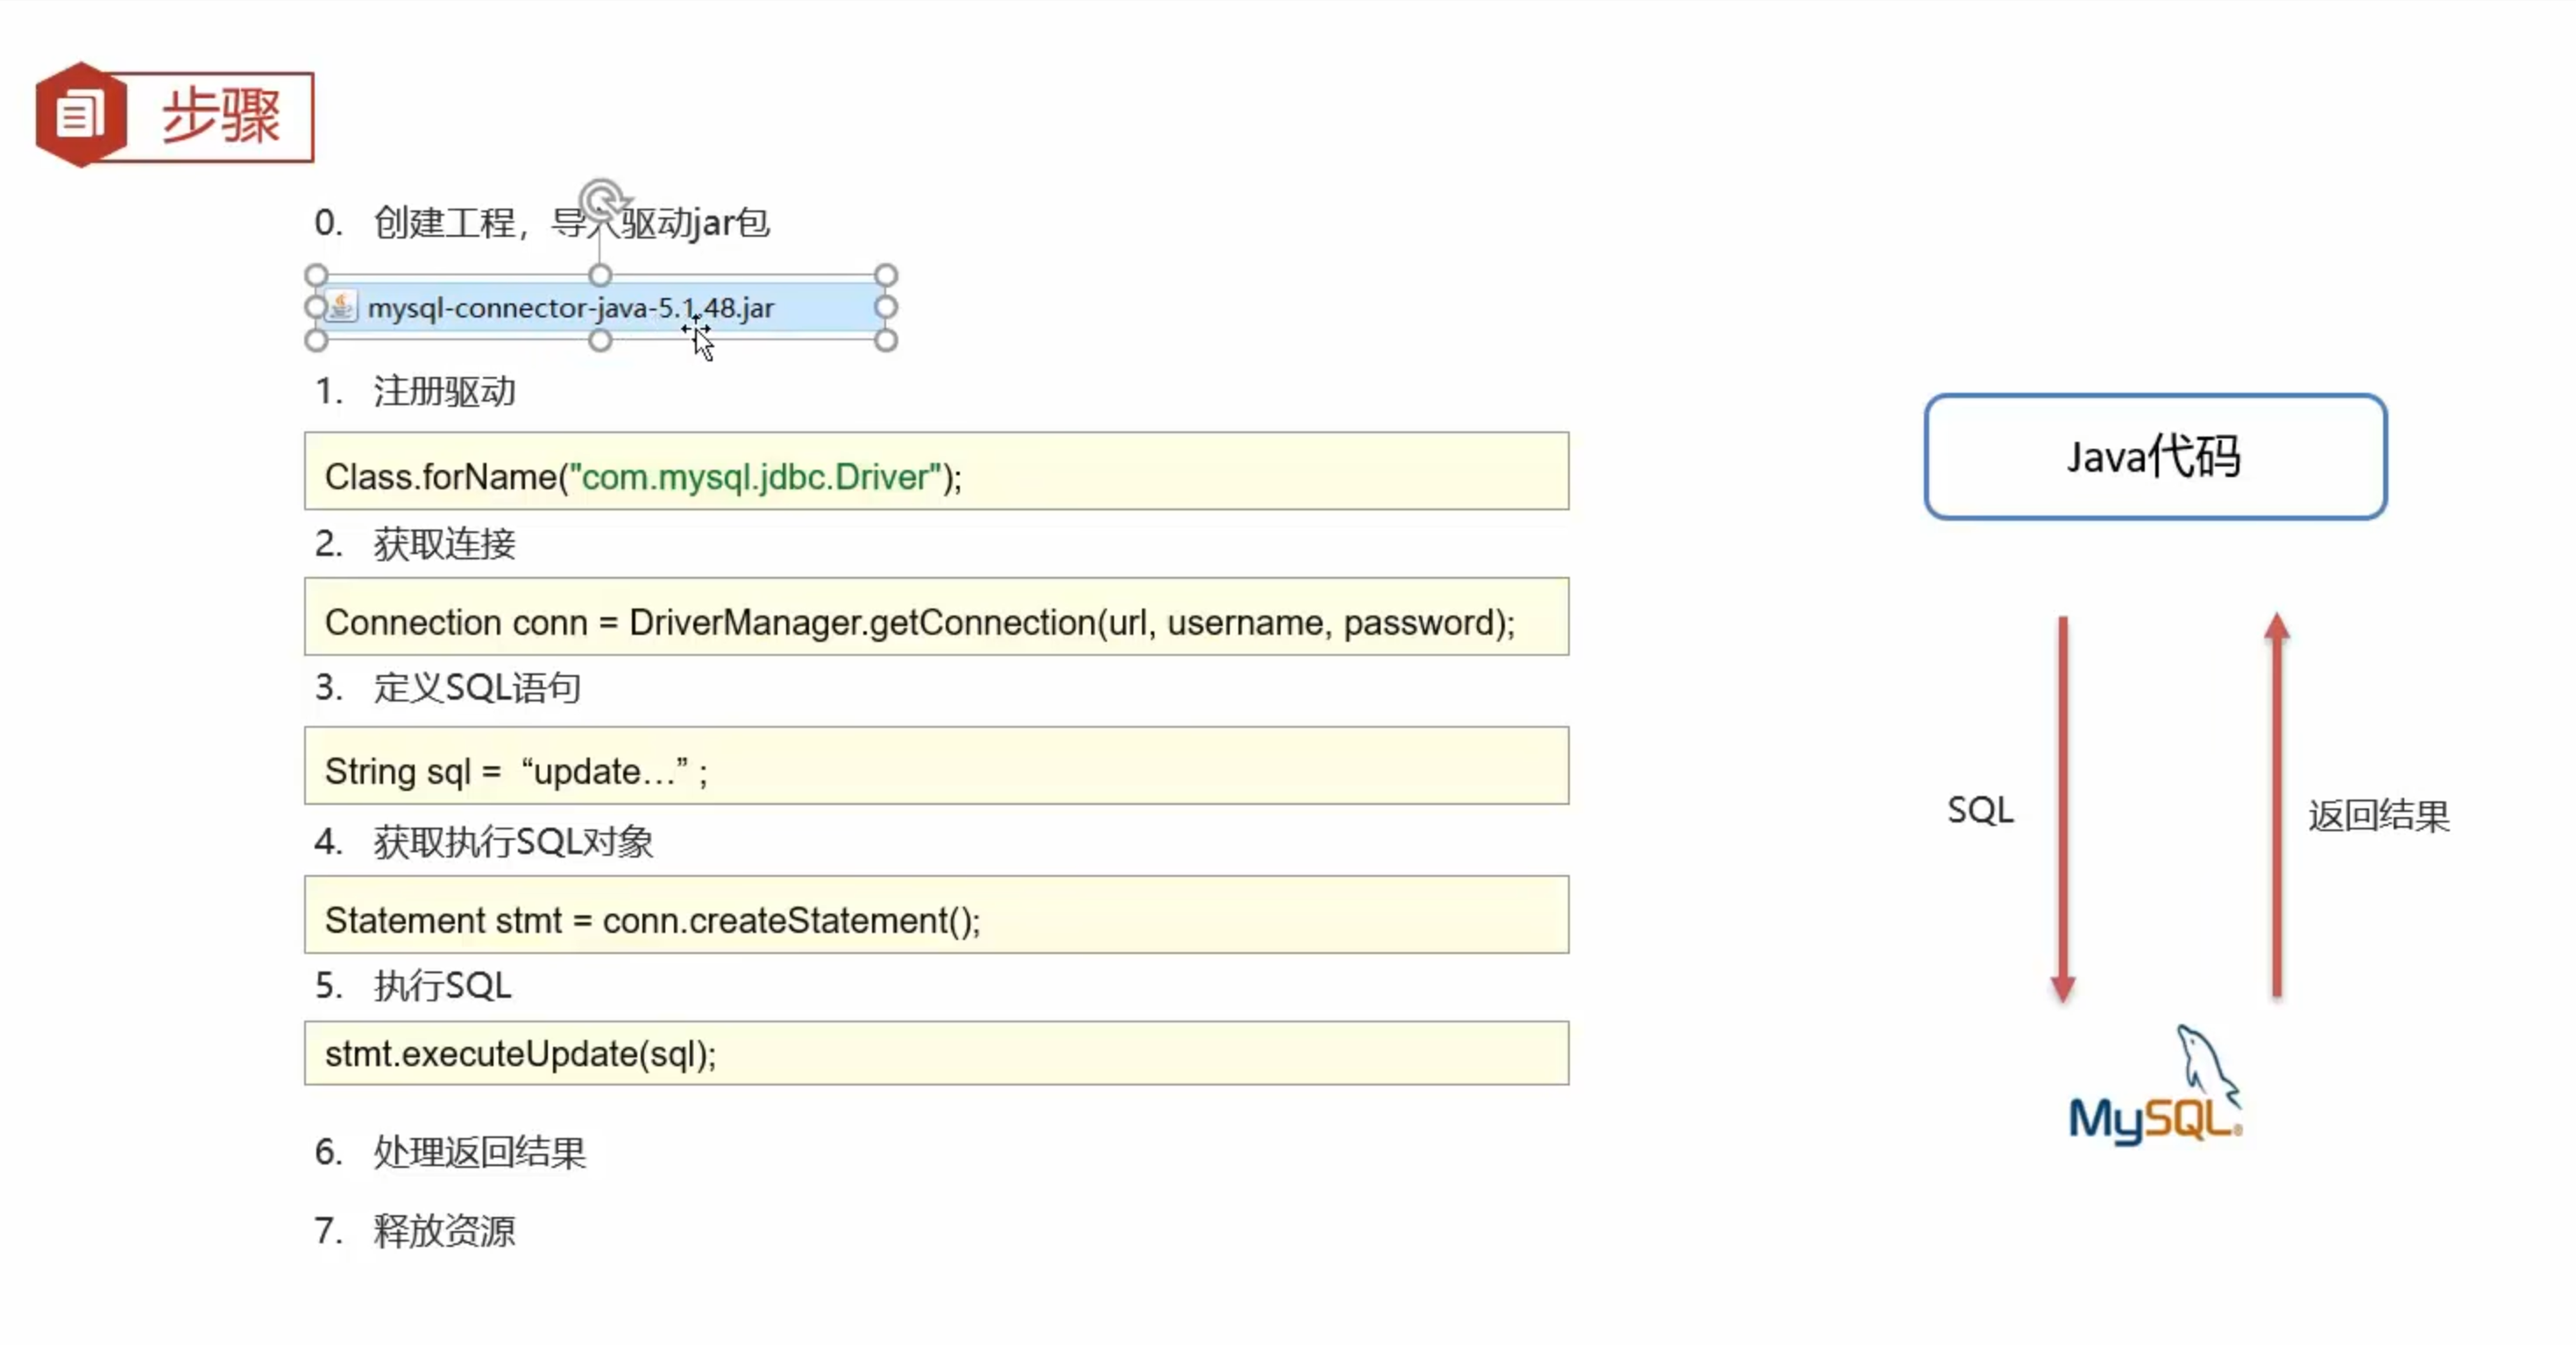
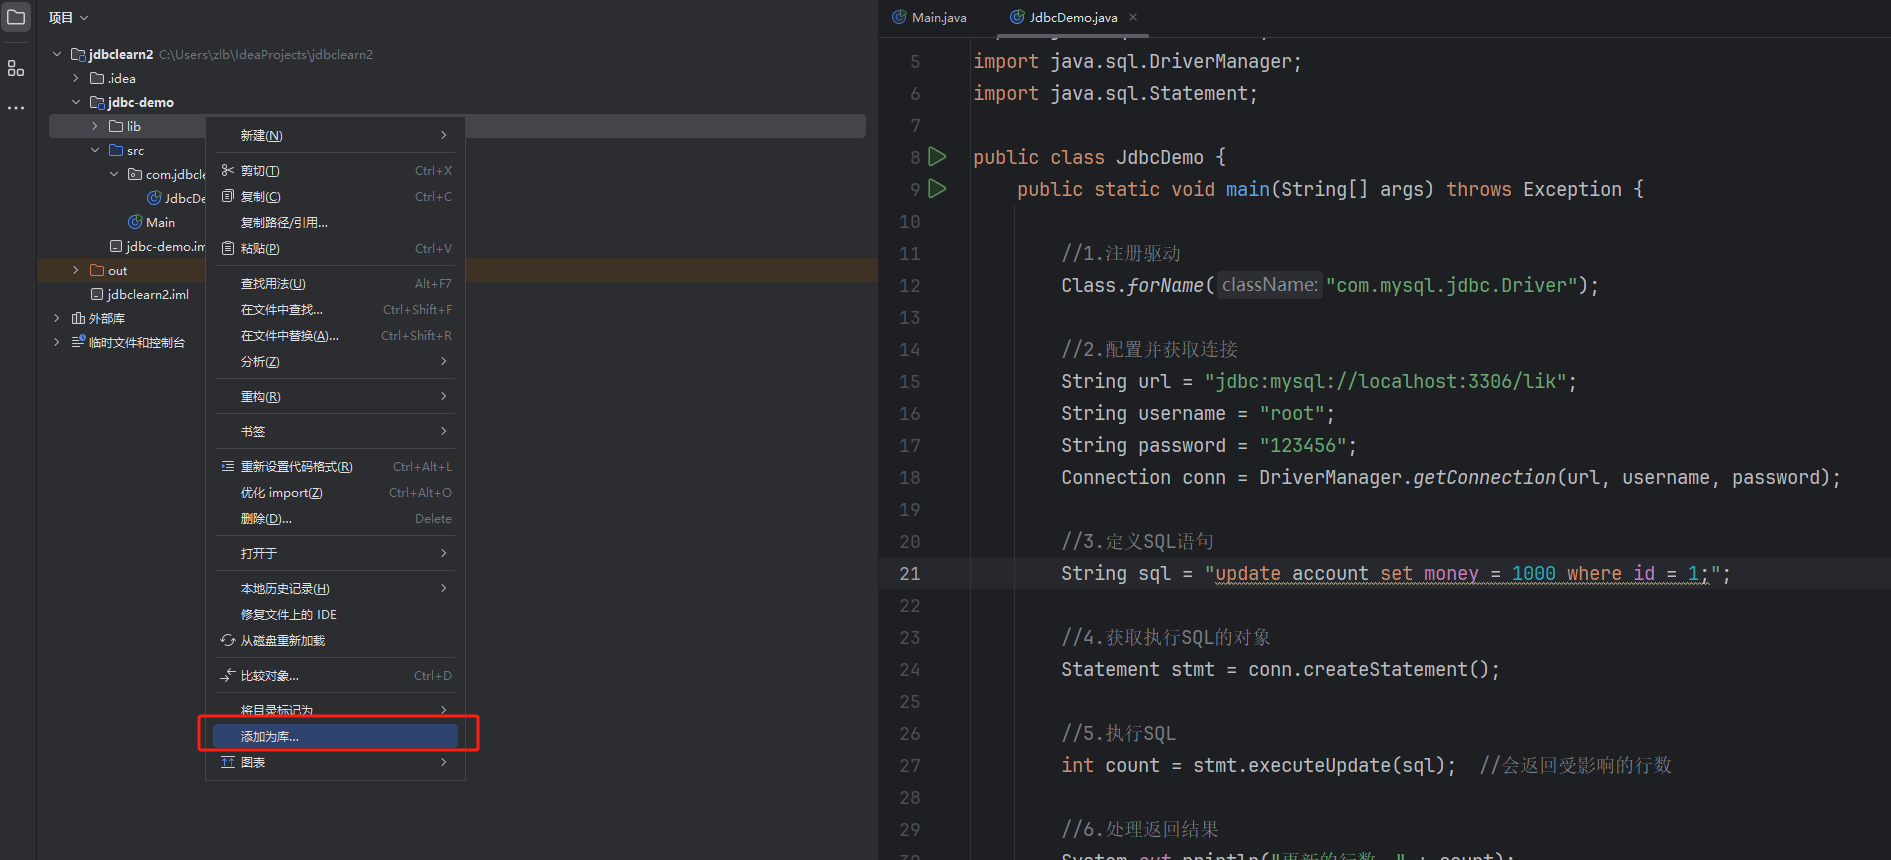
- 1.创建lib文件夹,将mysql的驱动jar包导入(复制粘贴)
- 2.右键lib文件夹,选择将该文件夹添加为库
- 3.编写代码:
package com.jdbclearn.jdbc;

import java.sql.Connection;
import java.sql.DriverManager;
import java.sql.Statement;

public class JdbcDemo {
    public static void main(String[] args) throws Exception {

        //1.注册驱动
        Class.forName("com.mysql.jdbc.Driver");

        //2.配置并获取连接
        String url = "jdbc:mysql://localhost:3306/lik";
        String username = "root";
        String password = "123456";
        Connection conn = DriverManager.getConnection(url, username, password);

        //3.定义SQL语句
        String sql = "update account set money = 1000 where id = 1;";

        //4.获取执行SQL的对象
        Statement stmt = conn.createStatement();

        //5.执行SQL
        int count = stmt.executeUpdate(sql);  //会返回受影响的行数

        //6.处理返回结果
        System.out.println("更新的行数:" + count);

        //7.释放资源

        //先开的后释放
        stmt.close();
        conn.close();
    }
}
2.JDBC-API
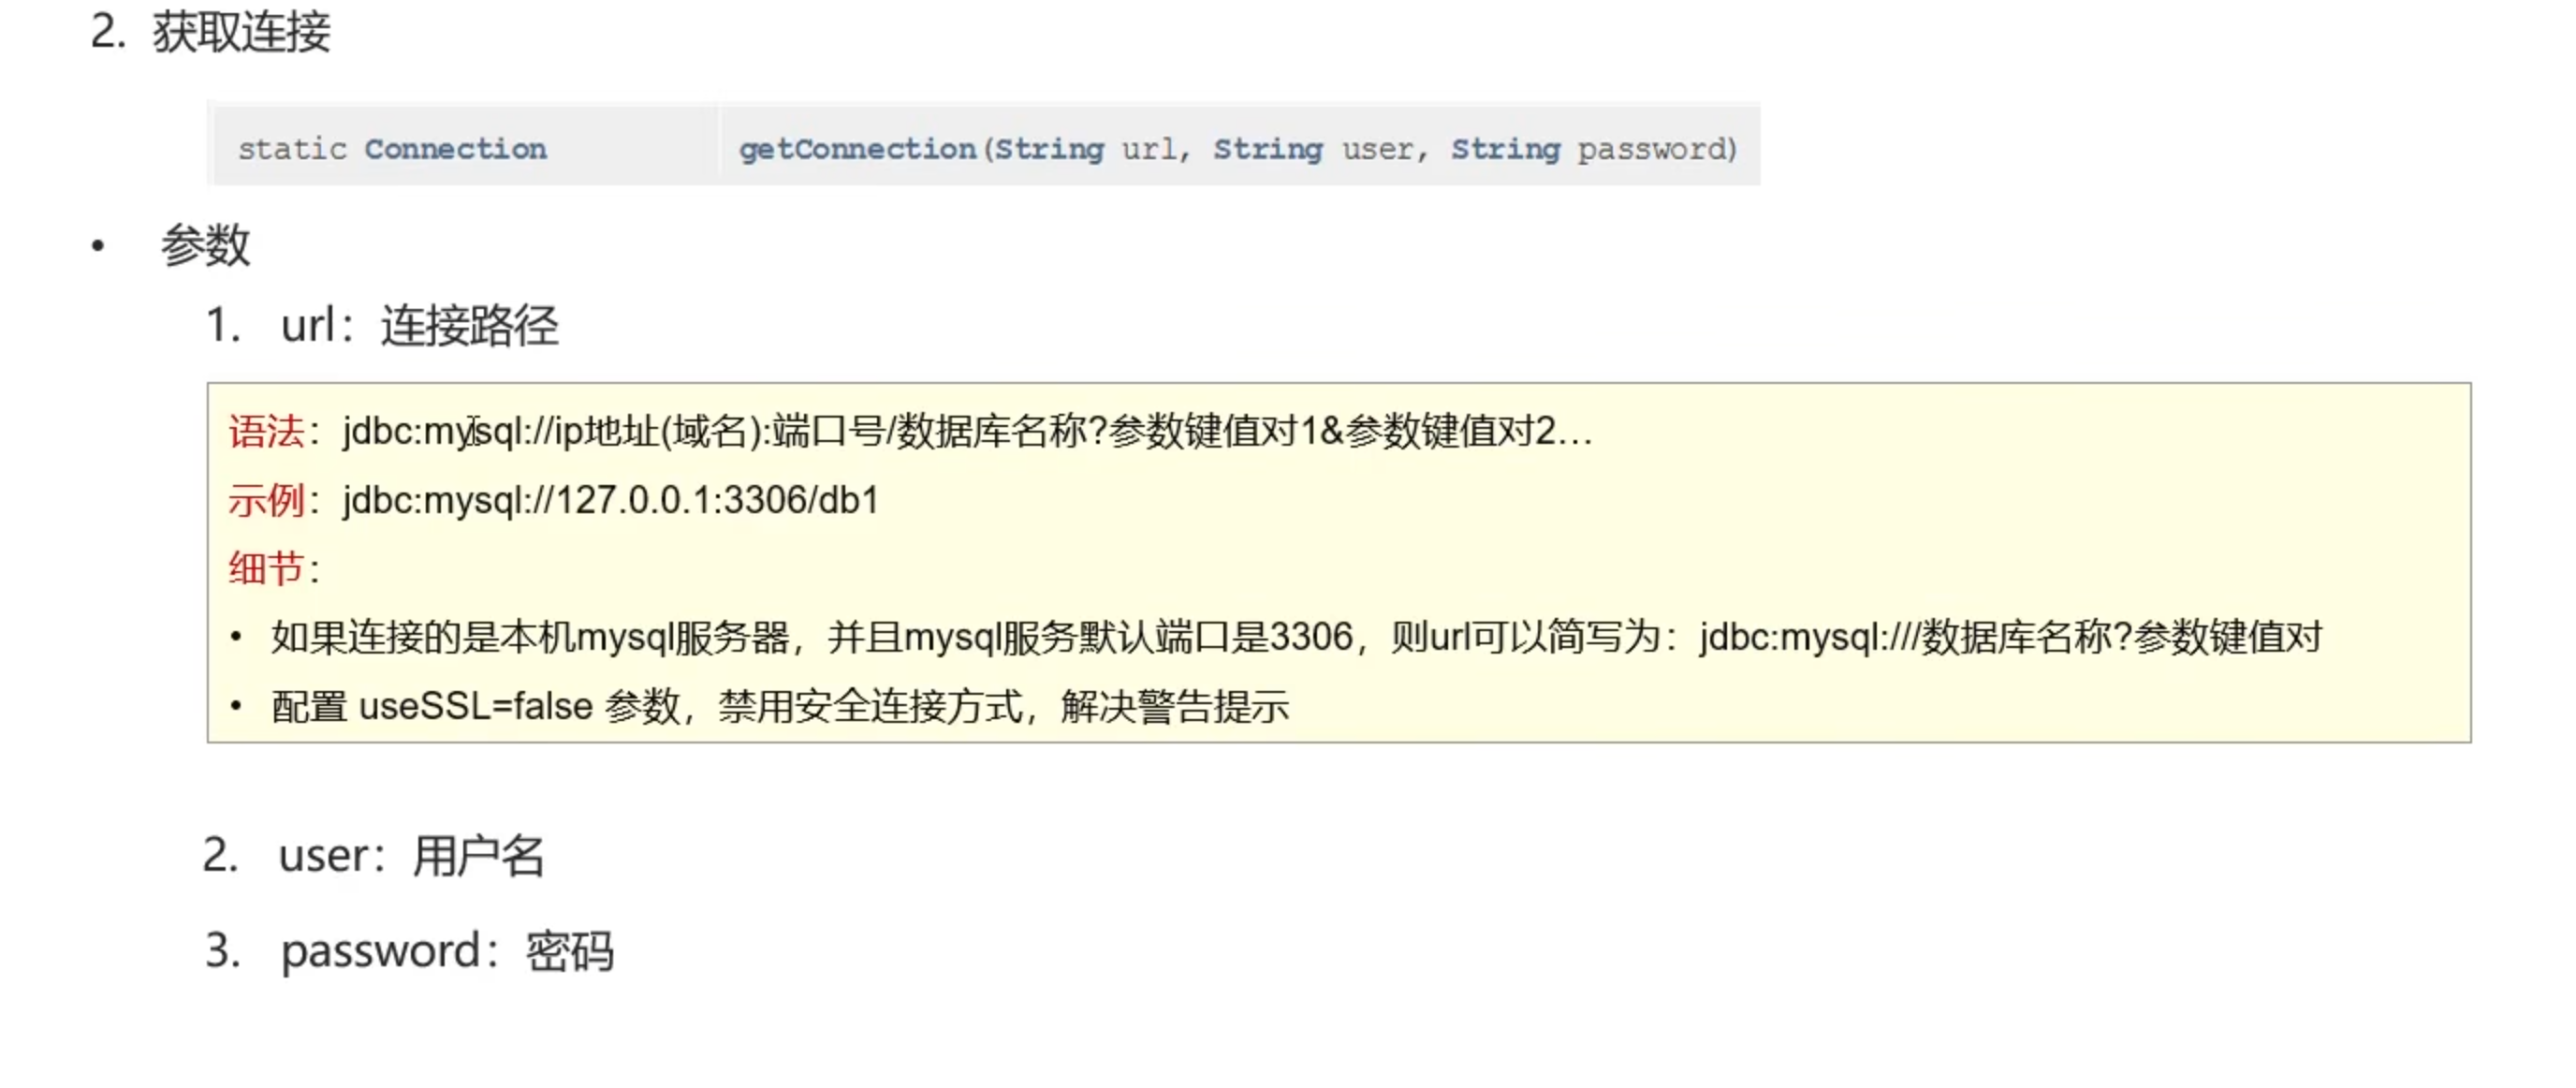
1)DriverManager
- 驱动管理类
2)Connection
- 1.获取执行SQL对象
- 普通执行SQL对象:
Statement createStatement() - 预编译SQL的执行SQL对象:防止SQL注入:
PreparedStatement preparedStatement(sql) - 执行存储过程的对象:
CallabelStatement prepareCall(sql)
- 普通执行SQL对象:
- 2.管理事务
- 1.MySQL 事务管理:
- 开启事务:
BEGIN;/start transaction - 提交事务:
COMMIT; - 回滚事务:
ROLLBACK; - 2.JDBC事务管理:
- 开启事务:
setAutoCommit(boolean autoCommit): true为自动提交事务,false为手动提交事务 - 提交事务:
commit() - 回滚事务:
rollback();
java中一般用异常处理机制:try-catch完成事务的开启和回滚
示例:
package com.jdbclearn.jdbc;

import java.sql.Connection;
import java.sql.DriverManager;
import java.sql.SQLException;
import java.sql.Statement;

public class JdbcDemo {
    public static void main(String[] args) throws Exception {

        //1.注册驱动
        Class.forName("com.mysql.jdbc.Driver");

        //2.配置并获取连接
        String url = "jdbc:mysql://localhost:3306/lik";
        String username = "root";
        String password = "123456";
        Connection conn = DriverManager.getConnection(url, username, password);

        //3.定义SQL语句
        String sql = "update account set money = 1000 where id = 1;";
        String sql2 = "update account set money = 1000 where id = 2;";

        //4.获取执行SQL的对象
        Statement stmt = conn.createStatement();

        try {

            //开启事务
            conn.setAutoCommit(false);

            //5.执行SQL
            int count = stmt.executeUpdate(sql);  //会返回受影响的行数
            int count2 = stmt.executeUpdate(sql2);

            //6.处理返回结果
            System.out.println("更新的行数:" + count);
            System.out.println(count2);

            //如果都执行成功则提交事务
            conn.commit();
        } catch (Exception e) {
            //有异常则回滚事务
            conn.rollback();
        }

        //7.释放资源

        //先开的后释放
        stmt.close();
        conn.close();
    }
}
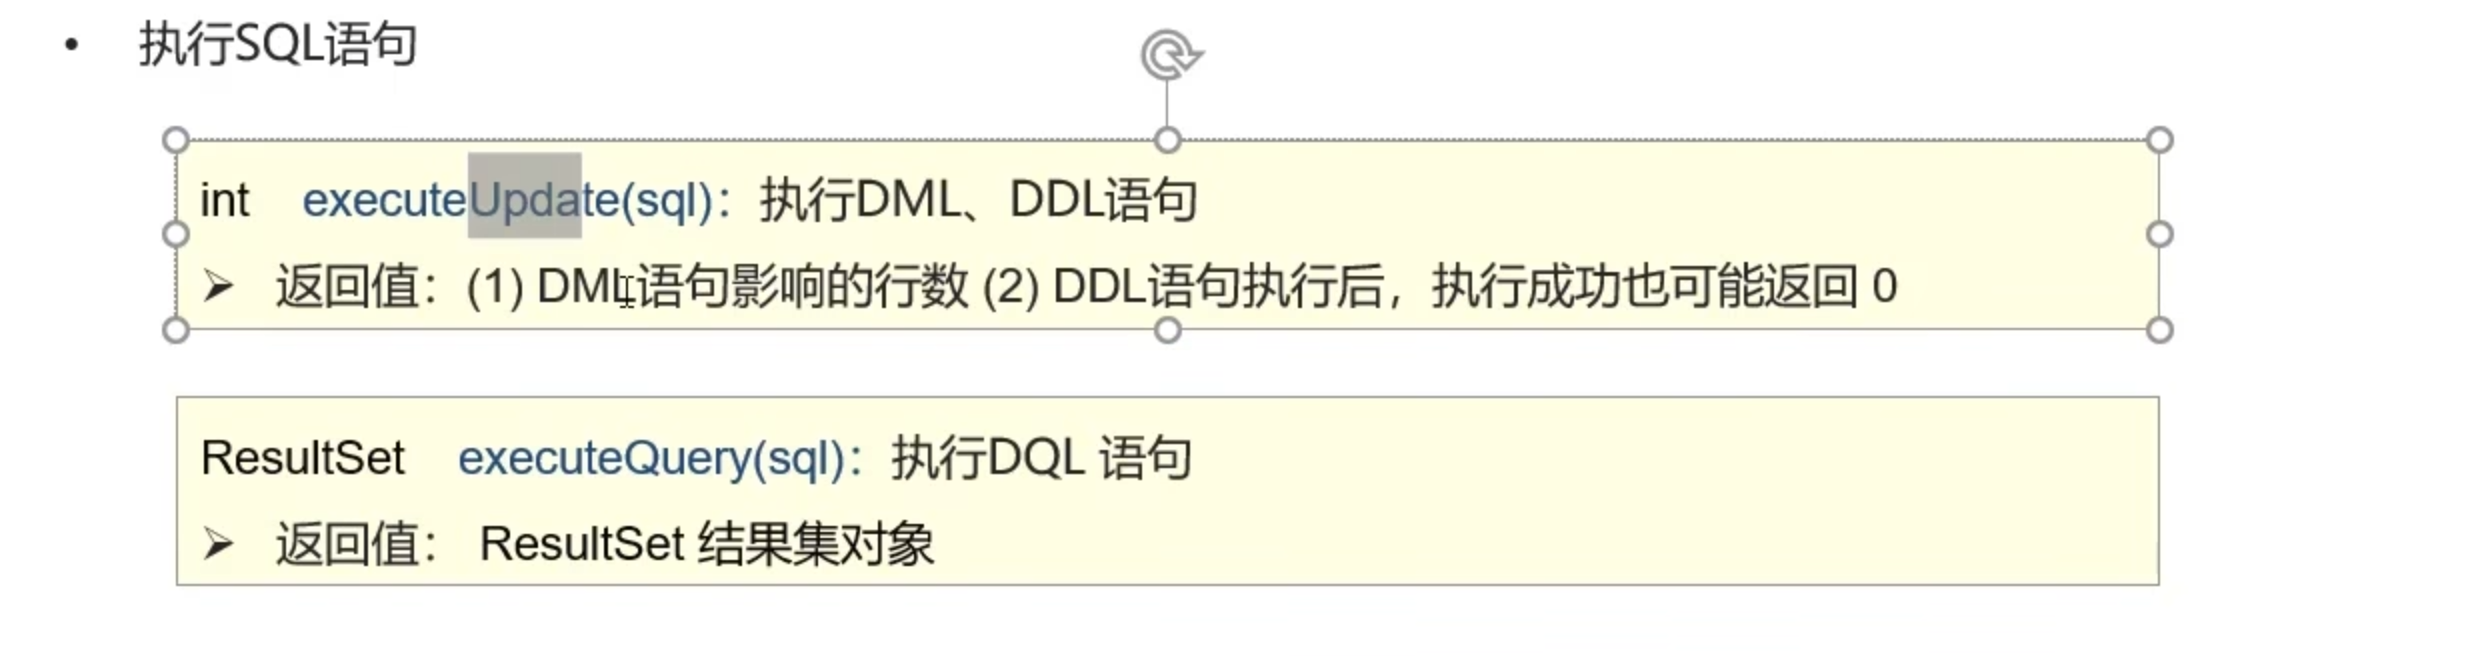
3)Statement
- 作用:执行SQL语句
4)ResultSet
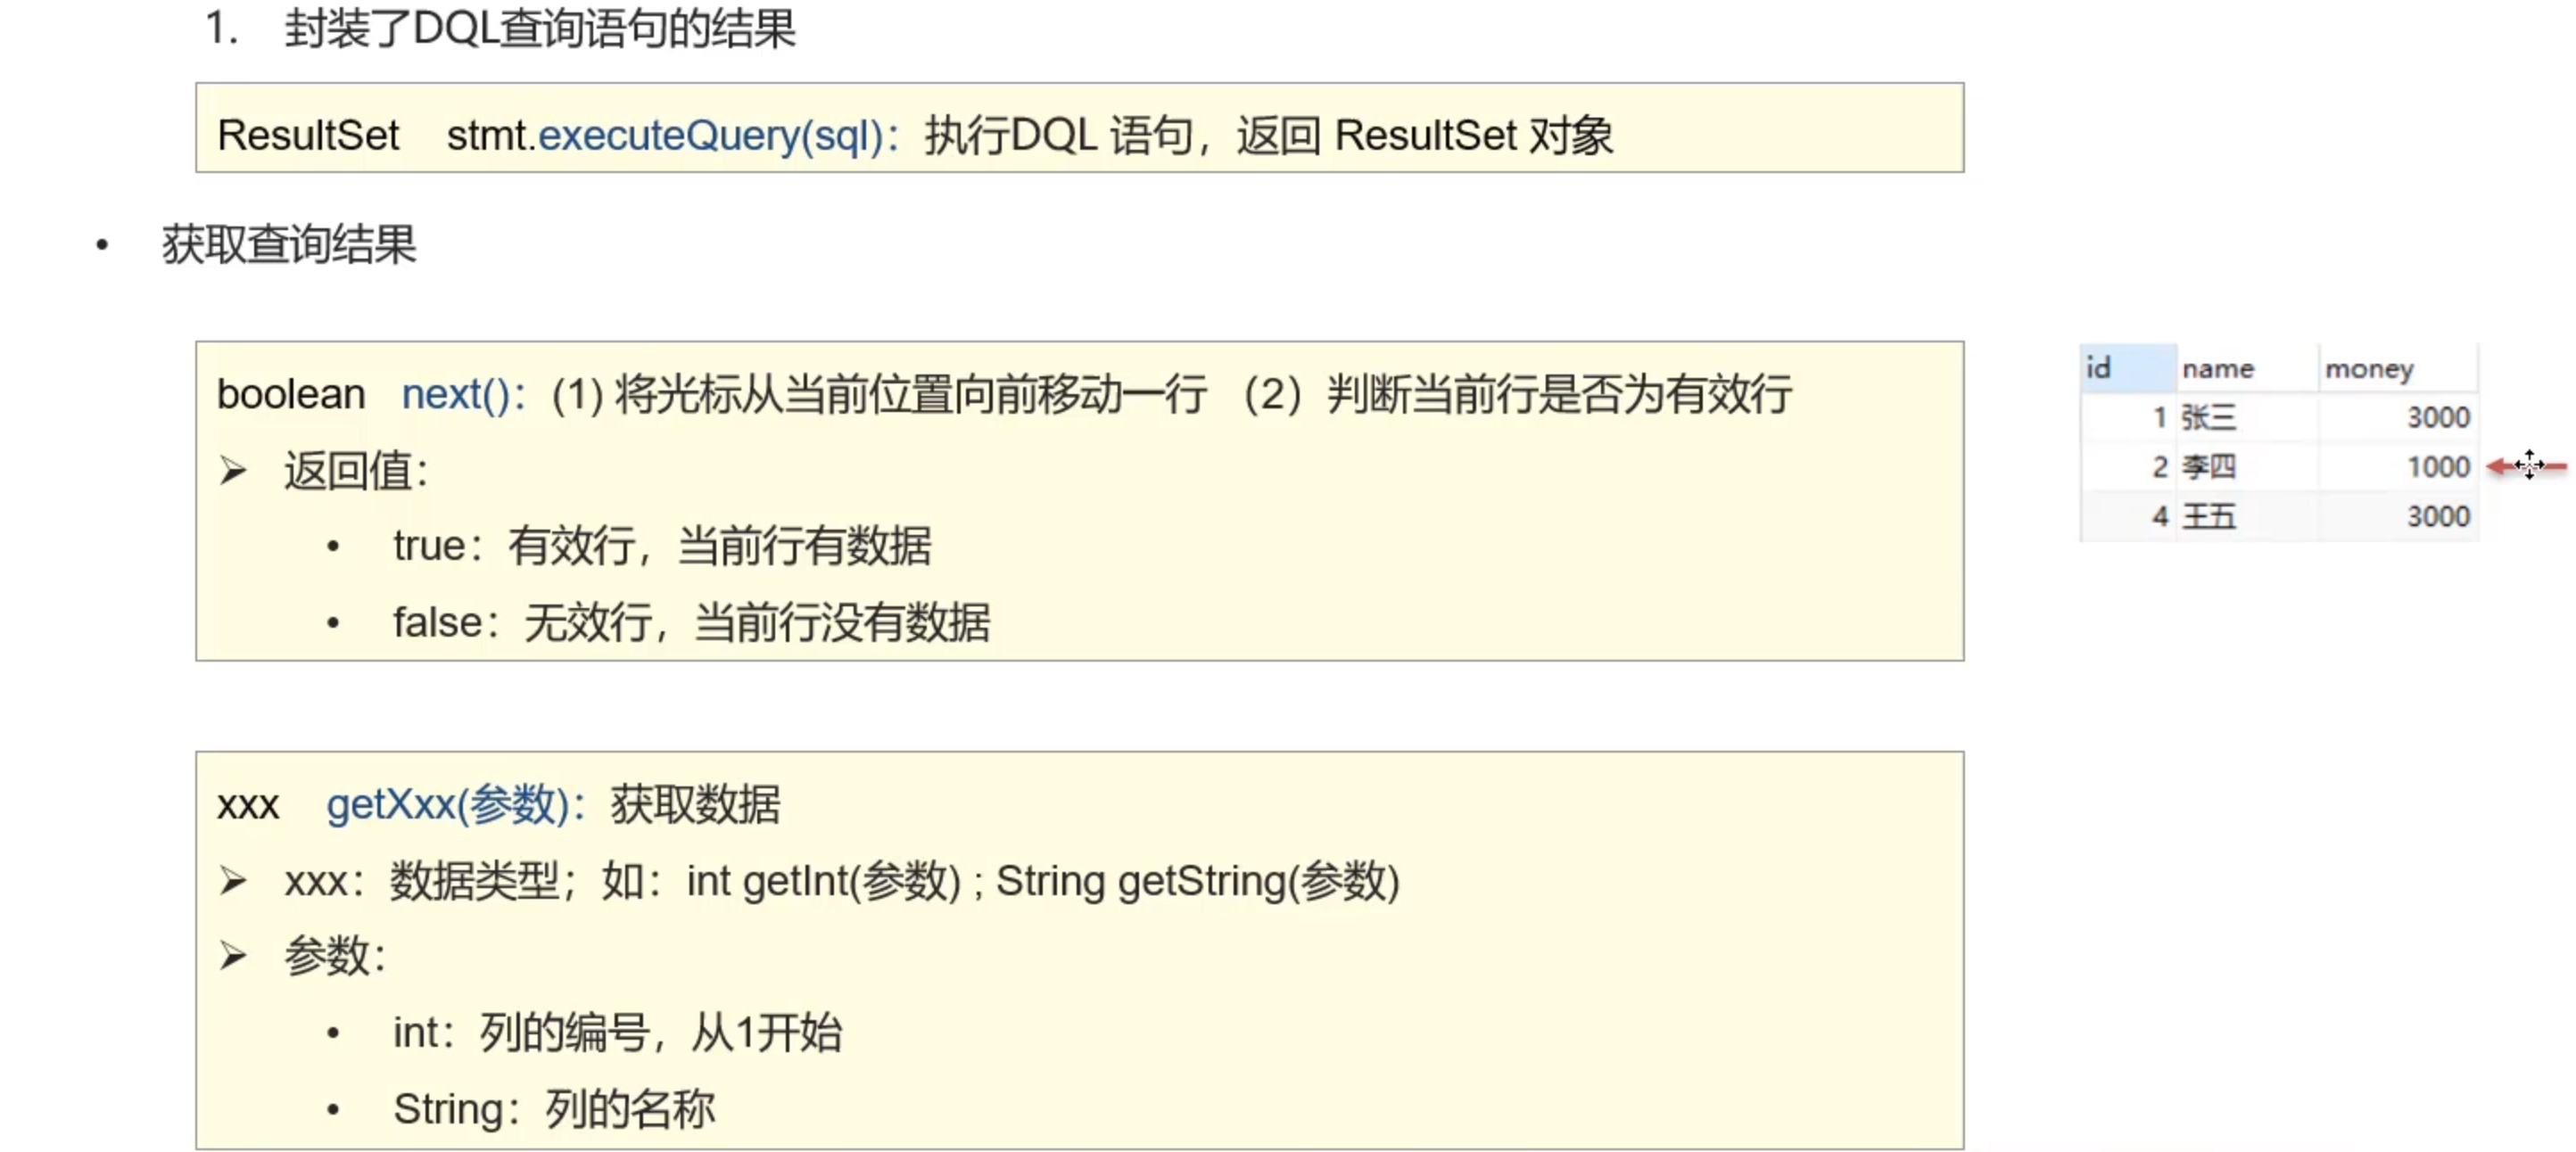
- ResultSet(结果集对象)作用:
查询:
package com.jdbclearn.jdbc;

import java.sql.*;

public class JdbcDemo {
    public static void main(String[] args) throws Exception {

        //1.注册驱动
        Class.forName("com.mysql.jdbc.Driver");

        //2.配置并获取连接
        String url = "jdbc:mysql://localhost:3306/lik";
        String username = "root";
        String password = "123456";
        Connection conn = DriverManager.getConnection(url, username, password);

        //3.定义SQL语句
//        String sql = "update account set money = 2000 where id = 1;";
//        String sql2 = "update account set money = 2000 where id = 2;";

        String sql = "select * from account;";


        //4.获取执行SQL的对象
        Statement stmt = conn.createStatement();

        //5.执行SQL,并获取返回的结果集
        ResultSet rs = stmt.executeQuery(sql);

        //6.处理结果,变量rs中的所有数据
        //6.1 循环判断,光标不断往下移动,,并且判断当前行是否有数据
        while (rs.next()) {
            int id = rs.getInt("id");
            String name = rs.getString("name");
            int money = rs.getInt("money");

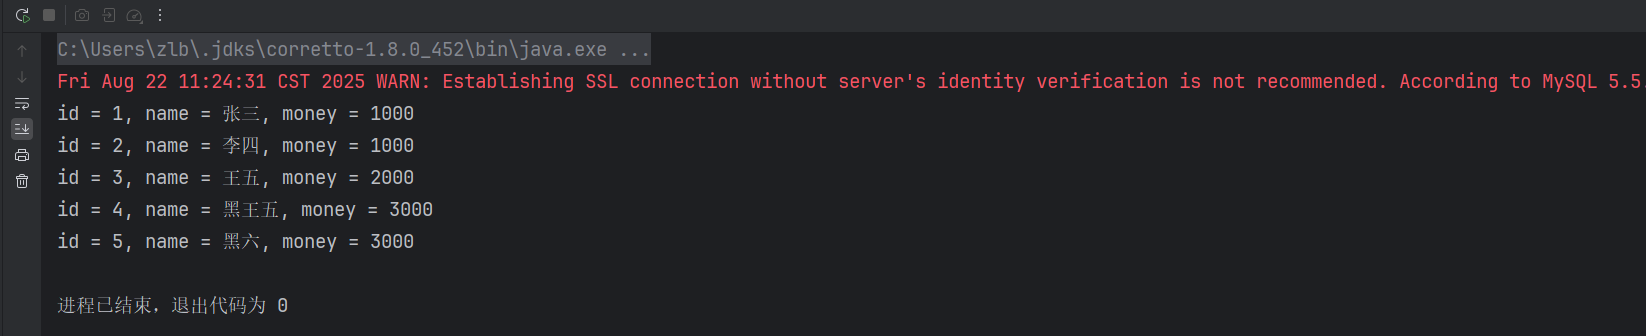
            System.out.println("id = " + id + ", name = " + name + ", money = " + money);
        }
        //7.释放资源

        //先开的后释放
        rs.close();
        stmt.close();
        conn.close();
    }
}
案例练习: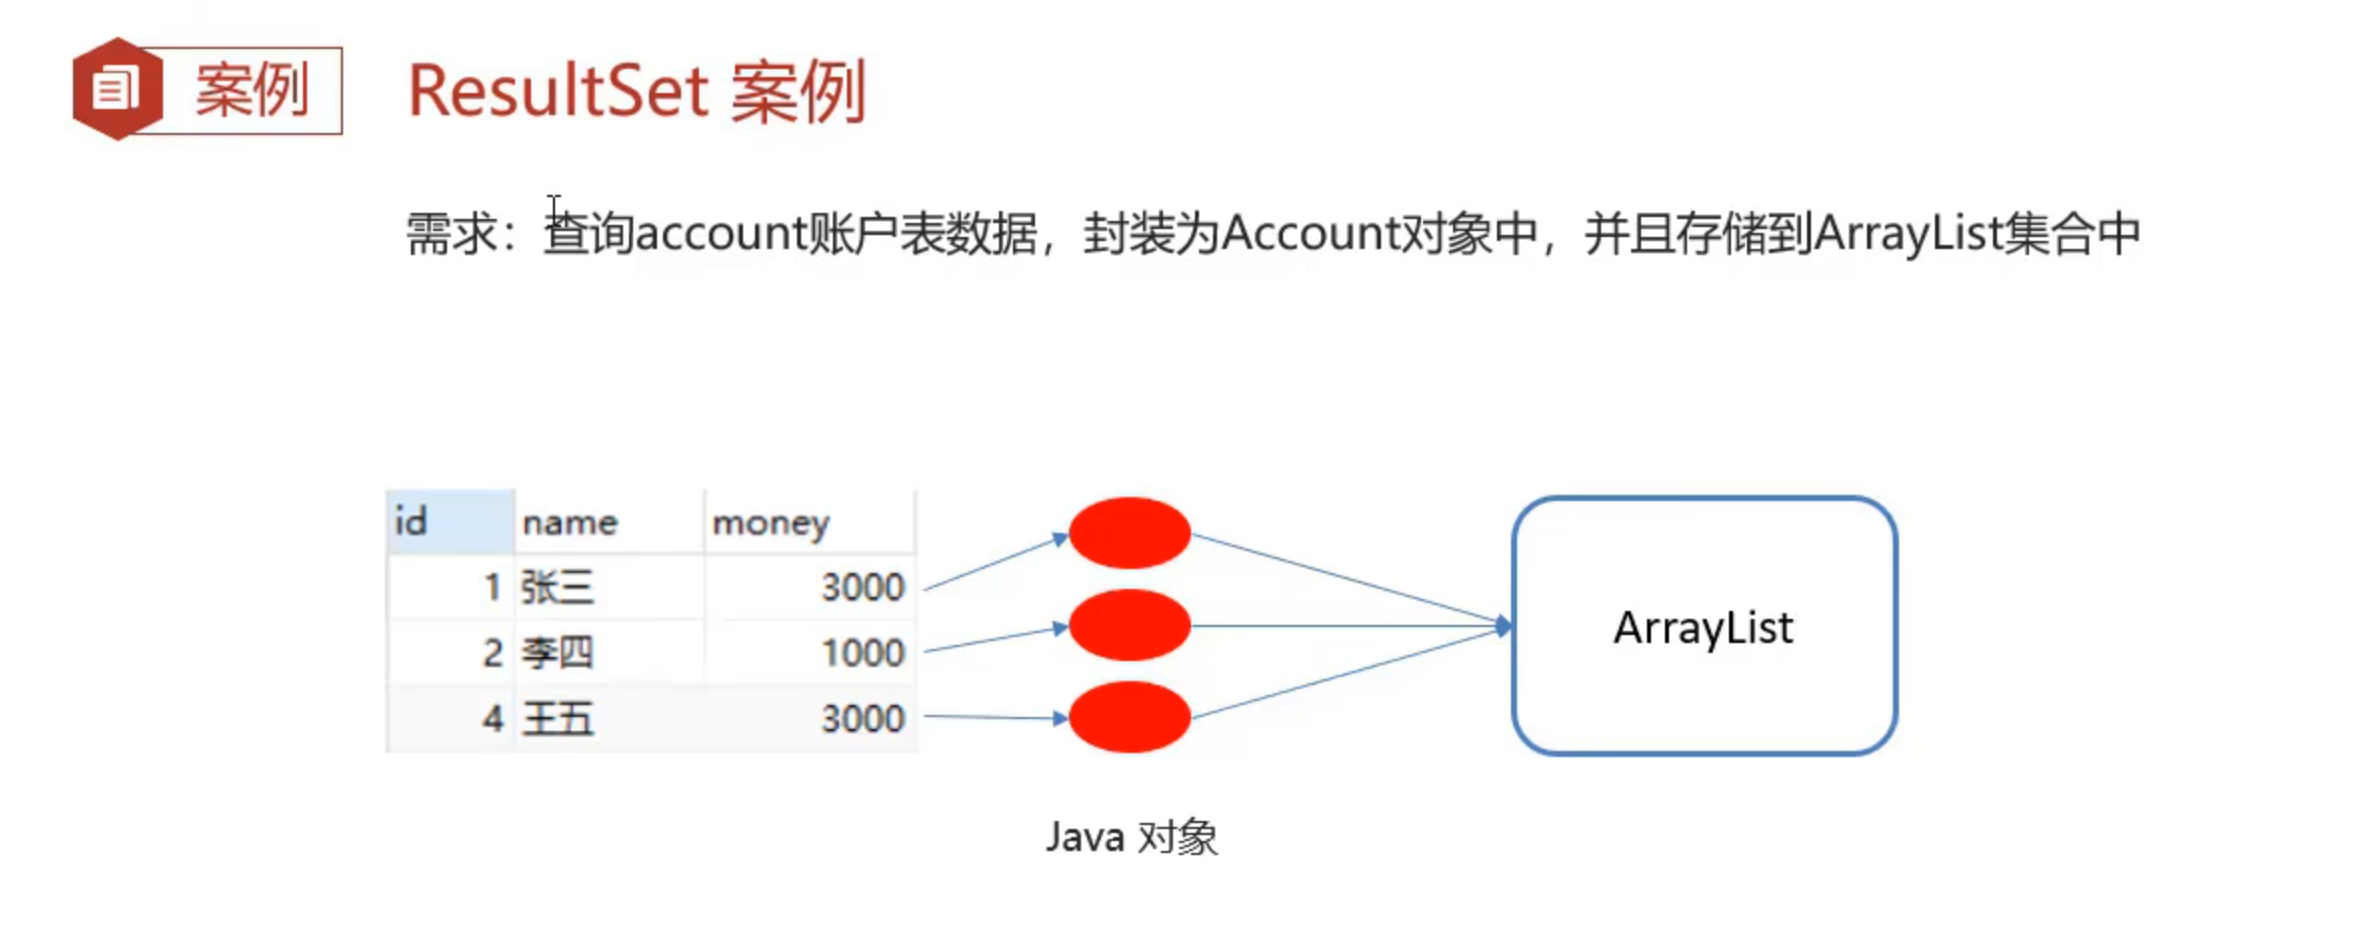
- 1.创建Account类:
package com.jdbclearn.pojo;


public class Account {
    private int id;
    private String name;
    private int money;

    public int getId() {
        return id;
    }

    public String getName() {
        return name;
    }

    public int getMoney() {
        return money;
    }

    public void setId(int id) {
        this.id = id;
    }

    public void setName(String name) {
        this.name = name;
    }

    public void setMoney(int money) {
        this.money = money;
    }
    @Override
    public String toString() {
        return "Account [id=" + id + ", name=" + name + ", money=" + money + "]";
    }
}
- 2.将从数据库读取到的数据创建为对象并保存到集合中:
package com.jdbclearn.jdbc;

import com.jdbclearn.pojo.Account;

import java.sql.*;
import java.util.ArrayList;
import java.util.List;

public class JdbcDemo {
    public static void main(String[] args) throws Exception {
        //定义account类的集合,创建account对象将其放入到集合中
        List<Account> accounts = new ArrayList<>();

        //1.注册驱动
        Class.forName("com.mysql.jdbc.Driver");

        //2.配置并获取连接
        String url = "jdbc:mysql://localhost:3306/lik";
        String username = "root";
        String password = "123456";
        Connection conn = DriverManager.getConnection(url, username, password);

        //3.定义SQL语句
//        String sql = "update account set money = 2000 where id = 1;";
//        String sql2 = "update account set money = 2000 where id = 2;";

        String sql = "select * from account;";


        //4.获取执行SQL的对象
        Statement stmt = conn.createStatement();

        //5.执行SQL,并获取返回的结果集
        ResultSet rs = stmt.executeQuery(sql);

        //6.处理结果,变量rs中的所有数据
        //6.1 循环判断,光标不断往下移动,,并且判断当前行是否有数据
        while (rs.next()) {

            Account account = new Account();

            int id = rs.getInt("id");
            String name = rs.getString("name");
            int money = rs.getInt("money");

            System.out.println("id = " + id + ", name = " + name + ", money = " + money);
            account.setId(id);
            account.setName(name);
            account.setMoney(money);
            accounts.add(account);
        }

        //打印集合中的对象
        System.out.println(accounts);

        //7.释放资源

        //先开的后释放
        rs.close();
        stmt.close();
        conn.close();
    }
}
5)PreparedStatement
- 作用:预编译SQL语句并执行,预防SQL注入问题
- SQL注入:
- 通过操作输入来修改事先定义号的SQL语句,来达到执行代码从而对服务器进行攻击的方法
案例:
用户登录时,是使用预定义的SQL语句,根据用户输入的username和password去查询数据库对应的数据,如果有,则返回结果,显示登录成功。String sql = "select * from user where username = 'zhangsan' and password = '123';
此时打印sql语句是直接根据字符串来拼的,传过去查询的SQL就是:select * from user where username = 'zhangsan' and password = '123';
但是当用户输入的password为'or '1' = '1时,拼凑出来的字符串为:
select * from user where username = 'zhangsan' and password = '' or '1' = '1';
那么这样拼凑出来的SQL语句就变成了username='zhangsan' and password=''会返回false,紧接着后面就是or '1' = '1'恒成立返回true,就直接不攻自破,轻松的登录到服务器中。
1.解决SQL注入:
- 1.获取PreparedStatement对象
//3.定义SQL语句
        String sql = "select * from user where username = ? and password = ?";

        //4.获取PreparedStatement对象
        PreparedStatement psmt = conn.prepareStatement(sql);
- 2.设置参数值
//5.设置?的值
        psmt.setString(1, name);
        psmt.setString(2, pwd);
- 3.执行SQL:
ResultSet rs = psmt.executeQuery();
package com.jdbclearn.jdbc;
import com.jdbclearn.pojo.Account;
import java.sql.*;
import java.util.ArrayList;
import java.util.List;

public class JdbcDemo {
    public static void main(String[] args) throws Exception {
        //定义account类的集合,创建account对象将其放入到集合中
        List<Account> accounts = new ArrayList<>();

        //1.注册驱动
        Class.forName("com.mysql.jdbc.Driver");

        //2.配置并获取连接
        String url = "jdbc:mysql://localhost:3306/lik";
        String username = "root";
        String password = "123456";
        Connection conn = DriverManager.getConnection(url, username, password);

        String name = "zhangsan";
        String pwd = "123456";

        //3.定义SQL语句
        String sql = "select * from user where username = ? and password = ?";

        //4.获取PreparedStatement对象
        PreparedStatement psmt = conn.prepareStatement(sql);

        //5.设置?的值
        psmt.setString(1, name);
        psmt.setString(2, pwd);

        //6.执行SQL
        ResultSet rs = psmt.executeQuery();


        if (rs.next()) {
            System.out.println("登录成功");
        } else {
            System.out.println("登录失败");
        }

        //7.释放资源

        //先开的后释放
        rs.close();
        psmt.close();
        conn.close();
    }
}
2.PreparedStatement原理
实质上是将输入数据作为参数传入SQL语句中,对输入数据中的特殊字符进行了转义
优势:
- 1.可以防止SQL注入
- 2.预编译SQL,提高相同模板下的效率

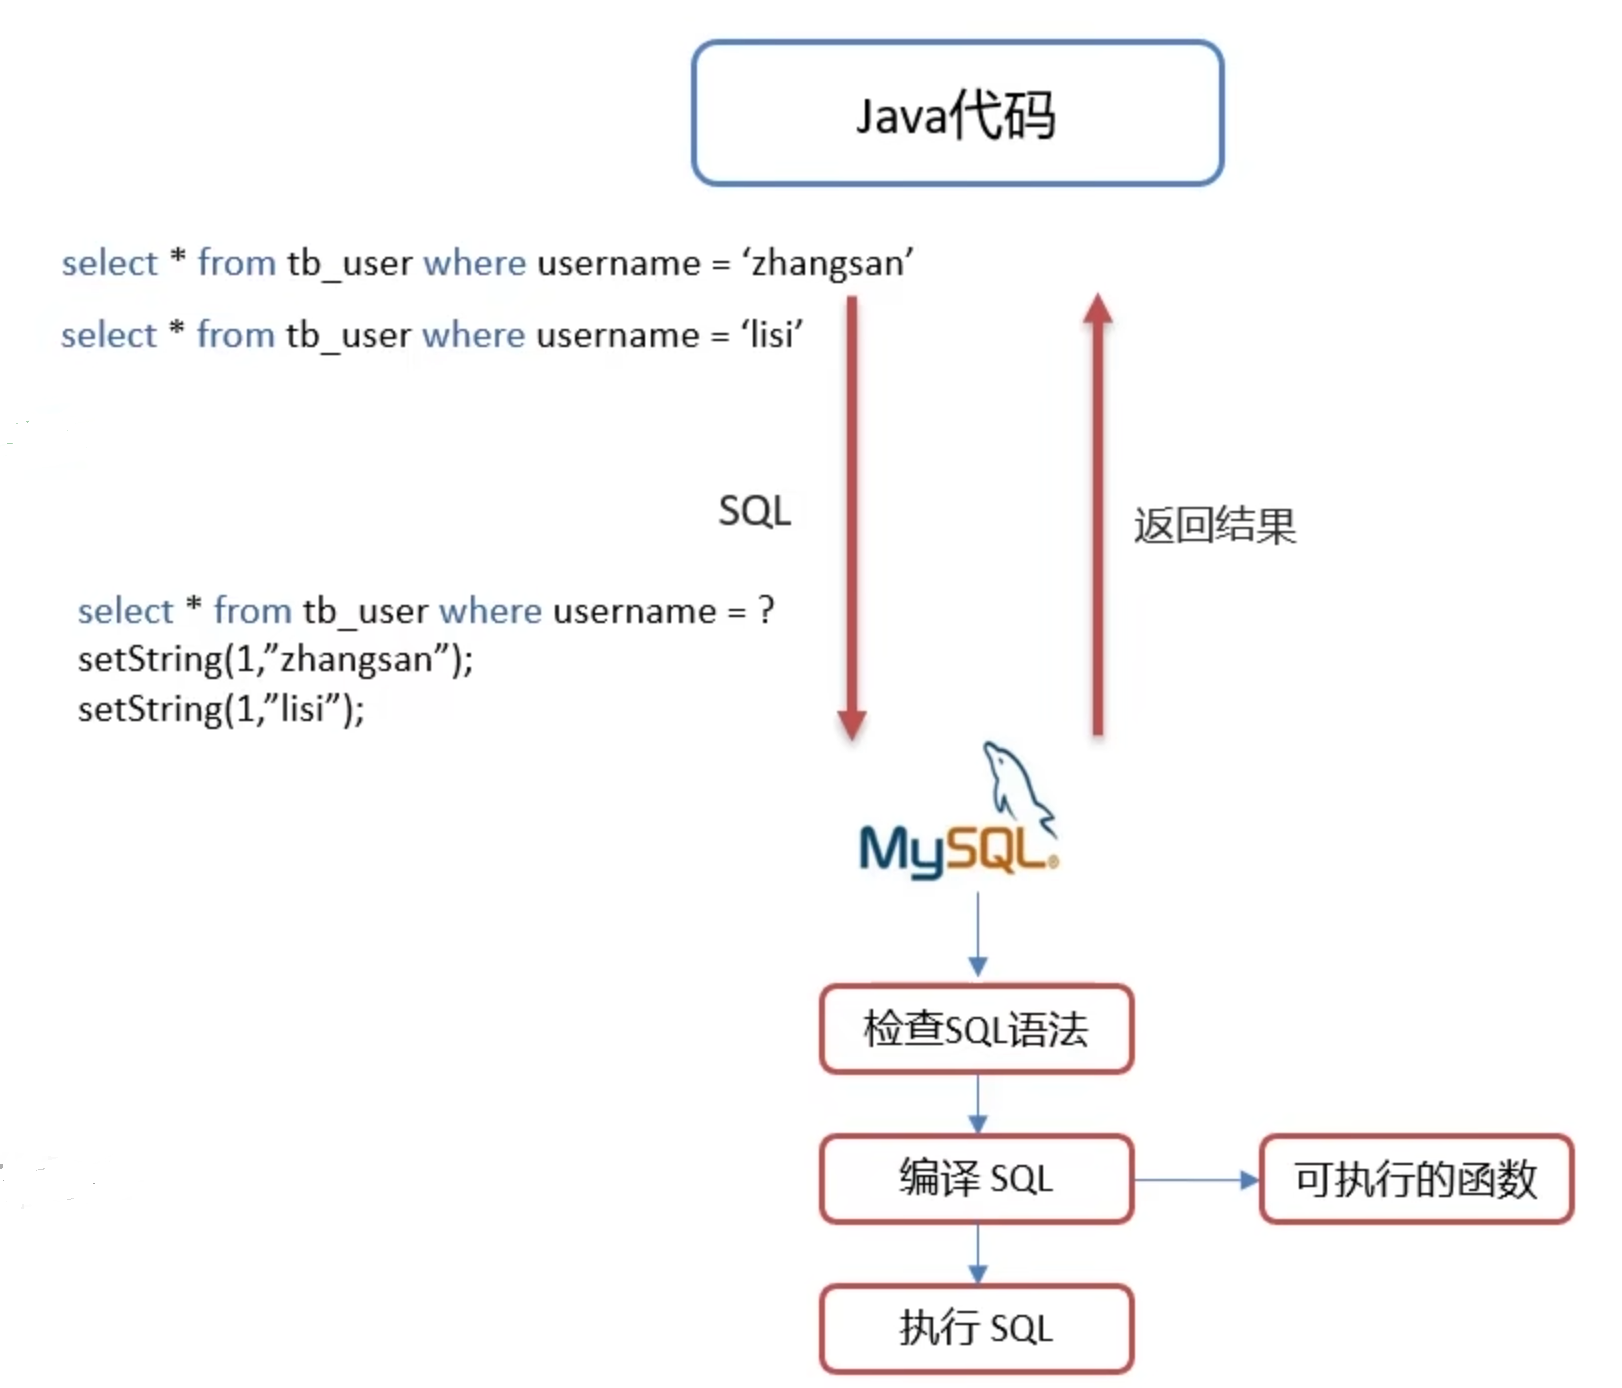
3.预编译SQL
正常的JDBC流程:
- 1.在Java中编写SQL语句,传入到MySQL中
- 2.在MySQL中需要对Java中编写的SQL语句进行语法检查
- 3.语法检查通过之后需要编译SQL,将SQL编译成可执行的函数
- 4.执行SQL
当需要使用相同结构的SQL对不同输入数据的查询时,每次都要执行上述流程。
而使用PreparedStatement之后:
- 1.在Java中编写SQL语句,传入到MySQL中
- 2.在MySQL中需要对Java中编写的SQL语句进行语法检查
- 3.语法检查通过之后需要编译SQL,将SQL编译成可执行的函数
- 4.传入参数
- 5.执行SQL
这样当输入不同数据时,相同模板下的SQL就无需再次编译,只需要通过setXxx()方法传入参数,即可执行SQL
3.数据库连接池
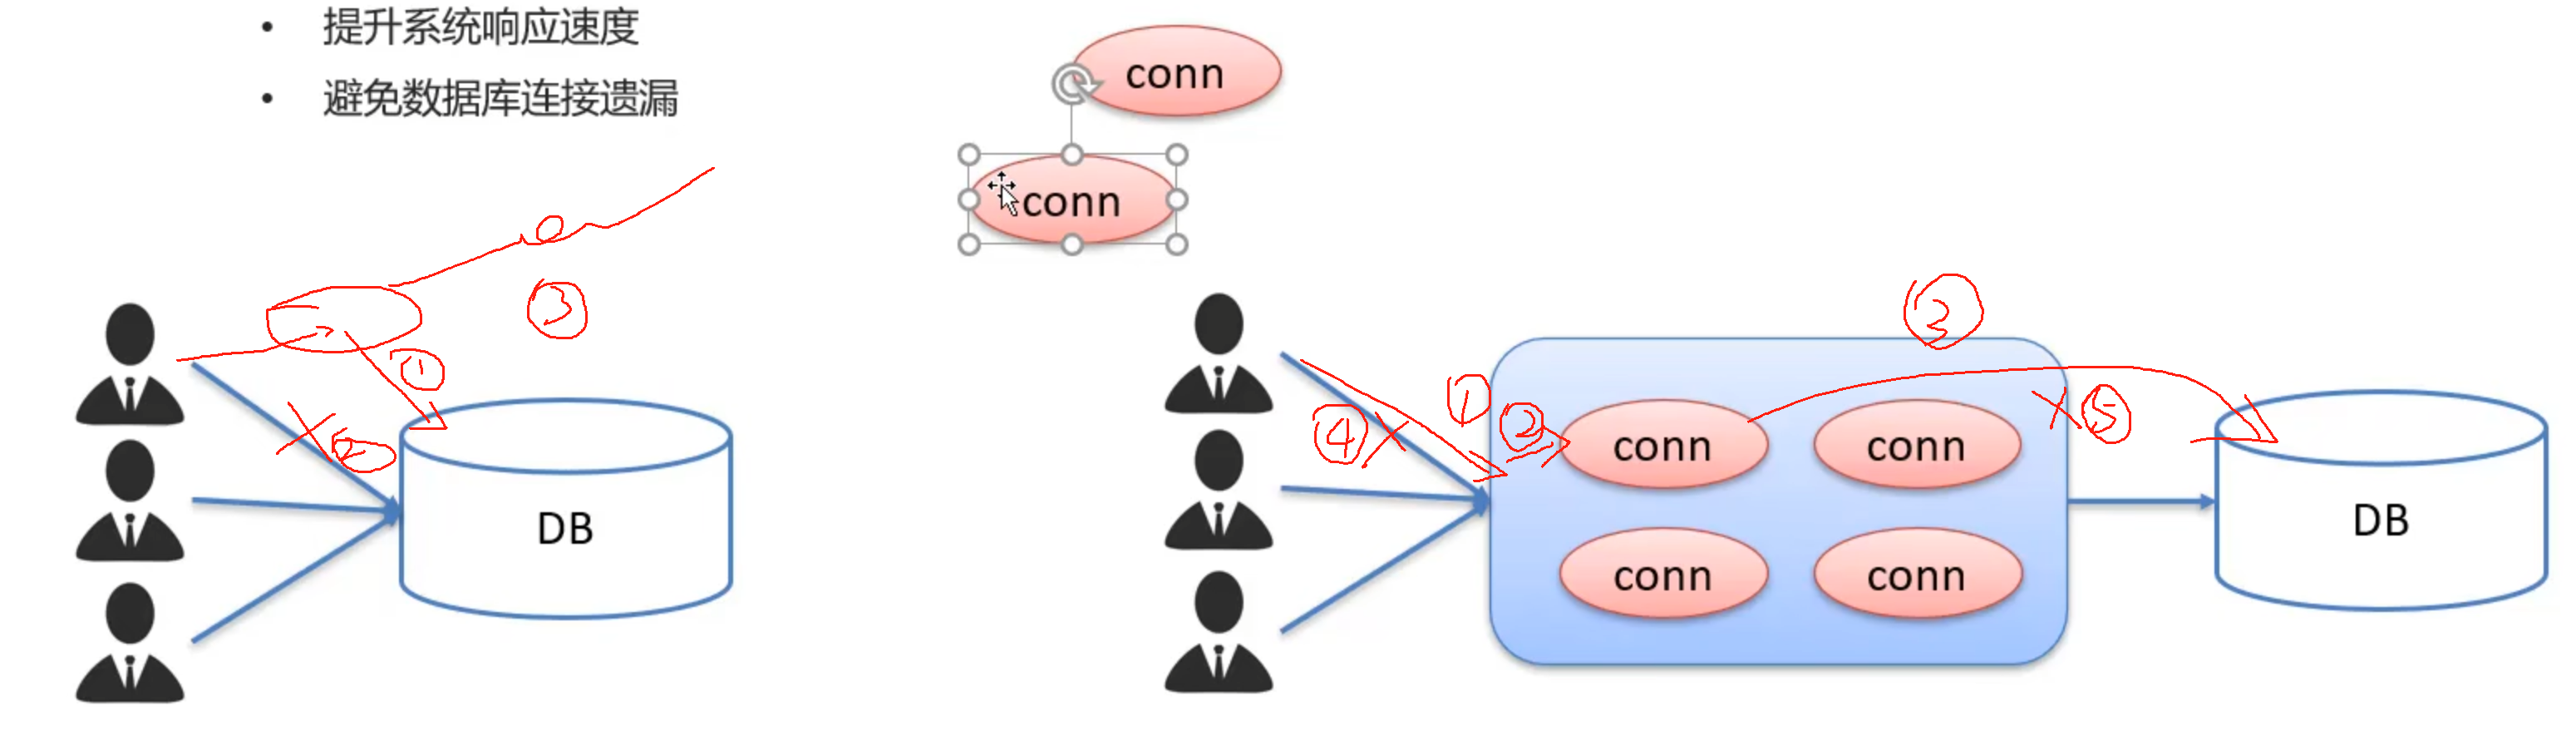
- 数据库连接池是一个容纳数据库连接的容器,负责分配、管理数据库连接
- 可以允许应用程序重复使用一个建立好的数据库连接,而不是每次需要使用时临时建立连接
- 释放掉空闲时间超过最大空闲时间的数据库连接,从而避免没有释放数据库连接导致的数据库连接遗漏(也就是当连接池中的一个连接超过一定时间没有外部程序连接时,会自动释放)
- 优点:
- 资源复用
- 提升系统响应速度
- 避免数据库连接的遗漏
在连接数据库时,拉起一个数据库连接需要消耗大量的资源和时间,同时当一个程序断开连接时,释放该数据库连接也会占用大量的资源,数据库连接池就是维护了一定数量的在线连接,如果需要连接时只需要连接数据库连接池中已经建立的空闲连接即可,这样减少了数据库连接的建立和释放,大大提升了性能。
数据库连接池实现
- 标准接口:
DataSource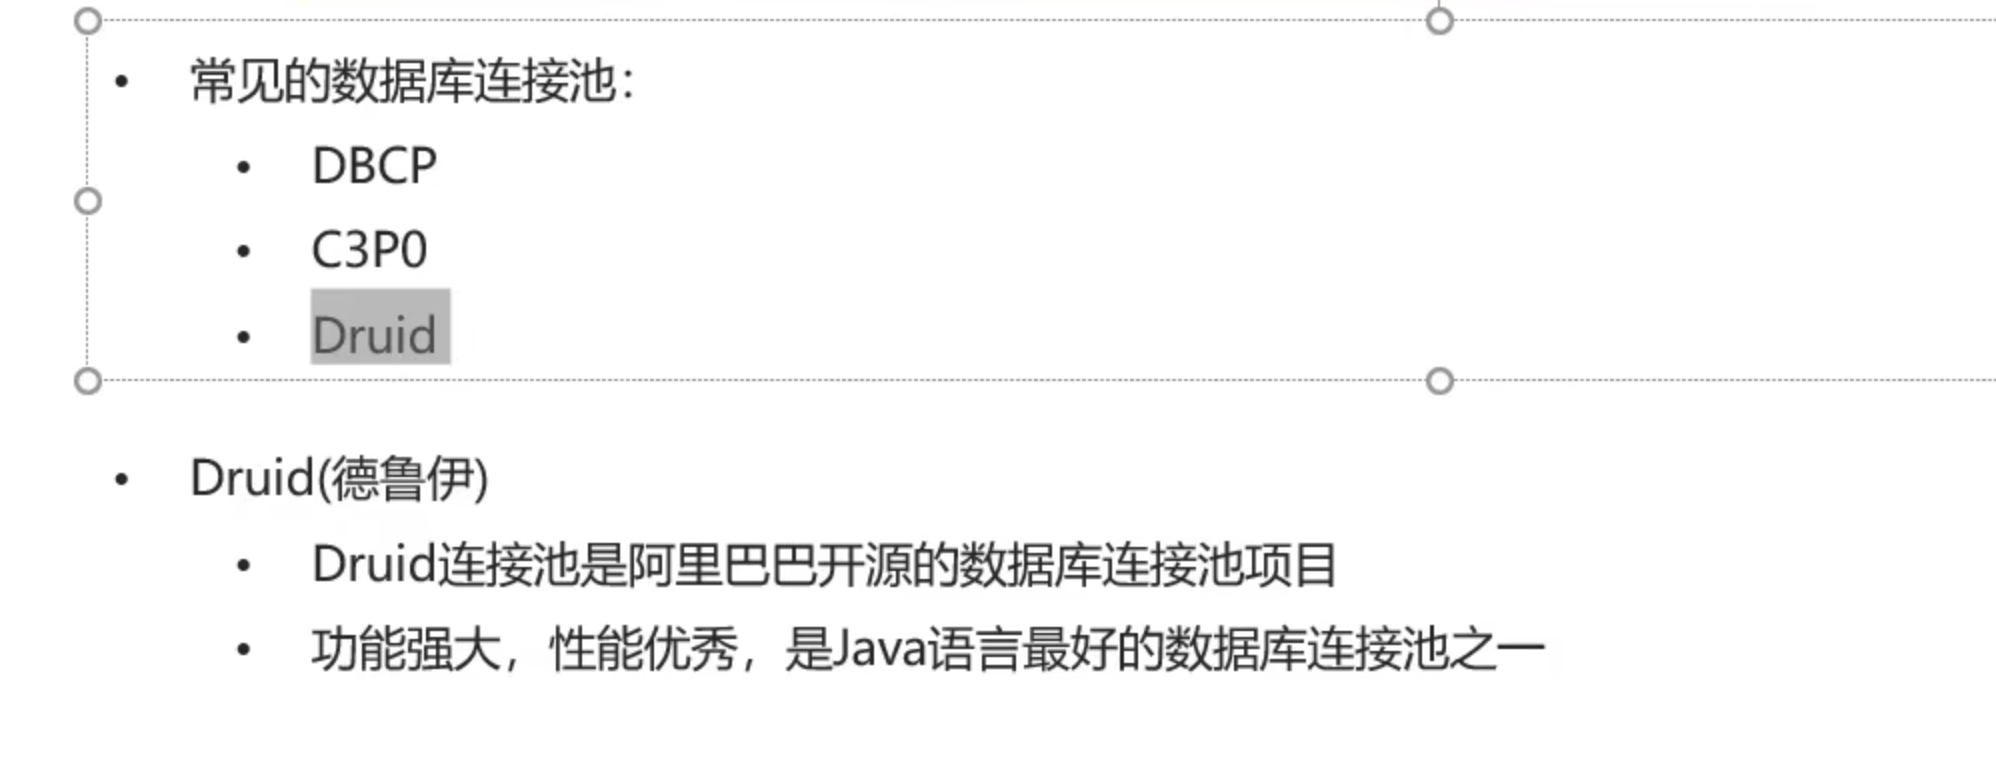
druid数据库连接池快速入门
- 1.导入jar包(maven导入坐标也行)
- 2.定义配置文件
driverClassName=com.mysql.jdbc.Driver
url=jdbc:mysql:///lik?useSSL=false&useServerPrepStmts=true
username=root
password=123456
initialSize=5
maxActive=10
maxWait=1000
- 3.加载配置文件
//3.配置文件加载
        Properties prop = new Properties();
        prop .load(new FileInputStream("jdbc-demo/src/druid.properties"));
- 4.获取连接池对象
- 5.获取数据库连接
package com.jdbclearn.jdbc;

import com.alibaba.druid.pool.DruidDataSource;
import com.alibaba.druid.pool.DruidDataSourceFactory;

import javax.sql.DataSource;
import java.io.FileInputStream;
import java.io.FileNotFoundException;
import java.sql.Connection;
import java.util.Properties;

public class DataSourveDemo {
    public static void main(String[] args) throws Exception {

        //3.配置文件加载
        Properties prop = new Properties();
        prop .load(new FileInputStream("jdbc-demo/src/druid.properties"));

        //创建连接池对象
        DataSource dataSource = DruidDataSourceFactory.createDataSource(prop);
        //从连接池中获取连接
        Connection connection = dataSource.getConnection();

        System.out.println(connection);

    }
}
4.JDBC案例练习
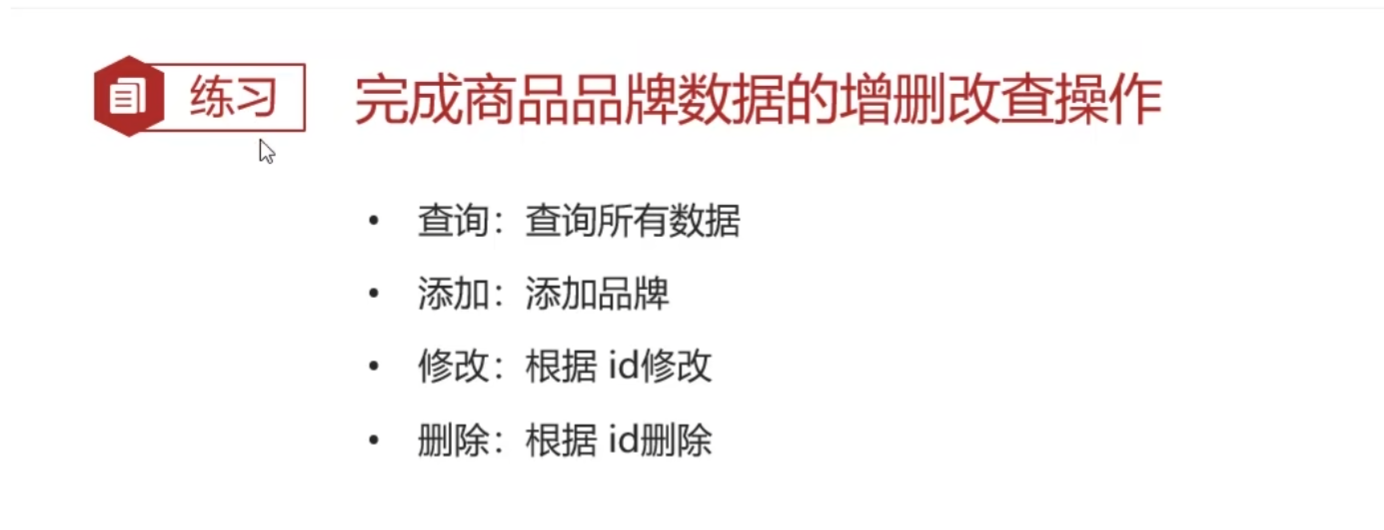
Brand对象类创建
package com.jdbclearn.pojo;

/**
 * 品牌
 *
 * alt + 鼠标左键:整列编辑
 *
 * 在实体类中,基本数据类型建议使用其对应的包装类型
 */

public class Brand {
    // id 主键
    private Integer id;
    // 品牌名称
    private String brandName;
    // 企业名称
    private String companyName;
    // 排序字段
    private Integer ordered;
    // 描述信息
    private String description;
    // 状态:0:禁用  1:启用
    private Integer status;

    public Integer getId() {
        return id;
    }

    public void setId(Integer id) {
        this.id = id;
    }

    public String getBrandName() {
        return brandName;
    }

    public void setBrandName(String brandName) {
        this.brandName = brandName;
    }

    public String getCompanyName() {
        return companyName;
    }

    public void setCompanyName(String companyName) {
        this.companyName = companyName;
    }

    public Integer getOrdered() {
        return ordered;
    }

    public void setOrdered(Integer ordered) {
        this.ordered = ordered;
    }

    public String getDescription() {
        return description;
    }

    public void setDescription(String description) {
        this.description = description;
    }

    public Integer getStatus() {
        return status;
    }

    public void setStatus(Integer status) {
        this.status = status;
    }

    @Override
    public String toString() {
        return "Brand{" +
                "id=" + id +
                ", brandName='" + brandName + '\'' +
                ", companyName='" + companyName + '\'' +
                ", ordered=" + ordered +
                ", description='" + description + '\'' +
                ", status=" + status +
                '}';
    }
}
BrandTest:
package com.jdbclearn.jdbc;

import com.alibaba.druid.pool.DruidDataSourceFactory;
import com.jdbclearn.pojo.Brand;
import org.junit.Test;

import javax.sql.DataSource;
import java.io.FileInputStream;
import java.sql.Connection;
import java.sql.PreparedStatement;
import java.sql.ResultSet;
import java.util.ArrayList;
import java.util.List;
import java.util.Properties;

/**
 * 品牌数据的增删改查操作
 */
public class BrandTest {

    /**
     * 查询所有
     * 1. SQL:select * from tb_brand;
     * 2. 参数:不需要
     * 3. 结果:List<Brand>
     */

    @Test
    public void testSelectAll() throws Exception {
        //1. 获取Connection
        //3. 加载配置文件
        Properties prop = new Properties();
        prop .load(new FileInputStream("jdbc-demo/src/druid.properties"));
        //4. 获取连接池对象
        DataSource dataSource = DruidDataSourceFactory.createDataSource(prop);

        //5. 获取数据库连接 Connection
        Connection conn = dataSource.getConnection();

        //2. 定义SQL
        String sql = "select * from tb_brand;";

        //3. 获取pstmt对象
        PreparedStatement pstmt = conn.prepareStatement(sql);

        //4. 设置参数

        //5. 执行SQL
        ResultSet rs = pstmt.executeQuery();

        //6. 处理结果 List<Brand> 封装Brand对象,装载List集合
        Brand brand = null;
        List<Brand> brands = new ArrayList<>();
        while (rs.next()){
            //获取数据
            int id = rs.getInt("id");
            String brandName = rs.getString("brand_name");
            String companyName = rs.getString("company_name");
            int ordered = rs.getInt("ordered");
            String description = rs.getString("description");
            int status = rs.getInt("status");
            //封装Brand对象
            brand = new Brand();
            brand.setId(id);
            brand.setBrandName(brandName);
            brand.setCompanyName(companyName);
            brand.setOrdered(ordered);
            brand.setDescription(description);
            brand.setStatus(status);

            //装载集合
            brands.add(brand);

        }
        System.out.println(brands);
        //7. 释放资源
        rs.close();
        pstmt.close();
        conn.close();


    }


    /**
     * 添加
     * 1. SQL:insert into tb_brand(brand_name, company_name, ordered, description, status) values(?,?,?,?,?);
     * 2. 参数:需要,除了id之外的所有参数信息
     * 3. 结果:boolean
     */

    @Test
    public void testAdd() throws Exception {
        // 接收页面提交的参数
        String brandName = "香飘飘";
        String companyName = "香飘飘";
        int ordered = 1;
        String description = "绕地球一圈";
        int status = 1;


        //1. 获取Connection
        //3. 加载配置文件
        Properties prop = new Properties();
        prop.load(new FileInputStream("jdbc-demo/src/druid.properties"));
        //4. 获取连接池对象
        DataSource dataSource = DruidDataSourceFactory.createDataSource(prop);

        //5. 获取数据库连接 Connection
        Connection conn = dataSource.getConnection();

        //2. 定义SQL
        String sql = "insert into tb_brand(brand_name, company_name, ordered, description, status) values(?,?,?,?,?);";

        //3. 获取pstmt对象
        PreparedStatement pstmt = conn.prepareStatement(sql);

        //4. 设置参数
        pstmt.setString(1,brandName);
        pstmt.setString(2,companyName);
        pstmt.setInt(3,ordered);
        pstmt.setString(4,description);
        pstmt.setInt(5,status);

        //5. 执行SQL
        int count = pstmt.executeUpdate(); // 影响的行数
        //6. 处理结果
        System.out.println(count > 0);


        //7. 释放资源
        pstmt.close();
        conn.close();


    }


    /**
     * 修改
     * 1. SQL:

     update tb_brand
         set brand_name  = ?,
         company_name= ?,
         ordered     = ?,
         description = ?,
         status      = ?
     where id = ?


     * 2. 参数:需要,所有数据
     * 3. 结果:boolean
     */

    @Test
    public void testUpdate() throws Exception {
        // 接收页面提交的参数
        String brandName = "香飘飘";
        String companyName = "香飘飘";
        int ordered = 1000;
        String description = "绕地球三圈";
        int status = 1;
        int id = 4;


        //1. 获取Connection
        //3. 加载配置文件
        Properties prop = new Properties();
        prop.load(new FileInputStream("jdbc-demo/src/druid.properties"));
        //4. 获取连接池对象
        DataSource dataSource = DruidDataSourceFactory.createDataSource(prop);

        //5. 获取数据库连接 Connection
        Connection conn = dataSource.getConnection();

        //2. 定义SQL
        String sql = " update tb_brand\n" +
                "         set brand_name  = ?,\n" +
                "         company_name= ?,\n" +
                "         ordered     = ?,\n" +
                "         description = ?,\n" +
                "         status      = ?\n" +
                "     where id = ?";

        //3. 获取pstmt对象
        PreparedStatement pstmt = conn.prepareStatement(sql);

        //4. 设置参数
        pstmt.setString(1,brandName);
        pstmt.setString(2,companyName);
        pstmt.setInt(3,ordered);
        pstmt.setString(4,description);
        pstmt.setInt(5,status);
        pstmt.setInt(6,id);

        //5. 执行SQL
        int count = pstmt.executeUpdate(); // 影响的行数
        //6. 处理结果
        System.out.println(count > 0);


        //7. 释放资源
        pstmt.close();
        conn.close();


    }


    /**
     * 删除
     * 1. SQL:

            delete from tb_brand where id = ?

     * 2. 参数:需要,id
     * 3. 结果:boolean
     */

    @Test
    public void testDeleteById() throws Exception {
        // 接收页面提交的参数

        int id = 4;


        //1. 获取Connection
        //3. 加载配置文件
        Properties prop = new Properties();
        prop.load(new FileInputStream("jdbc-demo/src/druid.properties"));
        //4. 获取连接池对象
        DataSource dataSource = DruidDataSourceFactory.createDataSource(prop);

        //5. 获取数据库连接 Connection
        Connection conn = dataSource.getConnection();

        //2. 定义SQL
        String sql = " delete from tb_brand where id = ?";

        //3. 获取pstmt对象
        PreparedStatement pstmt = conn.prepareStatement(sql);

        //4. 设置参数

        pstmt.setInt(1,id);

        //5. 执行SQL
        int count = pstmt.executeUpdate(); // 影响的行数
        //6. 处理结果
        System.out.println(count > 0);

        //7. 释放资源
        pstmt.close();
        conn.close();
    }
}

二、Mybatis
- 持久层框架,用于简化JDBC开发
- 持久层:负责将数据保存到数据可以的那一层代码
- JavaEE三层架构:
- 表现层:将数据展现到页面上的代码
- 业务层:对数据的一些查询操作代码
- 持久层
框架:
- 是一个半成品软件,是一套可重用的、通用的、软件基础代码模型
- 在框架的基础上构建软件编写更加高效、规范、通用、可扩展
1.JDBC的缺点以及Mybatis的简化操作
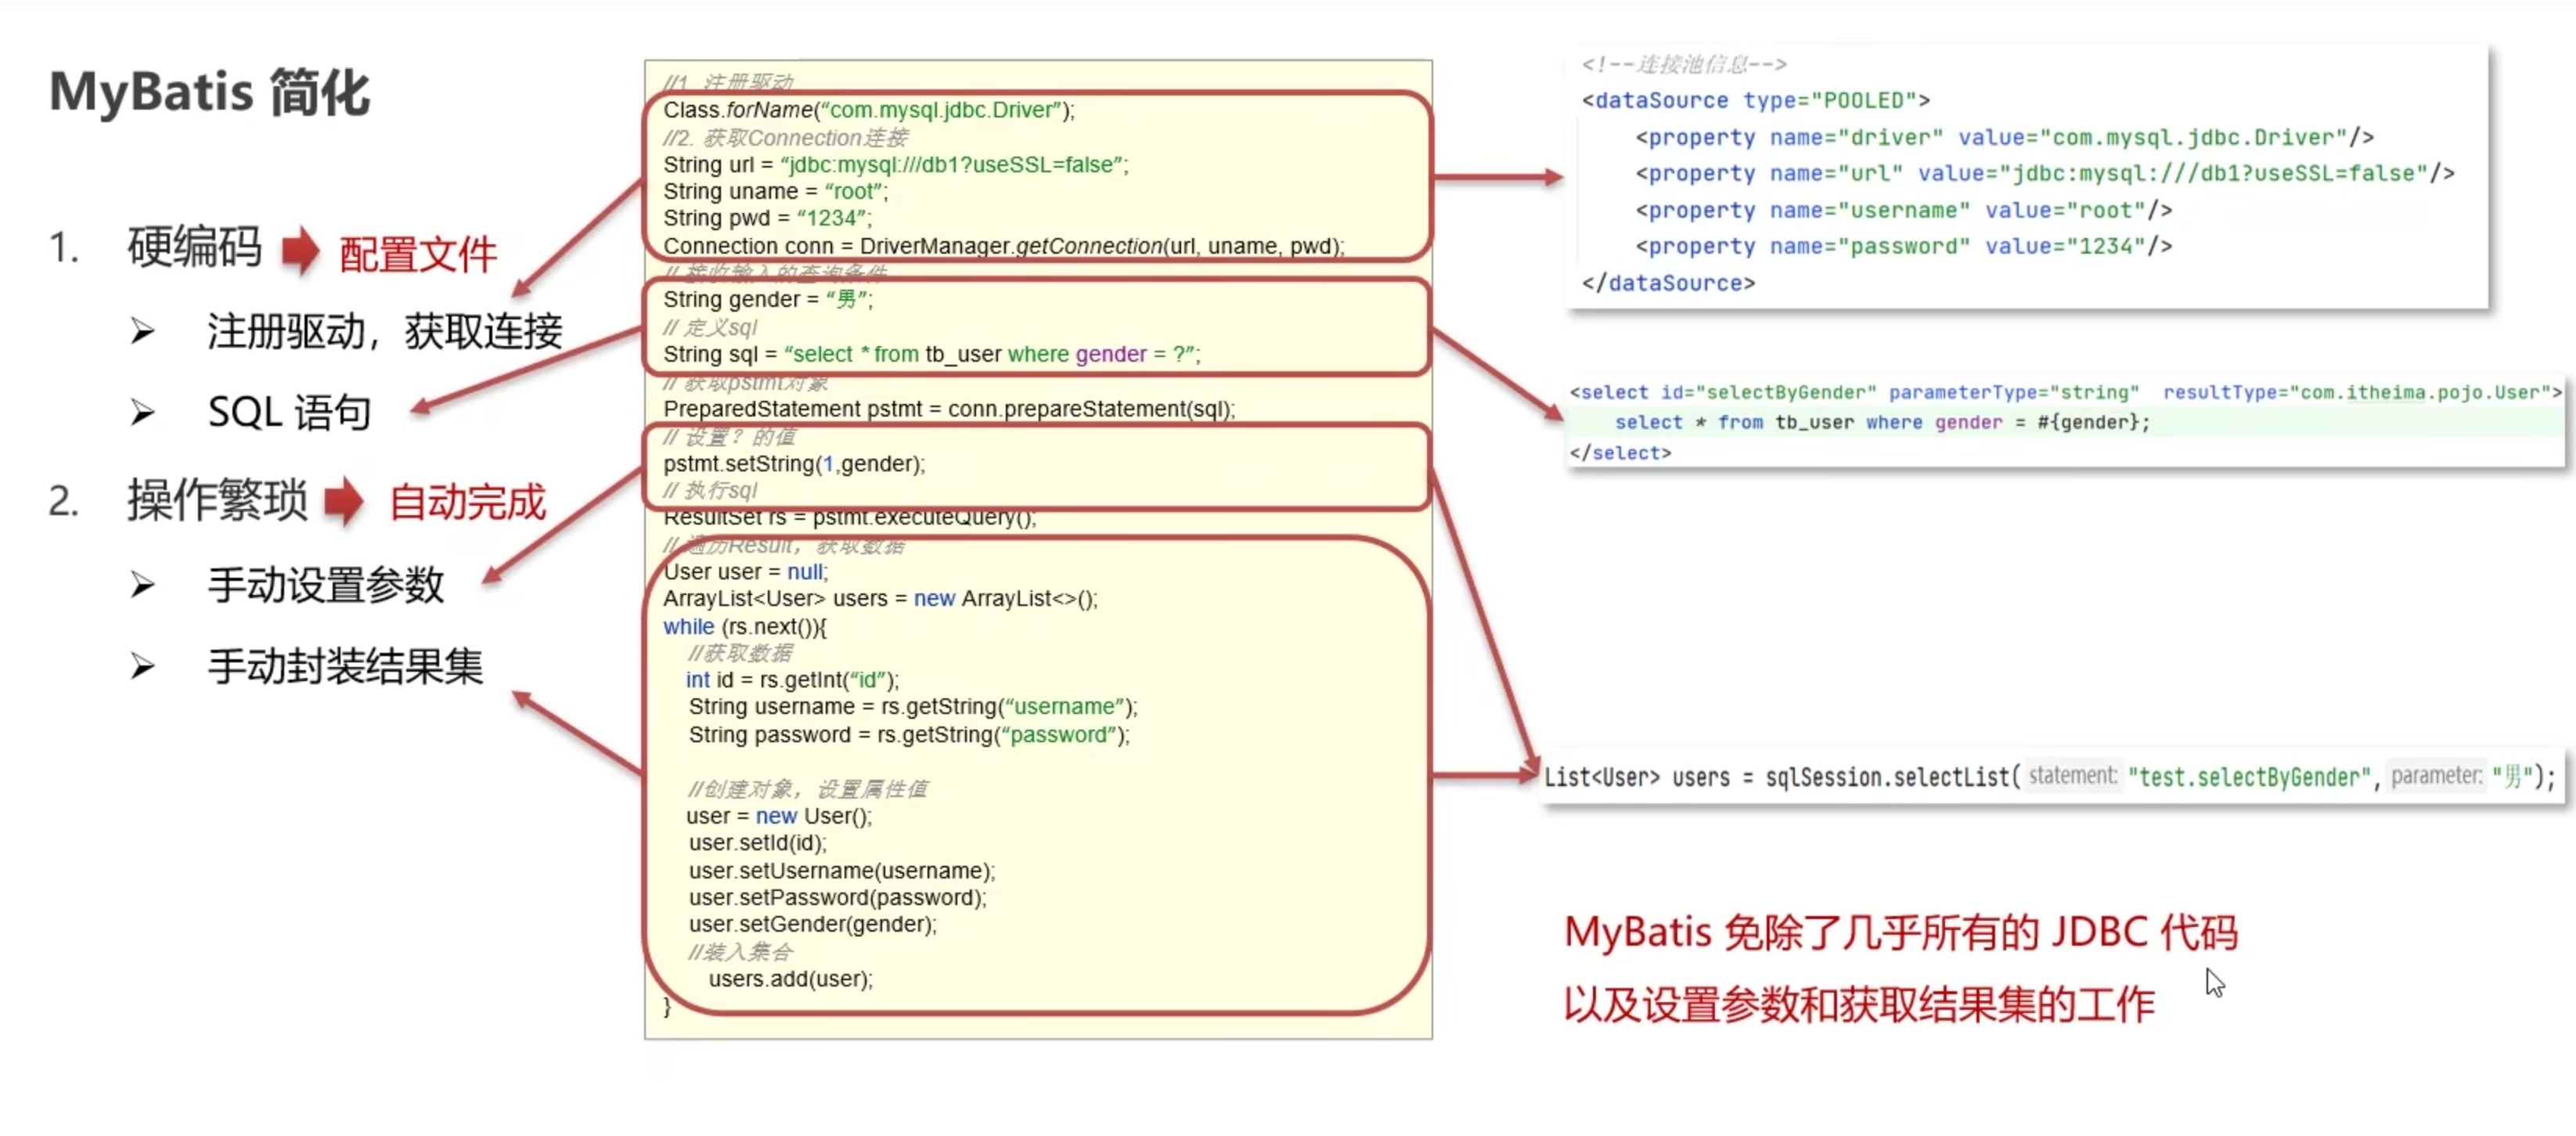
2.Mybatis快速入门
1)案例演示
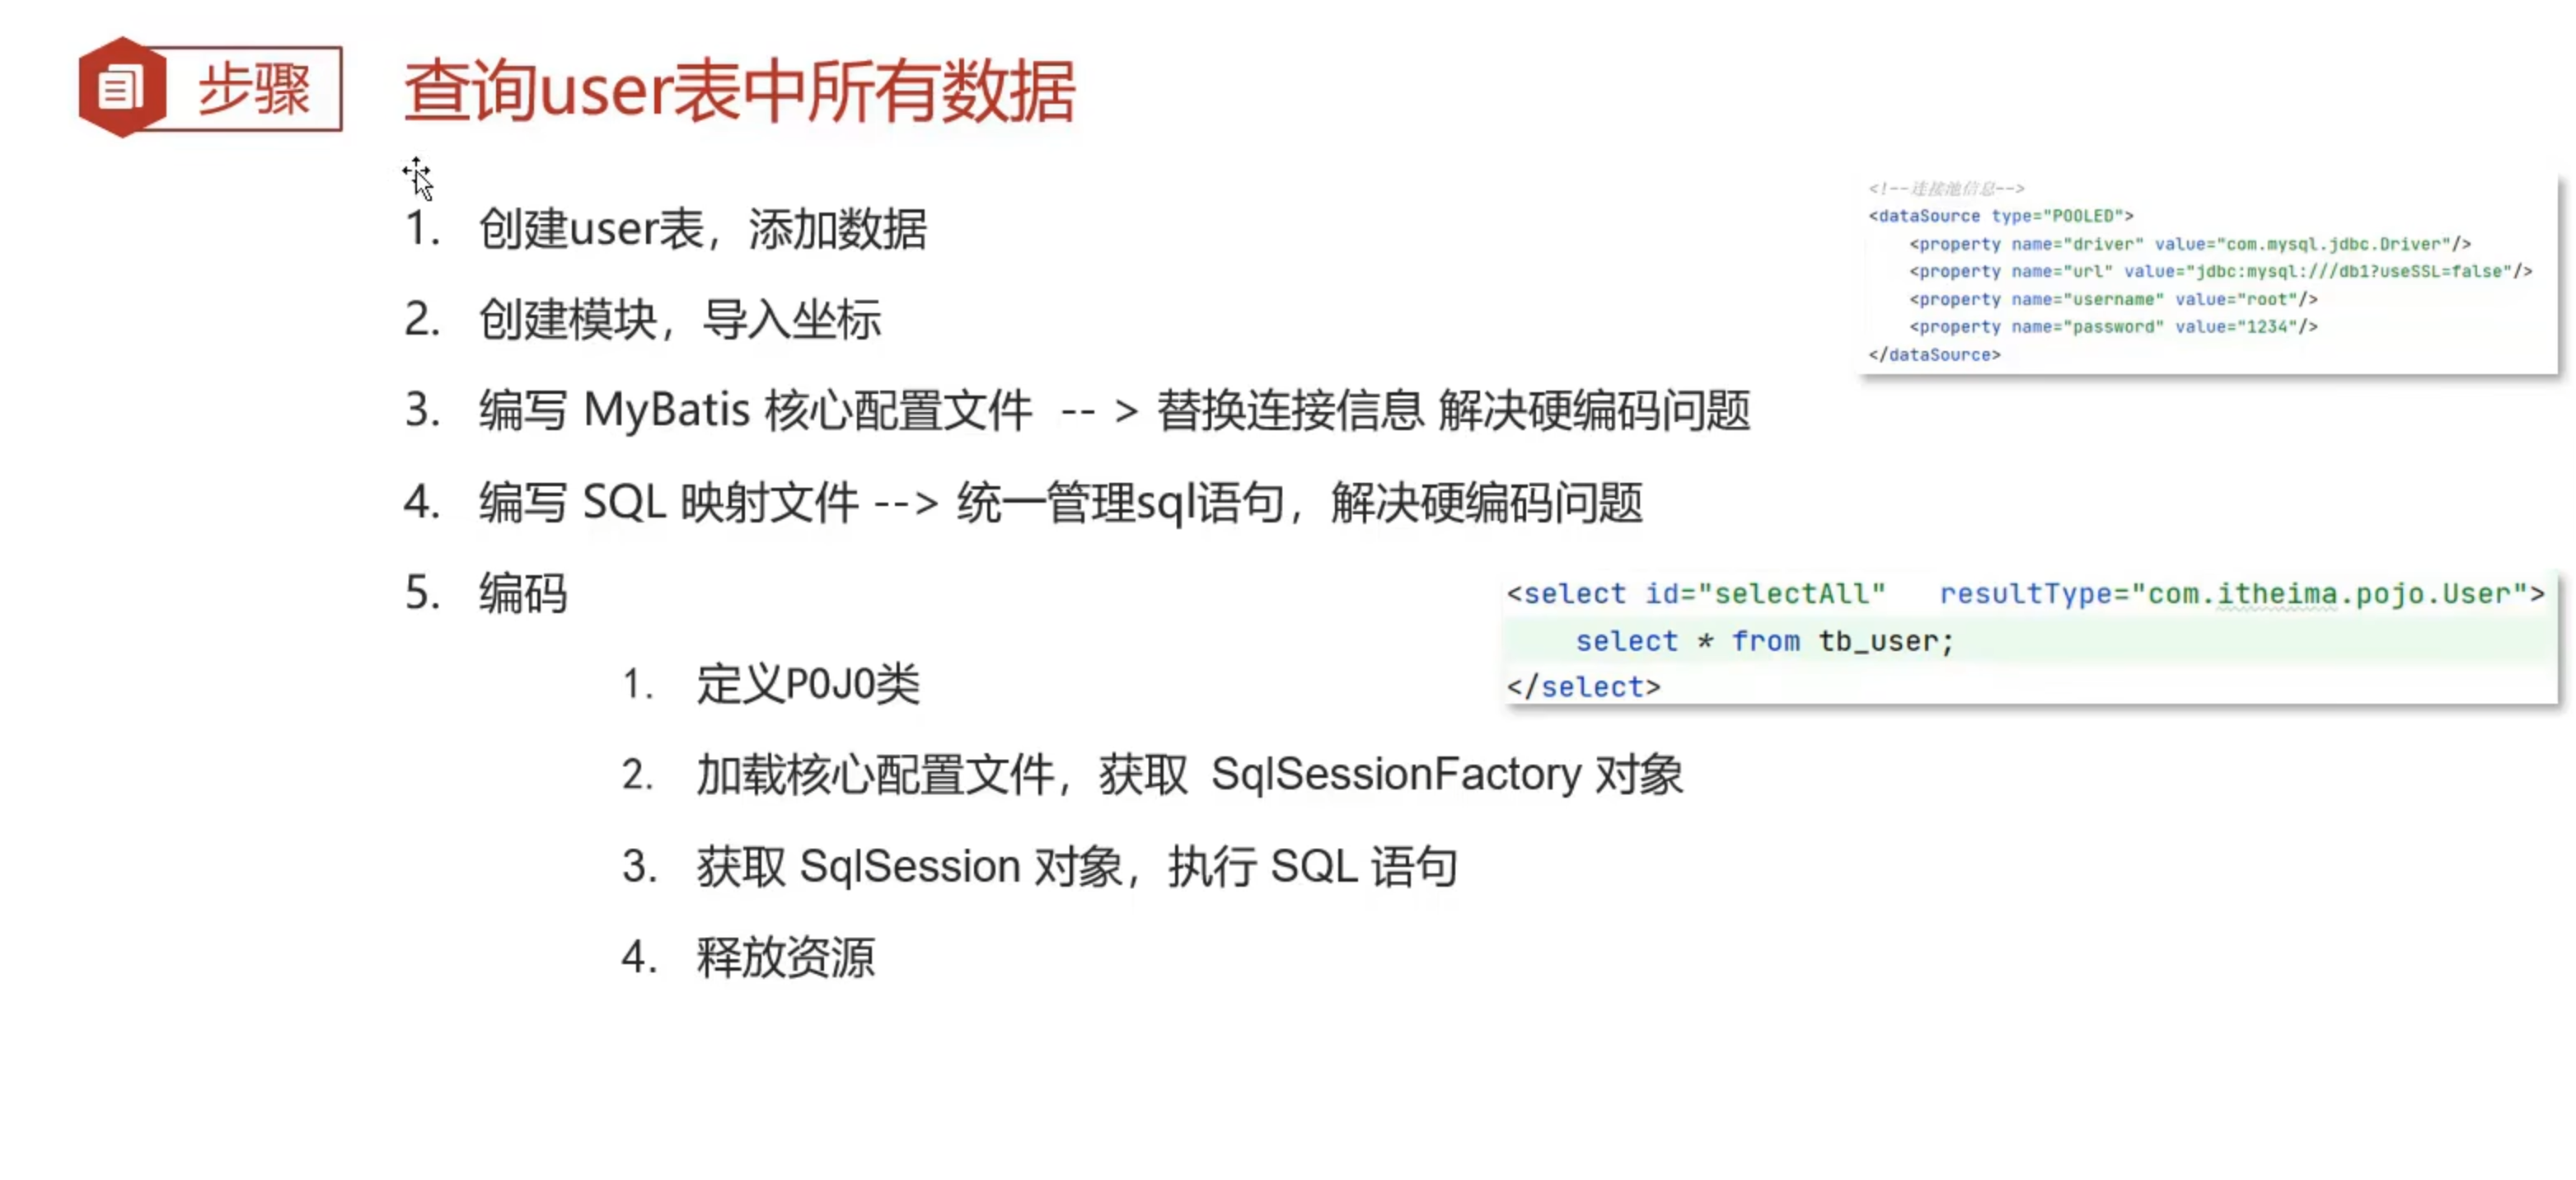
package com.mybatisDemo.mybatis;

import com.mybatisDemo.mybatis.pojo.User;
import org.apache.ibatis.io.Resources;
import org.apache.ibatis.session.SqlSession;
import org.apache.ibatis.session.SqlSessionFactory;
import org.apache.ibatis.session.SqlSessionFactoryBuilder;

import java.io.IOException;
import java.io.InputStream;
import java.util.List;

public class MybatisDemo {
    public static void main(String[] args) throws Exception {

        //1. 加载mybatis的核心配置文件,获取 SqlSessionFactory
        String resource = "mybatis-config.xml";
        InputStream inputStream = Resources.getResourceAsStream(resource);
        SqlSessionFactory sqlSessionFactory = new SqlSessionFactoryBuilder().build(inputStream);

        //2. 获取SqlSession对象,用它来执行sql
        SqlSession sqlSession = sqlSessionFactory.openSession();
        //3. 执行sql
        List<User> users = sqlSession.selectList("test.selectAll");
        System.out.println(users);
        //4. 释放资源
        sqlSession.close();
    }
}
2)IDEA配置MySQL数据库连接
在编写SQL映射文件UserMapper时,会产生警告信息提示: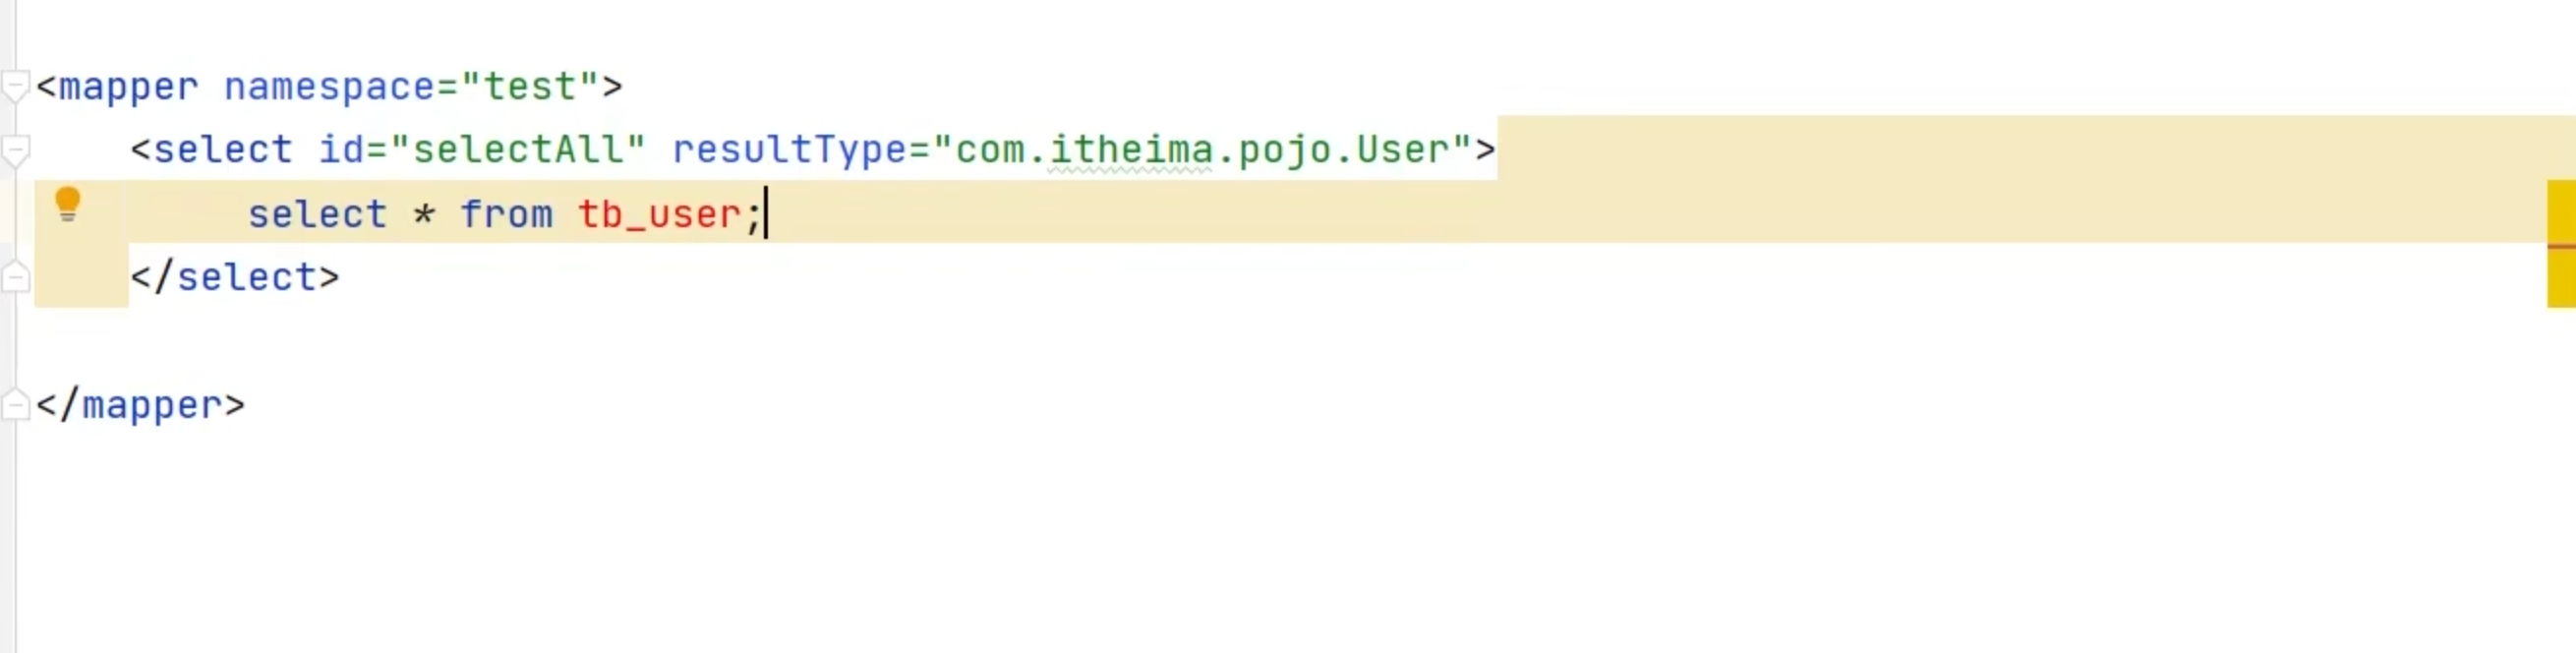
原因:
- 1.IDEA没有和数据库建立连接,不识别表信息
解决方法: - 在IDEA中配置MySQL数据库连接
步骤: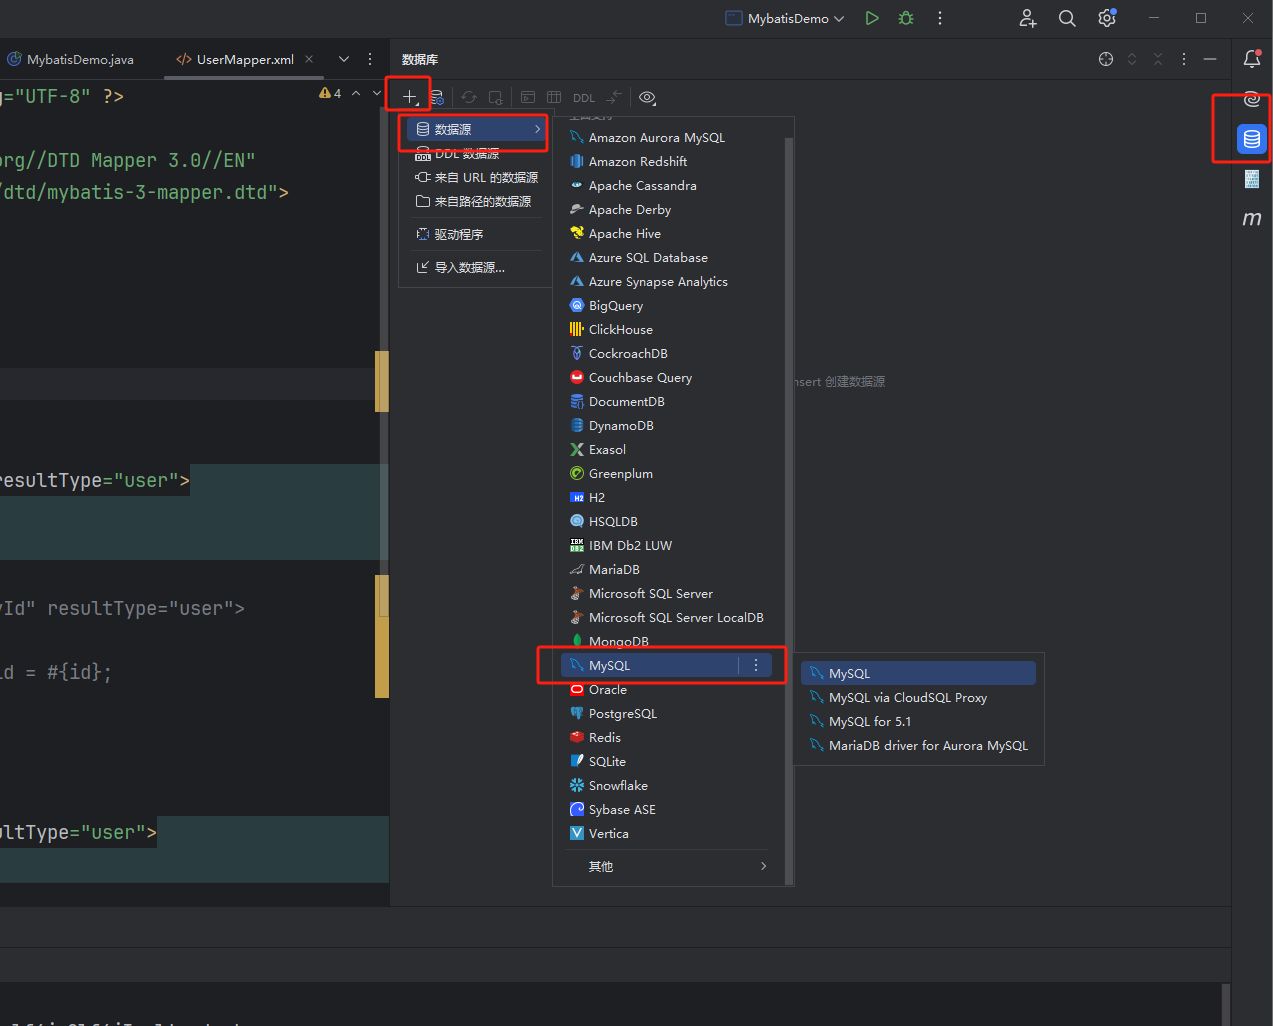
下载对应的配置文件,完成之后测试连接成功,则说明IDEA配置MySQL连接成功。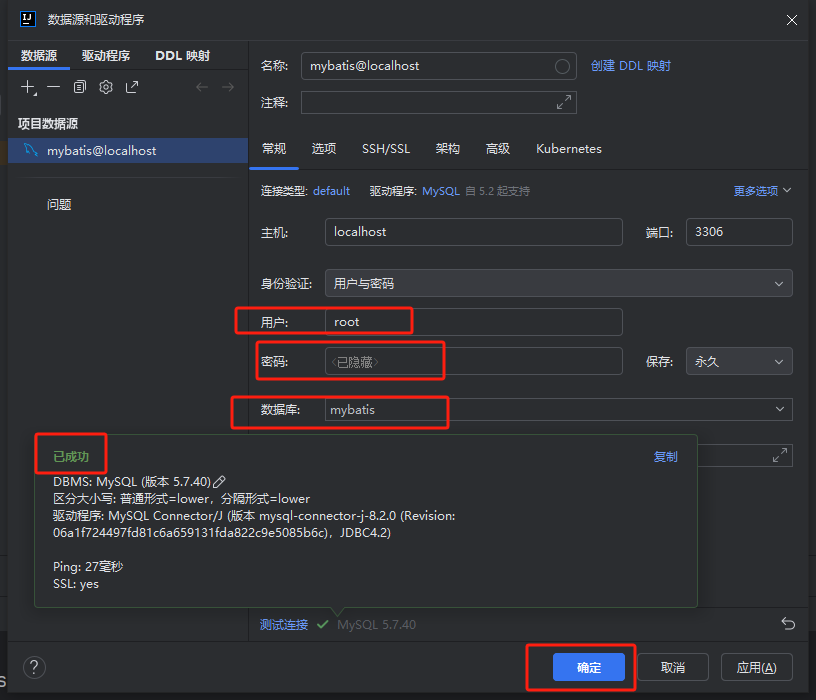
3.使用Mapper代理开发
1)Mapper介绍
在Mybatis中进行对数据库的增删改查等操作需要
- 1.先配置
UserMapper.xml, 然后将UserMapper配置到MybatisConfig.xml中, - 2.使用时需要先获取
sqlSession对象,然后调用对应的操作方法,传入在UserMapper中定义好的对应的namespace.id,这样不仅麻烦,而且在代码中还是出现了硬编码。
使用Mapper代理开发之后:
- 1.直接通过接口获取代理对象:
UserMapper userMapper = sqlSesion.getMapper(UserMapper.class); - 2.执行方法,其实就是执行在
UserMapper中定义好的对应SQL语句:List<User> users = userMapper.selectAll();
2)Mapper入门案例
-
1.定义与SQL映射文件同名的Mapper接口,并且将Mapper接口与SQL映射文件放置在同一目录下
可以在resource中创建与Mapper接口相同层级结构的目录,然后使得Mapper接口与SQL映射文件在相对相同位置: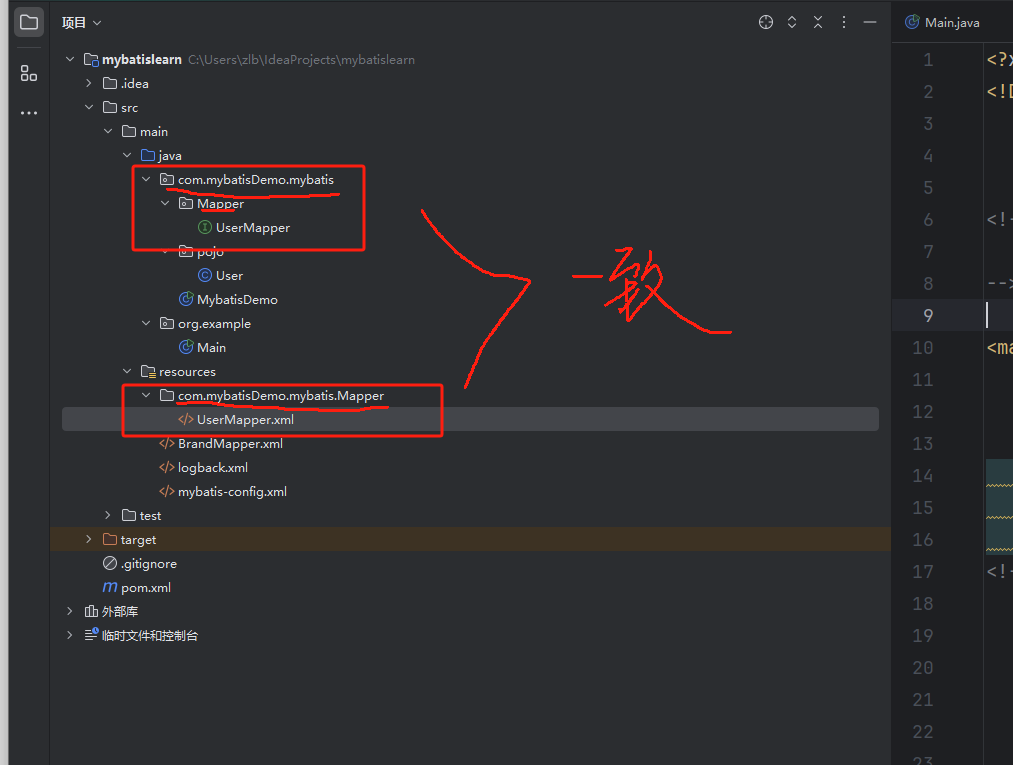
-
2.设置SQL映射文件的namespace属性位Mapper接口的全限定名
<mapper namespace="com.mybatisDemo.mybatis.Mapper.UserMapper"> -
3.在Mapper接口中定义方法,方法名对应SQL映射文件中sql语句的id,并保持参数类型和返回值类型一致
-
4.编码:
- 1.直接通过接口获取代理对象:
UserMapper userMapper = sqlSesion.getMapper(UserMapper.class); - 2.调用对应方法
List<User> users = userMapper.selectAll();
- 1.直接通过接口获取代理对象:
-
细节:如果Mapper接口名称和SQL映射文件名称相同,并在同一目录下,则可以使用
包扫描的方式简化SQL映射文件的加载:
  <mappers>
        <!--加载sql映射文件-->
<!--        <mapper resource="com/mybatisDemo/mybatis/mapper/UserMapper.xml"/>-->

        <!--Mapper代理方式-->
        <package name="com.mybatisDemo.mybatis.mapper"/>

 </mappers>
4.Mybatis核心配置文件
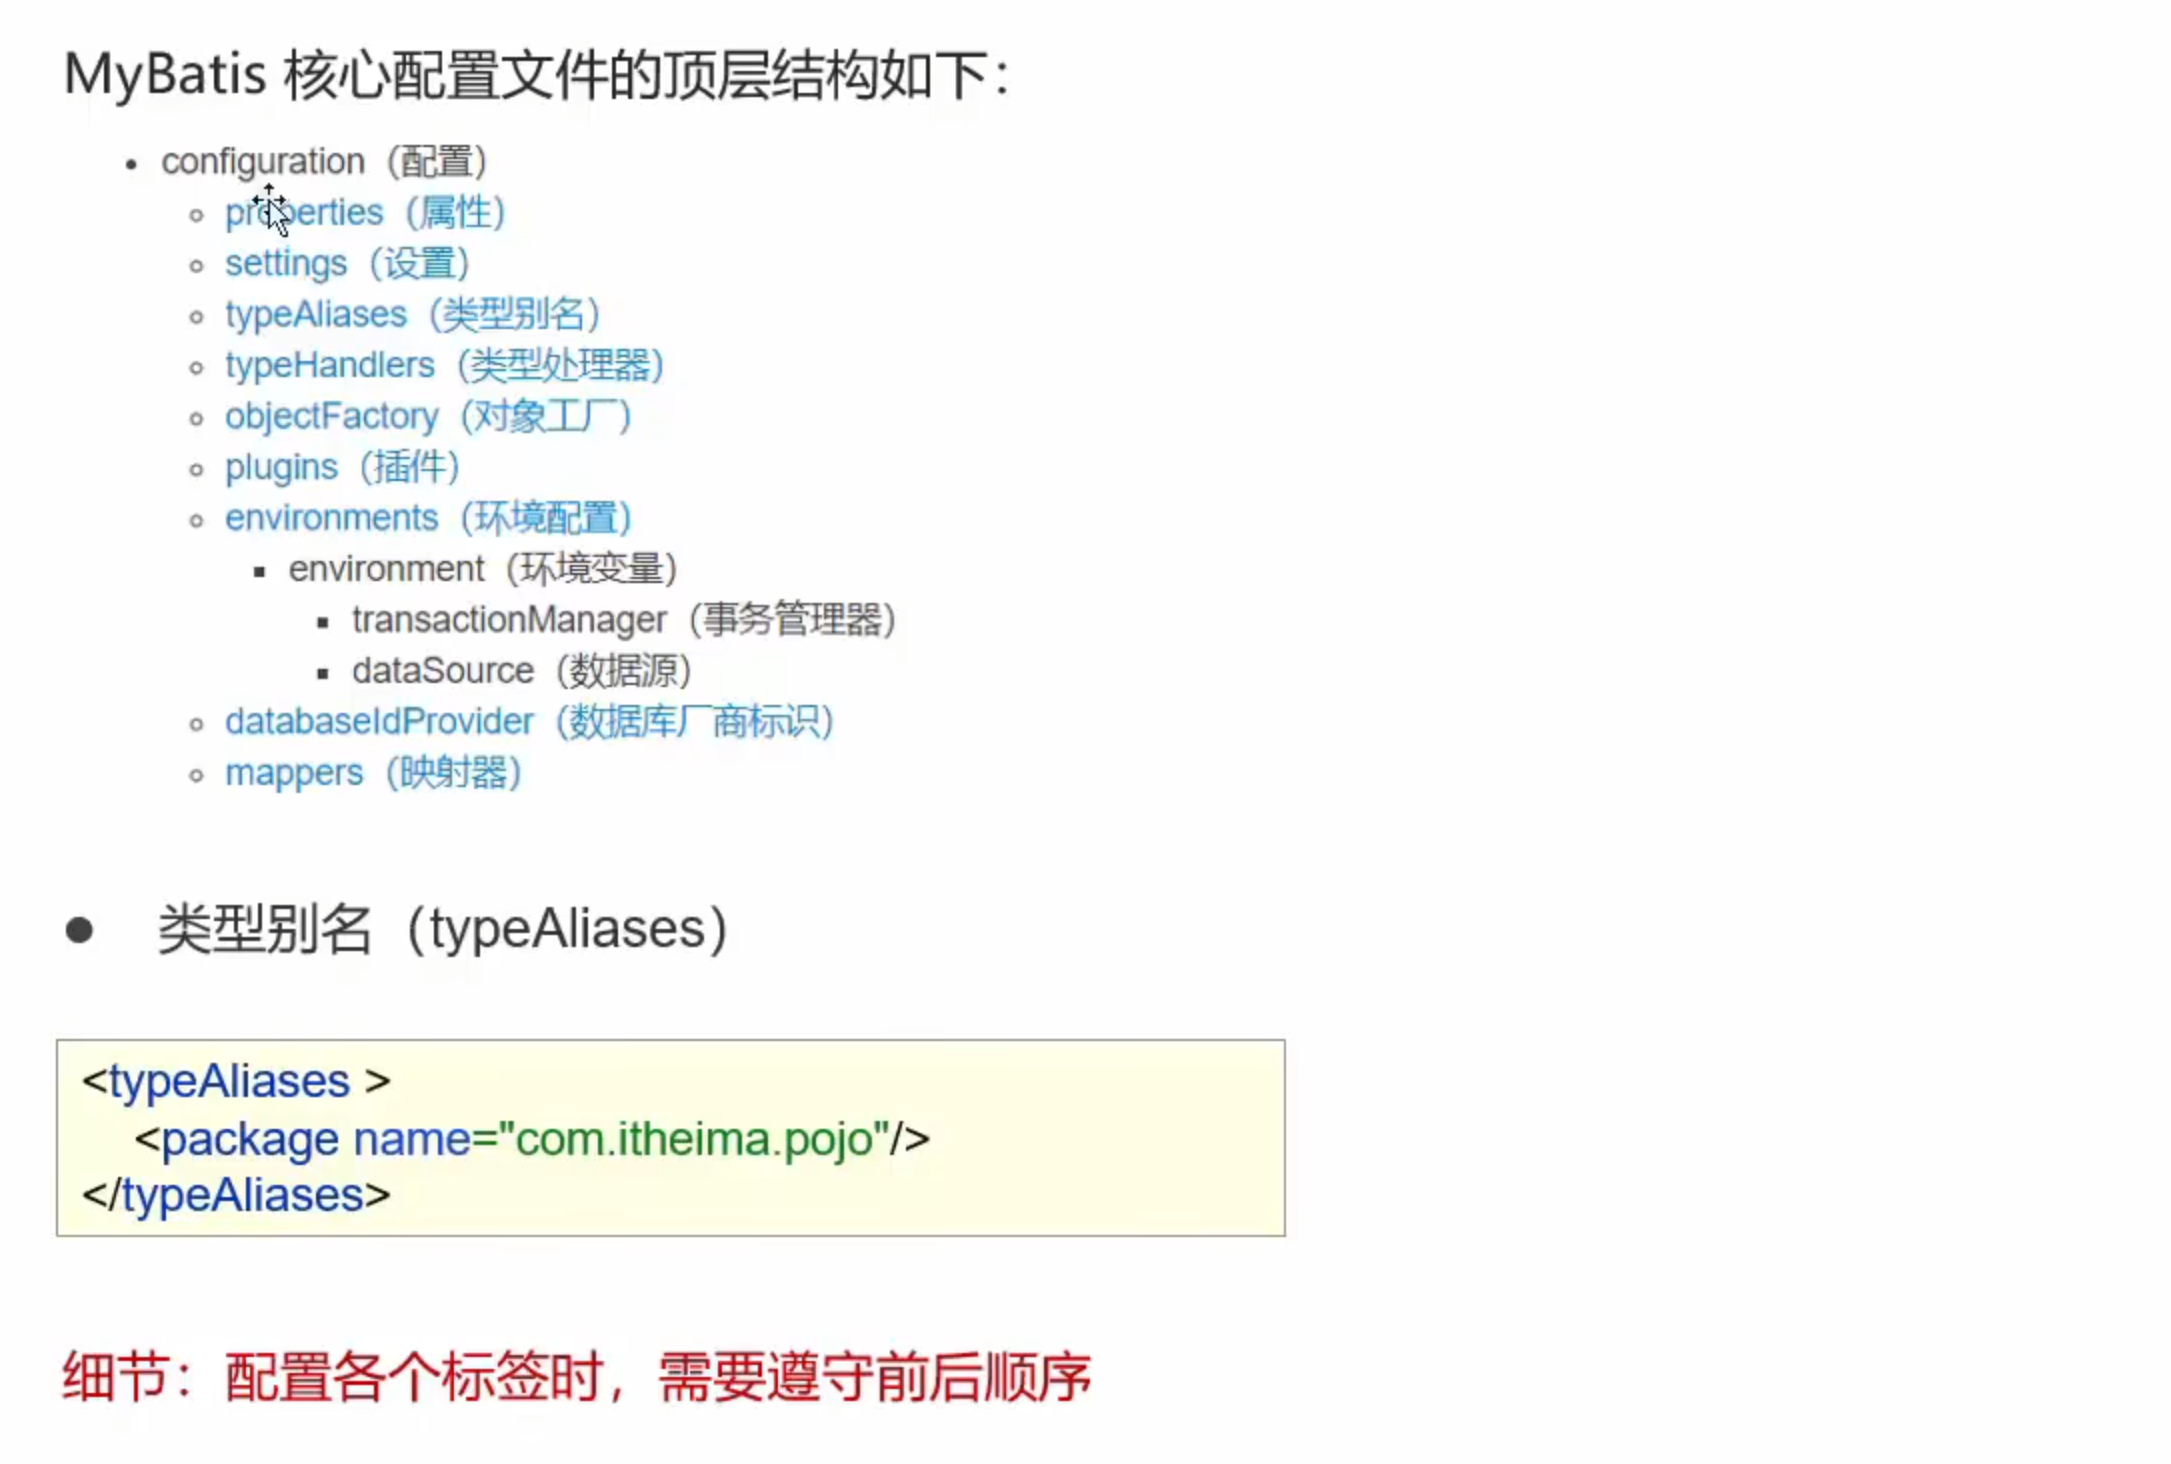
5.Mybatis案例实战
1.查询所有品牌数据:
- 1.编写接口方法:Mapper接口:
BrandMapper
查询所有:- 1.参数:无
- 2.返回结果:
List<Brand>
package com.mybatisDemo.mybatis.mapper;

import com.mybatisDemo.mybatis.pojo.Brand;

import java.util.List;

public interface BrandMapper {
    List<Brand> selectAll();
}
- 2.根据表结构建立
Brand类,方便封装返回:
tb_brand:
Brand:
package com.mybatisDemo.mybatis.pojo;

public class Brand {
    private int id;
    private String brandName;
    private String companyName;
    private int ordered;
    private String description;
    private int status;

    public int getId() {
        return id;
    }

    public void setId(int id) {
        this.id = id;
    }

    public String getBrandName() {
        return brandName;
    }

    public void setBrandName(String brandName) {
        this.brandName = brandName;
    }

    public String getCompanyName() {
        return companyName;
    }

    public void setCompanyName(String companyName) {
        this.companyName = companyName;
    }

    public int getOrdered() {
        return ordered;
    }

    public void setOrdered(int ordered) {
        this.ordered = ordered;
    }

    public String getDescription() {
        return description;
    }

    public void setDescription(String description) {
        this.description = description;
    }

    public int getStatus() {
        return status;
    }

    public void setStatus(int status) {
        this.status = status;
    }

    @Override
    public String toString() {
        return "Brand{" +
                "id=" + id +
                ", brandName='" + brandName + '\'' +
                ", companyName='" + companyName + '\'' +
                ", ordered=" + ordered +
                ", description='" + description + '\'' +
                ", status=" + status +
                '}';
    }
}
- 3.编写SQL映射文件:向对应的表中执行sql语句
BrandMapper.xml:
<?xml version="1.0" encoding="UTF-8" ?>
<!DOCTYPE mapper
        PUBLIC "-//mybatis.org//DTD Mapper 3.0//EN"
        "http://mybatis.org/dtd/mybatis-3-mapper.dtd">


<mapper namespace="com.mybatisDemo.mybatis.mapper.BrandMapper">


    <select id="selectAll" resultType="com.mybatisDemo.mybatis.pojo.Brand">
        select *
        from tb_brand;
    </select>

</mapper>
- 4.编写测试方法:
	@Test
    public void testSelectAll() throws Exception {
        //1. 加载mybatis的核心配置文件,获取 SqlSessionFactory
        String resource = "mybatis-config.xml";
        InputStream inputStream = Resources.getResourceAsStream(resource);
        SqlSessionFactory sqlSessionFactory = new SqlSessionFactoryBuilder().build(inputStream);

        //2. 获取SqlSession对象,用它来执行sql
        SqlSession sqlSession = sqlSessionFactory.openSession();

        BrandMapper brandMapper = sqlSession.getMapper(BrandMapper.class);
        List<Brand> brands = brandMapper.selectAll();

        System.out.println(brands);
    }
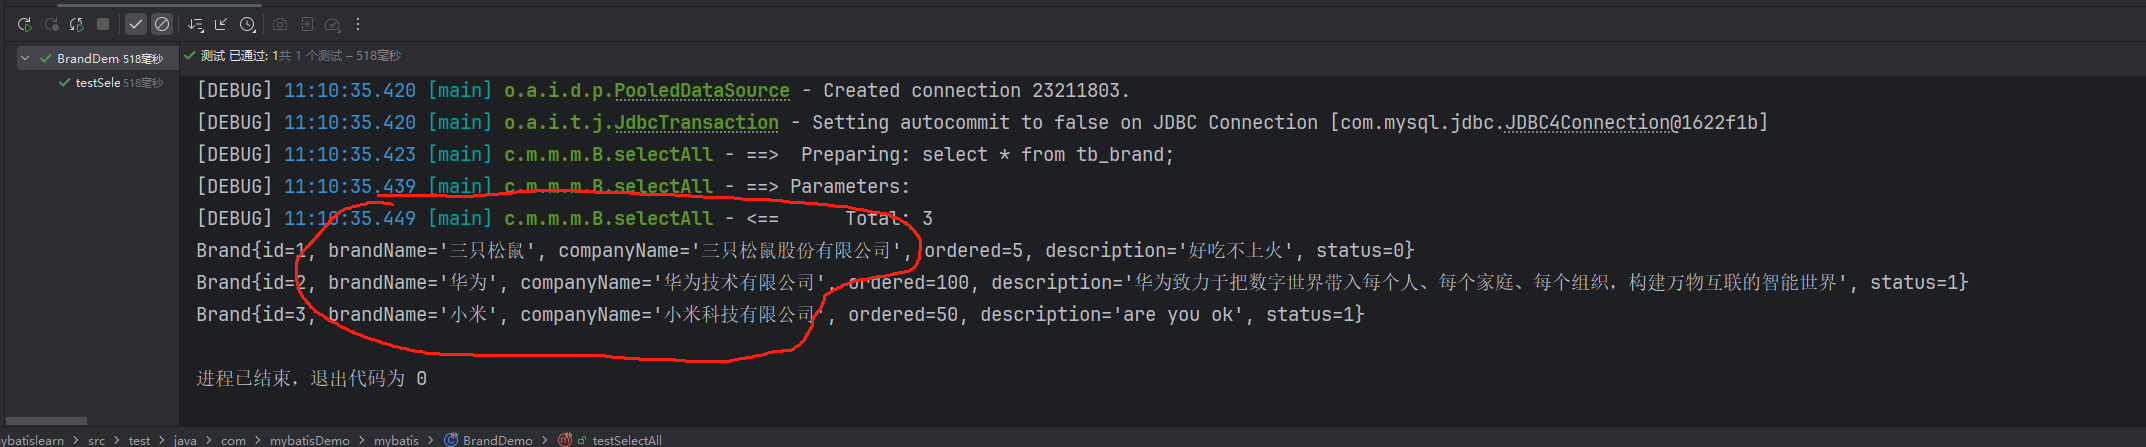
- 5.结果:

- 会发现,部分字段并没有读取到值,这是因为在Brand类中定义的名字是
brandName和companyName,此时实体类Brand和数据库表的列名brand_name和company_name不一致,无法自动封装数据。 - 解决方法:
- 1.起别名:在sql语句中对不一样的列在查询时起别名,使得别名和实体类属性名一样:
<select id="selectAll" resultType="com.mybatisDemo.mybatis.pojo.Brand">
        select id, brand_name as brandName, company_name as companyName, ordered, description, status
        from tb_brand;
</select>
这种写法比较繁琐,并且复用性不强,可以定义<sql>片段,提升复用性:
<sql id="brand_column">
         id, brand_name as brandName, company_name as companyName, ordered, description, status
</sql>

<select id="selectAll" resultType="brand">
         select
             <include refid="brand_column" />
         from tb_brand;
</select>
- 2.使用
<resultMap>:只需要将不一样的列放入到<resultMap>里面,就可以完成不同字段的映射
<resultMap id="brandResultMap" type="brand">
        <!--
            id:完成主键字段的映射
                column:表的列名
                property:实体类的属性名
            result:完成一般字段的映射
                column:表的列名
                property:实体类的属性名
        -->
        <result column="brand_name" property="brandName"/>
        <result column="company_name" property="companyName"/>
</resultMap>

<select id="selectAll" resultMap="brandResultMap">
   select *
   from tb_brand;
</select>
2.查看数据详情
- 1.编写接口方法:
查看详情:selectById():- 1.参数:根据选择的数据的id进行查询
- 2.返回结果:返回对应的Brand对象
BrandMapper:
package com.mybatisDemo.mybatis.mapper;
import com.mybatisDemo.mybatis.pojo.Brand;
import java.util.List;

public interface BrandMapper {
    List<Brand> selectAll();
    Brand selectById(int id);
}
- 2.编写SQL映射文件:完成
selectById的sql语句
<select id="selectById"  parameterType="int" resultMap="brandResultMap">
        select *
        from tb_brand
        where id = #{id};
</select>
面试题:在SQL映射文件中传参时使用#{}还是${}?
#{}: 会将参数替换为?,可以防止SQL注入${}: 直接将参数拼接到sql语句中,会存在SQL注入问题
使用时机:
* 参数传递时使用:#{}
* 表名或者列名不固定的情况时使用:${}
* 特殊字符:比如<,是xml中的特殊字符,
* 1.使用转义符:<
* 2.使用CDATA区:<![CDATA[内容]]>
- 3.编写测试方法
package com.mybatisDemo.mybatis;

import com.mybatisDemo.mybatis.mapper.BrandMapper;
import com.mybatisDemo.mybatis.pojo.Brand;
import org.apache.ibatis.io.Resources;
import org.apache.ibatis.session.SqlSession;
import org.apache.ibatis.session.SqlSessionFactory;
import org.apache.ibatis.session.SqlSessionFactoryBuilder;
import org.junit.Test;

import java.io.IOException;
import java.io.InputStream;
import java.util.List;

public class BrandDemo {
    @Test
    public void testSelectById() throws Exception {
        //1. 加载mybatis的核心配置文件,获取 SqlSessionFactory
        String resource = "mybatis-config.xml";
        InputStream inputStream = Resources.getResourceAsStream(resource);
        SqlSessionFactory sqlSessionFactory = new SqlSessionFactoryBuilder().build(inputStream);

        //2. 获取SqlSession对象,用它来执行sql
        SqlSession sqlSession = sqlSessionFactory.openSession();

        BrandMapper brandMapper = sqlSession.getMapper(BrandMapper.class);
       Brand brand = brandMapper.selectById(1);

       System.out.println(brand);
    }
}
3.条件查询
1)多条件查询
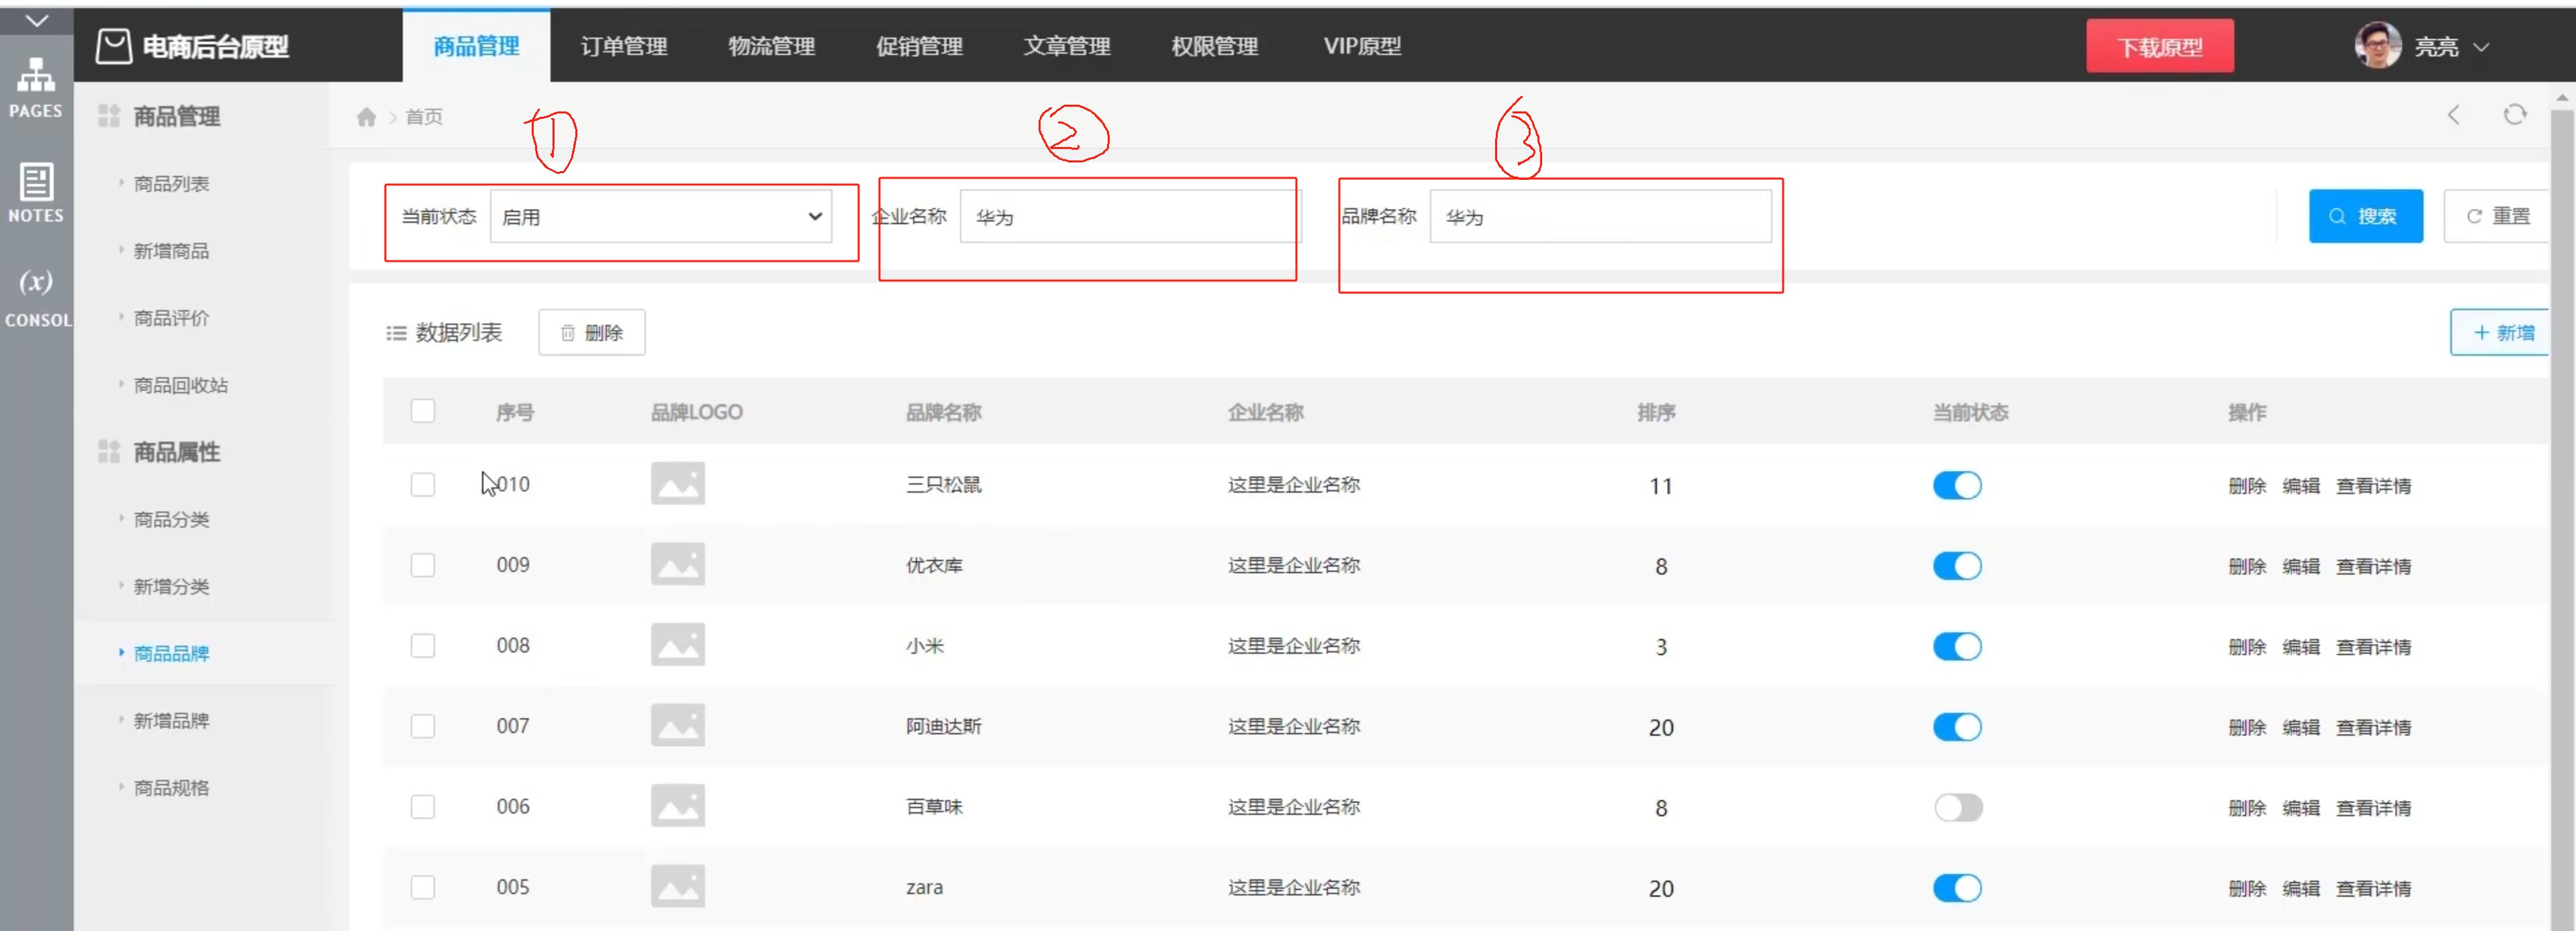
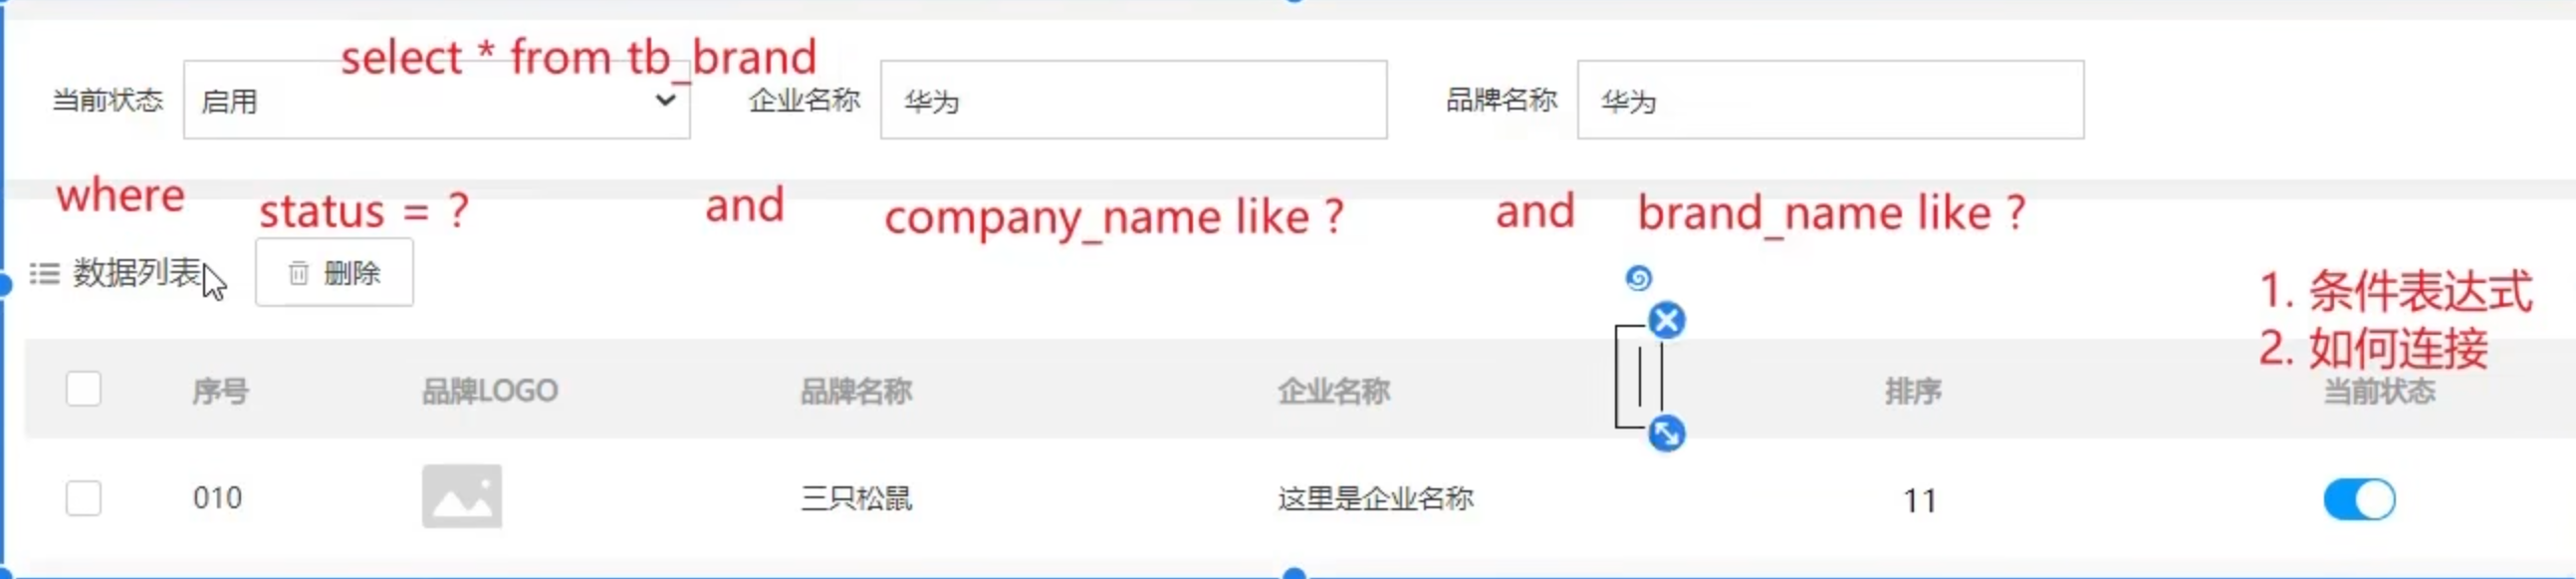
- 1.编写接口方法:Mapper接口
多条件查询:- 1.参数:提供的查询条件
- 2.返回结果:
List<Brand>
- 2.编写SQL映射文件:
selectByConditon的带参sql语句 - 3.编写测试方法
testSelectByCondtion(),接收参数并处理参数,然后将参数传入BrandMapper的对应方法进行执行对应SQL语句。
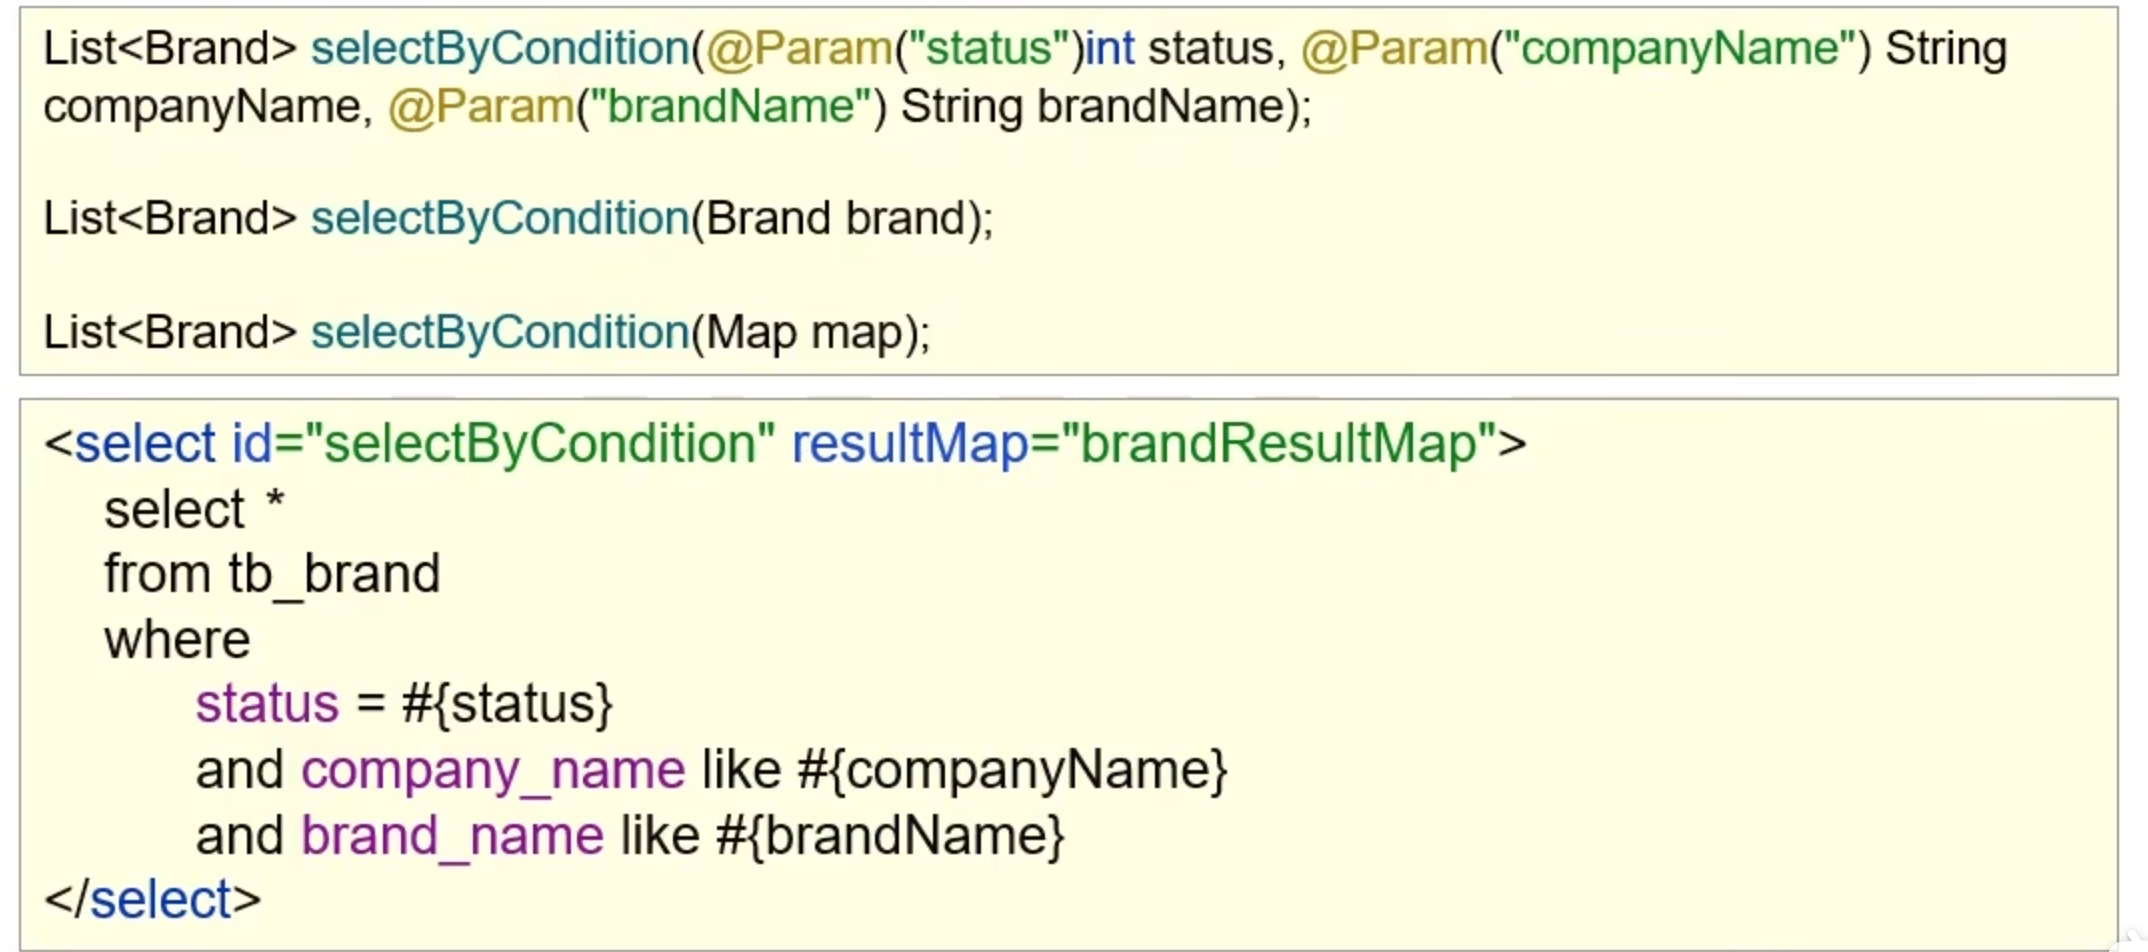
多条件查询中多个参数的设置方式:
- a.散装参数:需要使用
@Param("SQL中的参数占位符名称")
1.接口中编写对应方法时,需要设定SQL映射文件中对应参数的名称:
package com.mybatisDemo.mybatis.mapper;

import com.mybatisDemo.mybatis.pojo.Brand;
import org.apache.ibatis.annotations.Param;

import java.util.List;

public interface BrandMapper {
    List<Brand> selectAll();
    Brand selectById(int id);

    List<Brand> selectByCondition(@Param("status") int status,
                                  @Param("companyName") String companyName,
                                  @Param("brandName") String brandName);
}
2.调用接口方法时,直接将查询条件处理后传入方法:
package com.mybatisDemo.mybatis;

import com.mybatisDemo.mybatis.mapper.BrandMapper;
import com.mybatisDemo.mybatis.pojo.Brand;
import org.apache.ibatis.io.Resources;
import org.apache.ibatis.session.SqlSession;
import org.apache.ibatis.session.SqlSessionFactory;
import org.apache.ibatis.session.SqlSessionFactoryBuilder;
import org.junit.Test;

import java.io.IOException;
import java.io.InputStream;
import java.util.List;

public class BrandDemo {
    @Test
    public void testSelectByCondition() throws Exception {

        //假设传入的查询条件
        int status = 1;
        String companyName = "华为";
        String brandName = "华为";

        //处理参数: 匹配模糊查询
        companyName = "%" + companyName + "%";
        brandName = "%" + brandName + "%";

        //1. 加载mybatis的核心配置文件,获取 SqlSessionFactory
        String resource = "mybatis-config.xml";
        InputStream inputStream = Resources.getResourceAsStream(resource);
        SqlSessionFactory sqlSessionFactory = new SqlSessionFactoryBuilder().build(inputStream);

        //2. 获取SqlSession对象,用它来执行sql
        SqlSession sqlSession = sqlSessionFactory.openSession();

        BrandMapper brandMapper = sqlSession.getMapper(BrandMapper.class);
        List<Brand> brands = brandMapper.selectByCondition(status, companyName, brandName);

        for (Brand brand : brands) {
            System.out.println(brand);
        }
    }
}
- b.实体类封装参数:将多个参数传入到一个对象中,
- 只需要保证SQL中参数名和实体类属性名中对应上
1.在接口类中定义方法时,设定为将参数以对象的形式传入UserMapper:
package com.mybatisDemo.mybatis.mapper;

import com.mybatisDemo.mybatis.pojo.Brand;
import org.apache.ibatis.annotations.Param;

import java.util.List;

public interface BrandMapper {
    List<Brand> selectAll();
    Brand selectById(int id);

//    List<Brand> selectByCondition(@Param("status") int status,
//                                  @Param("companyName") String companyName,
//                                  @Param("brandName") String brandName);

    List<Brand> selectByCondition(Brand brand);
}
2.方法调用时,将参数封装成对象传递给selectByCondition:
package com.mybatisDemo.mybatis;

import com.mybatisDemo.mybatis.mapper.BrandMapper;
import com.mybatisDemo.mybatis.pojo.Brand;
import org.apache.ibatis.io.Resources;
import org.apache.ibatis.session.SqlSession;
import org.apache.ibatis.session.SqlSessionFactory;
import org.apache.ibatis.session.SqlSessionFactoryBuilder;
import org.junit.Test;

import java.io.IOException;
import java.io.InputStream;
import java.util.List;

public class BrandDemo {
    @Test
    public void testSelectByCondition() throws Exception {

        //假设传入的查询条件
        int status = 1;
        String companyName = "华为";
        String brandName = "华为";

        //处理参数: 匹配模糊查询
        companyName = "%" + companyName + "%";
        brandName = "%" + brandName + "%";

        Brand brand = new Brand();
        brand.setStatus(status);
        brand.setCompanyName(companyName);
        brand.setBrandName(brandName);


        //1. 加载mybatis的核心配置文件,获取 SqlSessionFactory
        String resource = "mybatis-config.xml";
        InputStream inputStream = Resources.getResourceAsStream(resource);
        SqlSessionFactory sqlSessionFactory = new SqlSessionFactoryBuilder().build(inputStream);

        //2. 获取SqlSession对象,用它来执行sql
        SqlSession sqlSession = sqlSessionFactory.openSession();

        BrandMapper brandMapper = sqlSession.getMapper(BrandMapper.class);

        List<Brand> brands = brandMapper.selectByCondition(brand);

        for (Brand brand1 : brands) {
            System.out.println(brand1);
        }
    }
}
- c.map集合:
- 只需要保证SQL中的参数名和map集合的键的名称对应上
1.在接口类中定义selectByCondition时,设定为将参数作为Map集合传入:
package com.mybatisDemo.mybatis.mapper;

import com.mybatisDemo.mybatis.pojo.Brand;
import org.apache.ibatis.annotations.Param;

import java.util.List;
import java.util.Map;

public interface BrandMapper {
    List<Brand> selectAll();
    Brand selectById(int id);
    List<Brand> selectByCondition(Map condition);
}
2.将接收的参数放到Map集合中,在获取到BrandMapper对象之后,调用selectByCondition()方法时,将Map集合传递进去:
package com.mybatisDemo.mybatis;

import com.mybatisDemo.mybatis.mapper.BrandMapper;
import com.mybatisDemo.mybatis.pojo.Brand;
import org.apache.ibatis.io.Resources;
import org.apache.ibatis.session.SqlSession;
import org.apache.ibatis.session.SqlSessionFactory;
import org.apache.ibatis.session.SqlSessionFactoryBuilder;
import org.junit.Test;

import java.io.IOException;
import java.io.InputStream;
import java.util.HashMap;
import java.util.List;
import java.util.Map;

public class BrandDemo {
    @Test
    public void testSelectByCondition() throws Exception {

        //假设传入的查询条件
        int status = 1;
        String companyName = "华为";
        String brandName = "华为";

        //处理参数: 匹配模糊查询
        companyName = "%" + companyName + "%";
        brandName = "%" + brandName + "%";

       //将参数封装成一个Map集合
        Map condition = new HashMap();
        condition.put("status", status);
        condition.put("companyName", companyName);
        condition.put("brandName", brandName);


        //1. 加载mybatis的核心配置文件,获取 SqlSessionFactory
        String resource = "mybatis-config.xml";
        InputStream inputStream = Resources.getResourceAsStream(resource);
        SqlSessionFactory sqlSessionFactory = new SqlSessionFactoryBuilder().build(inputStream);

        //2. 获取SqlSession对象,用它来执行sql
        SqlSession sqlSession = sqlSessionFactory.openSession();

        BrandMapper brandMapper = sqlSession.getMapper(BrandMapper.class);

        List<Brand> brands = brandMapper.selectByCondition(condition);

        for (Brand brand1 : brands) {
            System.out.println(brand1);
        }
    }
}

2)多条件查询–动态SQL
- 当根据多条件写定sql语句时,用户如果漏写其中一个条件,那么传入的对应参数则为null,再根据多条件sql查询时,就会将对应的参数设为null,那么查询的数据就不是我们想要的数据。
- 为了解决这个问题,我们需要根据参数值动态的去适配执行对应的sql语句。
- 这里就要用到动态SQL:sql语句随着用户的输入或者外部条件的变化而变化
- 动态SQL:
- 1.
<if>:使用<if test=“字段条件”>:符合条件时,包裹的sql条件才会被添加到整个sql中进行查询
- 1.
    <select id="selectByCondition" resultMap="brandResultMap">
        select *
        from tb_brand
        where
            <if test="status != null">
                status = #{status}
            </if>
            <if test="companyName != null and companyName != ''">
                and company_name like #{companyName}
            </if>
            <if test="brandName != null and brandName != ''">
                and brand_name like #{brandName}
            </if>
    </select>
- 2.上面的方式还是会存在一点问题,当第一个条件不满足时,会舍弃该段条件,整个sql会变成:
select * from tb_brand where and company_name like '%华为%' and brand_name like '%华为%';

就导致sql语句不合法。
于是这里继续使用<where>来包裹全部的<if>,这样如果有其中一个条件不符合则会去除该条件,并将下一个sql条件前面的and去掉:
    <select id="selectByCondition" resultMap="brandResultMap">
        select *
        from tb_brand
        <where>
            <if test="status != null">
                and status = #{status}
            </if>
            <if test="companyName != null and companyName != ''">
                and company_name like #{companyName}
            </if>
            <if test="brandName != null and brandName != ''">
                and brand_name like #{brandName}
            </if>
        </where>
    </select>

3)单条件的动态查询
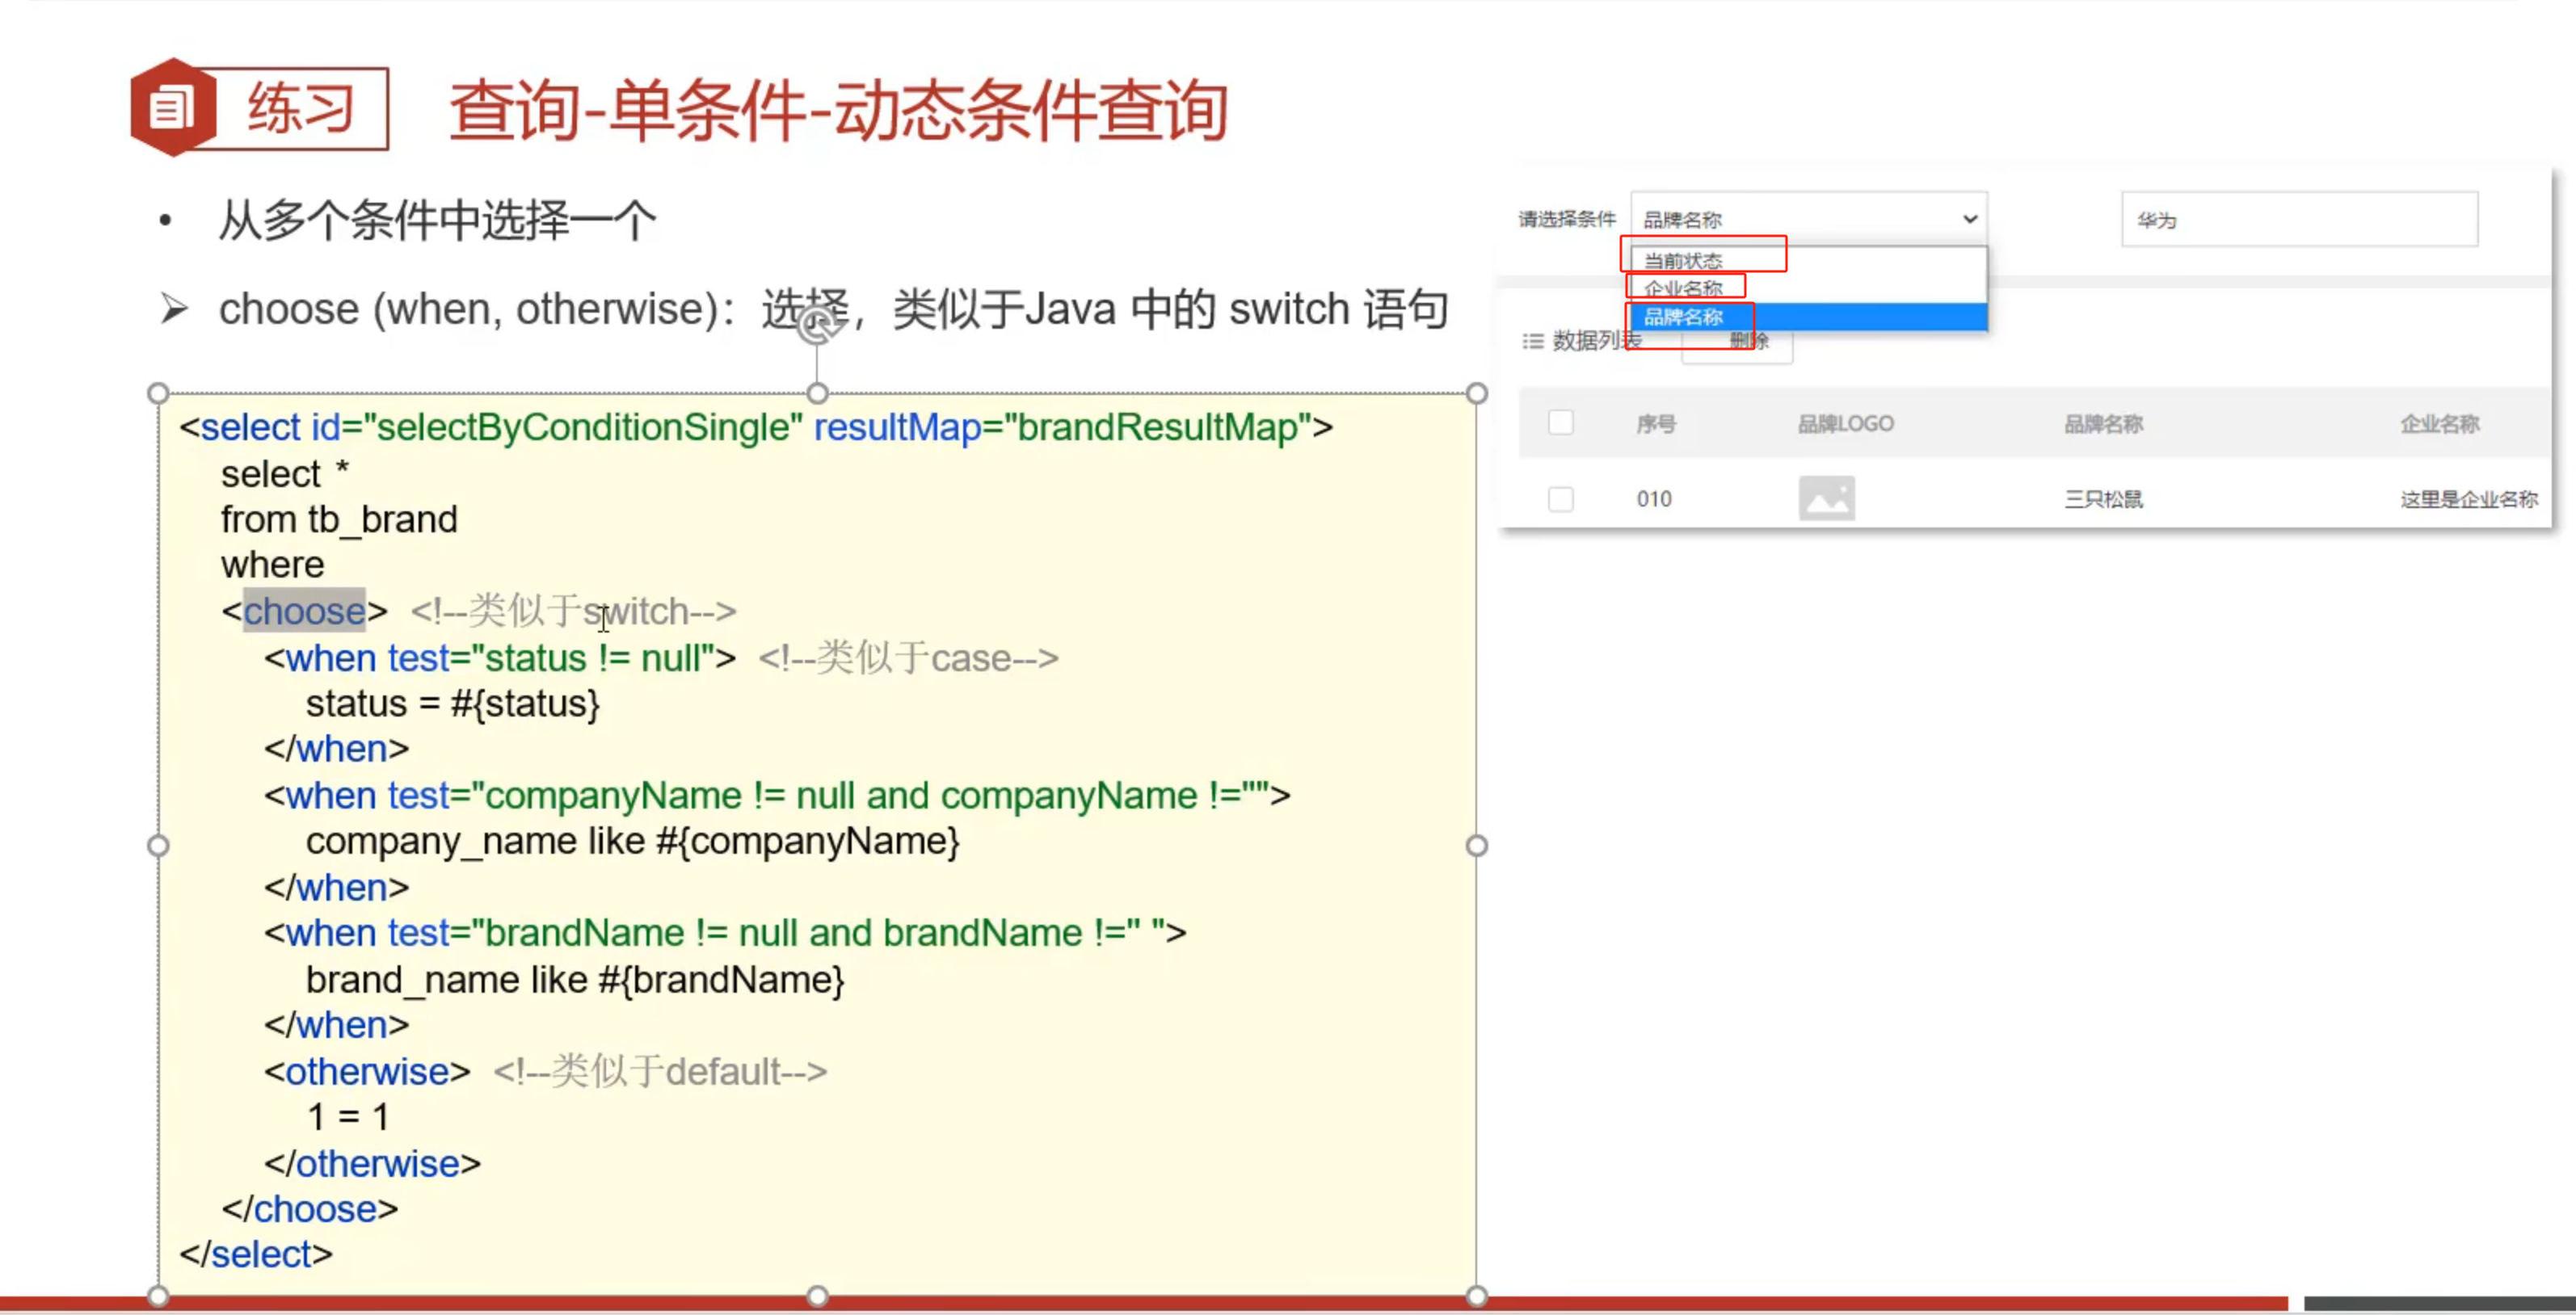
- 当需要根据用户的多选一操作进行匹配查询时,也就是当用户选择当前状态时,需要根据当前状态去查询,选择品牌名称则需要根据品牌名称对应的查询sql去查询
- 如果针对三个输入都另外写专门的sql映射以及Mapper接口方法的话就会很重复
- 我们可以通过
<choose>--相对于switch,然后在<choose>内用<when>--相当于case - 去包裹符合
test的条件时的sql语句,则会根据是否满足test条件从而对该部分的sql语句进行查询
    <select id="selectByCondition" resultMap="brandResultMap">
        select *
        from tb_brand
        <where>
            <choose>
                <when test="status != null">
                    status = #{status}
                </when>
                <when test="companyName != null and companyName != ''">
                    company_name like #{companyName}
                </when>
                <when test="brandName != null and brandName != ''">
                    brand_name like #{brandName}
                </when>
            </choose>
        </where>
    </select>
4.添加
1)添加
点击添加按钮之后,需要完成对象的添加:
- 1.实现Mapper接口:
Add():- 传入参数:接收id之外的所有参数
- 放回结果:add不需要返回
package com.mybatisDemo.mybatis.mapper;

import com.mybatisDemo.mybatis.pojo.Brand;

import java.util.List;

public interface BrandMapper {
    List<Brand> selectAll();
    Brand selectById(int id);
    List<Brand> selectByCondition(Brand brand);
    List<Brand> selectByConditions(Brand brand);
//    List<Brand> selectByConditions(Map condition);
    void addBrand(Brand brand);
}
- 2.编写SQL映射文件:完成
add()对应的sql语句
    <insert id="addBrand">
        insert into tb_brand
        (brand_name, company_name, ordered, description, status)
        values (#{brandName}, #{companyName}, #{ordered}, #{description}, #{status});
    </insert>
- 3.在测试方法中接收数据,封装成对象,调用Mapper对象的接口执行对应的sql将对象添加到数据库中
testAddBrand():
package com.mybatisDemo.mybatis;

import com.mybatisDemo.mybatis.mapper.BrandMapper;
import com.mybatisDemo.mybatis.pojo.Brand;
import org.apache.ibatis.io.Resources;
import org.apache.ibatis.session.SqlSession;
import org.apache.ibatis.session.SqlSessionFactory;
import org.apache.ibatis.session.SqlSessionFactoryBuilder;
import org.junit.Test;

import java.io.IOException;
import java.io.InputStream;
import java.util.HashMap;
import java.util.List;
import java.util.Map;

public class BrandDemo {
    @Test
    public void testAddBrand() throws Exception {

        //假设传入的查询条件
        int status = 1;
        String companyName = "菠萝";
        String brandName = "菠萝";
        int ordered = 9999;
        String description = "菠萝手机,联赛升级";

        Brand brand = new Brand();
        brand.setStatus(status);
        brand.setCompanyName(companyName);
        brand.setBrandName(brandName);
        brand.setOrdered(ordered);
        brand.setDescription(description);

        //1. 加载mybatis的核心配置文件,获取 SqlSessionFactory
        String resource = "mybatis-config.xml";
        InputStream inputStream = Resources.getResourceAsStream(resource);
        SqlSessionFactory sqlSessionFactory = new SqlSessionFactoryBuilder().build(inputStream);

        //2. 获取SqlSession对象,用它来执行sql
        SqlSession sqlSession = sqlSessionFactory.openSession(true);

        BrandMapper brandMapper = sqlSession.getMapper(BrandMapper.class);
        brandMapper.addBrand(brand);
    }
}
2)主键返回
比如在添加完数据之后,需要将添加的数据对应的主键id保存到专属的订单页中
- 正常按照上述1)保存完数据是无法立即获取到主键id的
- 这里通过设置
userGeneratedKeys=true和keyProperty="id"来获取插入数据库的当前这条数据的主键的值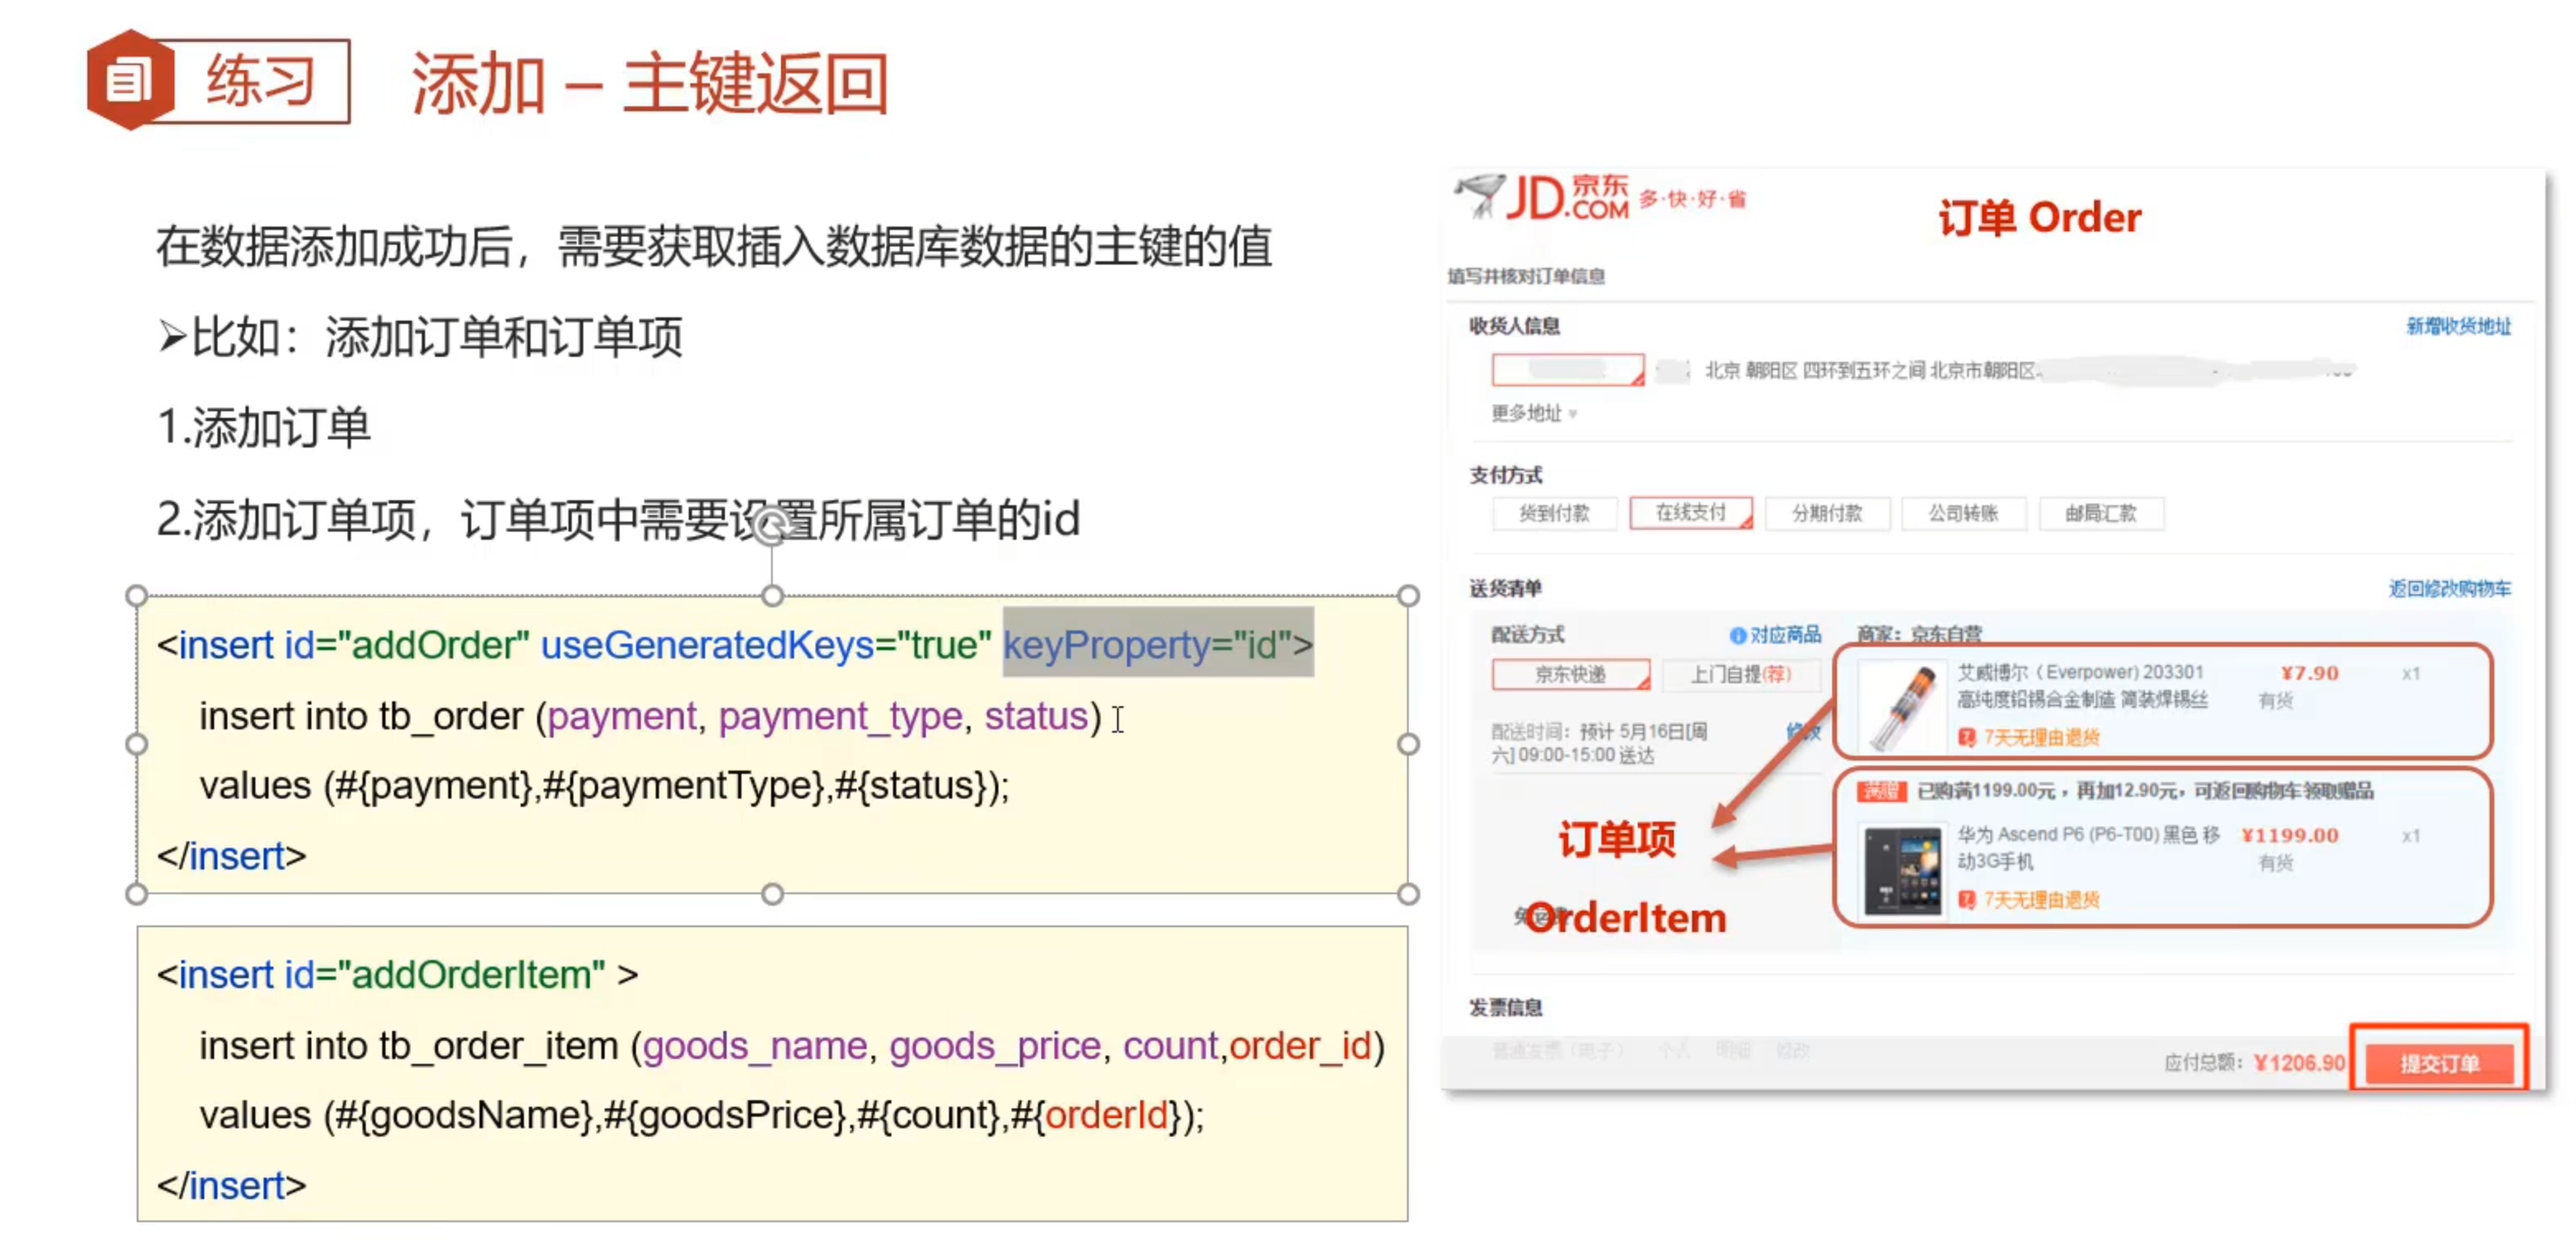
    <insert id="addBrand" useGeneratedKeys="true" keyProperty="id">
        insert into tb_brand
        (brand_name, company_name, ordered, description, status)
        values (#{brandName}, #{companyName}, #{ordered}, #{description}, #{status});
    </insert>
		BrandMapper brandMapper = sqlSession.getMapper(BrandMapper.class);

        brandMapper.addBrand(brand);

        int id = brand.getId();
        System.out.println("该数据的主键id=" + id);
直接通过brand.getId(),就能重新获取到当前数据的主键的值: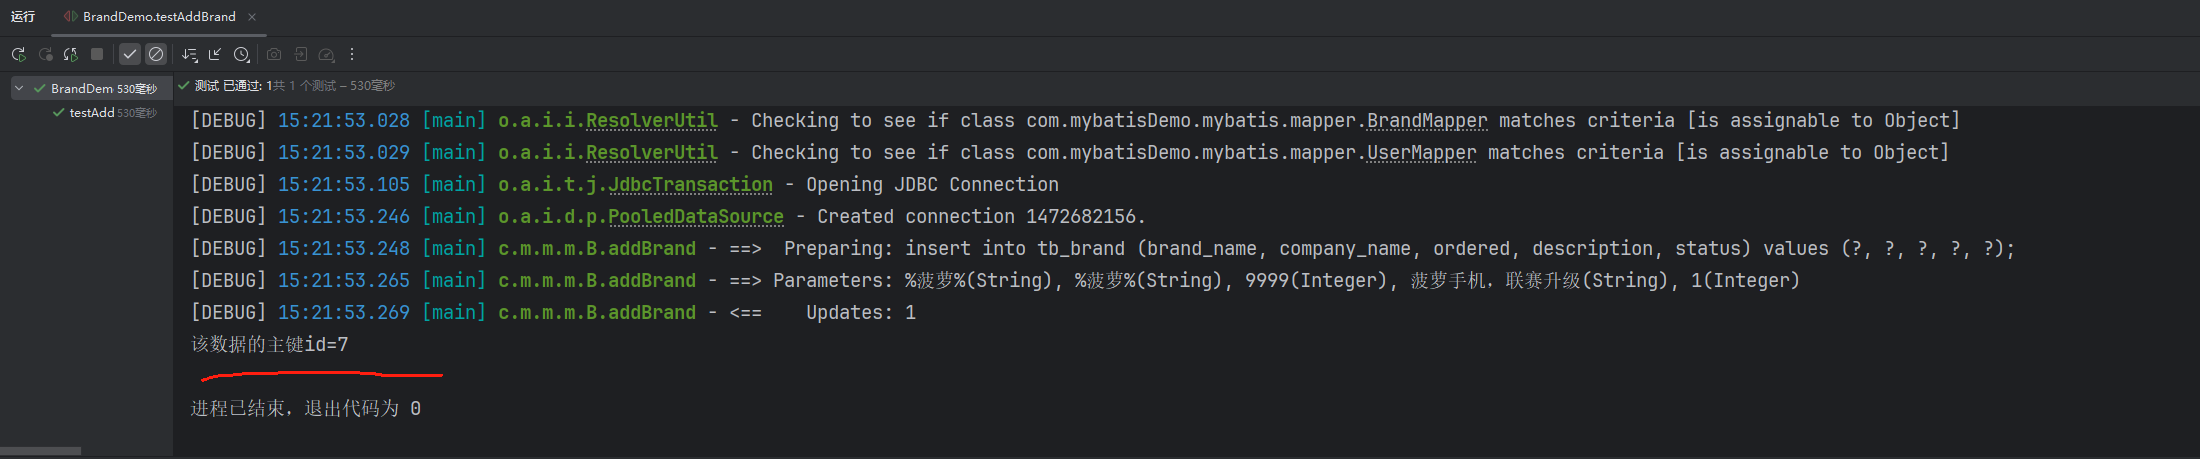
5.修改
1)修改全部字段
对全部字段进行修改,但是如果某个字段没有传入,则会修改为null:
    <update id="updateBrand">
        update tb_brand
        set
            brand_name = #{brandName},
            company_name = #{companyName},
            ordered = #{ordered},
            description = #{description},
            status = #{status}
        where id = #{id};
    </update>
2)动态修改字段
使用<set>对字段的修改语句进行包裹,达到动态SQL的效果:
当其他字段未传入时,也不会发生sql语句的拼接错误
    <update id="updateBrand">
        update tb_brand
        <set>
            <if test="brandName != null and brandName != ''">
                brand_name = #{brandName},
            </if>
            <if test="companyName != null and companyName != ''">
                company_name = #{companyName},
            </if>
            <if test="ordered != null">
                ordered = #{ordered},
            </if>
            <if test="description != null and description != ''">
                description = #{description},
            </if>
            <if test="status != null">
                status = #{status}
            </if>
        </set>
        where id = #{id};
    </update>
testUpdateBrand():
package com.mybatisDemo.mybatis;

import com.mybatisDemo.mybatis.mapper.BrandMapper;
import com.mybatisDemo.mybatis.pojo.Brand;
import org.apache.ibatis.io.Resources;
import org.apache.ibatis.session.SqlSession;
import org.apache.ibatis.session.SqlSessionFactory;
import org.apache.ibatis.session.SqlSessionFactoryBuilder;
import org.junit.Test;

import java.io.IOException;
import java.io.InputStream;
import java.util.HashMap;
import java.util.List;
import java.util.Map;

public class BrandDemo {
    @Test
    public void testUpdateBrand() throws Exception {

        //假设传入的查询条件
        int id = 6;
        int status = 1;
        String companyName = "菠萝11";
        String brandName = "菠萝11";
        int ordered = 9999;
        String description = "菠萝手机,联赛升级,ou";

        Brand brand = new Brand();
        brand.setId(id);
        brand.setStatus(status);
        brand.setCompanyName(companyName);
        brand.setBrandName(brandName);
        brand.setOrdered(ordered);
        brand.setDescription(description);

        //1. 加载mybatis的核心配置文件,获取 SqlSessionFactory
        String resource = "mybatis-config.xml";
        InputStream inputStream = Resources.getResourceAsStream(resource);
        SqlSessionFactory sqlSessionFactory = new SqlSessionFactoryBuilder().build(inputStream);

        //2. 获取SqlSession对象,用它来执行sql
        SqlSession sqlSession = sqlSessionFactory.openSession(true);

        BrandMapper brandMapper = sqlSession.getMapper(BrandMapper.class);

        int count = brandMapper.updateBrand(brand);
        System.out.println("影响的行数为:" + count);
    }
}

这样当某个条件为空时,也不会发生sql语句的错误。
6.删除
1.单个删除
点击删除按钮时,传入id,根据id删除对应的订单:
- 1.编写Mapper接口方法:
deleteBrand()- 参数:接收id
- 返回结果:不需要返回值
- 2.编写SQL映射文件:完成
deleteBrand()的sql语句:
    <delete id="deleteBrand">
        delete from tb_brand
        where id = #{id};
    </delete>
2.批量删除
选择多选,指定多个id,批量删除
- 1.编写Mapper接口方法:
deleteBrands():- 参数:id数组: int[] ids (需要在
deleteBrands()的传入参数中使用@Param注解改变map集合的默认key的名称:int deleteBrands(@Param("ids") int[] ids); - 返回结果:不需要返回值
- 参数:id数组: int[] ids (需要在
- 2.编写SQL映射文件:完成
deleteBrands()的动态sql语句:
    <delete id="deleteBrands">
        delete from tb_brand where id
        in (
            <foreach collection="ids" item="id" separator=",">
                #{id}
            </foreach>
        );
    </delete>
- 3.编写
testDeleteBrands()测试方法,传入ids数组,完成订单的批量删除:
package com.mybatisDemo.mybatis;

import com.mybatisDemo.mybatis.mapper.BrandMapper;
import com.mybatisDemo.mybatis.pojo.Brand;
import org.apache.ibatis.io.Resources;
import org.apache.ibatis.session.SqlSession;
import org.apache.ibatis.session.SqlSessionFactory;
import org.apache.ibatis.session.SqlSessionFactoryBuilder;
import org.junit.Test;

import java.io.IOException;
import java.io.InputStream;
import java.util.HashMap;
import java.util.List;
import java.util.Map;

public class BrandDemo {
    @Test
    public void testDeleteBrands() throws Exception {

        //假设传入的查询条件
        int[] ids = {5, 6, 7};

        //1. 加载mybatis的核心配置文件,获取 SqlSessionFactory
        String resource = "mybatis-config.xml";
        InputStream inputStream = Resources.getResourceAsStream(resource);
        SqlSessionFactory sqlSessionFactory = new SqlSessionFactoryBuilder().build(inputStream);

        //2. 获取SqlSession对象,用它来执行sql
        SqlSession sqlSession = sqlSessionFactory.openSession(true);

        BrandMapper brandMapper = sqlSession.getMapper(BrandMapper.class);

        int count = brandMapper.deleteBrands(ids);
        System.out.println("影响的行数为:" + count);
    }
}
7.参数传递
Mybatis对不同参数接收的封装处理方式:
- 1.多个参数:
Mybatis中默认将多个参数存放到一个map集合中,在map集合中会将
map.pug(“arg0”, 参数值1)
map.pug(“param1”, 参数值1)
map.pug(“arg1”, 参数值2)
map.pug(“param2”, 参数值2)
…
以此类推。
我们在sql中使用占位符去传入参数时,也可以直接使用对应的"arg0"这种索引方式,但是可读性太差,所以一般使用@Param(“重命名”)来绑定指定的参数。在sql中则直接使用自己定义的名称来获取参数值。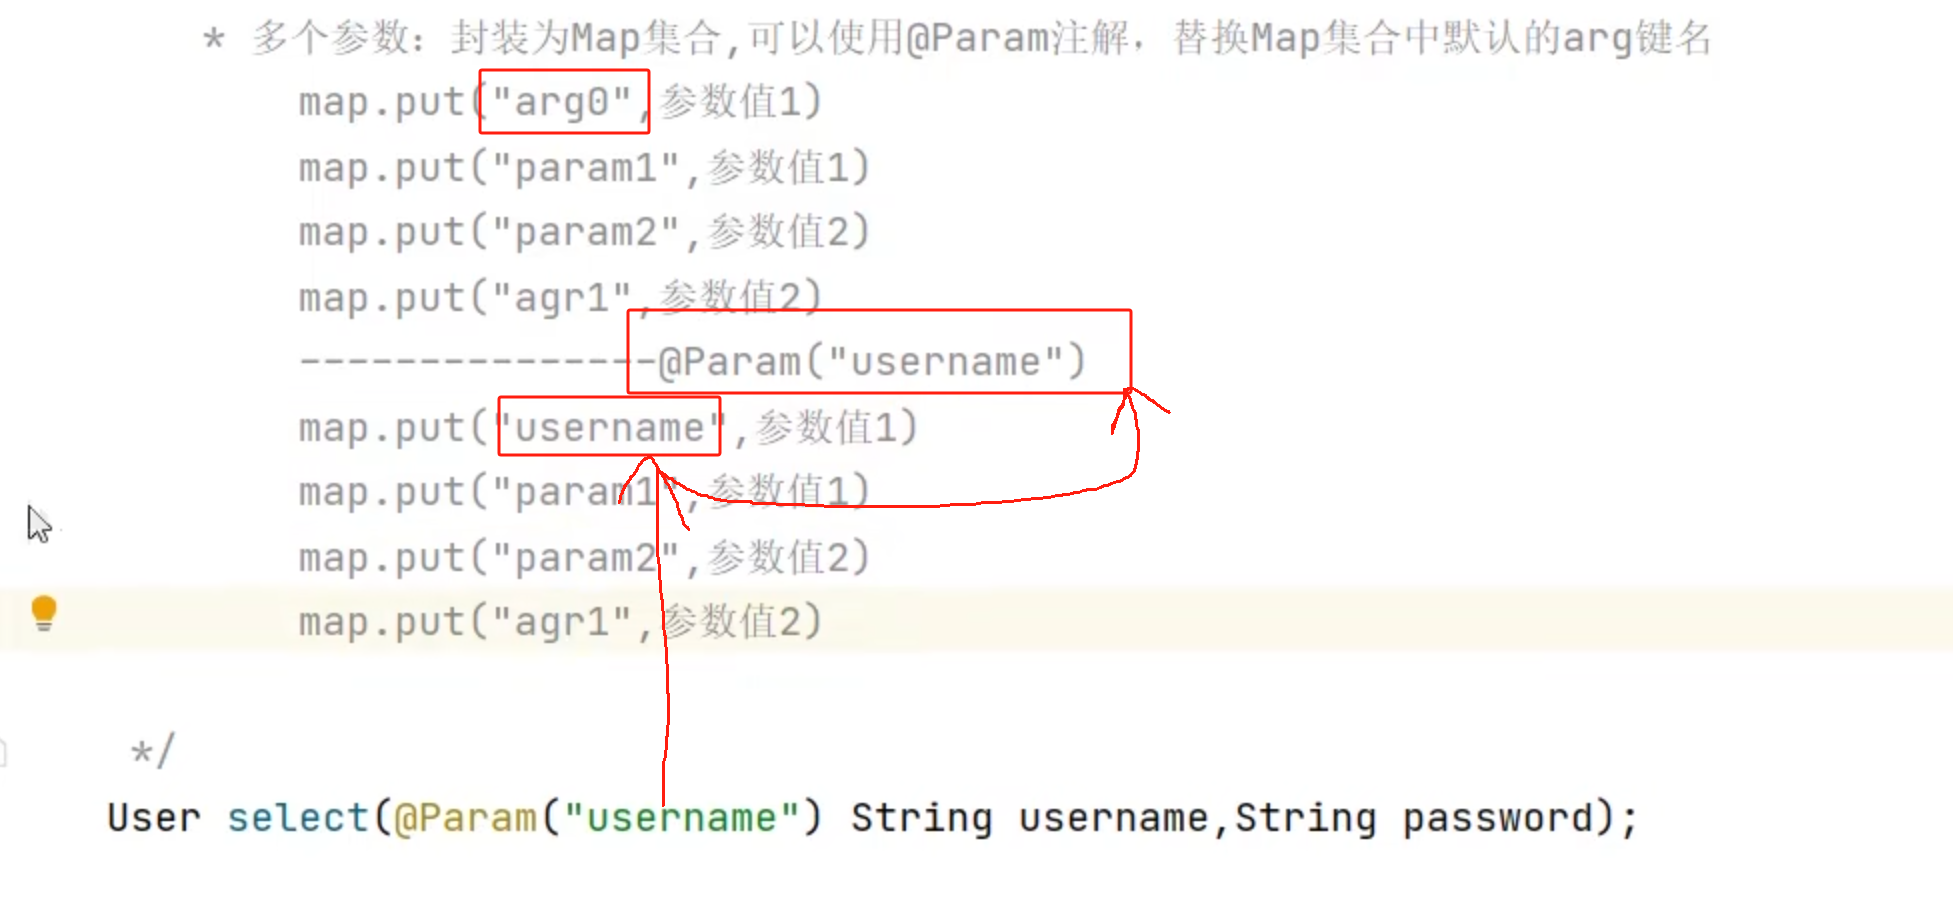
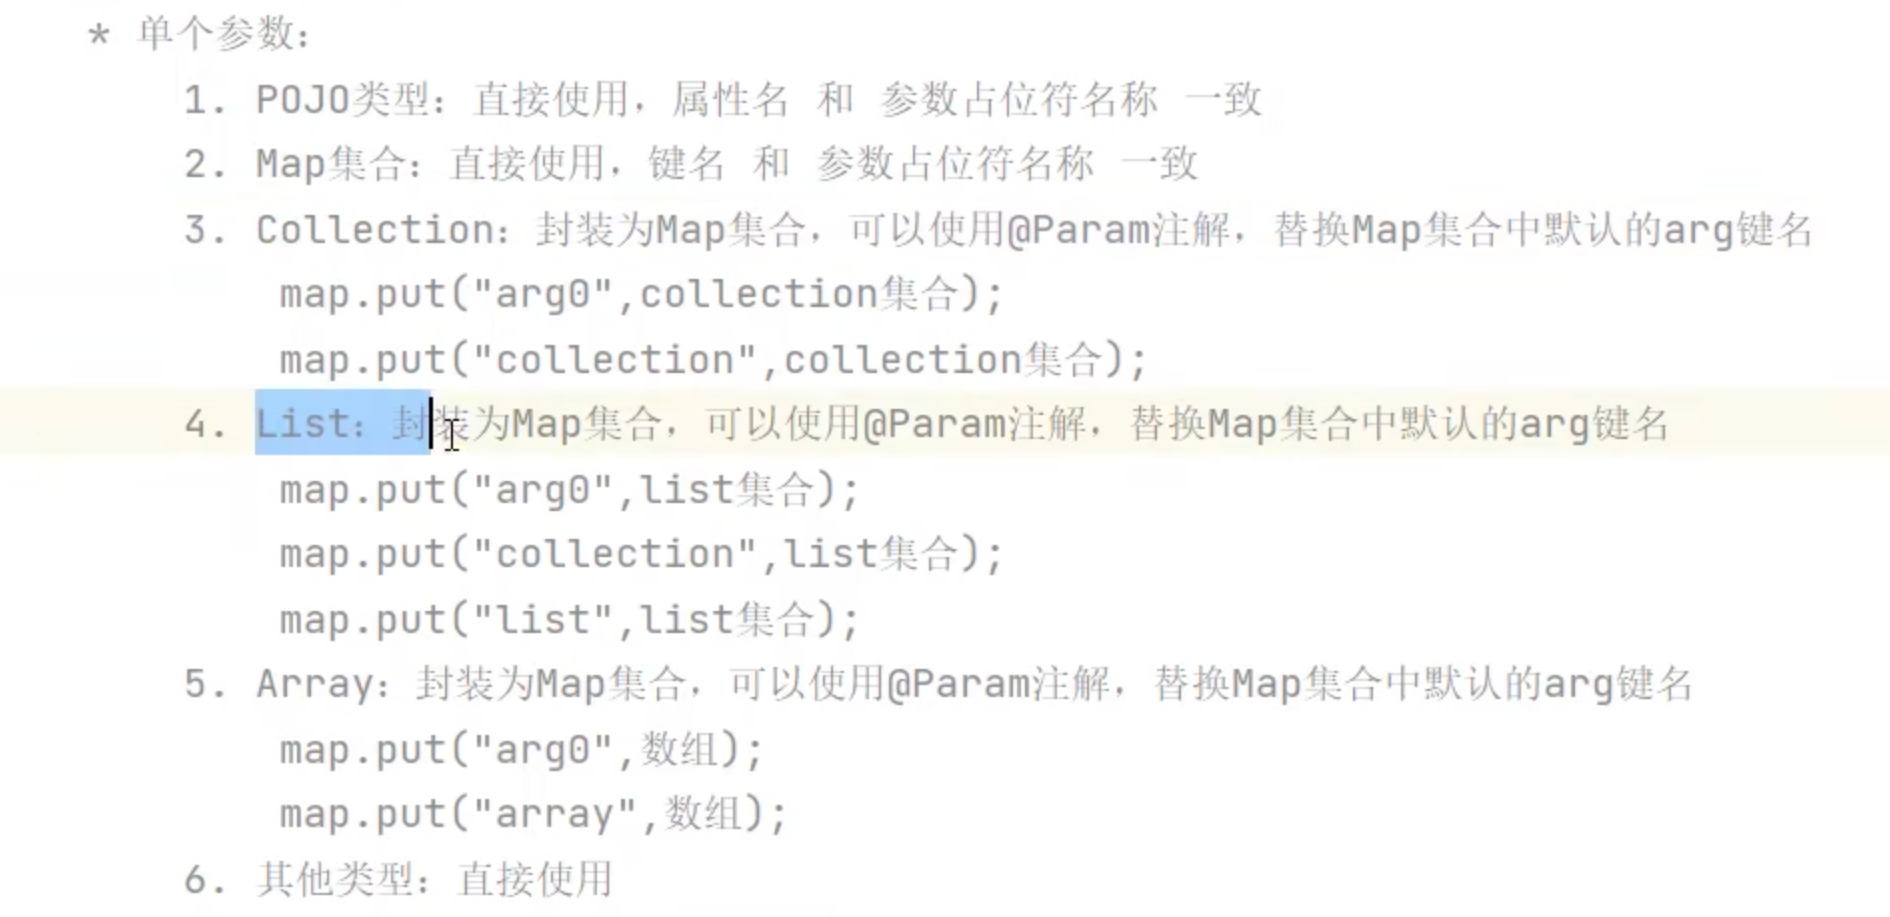
- 建议都使用@Param注解来修改map集合中默认的键名,并使用修改后的名称来获取值,这样可读性更高。
8.注解开发
- 将sql语句写到注解上:
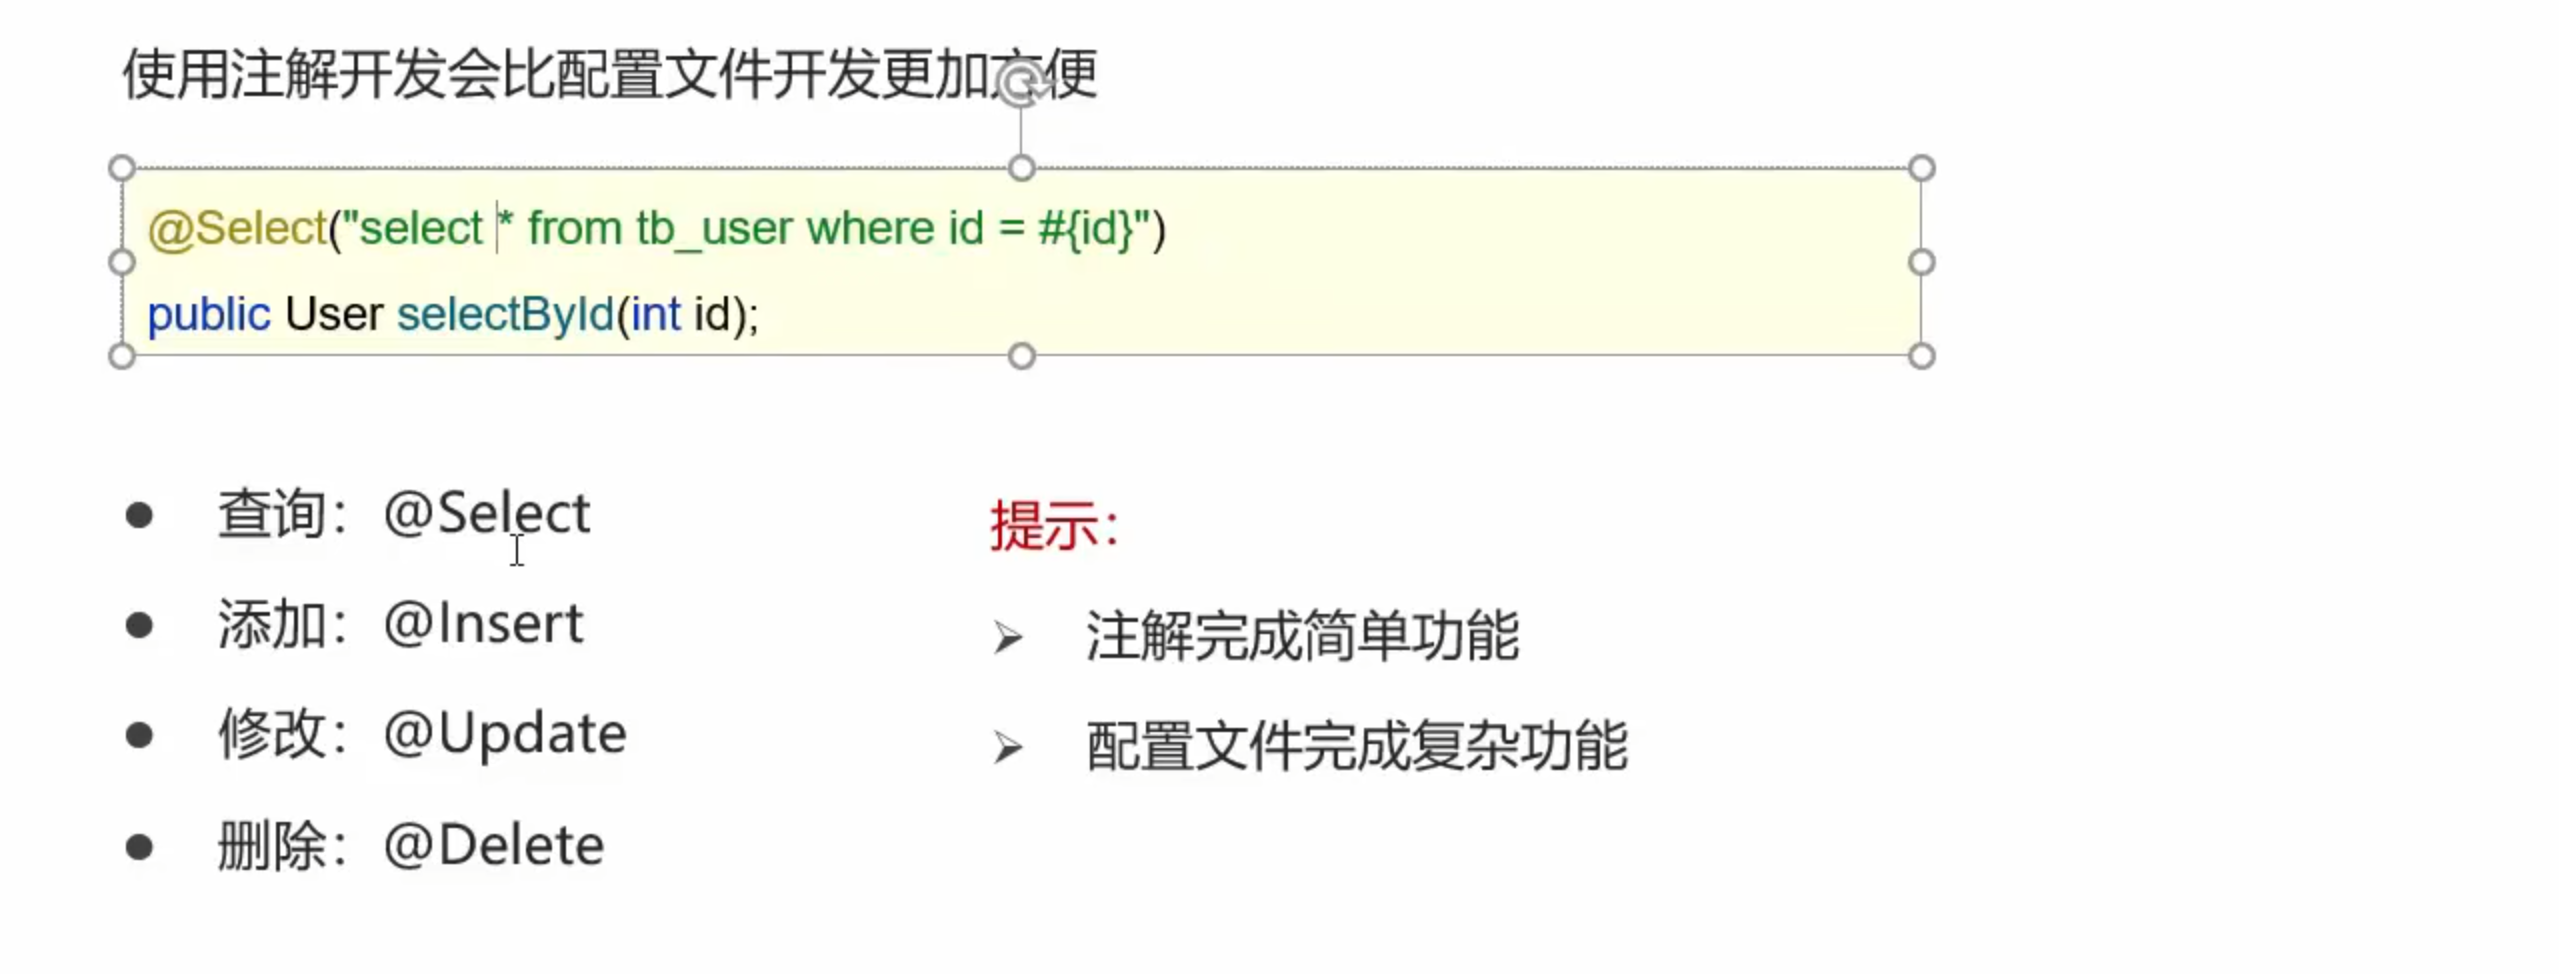
- 简单的SQL语句用注解
- 复杂或者动态的SQL则使用配置文件完成开发
*注:上述内容来自B站黑马程序员视频的截图,仅作为学习交流使用,不作为商业用途,如有侵权联系删除。
更多推荐

 18
18 0
0- 0


 已为社区贡献3条内容

所有评论(0)