
Python + Jmeter 实现自动化性能压测
·
Step01: Python脚本开发
文件路径:D://wl//testproject//Fone-grpc//project1//test_client.py
Python 脚本作用:
1.通过 grpc 调用底层 c++ 的接口,做数据库的数据插入与查询操作,然后将返回的结果进行拼接与输出。
2.代码里面将每一次调用后返回的内容进行拼接后,并做了成功信息的统计,输出成功的次数为3,输出后会转给 jmeter 里面的脚本获取。
from __future__ import print_function

import logging

import sys

import grpc

import Storage_pb2 # Storage_pb2.py which contains our generated request and response classes

import StorageService_pb2_grpc # StorageService_pb2_grpc.py which contains our generated client and server classes.


host="10.10.1.117:50066"


def run():

result=""

with grpc.insecure_channel(host) as channel:

resp0=StorageService_pb2_grpc.FOneStorageStub(channel).InsertKVS(Storage_pb2.PUpsertKVS(

DBName="MergeLog",TableName="MergeLog",KeyValues=[{"Key":b'',"Key":b''}],Upsert=True,Transaction=True

))

result+=str(resp0)


with grpc.insecure_channel(host) as channel:

stud1=StorageService_pb2_grpc.FOneStorageStub(channel)

resp1=stud1.InsertV(Storage_pb2.PInsertV(DBName="MergeLog", TableName="MergeLog", Value=b"1"))

result += str(resp1)


with grpc.insecure_channel(host) as channel:

stud2=StorageService_pb2_grpc.FOneStorageStub(channel)

resp2=stud2.FindOne(Storage_pb2.PFindK(DBName="MergeLog", TableName="MergeLog", Key="1"))

result += str(resp2)


result=result.replace("\n", " ")

result=result.count("Successful return: 0")

print(result)


if __name__ == '__main__':

logging.basicConfig()

run()
PS:在本地调试好脚本,确保符合预期。
Step02: Jmeter 创建 beanshell 取样器
脚本内容如下:
import java.io.BufferedReader;

import java.io.InputStreamReader;


log.info("----------------------------start to exe");

String command = "cmd /c python D://wl//testproject//Fone-grpc//project1//test_client.py"; //定义要执行的python文件路径

String var;

Runtime rt = Runtime.getRuntime();

Process pr = rt.exec(command); //执行上面的python脚本

pr.waitFor()

BufferedReader b = new BufferedReader(new InputStreamReader(pr.getInputStream())); // 转换执行脚本后的返回响应

String line = "";

StringBuilder response = new StringBuilder();

while ((line = b.readLine()) != null) {

response.append(line);

}

String response_data = response.toString();

log.info(response_data);

if(response_data.equals("3")){ // 判断响应的内容是否有3次,如果不是3次就表示执行失败了

log.info("---------------------------success end exe");

}else{

log.error("--------------------------failed end exe"); //这里的输出一次会记录一次失败次数

}

b.close();
Step03: 执行效果
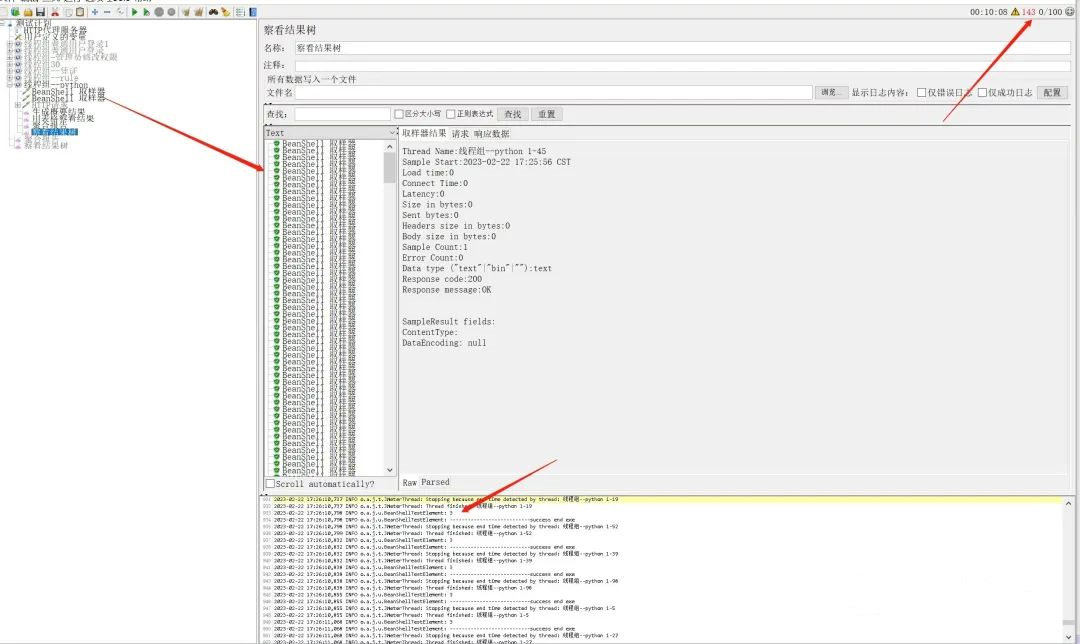
通过 jmeter 工具进行并发操作,对后端底层接口进行压力测试,效果不错,效果图如下所示。
Step04: Jmeter日志输出
2023-02-22 17:26:08,539 INFO o.a.j.t.JMeterThread: Stopping because end time detected by thread: 线程组--python 1-33

2023-02-22 17:26:08,539 INFO o.a.j.t.JMeterThread: Thread finished: 线程组--python 1-33

2023-02-22 17:26:08,597 INFO o.a.j.u.BeanShellTestElement: 3

2023-02-22 17:26:08,597 INFO o.a.j.u.BeanShellTestElement: ---------------------------success end exe

2023-02-22 17:26:08,598 INFO o.a.j.t.JMeterThread: Stopping because end time detected by thread: 线程组--python 1-82

2023-02-22 17:26:08,598 INFO o.a.j.t.JMeterThread: Thread finished: 线程组--python 1-82

2023-02-22 17:26:08,608 INFO o.a.j.u.BeanShellTestElement: 2

2023-02-22 17:26:08,608 ERROR o.a.j.u.BeanShellTestElement: --------------------------failed end exe
最后作为一位过来人也是希望大家少走一些弯路,如果你不想再体验一次学习时找不到资料,没人解答问题,坚持几天便放弃的感受的话,在这里我给大家分享一些软件测试的学习资源,希望能给你前进的路上带来帮助。

视频文档获取方式:
这份文档和视频资料,对于想从事【软件测试】的朋友来说应该是最全面最完整的备战仓库,这个仓库也陪伴我走过了最艰难的路程,希望也能帮助到你!以上均可以分享,点下方小卡片即可自行领取。

更多推荐


 3
3 0
0- 0


 已为社区贡献2条内容

所有评论(0)