软件杯 深度学习 大数据 股票预测系统 - python lstm
🔥 优质竞赛项目系列,今天要分享的是🚩深度学习 大数据 股票预测系统该项目较为新颖,适合作为竞赛课题方向,学长非常推荐!🥇学长这里给一个题目综合评分(每项满分5分)难度系数:3分工作量:3分创新点:4分🧿LSTM是长短期记忆网络(LSTM,Long Short-Term Memory),想要理解什么是LSTM,首先要了解什么是循环神经网络。🧿。
文章目录
0 前言
🔥 优质竞赛项目系列,今天要分享的是
🚩 深度学习 大数据 股票预测系统
该项目较为新颖,适合作为竞赛课题方向,学长非常推荐!
🥇学长这里给一个题目综合评分(每项满分5分)
- 难度系数:3分
- 工作量:3分
- 创新点:4分
🧿 更多资料, 项目分享:
https://gitee.com/dancheng-senior/postgraduate
1 课题意义
利用神经网络模型如果能够提高对股票价格的预测精度,更好地掌握股票价格发展趋势,这对于投资者来说可以及时制定相应的发展策略,更好地应对未来发生的不确定性事件,对于个人来说可以降低投资风险,减少财产损失,实现高效投资,具有一定的实践价值。
1.1 股票预测主流方法
股票市场复杂、非线性的特点使我们难以捉摸其变化规律,目前有很多预测股票走势的论文和算法。
定量分析从精确的数据资料中获得股票发展的价值规律,通过建立模型利用数学语言对股市的发展情况做出解释与预测。
目前常用的定量分析方法有:
- 传统时间序列预测模型
- 马尔可夫链预测
- 灰色系统理论预测
- 遗传算法
- 机器学习预测等方法
2 什么是LSTM
LSTM是长短期记忆网络(LSTM,Long Short-Term Memory),想要理解什么是LSTM,首先要了解什么是循环神经网络。
2.1 循环神经网络
对于传统的BP神经网络如深度前馈网络、卷积神经网络来说,同层及跨层之间的神经元是独立的,但实际应用中对于一些有上下联系的序列来说,如果能够学习到它们之间的相互关系,使网络能够对不同时刻的输入序列产生一定的联系,像生物的大脑一样有“记忆功能”,这样的话我们的模型也就会有更低的训练出错频率及更好的泛化能力。
JordanMI提出序列理论,描述了一种体现“并行分布式处理”的网络动态系统,适用于语音生成中的协同发音问题,并进行了相关仿真实验,ElmanJL认为连接主义模型中对时间如何表示是至关重要的,1990年他提出使用循环连接为网络提供动态内存,从相对简单的异或问题到探寻单词的语义特征,网络均学习到了有趣的内部表示,网络还将任务需求和内存需求结合在一起,由此形成了简单循环网络的基础框架。
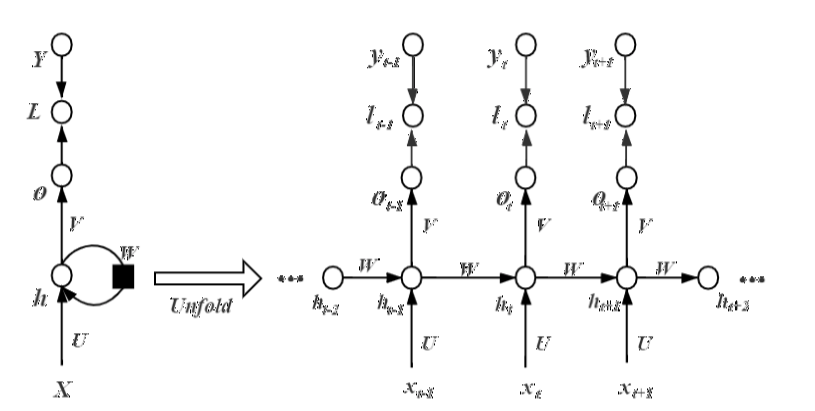
循环神经网络(RNN)之间的神经元是相互连接的,不仅在层与层之间的神经元建立连接,而且每一层之间的神经元也建立了连接,隐藏层神经元的输入由当前输入和上一时刻隐藏层神经元的输出共同决定,每一时刻的隐藏层神经元记住了上一时刻隐藏层神经元的输出,相当于对网络增添了“记忆”功能。我们都知道在输入序列中不可避免会出现重复或相似的某些序列信息,我们希望RNN能够保留这些记忆信息便于再次调用,且RNN结构中不同时刻参数是共享的,这一优点便于网络在不同位置依旧能将该重复信息识别出来,这样一来模型的泛化能力自然有所上升。
RNN结构如下:

2.1 LSTM诞生
RNN在解决长序列问题时未能有良好的建模效果,存在长期依赖的弊端,对此HochreiterS等人对神经单元做出了改进,引入自循环使梯度信息得以长时间持续流动,即模型可以拥有长期记忆信息,且自循环权重可以根据前后信息进行调整并不是固定的。作为RNN的一种特殊结构,它可以根据前后输入情况决定历史信息的去留,增进的门控机制可以动态改变累积的时间尺度进而控制神经单元的信息流,这样神经网络便能够自己根据情况决定清除或保留旧的信息,不至于状态信息过长造成网络崩溃,这便是长短期记忆(LSTM)网络。随着信息不断流入,该模型每个神经元内部的遗忘门、输入门、输出门三个门控机制会对每一时刻的信息做出判断并及时进行调整更新,LSTM模型现已广泛应用于无约束手写识别、语音识别、机器翻译等领域。

2 如何用LSTM做股票预测
2.1 算法构建流程

2.2 部分代码
import numpy as np
import matplotlib.pyplot as plt
import tensorflow as tf
import pandas as pd
import math
def LSTMtest(data):
n1 = len(data[0]) - 1 #因为最后一位为label
n2 = len(data)
print(n1, n2)
# 设置常量
input_size = n1 # 输入神经元个数
rnn_unit = 10 # LSTM单元(一层神经网络)中的中神经元的个数
lstm_layers = 7 # LSTM单元个数
output_size = 1 # 输出神经元个数(预测值)
lr = 0.0006 # 学习率
train_end_index = math.floor(n2*0.9) # 向下取整
print('train_end_index', train_end_index)
# 前90%数据作为训练集,后10%作为测试集
# 获取训练集
# time_step 时间步,batch_size 每一批次训练多少个样例
def get_train_data(batch_size=60, time_step=20, train_begin=0, train_end=train_end_index):
batch_index = []
data_train = data[train_begin:train_end]
normalized_train_data = (data_train - np.mean(data_train, axis=0)) / np.std(data_train, axis=0) # 标准化
train_x, train_y = [], [] # 训练集
for i in range(len(normalized_train_data) - time_step):
if i % batch_size == 0:
# 开始位置
batch_index.append(i)
# 一次取time_step行数据
# x存储输入维度(不包括label) :X(最后一个不取)
# 标准化(归一化)
x = normalized_train_data[i:i + time_step, :n1]
# y存储label
y = normalized_train_data[i:i + time_step, n1, np.newaxis]
# np.newaxis分别是在行或列上增加维度
train_x.append(x.tolist())
train_y.append(y.tolist())
# 结束位置
batch_index.append((len(normalized_train_data) - time_step))
print('batch_index', batch_index)
# print('train_x', train_x)
# print('train_y', train_y)
return batch_index, train_x, train_y
# 获取测试集
def get_test_data(time_step=20, test_begin=train_end_index+1):
data_test = data[test_begin:]
mean = np.mean(data_test, axis=0)
std = np.std(data_test, axis=0) # 矩阵标准差
# 标准化(归一化)
normalized_test_data = (data_test - np.mean(data_test, axis=0)) / np.std(data_test, axis=0)
# " // "表示整数除法。有size个sample
test_size = (len(normalized_test_data) + time_step - 1) // time_step
print('test_size$$$$$$$$$$$$$$', test_size)
test_x, test_y = [], []
for i in range(test_size - 1):
x = normalized_test_data[i * time_step:(i + 1) * time_step, :n1]
y = normalized_test_data[i * time_step:(i + 1) * time_step, n1]
test_x.append(x.tolist())
test_y.extend(y)
test_x.append((normalized_test_data[(i + 1) * time_step:, :n1]).tolist())
test_y.extend((normalized_test_data[(i + 1) * time_step:, n1]).tolist())
return mean, std, test_x, test_y
# ——————————————————定义神经网络变量——————————————————
# 输入层、输出层权重、偏置、dropout参数
# 随机产生 w,b
weights = {
'in': tf.Variable(tf.random_normal([input_size, rnn_unit])),
'out': tf.Variable(tf.random_normal([rnn_unit, 1]))
}
biases = {
'in': tf.Variable(tf.constant(0.1, shape=[rnn_unit, ])),
'out': tf.Variable(tf.constant(0.1, shape=[1, ]))
}
keep_prob = tf.placeholder(tf.float32, name='keep_prob') # dropout 防止过拟合
# ——————————————————定义神经网络——————————————————
def lstmCell():
# basicLstm单元
# tf.nn.rnn_cell.BasicLSTMCell(self, num_units, forget_bias=1.0,
# tate_is_tuple=True, activation=None, reuse=None, name=None)
# num_units:int类型,LSTM单元(一层神经网络)中的中神经元的个数,和前馈神经网络中隐含层神经元个数意思相同
# forget_bias:float类型,偏置增加了忘记门。从CudnnLSTM训练的检查点(checkpoin)恢复时,必须手动设置为0.0。
# state_is_tuple:如果为True,则接受和返回的状态是c_state和m_state的2-tuple;如果为False,则他们沿着列轴连接。后一种即将被弃用。
# (LSTM会保留两个state,也就是主线的state(c_state),和分线的state(m_state),会包含在元组(tuple)里边
# state_is_tuple=True就是判定生成的是否为一个元组)
# 初始化的 c 和 a 都是zero_state 也就是都为list[]的zero,这是参数state_is_tuple的情况下
# 初始state,全部为0,慢慢的累加记忆
# activation:内部状态的激活函数。默认为tanh
# reuse:布尔类型,描述是否在现有范围中重用变量。如果不为True,并且现有范围已经具有给定变量,则会引发错误。
# name:String类型,层的名称。具有相同名称的层将共享权重,但为了避免错误,在这种情况下需要reuse=True.
#
basicLstm = tf.nn.rnn_cell.BasicLSTMCell(rnn_unit, forget_bias=1.0, state_is_tuple=True)
# dropout 未使用
drop = tf.nn.rnn_cell.DropoutWrapper(basicLstm, output_keep_prob=keep_prob)
return basicLstm
def lstm(X): # 参数:输入网络批次数目
batch_size = tf.shape(X)[0]
time_step = tf.shape(X)[1]
w_in = weights['in']
b_in = biases['in']
# 忘记门(输入门)
# 因为要进行矩阵乘法,所以reshape
# 需要将tensor转成2维进行计算
input = tf.reshape(X, [-1, input_size])
input_rnn = tf.matmul(input, w_in) + b_in
# 将tensor转成3维,计算后的结果作为忘记门的输入
input_rnn = tf.reshape(input_rnn, [-1, time_step, rnn_unit])
print('input_rnn', input_rnn)
# 更新门
# 构建多层的lstm
cell = tf.nn.rnn_cell.MultiRNNCell([lstmCell() for i in range(lstm_layers)])
init_state = cell.zero_state(batch_size, dtype=tf.float32)
# 输出门
w_out = weights['out']
b_out = biases['out']
# output_rnn是最后一层每个step的输出,final_states是每一层的最后那个step的输出
output_rnn, final_states = tf.nn.dynamic_rnn(cell, input_rnn, initial_state=init_state, dtype=tf.float32)
output = tf.reshape(output_rnn, [-1, rnn_unit])
# 输出值,同时作为下一层输入门的输入
pred = tf.matmul(output, w_out) + b_out
return pred, final_states
# ————————————————训练模型————————————————————
def train_lstm(batch_size=60, time_step=20, train_begin=0, train_end=train_end_index):
# 于是就有了tf.placeholder,
# 我们每次可以将 一个minibatch传入到x = tf.placeholder(tf.float32,[None,32])上,
# 下一次传入的x都替换掉上一次传入的x,
# 这样就对于所有传入的minibatch x就只会产生一个op,
# 不会产生其他多余的op,进而减少了graph的开销。
X = tf.placeholder(tf.float32, shape=[None, time_step, input_size])
Y = tf.placeholder(tf.float32, shape=[None, time_step, output_size])
batch_index, train_x, train_y = get_train_data(batch_size, time_step, train_begin, train_end)
# 用tf.variable_scope来定义重复利用,LSTM会经常用到
with tf.variable_scope("sec_lstm"):
pred, state_ = lstm(X) # pred输出值,state_是每一层的最后那个step的输出
print('pred,state_', pred, state_)
# 损失函数
# [-1]——列表从后往前数第一列,即pred为预测值,Y为真实值(Label)
#tf.reduce_mean 函数用于计算张量tensor沿着指定的数轴(tensor的某一维度)上的的平均值
loss = tf.reduce_mean(tf.square(tf.reshape(pred, [-1]) - tf.reshape(Y, [-1])))
# 误差loss反向传播——均方误差损失
# 本质上是带有动量项的RMSprop,它利用梯度的一阶矩估计和二阶矩估计动态调整每个参数的学习率。
# Adam的优点主要在于经过偏置校正后,每一次迭代学习率都有个确定范围,使得参数比较平稳.
train_op = tf.train.AdamOptimizer(lr).minimize(loss)
saver = tf.train.Saver(tf.global_variables(), max_to_keep=15)
with tf.Session() as sess:
# 初始化
sess.run(tf.global_variables_initializer())
theloss = []
# 迭代次数
for i in range(200):
for step in range(len(batch_index) - 1):
# sess.run(b, feed_dict = replace_dict)
state_, loss_ = sess.run([train_op, loss],
feed_dict={X: train_x[batch_index[step]:batch_index[step + 1]],
Y: train_y[batch_index[step]:batch_index[step + 1]],
keep_prob: 0.5})
# 使用feed_dict完成矩阵乘法 处理多输入
# feed_dict的作用是给使用placeholder创建出来的tensor赋值
# [batch_index[step]: batch_index[step + 1]]这个区间的X与Y
# keep_prob的意思是:留下的神经元的概率,如果keep_prob为0的话, 就是让所有的神经元都失活。
print("Number of iterations:", i, " loss:", loss_)
theloss.append(loss_)
print("model_save: ", saver.save(sess, 'model_save2\\modle.ckpt'))
print("The train has finished")
return theloss
theloss = train_lstm()
# 相对误差=(测量值-计算值)/计算值×100%
test_y = np.array(test_y) * std[n1] + mean[n1]
test_predict = np.array(test_predict) * std[n1] + mean[n1]
acc = np.average(np.abs(test_predict - test_y[:len(test_predict)]) / test_y[:len(test_predict)])
print("预测的相对误差:", acc)
print(theloss)
plt.figure()
plt.plot(list(range(len(theloss))), theloss, color='b', )
plt.xlabel('times', fontsize=14)
plt.ylabel('loss valuet', fontsize=14)
plt.title('loss-----blue', fontsize=10)
plt.show()
# 以折线图表示预测结果
plt.figure()
plt.plot(list(range(len(test_predict))), test_predict, color='b', )
plt.plot(list(range(len(test_y))), test_y, color='r')
plt.xlabel('time value/day', fontsize=14)
plt.ylabel('close value/point', fontsize=14)
plt.title('predict-----blue,real-----red', fontsize=10)
plt.show()
prediction()
需要完整代码工程的同学,请联系学长获取
3 实现效果
3.1 数据
采集股票数据

任选几支股票作为研究对象。
3.2 预测结果


项目运行展示
废话不多说, 先展示项目运行结果, 后面才进行技术讲解
对某公司的股票进行分析和预测 :

开发环境
如果只运行web项目,则只需安装如下包:
-
python 3.6.x
-
django >= 2.1.4 (或者使用conda安装最新版)
-
pandas >= 0.23.4 (或者使用conda安装最新版)
-
numpy >= 1.15.2 (或者使用conda安装最新版)
*apscheduler = 2.1.2 (请用pip install apscheduler==2.1.2 安装,conda装的版本不兼容)
如果需要训练模型或者使用模型来预测(注:需要保证本机拥有 NVIDIA GPU以及显卡驱动),则还需要安装: -
tensorflow-gpu >= 1.10.0 (可以使用conda安装最新版。如用conda安装,cudatoolkit和cudnn会被自动安装)
-
cudatoolkit >= 9.0 (根据自己本机的显卡型号决定,请去NVIDIA官网查看)
-
cudnn >= 7.1.4 (版本与cudatoolkit9.0对应的,其他版本请去NVIDIA官网查看对应的cudatoolkit版本)
-
keras >= 2.2.2 (可以使用conda安装最新版)
-
matplotlib >= 2.2.2 (可以使用conda安装最新版)
数据获取
训练模型的数据,即10个公司的历史股票数据。获取国内上市公司历史股票数据,
并以csv格式保存下来。csv格式方便用pandas读取,输入到LSTM神经网络模型, 用于训练模型以及预测股票数据。
最后
🧿 更多资料, 项目分享:
更多推荐
 已为社区贡献6条内容


所有评论(0)