
Claude Code架构深度解读(一)[新手小白也能看懂!!!!!]
本文介绍了Claude Code的常用命令快捷键,并深入探讨了Agent与Harness的区别。随后通过Python代码实例,详细演示了从零构建Agent Harness的五个阶段:Agent Loop、Tool Use、Todo Write、Subagents和Skills,涵盖了工具调度、任务规划、上下文隔离和按需知识加载等核心功能。这个是学习的项目链接:https://github.com/
前情提要:在学会Claude Code之前要先学会用这个工具哦,这是本文所用到的项目链接:https://github.com/shareAI-lab/learn-claude-code
熟悉Claude code本身
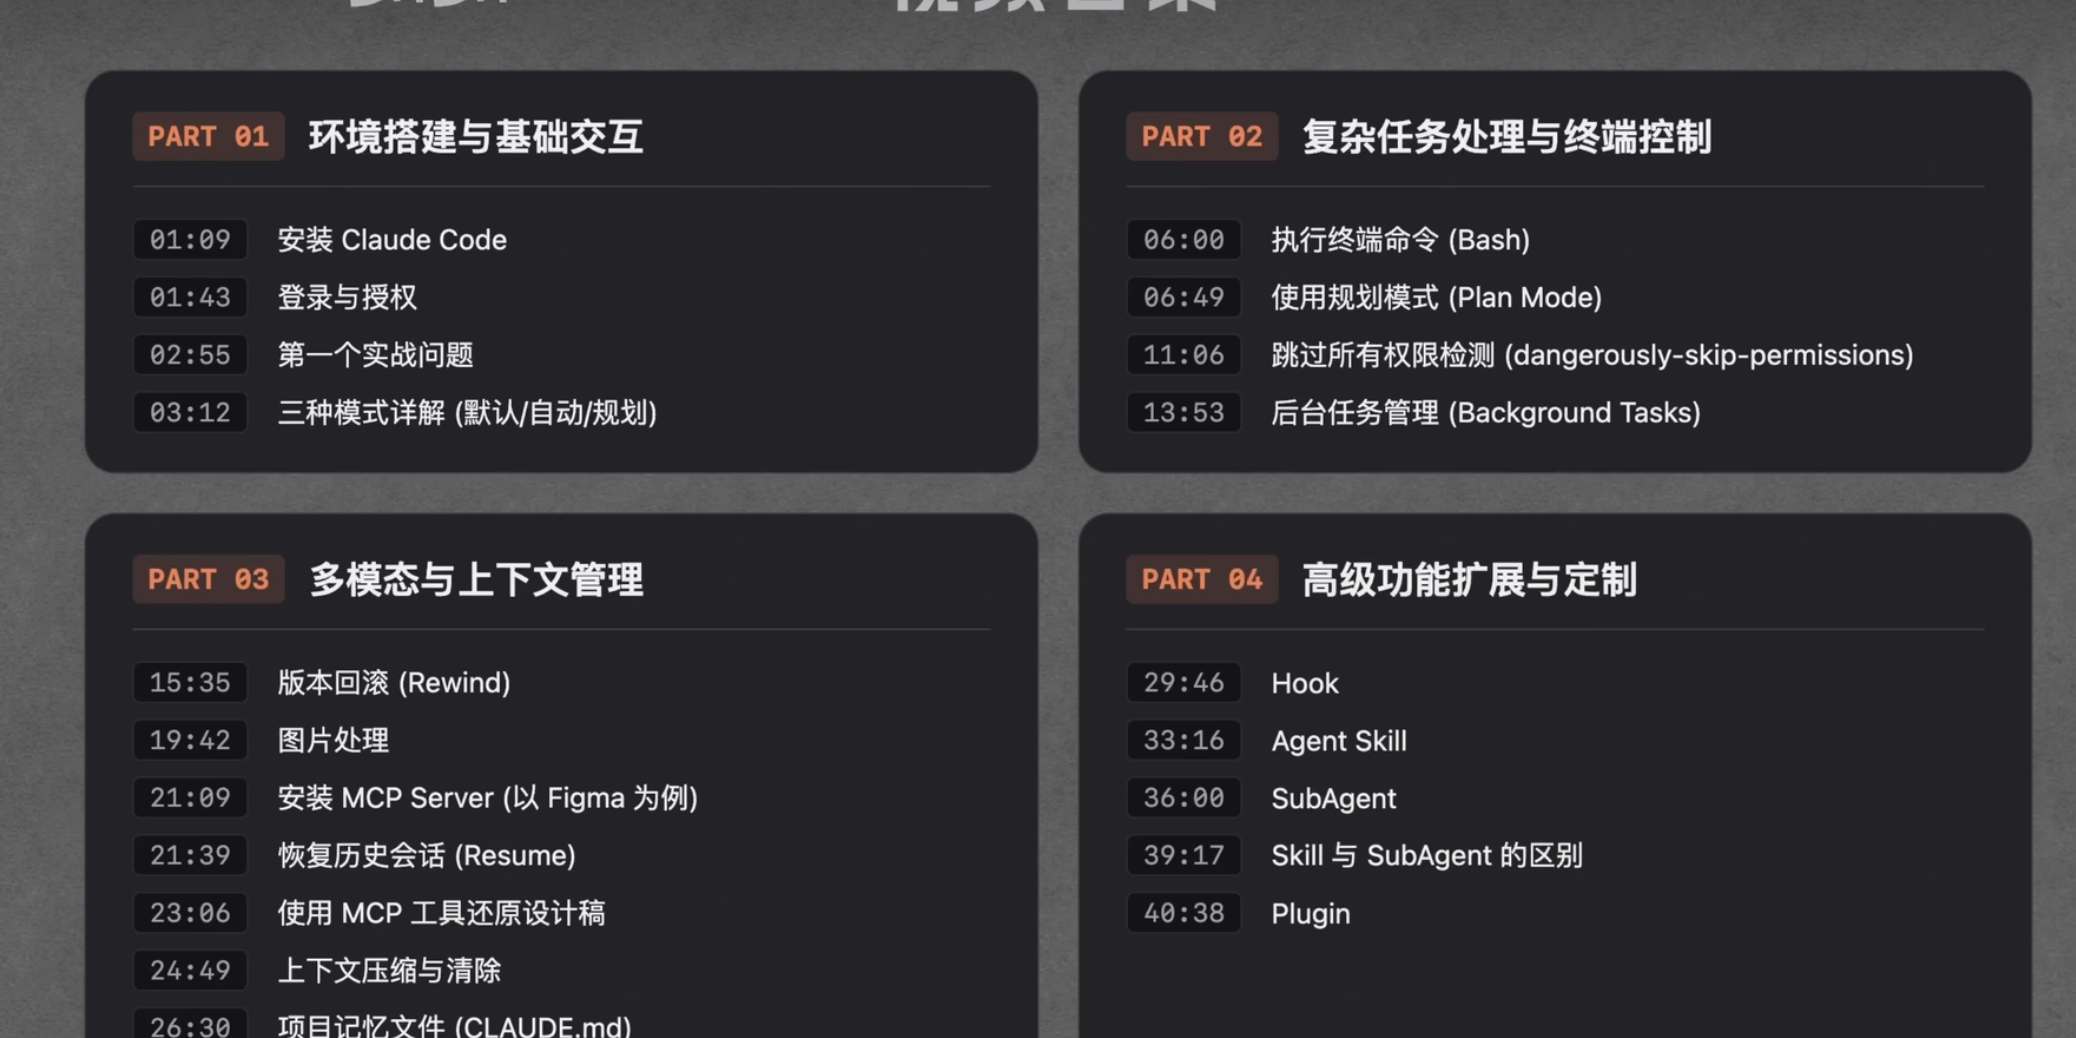
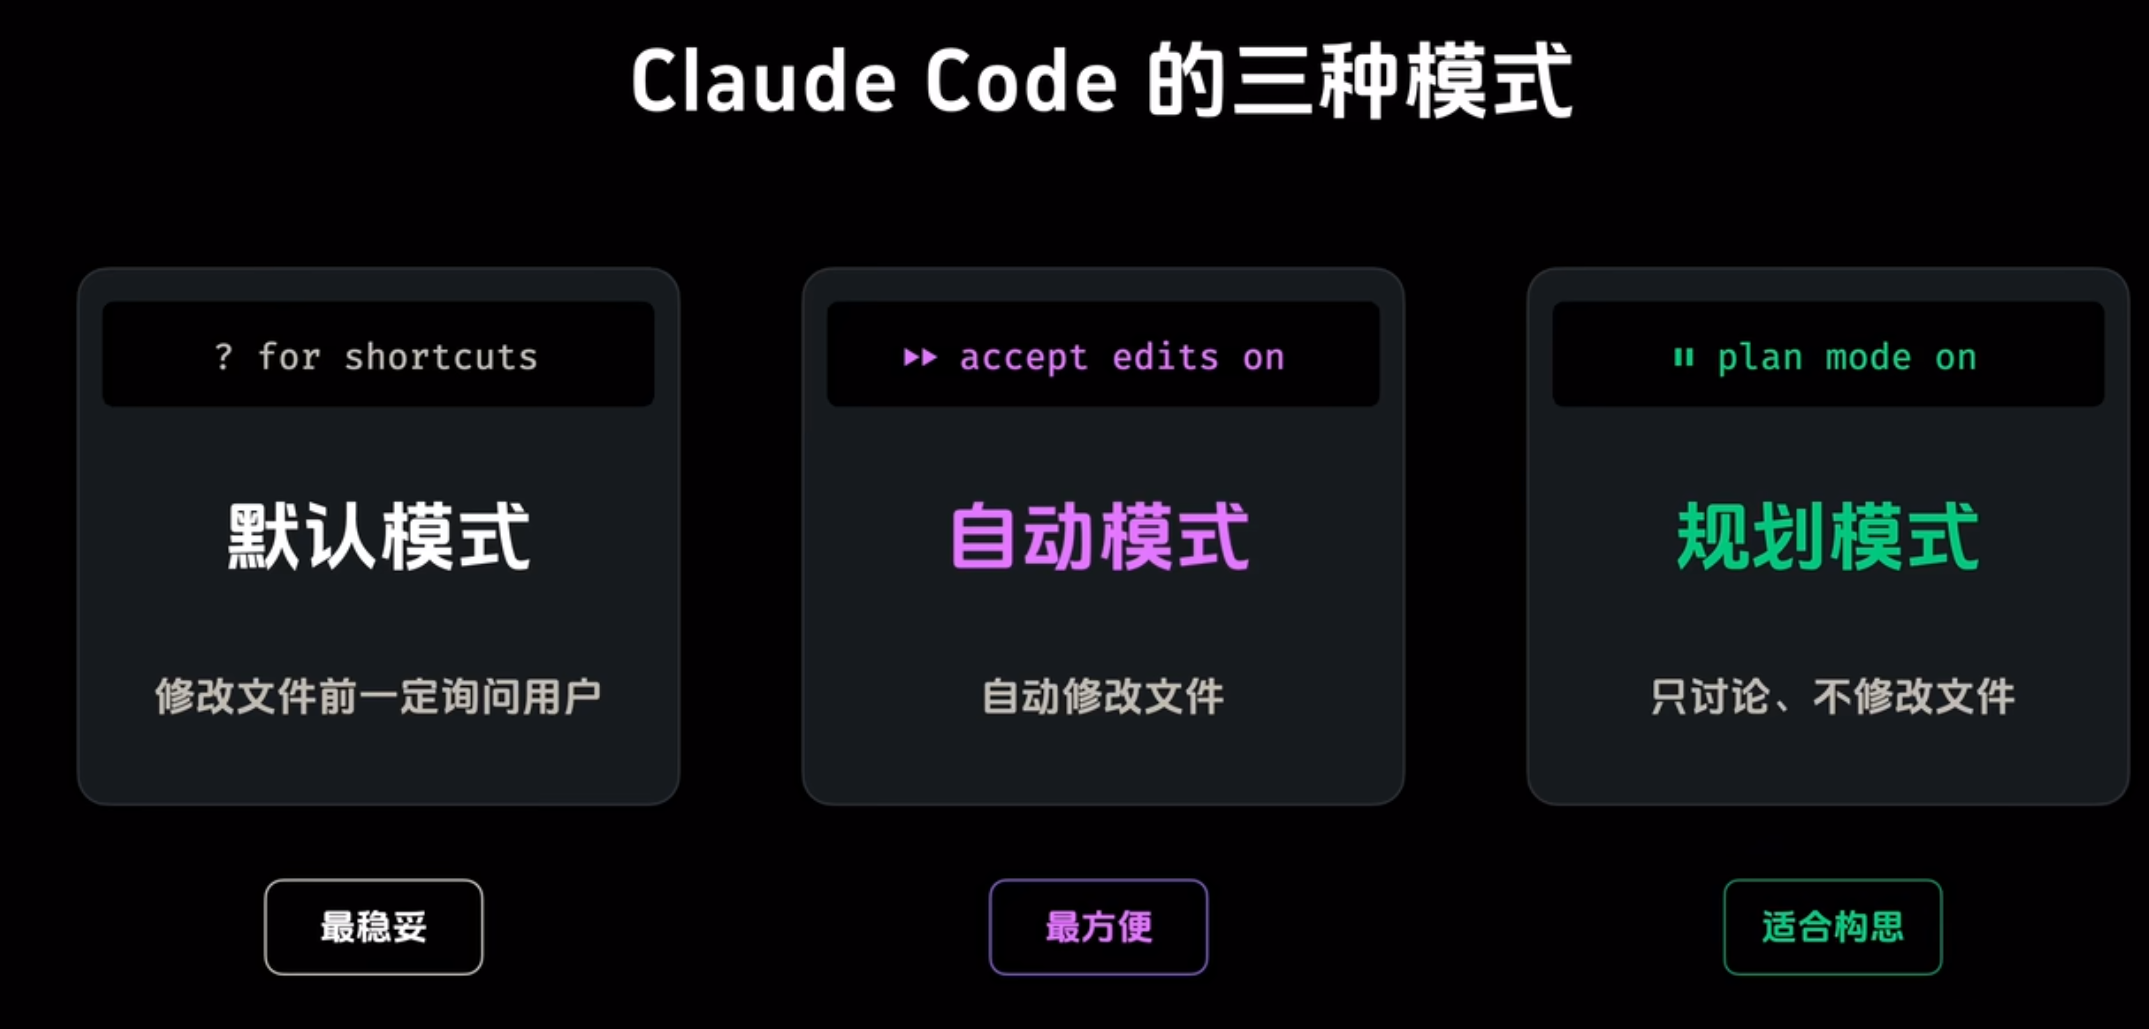
shift+tab转换模式
1.终端执行命令
2.回车的话就用\,比如我\ 按下回车就会换行
3.ctrl+g
保存关闭就行了
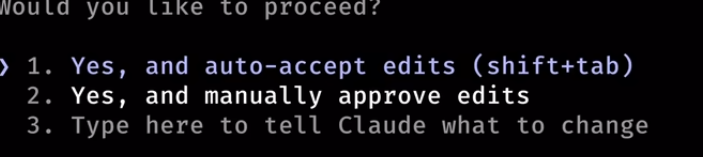
4.这里第一个恢复到自动接受,第二个则是手动接受,第三个接着规划(现在是plan mode模式)
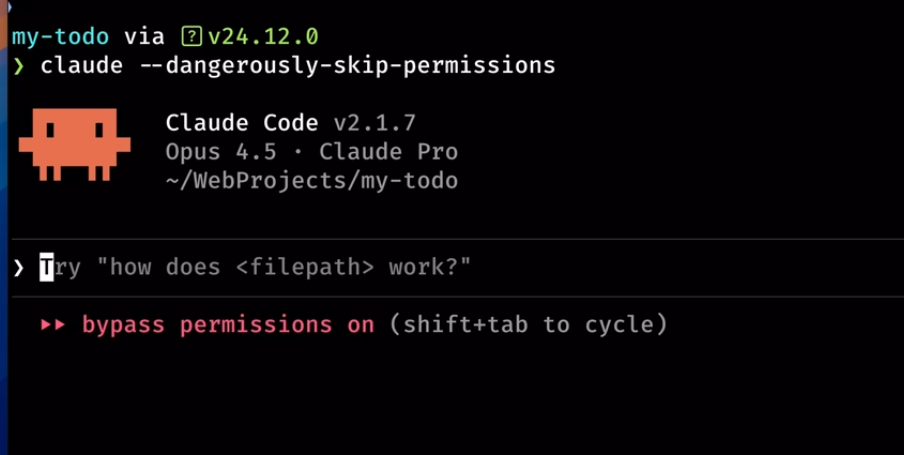
5.claude --dangerously-skip-permissions(不用按回车了,风险比较高)
6./resume 回到历史会话(这个实用,还可以claude -c)
7./tasks
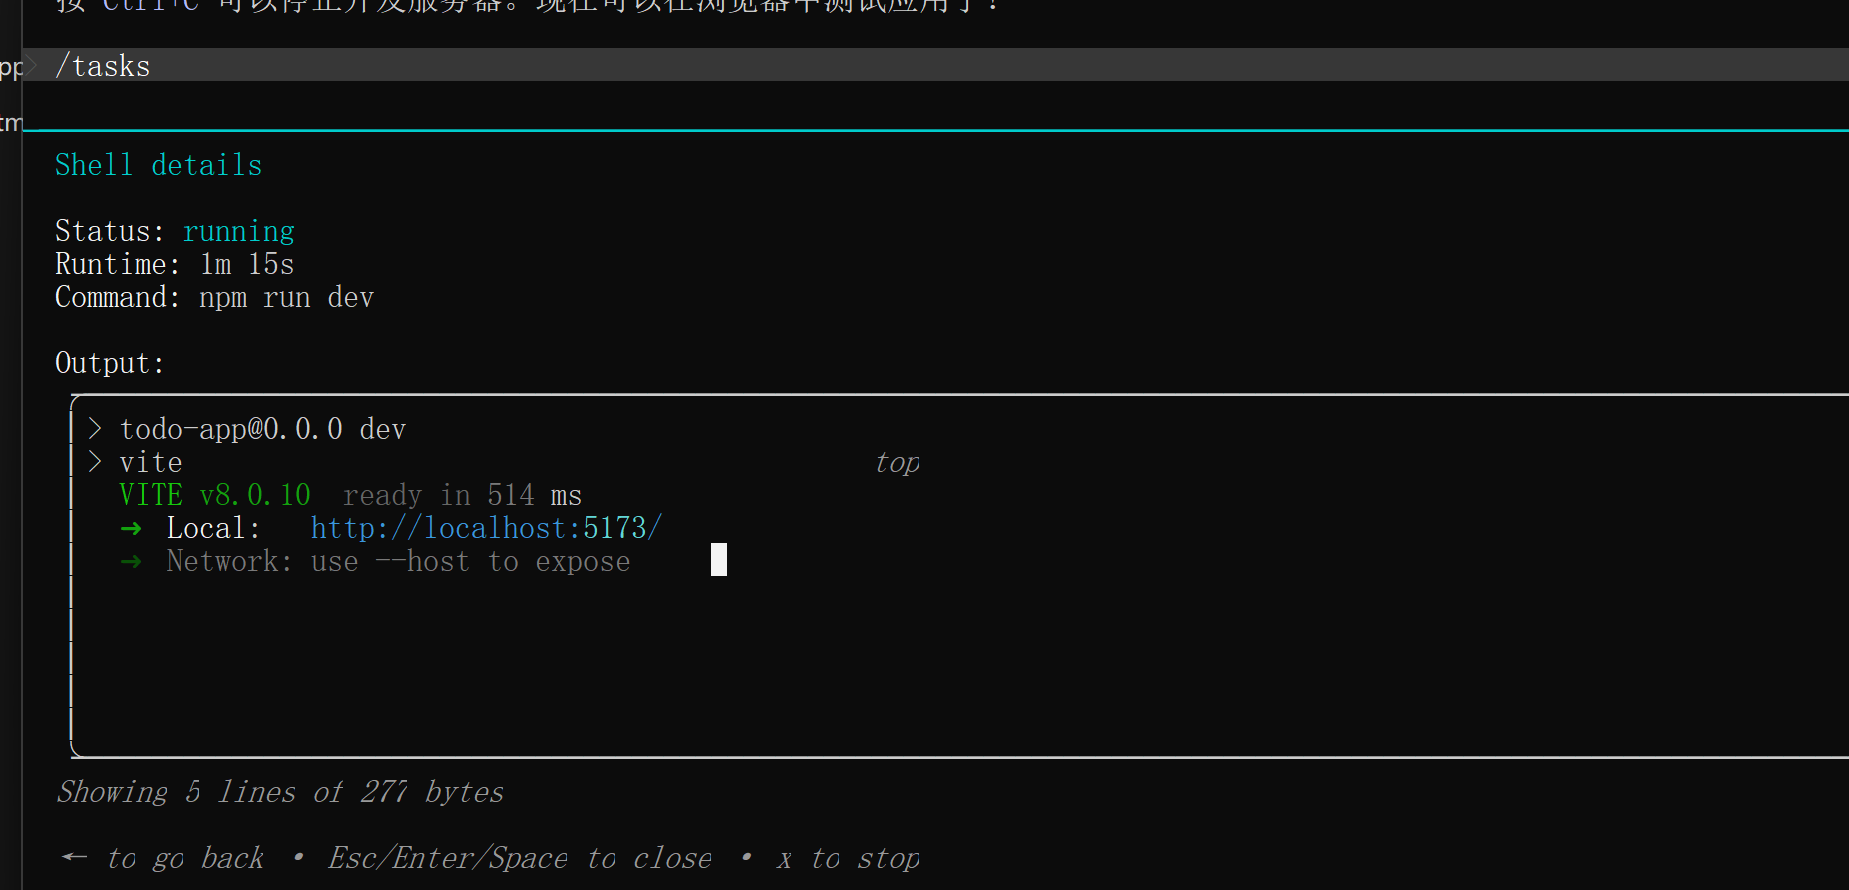
可以查看后台的任务
8.两下esc或者/rewind可以回滚(经常用不到)
9./compact压缩上下文
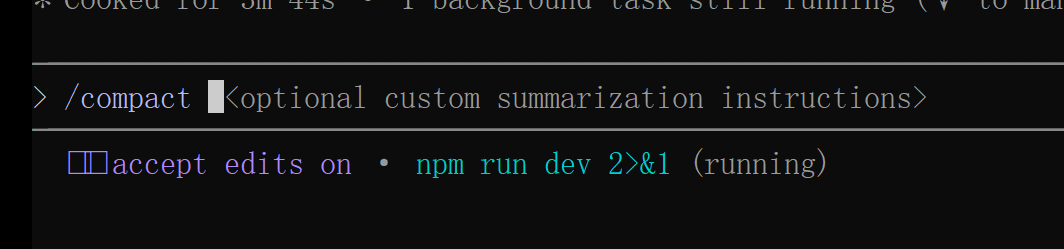
10./clear清除上下文(这个是直接清空)
11./init

生成一份CLAUDE.md文件(希望每次claude code都去读取)
12.如果要用skills就把它放在
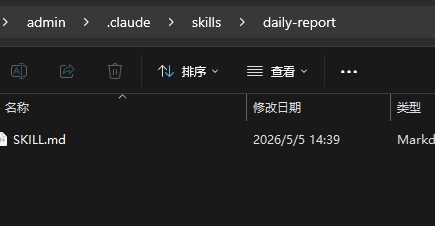
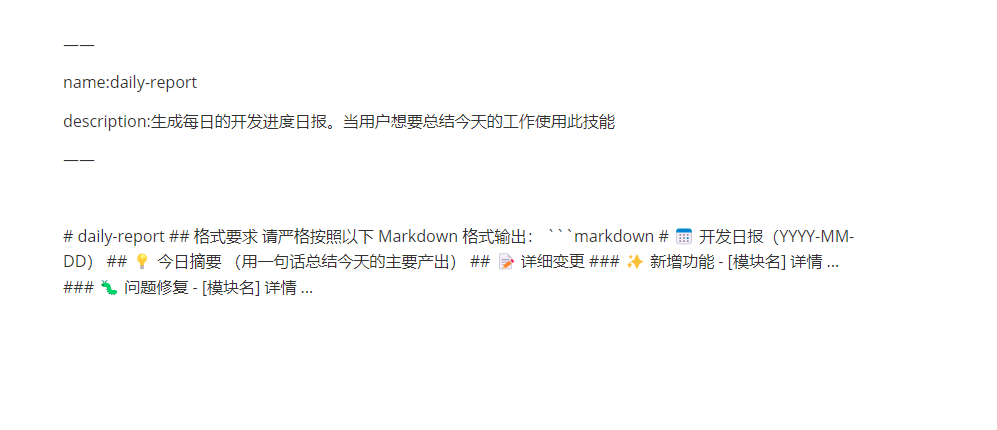
前面必须写name和description随后就可以了,下面则是skills的主要内容
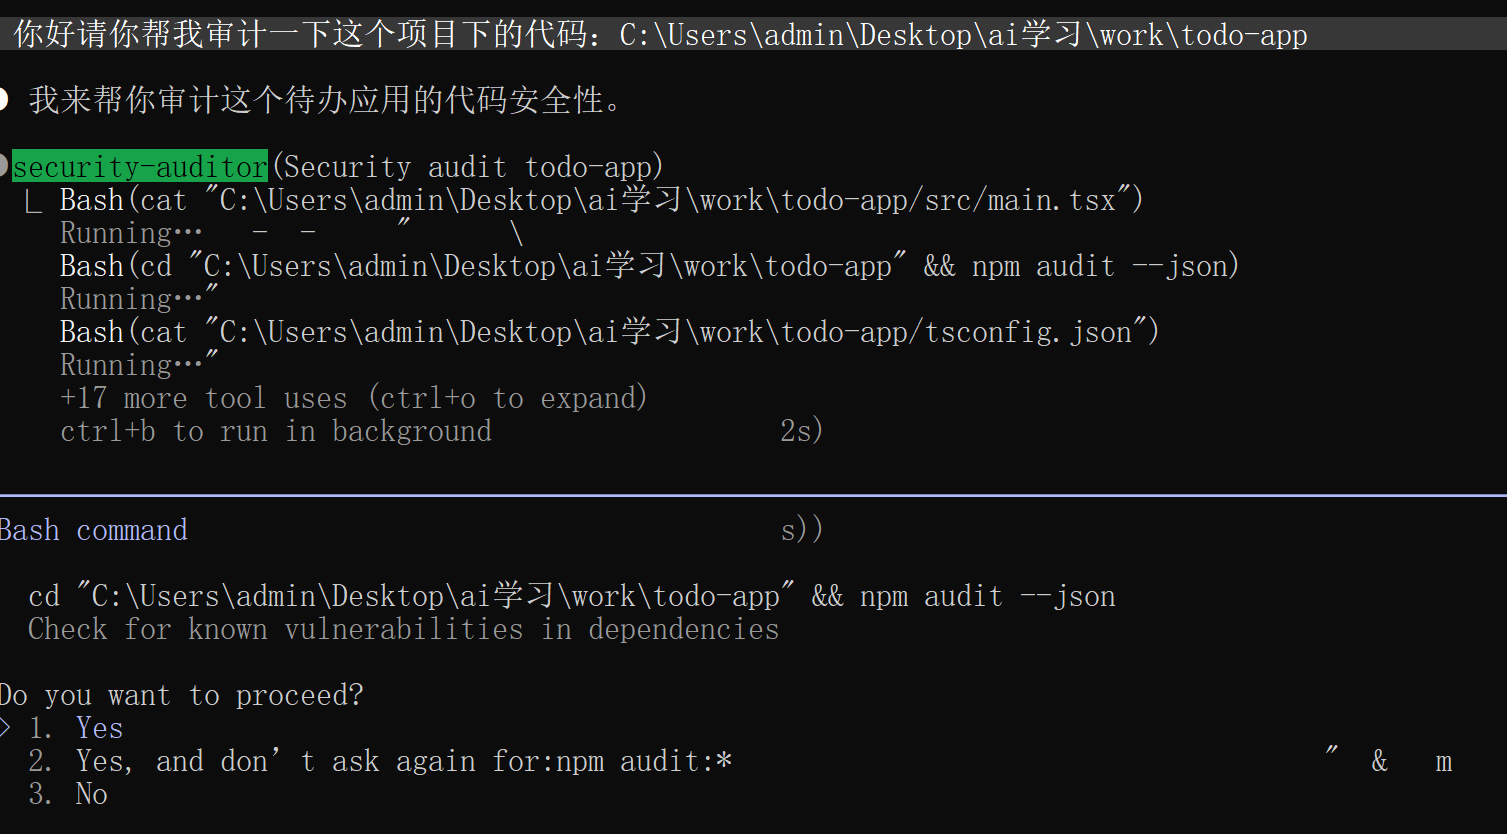
13./agents就去创建subagent
记得输入提示词就可以了
14./plugin插件市场找找有frontend design 相当好用
下载frontend-design相当友好的风格
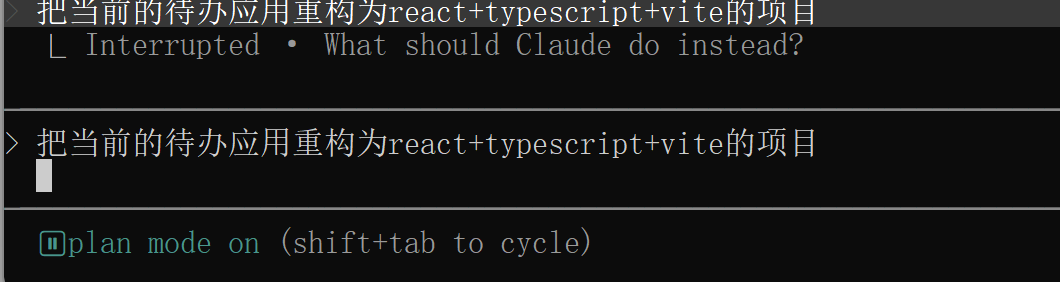
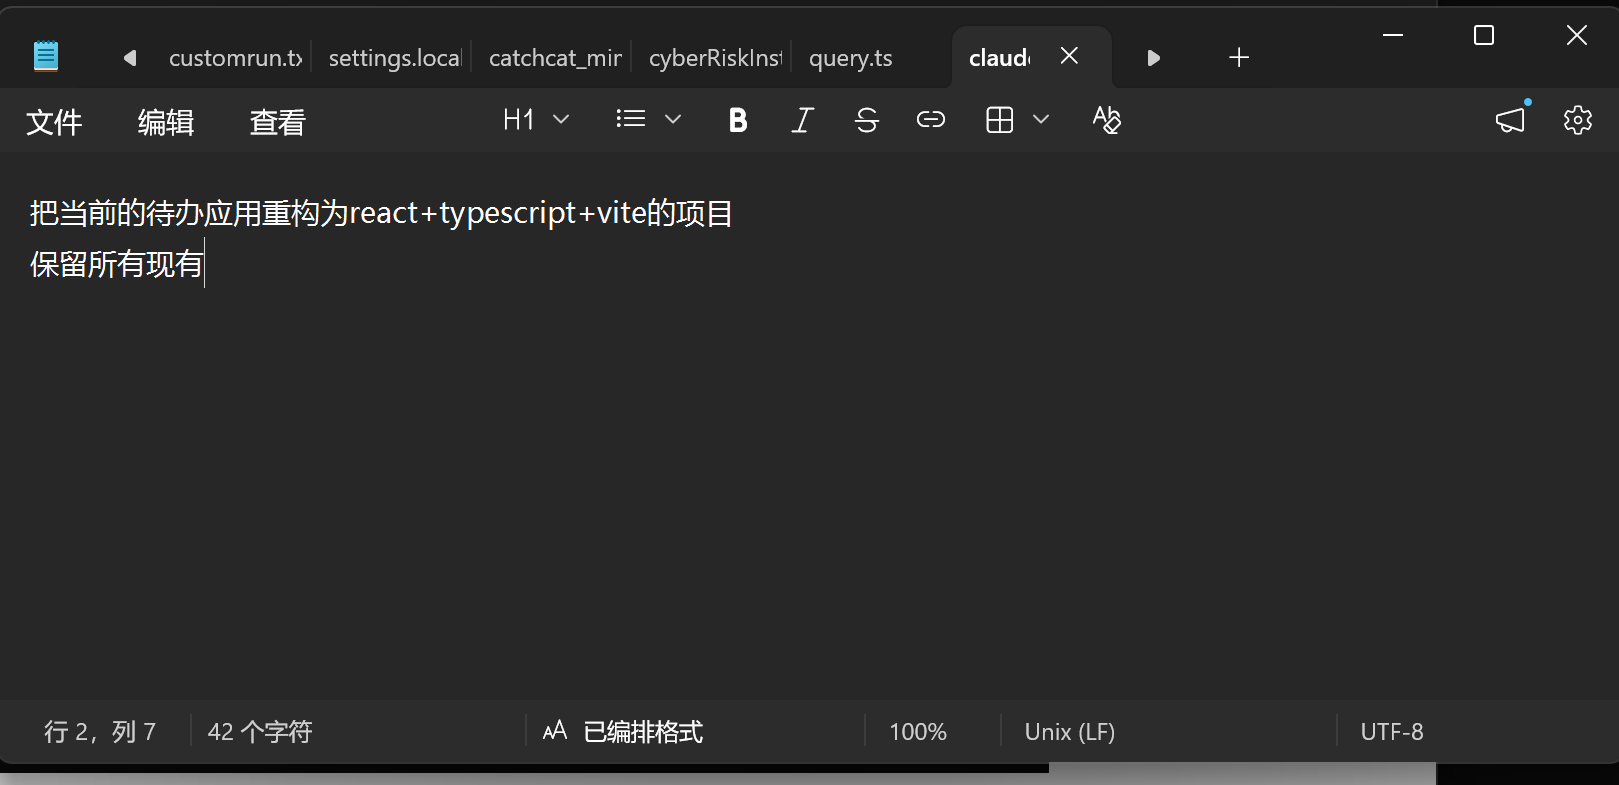
按照frontend-design的要求做一个待办软件,默认中文,使用html实现
15.还有其他的比较冷门的\btw就不再显示了,常用的就那8-9个
从零开始理解Claude code
Agency 从哪来
智能体的核心是一个神经网络——Transformer、RNN,或经训练而成的函数——经过数十亿次梯度更新,在行动序列数据上学会了感知环境、推理目标、采取行动。所谓“智能体”,从来不是外部代码赋予的,而是模型在训练过程中自主习得的。
人类就是最好的例子。一个由数百万年进化训练出来的生物神经网络,通过感官感知世界,通过大脑推理,通过身体行动。当 DeepMind、OpenAI 或 Anthropic 说 “agent” 时,他们说的核心都是同一件事:一个通过训练学会了行动的模型,加上让它能在特定环境中工作的基础设施。
Harness = Tools + Knowledge + Observation + Action Interfaces + Permissions

    Tools:          文件读写、Shell、网络、数据库、浏览器
    Knowledge:      产品文档、领域资料、API 规范、风格指南
    Observation:    git diff、错误日志、浏览器状态、传感器数据
    Action:         CLI 命令、API 调用、UI 交互
    Permissions:    沙箱隔离、审批流程、信任边界
| 对比维度 | Agent | Harness |
|---|---|---|
| 核心定位 | 自主行动的 “智能主体”,负责决策与执行 | Agent 的 “运行支撑系统”,负责调度与约束 |
| 核心目标 | 完成用户设定的具体任务 | 保障 Agent 稳定、安全、高效地运行 |
| 抽象层次 | 更高层次,关注 “做什么” 和 “为什么做” | 更低层次,关注 “怎么做” 和 “如何保障做对” |
| 能力侧重 | 推理、规划、目标导向 | 编排、监控、安全、容错、资源管理 |
| 组成关系 | 整体,包含模型与 Harness | 部分,是 Agent 的核心支撑组件 |
| 典型场景 | 自动数据分析、智能客服、自主编程 | 模型部署、任务调度、生产环境管控 |
| 本质属性 | 智能体,具备自主性与目标性 | 工具 / 框架,提供基础设施与管控能力 |
依赖关系:裸大模型无法成为 Agent,必须通过 Harness 赋予流程调度、工具管理、记忆保存等能力
协同模式:
- Agent 负责 “思考”:决定目标、规划步骤、选择工具
- Harness 负责 “执行”:调度工具、管理状态、处理异常、保障安全
架构视角:
- 内部视角:Harness 包裹模型,是 Agent 的 “控制系统”
- 外部视角:Harness 包裹整个 Agent,是 Agent 的 “运行容器”
因为 Claude Code 是所见过的最优雅、最完整的 agent harness 实现。不是因为某个巧妙的技巧,而是因为它 没做 的事:它没有试图成为 agent 本身。它没有强加僵化的工作流。它没有用精心设计的决策树去替模型做判断。它给模型提供了工具、知识、上下文管理和权限边界 – 然后让开了。
Claude Code = 一个 agent loop
            + 工具 (bash, read, write, edit, glob, grep, browser...)
            + 按需 skill 加载
            + 上下文压缩
            + 子 agent 派生
            + 带依赖图的任务系统
            + 异步邮箱的团队协调
            + worktree 隔离的并行执行
            + 权限治理
这套课程主要
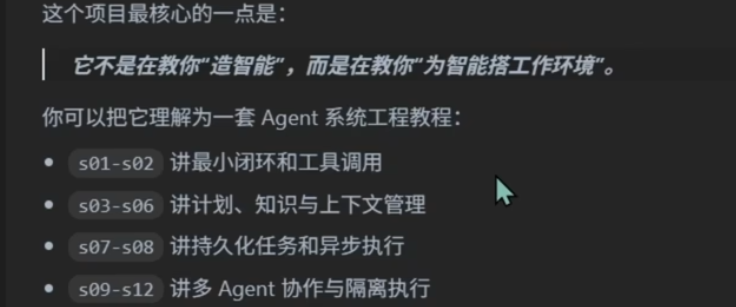
s01 Agent Loop(就这一步是一个正常agent该做的)
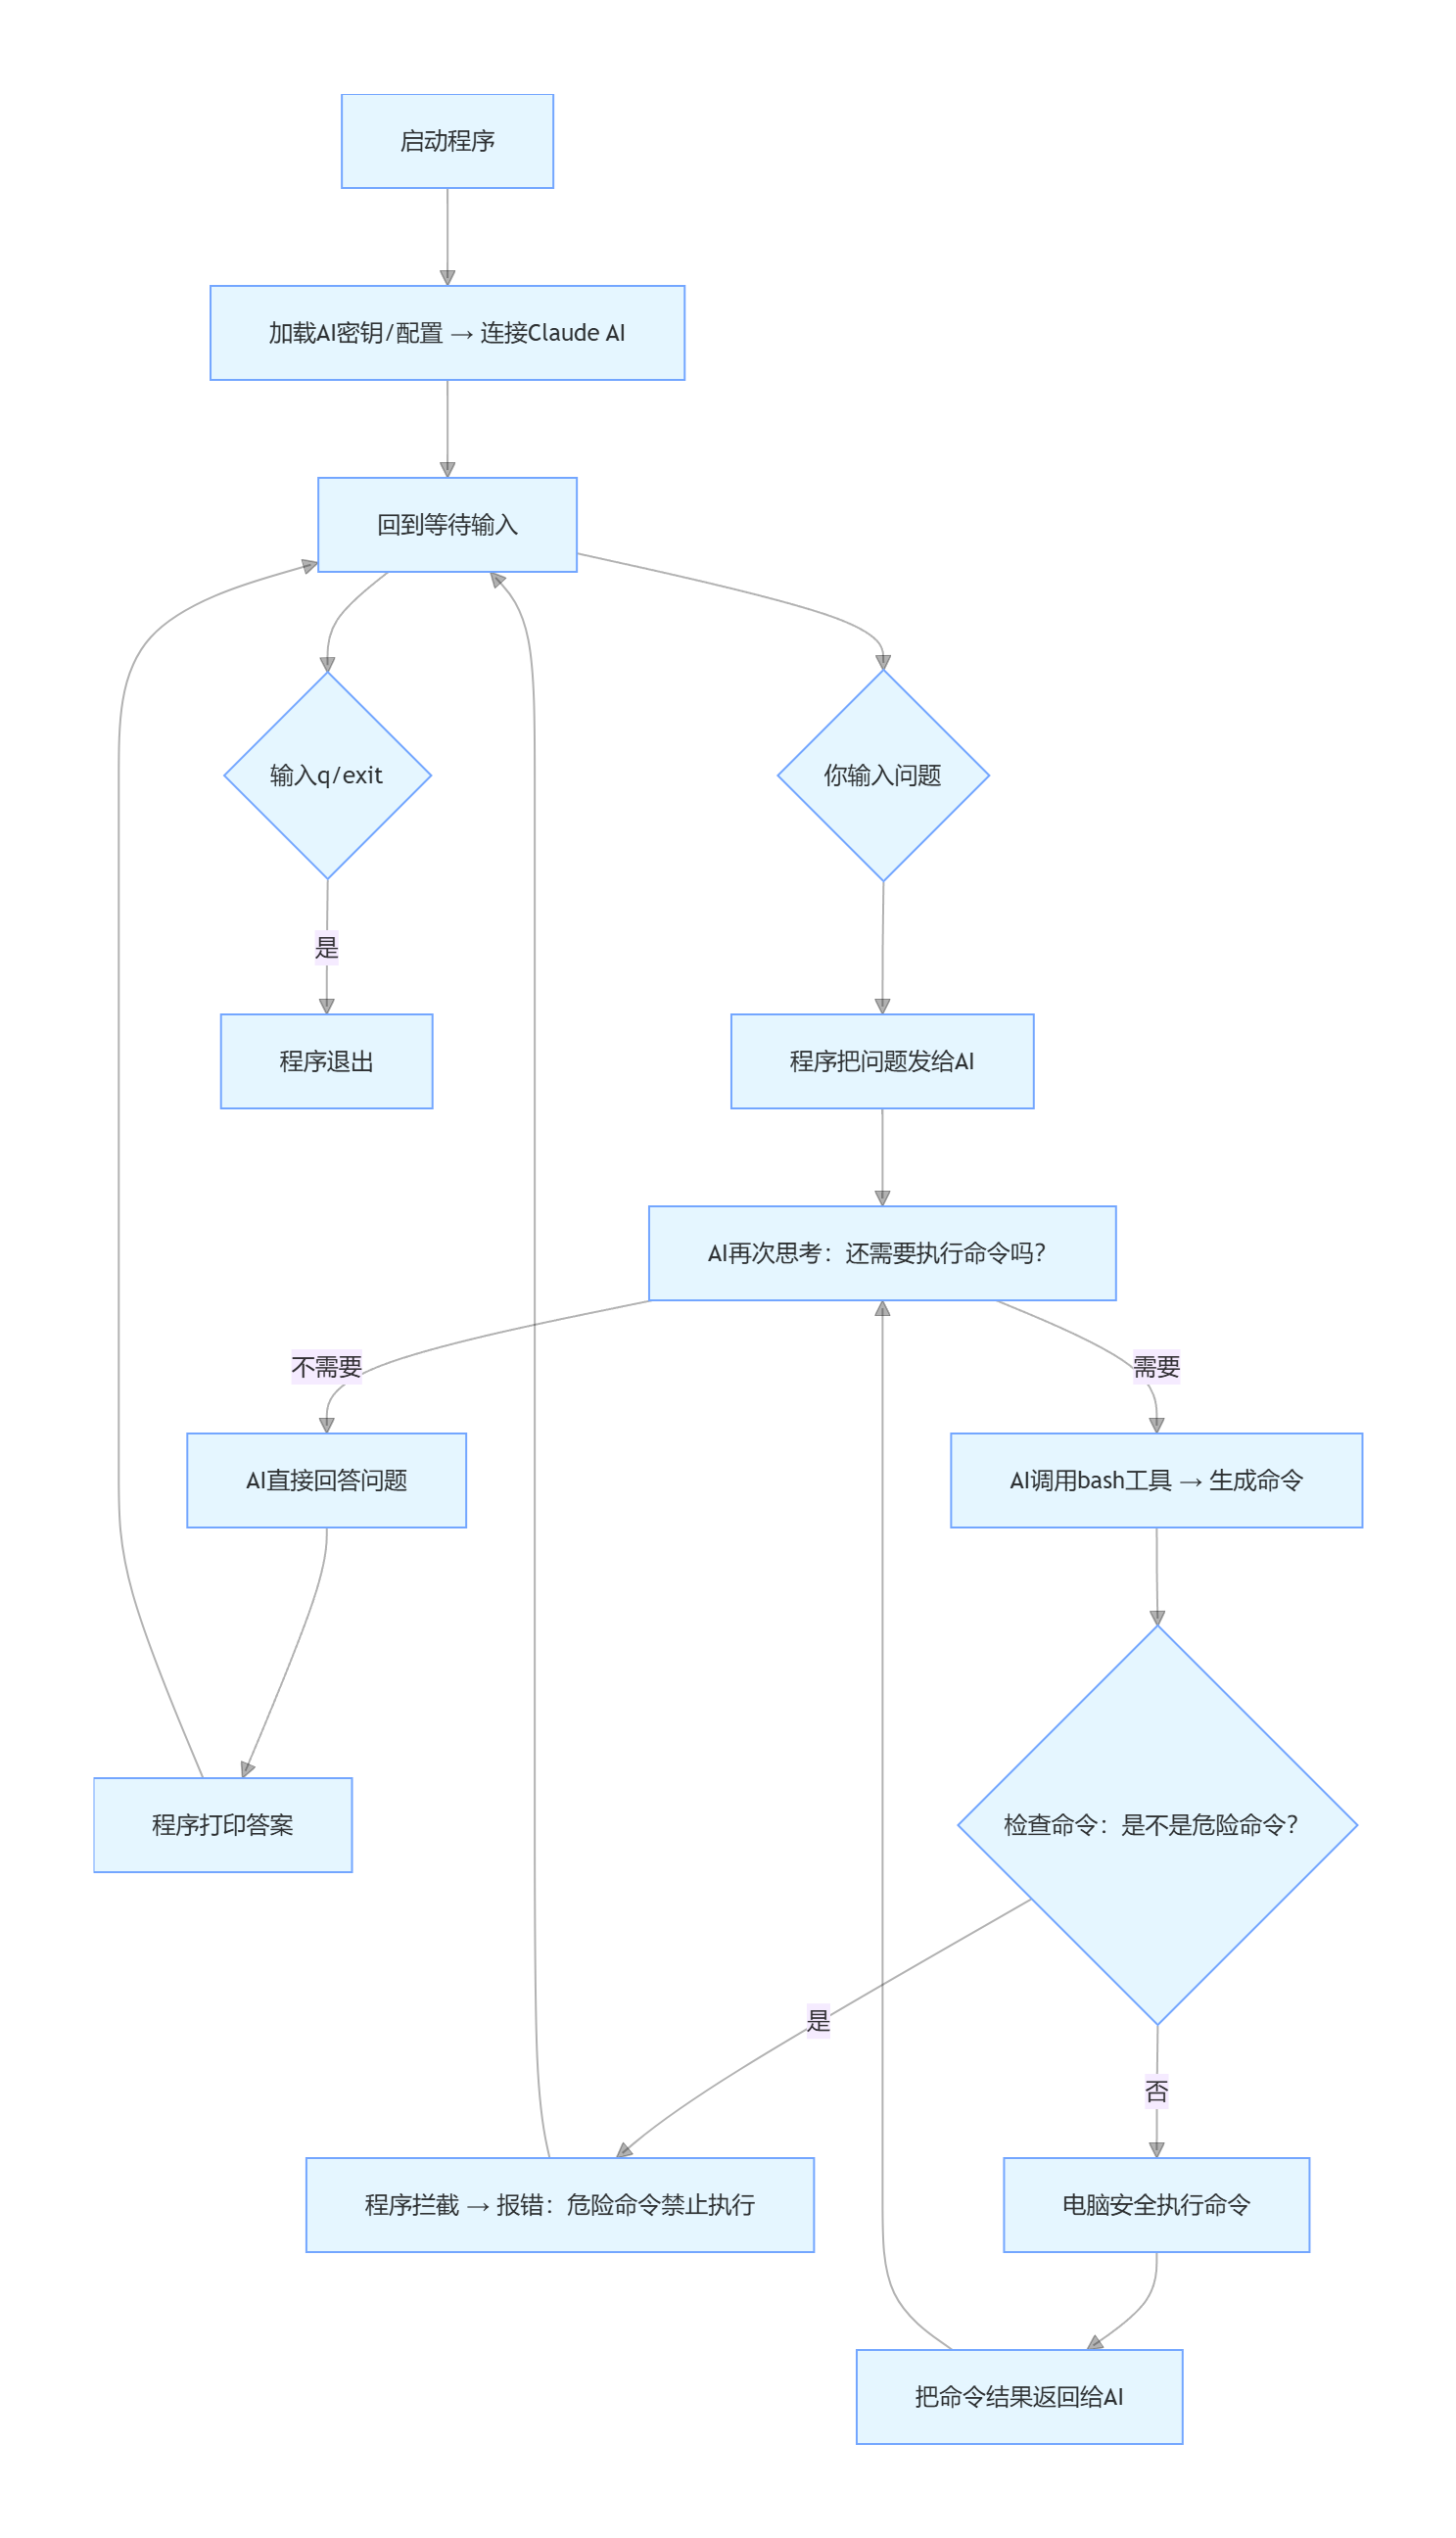
问题
语言模型能推理代码, 但碰不到真实世界 – 不能读文件、跑测试、看报错。没有循环, 每次工具调用我都得手动把结果粘回去。我自己就是那个循环。
解决方案
+--------+      +-------+      +---------+
|  User  | ---> |  LLM  | ---> |  Tool   |
| prompt |      |       |      | execute |
+--------+      +---+---+      +----+----+
                    ^                |
                    |   tool_result  |
                    +----------------+
                    (loop until stop_reason != "tool_use")
代码实现
def agent_loop(query):
    messages = [{"role": "user", "content": query}] #喂给大模型角色和问题
    while True:
    	#把消息和工具定义一起发给了llm
        response = client.messages.create(
            model=MODEL, system=SYSTEM, messages=messages,
            tools=TOOLS, max_tokens=8000,
        )

        #追加助手响应。检查 stop_reason -- 如果模型没有调用工具, 结束。
        messages.append({"role": "assistant", "content": response.content})

        if response.stop_reason != "tool_use":
            return

		#执行每个工具调用, 收集结果, 作为 user 消息追加。回到第 2 步。
        results = []
        for block in response.content:
            if block.type == "tool_use":
                output = run_bash(block.input["command"])
                results.append({
                    "type": "tool_result",
                    "tool_use_id": block.id,
                    "content": output,
                })
        messages.append({"role": "user", "content": results})
完整
# 1. 导入电脑系统工具:获取文件夹路径、系统配置
import os
# 2. 导入命令执行工具:让Python运行电脑的终端命令(如ls、dir)
import subprocess

# 3. 尝试执行优化命令行的代码,出错也不崩溃
try:
    # 4. 导入命令行优化模块:支持上下键翻历史、正常输入中文
    import readline # 增强命令行输入体验(支持方向键、历史记录等)
    # 5~9行:专门优化命令行输入,让中文/符号正常显示、快捷键可用
    readline.parse_and_bind('set bind-tty-special-chars off')
    readline.parse_and_bind('set input-meta on')
    readline.parse_and_bind('set output-meta on')
    readline.parse_and_bind('set convert-meta off')
    readline.parse_and_bind('set enable-meta-keybindings on')
# 10. 如果电脑没有readline模块,就跳过,不报错
except ImportError:
    # 11. 跳过执行,什么都不做
    pass

# 12. 导入Claude AI工具:连接AI大模型
from anthropic import Anthropic
# 13. 导入配置读取工具:读取私密配置(AI密钥、接口)
from dotenv import load_dotenv

# 14. 注释:下面是程序准备工作
#前置准备部分
# 15. 加载.env私密配置文件,覆盖系统原有配置
load_dotenv(override=True)
# 16. 创建AI客户端:填入接口地址+AI密钥,连接Claude
client = Anthropic(base_url=os.getenv("ANTHROPIC_BASE_URL"),auth_token=os.getenv("ANTHROPIC_AUTH_TOKEN"))
# 17. 读取要使用的AI模型型号(如claude-4.6opus4.6)
MODEL = os.environ["MODEL_ID"]

# 18. 注释:给AI设定角色的指令
#SYSTEM 提示词
# 19. 设定AI角色:我是当前文件夹的代码助手,用命令解决问题,别废话
SYSTEM = f"You are a coding agent at {os.getcwd()}. Use bash to solve tasks. Act, don't explain."

# 20. 注释:定义AI能使用的工具
#工具定义
# 21. 注释:AI要执行命令,会按这个格式告诉程序
#模型每次思考后,如果需要执行命令,就会以标准 Tool Use 格式返回 {"name": "bash", "input": {"command": "ls -la"}}。
# 22~34. 定义AI的工具:只有一个【bash命令执行工具】
TOOLS = [{
    "name": "bash",
    "description": "Run a shell command.",
    "input_schema": {
        "type": "object",
        "properties": {"command": {"type": "string"}},
        "required": ["command"],
    },
}]

# 35. 注释:核心函数→执行电脑终端命令
#核心执行函数:run_bash
# 36. 定义函数:输入命令,返回执行结果
def run_bash(command: str) -> str:
    # 37. 危险命令黑名单:删系统文件、关机、重启,绝对禁止执行
    dangerous = ["rm -rf /", "sudo", "shutdown", "reboot", "> /dev/"]# 危险命令黑名单
    # 38. 检查命令里有没有危险内容
    if any(d in command for d in dangerous):
        # 39. 有危险→直接拦截,返回错误
        return "Error: Dangerous command blocked"
    # 40. 尝试执行命令,出错自动处理
    try:
        # 41~43. 执行命令:当前文件夹运行,120秒超时,捕获输出结果
        r = subprocess.run(command, shell=True, cwd=os.getcwd(),
                           capture_output=True, text=True, timeout=120)
        # 44. 合并命令的正常输出+错误输出,去掉空格
        out = (r.stdout + r.stderr).strip()
        # 45. 只返回前5万个字符(防止太多卡死),无输出就提示空
        return out[:50000] if out else "(no output)"#只返回前 50000 字符结果,避免输出过大导致卡死。

    # 46. 命令执行超过120秒→触发超时错误
    except subprocess.TimeoutExpired:  #超时 120 秒保护。
        return "Error: Timeout (120s)"
    # 47. 命令找不到/系统错误→返回具体报错
    except (FileNotFoundError, OSError) as e: #把命令执行错误的也要Error输出
        return f"Error: {e}"

# 48. 定义AI核心循环:AI思考→调用命令→循环直到完成任务
def agent_loop(messages: list):
    # 49. 无限循环:直到AI不用执行命令才停止
    while True:
        # 50~53. 给AI发请求:模型+角色+对话历史+工具+最大字数
        response = client.messages.create(
            model=MODEL, system=SYSTEM, messages=messages,
            tools=TOOLS, max_tokens=8000,
        )
        # 54. 注释:把AI的回答存入对话历史
        # 追加助手响应。检查 stop_reason -- 如果模型没有调用工具, 结束
        # 55. 把AI的回答加入对话记录
        messages.append({"role": "assistant", "content": response.content})
        # 56. 注释:AI不调用命令就结束循环
        # 大模型不再调用工具就退出
        # 57. 判断:AI停止原因不是执行命令
        if response.stop_reason != "tool_use":
            # 58. 退出循环,结束任务
            return
        # 59. 注释:执行AI调用的所有命令,收集结果
        # Execute each tool call, collect results
        # 60. 空列表:存命令执行结果
        results = []
        # 61. 遍历AI返回的所有内容
        for block in response.content:
            # 62. 如果内容是【执行命令】
            if block.type == "tool_use":
                # 63. 黄色字体打印AI要执行的命令
                print(f"\033[33m$ {block.input['command']}\033[0m")
                # 64. 调用函数执行命令,获取结果
                output = run_bash(block.input["command"])
                # 65. 打印命令结果的前200字符
                print(output[:200])
                # 66~67. 把命令结果存入列表
                results.append({"type": "tool_result", "tool_use_id": block.id,
                                "content": output})
        # 68. 把命令结果发给AI,让AI继续思考
        messages.append({"role": "user", "content": results})

# 69. 程序主入口:只有直接运行这个文件,才执行下面代码
if __name__ == "__main__":
    # 70. 空列表:存储全程对话历史
    history = []
    # 71. 无限循环:等待用户输入
    while True:
        # 72. 尝试获取用户输入,按Ctrl+C就退出
        try:
            # 73. 蓝色字体提示:等待我输入问题
            query = input("\033[36ms01 >> \033[0m")
        # 74. 用户按Ctrl+C/D→结束程序
        except (EOFError, KeyboardInterrupt):
            break
        # 75. 输入q/exit/空内容→退出
        if query.strip().lower() in ("q", "exit", ""):
            break
        # 76. 把我的问题存入对话历史
        history.append({"role": "user", "content": query})
        # 77. 启动AI核心循环,处理我的问题
        agent_loop(history)
        # 78. 获取AI的最终回答
        response_content = history[-1]["content"]
        # 79. 如果回答是列表格式
        if isinstance(response_content, list):
            # 80. 遍历回答内容
            for block in response_content:
                # 81. 如果有文本内容
                if hasattr(block, "text"):
                    # 82. 打印AI的回答
                    print(block.text)
        # 83. 打印空行,排版美观
        print()
这是我规定的tools
TOOLS = [{
    "name": "bash", # 1. 工具名字:就叫 bash
    "description": "Run a shell command.",   # 2. 工具用途:运行终端命令
    "input_schema": {
        "type": "object",
        "properties": {"command": {"type": "string"}},  # 必须传 command,且是文本
        "required": ["command"],   # 4. 强制要求:必须传 command 参数
    },
}]
Claude 返回了要执行 ls -la 的工具调用:
{
    "role":"assistant",
    "content":[
        {
            "type":"tool_use",   # 官方固定标识:我要调用工具了
            "id":"tu_xxxx",      # 官方自动生成的编号(方便程序核对)
            "name":"bash",       # ✅ 严格对应写的 name: bash
            "input":{"command":"ls -la"}  # ✅ 严格对应写的 input_schema,# ✅ 严格对应要求的 command 参数
        }
    ]
}
完整真实流程(原样 JSON,不做任何修改)
第一步:我输入
输入:
我看一下这个目录有什么文件
history.append({"role": "user", "content": "我看一下这个目录有什么文件"})
此时 history 长这样(也是第一次发给 AI 的完整消息):
[
  {"role":"user","content":"我看一下这个目录有什么文件"}
]
第二步:第一次发给 Claude 的完整请求
传给 client.messages.create 的 messages 就是上面这个。
没有任何 assistant,就只有这一句用户消息。
第三步:Claude 第一次原样返回(真实结构,固定不变)
{
  "id": "msg_001",
  "type": "message",
  "role": "assistant",
  "content": [
    {
      "type": "tool_use",
      "id": "tu_001",
      "name": "bash",
      "input": {"command": "ls -la"}
    }
  ],
  "stop_reason": "tool_use",
  "model": "deepseek-v4-flash"
}
重点:
stop_reason: "tool_use" 就在最外层,不是里面的 content。
第四步:代码执行这行
messages.append({"role": "assistant", "content": response.content})
现在内存里消息列表变成两条:
[
  {"role":"user","content":"我看一下这个目录有什么文件"},
  {
    "role":"assistant",
    "content":[
      {
        "type":"tool_use",
        "id":"tu_001",
        "name":"bash",
        "input":{"command":"ls -la"}
      }
    ]
  }
]
第五步:代码判断
if response.stop_reason != "tool_use":
    return
现在是 tool_use → 条件不成立,不 return,继续往下跑
第六步:执行 bash 命令 + 拼装工具结果
程序运行 ls -la,拿到目录输出,然后拼成:
{
  "type":"tool_result",
  "tool_use_id":"tu_001",
  "content":"总用量 16\ndrwxr-xr-x 2 .\ndrwxr-xr-x 2 ..\n-rw-r--r-- .env\n-rw-r--r-- agent.py"
}
然后代码:
messages.append({"role": "user", "content": results})
现在消息列表变成三条,这是第二次要发给 AI 的完整消息:
[
  {"role":"user","content":"我看一下这个目录有什么文件"},
  {
    "role":"assistant",
    "content":[
      {
        "type":"tool_use",
        "id":"tu_001",
        "name":"bash",
        "input":{"command":"ls -la"}
      }
    ]
  },
  {
    "role":"user",
    "content":[
      {
        "type":"tool_result",
        "tool_use_id":"tu_001",
        "content":"总用量 16\ndrwxr-xr-x 2 .\ndrwxr-xr-x 2 ..\n-rw-r--r-- .env\n-rw-r--r-- agent.py"
      }
    ]
  }
]
第七步:第二次循环,把上面三条整条发给 Claude
AI 拿到上下文:我的问题 + 它自己要执行命令 + 命令结果。
Claude 第二次返回:
{
  "id": "msg_002",
  "type": "message",
  "role": "assistant",
  "content": [
    {
      "type": "text",
      "text": "当前目录下有:.env 配置文件、agent.py 主程序文件"
    }
  ],
  "stop_reason": "end_turn",
  "model": "deepseek-v4-flash"
}
第八步:再次判断 stop_reason
if response.stop_reason != "tool_use":
    return
现在 stop_reason 是 end_turn不等于tool_use
→ 执行 return 跳出 agent_loop 循环,任务结束。
s02 tool use
问题
只有 bash 时, 所有操作都走 shell。cat 截断不可预测, sed 遇到特殊字符就崩, 每次 bash 调用都是不受约束的安全面。专用工具 (read_file, write_file) 可以在工具层面做路径沙箱。
解决方案
+--------+      +-------+      +------------------+
|  User  | ---> |  LLM  | ---> | Tool Dispatch    |
| prompt |      |       |      | {                |
+--------+      +---+---+      |   bash: run_bash |
                    ^           |   read: run_read |
                    |           |   write: run_wr  |
                    +-----------+   edit: run_edit |
                    tool_result | }                |
                                +------------------+

The dispatch map is a dict: {tool_name: handler_function}.
One lookup replaces any if/elif chain.
工作原理(其实就去把命令细分,这样安全性就提升了许多)
- 每个工具有一个处理函数。路径沙箱防止逃逸工作区。
def safe_path(p: str) -> Path:
    path = (WORKDIR / p).resolve()
    if not path.is_relative_to(WORKDIR):
        raise ValueError(f"Path escapes workspace: {p}")
    return path

def run_read(path: str, limit: int = None) -> str:
    text = safe_path(path).read_text()
    lines = text.splitlines()
    if limit and limit < len(lines):
        lines = lines[:limit]
    return "\n".join(lines)[:50000]
2.dispatch map 将工具名映射到处理函数。
TOOL_HANDLERS = {
    "bash":       lambda **kw: run_bash(kw["command"]),
    "read_file":  lambda **kw: run_read(kw["path"], kw.get("limit")),
    "write_file": lambda **kw: run_write(kw["path"], kw["content"]),
    "edit_file":  lambda **kw: run_edit(kw["path"], kw["old_text"],
                                        kw["new_text"]),
}
3.循环中按名称查找处理函数。循环体本身与 s01 完全一致,用id找工具
for block in response.content:
    if block.type == "tool_use":
        handler = TOOL_HANDLERS.get(block.name)
        output = handler(**block.input) if handler \
            else f"Unknown tool: {block.name}"
        results.append({
            "type": "tool_result",
            "tool_use_id": block.id,
            "content": output,
        })
加工具 = 加 handler + 加 schema。循环永远不变。
相对 s01 的变更
| 组件 | 之前 (s01) | 之后 (s02) |
|---|---|---|
| Tools | 1 (仅 bash) | 4 (bash, read, write, edit) |
| Dispatch | 硬编码 bash 调用 | TOOL_HANDLERS 字典 |
| 路径安全 | 无 | safe_path() 沙箱 |
| Agent loop | 不变 | 不变 |
第一步:输入
请读一下当前目录的test.py文件
history.append({"role": "user", "content": "请读一下当前目录的test.py文件"})
此时 history:
[
  {"role": "user", "content": "请读一下当前目录的test.py文件"}
]
第二步:代码调用大模型(完整真实请求,和代码完全一致)
这是真正发给 AI 的全部内容,包含 system/model/tools/max_tokens/messages 所有参数
# 完全对应我代码里的调用
response = client.messages.create(
    # 系统提示词(固定)
    system="You are a coding agent at /我的工作目录. Use tools to solve tasks. Act, don't explain.",
    # 模型(来自环境变量)
    model=os.environ["MODEL_ID"],
    # 消息上下文(第一步的history)
    messages=[
        {"role": "user", "content": "请读一下当前目录的test.py文件"}
    ],
    # 完整工具列表(我代码里定义的4个工具)
    tools=[
        {"name": "bash", "description": "Run a shell command.", "input_schema": {"type": "object", "properties": {"command": {"type": "string"}}, "required": ["command"]}},
        {"name": "read_file", "description": "Read file contents.", "input_schema": {"type": "object", "properties": {"path": {"type": "string"}, "limit": {"type": "integer"}}, "required": ["path"]}},
        {"name": "write_file", "description": "Write content to file.", "input_schema": {"type": "object", "properties": {"path": {"type": "string"}, "content": {"type": "string"}}, "required": ["path", "content"]}},
        {"name": "edit_file", "description": "Replace exact text in file.", "input_schema": {"type": "object", "properties": {"path": {"type": "string"}, "old_text": {"type": "string"}, "new_text": {"type": "string"}}, "required": ["path", "old_text", "new_text"]}},
    ],
    # 最大token
    max_tokens=8000,
)
第三步:大模型第一次返回(工具调用)
{
  "id": "msg_001",
  "type": "message",
  "role": "assistant",
  "content": [
    {
      "type": "tool_use",
      "id": "tu_001",
      "name": "read_file",
      "input": {"path": "test.py"}
    }
  ],
  "stop_reason": "tool_use",
  "model": "我的模型名称"
}
第四步:代码追加 AI 消息到上下文
messages.append({"role": "assistant", "content": response.content})
[
  {"role": "user", "content": "请读一下当前目录的test.py文件"},
  {
    "role": "assistant",
    "content": [{"type": "tool_use", "id": "tu_001", "name": "read_file", "input": {"path": "test.py"}}]
  }
]
第五步:代码判断(继续执行工具)
if response.stop_reason != "tool_use":
    return
# tool_use → 不返回,继续执行
第六步:执行工具(完整对应代码逻辑)
-
匹配
TOOL_HANDLERShandler = TTOOL_HANDLERS.get(read_file) # 执行:run_read("test.py")初始状态(我给的消息列表 + AI 返回的 tool_use 块)
# 当前内存中的 messages 列表
[
  {"role": "user", "content": "请读一下当前目录的test.py文件"},
  {
    "role": "assistant",
    "content": [
      {
        "type": "tool_use",
        "id": "tu_001",
        "name": "read_file",        # 工具名称
        "input": {"path": "test.py"} # AI传入的参数
      }
    ]
  }
]
代码开始执行这段核心逻辑:
for block in response.content:
    if block.type == "tool_use":
        handler = TOOL_HANDLERS.get(block.name)
        output = handler(**block.input) if handler else f"Unknown tool: {block.name}"
        print(f"> {block.name}:")
        print(output[:200])
        results.append({"type": "tool_result", "tool_use_id": block.id, "content": output})
第一步:遍历 block,拿到工具对象
block = {
    "type": "tool_use",
    "id": "tu_001",
    "name": "read_file",
    "input": {"path": "test.py"}
}
block.name = "read_file"
block.input = {"path": "test.py"}
block.id = "tu_001"
第二步:handler = TOOL_HANDLERS.get (block.name)
先看我定义的 TOOL_HANDLERS 字典(核心!)
TOOL_HANDLERS = {
    "bash":       lambda **kw: run_bash(kw["command"]),
    "read_file":  lambda **kw: run_read(kw["path"], kw.get("limit")),
    "write_file": lambda **kw: run_write(kw["path"], kw["content"]),
    "edit_file":  lambda **kw: run_edit(kw["path"], kw["old_text"], kw["new_text"]),
}
1. 什么是 lambda?
匿名函数 = 一句话的函数,不用 def 定义,直接存到字典里当值
格式:
lambda 参数: 返回值2. **kw 是什么?(关键!)
**kw= 关键字参数解包作用:把一个字典 → 拆成
key=value的参数传给函数3. 这一步执行结果
handler = TOOL_HANDLERS.get("read_file")→ handler 等于 这个 lambda 函数:
lambda **kw: run_read(kw["path"], kw.get("limit"))
第三步:output = handler (**block.input)
代入值:
block.input = {"path": "test.py"}
**block.input` → 把字典**拆包** 变成 `path="test.py"
执行 lambda 函数:
handler(**{"path": "test.py"})
= run_read(kw["path"], kw.get("limit"))
= run_read(path="test.py", limit=None)
第四步:进入 run_read 函数(逐行执行)
def run_read(path: str, limit: int = None) -> str:
    try:
        # 1. 安全路径校验
        text = safe_path(path).read_text()
        # 2. 按行分割
        lines = text.splitlines()
        # 3. 行数限制(这里limit=None,不执行)
        if limit and limit < len(lines):
            lines = lines[:limit] + [f"... ({len(lines) - limit} more lines)"]
        # 4. 拼接文本,返回
        return "\n".join(lines)[:50000]
    except Exception as e:
        return f"Error: {e}"
4.1 执行 safe_path (path) 安全校验
def safe_path(p: str) -> Path:
    # WORKDIR = 当前代码运行的文件夹
    path = (WORKDIR / p).resolve()
    # 校验:文件必须在当前文件夹内(防止访问系统文件)
    if not path.is_relative_to(WORKDIR):
        raise ValueError(f"Path escapes workspace: {p}")
    return path
执行:
safe_path("test.py")→ 拼接路径 → 合法 → 返回路径对象4.2 读取文件内容
safe_path(path).read_text()→ 读取 test.py 真实内容:
print('test.py内容')
def test():
    return 123
4.3 run_read 最终返回
返回字符串
"print('test.py内容')\ndef test():\n return 123"4.4 赋值给 output
output = "print('test.py内容')\ndef test():\n return 123"
第五步:results.append (…) 生成最终 JSON
代码行:
results.append({
    "type": "tool_result",
    "tool_use_id": block.id,  # tu_001
    "content": output         # 刚才读到的文件内容
})
最终生成的结果(就是我要的 JSON)
{ "type": "tool_result", "tool_use_id": "tu_001", "content": "print('test.py内容')\ndef test():\n return 123" } -
生成工具结果:
{ "type": "tool_result", "tool_use_id": "tu_001", "content": "print('test.py内容')\ndef test():\n return 123" } -
追加结果到上下文:
messages.append({"role": "user", "content": [结果]})
第七步:第二次调用大模型(完整参数)
发送全部参数,messages 是三条上下文(用户 + AI + 工具结果):
client.messages.create(
    system="同上",
    model=os.environ["MODEL_ID"],
    messages=[
        {"role": "user", "content": "请读一下当前目录的test.py文件"},
        {"role": "assistant", "content": [工具调用]},
        {"role": "user", "content": [工具结果]}
    ],
    tools=完整工具列表,
    max_tokens=8000,
)
第八步:大模型返回最终文本回答
{
  "role": "assistant",
  "content": [{"type": "text", "text": "已读取test.py文件:..."}],
  "stop_reason": "end_turn"
}
第九步:退出循环,打印结果
if response.stop_reason != "tool_use":
    return  # 结束循环
s03 todo_write(Harness 层: 规划 – 让模型不偏航, 但不替它画航线)
+--------+      +-------+      +---------+
|  User  | ---> |  LLM  | ---> | Tools   |
| prompt |      |       |      | + todo  |
+--------+      +---+---+      +----+----+
                    ^                |
                    |   tool_result  |
                    +----------------+
                          |
              +-----------+-----------+
              | TodoManager state     |
              | [ ] task A            |
              | [>] task B  <- doing  |
              | [x] task C            |
              +-----------------------+
                          |
              if rounds_since_todo >= 3:
                inject <reminder> into tool_result
相对 s02 的变更
| 组件 | 之前 (s02) | 之后 (s03) |
|---|---|---|
| Tools | 4 | 5 (+todo) |
| 规划 | 无 | 带状态的 TodoManager |
| Nag 注入 | 无 | 3 轮后注入 <reminder> |
| Agent loop | 简单分发 | + rounds_since_todo 计数器 |
Refactor the file hello.py: add type hints, docstrings, and a main guard
> todo:
[>] #1: Read hello.py to understand current content
[ ] #2: Refactor hello.py with type hints, docstrings, and main guard

(0/2 completed)
> read_file:
print("catchcat")
> todo:
[x] #1: Read hello.py to understand current content
[>] #2: Refactor hello.py with type hints, docstrings, and main guard

(1/2 completed)
> write_file:
Wrote 418 bytes
> bash:
Hello, catchcat!
> todo:
[x] #1: Read hello.py to understand current content
[x] #2: Refactor hello.py with type hints, docstrings, and main guard

(2/2 completed)
Refactoring complete. Here's what was done to `hello.py`:

1. **Module docstring** at the top describing the module.
2. **`greet()` function** with:
   - **Type hints**: `name: str = "catchcat"` and `-> str`
   - **Docstring** explaining the function, its argument, and return value.
   - Returns a formatted greeting string instead of printing directly.
3. **`main()` function** with:
   - **Type hint**: `-> None`
   - **Docstring** explaining it prints the greeting to stdout.
   - Calls `greet()` and prints the result.
4. **Main guard** (`if __name__ == "__main__":`) ensuring `main()` only runs when the script is executed directly, not when imported as a module.

Running `python hello.py` outputs: `Hello, catchcat!`
初始环境
工作目录存在 hello.py 原始代码:
# 旧代码
def hello():
    print("Hello World")

hello()
第一步:我输入指令
我输入:
重构hello.py文件:添加类型提示、文档字符串和主函数保护
代码执行:
history.append({"role": "user", "content": "重构hello.py文件:添加类型提示、文档字符串和主函数保护"})
初始 history(第一次发给模型的消息):
[
  {"role": "user", "content": "重构hello.py文件:添加类型提示、文档字符串和主函数保护"}
]
第二步:代码第一次调用模型(完整参数)
response = client.messages.create(
    # 系统提示(强制用todo规划任务)
    system="You are a coding agent at /我的工作目录. Use the todo tool to plan multi-step tasks. Mark in_progress before starting, completed when done. Prefer tools over prose.",
    # 模型ID
    model=os.environ["MODEL_ID"],
    # 对话消息
    messages=[
      {"role": "user", "content": "重构hello.py文件:添加类型提示、文档字符串和主函数保护"}
    ],
    # 完整工具列表(新增todo工具)
    tools=TOOLS,
    max_tokens=8000,
)
第三步:模型第一次返回(调用 todo 工具规划任务)
模型返回完整 JSON:
{
  "role": "assistant",
  "content": [
    {
      "type": "tool_use",
      "id": "tu_001",
      "name": "todo",  # 优先调用任务规划工具
      "input": {
        "items": [
          {"id": "1", "text": "读取hello.py原始文件", "status": "pending"},
          {"id": "2", "text": "添加类型提示", "status": "pending"},
          {"id": "3", "text": "添加文档字符串", "status": "pending"},
          {"id": "4", "text": "添加主函数保护if __name__ == '__main__'", "status": "pending"},
          {"id": "5", "text": "写入重构后的文件", "status": "pending"}
        ]
      }
    }
  ],
  "stop_reason": "tool_use"
}
第四步:代码追加 AI 回复 → messages 变为 2 条
messages.append({"role": "assistant", "content": response.content})
当前 messages:
[
  {"role": "user", "content": "重构hello.py文件:添加类型提示、文档字符串和主函数保护"},
  {
    "role": "assistant",
    "content": [
      {
        "type": "tool_use",
        "id": "tu_001",
        "name": "todo",
        "input": {"items": [...]}  # 任务列表
      }
    ]
  }
]
第五步:核心工具执行(todo 工具 + lambda + TodoManager)
代码执行:
handler = TOOL_HANDLERS.get(block.name)
output = handler(**block.input)
5.1 TOOL_HANDLERS 中的 todo lambda(重点)
TOOL_HANDLERS = {
  ...,
  "todo": lambda **kw: TODO.update(kw["items"])
}
**kw解包模型传入的{"items": [...]}- 调用
TODO.update(kw["items"])→ 执行任务管理
5.2 进入 TodoManager.update ()
TODO.update(items=[...])
执行校验:
- 任务数 ≤20 ✔️
- 每个任务有 id/text/status ✔️
- 最多 1 个 in_progress ✔️
- 保存任务列表 → 渲染格式化文本
5.3 todo 工具返回结果
[ ] #1: 读取hello.py原始文件
[ ] #2: 添加类型提示
[ ] #3: 添加文档字符串
[ ] #4: 添加主函数保护if __name__ == '__main__'
[ ] #5: 写入重构后的文件

(0/5 completed)
5.4 生成 tool_result JSON
{
  "type": "tool_result",
  "tool_use_id": "tu_001",
  "content": "[ ] #1: 读取hello.py原始文件\n[ ] #2: 添加类型提示\n...(0/5 completed)"
}
5.5 计数:used_todo = True → rounds_since_todo = 0
rounds_since_todo = 0
5.6 追加结果 → messages 变为 3 条
messages.append({"role": "user", "content": [结果]})
第六步:第二次循环 → 模型调用 read_file
模型返回 JSON(读取文件)
{
  "role": "assistant",
  "content": [
    {
      "type": "tool_use",
      "id": "tu_002",
      "name": "todo",
      "input": {"items": [{"id": "1", "text": "读取hello.py原始文件", "status": "in_progress"}, ...其余不变]}
    },
    {
      "type": "tool_use",
      "id": "tu_003",
      "name": "read_file",
      "input": {"path": "hello.py"}
    }
  ],
  "stop_reason": "tool_use"
}
执行 read_file 工具(完整链路)
-
handler = TOOL_HANDLERS["read_file"]→
lambda **kw: run_read(kw["path"], kw.get("limit")) -
**block.input解包 →path="hello.py" -
调用
run_read("hello.py") -
safe_path校验路径安全 -
读取文件原始内容
-
返回内容给模型
第七步:第三次循环 → 模型调用 write_file
模型生成重构后的完整代码,调用 write_file 写入:
{
  "type": "tool_use",
  "id": "tu_004",
  "name": "write_file",
  "input": {
    "path": "hello.py",
    "content": '''\
\"\"\"Hello 工具函数\"\"\"

def hello() -> None:
    \"\"\"打印 Hello World\"\"\"
    print("Hello World")

if __name__ == "__main__":
    hello()
'''
  }
}
执行 write_file
- lambda 解包
path+content safe_path校验- 自动创建目录(如有)
- 覆盖写入文件
- 返回:
Wrote 180 bytes
第八步:第四次循环 → 模型调用 todo 标记完成
{
  "type": "tool_use",
  "id": "tu_005",
  "name": "todo",
  "input": {
    "items": [
      {"id": "1", "status": "completed"},
      {"id": "2", "status": "completed"},
      {"id": "3", "status": "completed"},
      {"id": "4", "status": "completed"},
      {"id": "5", "status": "completed"}
    ]
  }
}
todo 返回:
[x] #1: 读取hello.py原始文件
[x] #2: 添加类型提示
[x] #3: 添加文档字符串
[x] #4: 添加主函数保护
[x] #5: 写入重构后的文件

(5/5 completed)
第九步:模型结束任务(stop_reason=end_turn)
模型最终返回文本:
{
  "role": "assistant",
  "content": [
    {
      "type": "text",
      "text": "已完成hello.py重构:✅ 添加类型提示 ✅ 添加文档字符串 ✅ 添加主函数保护"
    }
  ],
  "stop_reason": "end_turn"
}
代码判断:
if response.stop_reason != "tool_use":
    return  # 退出循环
第十步:最终重构后的 hello.py
"""Hello 工具函数"""

def hello() -> None:
    """打印 Hello World"""
    print("Hello World")

if __name__ == "__main__":
    hello()
s04: Subagents (Subagent)(Harness 层: 上下文隔离 – 守护模型的思维清晰度。)
Agent 工作越久, messages 数组越臃肿。每次读文件、跑命令的输出都永久留在上下文里。“这个项目用什么测试框架?” 可能要读 5 个文件, 但父 Agent 只需要一个词: “pytest。”
比agent team区别就在于它存在周期比较短
解决方案
Parent agent                     Subagent
+------------------+             +------------------+
| messages=[...]   |             | messages=[]      | <-- fresh
|                  |  dispatch   |                  |
| tool: task       | ----------> | while tool_use:  |
|   prompt="..."   |             |   call tools     |
|                  |  summary    |   append results |
|   result = "..." | <---------- | return last text |
+------------------+             +------------------+

Parent context stays clean. Subagent context is discarded.
Subagent 可能跑了 30+ 次工具调用, 但整个消息历史直接丢弃。父 Agent 收到的只是一段摘要文本, 作为普通 tool_result 返回。
相对 s03 的变更
| 组件 | 之前 (s03) | 之后 (s04) |
|---|---|---|
| Tools | 5 | 5 (基础) + task (仅父端) |
| 上下文 | 单一共享 | 父 + 子隔离 |
| Subagent | 无 | run_subagent() 函数 |
| 返回值 | 不适用 | 仅摘要文本 |
简单测试
s04 >> 使用子任务来查找该项目所使用的测试框架,我稍后的回答全部用中文回复
> task (查找项目测试框架): 请探索 C:\Users\admin\PyCharmMiscProject\ai学习\learn-claude-code-main\agents 目录,找出该项

  ---

## 测试框架分析汇总

经过对 `C:\Users\admin\PyCharmMiscProject\ai学习\learn-claude-code-main` 项目的全面检查,以下是测试框架的发现:

### 1. 项目根目录配置文件

| 文件 | 内容 |
|------|------|
| **requirements.txt** | `anthropic`, `python-d
## 测试框架调查结果

该项目使用了 **两种** Python 测试框架:

### 1. 🥇 pytest(主要测试框架)
- **证据**:`tests/test_agents_smoke.py` 中导入了 `pytest`,使用了 `@pytest.mark.parametrize` 参数化测试
- **CI 验证**:`.github/workflows/test.yml` 明确使用 `python -m pytest tests/test_agents_smoke.py -q` 执行测试
- **用途**:冒烟测试(smoke tests)

### 2. 🥈 unittest(辅助测试框架)
- **证据**:`tests/test_s_full_background.py` 导入了 `unittest`,定义了继承 `unittest.TestCase` 的测试类
- **用途**:BackgroundManager 的单元测试

### 📋 其他发现
- **前端(web/)**:`package.json` 中没有任何测试依赖,也未配置测试脚本
- **项目依赖**:`requirements.txt` 中只有 `anthropic`、`python-dotenv`、`pyyaml`,没有显式列出 `pytest`(可能是开发依赖)
- **CI 配置**:只有 `test.yml` 涉及测试,另一个 `ci.yml` 仅做 TypeScript 类型检查

**核心结论**:该项目以 **pytest** 为主要测试框架(CI 中也使用 pytest 执行),同时部分测试用例使用了 Python 标准库的 **unittest**。
第一步:我输入指令
我输入:
使用子任务来查找该项目所使用的测试框架,我稍后的回答全部用中文回复
代码执行:
history.append({"role": "user", "content": "使用子任务来查找该项目所使用的测试框架,我稍后的回答全部用中文回复"})
父代理初始 history(第一次发给父模型的消息):
[
  {"role": "user", "content": "使用子任务来查找该项目所使用的测试框架,我稍后的回答全部用中文回复"}
]
第二步:父代理第一次调用模型(完整参数,严格对应代码)
response = client.messages.create(
    # 父代理系统提示
    system="You are a coding agent at /我的工作目录. Use the task tool to delegate exploration or subtasks.",
    # 模型ID
    model=os.environ["MODEL_ID"],
    # 父代理对话上下文
    messages=[
      {"role": "user", "content": "使用子任务来查找该项目所使用的测试框架,我稍后的回答全部用中文回复"}
    ],
    # 父代理工具(基础工具 + task子任务工具)
    tools=PARENT_TOOLS,
    max_tokens=8000,
)
第三步:父模型第一次返回(调用 task 工具创建子代理)
父模型返回完整 JSON:
{
  "role": "assistant",
  "content": [
    {
      "type": "tool_use",
      "id": "tu_001",
      "name": "task",  # 父代理专用:创建子任务
      "input": {
        "prompt": "查找当前项目中使用的测试框架,检查测试文件、配置文件",
        "description": "查找项目测试框架"
      }
    }
  ],
  "stop_reason": "tool_use"
}
第四步:代码追加父 AI 回复 → 父 messages 变为 2 条
messages.append({"role": "assistant", "content": response.content})
父代理当前 messages:
[
  {"role": "user", "content": "使用子任务来查找该项目所使用的测试框架,我稍后的回答全部用中文回复"},
  {
    "role": "assistant",
    "content": [
      {
        "type": "tool_use",
        "id": "tu_001",
        "name": "task",
        "input": {"prompt": "查找项目测试框架", "description": "查找项目测试框架"}
      }
    ]
  }
]
第五步:父代理执行 task 工具(核心:启动子代理)
代码执行:
if block.name == "task":
    desc = block.input.get("description", "subtask") #这里是提取description ,如果没有就默认为subtask
    prompt = block.input.get("prompt", "")  #这里则是提取prompt,如果没有就默认为空
    output = run_subagent(prompt)  # 启动子代理!
5.1 进入 run_subagent 函数(子代理核心)
def run_subagent(prompt: str) -> str:
    # 🔥 子代理:全新空上下文!无任何历史消息
    sub_messages = [{"role": "user", "content": "查找当前项目中使用的测试框架,检查测试文件、配置文件"}]
    # 子代理最多循环30次
    for _ in range(30):
        response = client.messages.create(
            model=MODEL,
            # 子代理专属系统提示
            system=SUBAGENT_SYSTEM,
            messages=sub_messages,
            # 子代理工具:无task工具,禁止递归创建子代理
            tools=CHILD_TOOLS,
            max_tokens=8000,
        )
第六步:子代理第一次调用模型
子代理发送独立空上下文,无父代理历史:
messages=[
  {"role": "user", "content": "查找当前项目中使用的测试框架,检查测试文件、配置文件"}
]
子模型返回(调用 bash + read_file 工具)
{
  "role": "assistant",
  "content": [
    {"type": "tool_use", "id": "sub_001", "name": "bash", "input": {"command": "ls -la | grep test"}},
    {"type": "tool_use", "id": "sub_002", "name": "read_file", "input": {"path": "pytest.ini"}}
  ],
  "stop_reason": "tool_use"
}
第七步:子代理执行工具(lambda 解包 + 函数调用)
7.1 子代理工具调度(和之前逻辑一致)
handler = TOOL_HANDLERS.get(block.name)
output = handler(**block.input)
bash执行ls -la | grep test→ 找到test_*.py/pytest.iniread_file读取配置文件 → 识别出 pytest 测试框架- 生成工具结果,追加到子代理独立上下文
第八步:子代理完成任务,返回总结
子模型最终返回文本总结,stop_reason=end_turn:
{
  "role": "assistant",
  "content": [{"type": "text", "text": "项目使用pytest测试框架,配置文件为pytest.ini,测试文件以test_开头"}]
}
子代理销毁上下文,仅返回总结给父代理
# 子代理上下文直接丢弃,不保留!
return "项目使用pytest测试框架,配置文件为pytest.ini,测试文件以test_开头"
第九步:父代理生成 tool_result JSON
父代理把子代理的总结,封装成工具结果:
{
  "type": "tool_result",
  "tool_use_id": "tu_001",
  "content": "项目使用pytest测试框架,配置文件为pytest.ini,测试文件以test_开头"
}
追加结果到父代理 messages → 父 messages 变为 3 条
messages.append({"role": "user", "content": [结果]})
第十步:父代理第二次调用模型
父代理发送完整上下文(用户 + 父 AI + 子代理结果),父模型返回最终中文回答:
{
  "role": "assistant",
  "content": [
    {
      "type": "text",
      "text": "已通过子任务完成查询:当前项目使用的测试框架是 pytest,核心特征:1. 存在 pytest.ini 配置文件 2. 测试文件以 test_ 开头命名"
    }
  ],
  "stop_reason": "end_turn"
}
第十一步:代码判断结束循环
if response.stop_reason != "tool_use":
    return  # 退出agent_loop,任务完成
最终打印结果(中文)
已通过子任务完成查询:当前项目使用的测试框架是 pytest,核心特征:
1. 存在 pytest.ini 配置文件
2. 测试文件以 test_ 开头命名
s05: Skills (Skill 加载)(Harness 层: 按需知识 – 模型开口要时才给的领域专长)
问题
我希望 Agent 遵循特定领域的工作流: git 约定、测试模式、代码审查清单。全塞进系统提示太浪费 – 10 个 Skill, 每个 2000 token, 就是 20,000 token, 大部分跟当前任务毫无关系。
解决方案
System prompt (Layer 1 -- always present):
+--------------------------------------+
| You are a coding agent.              |
| Skills available:                    |
|   - git: Git workflow helpers        |  ~100 tokens/skill
|   - test: Testing best practices     |
+--------------------------------------+

When model calls load_skill("git"):
+--------------------------------------+
| tool_result (Layer 2 -- on demand):  |
| <skill name="git">                   |
|   Full git workflow instructions...  |  ~2000 tokens
|   Step 1: ...                        |
| </skill>                             |
+--------------------------------------+
第一层: 系统提示中放 Skill 名称 (低成本)。第二层: tool_result 中按需放完整内容。
阶段 1:用户输入指令(代码第 1 步)
主程序接收输入,初始 history 只有 1 条消息
[
  {
    "role": "user",
    "content": "加载pdf的skill给我生成一个1.pdf里面写hello world"
  }
]
阶段 2:第一次 LLM 调用 → 返回 tool_use(加载 PDF 技能)
代码执行 agent_loop,调用大模型返回 stop_reason: tool_use
代码追加 assistant 工具调用消息,messages 变为 2 条
[
  {
    "role": "user",
    "content": "加载pdf的skill给我生成一个1.pdf里面写hello world"
  },
  {
    "role": "assistant",
    "content": [
      {
        "type": "tool_use",
        "id": "tu_001",
        "name": "load_skill",
        "input": {
          "name": "pdf"
        }
      }
    ]
  }
]
我的文件:agents/skills/pdf/SKILL.md
文件内容(我写的):
---
name: pdf
description: Process PDF files - extract text, create PDFs, merge documents. Use when user asks to read PDF, create PDF, or work with PDF files.
---

# PDF Processing Skill
You now have expertise in PDF manipulation...(完整正文)
第一步:程序启动 → 执行 _load_all(扫描 + 加载文件)
def _load_all(self):
    # 1. 判断技能文件夹是否存在
    if not self.skills_dir.exists():
        return
    # 2. 递归遍历所有 SKILL.md 文件
    for f in sorted(self.skills_dir.rglob("SKILL.md")):
        # 3. 读取文件的全部文本内容
        text = f.read_text()
        # 4. 调用解析方法,拆分 元数据(meta) 和 正文(body)
        meta, body = self._parse_frontmatter(text)
        # 5. 取技能名称:优先用meta里的name,没有就用文件夹名(pdf)
        name = meta.get("name", f.parent.name)
        # 6. 把技能存入内存字典 self.skills
        self.skills[name] = {"meta": meta, "body": body, "path": str(f)}
-
self.skills_dir=agents/skills→ 文件夹存在,不返回 -
rglob("SKILL.md")递归搜索 → 精准找到pdf/SKILL.md -
f.read_text()→ 把我文件里所有文字全部读入内存,变成一个长字符串 -
调用
_parse_frontmatter拆分:
meta:YAML 头的字典{"name":"pdf", "description":"..."}body:文件正文# PDF Processing Skill...
-
name = meta.get("name", ...)→ 直接拿到pdf -
存入内存
self.skills = {
    "pdf": {
        "meta": {"name": "pdf", "description": "Process PDF files..."},
        "body": "# PDF Processing Skill\nYou now have expertise in PDF manipulation...",
        "path": "我的路径/skills/pdf/SKILL.md"
    }
}
第二步:解析文件 → 执行 _parse_frontmatter(拆分 YAML 头 + 正文)
def _parse_frontmatter(text: str) -> tuple:
    # 正则匹配:以 --- 开头,中间是YAML,再 --- ,后面是正文
    match = re.match(r"^---\n(.*?)\n---\n(.*)", text, re.DOTALL)
    if not match:
        return {}, text
    # 解析YAML字符串为Python字典
    try:
        meta = yaml.safe_load(match.group(1)) or {}
    except yaml.YAMLError:
        meta = {}
    # 返回:(元数据字典, 正文字符串)
    return meta, match.group(2).strip()
逐行执行(针对我的文件)
-
正则匹配
-
^---\n:匹配文件开头的--- -
(.*?):捕获中间的 YAML 配置 -
\n---\n:匹配结尾的--- -
(.*):捕获后面的
技能正文
我的文件完美匹配
match
-
-
match.group(1)= YAML 字符串:
name: pdf description: Process PDF files ... -
yaml.safe_load→ 把 YAML 字符串转成
Python 字典
meta = {"name": "pdf", "description": "Process PDF files..."} -
match.group(2).strip()→ 拿到
纯正文
(去掉首尾空行):
# PDF Processing Skill You now have expertise in PDF manipulation... -
返回结果:
(meta字典, 正文字符串)
第三步:系统提示词用 → get_descriptions(无关当前流程,仅说明)
这个方法是给 AI 看技能列表的,和生成最终字符串无关,跳过。
第四步:工具调用 → 执行 get_content(核心!生成最终字符串)
这就是直接生成 tool_result 里 content 内容的方法!
def get_content(self, name: str) -> str:
    # 1. 从内存字典里拿技能数据
    skill = self.skills.get(name)
    # 2. 技能不存在就报错
    if not skill:
        return f"Error: Unknown skill..."
    # 3. 【核心】拼接固定格式字符串!!!
    return f"<skill name=\"{name}\">\n{skill['body']}\n</skill>"
逐行执行(传入参数 name="pdf")
-
self.skills.get("pdf")→ 从内存里拿到我加载好的技能数据 -
技能存在,不报错
-
执行字符串格式化拼接(最关键一步)
{name}→ 填入pdf{skill['body']}→ 填入我的技能正文- 拼接结果:
<skill name="pdf">
# PDF Processing Skill
You now have expertise in PDF manipulation...(完整正文)
</skill>
第五步:塞入 JSON → 最终结果
# TOOL_HANDLERS 映射
"load_skill": lambda **kw: SKILL_LOADER.get_content(kw["name"])
load_skill工具调用 → 执行get_content("pdf")- 方法返回的拼接好的字符串,直接赋值给
output - 代码把
output塞进tool_result的content:
{
  "type": "tool_result",
  "tool_use_id": "tu_001",
  "content": "<skill name=\"pdf\">\n# PDF Processing Skill\nYou now have expertise in PDF manipulation...(我的完整PDF技能内容)\n</skill>"
}
阶段 3:执行 load_skill 工具 → 返回 PDF 技能内容(代码第 6-8 步)
- 匹配
TOOL_HANDLERS→ 调用SKILL_LOADER.get_content("pdf") - 成功返回我的 PDF 技能完整文档
- 代码封装
tool_result,追加 user 消息,messages变为 3 条
[
  {
    "role": "user",
    "content": "加载pdf的skill给我生成一个1.pdf里面写hello world"
  },
  {
    "role": "assistant",
    "content": [
      {
        "type": "tool_use",
        "id": "tu_001",
        "name": "load_skill",
        "input": {
          "name": "pdf"
        }
      }
    ]
  },
  {
    "role": "user",
    "content": [
      {
        "type": "tool_result",
        "tool_use_id": "tu_001",
        "content": "<skill name=\"pdf\">\n# PDF Processing Skill\nYou now have expertise in PDF manipulation...(我的完整PDF技能内容)\n</skill>"
      }
    ]
  }
]
阶段 4:第二次 LLM 调用 → 返回 tool_use(生成 1.pdf)
大模型加载 PDF 技能后,调用 write_file 工具生成 PDF 文件
代码追加 assistant 工具调用消息,messages 变为 4 条
[
  // 前3条消息省略...
  {
    "role": "assistant",
    "content": [
      {
        "type": "tool_use",
        "id": "tu_002",
        "name": "write_file",
        "input": {
          "path": "1.pdf",
          "content": "hello world"
        }
      }
    ]
  }
]
阶段 5:执行 write_file 工具 → 成功写入 1.pdf(代码第 6-8 步)
safe_path校验通过(工作目录内)- 自动创建文件,写入
hello world - 返回成功信息,封装
tool_result追加 user 消息,messages变为 5 条
[
  // 前4条消息省略...
  {
    "role": "user",
    "content": [
      {
        "type": "tool_result",
        "tool_use_id": "tu_002",
        "content": "Wrote 11 bytes"
      }
    ]
  }
]
阶段 6:LLM 返回 end_turn → 任务结束(代码第 5 步)
大模型检测到工具执行成功,返回文本回答,stop_reason != tool_use,退出循环
代码追加最终 assistant 文本消息,messages 变为 6 条,任务完成
[
  // 前5条消息省略...
  {
    "role": "assistant",
    "content": "已成功加载PDF技能,并在当前目录生成1.pdf文件,内容为:hello world"
  }
]
更多推荐

 6
6 0
0- 0


 已为社区贡献2条内容

所有评论(0)