OpenClaw多智能体实战:打造飞书群聊AI军团,实现AI大师协同办公
本文详细介绍了如何在飞书群聊中配置OpenClaw多智能体系统。从安装nvm和Node.js环境开始,到配置国内镜像源和安装OpenClaw,再到关键的激活配置步骤,包括选择AI模型(推荐MiniMax)、安装飞书插件和必备技能模块。最后指导用户在飞书开放平台创建应用并配置权限,完成机器人与群聊的对接。整个过程包含详细命令、截图指引和实用建议,帮助用户快速搭建包含多个AI助手的智能工作群。
OpenClaw 多智能体实战:飞书群聊配置指南
前言
你是否想象过这样的场景:在飞书群里同时拥有多个 AI 助手,一个负责统筹规划,一个负责运营执行,一个负责数据分析?
本文将手把手教你配置 OpenClaw 的多智能体模式,让三个"AI 大师"同时在你的飞书群里为你工作。目前还在加急做50元套餐的一件包,准备附送一些功能和教程,大家想看什么内容,是自媒体账号自动化运营还是量化交易相关的内容,欢迎打在评论区!!!
安装nvm
打开 Mac 的终端 (Terminal),复制并运行以下命令:
Bash
curl -o- https://raw.githubusercontent.com/nvm-sh/nvm/v0.40.1/install.sh | bash
注意: 如果你在国内由于网络问题无法访问 GitHub,可以使用以下国内镜像加速命令:
Bash
curl -o- https://gitee.com/mirrors/nvm/raw/master/install.sh | bash
第二步:配置环境变量
安装脚本通常会自动把配置写入你的配置文件,但有时需要手动刷新。请根据你使用的 Shell 执行命令:
确定你的 Shell:输入echo $SHELL。如果是/bin/zsh(Mac 默认),则编辑.zshrc;如果是/bin/bash,则编辑.bash_profile。
执行刷新命令:
Bash
source ~/.zshrc
验证安装:输入nvm -v,如果显示版本号(如 0.40.1),说明安装成功。
第三步:安装 Node.js 22
有了 nvm 后,安装 Node 22 只需要一行命令:
Bash
nvm install 22
安装完成后,你可以验证版本:
查看 Node 版本:node -v(应显示 v22.x.x)
查看 npm 版本:npm -v

第四步:针对 OpenClaw 的后续配置 (重要)
因为你准备运行 OpenClaw,建议完成以下两项优化:
- 切换 npm 国内镜像源为了之后安装 OpenClaw 不报错,先切到淘宝镜像:
Bash
npm config set registry https://registry.npmmirror.com
- 安装 OpenClaw现在环境已经就绪,你可以直接安装了:
Bash
npm install -g openclaw@latest
- 测试openclaw是否安装成功:
openclaw -v
在终端查看

第五步:激活与配置(灵魂开始)
openclaw onboard
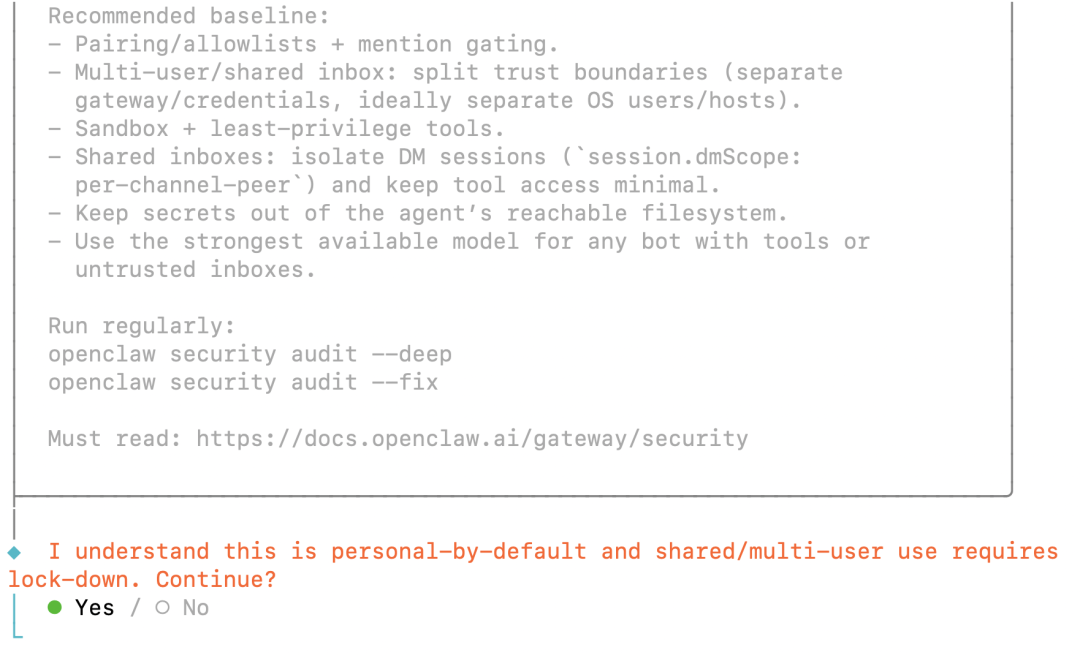
弹出一个窗口,第一步这儿选择yes
然后选择QuickStart
然后选择Update Values
接下来开始重头戏
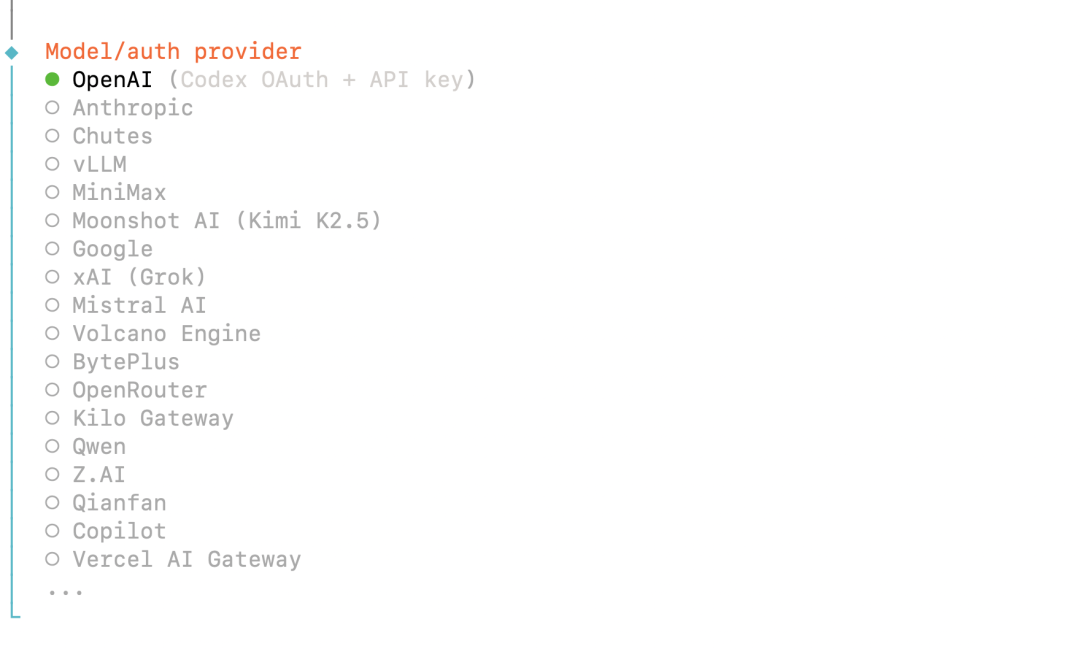
这一步是选择模型,这儿建议选择国内的几家先试试,我一直在用MiniMax,这儿就按照MiniMax的配置(如果买MiniMax的话,我这儿也有比较优惠的方案供大家选择)
选择minimax之后
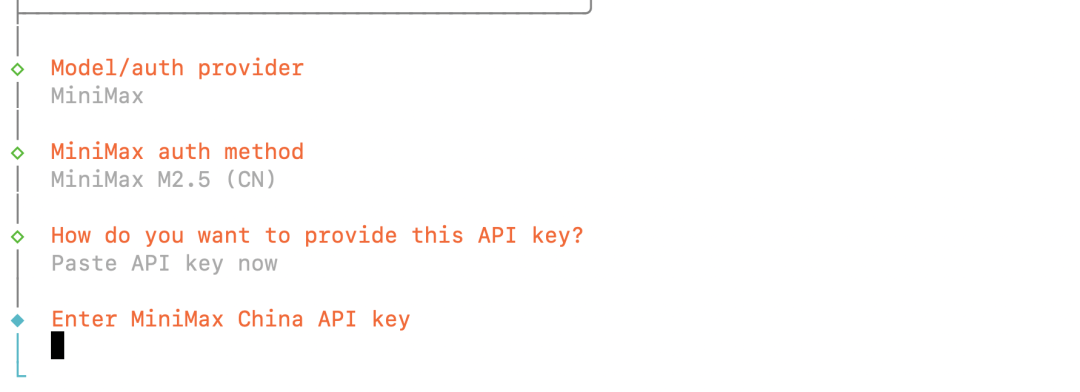
这儿复制粘贴api key即可,后续推荐选择 minimax-cn/MiniMax-M2.5,用其他家的也都差不多的流程
接下来选择IM软件,这儿以飞书为例
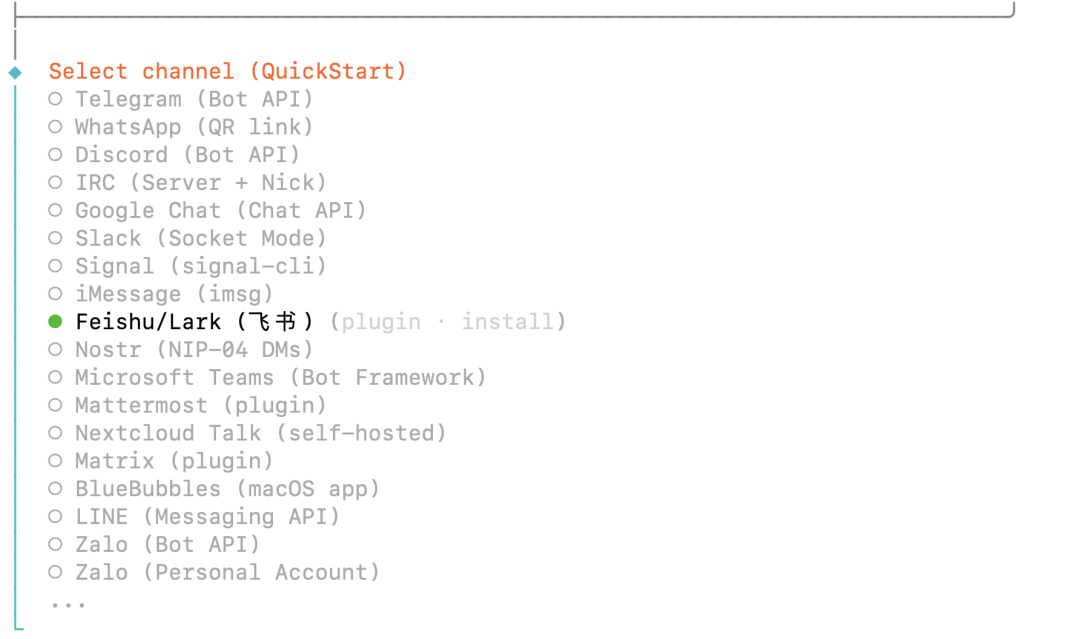
要安装 feishu的插件,选择确定就好
然后安装skills
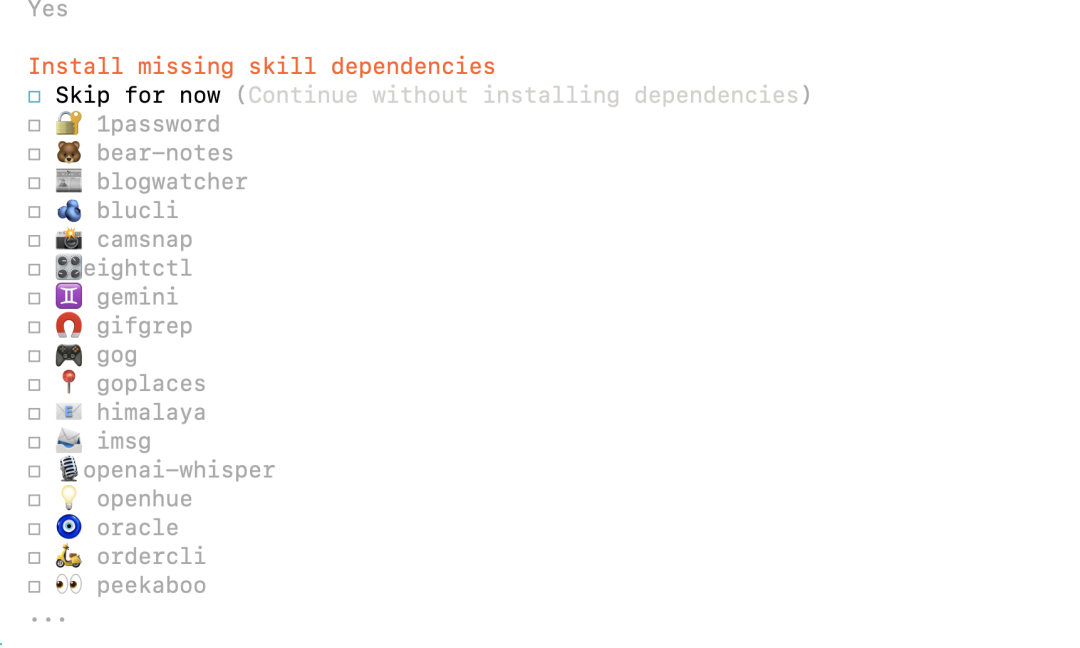
这儿必装mcporter,其他的随意即可
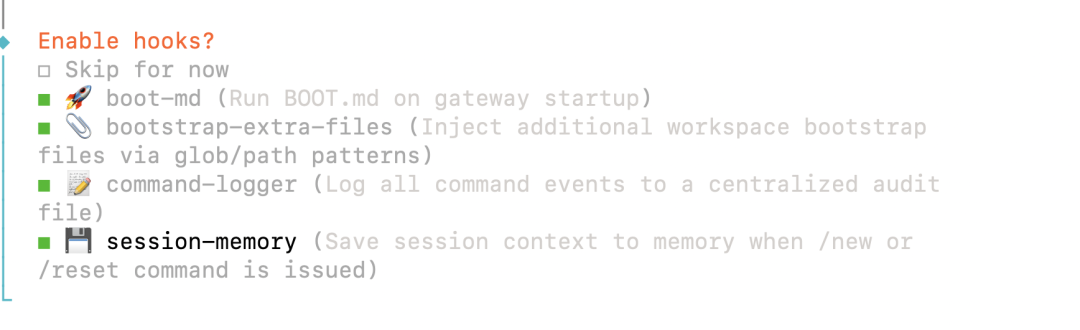
下一步 开始安装Enable hooks
这儿推荐这四个都安装
操作方法:
用键盘的上下方向键移动。
按空格键 (Space)勾选(勾选后方框里会变成[x]或带颜色的符号)。
全部选好后,按回车键 (Enter)确认。
这几个技能解释
- 🚀 boot-md (启动文档)
大白话:给 AI 配一本“说明书”。
功能:它会自动把你的项目环境、当前的文件结构等信息整理成一份文档喂给 AI。
- 📎 bootstrap-extra-files (额外文件初始化)
大白话:自动帮你把“家”布置好。
功能:它会帮你自动生成一些必要的配置文件和基础文件夹,不用你手动去一个一个创建。
- 📝 command-logger (命令记录器)
大白话:给 AI 装一个“黑匣子”。
功能:它会记录 AI 执行过的所有命令和操作。
- 💾 session-memory (会话记忆)
大白话:给 AI 塞一个“记事本”。
功能:让 AI 记住你们之前的聊天记录和操作上下文。没有这个的话,AI 可能说完后半句就忘了前半句。
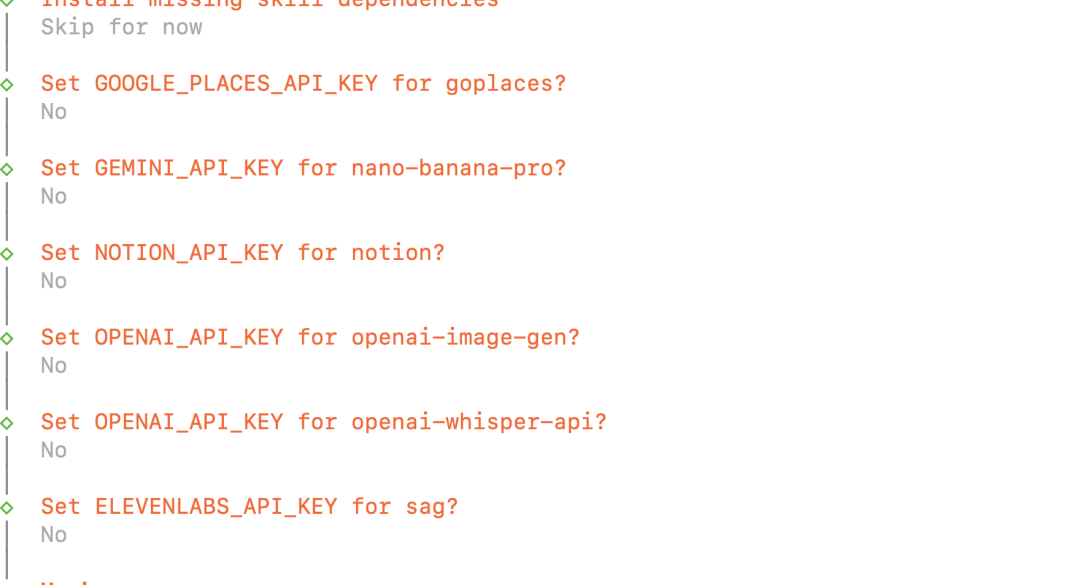
之后这两步就比较常规了,没必要解释了。


接下来需要确认是否真的开始养殖小龙虾了
输入
openclaw status
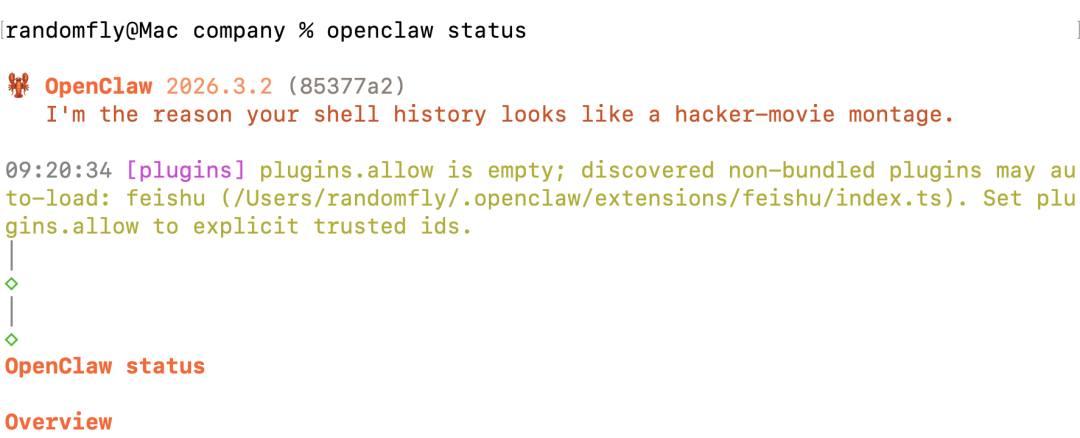
或者在浏览器中打开
配置飞书
现在龙虾已经开始养殖了,但是我们要在飞书里,在tel或者discord中养殖龙虾群还需要配置多个步骤。
接下来开始配置飞书龙虾群。
创建应用
首先我们要在飞书开放平台创建企业自建应用,链接
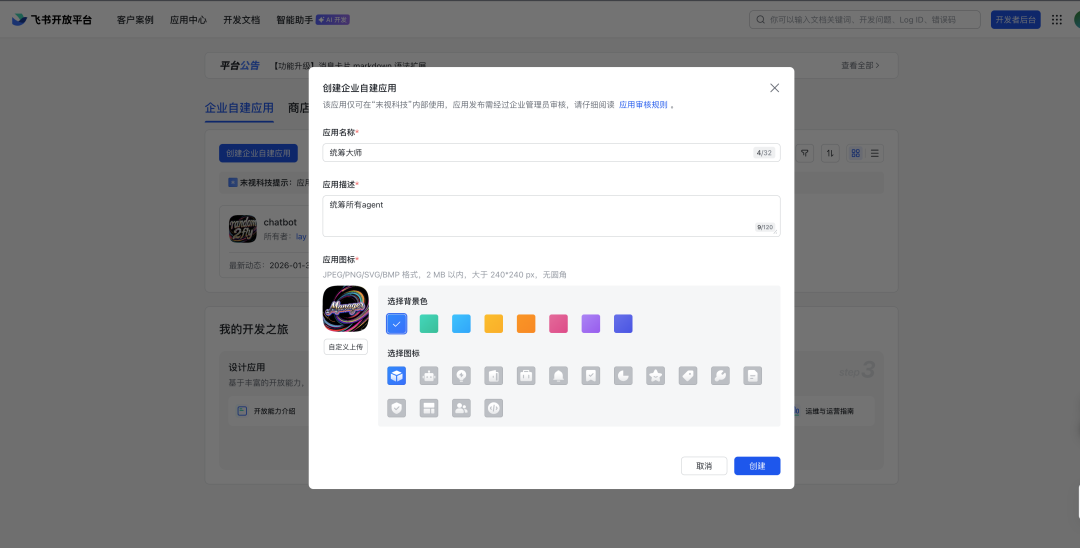
创建完之后点击添加机器人

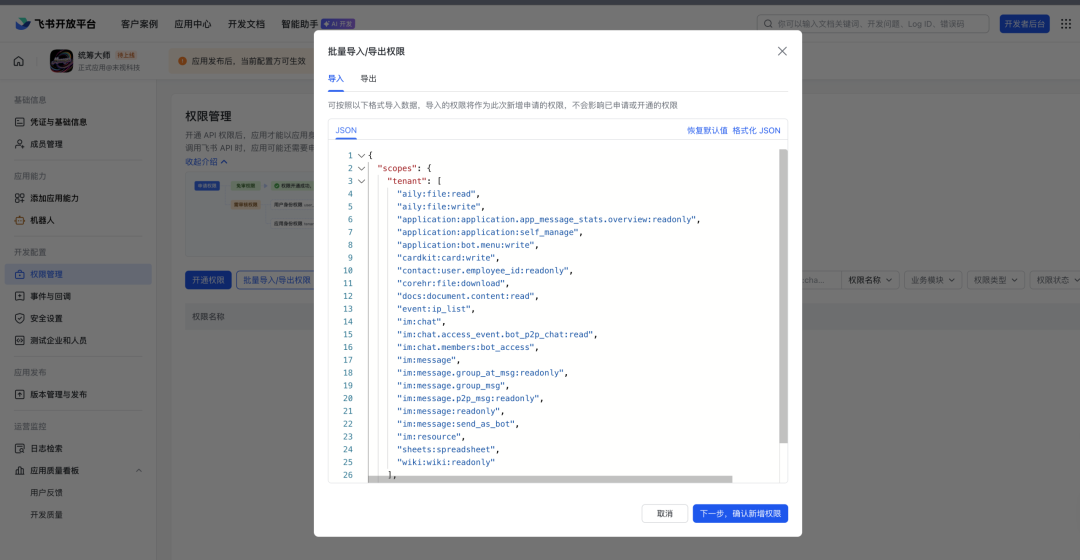
然后到权限管理这儿,点击批量导入/导出权限
复制粘贴这段
{ “scopes”: { “tenant”: [ “aily:file:read”, “aily:file:write”, “application:application.app_message_stats.overview:readonly”, “application:application:self_manage”, “application:bot.menu:write”, “cardkit:card:write”, “contact:user.employee_id:readonly”, “corehr:file:download”, “docs:document.content:read”, “event:ip_list”, “im:chat”, “im:chat.access_event.bot_p2p_chat:read”, “im:chat.members:bot_access”, “im:message”, “im:message.group_at_msg:readonly”, “im:message.group_msg”, “im:message.p2p_msg:readonly”, “im:message:readonly”, “im:message:send_as_bot”, “im:resource”, “sheets:spreadsheet”, “wiki:wiki:readonly” ], “user”: [“aily:file:read”, “aily:file:write”, “im:chat.access_event.bot_p2p_chat:read”] }}
然后确定即可
然后回到机器人界面,给龙虾起一个名字
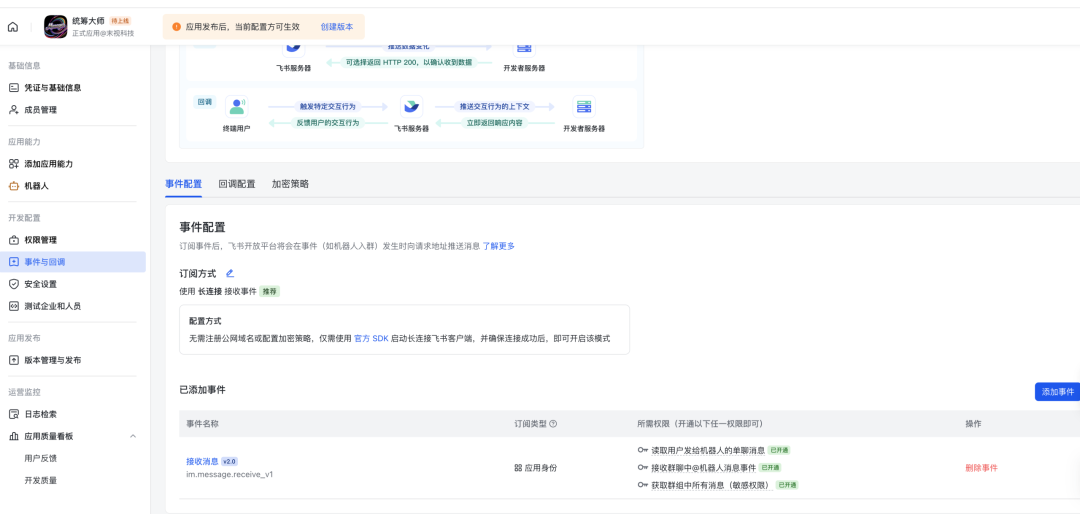
事件配置
一定要按照流程来,不然这儿配置不上!!!
首先在终端,运行
openclaw channels add
然后点击确定
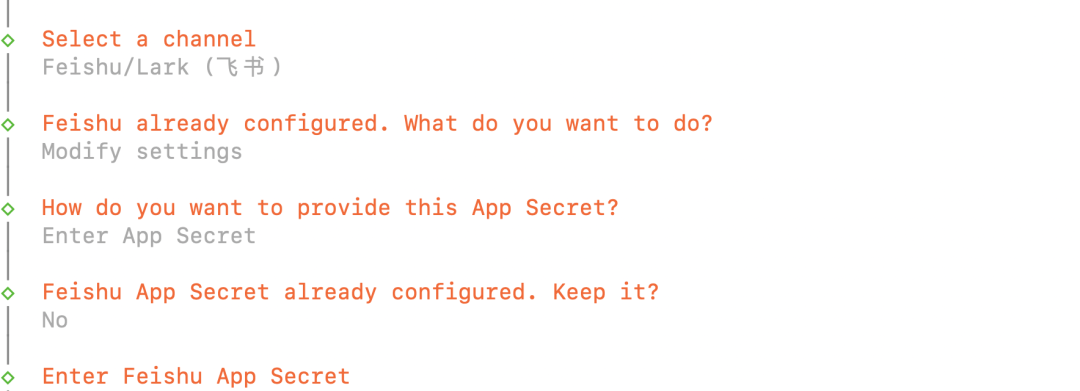
就再次来到了
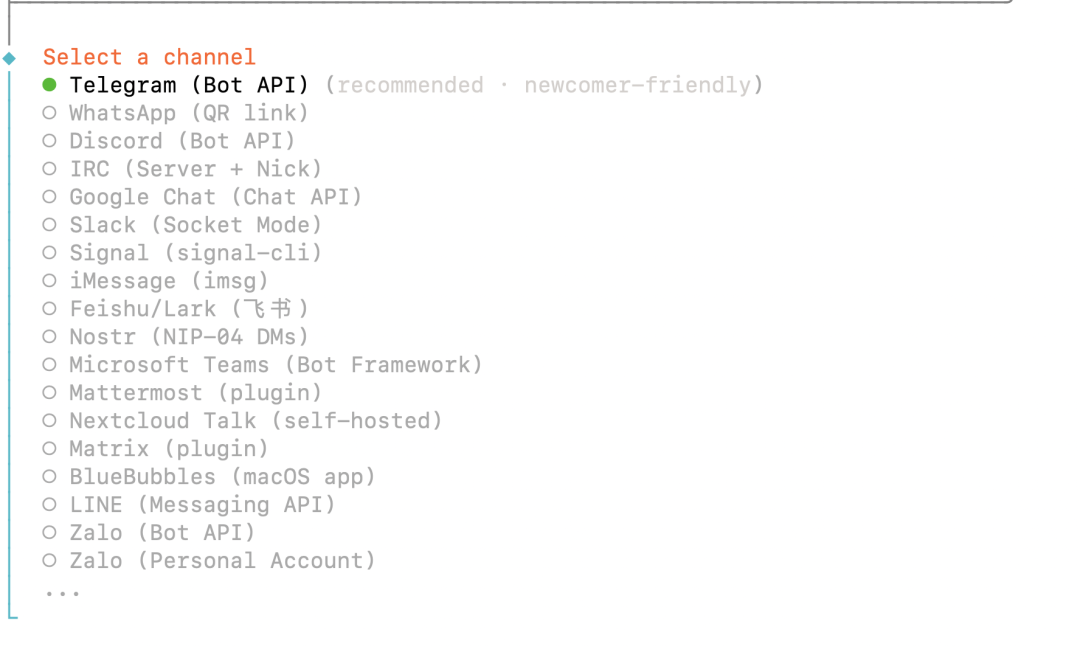
选择 Feishu/Lark (我这儿一直显示plugin install failed:plugin already exists,我先删掉了,然后再安装的 )
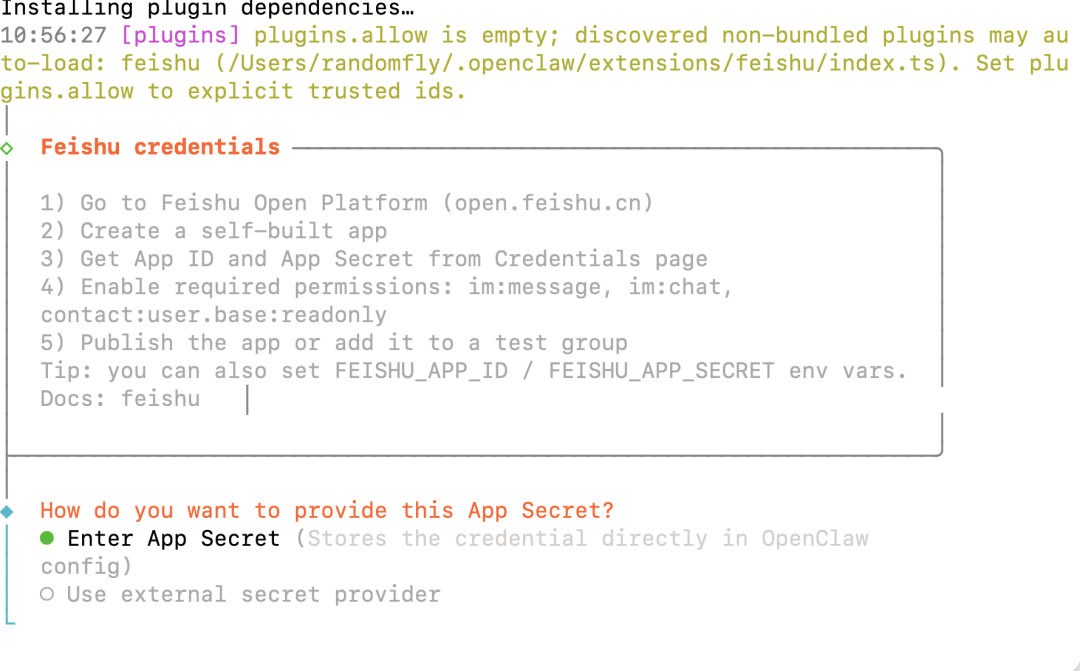
这儿选择之后就需要输入Enter Feishu App Secret和Enter Feishu App ID
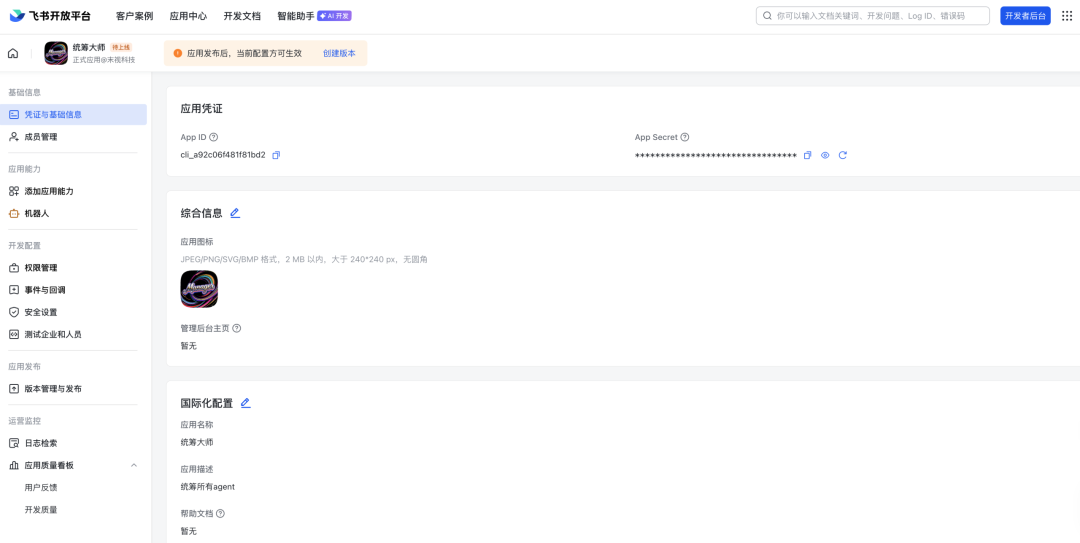
从这儿复制粘贴进来即可
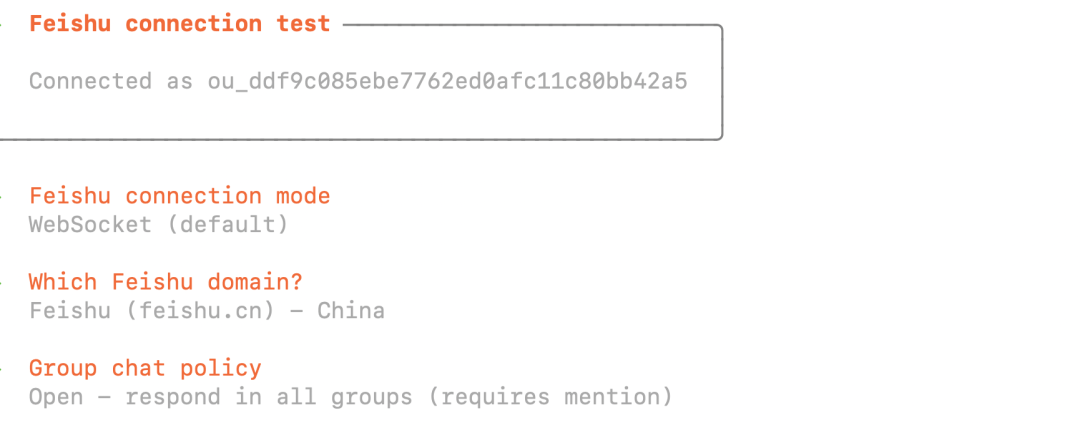
然后选择WebSocket(default),然后选择feishu-China,选择 Open模式,如下图
然后按照如下方式配置即可
然后我们回到页面,配置事件与回调
然后创建版本,去审核应用通过
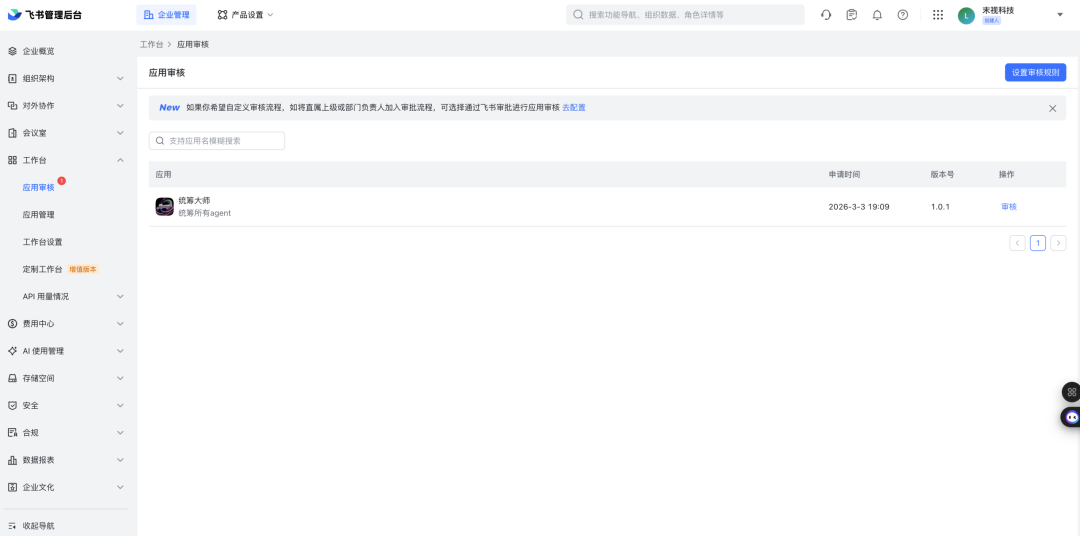
通过后飞书会有通知
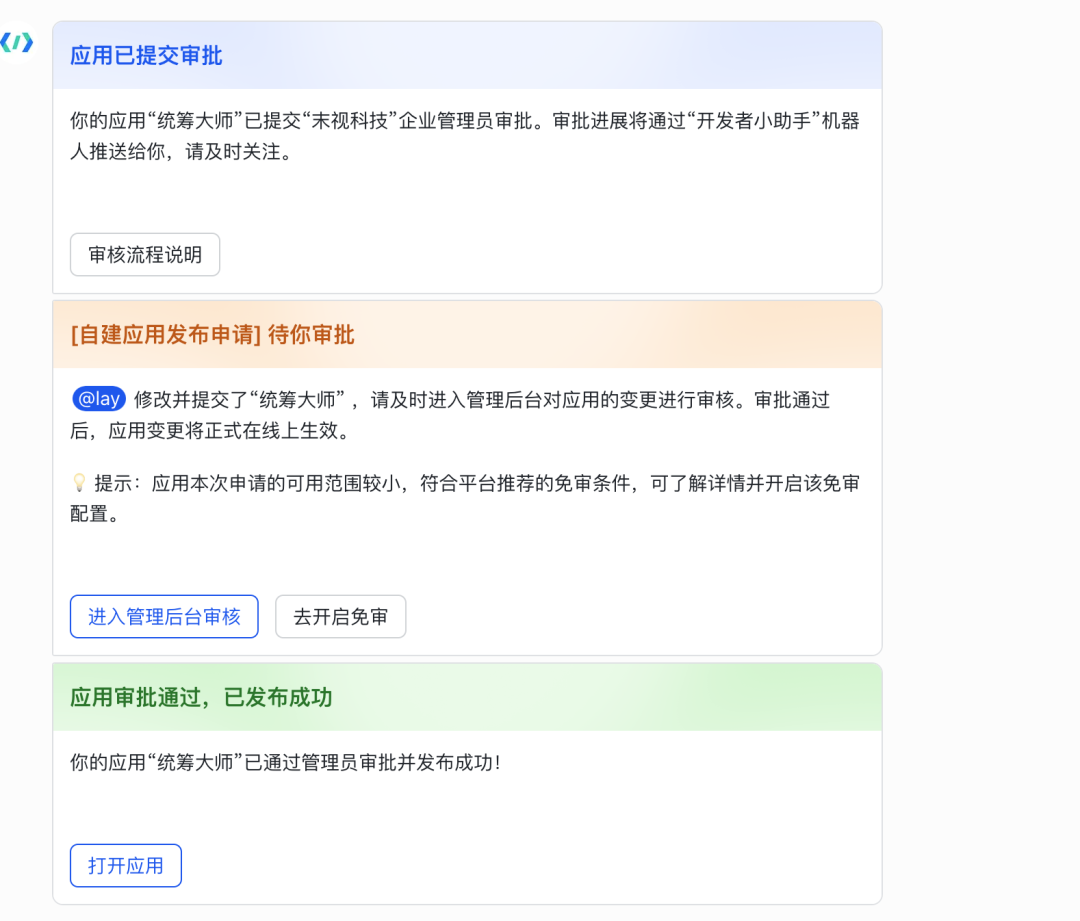
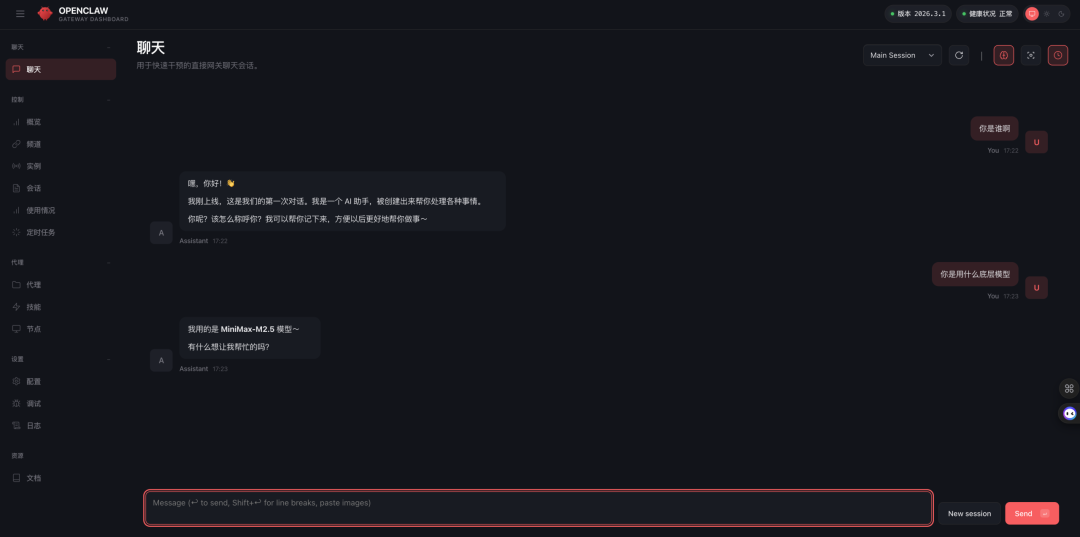
打开应用之后,就可以养第一个龙虾了!!!

如果出现 emoji就说明他在思考回复你什么东西了
多agent模式
接下来是重头戏,玩多agent模式,也就是配置多个AI员工。多个员工的定义就是
多个智能体 = 多个人、多种人格
使用多个智能体,每个agentId成为一个完全隔离的人格:
不同的电话号码/账户(每渠道accountId)。
不同的人格(每智能体工作区文件如AGENTS.md和SOUL.md)。
独立的认证 + 会话(除非明确启用,否则无交叉通信)。
这让多个人共享一个 Gateway 网关服务器,同时保持他们的 AI”大脑”和数据隔离。
首先在终端输入
openclaw agents add work
这个work指的是你要添加的智能体,比如说我要把上面的统筹大师改成多智能体模式,那就是
openclaw agents add manager-统筹大师
纯中文好像不太行
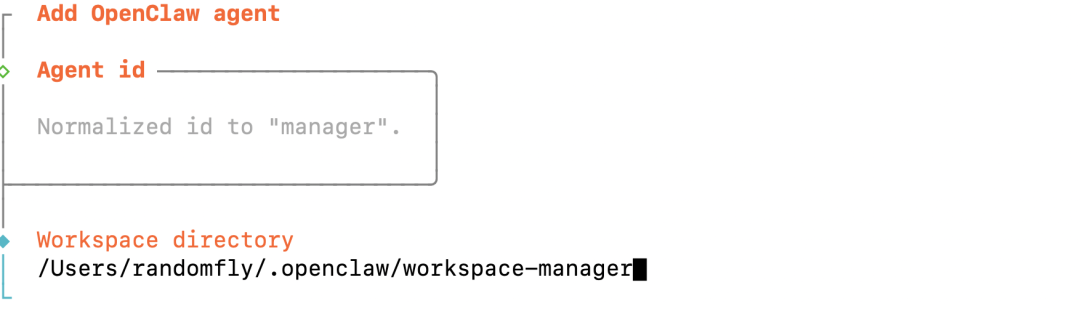
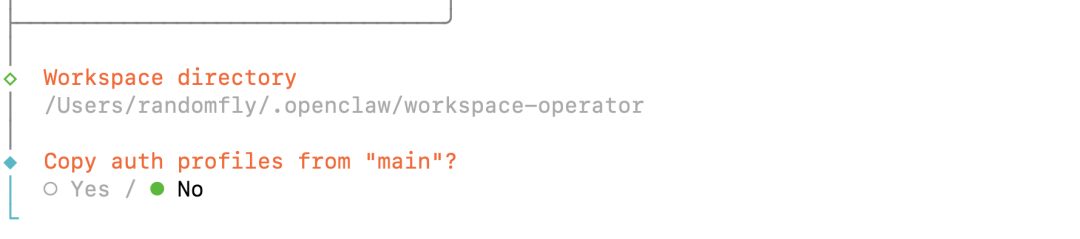
这儿出现的这个workspace-manager就是对应的工作区,也就是智能体的记忆存储位置
然后一路 enter 就可以了。其中
Copy auth profiles from “main”?│ Yes
这儿选择yes就是复制配置过来了。
配置完之后
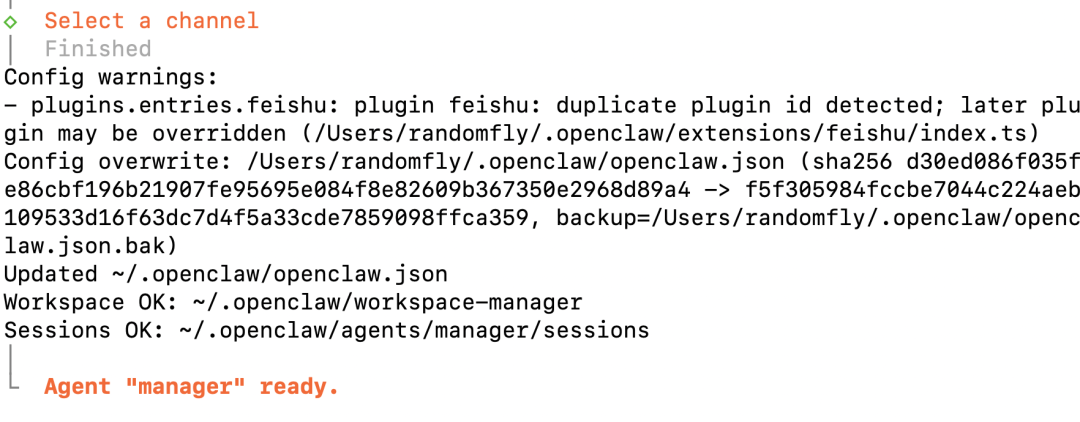
这儿就显示了我的workspace,以及最重要的 ~/.openclaw/openclaw.json,这儿这个json文件是需要持续配置的。
配置多个agent
然后我们继续配置多个agent,输入
openclaw agents add operator-运营大师
然后
这儿一定要选择No,这是我们配置多个agent的一个关键,选择yes就是复制配置了。
然后选择配置channels,选择飞书

后续配置
然后在飞书开放平台继续创建应用即可,这儿不做赘述了
需要注意的是,一定要配置完机器人和权限管理之后填完上述飞书app secret和app id,然后一路配置下来,配置完之后再回到飞书开放平台做事件与回调的配置工作!!!
多agent联动
当我们配置了多个agent之后,我们的配置文件里就有对应的参数了,打开 ~/.openclaw/openclaw.json能看到,我已经将配置分析放到了附录1
其中主要是配置了
{
“id”: “manager”,
“name”: “manager-统筹大师”,
“workspace”: “~/.openclaw/workspace-manager”,
“agentDir”: “~/.openclaw/agents/manager/agent”,
“model”: “minimax-cn/MiniMax-M2.5”
},
{
“id”: “operator”,
“name”: “operator-运营大师”,
“workspace”: “~/.openclaw/workspace-operator”,
“agentDir”: “~/.openclaw/agents/operator/agent”
},
{
“id”: “ananlyst”,
“name”: “ananlyst-数分大师”,
“workspace”: “~/.openclaw/workspace-ananlyst”,
“agentDir”: “~/.openclaw/agents/ananlyst/agent”,
“model”: “minimax-cn/MiniMax-M2.5”
}
这时候龙虾军团就初具规模了,总共有三只龙虾了。
但是这时候龙虾军团还不够智能,因为他们没有互相认识,试问没有互相认识的龙虾们怎么协作呢。
配置协作能力
配置群聊能力
当前我只有main智能体绑定了飞书,其他知恩感体都没有绑定渠道,也就是bindings,所以单聊可以,但是群聊不行。也就是在~/.openclaw/openclaw.json中有这一段
“bindings”: [
{
“agentId”: “main”,
“match”: {
“channel”: “feishu”,
“accountId”: “default”
}
}
]
那这时候我们需要改成如下配置,也就是channels中要给每个智能体一根与外界联络的电话线。用bindings来分配电话线的接收方
- channels - 三个飞书账号
"channels": {
"feishu": {
"defaultAccount": "ananlyst",
"accounts": {
"ananlyst": { "appId": "cli_xxx", "appSecret": "xxx" },
"operator": { "appId": "cli_xxx", "appSecret": "xxx" },
"manager": { "appId": "cli_xxx", "appSecret": "xxx" }
}
}
}
- bindings - 绑定到不同账号
"bindings": [
{ "agentId": "manager", "match": { "channel": "feishu", "accountId":
"manager" } },
{ "agentId": "operator", "match": { "channel": "feishu", "accountId":
"operator" } },
{ "agentId": "ananlyst", "match": { "channel": "feishu", "accountId":
"ananlyst" } }
]
附录2中有我现在的配置,可以看到区别。
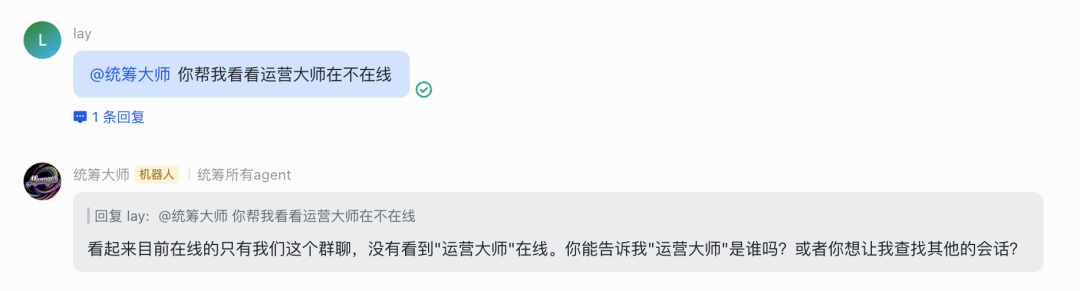
如果配置成功了之后会如下图所示,之前的@都不起作用,配置完之后就可以通过@来聊天了。

配置交互能力
现在虽然可以@了,但是龙虾们彼此都不认识。现在就是要让他们认识,理解他们之间的组织架构。
这时候就需要配置他们之间的通讯录了。其中最主要的就是用sessions_send来互相调用。
总结如下:
智能体互相调用配置
- 全局配置 - tools
"tools": {
"sessions": {
"visibility": "all"
},
"agentToAgent": {
"enabled": true,
"allow": ["manager", "operator", "ananlyst"]
}
}
2.每个智能体的subagents配置
{
"id": "manager",
"subagents": {
"allowAgents": ["operator", "ananlyst"]
},
"tools": {
"allow": [
"sessions_spawn",
"sessions_send",
"sessions_list",
"sessions_history",
"session_status"
]
}
}
关键点:
-
tools.sessions.visibility = “all” - 让智能体能列出会话
-
tools.agentToAgent.enabled = true - 启用互相调用
-
tools.agentToAgent.allow - 允许哪些智能体之间调用
-
每个智能体的 subagents.allowAgents - 允许调用哪些智能体
-
每个智能体的 tools.allow - 需要包含 sessions 系列工具
配置完之后
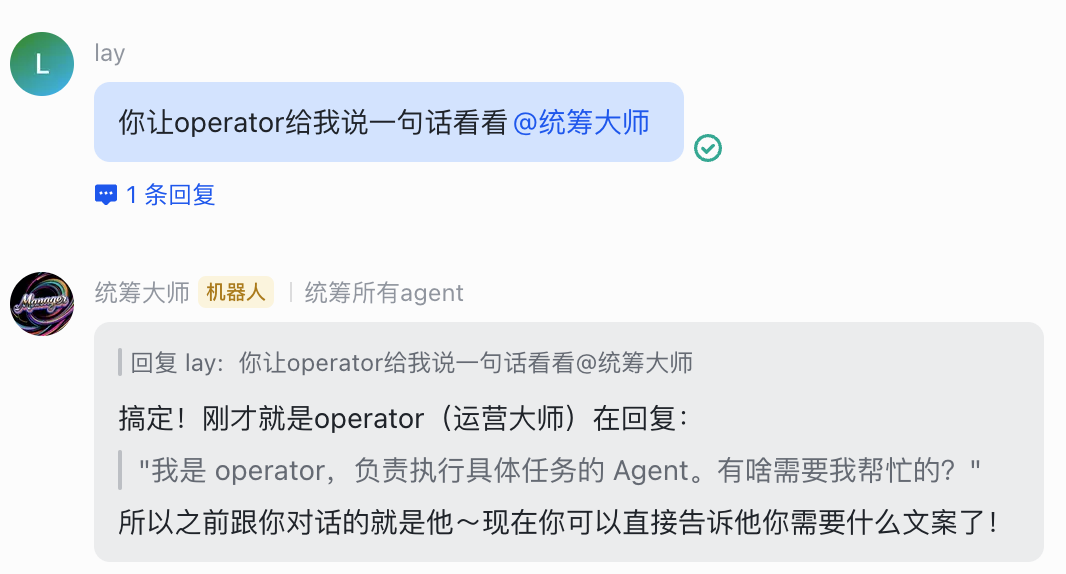
现在就能够互相调用了。
另外还需要配置他们之间的通讯录,也就是告诉他们要去哪儿找对应的agent和功能,例如
Calling Other Agents
You can delegate tasks to other agents in the team:
-
**manager (统筹大师)**: agentId = “manager” - Good for coordination and planning
-
**ananlyst (数分大师)**: agentId = “ananlyst” - Good for data analysis and research
How to Call Another Agent
When you need help from another agent, use the **sessions_send** tool:
**Step 1: Find their session key**
Use sessions\_list to see available sessions:
sessions_list({ kinds: [“group”, “dm”], limit: 10 })
Look for sessions starting with agent:manager: or agent:ananlyst:.
**Step 2: Send message**
Use sessions\_send to send a message:
sessions_send({ sessionKey: “agent:ananlyst:feishu:group:xxx”, message: “帮我分析这个数据” })
龙虾军团启动
现在初步的协作功能已经配置完了,剩下的就是做每个员工的配置了,这一步需要精细打磨,主要是配置以下几个md文档每个智能体是独立的,有自己的:
workspace- 工作区(文件、记忆)
agentDir- 智能体目录(配置、凭证)
tools- 不同工具权限
AGENTS.md / SOUL.md / USER.md- 角色定义
⏺配置不同角色和记忆每个智能体的工作区都有这些文件:
│ 文件 │ 作用 │
│SOUL.md│ 人格/灵魂定义 │
│AGENTS.md│ 行为规范 │
│USER.md│ 用户信息 │
│IDENTITY.md│ 身份定义 │
│MEMORY.md│ 长期记忆(需创建) │
配置方式
1.角色定义-修改SOUL.md
每个智能体有不同的性格和角色定位
2.功能配置-修改tools
在 agents.list 中给每个智能体不同的 tools.allow
3.记忆配置
短期:会话历史自动保存
长期:创建 MEMORY.md 文件
截止到目前,~/.openclaw/openclaw.json内容为
{
"meta": {
"lastTouchedVersion": "2026.3.2",
"lastTouchedAt": "2026-03-03T13:44:16.521Z"
},
"wizard": {
"lastRunAt": "2026-03-03T13:44:16.514Z",
"lastRunVersion": "2026.3.2",
"lastRunCommand": "doctor",
"lastRunMode": "local"
},
"auth": {
"profiles": {
"minimax-cn:default": {
"provider": "minimax-cn",
"mode": "api_key"
}
}
},
"models": {
"mode": "merge",
"providers": {
"minimax": {
"baseUrl": "https://api.minimaxi.com/v1",
"apiKey": "sk-xxx",
"api": "openai-completions",
"models": [
{
"id": "MiniMax-M2.5",
"name": "MiniMax M2.5",
"cost": {
"input": 0.001,
"output": 0.004
},
"contextWindow": 200000
}
]
},
"minimax-cn": {
"baseUrl": "https://api.minimaxi.com/anthropic",
"api": "anthropic-messages",
"authHeader": true,
"models": [
{
"id": "MiniMax-M2.5",
"name": "MiniMax M2.5",
"reasoning": true,
"input": [
"text"
],
"cost": {
"input": 0.3,
"output": 1.2,
"cacheRead": 0.03,
"cacheWrite": 0.12
},
"contextWindow": 200000,
"maxTokens": 8192
}
]
}
}
},
"agents": {
"defaults": {
"model": {
"primary": "minimax-cn/MiniMax-M2.5"
},
"models": {
"minimax/MiniMax-M2.5": {
"alias": "MiniMax"
},
"minimax-cn/MiniMax-M2.5": {
"alias": "Minimax"
}
},
"workspace": "~/xxx/workspace",
"compaction": {
"mode": "safeguard"
},
"maxConcurrent": 4,
"subagents": {
"maxConcurrent": 8
}
},
"list": [
{
"id": "manager",
"name": "manager-统筹大师",
"workspace": "~/xxx/workspace-manager",
"agentDir": "~/xxx/agents/manager/agent",
"model": "minimax-cn/MiniMax-M2.5",
"groupChat": {
"mentionPatterns": [
"manager",
"@manager",
"统筹大师",
"@统筹大师"
]
},
"subagents": {
"allowAgents": [
"operator",
"ananlyst"
]
},
"tools": {
"allow": [
"sessions_spawn",
"sessions_send",
"sessions_list",
"sessions_history",
"session_status",
"subagents"
]
}
},
{
"id": "operator",
"name": "operator-运营大师",
"workspace": "~/xxx/workspace-operator",
"agentDir": "~/xxx/agents/operator/agent",
"groupChat": {
"mentionPatterns": [
"operator",
"@operator",
"运营大师",
"@运营大师"
]
},
"subagents": {
"allowAgents": [
"manager",
"ananlyst"
]
},
"tools": {
"allow": [
"sessions_spawn",
"sessions_send",
"sessions_list",
"sessions_history",
"session_status",
"subagents"
]
}
},
{
"id": "ananlyst",
"name": "ananlyst-数分大师",
"workspace": "~/xxx/workspace-ananlyst",
"agentDir": "~/xxx/agents/ananlyst/agent",
"model": "minimax-cn/MiniMax-M2.5",
"groupChat": {
"mentionPatterns": [
"ananlyst",
"@ananlyst",
"数分大师",
"@数分大师"
]
},
"subagents": {
"allowAgents": [
"manager",
"operator"
]
},
"tools": {
"allow": [
"sessions_spawn",
"sessions_send",
"sessions_list",
"sessions_history",
"session_status",
"subagents"
]
}
}
]
},
"tools": {
"profile": "messaging",
"sessions": {
"visibility": "all"
},
"agentToAgent": {
"enabled": true,
"allow": [
"manager",
"operator",
"ananlyst"
]
}
},
"bindings": [
{
"agentId": "manager",
"match": {
"channel": "feishu",
"accountId": "manager"
}
},
{
"agentId": "operator",
"match": {
"channel": "feishu",
"accountId": "operator"
}
},
{
"agentId": "ananlyst",
"match": {
"channel": "feishu",
"accountId": "ananlyst"
}
}
],
"messages": {
"ackReactionScope": "group-mentions"
},
"commands": {
"native": "auto",
"nativeSkills": "auto",
"restart": true,
"ownerDisplay": "raw"
},
"session": {
"dmScope": "per-channel-peer"
},
"hooks": {
"internal": {
"enabled": true,
"entries": {
"boot-md": {
"enabled": true
},
"bootstrap-extra-files": {
"enabled": true
},
"command-logger": {
"enabled": true
},
"session-memory": {
"enabled": true
}
}
}
},
"channels": {
"feishu": {
"enabled": true,
"connectionMode": "websocket",
"domain": "feishu",
"defaultAccount": "ananlyst",
"accounts": {
"ananlyst": {
"appId": "cli_xxx",
"appSecret": "xxx"
},
"operator": {
"appId": "cli_xxx",
"appSecret": "xxx"
},
"manager": {
"appId": "cli_xxx",
"appSecret": "xxx"
},
"default": {
"groupPolicy": "open",
"dmPolicy": "open",
"allowFrom": [
"*"
]
}
}
}
},
"gateway": {
"port": 18789,
"mode": "local",
"bind": "loopback",
"auth": {
"mode": "token",
"token": "xxx"
},
"tailscale": {
"mode": "off",
"resetOnExit": false
}
},
"skills": {
"install": {
"nodeManager": "npm"
}
},
"plugins": {
"entries": {
"feishu": {
"enabled": true
}
},
"installs": {
"feishu": {
"source": "npm",
"spec": "@openclaw/feishu",
"installPath": "~/xxx/extensions/feishu",
"version": "2026.3.2",
"resolvedName": "@openclaw/feishu",
"resolvedVersion": "2026.3.2",
"resolvedSpec": "@openclaw/feishu@2026.3.2"
}
}
}
}
附录1
OpenClaw 配置文件说明
概述
本文档说明~/.openclaw/openclaw.json配置文件的各部分含义。
配置结构
- meta - 元信息
=============
记录配置文件的版本和最后修改时间。
| 字段 | 类型 | 说明 |
|---|---|---|
| lastTouchedVersion | string | 最后修改时使用的版本 |
| lastTouchedAt | string | 最后修改时间 (ISO 8601) |
- wizard - 向导信息
================
记录新手引导 (onboard) 的运行信息。
| 字段 | 类型 | 说明 |
|---|---|---|
| lastRunAt | string | 最后运行时间 |
| lastRunVersion | string | 运行时的版本 |
| lastRunCommand | string | 运行过的命令 (如 onboard) |
| lastRunMode | string | 运行模式 (local/remote) |
- auth - 认证配置
==============
定义外部服务的认证配置。
| 字段 | 类型 | 说明 |
|---|---|---|
| profiles | object | 认证配置集合 |
| provider | string | 认证提供商 |
| mode | string | 认证模式 (如 api_key) |
- models - 模型配置
================
配置 AI 模型提供商和模型参数。
“models”: {“mode”:“merge”,“providers”: {“minimax”: {…},“minimax-cn”: {…} }}
| 字段 | 类型 | 说明 |
|---|---|---|
| mode | string | 模型模式 (merge 表示合并多个提供商) |
| providers | object | 模型提供商集合 |
模型提供商
minimax (国际版)
| 字段 | 说明 |
|---|---|
| baseUrl | API 端点 (https://api.minimaxi.com/v1) |
| api | API 类型 (openai-completions) |
| models | 模型列表 |
minimax-cn (中国区)
| 字段 | 说明 |
|---|---|
| baseUrl | API 端点 (https://api.minimaxi.com/anthropic) |
| api | API 类型 (anthropic-messages) |
| authHeader | 是否使用认证头 |
模型参数
| 字段 | 类型 | 说明 |
|---|---|---|
| id | string | 模型 ID |
| name | string | 模型名称 |
| reasoning | boolean | 是否支持推理 |
| input | array | 输入类型 |
| cost.input | number | 输入价格 (每千 tokens) |
| cost.output | number | 输出价格 (每千 tokens) |
| cost.cacheRead | number | 缓存读取价格 |
| cost.cacheWrite | number | 缓存写入价格 |
| contextWindow | number | 上下文窗口大小 |
| maxTokens | number | 最大输出 tokens |
- agents - 智能体配置
=================
配置智能体默认参数和智能体列表。
“agents”: {“defaults”: {…},“list”: […]}
默认配置 (defaults)
| 字段 | 说明 |
|---|---|
| model.primary | 默认使用的模型 |
| models | 模型别名配置 |
| workspace | 默认工作区路径 |
| compaction.mode | 压缩模式 (safeguard) |
| maxConcurrent | 最大并发数 |
| subagents.maxConcurrent | 子智能体最大并发数 |
智能体列表 (list)
| ID | 名称 | 说明 |
|---|---|---|
| main | - | 主智能体 |
| manager | 统筹大师 | 负责统筹管理的智能体 |
| operator | 运营大师 | 负责运营的智能体 |
| ananlyst | 数分大师 | 负责数据分析的智能体 |
每个智能体可配置:
workspace: 工作区路径
agentDir: 智能体代码目录
model: 使用的模型
- channels - 渠道配置
==================
配置消息渠道,目前支持飞书。
| 字段 | 说明 |
|---|---|
| enabled | 是否启用 |
| appId | 飞书应用 ID |
| appSecret | 飞书应用密钥 |
| connectionMode | 连接模式 (websocket) |
| domain | 域名 |
| groupPolicy | 群组策略 (open/closed) |
| dmPolicy | 私信策略 (open/closed) |
| allowFrom | 允许的消息来源 (* 表示全部) |
- gateway - 网关配置
=================
配置 Gateway 网关服务。
| 字段 | 说明 |
|---|---|
| port | 服务端口 (18789) |
| mode | 运行模式 (local/remote) |
| bind | 绑定地址 (loopback/0.0.0.0) |
| auth.mode | 认证模式 (token) |
| auth.token | 访问令牌 |
| tailscale.mode | Tailscale 模式 (off/on) |
| tailscale.resetOnExit | 退出时重置 Tailscale |
- hooks - 钩子配置
===============
配置内部钩子功能。
| 钩子名称 | 说明 |
|---|---|
| boot-md | 启动 Markdown 支持 |
| bootstrap-extra-files | 引导额外文件加载 |
| command-logger | 命令日志记录 |
| session-memory | 会话记忆功能 |
- 其他配置
=======
| 配置项 | 说明 |
|---|---|
| bindings | 智能体与渠道的绑定关系 |
| messages.ackReactionScope | 消息确认反应范围 (group-mentions) |
| commands.native | 原生命令模式 (auto/manual) |
| commands.nativeSkills | 技能命令模式 (auto/manual) |
| commands.restart | 是否支持重启命令 |
| commands.ownerDisplay | 所有者显示方式 |
| session.dmScope | 私信范围 (per-channel-peer) |
| tools.profile | 工具配置 (messaging) |
| skills.install.nodeManager | 技能安装工具 (npm) |
| plugins.entries | 已启用插件列表 |
| plugins.installs | 已安装插件详情 |
配置示例
更改默认模型
{“agents”: {“defaults”: {“model”: {“primary”:“minimax/MiniMax-M2.5”} } }}
限制飞书消息来源
{“channels”: {“feishu”: {“allowFrom”: [“ou_xxxxxxxx”,“ou_yyyyyyyy”] } }}
开启 Tailscale 远程访问
{“gateway”: {“tailscale”: {“mode”:“on”} }}
相关文档
附录2
OpenClaw 配置文件说明
概述
本文档说明~/.openclaw/openclaw.json配置文件的各部分含义。
配置结构
- meta - 元信息
=============
记录配置文件的版本和最后修改时间。
| 字段 | 类型 | 说明 |
|---|---|---|
| lastTouchedVersion | string | 最后修改时使用的版本 |
| lastTouchedAt | string | 最后修改时间 (ISO 8601) |
- wizard - 向导信息
================
记录新手引导 (onboard) 的运行信息。
| 字段 | 类型 | 说明 |
|---|---|---|
| lastRunAt | string | 最后运行时间 |
| lastRunVersion | string | 运行时的版本 |
| lastRunCommand | string | 运行过的命令 (如 onboard) |
| lastRunMode | string | 运行模式 (local/remote) |
- auth - 认证配置
==============
定义外部服务的认证配置。
“auth”: {“profiles”: {“minimax-cn:default”: {“provider”:“minimax-cn”,“mode”:“api_key”} }}
- models - 模型配置
================
配置 AI 模型提供商和模型参数。
“models”: {“mode”:“merge”,“providers”: {“minimax”: {…},“minimax-cn”: {…} }}
| 字段 | 类型 | 说明 |
|---|---|---|
| mode | string | 模型模式 (merge 表示合并多个提供商) |
| providers | object | 模型提供商集合 |
模型提供商
minimax (国际版)
| 字段 | 说明 |
|---|---|
| baseUrl | API 端点 (https://api.minimaxi.com/v1) |
| api | API 类型 (openai-completions) |
| apiKey | API 密钥 |
| models | 模型列表 |
minimax-cn (中国区)
| 字段 | 说明 |
|---|---|
| baseUrl | API 端点 (https://api.minimaxi.com/anthropic) |
| api | API 类型 (anthropic-messages) |
| authHeader | 是否使用认证头 |
模型参数
| 字段 | 类型 | 说明 |
|---|---|---|
| id | string | 模型 ID |
| name | string | 模型名称 |
| reasoning | boolean | 是否支持推理 |
| input | array | 输入类型 |
| cost.input | number | 输入价格 (每千 tokens) |
| cost.output | number | 输出价格 (每千 tokens) |
| cost.cacheRead | number | 缓存读取价格 |
| cost.cacheWrite | number | 缓存写入价格 |
| contextWindow | number | 上下文窗口大小 |
| maxTokens | number | 最大输出 tokens |
- agents - 智能体配置
=================
配置智能体默认参数和智能体列表。
“agents”: {“defaults”: {…},“list”: […]}
默认配置 (defaults)
| 字段 | 说明 |
|---|---|
| model.primary | 默认使用的模型 |
| models | 模型别名配置 |
| workspace | 默认工作区路径 |
| compaction.mode | 压缩模式 (safeguard) |
| maxConcurrent | 最大并发数 |
| subagents.maxConcurrent | 子智能体最大并发数 |
智能体列表 (list)
| ID | 名称 | 工作区 | @触发词 |
|---|---|---|---|
| manager | 统筹大师 | ~/.openclaw/workspace-manager | @manager, @统筹大师, 统筹大师 |
| operator | 运营大师 | ~/.openclaw/workspace-operator | @operator, @运营大师, 运营大师 |
| ananlyst | 数分大师 | ~/.openclaw/workspace-ananlyst | @ananlyst, @数分大师, 数分大师 |
每个智能体可配置:
workspace: 工作区路径
agentDir: 智能体代码目录
model: 使用的模型
groupChat.mentionPatterns: 群组 @触发词列表
- channels - 渠道配置
==================
配置消息渠道,目前支持飞书。
“channels”: {“feishu”: {“enabled”:true,“connectionMode”:“websocket”,“domain”:“feishu”,“groupPolicy”:“open”,“dmPolicy”:“open”,“allowFrom”: [“*”],“defaultAccount”:“ananlyst”,“accounts”: {“ananlyst”: {“appId”:“cli_xxx”,“appSecret”:“xxx”},“operator”: {“appId”:“cli_xxx”,“appSecret”:“xxx”},“manager”: {“appId”:“cli_xxx”,“appSecret”:“xxx”} } }}
| 字段 | 说明 |
|---|---|
| enabled | 是否启用 |
| connectionMode | 连接模式 (websocket) |
| domain | 域名 (feishu/lark) |
| groupPolicy | 群组策略 (open/disabled/allowlist) |
| dmPolicy | 私信策略 (open/pairing/disabled) |
| allowFrom | 允许的消息来源 (* 表示全部) |
| defaultAccount | 默认账号 |
| accounts | 多账号配置 (accountId: { appId, appSecret }) |
- bindings - 消息路由绑定
====================
将智能体绑定到渠道账号。
“bindings”: [ {“agentId”:“manager”,“match”: {“channel”:“feishu”,“accountId”:“manager”} }, {“agentId”:“operator”,“match”: {“channel”:“feishu”,“accountId”:“operator”} }, {“agentId”:“ananlyst”,“match”: {“channel”:“feishu”,“accountId”:“ananlyst”} }]
| 字段 | 说明 |
|---|---|
| agentId | 智能体 ID |
| match.channel | 渠道类型 |
| match.accountId | 渠道账号 ID |
- gateway - 网关配置
=================
配置 Gateway 网关服务。
| 字段 | 说明 |
|---|---|
| port | 服务端口 (18789) |
| mode | 运行模式 (local/remote) |
| bind | 绑定地址 (loopback/0.0.0.0) |
| auth.mode | 认证模式 (token) |
| auth.token | 访问令牌 |
| tailscale.mode | Tailscale 模式 (off/on) |
| tailscale.resetOnExit | 退出时重置 Tailscale |
- hooks - 钩子配置
===============
配置内部钩子功能。
| 钩子名称 | 说明 |
|---|---|
| boot-md | 启动 Markdown 支持 |
| bootstrap-extra-files | 引导额外文件加载 |
| command-logger | 命令日志记录 |
| session-memory | 会话记忆功能 |
- 其他配置
========
| 配置项 | 说明 |
|---|---|
| tools.profile | 工具配置 (messaging) |
| messages.ackReactionScope | 消息确认反应范围 (group-mentions) |
| commands.native | 原生命令模式 (auto/manual) |
| commands.nativeSkills | 技能命令模式 (auto/manual) |
| commands.restart | 是否支持重启命令 |
| session.dmScope | 私信范围 (per-channel-peer) |
| skills.install.nodeManager | 技能安装工具 (npm) |
| plugins.entries | 已启用插件列表 |
| plugins.installs | 已安装插件详情 |
配置示例
多智能体飞书多账号配置
{“channels”: {“feishu”: {“enabled”:true,“connectionMode”:“websocket”,“domain”:“feishu”,“groupPolicy”:“open”,“dmPolicy”:“open”,“allowFrom”: [“*”],“defaultAccount”:“ananlyst”,“accounts”: {“ananlyst”: {“appId”:“cli_xxx”,“appSecret”:“xxx”},“operator”: {“appId”:“cli_xxx”,“appSecret”:“xxx”},“manager”: {“appId”:“cli_xxx”,“appSecret”:“xxx”} } } },“bindings”: [ {“agentId”:“manager”,“match”: {“channel”:“feishu”,“accountId”:“manager”} }, {“agentId”:“operator”,“match”: {“channel”:“feishu”,“accountId”:“operator”} }, {“agentId”:“ananlyst”,“match”: {“channel”:“feishu”,“accountId”:“ananlyst”} } ]}
群组需要 @提及才回复
{“channels”: {“feishu”: {“groupPolicy”:“open”,“groups”: {“*”: {“requireMention”:true} } } }}
开启 Tailscale 远程访问
{“gateway”: {“tailscale”: {“mode”:“on”} }}
01
什么是AI大模型应用开发工程师?
如果说AI大模型是蕴藏着巨大能量的“后台超级能力”,那么AI大模型应用开发工程师就是将这种能量转化为实用工具的执行者。
AI大模型应用开发工程师是基于AI大模型,设计开发落地业务的应用工程师。
这个职业的核心价值,在于打破技术与用户之间的壁垒,把普通人难以理解的算法逻辑、模型参数,转化为人人都能轻松操作的产品形态。
无论是日常写作时用到的AI文案生成器、修图软件里的智能美化功能,还是办公场景中的自动记账工具、会议记录用的语音转文字APP,这些看似简单的应用背后,都是应用开发工程师在默默搭建技术与需求之间的桥梁。
他们不追求创造全新的大模型,而是专注于让已有的大模型“听懂”业务需求,“学会”解决具体问题,最终形成可落地、可使用的产品。
CSDN粉丝独家福利
给大家整理了一份AI大模型全套学习资料,这份完整版的 AI 大模型学习资料已经上传CSDN,朋友们如果需要可以扫描下方二维码&点击下方CSDN官方认证链接免费领取 【保证100%免费】

02
AI大模型应用开发工程师的核心职责
需求分析与拆解是工作的起点,也是确保开发不偏离方向的关键。
应用开发工程师需要直接对接业务方,深入理解其核心诉求——不仅要明确“要做什么”,更要厘清“为什么要做”以及“做到什么程度算合格”。
在此基础上,他们会将模糊的业务需求拆解为具体的技术任务,明确每个环节的执行标准,并评估技术实现的可行性,同时定义清晰的核心指标,为后续开发、测试提供依据。
这一步就像建筑前的图纸设计,若出现偏差,后续所有工作都可能白费。
技术选型与适配是衔接需求与开发的核心环节。
工程师需要根据业务场景的特点,选择合适的基础大模型、开发框架和工具——不同的业务对模型的响应速度、精度、成本要求不同,选型的合理性直接影响最终产品的表现。
同时,他们还要对行业相关数据进行预处理,通过提示词工程优化模型输出,或在必要时进行轻量化微调,让基础模型更好地适配具体业务。
此外,设计合理的上下文管理规则确保模型理解连贯需求,建立敏感信息过滤机制保障数据安全,也是这一环节的重要内容。
应用开发与对接则是将方案转化为产品的实操阶段。
工程师会利用选定的开发框架构建应用的核心功能,同时联动各类外部系统——比如将AI模型与企业现有的客户管理系统、数据存储系统打通,确保数据流转顺畅。
在这一过程中,他们还需要配合设计团队打磨前端交互界面,让技术功能以简洁易懂的方式呈现给用户,实现从技术方案到产品形态的转化。
测试与优化是保障产品质量的关键步骤。
工程师会开展全面的功能测试,找出并修复开发过程中出现的漏洞,同时针对模型的响应速度、稳定性等性能指标进行优化。
安全合规性也是测试的重点,需要确保应用符合数据保护、隐私安全等相关规定。
此外,他们还会收集用户反馈,通过调整模型参数、优化提示词等方式持续提升产品体验,让应用更贴合用户实际使用需求。
部署运维与迭代则贯穿产品的整个生命周期。
工程师会通过云服务器或私有服务器将应用部署上线,并实时监控运行状态,及时处理突发故障,确保应用稳定运行。
随着业务需求的变化,他们还需要对应用功能进行迭代更新,同时编写完善的开发文档和使用手册,为后续的维护和交接提供支持。
03
薪资情况与职业价值
市场对这一职业的高度认可,直接体现在薪资待遇上。
据猎聘最新在招岗位数据显示,AI大模型应用开发工程师的月薪最高可达60k。
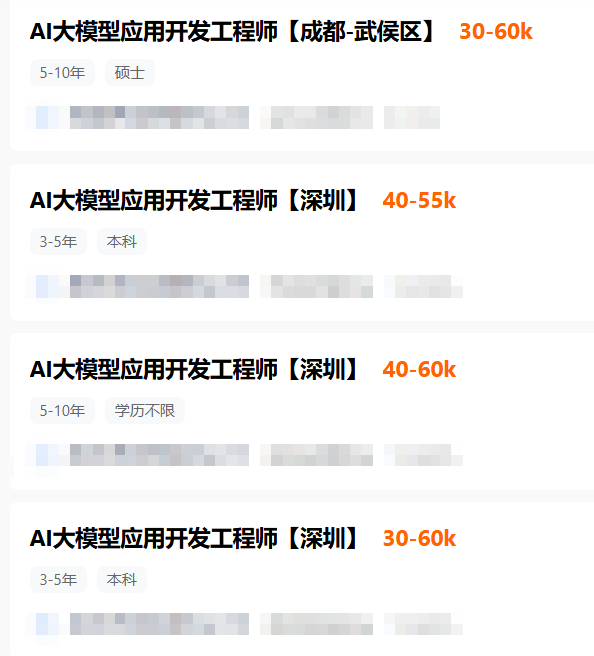
在AI技术加速落地的当下,这种“技术+业务”的复合型能力尤为稀缺,让该职业成为当下极具吸引力的就业选择。
AI大模型应用开发工程师是AI技术落地的关键桥梁。
他们用专业能力将抽象的技术转化为具体的产品,让大模型的价值真正渗透到各行各业。
随着AI场景化应用的不断深化,这一职业的重要性将更加凸显,也必将吸引更多人才投身其中,推动AI技术更好地服务于社会发展。
CSDN粉丝独家福利
给大家整理了一份AI大模型全套学习资料,这份完整版的 AI 大模型学习资料已经上传CSDN,朋友们如果需要可以扫描下方二维码&点击下方CSDN官方认证链接免费领取 【保证100%免费】


一座年轻的奋斗人之城,一个温馨的开发者之家。在这里,代码改变人生,开发创造未来!
更多推荐
 4
4 0
0- 0


 已为社区贡献4条内容

所有评论(0)