
从零开始用Java搭建Spring AI MCP Server:全面指南
本文介绍了使用Java搭建四种Spring AI MCP Server的全面指南。MCP(Model Context Protocol)是一套标准化协议,用于让服务器向AI应用暴露特定能力。文章详细讲解了基于Spring AI 1.1.0版本的四种主流MCP Server实现方式:STDIO(命令行工具)、SSE(实时数据流)、Streamable-HTTP(HTTP流式传输)和Stateless
从零开始用Java搭建Spring AI MCP Server:全面指南
1. 引言:什么是MCP Server?
在AI应用开发中,如何让模型与外部工具、资源高效交互是核心挑战之一。Model Context Protocol(MCP) 应运而生——它是一套标准化协议,用于让服务器向AI应用暴露特定能力(如工具调用、资源访问、Prompt模板),而Spring AI提供的MCP Server Boot Starter则极大简化了MCP服务器的搭建过程,支持自动配置、多协议传输和灵活的功能扩展。
本文基于Spring AI 1.1.0(1.1.0-M2)版本,将详细讲解如何用Java搭建四种主流MCP Server(STDIO、SSE、Streamable-HTTP、Stateless),覆盖依赖配置、代码实现、功能扩展和测试验证,适用于从命令行工具到云原生微服务的各类场景。
2. 环境准备
在开始前,确保你的开发环境满足以下要求:
- JDK版本:17+(Spring AI 1.1.0最低要求)
- 构建工具:Maven 3.8+ 或 Gradle 7.5+
- Spring生态版本:
- Spring Boot 3.2+(与Spring AI 1.1兼容)
- Spring AI 1.1.0(核心依赖)
- 依赖管理:建议在
pom.xml中引入Spring AI BOM统一版本:
<!-- Maven父工程依赖(统一版本) -->
<parent>
    <groupId>org.springframework.boot</groupId>
    <artifactId>spring-boot-starter-parent</artifactId>
    <version>3.5.6</version>
    <relativePath/>
</parent>

<!-- Spring AI BOM -->
<dependencyManagement>
    <dependencies>
        <dependency>
            <groupId>org.springframework.ai</groupId>
            <artifactId>spring-ai-bom</artifactId>
            <version>1.1.0-M2</version>
            <type>pom</type>
            <scope>import</scope>
        </dependency>
    </dependencies>
</dependencyManagement>
3. 搭建四种主流MCP Server
Spring AI MCP Server支持四种核心传输协议/模式,每种适用于不同场景。以下分章节讲解每种服务器的搭建步骤。
均在同一父工程下搭建,父工程依赖:
<?xml version="1.0" encoding="UTF-8"?>
<project xmlns="http://maven.apache.org/POM/4.0.0" xmlns:xsi="http://www.w3.org/2001/XMLSchema-instance"
         xsi:schemaLocation="http://maven.apache.org/POM/4.0.0 https://maven.apache.org/xsd/maven-4.0.0.xsd">
    <modelVersion>4.0.0</modelVersion>
    <parent>
        <groupId>org.springframework.boot</groupId>
        <artifactId>spring-boot-starter-parent</artifactId>
        <version>3.5.6</version>
        <relativePath/> <!-- lookup parent from repository -->
    </parent>
    <groupId>com.itzi</groupId>
    <artifactId>springai</artifactId>
    <version>0.0.1-SNAPSHOT</version>
    <name>springai-1.1.0-M2-parent</name>
    <description>springai-1.1.0-M2-parent</description>
    <packaging>pom</packaging>
    <modules>
        <module>StreamableHTTPMCPServers</module>
        <module>mcp-client</module>
        <module>stdio-mcp</module>
        <module>可根据实际项目添加...</module>
    </modules>
    <properties>
        <java.version>21</java.version>
        <spring-ai.version>1.1.0-M2</spring-ai.version>
    </properties>
    <dependencyManagement>
        <dependencies>
            <dependency>
                <groupId>org.springframework.ai</groupId>
                <artifactId>spring-ai-bom</artifactId>
                <version>${spring-ai.version}</version>
                <type>pom</type>
                <scope>import</scope>
            </dependency>
        </dependencies>
    </dependencyManagement>
    <dependencies>
    </dependencies>

    <build>
        <plugins>
            <plugin>
                <groupId>org.springframework.boot</groupId>
                <artifactId>spring-boot-maven-plugin</artifactId>
            </plugin>
        </plugins>
    </build>

</project>
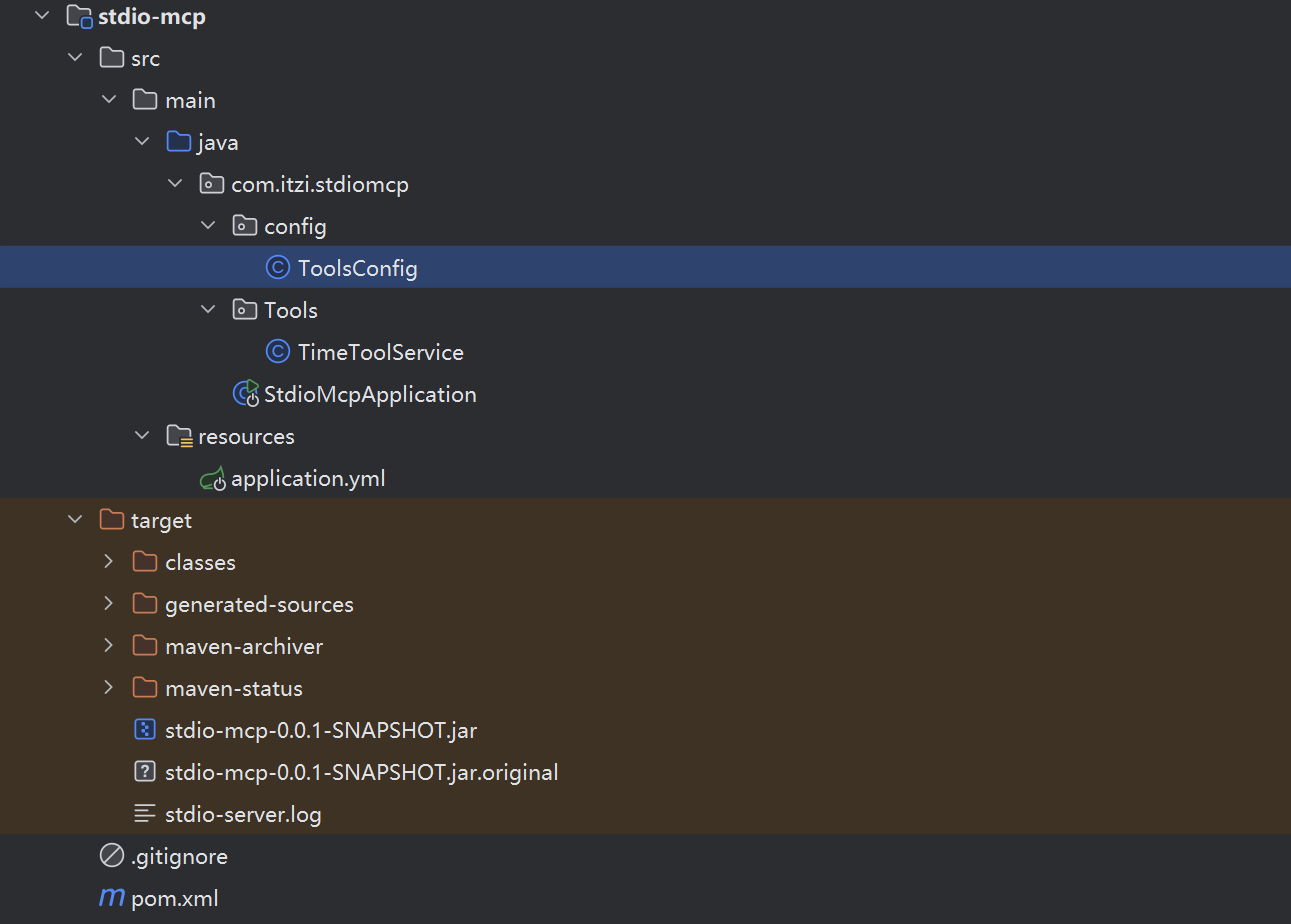
3.1 场景1:STDIO MCP Server(命令行/桌面工具)
适用场景:轻量级命令行工具、桌面应用内嵌服务(无网络依赖,通过标准输入输出通信)。
核心特点:无需Web依赖,支持同步/异步模式,适合单机环境。
3.1.1 引入依赖
在pom.xml中添加STDIO专用Starter:
<?xml version="1.0" encoding="UTF-8"?>
<project xmlns="http://maven.apache.org/POM/4.0.0" xmlns:xsi="http://www.w3.org/2001/XMLSchema-instance"
         xsi:schemaLocation="http://maven.apache.org/POM/4.0.0 https://maven.apache.org/xsd/maven-4.0.0.xsd">
    <modelVersion>4.0.0</modelVersion>
    <parent>
        <groupId>com.itzi</groupId>
        <artifactId>springai</artifactId>
        <version>0.0.1-SNAPSHOT</version>
        <relativePath>../pom.xml</relativePath>
    </parent>
    <artifactId>stdio-mcp</artifactId>
    <version>0.0.1-SNAPSHOT</version>
    <name>stdio-mcp</name>
    <description>stdio-mcp</description>
    <properties>
        <java.version>21</java.version>
    </properties>
    <dependencies>
        <dependency>
            <groupId>org.springframework.ai</groupId>
            <artifactId>spring-ai-starter-mcp-server</artifactId>
        </dependency>
    </dependencies>

    <build>
        <plugins>
            <plugin>
                <groupId>org.springframework.boot</groupId>
                <artifactId>spring-boot-maven-plugin</artifactId>
            </plugin>
        </plugins>
    </build>
</project>
3.1.2 配置application.yml
启用STDIO协议并配置基础参数:
spring:
  main:
    banner-mode: off # 表示关闭 Spring Boot 启动时的横幅显示。保持控制台简洁
    web-application-type: none # none 启动方式 不启动web容器
  ai:
    mcp:
      server:
        enabled: true  # 启用MCP Server(默认true)
        stdio: true    # 启用STDIO传输(核心开关)
        name: stdio-time-server  # 服务器名称(标识用)
        version: 1.0.0 # 服务器版本
        type: SYNC     # 同步模式(可选ASYNC,需Reactor依赖)
        # 能力开关(默认全开启,可按需关闭)
        capabilities:
          tool: true    # 启用工具能力
          resource: true# 启用资源能力
          prompt: true  # 启用Prompt能力
        request-timeout: 30s # 请求超时时间(默认20s)
logging:
  pattern:
    console: null # 关闭控制台日志输出
  file: # 日志文件
    name: 日志文件目录
3.1.3 定义MCP工具(@Tool)
用@Tool注解标记方法为可被AI调用的工具,自动生成JSON Schema:
import org.springframework.ai.tool.annotation.Tool;
import org.springframework.stereotype.Service;
import java.time.LocalDateTime;
import java.time.ZoneId;
import java.time.format.DateTimeFormatter;

@Service
public class TimeToolService {

    @Tool(description = "获取当前本地时间")
    public String getTime() {

        LocalDateTime dateTime = LocalDateTime.now(ZoneId.of("Asia/Shanghai"));
        Long timestamp = System.currentTimeMillis();

        // 格式化时间为可读格式
        DateTimeFormatter formatter = DateTimeFormatter.ofPattern("yyyy-MM-dd HH:mm:ss");
        String formattedTime = dateTime.format(formatter);

        // 计算本年第几个星期的星期几
        int dayOfWeek = dateTime.getDayOfWeek().getValue();
        int dayOfYear = dateTime.getDayOfYear();

        // 返回详细时间信息
        return String.format("时间戳: %d, 时间: %s, 星期%d, 本年第%d天",
                timestamp, formattedTime, dayOfWeek, dayOfYear);
    }
}
3.1.4 注册暴露 MCP 方法
import com.itzi.stdiomcp.Tools.TimeToolService;
import org.springframework.ai.tool.ToolCallbackProvider;
import org.springframework.ai.tool.method.MethodToolCallbackProvider;
import org.springframework.context.annotation.Bean;
import org.springframework.context.annotation.Configuration;

@Configuration
public class ToolsConfig {
    @Bean
    public ToolCallbackProvider timeTools(TimeToolService timeToolService) {
        return MethodToolCallbackProvider.builder().toolObjects(timeToolService).build();
    }
}
3.1.5 打包
3.1.5 测试STDIO Server
3.1.5.1 在项目中集成(MCP客户端搭建在文章下面):
spring:
  ai:
    mcp:
      client:
        type: sync
        request-timeout: 5000
        stdio:
          servers-configuration: classpath:/mcp/mcp-servers-config.json
/mcp/mcp-servers-config.json文件内容:
{
  "mcpServers": {
    "time-mcp-server": {
      "command": "java",
      "args": [
        "-Dspring.ai.mcp.server.stdio=true",(可选,我们已经在MCP的服务器的yml中添加)
        "-Dlogging.pattern.console=",(可选,我们已经在MCP的服务器的yml中添加)
        "-jar",
        "XXX你的绝对路径\\target\\stdio-mcp-0.0.1-SNAPSHOT.jar"
      ]
    }
  }
}
启动客户端我们可以看到连接MCP服务器的日志信息: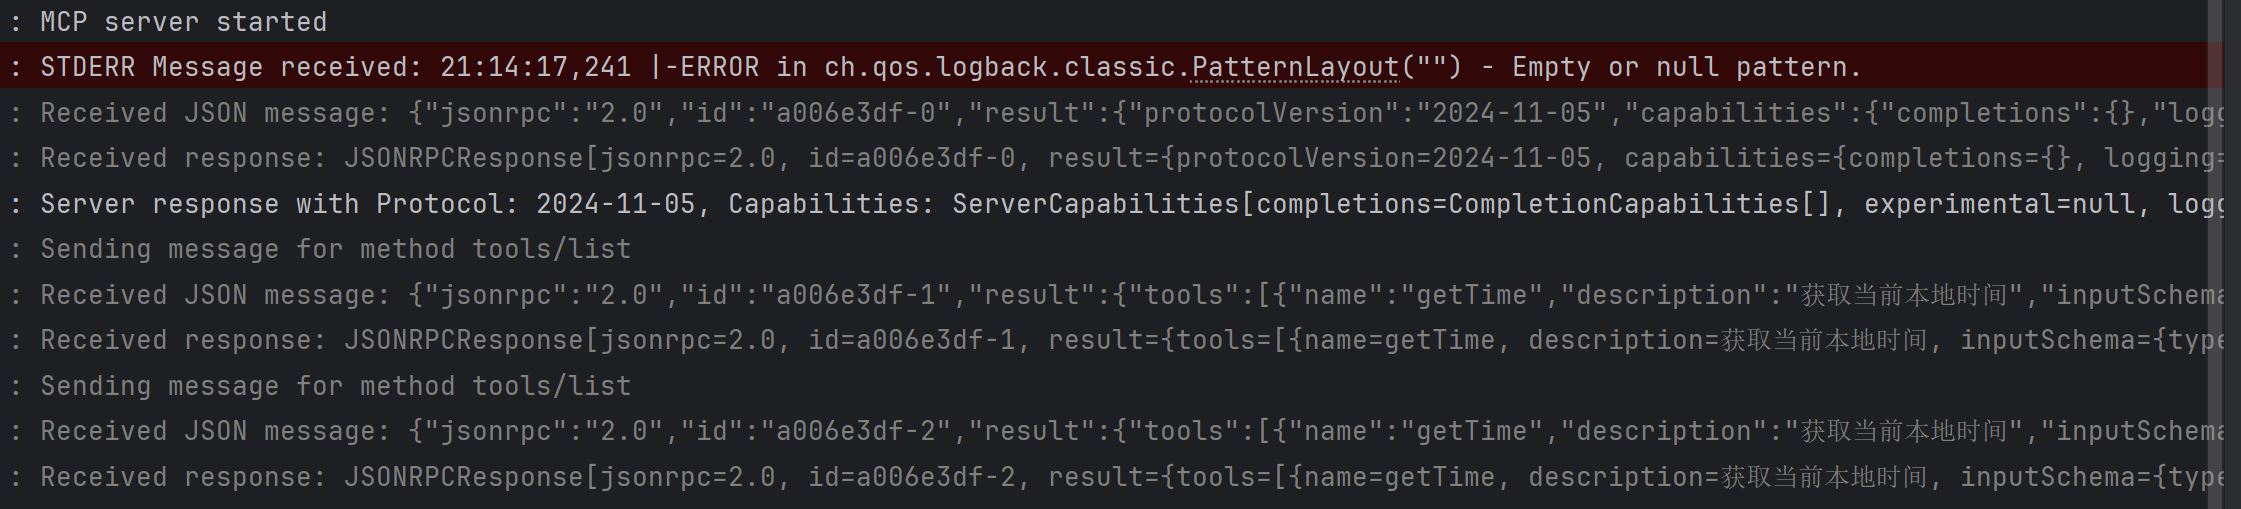
接口测试: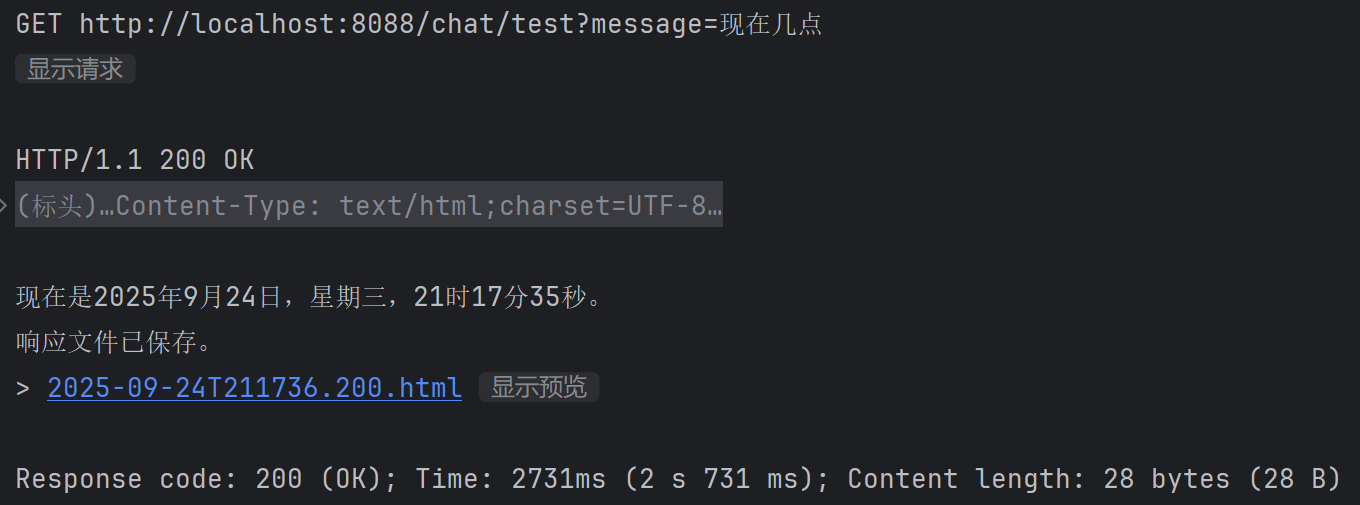
3.1.5.2 在TRAE等智能体中集成(本文以TRAE插件为例):
添加MCP输入:
{
  "mcpServers": {
    "time-mcp-server": {
      "command": "java",
      "args": [
        "-Dspring.ai.mcp.server.stdio=true",(可选,我们已经在MCP的服务器的yml中添加)
        "-Dlogging.pattern.console=",(可选,我们已经在MCP的服务器的yml中添加)
        "-jar",
        "XXX你的绝对路径\\stdio-mcp-0.0.1-SNAPSHOT.jar"
      ]
    }
  }
}
使用效果: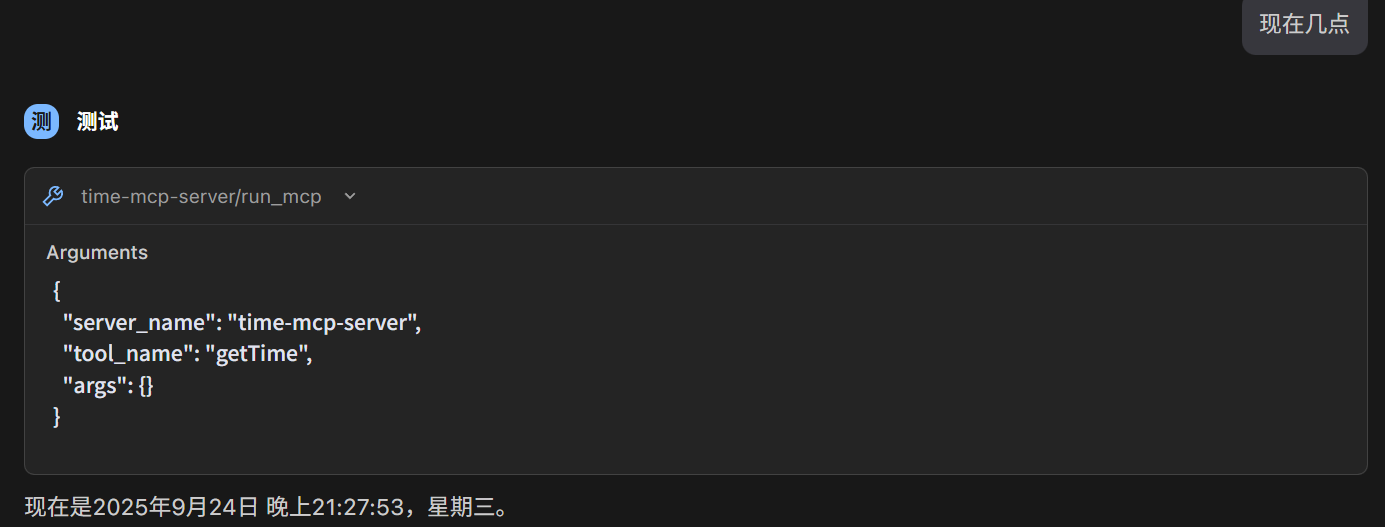
3.2 场景2:SSE MCP Server(实时推送)
适用场景:需要实时更新的AI应用(如实时日志、任务进度推送),基于HTTP的Server-Sent Events协议。
核心特点:支持多客户端连接、实时消息推送,分WebMVC(同步)和WebFlux(反应式)两种实现,以及可选的 STDIO 传输。
3.2.1 选择依赖(WebMVC vs WebFlux)
| 类型 | 依赖坐标 | 适用场景 |
|---|---|---|
| SSE WebMVC | spring-ai-starter-mcp-server-webmvc |
传统同步Web应用 |
| SSE WebFlux | spring-ai-starter-mcp-server-webflux |
高并发、非阻塞反应式应用 |
注意:WebMVC和WebFlux依赖不能同时存在(Spring Boot优先选择WebMVC),此处以WebFlux为例:
<?xml version="1.0" encoding="UTF-8"?>
<project xmlns="http://maven.apache.org/POM/4.0.0" xmlns:xsi="http://www.w3.org/2001/XMLSchema-instance"
         xsi:schemaLocation="http://maven.apache.org/POM/4.0.0 https://maven.apache.org/xsd/maven-4.0.0.xsd">
    <modelVersion>4.0.0</modelVersion>
    <parent>
        <groupId>com.itzi</groupId>
        <artifactId>springai</artifactId>
        <version>0.0.1-SNAPSHOT</version>
        <relativePath>../pom.xml</relativePath>
    </parent>
    <artifactId>SSE-HTTP</artifactId>
    <version>0.0.1-SNAPSHOT</version>
    <name>SSEMCPServers</name>
    <description>SSEMCPServers</description>
    <properties>
        <java.version>21</java.version>
    </properties>
    <dependencies>
        <dependency>
            <groupId>org.springframework.ai</groupId>
            <artifactId>spring-ai-starter-mcp-server-webflux</artifactId>
        </dependency>
    </dependencies>

    <build>
        <plugins>
            <plugin>
                <groupId>org.springframework.boot</groupId>
                <artifactId>spring-boot-maven-plugin</artifactId>
            </plugin>
        </plugins>
    </build>
</project>
3.2.2 配置application.yml
启用SSE协议并配置实时推送参数:
spring:
  ai:
    mcp:
      server:
        enabled: true
        name: sse-time-server
        version: 1.0.0
        type: SYNC    # WebFlux推荐用异步模式(但是我使用异步时不能正确解析返回的信息)
        instructions: "这个是一个提供时间信息的工具和资源"
3.2.3 实现工具
- 创建和配置HTTP客户端Bean
import org.springframework.context.annotation.Bean;
import org.springframework.context.annotation.Configuration;
import org.springframework.web.client.RestTemplate;
import org.springframework.web.reactive.function.client.WebClient;

@Configuration
public class RestConfig {
    @Bean
    public RestTemplate restTemplate() {
        return new RestTemplate(); // 基础配置,可根据需要自定义(如添加拦截器、超时设置等)
    }

    @Bean
    public WebClient.Builder webClientBuilder() {
        return WebClient.builder();
    }
}
- 同步写法
import org.springframework.ai.tool.annotation.Tool;
import org.springframework.beans.factory.annotation.Autowired;
import org.springframework.stereotype.Service;
import org.springframework.web.client.RestTemplate;

import java.time.Instant;
import java.time.LocalDateTime;
import java.time.ZoneId;
import java.time.format.DateTimeFormatter;

@Service
public class TimeToolService {
    @Autowired
    private RestTemplate restTemplate;

    @Tool(description = "获取当前时间")
    public String getTime() {
        String url = "https://f.m.suning.com/api/ct.do";
        long timestamp;
        LocalDateTime dateTime;

        try {
            // 调用苏宁API获取时间
            String response = restTemplate.getForObject(url, String.class);
            // 解析JSON响应中的时间戳
            // 提取currentTime字段的值
            int startIndex = response.indexOf("\"currentTime\":") + 14;
            int endIndex = response.indexOf(",", startIndex);
            if (endIndex == -1) {
                endIndex = response.indexOf("}", startIndex);
            }
            String timestampStr = response.substring(startIndex, endIndex).trim();

            // 去除可能存在的引号
            timestampStr = timestampStr.replace("\"", "");

            // 将时间戳转换为long类型
            timestamp = Long.parseLong(timestampStr);

            // 将时间戳转换为上海时区的时间
            dateTime = LocalDateTime.ofInstant(
                    Instant.ofEpochMilli(timestamp),
                    ZoneId.of("Asia/Shanghai")
            );
        } catch (Exception e) {
            // 如果网络获取时间失败,则使用本地时间
            dateTime = LocalDateTime.now(ZoneId.of("Asia/Shanghai"));
            timestamp = System.currentTimeMillis();
        }

        // 格式化时间为可读格式
        DateTimeFormatter formatter = DateTimeFormatter.ofPattern("yyyy-MM-dd HH:mm:ss");
        String formattedTime = dateTime.format(formatter);

        // 计算本年第几个星期的星期几
        int dayOfWeek = dateTime.getDayOfWeek().getValue();
        int dayOfYear = dateTime.getDayOfYear();

        // 返回详细时间信息
        return String.format("时间戳: %d, 时间: %s, 星期%d, 本年第%d天",
                timestamp, formattedTime, dayOfWeek, dayOfYear);
    }
}
- 异步写法(我使用异步时,MCP客户端无法正确解析返回的信息,求大佬指点)
import com.fasterxml.jackson.databind.JsonNode;
import com.fasterxml.jackson.databind.ObjectMapper;
import org.springframework.ai.tool.annotation.Tool;
import org.springframework.beans.factory.annotation.Autowired;
import org.springframework.stereotype.Service;
import org.springframework.web.reactive.function.client.WebClient;
import reactor.core.publisher.Mono;

import java.time.Instant;
import java.time.LocalDateTime;
import java.time.ZoneId;
import java.time.format.DateTimeFormatter;

@Service
public class TimeToolWebFlux {

    private final WebClient webClient;
    private final ObjectMapper objectMapper;

    @Autowired
    public TimeToolWebFlux(WebClient.Builder webClientBuilder, ObjectMapper objectMapper) {
        this.webClient = webClientBuilder.build();
        this.objectMapper = objectMapper;
    }

    @Tool(description = "获取当前时间(非阻塞)")
    public Mono<String> getTime() {
        String url = "https://f.m.suning.com/api/ct.do";

        return webClient.get()
                .uri(url)
                .retrieve()
                .bodyToMono(String.class)
                .flatMap(this::parseResponse)
                .onErrorResume(this::handleError);
    }

    private Mono<String> parseResponse(String response) {
        try {
            JsonNode root = objectMapper.readTree(response);
            long timestamp = root.get("currentTime").asLong();

            LocalDateTime dateTime = LocalDateTime.ofInstant(
                    Instant.ofEpochMilli(timestamp),
                    ZoneId.of("Asia/Shanghai")
            );

            return Mono.just(formatDateTime(timestamp, dateTime));
        } catch (Exception e) {
            return Mono.just(getLocalTimeInfo());
        }
    }

    private Mono<String> handleError(Throwable throwable) {
        // 如果网络获取时间失败,则使用本地时间
        return Mono.just(getLocalTimeInfo());
    }

    private String getLocalTimeInfo() {
        LocalDateTime dateTime = LocalDateTime.now(ZoneId.of("Asia/Shanghai"));
        long timestamp = System.currentTimeMillis();
        return formatDateTime(timestamp, dateTime);
    }

    private String formatDateTime(long timestamp, LocalDateTime dateTime) {
        DateTimeFormatter formatter = DateTimeFormatter.ofPattern("yyyy-MM-dd HH:mm:ss");
        String formattedTime = dateTime.format(formatter);

        // 计算本年第几个星期的星期几
        int dayOfWeek = dateTime.getDayOfWeek().getValue();
        int dayOfYear = dateTime.getDayOfYear();

        // 返回详细时间信息
        return String.format("时间戳: %d, 时间: %s, 星期%d, 本年第%d天",
                timestamp, formattedTime, dayOfWeek, dayOfYear);
    }
}
3.2.4 暴露工具
import com.itzi.streamablehttp.Tools.TimeToolService;
import com.itzi.streamablehttp.Tools.TimeToolWebFlux;
import org.springframework.ai.tool.ToolCallbackProvider;
import org.springframework.ai.tool.method.MethodToolCallbackProvider;
import org.springframework.context.annotation.Bean;
import org.springframework.context.annotation.Configuration;

@Configuration
public class ToolsConfig {
    @Bean
    public ToolCallbackProvider timeTools(TimeToolService timeToolService) {
        return MethodToolCallbackProvider.builder().toolObjects(timeToolService).build();
    }
//    @Bean
//    public ToolCallbackProvider timeToolsWebFlux(TimeToolWebFlux timeToolWebFlux) {
//        return MethodToolCallbackProvider.builder().toolObjects(timeToolWebFlux).build();
//    }
}
3.2.5 测试SSE Server
使用curl或Postman连接SSE端点,接收实时推送:
- 启动应用:
mvn spring-boot:run - 连接SSE端点(curl命令):
返回如下信息:curl http://localhost:8080/sse
客户端集成:
spring:
  ai:
    mcp:
      client:
        request-timeout: 5000
        sse:
          connections:
            sse-weather-server:
              url: http://localhost:8080
或:
{
  "mcpServers": {
    "sse-weather-server": {
      "url": "http://localhost:8080/sse"
    }
  }
}
或通过STDIO方式集成
{
  "mcpServers": {
    "time-mcp-server": {
      "command": "java",
      "args": [
        "-Dspring.ai.mcp.server.stdio=true",
        "-Dspring.main.banner-mode=off",
        "-Dspring.main.web-application-type=none",
        "-Dlogging.pattern.console=",
        "-jar",
        "XXXjar包的绝对路径XXX"
      ]
    }
  }
}
3.3 场景3:Streamable-HTTP MCP Server(替代SSE)
适用场景:需要处理多客户端连接、动态能力更新(如工具/资源新增)的应用,是SSE的升级替代方案。
核心特点:允许 MCP 服务器作为独立进程运行,通过 HTTP POST 和 GET 请求处理多个客户端连接,并可选地使用服务器发送事件(SSE)流式传输多个服务器消息。它取代了 SSE 传输。
3.3.1 引入依赖
与SSE共享依赖,此处以WebFlux为例:
<?xml version="1.0" encoding="UTF-8"?>
<project xmlns="http://maven.apache.org/POM/4.0.0" xmlns:xsi="http://www.w3.org/2001/XMLSchema-instance"
         xsi:schemaLocation="http://maven.apache.org/POM/4.0.0 https://maven.apache.org/xsd/maven-4.0.0.xsd">
    <modelVersion>4.0.0</modelVersion>
    <parent>
        <groupId>com.itzi</groupId>
        <artifactId>springai</artifactId>
        <version>0.0.1-SNAPSHOT</version>
        <relativePath>../pom.xml</relativePath>
    </parent>
    <artifactId>Streamable-HTTP</artifactId>
    <version>0.0.1-SNAPSHOT</version>
    <name>StreamableHTTPMCPServers</name>
    <description>StreamableHTTPMCPServers</description>
    <properties>
        <java.version>21</java.version>
    </properties>
    <dependencies>
        <dependency>
            <groupId>org.springframework.ai</groupId>
            <artifactId>spring-ai-starter-mcp-server-webflux</artifactId>
        </dependency>
    </dependencies>

    <build>
        <plugins>
            <plugin>
                <groupId>org.springframework.boot</groupId>
                <artifactId>spring-boot-maven-plugin</artifactId>
            </plugin>
        </plugins>
    </build>
</project>
3.3.2 配置application.yml
关键是设置protocol: STREAMABLE,并配置Streamable-HTTP特有参数:
server:
  port: 9000
spring:
  ai:
    mcp:
      server:
        protocol: STREAMABLE #必须设置为 STREAMABLE 以启用流式服务器
#        protocol: STATELESS #必须设置为 STATELESS 才能启用无状态服务器
        name: time-streamable-mcp
        version: 1.0.0
        type: SYNC #Server type (SYNC/ASYNC)  服务器类型(同步/异步)
        instructions: "这个是一个提供时间信息的工具和资源"
        request-timeout: 5000 #请求超时时间(毫秒)
        # Streamable-HTTP特有配置
        streamable-http:
          mcp-endpoint: /api/mcp
          keep-alive-interval: 30s # 连接保活,表示每 30 秒发送一次心跳包
3.3.3 工具实现
与SSE写法一致,略…
3.4 场景4:Stateless MCP Server(微服务/云原生)
适用场景:微服务架构、云原生部署(如K8s集群),无会话状态,适合水平扩展。
核心特点:不维护客户端会话,请求独立处理,不支持ping/elicit等客户端消息。
3.4.1 引入依赖
与SSE/Streamable-HTTP共享依赖,此处以WebFlux为例:
<dependency>
    <groupId>org.springframework.ai</groupId>
    <artifactId>spring-ai-starter-mcp-server-webflux</artifactId>
</dependency>
3.4.2 配置application.yml
关键是设置protocol: STATELESS,且无会话相关配置:
spring:
  ai:
    mcp:
      server:
        enabled: true
        protocol: STATELESS  # 启用无状态协议(核心)
        name: stateless-user-server
        version: 1.0.0
        type: ASYNC  # WebFlux推荐异步
        # 无状态服务器不支持变更通知,需关闭
        tool-change-notification: false
        resource-change-notification: false
        # 无状态特有配置
        stateless:
          mcp-endpoint: /api/stateless/mcp  # 核心端点(默认/mcp)
          disallow-delete: true  # 禁止删除操作(云环境安全推荐)
3.4.3 工具实现
与上面写法一致,略…
4. 核心配置参数详解
Spring AI MCP Server的配置参数分为公共参数和协议特有参数,以下表格整理关键参数:
4.1 公共参数(所有服务器通用)
| 参数路径 | 描述 | 默认值 |
|---|---|---|
spring.ai.mcp.server.enabled |
是否启用MCP Server | true |
spring.ai.mcp.server.type |
服务器类型(同步/异步) | SYNC |
spring.ai.mcp.server.name |
服务器名称(标识用) | mcp-server |
spring.ai.mcp.server.version |
服务器版本 | 1.0.0 |
spring.ai.mcp.server.request-timeout |
请求超时时间 | 20s |
spring.ai.mcp.server.capabilities.tool |
是否启用工具能力 | true |
spring.ai.mcp.server.tool-callback-converter |
是否自动转换Spring AI ToolCallback | true |
4.2 协议特有参数
| 协议类型 | 参数路径 | 描述 | 默认值 |
|---|---|---|---|
| STDIO | spring.ai.mcp.server.stdio |
是否启用STDIO传输 | false |
| SSE | spring.ai.mcp.server.sse-endpoint |
SSE推送端点 | /mcp/sse |
| SSE | spring.ai.mcp.server.keep-alive-interval |
SSE连接保活间隔 | null(禁用) |
| Streamable-HTTP | spring.ai.mcp.server.streamable-http.mcp-endpoint |
核心端点 | /mcp |
| Stateless | spring.ai.mcp.server.stateless.disallow-delete |
是否禁止删除 | false |
5. 常见问题与解决方案
5.1 依赖冲突:WebMVC与WebFlux共存
问题:同时引入spring-ai-starter-mcp-server-webmvc和spring-ai-starter-mcp-server-webflux,应用启动失败。
引入spring-ai-starter-mcp-server-webflux后无需引入spring-boot-starter-web依赖,同时引入可能会导致MCP失效
解决方案:删除其中一个依赖,Spring Boot优先选择WebMVC(因DispatcherServlet优先级更高)。
5.2 MCP注解未被扫描
问题:@McpTool标注的方法未被注册为工具。
解决方案:
- 确保类上有
@Component/@Service等Spring Bean注解; - 检查
spring.ai.mcp.server.annotation-scanner.enabled是否为true(默认启用); - 若使用自定义包扫描,需在
@SpringBootApplication中添加scanBasePackages。
5.3 无状态服务器不支持进度推送
问题:在Stateless Server中使用McpAsyncServerExchange推送进度,报错“不支持会话操作”。
解决方案:Stateless Server不维护会话,无法推送进度/日志,需改用Streamable-HTTP或SSE协议。
6. 总结与适用场景选择
Spring AI MCP Server提供四种协议/模式,覆盖从单机工具到云原生微服务的全场景,选择建议如下:
| 服务器类型 | 适用场景 | 核心优势 | 注意事项 |
|---|---|---|---|
| STDIO | 命令行工具、桌面应用 | 无网络依赖,轻量级 | 不支持多客户端 |
| SSE | 实时进度/日志推送(如AI任务监控) | 实时性好,支持多客户端 | 依赖HTTP长连接,不适合动态能力更新 |
| Streamable-HTTP | 动态能力更新(如工具新增)、SSE替代方案 | 支持能力变更通知,更灵活 | 需较高版本Spring AI(1.1+) |
| Stateless | 微服务、云原生部署(K8s) | 无状态,支持水平扩展 | 不支持会话相关功能(如ping) |
7.MCP客户端搭建
- 依赖:
<?xml version="1.0" encoding="UTF-8"?>
<project xmlns="http://maven.apache.org/POM/4.0.0" xmlns:xsi="http://www.w3.org/2001/XMLSchema-instance"
         xsi:schemaLocation="http://maven.apache.org/POM/4.0.0 https://maven.apache.org/xsd/maven-4.0.0.xsd">
    <modelVersion>4.0.0</modelVersion>
    <parent>
        <groupId>com.itzi</groupId>
        <artifactId>springai</artifactId>
        <version>0.0.1-SNAPSHOT</version>
        <relativePath>../pom.xml</relativePath>
    </parent>
    <artifactId>mcp-client</artifactId>
    <version>0.0.1-SNAPSHOT</version>
    <name>mcp-client</name>
    <description>mcp-client</description>
    <properties>
        <java.version>21</java.version>
    </properties>
    <dependencies>
        <dependency>
            <groupId>org.springframework.boot</groupId>
            <artifactId>spring-boot-starter-webflux</artifactId>
        </dependency>
        <dependency>
            <groupId>org.springframework.boot</groupId>
            <artifactId>spring-boot-starter-test</artifactId>
            <scope>test</scope>
        </dependency>
        <dependency>
            <groupId>org.springframework.ai</groupId>
            <artifactId>spring-ai-starter-model-openai</artifactId>
        </dependency>
        <dependency>
            <groupId>org.springframework.ai</groupId>
            <artifactId>spring-ai-starter-mcp-client-webflux</artifactId>
        </dependency>
    </dependencies>

    <build>
        <plugins>
            <plugin>
                <groupId>org.springframework.boot</groupId>
                <artifactId>spring-boot-maven-plugin</artifactId>
            </plugin>
        </plugins>
    </build>
</project>
- 配置:
server:
  port: 8088

spring:
  profiles:
    active: dev
  main:
    allow-circular-references: true
  ai:
    openai:
      api-key: ${OPENAI_API_KEY}
      base-url: https://api-inference.modelscope.cn
      chat:
        options:
          model: Qwen/Qwen3-235B-A22B-Instruct-2507
#          model: Qwen/Qwen3-Coder-480B-A35B-Instruct
    mcp:
      client:
        type: SYNC
        request-timeout: 5000
        streamable-http:
          connections:
            server1:
              url: http://localhost:9000
              endpoint: /api/mcp
        sse:
          connections:
            time-server:
              url: http://localhost:9005
            email-server:
              url: http://localhost:9006
        stdio:
          servers-configuration: classpath:/mcp/mcp-servers-config.json

logging:
  level:
    io:
      modelcontextprotocol:
#        client: DEBUG
        spec: DEBUG
- 对话客户端:
import org.springframework.ai.chat.client.ChatClient;
import org.springframework.ai.openai.OpenAiChatModel;
import org.springframework.ai.tool.ToolCallbackProvider;
import org.springframework.web.bind.annotation.GetMapping;
import org.springframework.web.bind.annotation.RequestMapping;
import org.springframework.web.bind.annotation.RequestParam;
import org.springframework.web.bind.annotation.RestController;
import reactor.core.publisher.Flux;

@RequestMapping("/chat")
@RestController
public class OpenAiController {

    private final ChatClient chatClient;

    public OpenAiController(
            OpenAiChatModel openAiChatModel,
            // 外部 mcp tools
            ToolCallbackProvider mcpTools){
        this.chatClient = ChatClient.builder(openAiChatModel)
                .defaultToolCallbacks(mcpTools)
                .build();
    }

    @GetMapping(value = "/test", produces = "text/html;charset=UTF-8")
    public Flux<String> generateStreamAsString(@RequestParam(value = "message") String message) {
        return chatClient.prompt()
                .user(message)
                .stream()
                .content();
    }
}
通过本文的指南,你可以根据实际需求选择合适的MCP Server类型,快速搭建起AI应用与外部能力的标准化交互桥梁。如需进一步深入,可参考Spring AI官方文档。
更多推荐


 24
24 0
0- 0


 已为社区贡献2条内容

所有评论(0)