Kotlin 协程与架构组件一起使用及底层原理分析,2024移动开发者未来的出路在哪里
针对Android程序员,我这边给大家整理了一些资料,包括不限于高级UI、性能优化、架构师课程、NDK、混合式开发(ReactNative+Weex)微信小程序、Flutter等全方面的Android进阶实践技术;希望能帮助到大家,也节省大家在网上搜索资料的时间来学习,也可以分享动态给身边好友一起学习!往期Android高级架构资料、源码、笔记、视频。高级UI、性能优化、架构师课程、混合式开发(R
)
}
internal class CloseableCoroutineScope(context: CoroutineContext) : Closeable, CoroutineScope {
override val coroutineContext: CoroutineContext = context
override fun close() {
coroutineContext.cancel()
}
}
源码中首先是介绍了viewModelScope是什么,它其实是一个ViewModel的扩展属性,它的实际类型是CloseableCoroutineScope。这名字看起来就是一个可以取消的协程,果不其然,它实现了Closeable并在close方法中进行了取消。
每次在使用viewModelScope的时候,会先从缓存中取,如果没有才去新建一个CloseableCoroutineScope。需要注意的是,CloseableCoroutineScope的执行是在主线程中执行的。
我们现在需要知道的是缓存是怎么存储和取出的。
//ViewModel.java
// Can’t use ConcurrentHashMap, because it can lose values on old apis (see b/37042460)
@Nullable
private final Map<String, Object> mBagOfTags = new HashMap<>();
/**
- Returns the tag associated with this viewmodel and the specified key.
*/
@SuppressWarnings({“TypeParameterUnusedInFormals”, “unchecked”})
T getTag(String key) {
if (mBagOfTags == null) {
return null;
}
synchronized (mBagOfTags) {
return (T) mBagOfTags.get(key);
}
}
/**
-
Sets a tag associated with this viewmodel and a key.
-
If the given {@code newValue} is {@link Closeable},
-
it will be closed once {@link #clear()}.
-
-
If a value was already set for the given key, this calls do nothing and
-
returns currently associated value, the given {@code newValue} would be ignored
-
-
If the ViewModel was already cleared then close() would be called on the returned object if
-
it implements {@link Closeable}. The same object may receive multiple close calls, so method
-
should be idempotent.
*/
@SuppressWarnings(“unchecked”)
T setTagIfAbsent(String key, T newValue) {
T previous;
synchronized (mBagOfTags) {
previous = (T) mBagOfTags.get(key);
if (previous == null) {
mBagOfTags.put(key, newValue);
}
}
T result = previous == null ? newValue : previous;
if (mCleared) {
// It is possible that we’ll call close() multiple times on the same object, but
// Closeable interface requires close method to be idempotent:
// “if the stream is already closed then invoking this method has no effect.” ©
closeWithRuntimeException(result);
}
return result;
}
现在我们知道了,原来是存在了ViewModel的mBagOfTags中,它是一个HashMap。
知道了怎么存的,那么它是在什么时候用的呢?
@MainThread
final void clear() {
mCleared = true;
// Since clear() is final, this method is still called on mock objects
// and in those cases, mBagOfTags is null. It’ll always be empty though
// because setTagIfAbsent and getTag are not final so we can skip
// clearing it
if (mBagOfTags != null) {
synchronized (mBagOfTags) {
for (Object value : mBagOfTags.values()) {
// see comment for the similar call in setTagIfAbsent
closeWithRuntimeException(value);
}
}
}
onCleared();
}
private static void closeWithRuntimeException(Object obj) {
if (obj instanceof Closeable) {
try {
((Closeable) obj).close();
} catch (IOException e) {
throw new RuntimeException(e);
}
}
}
我在ViewModel中搜索了一下mBagOfTags,发现有一个clear方法,在里面将mBagOfTags遍历一遍,然后将所有value是Closeable的全部close。在上面的源码中,第一次使用viewModelScope的时候,会创建一个CloseableCoroutineScope,它实现了Closeable接口,并实现了close方法,刚好用来做取消操作。
看到这里,我们知道了:viewModelScope构建的协程是在ViewModel的clear方法回调时取消协程的。
而且,clear方法里面居然还有我们熟悉的onCleared方法调用。而onCleared我们知道是干什么的,当这个ViewModel不再使用时会回调这个方法,一般我们需要在此方法中做一些收尾工作,如取消观察者订阅、关闭资源之类的。
那么,大胆猜测一下,这个clear()方法应该也是在ViewModel要结束生命的时候调用的。
搜索了一下,发现clear方法是在ViewModelStore里面调用的。
public class ViewModelStore {
private final HashMap<String, ViewModel> mMap = new HashMap<>();
final void put(String key, ViewModel viewModel) {
ViewModel oldViewModel = mMap.put(key, viewModel);
if (oldViewModel != null) {
oldViewModel.onCleared();
}
}
final ViewModel get(String key) {
return mMap.get(key);
}
Set keys() {
return new HashSet<>(mMap.keySet());
}
/**
- Clears internal storage and notifies ViewModels that they are no longer used.
*/
public final void clear() {
for (ViewModel vm : mMap.values()) {
vm.clear();
}
mMap.clear();
}
}
ViewModelStore是一个容器,用于盛放ViewModel。在ViewModelStore的clear方法中调用了该ViewModelStore中所有ViewModel的clear方法。那么ViewModelStore的clear是在哪里调用的?我跟着追踪,发现是在ComponentActivity的构造方法中。
public ComponentActivity() {
Lifecycle lifecycle = getLifecycle();
getLifecycle().addObserver(new LifecycleEventObserver() {
@Override
public void onStateChanged(@NonNull LifecycleOwner source,
@NonNull Lifecycle.Event event) {
if (event == Lifecycle.Event.ON_DESTROY) {
if (!isChangingConfigurations()) {
getViewModelStore().clear();
}
}
}
});
}
在Activity的生命周期走到onDestroy的时候调用ViewModelStore的clear做收尾工作。但是,注意一下,这个调用有个前提,此次走onDestroy不是因为配置更改才会去调用clear方法。
好的,到此为止,咱们理通了viewModelScope的协程是怎么做到自动取消的(ViewModel的mBagOfTags),以及是在什么时候进行取消的(ViewModel的clear()时)。
3. lifecycleScope
对于Lifecycle,Google贴心地提供了LifecycleScope,我们可以直接通过launch来创建Coroutine。
3.1 使用
举个简单例子,比如在Activity的onCreate里面,每隔100毫秒更新一下TextView的文字。
lifecycleScope.launch {
repeat(100000) {
delay(100)
tvText.text = “$it”
}
}
因为LifeCycle是可以感知组件的生命周期的,所以Activity一旦onDestroy了,相应的上面这个lifecycleScope。launch闭包的调用也会取消。
另外,lifecycleScope还贴心地提供了launchWhenCreated、launchWhenStarted、launchWhenResumed方法,这些方法的闭包里面有协程的作用域,它们分别是在CREATED、STARTED、RESUMED时被执行。
//方式1
lifecycleScope.launchWhenStarted {
repeat(100000) {
delay(100)
tvText.text = “$it”
}
}
//方式2
lifecycleScope.launch {
whenStarted {
repeat(100000) {
delay(100)
tvText.text = “$it”
}
}
}
不管是直接调用launchWhenStarted还是在launch中调用whenStarted都能达到同样的效果。
3.2 LifecycleScope的底层实现
先来看下lifecycleScope.launch是怎么做到的
/**
-
[CoroutineScope] tied to this [LifecycleOwner]'s [Lifecycle].
-
This scope will be cancelled when the [Lifecycle] is destroyed.
-
This scope is bound to
-
[Dispatchers.Main.immediate][kotlinx.coroutines.MainCoroutineDispatcher.immediate].
*/
val LifecycleOwner.lifecycleScope: LifecycleCoroutineScope
get() = lifecycle.coroutineScope
好家伙,又是扩展属性。这次扩展的是LifecycleOwner,返回了一个LifecycleCoroutineScope。每次在get的时候,是返回的lifecycle.coroutineScope,看看这个是啥。
/**
-
[CoroutineScope] tied to this [Lifecycle].
-
This scope will be cancelled when the [Lifecycle] is destroyed.
-
This scope is bound to
-
[Dispatchers.Main.immediate][kotlinx.coroutines.MainCoroutineDispatcher.immediate]
*/
val Lifecycle.coroutineScope: LifecycleCoroutineScope
get() {
while (true) {
val existing = mInternalScopeRef.get() as LifecycleCoroutineScopeImpl?
if (existing != null) {
return existing
}
val newScope = LifecycleCoroutineScopeImpl(
this,
SupervisorJob() + Dispatchers.Main.immediate
)
if (mInternalScopeRef.compareAndSet(null, newScope)) {
newScope.register()
return newScope
}
}
}
Lifecycle的coroutineScope也是扩展属性,它是一个LifecycleCoroutineScope。从注释可以看到,在Lifecycle被销毁之后,这个协程会跟着取消。这里首先会从mInternalScopeRef中取之前存入的缓存,如果没有再生成一个LifecycleCoroutineScopeImpl放进去,并调用LifecycleCoroutineScopeImpl的register函数。这里的mInternalScopeRef是Lifecycle类里面的一个属性: AtomicReference<Object> mInternalScopeRef = new AtomicReference<>(); (AtomicReference可以让一个对象保证原子性)。这里使用AtomicReference当然是为了线程安全。
既然生成的是LifecycleCoroutineScopeImpl,那么就先来看看这个东西是什么
internal class LifecycleCoroutineScopeImpl(
override val lifecycle: Lifecycle,
override val coroutineContext: CoroutineContext
) : LifecycleCoroutineScope(), LifecycleEventObserver {
init {
// in case we are initialized on a non-main thread, make a best effort check before
// we return the scope. This is not sync but if developer is launching on a non-main
// dispatcher, they cannot be 100% sure anyways.
if (lifecycle.currentState == Lifecycle.State.DESTROYED) {
coroutineContext.cancel()
}
}
fun register() {
//启了个协程,当前Lifecycle的state大于等于INITIALIZED,就注册一下Lifecycle的观察者,观察生命周期
launch(Dispatchers.Main.immediate) {
if (lifecycle.currentState >= Lifecycle.State.INITIALIZED) {
lifecycle.addObserver(this@LifecycleCoroutineScopeImpl)
} else {
coroutineContext.cancel()
}
}
}
override fun onStateChanged(source: LifecycleOwner, event: Lifecycle.Event) {
//观察到当前生命周期小于等于DESTROYED,那么就移除当前这个观察者并且取消协程
if (lifecycle.currentState <= Lifecycle.State.DESTROYED) {
lifecycle.removeObserver(this)
coroutineContext.cancel()
}
}
}
在上面的代码中,有2个重要的函数:register和onStateChanged。register函数是在初始化LifecycleCoroutineScopeImpl的时候调用的,先在register函数中添加一个观察者用于观察生命周期的变化,然后在onStateChanged函数中判断生命周期到DESTROYED时就移除观察者并且取消协程。
有个小细节,为啥register函数中能直接启协程?是因为LifecycleCoroutineScopeImpl继承了LifecycleCoroutineScope,,而LifecycleCoroutineScope实现了CoroutineScope接口(其实是在LifecycleCoroutineScopeImpl中实现的)。
public abstract class LifecycleCoroutineScope internal constructor() : CoroutineScope {
internal abstract val lifecycle: Lifecycle
…
}
现在我们流程理清楚了,lifecycleScope使用时会构建一个协程,同时会观察组件的生命周期,在适当的时机(DESTROYED)取消协程。
在上面的实例我们见过一段代码:
//方式1
lifecycleScope.launchWhenStarted {
repeat(100000) {
delay(100)
tvText.text = “$it”
}
}
//方式2
lifecycleScope.launch {
whenStarted {
repeat(100000) {
delay(100)
tvText.text = “$it”
}
}
}
可以直接通过lifecycleScope提供的launchWhenCreated、launchWhenStarted、launchWhenResumed在相应的生命周期时执行协程。
点进去看一下
abstract class LifecycleCoroutineScope internal constructor() : CoroutineScope {
internal abstract val lifecycle: Lifecycle
/**
-
Launches and runs the given block when the [Lifecycle] controlling this
-
[LifecycleCoroutineScope] is at least in [Lifecycle.State.CREATED] state.
-
The returned [Job] will be cancelled when the [Lifecycle] is destroyed.
-
@see Lifecycle.whenCreated
-
@see Lifecycle.coroutineScope
*/
fun launchWhenCreated(block: suspend CoroutineScope.() -> Unit): Job = launch {
lifecycle.whenCreated(block)
}
/**
-
Launches and runs the given block when the [Lifecycle] controlling this
-
[LifecycleCoroutineScope] is at least in [Lifecycle.State.STARTED] state.
-
The returned [Job] will be cancelled when the [Lifecycle] is destroyed.
-
@see Lifecycle.whenStarted
-
@see Lifecycle.coroutineScope
*/
fun launchWhenStarted(block: suspend CoroutineScope.() -> Unit): Job = launch {
lifecycle.whenStarted(block)
}
/**
-
Launches and runs the given block when the [Lifecycle] controlling this
-
[LifecycleCoroutineScope] is at least in [Lifecycle.State.RESUMED] state.
-
The returned [Job] will be cancelled when the [Lifecycle] is destroyed.
-
@see Lifecycle.whenResumed
-
@see Lifecycle.coroutineScope
*/
fun launchWhenResumed(block: suspend CoroutineScope.() -> Unit): Job = launch {
lifecycle.whenResumed(block)
}
}
原来这些函数就是LifecycleOwner的扩展属性lifecycleScope所返回的LifecycleCoroutineScope类里面的函数。这几个函数里面啥也没干,直接调用了lifecycle对应的函数
/**
-
Runs the given block when the [Lifecycle] is at least in [Lifecycle.State.CREATED] state.
-
@see Lifecycle.whenStateAtLeast for details
*/
suspend fun Lifecycle.whenCreated(block: suspend CoroutineScope.() -> T): T {
return whenStateAtLeast(Lifecycle.State.CREATED, block)
}
/**
-
Runs the given block when the [Lifecycle] is at least in [Lifecycle.State.STARTED] state.
-
@see Lifecycle.whenStateAtLeast for details
*/
suspend fun Lifecycle.whenStarted(block: suspend CoroutineScope.() -> T): T {
return whenStateAtLeast(Lifecycle.State.STARTED, block)
}
/**
-
Runs the given block when the [Lifecycle] is at least in [Lifecycle.State.RESUMED] state.
-
@see Lifecycle.whenStateAtLeast for details
*/
suspend fun Lifecycle.whenResumed(block: suspend CoroutineScope.() -> T): T {
return whenStateAtLeast(Lifecycle.State.RESUMED, block)
}
这几个函数原来是suspend函数,并且是扩展Lifecycle的函数。它们最终都调用到了whenStateAtLeast函数,并传入了执行协程的最小的生命周期状态标志(minState)。
suspend fun Lifecycle.whenStateAtLeast(
minState: Lifecycle.State,
block: suspend CoroutineScope.() -> T
) = withContext(Dispatchers.Main.immediate) {
val job = coroutineContext[Job] ?: error(“when[State] methods should have a parent job”)
val dispatcher = PausingDispatcher()
val controller =
LifecycleController(this@whenStateAtLeast, minState, dispatcher.dispatchQueue, job)
try {
//执行协程
withContext(dispatcher, block)
} finally {
//收尾工作 移除生命周期观察
controller.finish()
}
}
@MainThread
internal class LifecycleController(
private val lifecycle: Lifecycle,
private val minState: Lifecycle.State,
private val dispatchQueue: DispatchQueue,
parentJob: Job
) {
private val observer = LifecycleEventObserver { source, _ ->
if (source.lifecycle.currentState == Lifecycle.State.DESTROYED) {
//DESTROYED->取消协程
handleDestroy(parentJob)
} else if (source.lifecycle.currentState < minState) {
dispatchQueue.pause()
} else {
//执行
dispatchQueue.resume()
}
}
init {
// If Lifecycle is already destroyed (e.g. developer leaked the lifecycle), we won’t get
// an event callback so we need to check for it before registering
// see: b/128749497 for details.
if (lifecycle.currentState == Lifecycle.State.DESTROYED) {
handleDestroy(parentJob)
} else {
//观察生命周期变化
lifecycle.addObserver(observer)
}
}
@Suppress(“NOTHING_TO_INLINE”) // avoid unnecessary method
private inline fun handleDestroy(parentJob: Job) {
parentJob.cancel()
finish()
}
/**
-
Removes the observer and also marks the [DispatchQueue] as finished so that any remaining
-
runnables can be executed.
*/
@MainThread
fun finish() {
//移除生命周期观察者
lifecycle.removeObserver(observer)
//标记已完成 并执行剩下的可执行的Runnable
dispatchQueue.finish()
}
}
whenStateAtLeast也是一个Lifecycle的扩展函数,核心逻辑是在LifecycleController中添加了LifecycleObserver来监听生命周期状态,通过状态来决定是暂停执行还是恢复执行,或者是取消执行。当执行完成之后,也就是finally那里,从执行LifecycleController的finish进行收尾工作:移除生命周期监听,开始执行余下的任务。
执行完成一次,就会移除生命周期观察者,相当于我们写到launchWhenResumed之类的函数里面的闭包只会被执行一次。执行完成之后,即使再经过onPause->onResume也不会再次执行。
4. liveData
在我们平时使用LiveData的过程中,可能会涉及到这种场景:去请求网络拿结果,然后通过LiveData将数据转出去,在Activity里面收到通知,然后更新UI。非常常见的场景,这种情况下,我们可以通过官方的liveData构造器函数来简化上面的场景代码。
4.1 使用
val netData: LiveData = liveData {
//观察的时候在生命周期内,则会马上执行
val data = getNetData()
emit(data)
}
//将耗时任务切到IO线程去执行
private suspend fun getNetData() = withContext(Dispatchers.IO) {
//模拟网络耗时
delay(5000)
//模拟返回结果
“{}”
}
在上面的例子中,getNetData()是一个suspend函数。使用LiveData构造器函数异步调用getNetData(),然后使用emit()提交结果。在Activity那边如果观察了这个netData,并且处于活动状态,那么就会收到结果。我们知道,suspend函数需要在协程作用域中调用,所以liveData的闭包里面也是有协程作用域的。
自我介绍一下,小编13年上海交大毕业,曾经在小公司待过,也去过华为、OPPO等大厂,18年进入阿里一直到现在。
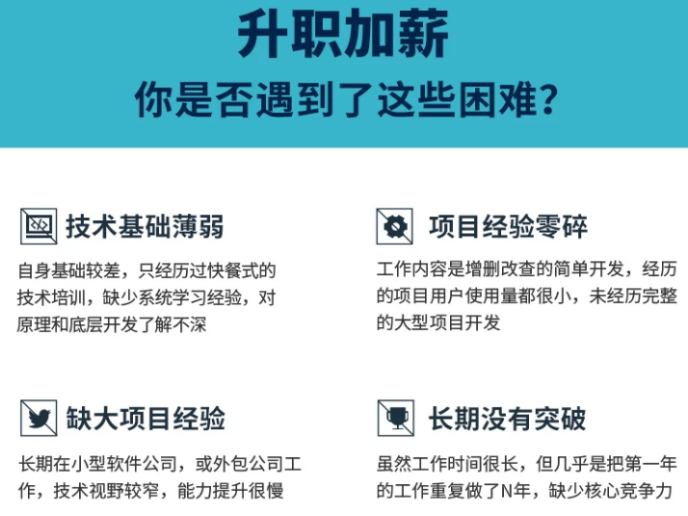
深知大多数初中级Android工程师,想要提升技能,往往是自己摸索成长或者是报班学习,但对于培训机构动则近万的学费,着实压力不小。自己不成体系的自学效果低效又漫长,而且极易碰到天花板技术停滞不前!
因此收集整理了一份《2024年Android移动开发全套学习资料》,初衷也很简单,就是希望能够帮助到想自学提升又不知道该从何学起的朋友,同时减轻大家的负担。

既有适合小白学习的零基础资料,也有适合3年以上经验的小伙伴深入学习提升的进阶课程,基本涵盖了95%以上Android开发知识点,真正体系化!
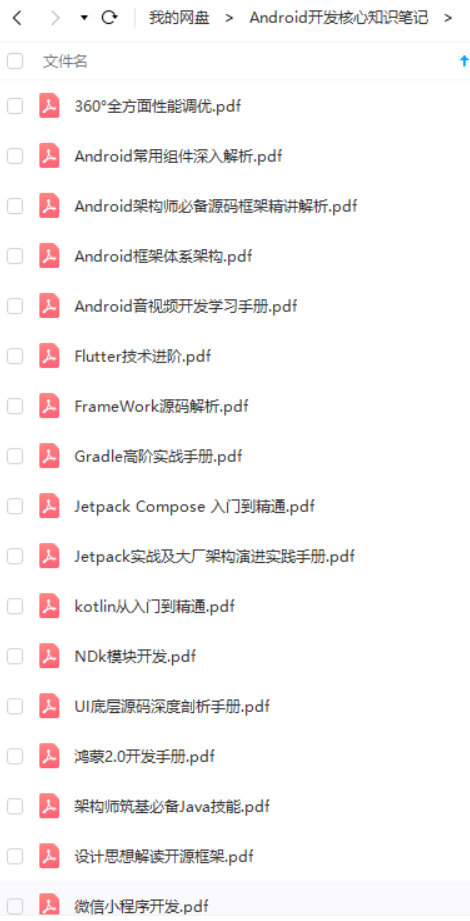
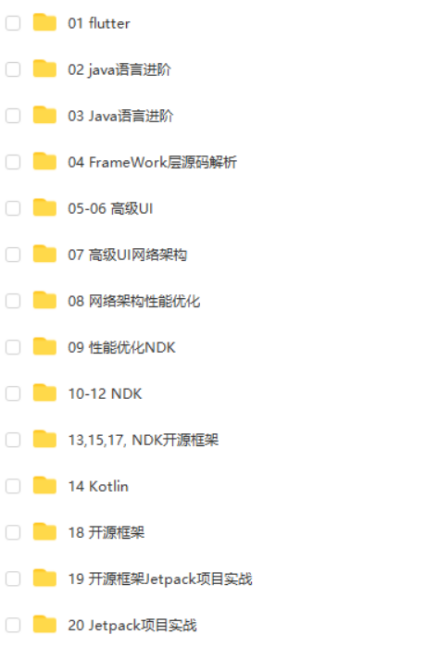
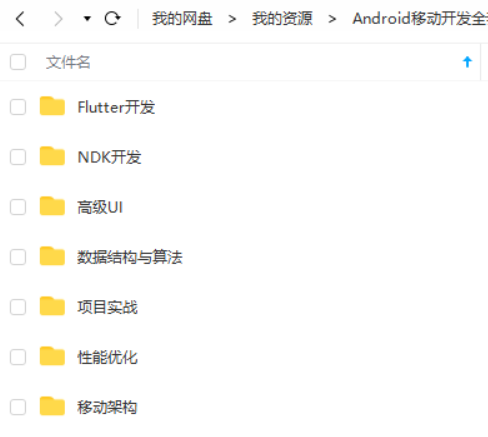
由于文件比较大,这里只是将部分目录截图出来,每个节点里面都包含大厂面经、学习笔记、源码讲义、实战项目、讲解视频,并且会持续更新!
如果你觉得这些内容对你有帮助,可以扫码获取!!(备注:Android)

最后
针对Android程序员,我这边给大家整理了一些资料,包括不限于高级UI、性能优化、架构师课程、NDK、混合式开发(ReactNative+Weex)微信小程序、Flutter等全方面的Android进阶实践技术;希望能帮助到大家,也节省大家在网上搜索资料的时间来学习,也可以分享动态给身边好友一起学习!
往期Android高级架构资料、源码、笔记、视频。高级UI、性能优化、架构师课程、混合式开发(ReactNative+Weex)全方面的Android进阶实践技术,群内还有技术大牛一起讨论交流解决问题。


《互联网大厂面试真题解析、进阶开发核心学习笔记、全套讲解视频、实战项目源码讲义》点击传送门即可获取!
低效又漫长,而且极易碰到天花板技术停滞不前!**
因此收集整理了一份《2024年Android移动开发全套学习资料》,初衷也很简单,就是希望能够帮助到想自学提升又不知道该从何学起的朋友,同时减轻大家的负担。
[外链图片转存中…(img-zATEkl9P-1712591576709)]
[外链图片转存中…(img-PMia9ilP-1712591576709)]
[外链图片转存中…(img-6L5gRk0m-1712591576709)]
[外链图片转存中…(img-MHc208a3-1712591576710)]
[外链图片转存中…(img-ZIHHf3R9-1712591576710)]
既有适合小白学习的零基础资料,也有适合3年以上经验的小伙伴深入学习提升的进阶课程,基本涵盖了95%以上Android开发知识点,真正体系化!
由于文件比较大,这里只是将部分目录截图出来,每个节点里面都包含大厂面经、学习笔记、源码讲义、实战项目、讲解视频,并且会持续更新!
如果你觉得这些内容对你有帮助,可以扫码获取!!(备注:Android)
最后
针对Android程序员,我这边给大家整理了一些资料,包括不限于高级UI、性能优化、架构师课程、NDK、混合式开发(ReactNative+Weex)微信小程序、Flutter等全方面的Android进阶实践技术;希望能帮助到大家,也节省大家在网上搜索资料的时间来学习,也可以分享动态给身边好友一起学习!
往期Android高级架构资料、源码、笔记、视频。高级UI、性能优化、架构师课程、混合式开发(ReactNative+Weex)全方面的Android进阶实践技术,群内还有技术大牛一起讨论交流解决问题。
[外链图片转存中…(img-2zVKDG1P-1712591576710)]
[外链图片转存中…(img-H1354QBb-1712591576710)]
《互联网大厂面试真题解析、进阶开发核心学习笔记、全套讲解视频、实战项目源码讲义》点击传送门即可获取!

一起探索未来云端世界的核心,云原生技术专区带您领略创新、高效和可扩展的云计算解决方案,引领您在数字化时代的成功之路。
更多推荐


 18
18 0
0- 0


 已为社区贡献1条内容

所有评论(0)