
【雕爷学编程】Arduino动手做(207)---合宙ESP32 C3开发板之点亮WS2812B硬屏
雕爷学编程,Arduino动手做,开源硬件,创客传感器,ESP32 C3开发板

37款传感器与模块的提法,在网络上广泛流传,其实Arduino能够兼容的传感器模块肯定是不止37种的。鉴于本人手头积累了一些传感器和模块,依照实践(动手试试)出真知的理念,以学习和交流为目的,这里准备逐一做做实验,不管能否成功,都会记录下来—小小的进步或是搞不掂的问题,希望能够抛砖引玉。
【Arduino】168种传感器模块系列实验(资料代码+仿真编程+图形编程)
实验二百零七:合宙ESP32C3开发板/核心板MCU开发板支持LuatOS/乐鑫IDF开发
昨天收到三块板子:Air103、Pico和ESP32C3

下面开始了解一下这款开发板的基本情况
1、简介
合宙CORE ESP32-C3核心板,是基于乐鑫ESP32-C3芯片进行设计的一款开发板。
尺寸仅有21mm×51mm,板边采用邮票孔设计,板载 Wi-Fi/BLE天线,方便开发者在不同场景下的使用。核心板支持UART、GPIO、SPI、I2C、ADC、PWM等接口,可根据实际需要选用。
2、主要特色
(1)功能强,应用广
合宙ESP32-C3开发板高集成化设计,板载 Wi-Fi/BLE天线、4MB Flash,支持UART、GPIO、SPI、I2C、ADC、PWM等接口,满足大多数应用;板载CH343P芯片实现更高速率的USB转串口,固件下载更快更稳。
(2)用料足,信号好
合宙ESP32-C3开发板采用4层PCB,板载2.4G天线,经过调试达到了比较好的使用效果。实测2.38到2.48GHz范围内的驻波比(VSWR)值比较好,能够有效的将发射功率辐射到无线空间。
(3)多样化开发更便捷
合宙ESP32-C3开发板目前支持:LuatOS/乐鑫IDF/Arduino/MicroPython等多样化开发方式,使用更便捷。LuatOS固件在社区大神梦程的努力下现已支持许多功能,其他内容正在不断更新。

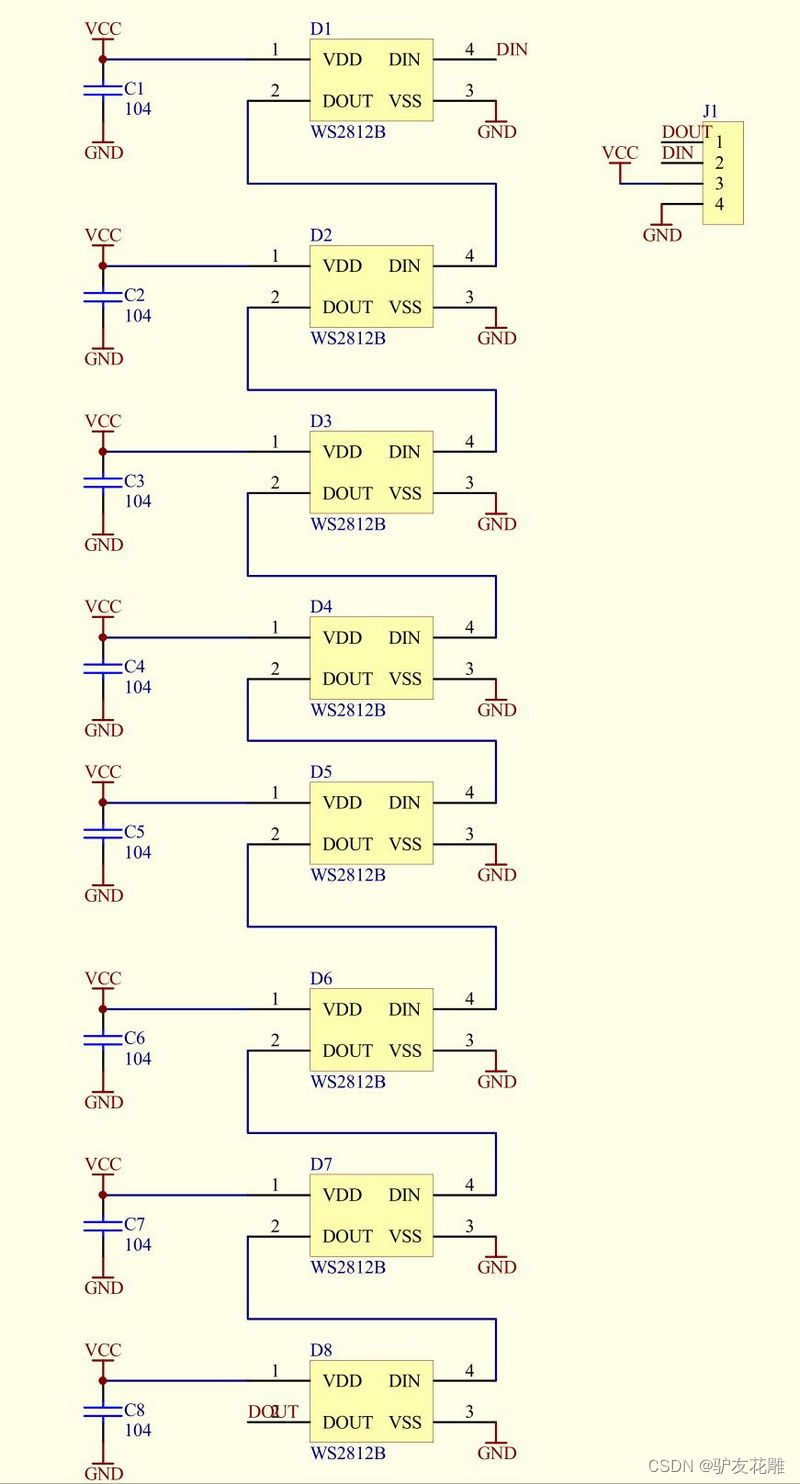
手头有64位和256位WS2812B的硬屏各一片,现在尝试点亮它们

WS2812主要特点
● 智能反接保护,电源反接不会损坏IC。
● IC控制电路与LED点光源公用一个电源。
● 控制电路与RGB芯片集成在一个5050封装的元器件中,构成一个完整的外控像素点。
● 内置信号整形电路,任何一个像素点收到信号后经过波形整形再输出,保证线路波形畸变不会累加。
● 内置上电复位和掉电复位电路。
● 每个像素点的三基色颜色可实现256级亮度显示,完成16777216种颜色的全真色彩显示,扫描频率不低于400Hz/s。
● 串行级联接口,能通过一根信号线完成数据的接收与解码。
● 任意两点传传输距离在不超过5米时无需增加任何电路。
● 当刷新速率30帧/秒时,级联数不小于1024点。
● 数据发送速度可达800Kbps。
● 光的颜色高度一致,性价比高。

WS2812模块电原理图
合宙CORE ESP32-C3核心板,是基于乐鑫ESP32-C3芯片进行设计的一款开发板。尺寸仅有21mm×51mm,板边采用邮票孔设计,板载 Wi-Fi/BLE天线,方便开发者在不同场景下的使用。核心板支持UART、GPIO、SPI、I2C、ADC、PWM等接口,可根据实际需要选用。
1路SPI FLASH,板载4MB,支持最高 16MB
2路UART接口,UART0~UART1,其中下载口为UART0
6 路 12 比特 ADC,最高采样率 100KSPS
1路低速SPI接口,支持主模式
1路IIC控制器
4路PWM接口
GPIO外部管脚15路,可复用
2路贴片LED指示灯
1路复位按键+1路BOOT按键
1路USB转TTL下载调试口
2.4G PCB板载天线

打开Arduino IDE——工具——管理库,搜索Adafruit NeoPixel,并安装

【花雕体验】19 合宙ESP32_C3点亮WS2812B硬屏
实验程序一:64位绿色上漂灯
Arduino实验开源代码
/*
  【花雕体验】19 合宙ESP32_C3点亮WS2812B硬屏
  实验程序一:64位绿色上漂灯
*/

#include <Adafruit_NeoPixel.h>

#define PIN 9
#define MAX_LED 64

int val = 0;

Adafruit_NeoPixel strip = Adafruit_NeoPixel( MAX_LED, PIN, NEO_RGB + NEO_KHZ800 );

void setup() {
  strip.setBrightness(150);
  strip.begin();
  strip.show();
}

void loop() {
  uint8_t i, a = 0;
  uint32_t color = strip.Color(160, 10, 10);
  while (a < 64)
  {
    for (i = 0; i < 64; i++)
    {
      if (i == a) strip.setPixelColor(i, color);
      else strip.setPixelColor(i, 0);
    }
    strip.show();
    delay(6);
    a++;
  }
}
实验串口返回情况

实验场景图 动态图

【花雕体验】19 合宙ESP32_C3点亮WS2812B硬屏
实验程序二:一个基本的NeoPixel 灯板灯条测试程序
Arduino实验开源代码
/*
  【花雕体验】19 合宙ESP32_C3点亮WS2812B硬屏
  实验程序二:一个基本的NeoPixel 灯板灯条测试程序
*/

#include <Adafruit_NeoPixel.h>

#define PIN 9
#define NUMPIXELS 64

Adafruit_NeoPixel strip = Adafruit_NeoPixel(NUMPIXELS, PIN, NEO_GRB + NEO_KHZ800);

void setup() {
  strip.setBrightness(50);
  strip.begin();
  strip.show();
}

void loop() {
  // Fill along the length of the strip in various colors...
  colorWipe(strip.Color(255,   0,   0), 50); // Red
  colorWipe(strip.Color(  0, 255,   0), 50); // Green
  colorWipe(strip.Color(  0,   0, 255), 50); // Blue

  // Do a theater marquee effect in various colors...
  theaterChase(strip.Color(127, 127, 127), 50); // White, half brightness
  theaterChase(strip.Color(127,   0,   0), 50); // Red, half brightness
  theaterChase(strip.Color(  0,   0, 127), 50); // Blue, half brightness

  rainbow(10);             // Flowing rainbow cycle along the whole strip
  theaterChaseRainbow(50); // Rainbow-enhanced theaterChase variant
}


// Some functions of our own for creating animated effects -----------------

// Fill strip pixels one after another with a color. Strip is NOT cleared
// first; anything there will be covered pixel by pixel. Pass in color
// (as a single 'packed' 32-bit value, which you can get by calling
// strip.Color(red, green, blue) as shown in the loop() function above),
// and a delay time (in milliseconds) between pixels.
void colorWipe(uint32_t color, int wait) {
  for (int i = 0; i < strip.numPixels(); i++) { // For each pixel in strip...
    strip.setPixelColor(i, color);         //  Set pixel's color (in RAM)
    strip.show();                          //  Update strip to match
    delay(wait);                           //  Pause for a moment
  }
}

// Theater-marquee-style chasing lights. Pass in a color (32-bit value,
// a la strip.Color(r,g,b) as mentioned above), and a delay time (in ms)
// between frames.
void theaterChase(uint32_t color, int wait) {
  for (int a = 0; a < 10; a++) { // Repeat 10 times...
    for (int b = 0; b < 3; b++) { //  'b' counts from 0 to 2...
      strip.clear();         //   Set all pixels in RAM to 0 (off)
      // 'c' counts up from 'b' to end of strip in steps of 3...
      for (int c = b; c < strip.numPixels(); c += 3) {
        strip.setPixelColor(c, color); // Set pixel 'c' to value 'color'
      }
      strip.show(); // Update strip with new contents
      delay(wait);  // Pause for a moment
    }
  }
}

// Rainbow cycle along whole strip. Pass delay time (in ms) between frames.
void rainbow(int wait) {
  // Hue of first pixel runs 5 complete loops through the color wheel.
  // Color wheel has a range of 65536 but it's OK if we roll over, so
  // just count from 0 to 5*65536. Adding 256 to firstPixelHue each time
  // means we'll make 5*65536/256 = 1280 passes through this outer loop:
  for (long firstPixelHue = 0; firstPixelHue < 5 * 65536; firstPixelHue += 256) {
    for (int i = 0; i < strip.numPixels(); i++) { // For each pixel in strip...
      // Offset pixel hue by an amount to make one full revolution of the
      // color wheel (range of 65536) along the length of the strip
      // (strip.numPixels() steps):
      int pixelHue = firstPixelHue + (i * 65536L / strip.numPixels());
      // strip.ColorHSV() can take 1 or 3 arguments: a hue (0 to 65535) or
      // optionally add saturation and value (brightness) (each 0 to 255).
      // Here we're using just the single-argument hue variant. The result
      // is passed through strip.gamma32() to provide 'truer' colors
      // before assigning to each pixel:
      strip.setPixelColor(i, strip.gamma32(strip.ColorHSV(pixelHue)));
    }
    strip.show(); // Update strip with new contents
    delay(wait);  // Pause for a moment
  }
}

// Rainbow-enhanced theater marquee. Pass delay time (in ms) between frames.
void theaterChaseRainbow(int wait) {
  int firstPixelHue = 0;     // First pixel starts at red (hue 0)
  for (int a = 0; a < 30; a++) { // Repeat 30 times...
    for (int b = 0; b < 3; b++) { //  'b' counts from 0 to 2...
      strip.clear();         //   Set all pixels in RAM to 0 (off)
      // 'c' counts up from 'b' to end of strip in increments of 3...
      for (int c = b; c < strip.numPixels(); c += 3) {
        // hue of pixel 'c' is offset by an amount to make one full
        // revolution of the color wheel (range 65536) along the length
        // of the strip (strip.numPixels() steps):
        int      hue   = firstPixelHue + c * 65536L / strip.numPixels();
        uint32_t color = strip.gamma32(strip.ColorHSV(hue)); // hue -> RGB
        strip.setPixelColor(c, color); // Set pixel 'c' to value 'color'
      }
      strip.show();                // Update strip with new contents
      delay(wait);                 // Pause for a moment
      firstPixelHue += 65536 / 90; // One cycle of color wheel over 90 frames
    }
  }
}
实验场景图 动态图


旨在为数千万中国开发者提供一个无缝且高效的云端环境,以支持学习、使用和贡献开源项目。
更多推荐


 3
3 0
0- 0


 已为社区贡献44条内容

所有评论(0)