C++ ubuntu环境下安装编译部署环境,用onnxruntime部署ppyoloe_r模型
在新安装的ubuntu环境下修改源、安装gcc和cmake,编译安装opencv,安装onnxruntime环境。并编写cmakelist文件,编译与运行ppyoloe_r模型。windows环境下onnx部署ppyoloe_r模型的代码可以参考https://blog.csdn.net/a486259/article/details/128151738,这里基于该代码进行linux适配,最终成功
在新安装的ubuntu环境下修改源、安装gcc和cmake,编译安装opencv,安装onnxruntime环境。并编写cmakelist文件,编译与运行ppyoloe_r模型。
windows环境下onnx部署ppyoloe_r模型的代码可以参考 https://blog.csdn.net/a486259/article/details/128151738,这里基于该代码进行linux适配,最终成功实现部署。
1、基础环境配置
1.1 更换源
参考一下链接,基于图形界面设置国内源即可
https://blog.csdn.net/u012206617/article/details/122321849
1.2 安装gcc
安装命令如下
sudo apt update
sudo apt install gcc-8
sudo apt install g++-8
查看安装效果 ls /usr/bin/gcc*
root@ubuntu:/home/xxx# ls /usr/bin/gcc*
/usr/bin/gcc-7  /usr/bin/gcc-ar-7  /usr/bin/gcc-nm-7  /usr/bin/gcc-ranlib-7
可以看到并没有生成gcc、g++的软链接。通过以下方式构建软链接,即可使用gcc、g++命令
cd /usr/bin
rm gcc
rm g++
sudo ln -s gcc-8 gcc
sudo ln -s g++-8 g++
1.3 安装cmake
sudo apt install cmake
检验cmake版本
root@ubuntu:/usr/bin# cmake --version
cmake version 3.10.2

CMake suite maintained and supported by Kitware (kitware.com/cmake).
root@ubuntu:/usr/bin#
2、运行环境配置
2.1 安装opencv
安装依赖包,参考https://blog.csdn.net/KIK9973/article/details/118830187,注意其博文中的cmake命令中多了个—D参数
sudo apt-get install build-essential
sudo apt-get install cmake git libgtk2.0-dev pkg-config libavcodec-dev libavformat-dev libswscale-dev
sudo apt-get install python-dev python-numpy libtbb2 libtbb-dev libjpeg-dev libpng-dev libtiff-dev libjasper-dev libdc1394-22-dev

wget https://www.witersen.com/wp-content/uploads/2022/03/opencv-4.5.5.tar.gz
wget https://www.witersen.com/wp-content/uploads/2022/03/opencv_contrib-4.5.5.tar.gz

unzip opencv_contrib-4.5.5.tar.gz
unzip opencv-4.5.5.tar.gz
使用以上命令安装 libjasper-dev可能会报错,参考https://blog.csdn.net/qq_31511955/article/details/115077907进行解决。主要是将ubuntu默认的源进行添加
add-apt-repository "deb http://security.ubuntu.com/ubuntu xenial-security main"
apt update
apt-get install software-properties-common
apt-get install libjasper-dev
将opencv_contrib-4.5.5重命名为opencv_contrib,然后拷贝到opencv-4.5.5目录下
cd opencv-4.5.5/
mkdir -p build
cd build

#不编译opencv_contrib cmake命令
cmake -D CMAKE_INSTALL_PREFIX=/usr/local -D CMAKE_BUILD_TYPE=Release -D OPENCV_GENERATE_PKGCONFIG=ON  -D OPENCV_ENABLE_NONFREE=True ..


#编译opencv_contrib cmake命令
cmake -D CMAKE_BUILD_TYPE=Release -D CMAKE_INSTALL_PREFIX=/usr/local  -D OPENCV_EXTRA_MODULES_PATH=../opencv_contrib/modules/ -D WITH_TBB=OFF  -D WITH_CUDA=OFF -D BUILD_opencv_gpu=OFF -D BUILD_opencv_gpuarithm=OFF -D OPENCV_GENERATE_PKGCONFIG=ON ..
输出以下内容则表示cmake配置成功
--   OpenCL:                        YES (no extra features)
--     Include path:                /home/xxx/opencv-4.7.0/3rdparty/include/opencl/1.2
--     Link libraries:              Dynamic load
--
--   Python (for build):            /usr/bin/python2.7
--
--   Java:
--     ant:                         NO
--     JNI:                         NO
--     Java wrappers:               NO
--     Java tests:                  NO
--
--   Install to:                    /usr/local
-- -----------------------------------------------------------------
--
-- Configuring done
-- Generating done
-- Build files have been written to: /home/xxx/opencv-4.7.0/build
项目配置成功后,进行make操作
make -j12
sudo make install
参考https://blog.csdn.net/KIK9973/article/details/118830187,实现对opencv的安装和环境测试。
编译心得
- 1、编译opencv时经常出错,先请确认一下章节
2.1 安装opencv中所需要的依赖包是否都正确安装好了 - 2、多线程编译报错时(如出现一下信息),可以多次执行make -j12命令;最好尝试make 命令,使用单线程进行编译
[ 95%] Building CXX object modules/gapi/CMakeFiles/opencv_test_gapi.dir/test/common/gapi_core_tests.cpp.o
c++: internal compiler error: Killed (program cc1plus)
Please submit a full bug report,
with preprocessed source if appropriate.
See <file:///usr/share/doc/gcc-7/README.Bugs> for instructions.
modules/gapi/CMakeFiles/opencv_perf_gapi.dir/build.make:206: recipe for target 'modules/gapi/CMakeFiles/opencv_perf_gapi.dir/perf/cpu/gapi_imgproc_perf_tests_cpu.cpp.o' failed
make[2]: *** [modules/gapi/CMakeFiles/opencv_perf_gapi.dir/perf/cpu/gapi_imgproc_perf_tests_cpu.cpp.o] Error 4
make[2]: *** Waiting for unfinished jobs....
[ 95%] Building CXX object modules/gapi/CMakeFiles/opencv_test_gapi.dir/test/common/gapi_imgproc_tests.cpp.o
c++: internal compiler error: Killed (program cc1plus)
Please submit a full bug report,
with preprocessed source if appropriate.
See <file:///usr/share/doc/gcc-7/README.Bugs> for instructions.
modules/gapi/CMakeFiles/opencv_test_gapi.dir/build.make:86: recipe for target 'modules/gapi/CMakeFiles/opencv_test_gapi.dir/test/common/gapi_core_tests.cpp.o' failed
make[2]: *** [modules/gapi/CMakeFiles/opencv_test_gapi.dir/test/common/gapi_core_tests.cpp.o] Error 4
make[2]: *** Waiting for unfinished jobs....
[ 95%] Building CXX object modules/python2/CMakeFiles/opencv_python2.dir/__/src2/cv2_util.cpp.o
[ 95%] Building CXX object modules/python2/CMakeFiles/opencv_python2.dir/__/src2/cv2_numpy.cpp.o
[ 95%] Building CXX object modules/python2/CMakeFiles/opencv_python2.dir/__/src2/cv2_convert.cpp.o
[ 95%] Building CXX object modules/python2/CMakeFiles/opencv_python2.dir/__/src2/cv2_highgui.cpp.o

c++: internal compiler error: Killed (program cc1plus)
Please submit a full bug report,
with preprocessed source if appropriate.
See <file:///usr/share/doc/gcc-7/README.Bugs> for instructions.
modules/gapi/CMakeFiles/opencv_test_gapi.dir/build.make:110: recipe for target 'modules/gapi/CMakeFiles/opencv_test_gapi.dir/test/common/gapi_imgproc_tests.cpp.o' failed
make[2]: *** [modules/gapi/CMakeFiles/opencv_test_gapi.dir/test/common/gapi_imgproc_tests.cpp.o] Error 4
CMakeFiles/Makefile2:8104: recipe for target 'modules/gapi/CMakeFiles/opencv_test_gapi.dir/all' failed
make[1]: *** [modules/gapi/CMakeFiles/opencv_test_gapi.dir/all] Error 2
make[1]: *** Waiting for unfinished jobs....
c++: internal compiler error: Killed (program cc1plus)
Please submit a full bug report,
with preprocessed source if appropriate.
See <file:///usr/share/doc/gcc-7/README.Bugs> for instructions.
modules/gapi/CMakeFiles/opencv_perf_gapi.dir/build.make:62: recipe for target 'modules/gapi/CMakeFiles/opencv_perf_gapi.dir/perf/common/gapi_core_perf_tests.cpp.o' failed
make[2]: *** [modules/gapi/CMakeFiles/opencv_perf_gapi.dir/perf/common/gapi_core_perf_tests.cpp.o] Error 4
CMakeFiles/Makefile2:8199: recipe for target 'modules/gapi/CMakeFiles/opencv_perf_gapi.dir/all' failed
make[1]: *** [modules/gapi/CMakeFiles/opencv_perf_gapi.dir/all] Error 2
博主使用单线程编译,最终100%通过

- 3、使用make install 可能会因为权限导致安装失败,可以将命令修改为sudo make install.

2.2 安装onnxruntime
这里以cpu版,非源码安装为实现案例。
在https://github.com/microsoft/onnxruntime/releases 中可以下载linux版的onnxruntime。这里下载onnxruntime-linux-x64-1.12.0.tgz 然后解压。
将lib目录下的so文件都拷贝到usr/local/lib/目录下
cd onnxruntime-linux-x64-1.12.0/lib
sudo cp * /usr/local/lib/
3、编写代码测试
3.1 编写c++代码
直接使用https://hpg123.blog.csdn.net/article/details/128151738?spm=1001.2014.3001.5502 导出的旋转框模型(ppyoloe_r)和博文中的c++代码
代码保存到src目录下,头文件和自己的动态库、静态库保存到include目录下。最终使整体的目录结构如下所示,其中ppyoloe_r_crn_s_3x_dota.onnx和t1.jpg是模型文件和图像,因为代码里写的是相对路径,故如此操作。
root@ubuntu:~/project1$ tree
.
├── build
├── CMakeLists.txt
├── include
└── src
    └── main.cpp

3 directories, 4 files
代码保存后要进行轻微修改,首先是将里面的 wchar_t 修改为char (因为linux没有wchar_t类型),
然后将第142行的output_node_dims.size()修改为k,并在该行前面插入代码: int k=output_node_dims.size();
此外,关于代码中的图片路径和模型路径可以按照个人实际情况修改。
3.2 编写CMakeLists.txt
project(myproject), 是设置项目的名称为myproject,最终编译的可执行文件也是myproject。
这里需要注意onnxruntime的路径,同时在target_link_libraries中看是否有自己的私有库需要链接。
cmake_minimum_required(VERSION 3.5.1)
#生成生成项目的名称

set_property(GLOBAL PROPERTY USE_FOLDERS ON)
set(CMAKE_SUPPRESS_REGENERATION FALSE)
#设置生成release项目
set(CMAKE_BUILE_TYPE RELEASE)
set(CMAKE_CXX_STANDARD 14)
# It prevents the decay to C++98 when the compiler does not support C++14
set(CMAKE_CXX_STANDARD_REQUIRED ON)
# It disables the use of compiler-specific extensions
# e.g. -std=c++14 rather than -std=gnu++14
set(CMAKE_CXX_EXTENSIONS OFF)
set(CMAKE_CXX_FLAGS "${CMAKE_CXX_FLAGS} -Wall")

set(ONNXRUNTIME_DIR  "/home/xxx/onnxruntime-linux-x64-gpu-1.12.0")
#set library path
find_package(OpenCV REQUIRED)

file(GLOB SOURCE_FILES src/*.cpp)
add_executable(${CMAKE_PROJECT_NAME} ${SOURCE_FILES})

include_directories(
    ${OpenCV_INCLUDE_DIRS}
    ${ONNXRUNTIME_DIR}/include
    /usr/local/include
    ${PROJECT_SOURCE_DIR}/include
)
link_directories(
    ${ONNXRUNTIME_DIR}/lib
    /usr/local/lib64
    /usr/local/lib
    ${PROJECT_SOURCE_DIR}/include
)

target_link_libraries (
    ${CMAKE_PROJECT_NAME}
    ${OpenCV_LIBS}
	onnxruntime
)
3.3 编译项目并运行
具体命令为:
cd build #进入目录
cmake … #配置父目录项目
make #编译项目
ls #查看编译结果,其中myproject就是编译好的可执行文件,与cmakelist中配置相同
root@ubuntu:~/project1$ cd build
root@ubuntu:~/project1/build$ cmake ..
-- Configuring done
-- Generating done
-- Build files have been written to: /home/xxx/project1/build
root@ubuntu:~/project1/build$ make
[100%] Built target myproject
root@ubuntu:~/project1/build$ ls
CMakeCache.txt  cmake_install.cmake  myproject                     t1.jpg
CMakeFiles      Makefile             ppyoloe_r_crn_s_3x_dota.onnx
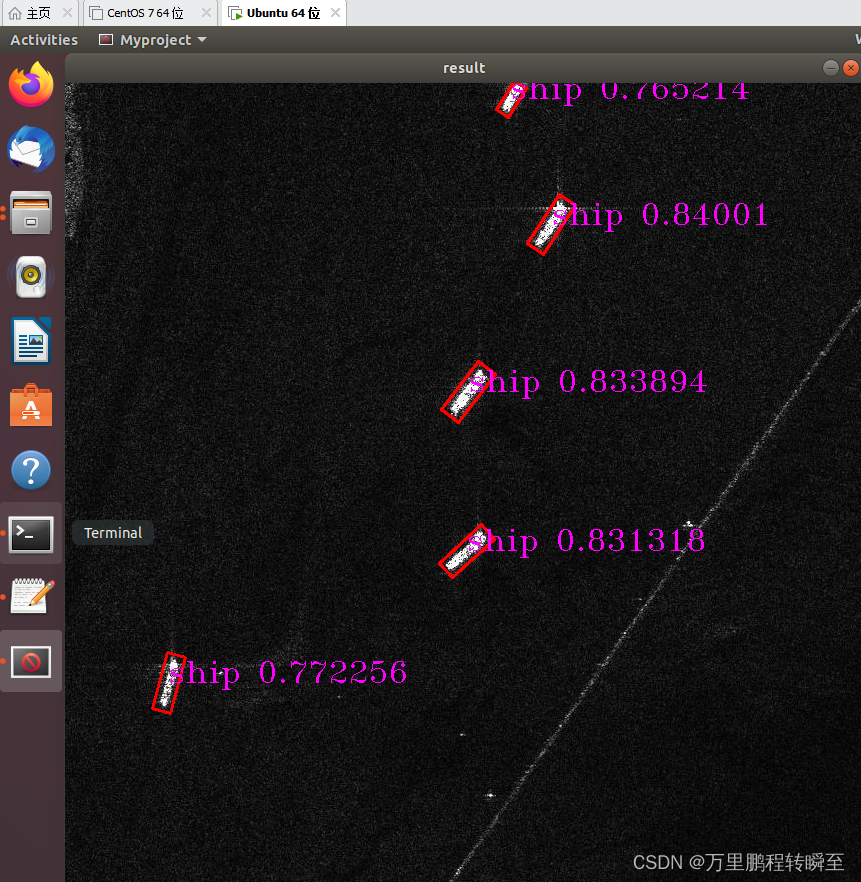
执行可执行文件,./myproject,程序输出如下
root@ubuntu:~/project1/build$ ./myproject
Structure message of model, input_nodes:1   output_nodes:2
Input0,  name=image,   num_dims:4,  shape:(-1,3,-1,-1,)  data_size:-3
Output0,  name=transpose_1.tmp_0,  num_dims:3,  shape:(-1,-1,2,)
Output1,  name=concat_21.tmp_0,  num_dims:3,  shape:(-1,-1,5,)
Gtk-Message: 01:48:32.428: Failed to load module "canberra-gtk-module"
所弹出的检测结如下,如果绘图的角度不对,请查看一下博文代码中第192行是否需要注释

更多推荐
 已为社区贡献2条内容


所有评论(0)