

这里是项目地址 https://github.com/dotnet-architecture/eShopOnContainers, 这是微软创建的一个基于 .NET 平台的微服务架构的示例应用程序,里面基本上市面上主流的时髦的技术都用上了。
因为涉及的内容比较多,所以我们只简单查看一下微服务的代码实现和 DockerFile 的编写,至于K8s,网关,鉴权等,我们不查看。
首先查看项目结构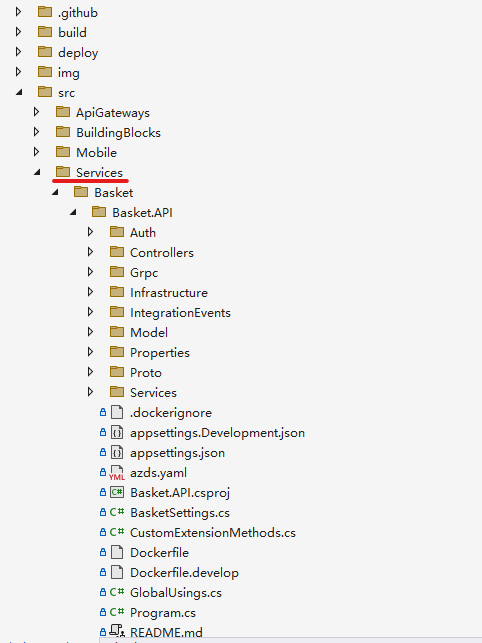
我们主要查看 Service 文件夹里面微服务的代码实现。具体来说也就是 Basket 购物车,catalog 商品目录,Ordering 订单微服务的实现。
查看 Basket.API 项目, Program.cs 和 Startup.cs 中的启动和配置我们直接跳过,直接查看 Controllers,下面是 BasketController 中 CheckoutAsync 方法的代码
[Route("checkout")]
[HttpPost]
[ProducesResponseType((int)HttpStatusCode.Accepted)]
[ProducesResponseType((int)HttpStatusCode.BadRequest)]
public async Task<ActionResult> CheckoutAsync([FromBody] BasketCheckout basketCheckout, [FromHeader(Name = "x-requestid")] string requestId)
{
    var userId = _identityService.GetUserIdentity();

    basketCheckout.RequestId = (Guid.TryParse(requestId, out Guid guid) && guid != Guid.Empty) ?
        guid : basketCheckout.RequestId;

    var basket = await _repository.GetBasketAsync(userId);

    if (basket == null)
    {
        return BadRequest();
    }

    var userName = this.HttpContext.User.FindFirst(x => x.Type == ClaimTypes.Name).Value;

    var eventMessage = new UserCheckoutAcceptedIntegrationEvent(userId, userName, basketCheckout.City, basketCheckout.Street,
        basketCheckout.State, basketCheckout.Country, basketCheckout.ZipCode, basketCheckout.CardNumber, basketCheckout.CardHolderName,
        basketCheckout.CardExpiration, basketCheckout.CardSecurityNumber, basketCheckout.CardTypeId, basketCheckout.Buyer, basketCheckout.RequestId, basket);

    // Once basket is checkout, sends an integration event to
    // ordering.api to convert basket to order and proceeds with
    // order creation process
    try
    {
        _eventBus.Publish(eventMessage);
    }
    catch (Exception ex)
    {
        _logger.LogError(ex, "ERROR Publishing integration event: {IntegrationEventId} from {AppName}", eventMessage.Id, Program.AppName);

        throw;
    }

    return Accepted();
}
该方法发送了一个集成事件,搜索 EventBus 的实现,我们发现有两个
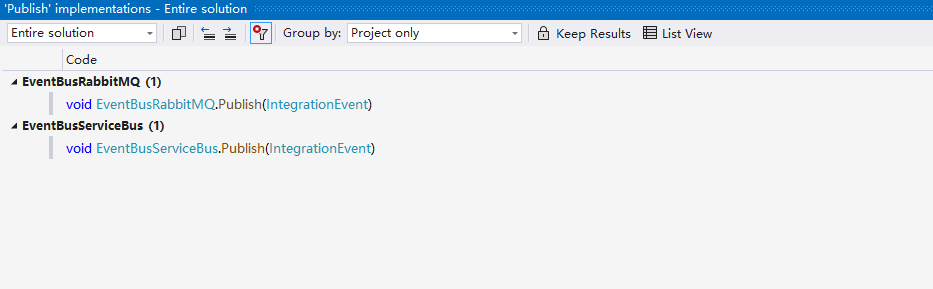
ServiceBus 是微软自己云服务的事件总线,我们查看 RabbitMQ 的实现,查看 Publish 方法
public void Publish(IntegrationEvent @event)
{
    if (!_persistentConnection.IsConnected)
    {
        _persistentConnection.TryConnect();
    }

    var policy = RetryPolicy.Handle<BrokerUnreachableException>()
        .Or<SocketException>()
        .WaitAndRetry(_retryCount, retryAttempt => TimeSpan.FromSeconds(Math.Pow(2, retryAttempt)), (ex, time) =>
        {
            _logger.LogWarning(ex, "Could not publish event: {EventId} after {Timeout}s ({ExceptionMessage})", @event.Id, $"{time.TotalSeconds:n1}", ex.Message);
        });

    var eventName = @event.GetType().Name;

    _logger.LogTrace("Creating RabbitMQ channel to publish event: {EventId} ({EventName})", @event.Id, eventName);

    using var channel = _persistentConnection.CreateModel();
    _logger.LogTrace("Declaring RabbitMQ exchange to publish event: {EventId}", @event.Id);

    channel.ExchangeDeclare(exchange: BROKER_NAME, type: "direct");

    var body = JsonSerializer.SerializeToUtf8Bytes(@event, @event.GetType(), new JsonSerializerOptions
    {
        WriteIndented = true
    });

    policy.Execute(() =>
    {
        var properties = channel.CreateBasicProperties();
        properties.DeliveryMode = 2; // persistent

            _logger.LogTrace("Publishing event to RabbitMQ: {EventId}", @event.Id);

        channel.BasicPublish(
            exchange: BROKER_NAME,
            routingKey: eventName,
            mandatory: true,
            basicProperties: properties,
            body: body);
    });
}
可以看到他利用 RetryPolicy 类创建了一个重试策略,当实际的发送动作抛出了 SocketException 的时候,进行重试。 RetryPolicy 类是 Polly 库提供的一个类,Poll 的仓库地址为 https://github.com/App-vNext/Polly。
这里指定发生 SocketException 以后重试的原因是为了方式应用程序已经启动而 RabbitMQ 还没有启动完成。然后其他的就没什么了,因为是简单的 CRUD 操作,所以使用的是贫血模型,并且使用 Redis 作为数据存储 DB。
然后再查看 Catalog.API 下面的 CatalogController 文件,我们注意到其没有注入任何域模型的 Repository,而是直接注入了 CatalogContext 这个 DbContext 的派生类(实际我也发现大部分时候 Repository 实际上没有什么用,还不如直接使用 DbContext,或许使用 Repository 的好处就是方便单元测试,毕竟 mock 一个 Repository 要比 mock 整个 DbContext 要简单)。
我们看到 UpdateProductAsync 方法
public async Task<ActionResult> UpdateProductAsync([FromBody] CatalogItem productToUpdate)
{
    var catalogItem = await _catalogContext.CatalogItems.SingleOrDefaultAsync(i => i.Id == productToUpdate.Id);

    if (catalogItem == null)
    {
        return NotFound(new { Message = $"Item with id {productToUpdate.Id} not found." });
    }

    var oldPrice = catalogItem.Price;
    var raiseProductPriceChangedEvent = oldPrice != productToUpdate.Price;

    // Update current product
    catalogItem = productToUpdate;
    _catalogContext.CatalogItems.Update(catalogItem);

    if (raiseProductPriceChangedEvent) // Save product's data and publish integration event through the Event Bus if price has changed
    {
        //Create Integration Event to be published through the Event Bus
        var priceChangedEvent = new ProductPriceChangedIntegrationEvent(catalogItem.Id, productToUpdate.Price, oldPrice);

        // Achieving atomicity between original Catalog database operation and the IntegrationEventLog thanks to a local transaction
        await _catalogIntegrationEventService.SaveEventAndCatalogContextChangesAsync(priceChangedEvent);

        // Publish through the Event Bus and mark the saved event as published
        await _catalogIntegrationEventService.PublishThroughEventBusAsync(priceChangedEvent);
    }
    else // Just save the updated product because the Product's Price hasn't changed.
    {
        await _catalogContext.SaveChangesAsync();
    }

    return CreatedAtAction(nameof(ItemByIdAsync), new { id = productToUpdate.Id }, null);
}
可以看到当产品价格发生了更改以后其首先保存了修改价格的实现和 DbContext 追踪的更改,然后发布了 ProductPriceChangedIntegrationEvent 这个集成事件,具体的我们查看
这两个方法的实现。
public async Task SaveEventAndCatalogContextChangesAsync(IntegrationEvent evt)
{
    _logger.LogInformation("----- CatalogIntegrationEventService - Saving changes and integrationEvent: {IntegrationEventId}", evt.Id);

    //Use of an EF Core resiliency strategy when using multiple DbContexts within an explicit BeginTransaction():
    //See: https://docs.microsoft.com/en-us/ef/core/miscellaneous/connection-resiliency
    await ResilientTransaction.New(_catalogContext).ExecuteAsync(async () =>
    {
        // Achieving atomicity between original catalog database operation and the IntegrationEventLog thanks to a local transaction
        await _catalogContext.SaveChangesAsync();
        await _eventLogService.SaveEventAsync(evt, _catalogContext.Database.CurrentTransaction);
    });
}

//>>>>>>>>>>>>>>>>>>>>>>>>>>>>>>>>>>>>>>>>>>

public async Task PublishThroughEventBusAsync(IntegrationEvent evt)
{
    try
    {
        _logger.LogInformation("----- Publishing integration event: {IntegrationEventId_published} from {AppName} - ({@IntegrationEvent})", evt.Id, Program.AppName, evt);

        await _eventLogService.MarkEventAsInProgressAsync(evt.Id);
        _eventBus.Publish(evt);
        await _eventLogService.MarkEventAsPublishedAsync(evt.Id);
    }
    catch (Exception ex)
    {
        _logger.LogError(ex, "ERROR Publishing integration event: {IntegrationEventId} from {AppName} - ({@IntegrationEvent})", evt.Id, Program.AppName, evt);
        await _eventLogService.MarkEventAsFailedAsync(evt.Id);
    }
}
可以看到 SaveEventAndCatalogContextChangesAsync 方法首先保存了 CatalogContext 追踪的所有更改,然后保存了集成事件事件到数据库,而此时集成事件实际上还没有被发布。
可以看到 PublishThroughEventBusAsync 实际发送了事件,并且标记了事件的状态,这是为了最终一致性而做的工作,也许还需要一个后台任务自动重发处理失败的事件。
然后看到 Ordering.API,我们首先看看其对集成事件是如何处理的。看到 Startup 中的 ConfigureEventBus 方法
private void ConfigureEventBus(IApplicationBuilder app)
{
    var eventBus = app.ApplicationServices.GetRequiredService<BuildingBlocks.EventBus.Abstractions.IEventBus>();

    eventBus.Subscribe<UserCheckoutAcceptedIntegrationEvent, IIntegrationEventHandler<UserCheckoutAcceptedIntegrationEvent>>();
    eventBus.Subscribe<GracePeriodConfirmedIntegrationEvent, IIntegrationEventHandler<GracePeriodConfirmedIntegrationEvent>>();
    eventBus.Subscribe<OrderStockConfirmedIntegrationEvent, IIntegrationEventHandler<OrderStockConfirmedIntegrationEvent>>();
    eventBus.Subscribe<OrderStockRejectedIntegrationEvent, IIntegrationEventHandler<OrderStockRejectedIntegrationEvent>>();
    eventBus.Subscribe<OrderPaymentFailedIntegrationEvent, IIntegrationEventHandler<OrderPaymentFailedIntegrationEvent>>();
    eventBus.Subscribe<OrderPaymentSucceededIntegrationEvent, IIntegrationEventHandler<OrderPaymentSucceededIntegrationEvent>>();
}
实际上主要是 IntegrationEvent 和 IIntegrationEventHandler 接口,通过 Subscribe 方法注册,我们仍然查看 EventBusRabbitMQ(EventBus 的其中一个实现)。
当调用 Subscribe 方法时候,判断事件处理器是否已经存在,如果不存在将其添加到 IEventBusSubscriptionsManager,然后注册消息处理的回调。回调函数主要的中一个主要的函数就是 ProcessEvent 函数,我们可以简单看看
private async Task ProcessEvent(string eventName, string message)
{
    _logger.LogTrace("Processing RabbitMQ event: {EventName}", eventName);

    if (_subsManager.HasSubscriptionsForEvent(eventName))
    {
        await using var scope = _autofac.BeginLifetimeScope(AUTOFAC_SCOPE_NAME);
        var subscriptions = _subsManager.GetHandlersForEvent(eventName);
        foreach (var subscription in subscriptions)
        {
            if (subscription.IsDynamic)
            {
                if (scope.ResolveOptional(subscription.HandlerType) is not IDynamicIntegrationEventHandler handler) continue;
                using dynamic eventData = JsonDocument.Parse(message);
                await Task.Yield();
                await handler.Handle(eventData);
            }
            else
            {
                var handler = scope.ResolveOptional(subscription.HandlerType);
                if (handler == null) continue;
                var eventType = _subsManager.GetEventTypeByName(eventName);
                var integrationEvent = JsonSerializer.Deserialize(message, eventType, new JsonSerializerOptions() { PropertyNameCaseInsensitive = true });
                var concreteType = typeof(IIntegrationEventHandler<>).MakeGenericType(eventType);

                await Task.Yield();
                await (Task)concreteType.GetMethod("Handle").Invoke(handler, new object[] { integrationEvent });
            }
        }
    }
    else
    {
        _logger.LogWarning("No subscription for RabbitMQ event: {EventName}", eventName);
    }
}
我们直接看不是 IDynamicIntegrationEventHandler 的情况,也就是 else 的那一部分。可以看到实际上这部分很简单,也就是将对应的 EventHandler 从 IOC 容器中取出,然后直接调用其的 Handle 方法
就可以了。不过 Task.Yield() 调用在这里是干什么呢?这里是让出当前线程,然后让后面的那一部分,也就是 Invoke Handle 方法的工作重新排队。
TODO MediaR 的使用
TODO 实现 CQRS
TODO Docker Docker-compose


 已为社区贡献2条内容

所有评论(0)