Faceswap文档之---部署安装
本篇博客,记录了部署github上的明星项目faceswap的过程,和一些踩坑记录。这个项目可以很好的实现视频换脸,感兴趣同学可以试一下。说明:本篇文章我将项目部署在linux操作系统进行使用的,因为我们公司服务器性能更好一点。当前时间版本:2022年3月
前言
本篇博客,记录了部署github上的明星项目faceswap的过程,和一些踩坑记录。这个项目可以很好的实现视频换脸,感兴趣同学可以试一下。
说明:本篇文章我将项目部署在linux操作系统进行使用的,因为我们公司服务器性能更好一点。
当前时间版本:2022年3月

https://github.com/deepfakes/faceswap![]() https://github.com/deepfakes/faceswap
https://github.com/deepfakes/faceswap
关于视频换脸的大概原理,如果你感兴趣也想要知道的话,可以通过这个几分钟的视频大概了解。
AI 换脸的原理 - 知乎知乎,中文互联网高质量的问答社区和创作者聚集的原创内容平台,于 2011 年 1 月正式上线,以「让人们更好的分享知识、经验和见解,找到自己的解答」为品牌使命。知乎凭借认真、专业、友善的社区氛围、独特的产品机制以及结构化和易获得的优质内容,聚集了中文互联网科技、商业、影视、时尚、文化等领域最具创造力的人群,已成为综合性、全品类、在诸多领域具有关键影响力的知识分享社区和创作者聚集的原创内容平台,建立起了以社区驱动的内容变现商业模式。![]() https://www.zhihu.com/zvideo/1417898689550053376
https://www.zhihu.com/zvideo/1417898689550053376
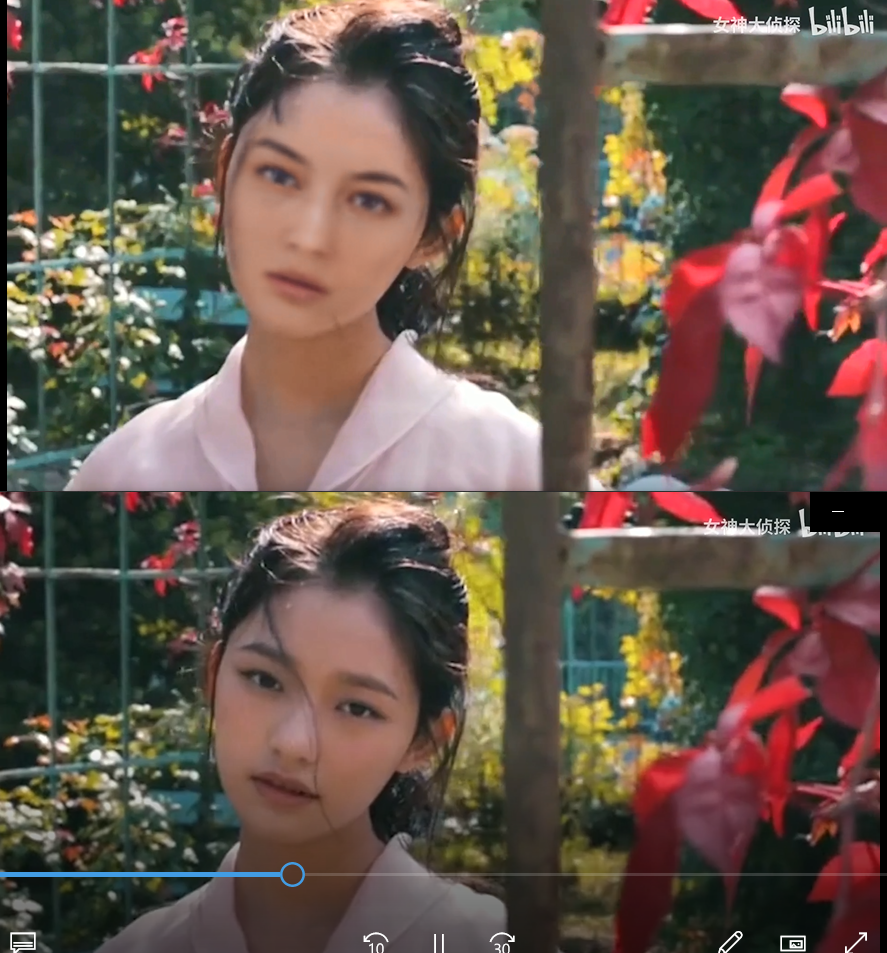
效果展示
我使用stylegan2生成了一个世界上不存在的人,各种方位角度的人脸图片160多张

对对抗神经网络生成图片感兴趣,可以参考以下链接,关于stylegan2的项目:
G-Lab人脸生成实验![]() http://www.seeprettyface.com/index.html
http://www.seeprettyface.com/index.html
将一个美女视频的脸换成了这个生成不存在的人脸,效果在下边:
原视频:林允唯美写真_哔哩哔哩_bilibili林允唯美写真视频片段 https://www.bilibili.com/video/BV1ZZ4y1n7gU换脸片段视频:out2_哔哩哔哩_bilibiliout2
 https://www.bilibili.com/video/BV1PZ4y167pR
感觉很有趣是不是,那就来安装试一试吧。
部署文档
git上的项目提供了 Install.md ,详细讲解了项目部署的过程,但是全英文就让人看的很头疼,所以我翻译了一下,我认为全篇读一下,有助于你部署的时候遇到困到,可以想到其他的方法解决困难。
引用块为译文:个人英语水平有限,大家最好对照原文灵活理解。
Prerequisites 先决条件
Machine learning essentially involves a ton of trial and error. You're letting a program try millions of different settings to land on an algorithm that sort of does what you want it to do. This process is really really slow unless you have the hardware required to speed this up.
机器学习本质上涉及大量的试验和错误。你让一个程序尝试数百万种不同的设置,以得到一个能完成你想让它做的事情的算法。这个过程非常非常慢,除非您有必要的硬件来加速这个过程。
The type of computations that the process does are well suited for graphics cards, rather than regular processors. It is pretty much required that you run the training process on a desktop or server capable GPU. Running this on your CPU means it can take weeks to train your model, compared to several hours on a GPU.
该过程所进行的计算类型非常适合显卡,而不是常规处理器。这非常需要你在桌面或服务器GPU上运行训练过程。在你的CPU上运行这意味着它可能需要几周的时间来训练你的模型,而在GPU上只需几个小时。
Hardware Requirements 硬件需求
TL;DR: you need at least one of the following:
A powerful CPU
Laptop CPUs can often run the software, but will not be fast enough to train at reasonable speeds
笔记本电脑的cpu通常可以运行该软件,但速度不够快,无法以合理的速度训练。
A powerful GPU
Currently, Nvidia GPUs are fully supported. and AMD graphics cards are partially supported through plaidML.
目前,完全支持Nvidia的gpu。和AMD显卡部分支持通过plaidML。
If using an Nvidia GPU, then it needs to support at least CUDA Compute Capability 3.5. (Release 1.0 will work on Compute Capability 3.0) To see which version your GPU supports, consult this list: CUDA GPUs | NVIDIA Developer Desktop cards later than the 7xx series are most likely supported.
如果使用Nvidia GPU,那么它至少需要支持CUDA计算能力3.5。(版本1.0将适用于计算能力3.0)要查看您的GPU支持哪个版本,请参考:https://developer.nvidia.com/cuda-gpus
Supported operating systems支持的操作系统
Windows 10 Windows 7 and 8 might work. Your mileage may vary. Windows has an installer which will set up everything you need. See: https://github.com/deepfakes/faceswap/releases
Windows 10 Windows 7和8可能可以。你的版本可能会不一致。对于Windows系统有一个安装程序,可以设置你需要的一切。参见:https://github.com/deepfakes/faceswap/releases
Linux Most Ubuntu/Debian or CentOS based Linux distributions will work.
Linux大多数基于Ubuntu/Debian或CentOS的Linux发行版都可以运行。
macOS GPU support on macOS is limited due to lack of drivers/libraries from Nvidia.
macOS的GPU支持在macOS上是有限的,因为缺少来自Nvidia的驱动程序/库。
Alternatively, there is a docker image that is based on Debian。
另外,(为方便部署)git社区还可以提供一个基于Debian的docker镜像。
Linux and Windows Install Guide Linux和Windows安装指南
Installer 下载器
Windows and Linux now both have an installer which installs everything for you and creates a desktop shortcut to launch straight into the GUI. You can download the installer from https://github.com/deepfakes/faceswap/releases.
If you have issues with the installer then read on for the more manual way to install faceswap on Windows.
Windows和Linux现在都有一个安装程序,可以为你安装所有的东西,并创建一个桌面快捷方式,直接启动到GUI。您可以从https://github.com/deepfakes/faceswap/releases下载安装程序。
如果你的安装程序有问题,请继续阅读Windows上安装faceswap的更多手动方式。
Manual Install 手动安装指南
(如果你使用提供的下载器安装系统环境出问题,可以使用手动安装)
Setting up faceswap can seem a little intimidating to new users, but it isn't that complicated, although a little time consuming. It is recommended to use Linux where possible as Windows will hog about 20% of your GPU Memory, making faceswap run a little slower, however using Windows is perfectly fine and 100% supported.
对新用户来说,部署faceswap环境的过程可能有点吓人,但它并不复杂,虽然有点耗时。建议在可能的情况下使用Linux系统,因为Windows会占用20%的GPU内存,让换脸运行得稍微慢一些,当然用Windows也完全没问题,而且100%支持。
Prerequisites 手动安装的先决条件
Anaconda(anaconda是python环境管工具)
Download and install the latest Python 3 Anaconda from: Anaconda | Individual Edition. Unless you know what you are doing, you can leave all the options at default.
https://www.anaconda.com/download/下载并安装最新的Python 3 Anaconda。在安装conda的过程中,安装选项都可以选择默认设置。如果您知道自己在做什么,可以自定义选择
Git
Download and install Git for Windows: Git - Downloading Package. Unless you know what you are doing, you can leave all the options at default.
下载并安装Windows版本的Git: https://git-scm.com/download/win。在安装Git的过程中,安装选项都可以选择默认设置。如果您知道自己在做什么,可以自定义选择
Setup
Reboot your PC, so that everything you have just installed gets registered.
重新启动你的电脑,这样你刚刚安装的所有东西都会被注册。
安装好之后,开始设置conda环境
Set up a virtual environment设置虚拟环境
Open up Anaconda Navigator
Select "Environments" on the left hand side
Select "Create" at the bottom
打开Anaconda Navigator
选择左侧的“Environments”
选择底部的“创建”
In the pop up:
Give it the name: faceswap
IMPORTANT: Select python version 3.8
Hit "Create" (NB: This may take a while as it will need to download Python)
设置位置在顶部:
给conda环境起个名字:faceswap
重点:选择python 3.8版本
点击“创建”(注意:这可能需要一段时间,因为它将需要下载Python)

Entering your virtual environment进入虚拟环境
To enter the virtual environment:
Open up Anaconda Navigator
Select "Environments" on the left hand side
Hit the ">" arrow next to your faceswap environment and select "Open Terminal"
要进入虚拟环境:
打开Anaconda Navigator
选择左侧的“Environments”
点击换脸环境旁边的“>”箭头并选择“Open Terminal”意为打开终端
faceswap 获取faceswap代码
If you are not already in your virtual environment follow these steps
Get the faceswap repo by typing: git clone --depth 1 https://github.com/deepfakes/faceswap.git
Enter the faceswap folder: cd faceswap
如果您还没有进入虚拟环境,可以进行以下步骤
通过输入:git clone --depth 1 https://github.com/deepfakes/faceswap.git获取faceswap 代码
进入faceswap项目文件夹 : cd faceswap
Easy install 进入代码文件 ,代码文件中有一个自动部署依赖环境的脚本,运行可以自动安装好环境依赖
Enter the command python setup.py and follow the prompts:
If you have issues/errors follow the Manual install steps below.
输入命令python setup.py,并按照提示执行(这个python脚本可以自动安装依赖环境):
如果您使用脚本有问题/错误,请按照下面的手动安装步骤继续进行。
Manual install手动安装
Do not follow these steps if the Easy Install above completed succesfully. If you are using an Nvidia card make sure you have the correct versions of Cuda/cuDNN installed for the required version of Tensorflow
如果上面的使用脚本安装成功完成,就不需要在进行手动安装过程了。另外提醒一点如果您使用的是英伟达卡,请确保您安装了正确版本的Cuda/cuDNN所需版本的Tensorflow,(需要的版本再开头讲到过)
Install tkinter (required for the GUI) by typing: conda install tk
如果要可视化界面GUI的话,需要conda安装tK命令如上
Install requirements:
For Nvidia GPU users: pip install -r requirements_nvidia.txt
For AMD GPU users: pip install -r requirements_amd.txt
For CPU users: pip install -r requirements_cpu.txt
对于不同版本GPU系统的pip安装依赖命令如上
Running faceswap 运行faceswap (环境安装完成后)
If you are not already in your virtual environment follow these steps
Enter the faceswap folder: cd faceswap
Enter the following to see the list of commands: python faceswap.py -h or enter python faceswap.py gui to launch the GUI
如果您还没有进入虚拟环境,请执行以下步骤
进入faceswap文件夹:cd faceswap
输入以下命令查看命令列表:python facswap .py -h或输入python facswap .py gui启动GUI
Create a desktop shortcut创建桌面快捷方式
A desktop shortcut can be added to easily launch straight into the faceswap GUI:
可以添加一个桌面快捷方式来轻松地直接启动到换面GUI:
Open Notepad
Paste the following:
%USERPROFILE%\Anaconda3\envs\faceswap\python.exe %USERPROFILE%/faceswap/faceswap.py gui
Save the file to your desktop as "faceswap.bat"
打开记事本
粘贴代码如上
将文件以“faceswap.bat”的形式保存到桌面即可生成快捷方式
Updating faceswap 关于更新faceswap
It's good to keep faceswap up to date as new features are added and bugs are fixed. To do so:
If using the GUI you can go to the Help menu and select "Check for Updates...". If updates are available go to the Help menu and select "Update Faceswap". Restart Faceswap to complete the update.
If you are not already in your virtual environment follow these steps
Enter the faceswap folder: cd faceswap
Enter the following git pull --all
Once the latest version has downloaded, make sure your dependencies are up to date. There is a script to help with this: python update_deps.py
随着新功能的添加和bug的修复,保持代码的更新是很好的。如何跟新,你可以这样做:
如果使用GUI,你可以进入帮助菜单并选择“检查更新”。如果有更新,请转到“帮助”菜单并选择“更新Faceswap”。重新启动Faceswap以完成更新。
使用git跟新的话,请执行以下步骤
输入faceswap文件夹:cd faceswap
输入以下git pull --all
下载了最新版本后,请确保您的依赖项是最新的。有一个脚本可以帮助解决这个问题:python update_ps .py
Run the project运行该项目
Once all these requirements are installed, you can attempt to run the faceswap tools. Use the -h or --help options for a list of options.
安装所有这些需求之后,您可以尝试运行faceswap工具。对选项列表使用-h或--help选项。可以查看帮助说明
or run with gui to launch the GUI
python faceswap.py gui
Proceed to ../blob/master/USAGE.md
或者运行gui来启动gui,命令如下
python faceswap.py gui
成功装好程序之后,为了进一步学习如何使用它,可以查看usage.md 说明文件。
部署过程中我踩到的坑
我在linux 系统中安装部署时,使用的官方提供的faceswap_setup_x64.sh脚本自动化的安装环境。在运行faceswap_setup_x64.sh 脚本时运行报错:
![]()
表示需要用普通用户身份运行sh文件。为了安全起见,脚本不能用root用户运行,可能会修改了一些相关环境的东西。
创建的普通用户后
按照提示创建成功:

上边的必要步骤完成后,就算时安装完成了,接下来就是学习如何使用faceswap 来打开新世界的大门了。
faceswap的使用方法,我会专门总结在我的下一篇博客
Facewap文档之---使用手册
Faceswap文档之---使用手册_卖香油的少掌柜的博客-CSDN博客本篇博客,记录了使用github上的明星项目faceswap的过程,和一些踩坑记录。这个项目可以很好的实现视频换脸,感兴趣同学可以试一下。说明:本篇文章我将项目部署在linux操作系统进行使用的,因为我们公司服务器性能更好一点。当前时间版本:2022年3月https://blog.csdn.net/qq_58832911/article/details/123579478

为开发者提供学习成长、分享交流、生态实践、资源工具等服务,帮助开发者快速成长。
更多推荐


 2
2 0
0- 0


 已为社区贡献1条内容

所有评论(0)