
发现一款数据备份恢复神器!开源免费、快速高效、安全
点击下方公众号「关注」和「星标」回复“1024”获取独家整理的学习资料!简介restic 是一个快速、高效和安全的备份程序。它支持三大操作系统(Linux、macOS、Windows)和一...
点击下方公众号「关注」和「星标」
回复“1024”获取独家整理的学习资料!

简介
restic 是一个快速、高效和安全的备份程序。它支持三大操作系统(Linux、macOS、Windows)和一些较小的操作系统(FreeBSD、OpenBSD)。它使用 go 编程语言编写,使用 AES-256 对数据进行加密,并使用 Poly1305-AES 对数据进行身份验证。
github地址:https://github.com/restic/restic
设计原则
Restic 是一个可以正确进行备份的程序,其设计遵循以下原则:
简单:备份应该是一个顺畅的过程,否则您可能会想跳过它。Restic 应该易于配置和使用,以便在数据丢失的情况下,您可以直接恢复它。同样,恢复数据不应该很复杂。
快速:使用 restic 备份数据应仅受网络或硬盘带宽的限制,以便您可以每天备份文件。如果需要太多时间,没有人会进行备份。恢复备份应该只传输要恢复的文件所需的数据,这样这个过程也很快。
可验证:比备份更重要的是恢复,所以 restic 使您可以轻松验证所有数据是否可以恢复。
安全:Restic 使用加密技术来保证您数据的机密性和完整性。假设备份数据的存储位置不是受信任的环境(例如,系统管理员等其他人可以访问您的备份的共享空间)。Restic 旨在保护您的数据免受此类攻击者的侵害。
高效:随着数据的增长,额外的快照应该只占用实际增量的存储。更重要的是,在将重复数据实际写入存储后端之前,应该对其进行去重,以节省宝贵的备份空间。
安装
CentOS
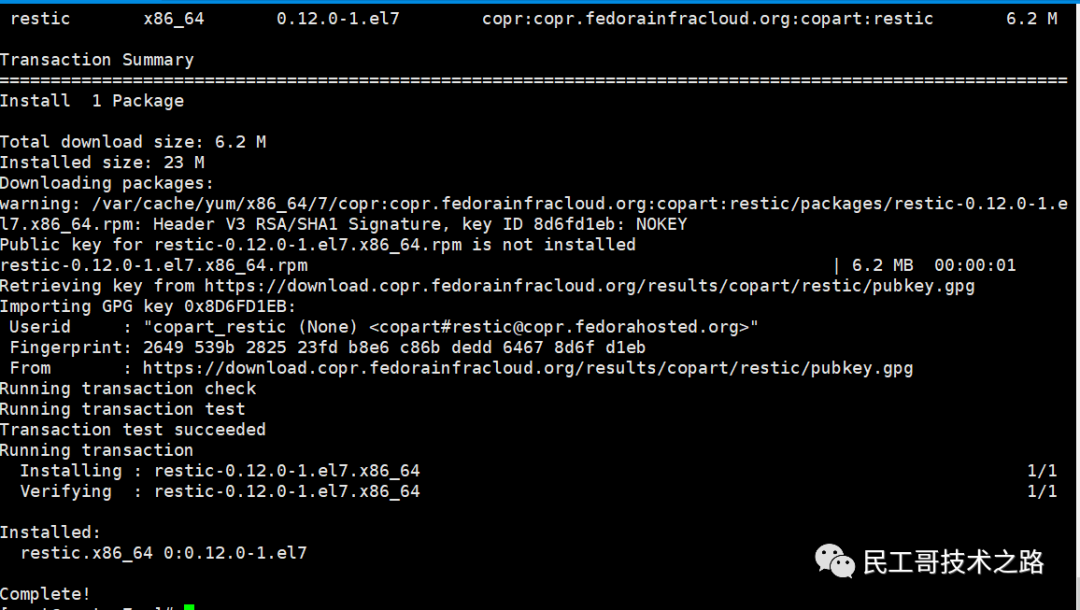
[root@centos7 ~]# yum install yum-plugin-copr -y
[root@centos7 ~]# yum copr enable copart/restic -y
Loaded plugins: copr, fastestmirror
copr done
[root@centos7 ~]# yum install restic -y
如果上面的安装出现错误,请执行下面的命令解决源的问题
[root@centos7 ~]# yum-config-manager --add-repo https://copr.fedorainfracloud.org/coprs/copart/restic/repo/epel-7/copart-restic-epel-7.repo
Loaded plugins: fastestmirror
adding repo from: https://copr.fedorainfracloud.org/coprs/copart/restic/repo/epel-7/copart-restic-epel-7.repo
grabbing file https://copr.fedorainfracloud.org/coprs/copart/restic/repo/epel-7/copart-restic-epel-7.repo to /etc/yum.repos.d/copart-restic-epel-7.repo
repo saved to /etc/yum.repos.d/copart-restic-epel-7.repo
macOS
# brew
$ brew install restic

# macprots
$ sudo port install restic
更多安装方式请参考:https://restic.readthedocs.io/en/latest/020_installation.html#stable-releases
配置备份存储库
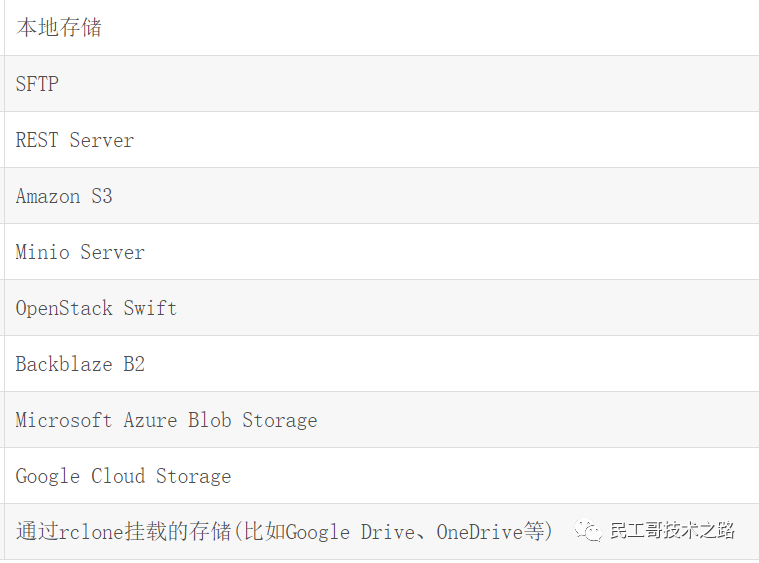
保存备份的位置称为“存储库”。存储库可以存储在本地,也可以存储在某个远程服务器或服务上。支持以下几种存储方式:
对于自动备份,restic 接受环境变量中的存储库位置RESTIC_REPOSITORY。Restic 还可以从通过--repository-file选项或环境变量指定的文件中读取存储库位置RESTIC_REPOSITORY_FILE。
对于密码,有几个选项:
设置环境变量 RESTIC_PASSWORD
通过选项--password-file或环境变量指定带有密码的文件路径 RESTIC_PASSWORD_FILE
通过选项--password-command或环境变量 配置需要密码时调用的程序RESTIC_PASSWORD_COMMAND
创建本地存储库
以创建本地存储库为例
[root@centos7 ~]# restic init --repo /restic/backup_dir
enter password for new repository:
enter password again:
created restic repository dff64d39c6 at /restic/backup_dir

Please note that knowledge of your password is required to access
the repository. Losing your password means that your data is
irrecoverably lost.
#提示很明白,让你记住在此处输入的密码,丢掉密码就是丢掉了数据
其它存储库创建方式请参考官方文档:https://restic.readthedocs.io/en/latest/030_preparing_a_new_repo.html
备份实操
备份目录data下的内容到存储库
[root@centos7 ~]# restic -r /restic/backup_dir --verbose backup ./data
open repository
enter password for repository:
repository dff64d39 opened successfully, password is correct
created new cache in /root/.cache/restic
lock repository
load index files
no parent snapshot found, will read all files
start scan on [./data]
start backup on [./data]
scan finished in 1.455s: 2922 files, 71.126 MiB

Files:        2922 new,     0 changed,     0 unmodified
Dirs:           99 new,     0 changed,     0 unmodified
Data Blobs:   2889 new
Tree Blobs:     99 new
Added to the repo: 72.083 MiB

processed 2922 files, 71.126 MiB in 0:05  #备份的文件数及大小
snapshot 4d20711e saved                   #创建了文件快照

--verbose #输出过程信息
也可以备份单个文件
[root@centos7 ~]# ls ./data
goInception-linux-amd64-v1.2.3.tar.gz  httpd-2.4.6-95.el7.centos.x86_64.rpm  mingongge.z02
httpd-2.4.46                           mingongge.file                        mingongge.zip
httpd-2.4.46.tar.gz                    mingongge.z01
[root@centos7 ~]# restic -r /restic/backup_dir --verbose backup ./data/mingongge.zip
open repository
enter password for repository:
repository dff64d39 opened successfully, password is correct
lock repository
load index files
no parent snapshot found, will read all files
start scan on [./data/mingongge.zip]
start backup on [./data/mingongge.zip]
scan finished in 0.249s: 1 files, 942.793 KiB

Files:           1 new,     0 changed,     0 unmodified
Dirs:            1 new,     0 changed,     0 unmodified
Data Blobs:      0 new
Tree Blobs:      2 new
Added to the repo: 750 B

processed 1 files, 942.793 KiB in 0:00
snapshot 3e5b7dea saved
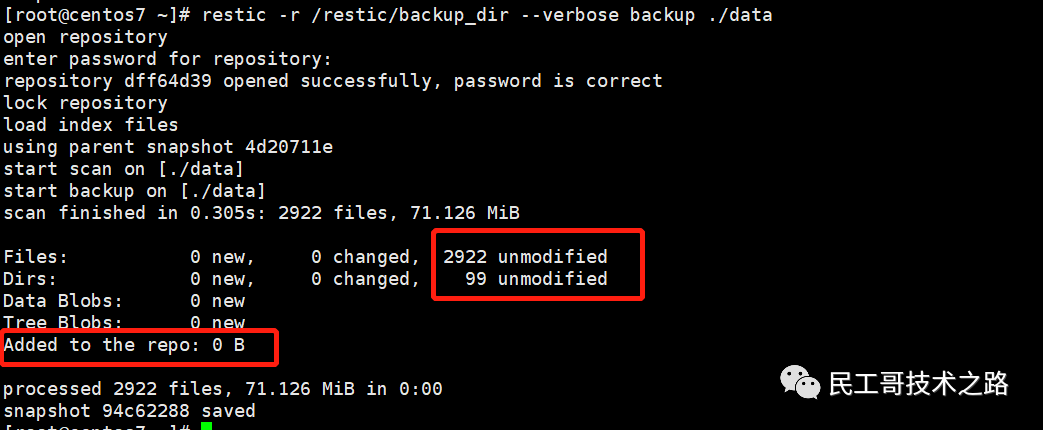
如果你再次执行第一步的备份命令,会发现它不再增加内容,只是为当前的数据再增加一个快照。其实,restic它具有扫描文件的功能(逐个文件扫描比对),所以restic只会备份存储一次相同的数据。
文件检测功能
扫描每个文件的全部内容,非常浪费资源,所以 restic 还使用基于文件元数据的更改检测规则来确定文件自上次备份以来是否可能未更改,如果是,则不会再次扫描文件。
在Unix(包括 Linux 和 Mac)上,鉴于文件与先前备份中的文件位于同一位置,以下文件元数据属性必须匹配才能假定其内容未更改:
修改时间戳(mtime)
元数据更改时间戳 (ctime)
文件大小
inode 编号(用于引用文件系统中的文件的内部编号)
所以,基于上述的原因,引入一些参数,如下:
--force         #关闭更改检测,重新扫描全部文件
--ignore-ctime #要求 mtime 匹配,但允许 ctime 不同
--ignore-inode #要求 mtime 匹配,但允许 inode number 和 ctime 不同
排除文件参数
--exclude   #指定一次或多次排除一个或多个项
--iexclude #与exclude相同,但忽略路径的情况
--exclude-caches #指定一次排除包含特殊文件的文件夹
--exclude-file   #指定一次排除包含特殊文件的文件夹
--iexclude-file   #与exclude-file相同,但忽略路径的情况
--exclude-if-present foo   #排除文件夹包含名为foo的文件
--exclude-larger-than size #指定一次以排除大于给定大小的文件
更多相关的功能请参考:https://restic.readthedocs.io/en/latest/040_backup.html
存储库使用
既然数据备份到了存储库,所以,我们也需要去使用存储库,下面来介绍相关的操作。
列出存储库的所有快照
这个功能和平时在系统上使用ls命令相同,查看显示的功能
[root@centos7 ~]# restic -r /restic/backup_dir/ snapshots
enter password for repository:
repository dff64d39 opened successfully, password is correct
ID        Time                 Host        Tags        Paths
-------------------------------------------------------------------------------
4d20711e  2021-06-04 03:40:47  centos7                 /root/data
3e5b7dea  2021-06-04 03:46:34  centos7                 /root/data/mingongge.zip
94c62288  2021-06-04 03:51:21  centos7                 /root/data
-------------------------------------------------------------------------------
3 snapshots

#还可以使用下面的参数进行过滤匹配查看
--path="dir_name"
--host hostname
#通过相同的过滤器(主机、路径、标签)对输出进行分组
--group-by
更多内容请参考:https://restic.readthedocs.io/en/latest/045_working_with_repos.html
检测存储库数据
[root@centos7 ~]# restic -r /restic/backup_dir/ check
using temporary cache in /tmp/restic-check-cache-294136679
enter password for repository:
repository dff64d39 opened successfully, password is correct
created new cache in /tmp/restic-check-cache-294136679
create exclusive lock for repository
load indexes
check all packs
check snapshots, trees and blobs
[0:00] 100.00%  3 / 3 snapshots
no errors were found
数据恢复
这个才是重点啊,恢复数据才是王炸。
创建模拟数据删除的环境
[root@centos7 ~]# cd data/
[root@centos7 data]# ll
total 33796
-rw-r--r--  1 root root 13034487 Aug 30  2020 goInception-linux-amd64-v1.2.3.tar.gz
drwxr-sr-x 11 root   40     4096 Dec 24 22:35 httpd-2.4.46
-rw-r--r--  1 root root  9363314 Aug  5  2020 httpd-2.4.46.tar.gz
-rw-r--r--  1 root root  2846172 Oct 14  2020 httpd-2.4.6-95.el7.centos.x86_64.rpm
-rw-r--r--  1 root root        0 Jan 16 11:32 mingongge.file
-rw-r--r--  1 root root  4194304 Jan 16 16:24 mingongge.z01
-rw-r--r--  1 root root  4194304 Jan 16 16:24 mingongge.z02
-rw-r--r--  1 root root   965420 Jan 16 16:24 mingongge.zip
[root@centos7 data]# rm -rf ./*
[root@centos7 data]# ll
total 0
恢复数据
直接从快照恢复误删除的数据
[root@centos7 ~]# restic -r /restic/backup_dir/ restore 4d20711e --target /root/
enter password for repository:
repository dff64d39 opened successfully, password is correct
restoring <Snapshot 4d20711e of [/root/data] at 2021-06-04 03:40:47.878873654 -0400 EDT by root@centos7> to /root/
[root@centos7 ~]# ll /root/data/
total 33796
-rw-r--r--  1 root root 13034487 Aug 30  2020 goInception-linux-amd64-v1.2.3.tar.gz
drwxr-sr-x 11 root   40     4096 Dec 24 22:35 httpd-2.4.46
-rw-r--r--  1 root root  9363314 Aug  5  2020 httpd-2.4.46.tar.gz
-rw-r--r--  1 root root  2846172 Oct 14  2020 httpd-2.4.6-95.el7.centos.x86_64.rpm
-rw-r--r--  1 root root        0 Jan 16 11:32 mingongge.file
-rw-r--r--  1 root root  4194304 Jan 16 16:24 mingongge.z01
-rw-r--r--  1 root root  4194304 Jan 16 16:24 mingongge.z02
-rw-r--r--  1 root root   965420 Jan 16 16:24 mingongge.zip
上面的这种恢复方法相当指定从某某快照恢复数据,有时候快照较多,你不知道如何快速从哪个快照恢复的话,可以使用 latest 参数,去从最后一次备份的快照中恢复数据。
[root@centos7 ~]# rm -rf /root/data/*
[root@centos7 ~]# ll /root/data/
total 0
[root@centos7 ~]# restic -r /restic/backup_dir/ restore latest --target /root/
enter password for repository:
repository dff64d39 opened successfully, password is correct
restoring <Snapshot 94c62288 of [/root/data] at 2021-06-04 03:51:21.232686491 -0400 EDT by root@centos7> to /root/
[root@centos7 ~]# ll /root/data/
total 33796
-rw-r--r--  1 root root 13034487 Aug 30  2020 goInception-linux-amd64-v1.2.3.tar.gz
drwxr-sr-x 11 root   40     4096 Dec 24 22:35 httpd-2.4.46
-rw-r--r--  1 root root  9363314 Aug  5  2020 httpd-2.4.46.tar.gz
-rw-r--r--  1 root root  2846172 Oct 14  2020 httpd-2.4.6-95.el7.centos.x86_64.rpm
-rw-r--r--  1 root root        0 Jan 16 11:32 mingongge.file
-rw-r--r--  1 root root  4194304 Jan 16 16:24 mingongge.z01
-rw-r--r--  1 root root  4194304 Jan 16 16:24 mingongge.z02
-rw-r--r--  1 root root   965420 Jan 16 16:24 mingongge.zip
其它管理介绍
删除快照
这里的快照和备份的文件名义是相同的,快照多了,可能就需要定期删除,一般对于数据的备份时间要求基本上30天是一个周期,除了特别重要的数据可能更久一点,这个根据实际情况定。
[root@centos7 ~]# restic -r /restic/backup_dir/ snapshots
enter password for repository:
repository dff64d39 opened successfully, password is correct
ID        Time                 Host        Tags        Paths
-------------------------------------------------------------------------------
4d20711e  2021-06-04 03:40:47  centos7                 /root/data
3e5b7dea  2021-06-04 03:46:34  centos7                 /root/data/mingongge.zip
94c62288  2021-06-04 03:51:21  centos7                 /root/data
-------------------------------------------------------------------------------
3 snapshots
[root@centos7 ~]# restic -r /restic/backup_dir/ forget 4d20711e
enter password for repository:
repository dff64d39 opened successfully, password is correct
[0:00] 100.00%  1 / 1 files deleted
[root@centos7 ~]# restic -r /restic/backup_dir/ snapshots
enter password for repository:
repository dff64d39 opened successfully, password is correct
ID        Time                 Host        Tags        Paths
-------------------------------------------------------------------------------
3e5b7dea  2021-06-04 03:46:34  centos7                 /root/data/mingongge.zip
94c62288  2021-06-04 03:51:21  centos7                 /root/data
-------------------------------------------------------------------------------
2 snapshots

#这个方式和恢复相同,都是指定快照ID
这种方式的删除,只是将快照删除了,但是引用的文件仍然在存储库中,也就是说存储库的大小没有变化,需要使用 prune 参数来清除数据。
[root@centos7 ~]# restic -r /restic/backup_dir/ prune
enter password for repository:
repository dff64d39 opened successfully, password is correct
loading indexes...
loading all snapshots...
finding data that is still in use for 2 snapshots
[0:00] 100.00%  2 / 2 snapshots
searching used packs...
collecting packs for deletion and repacking
[0:00] 100.00%  19 / 19 packs processed

to repack:            0 blobs / 0 B
this removes          0 blobs / 0 B
to delete:            0 blobs / 0 B
total prune:          0 blobs / 0 B
remaining:         2990 blobs / 72.175 MiB
unused size after prune: 0 B (0.00% of remaining size)

done
还可以使用下面的命令同时执行上面两步的操作,相当于合并操作
restic forget --keep-last 1 --prune
#--keep-last 1 不删除最后一次的快照
更多关于快照删除请参考:https://restic.readthedocs.io/en/latest/060_forget.html
存储库的密码管理
我们可以使用key命令来为同一个存储库设置多个密码,还可以使用 add、list、remove、passwd 来管理密码。
查看密码
[root@centos7 ~]# restic -r /restic/backup_dir/ key list
enter password for repository:
repository dff64d39 opened successfully, password is correct
 ID        User  Host     Created
---------------------------------------------
*d216779f  root  centos7  2021-06-04 03:28:34
---------------------------------------------
新增密码
[root@centos7 ~]# restic -r /restic/backup_dir/ key add
enter password for repository:
repository dff64d39 opened successfully, password is correct
enter new password:
enter password again:
saved new key as <Key of root@centos7, created on 2021-06-04 04:43:18.024358447 -0400 EDT m=+18.001857421>
[root@centos7 ~]# restic -r /restic/backup_dir/ key list
enter password for repository:
repository dff64d39 opened successfully, password is correct
 ID        User  Host     Created
---------------------------------------------
*d216779f  root  centos7  2021-06-04 03:28:34
 33d0b428  root  centos7  2021-06-04 04:43:18
---------------------------------------------
删除
[root@centos7 ~]# restic -r /restic/backup_dir/ key remove 33d0b428
enter password for repository:
repository dff64d39 opened successfully, password is correct
removed key 33d0b428cba5c62585f1190432e61d46b88b4a6418c693d09ec47db596eace1f
[root@centos7 ~]# restic -r /restic/backup_dir/ key list
enter password for repository:
repository dff64d39 opened successfully, password is correct
 ID        User  Host     Created
---------------------------------------------
*d216779f  root  centos7  2021-06-04 03:28:34
---------------------------------------------
更改密码
[root@centos7 ~]# restic -r /restic/backup_dir/ key passwd
enter password for repository:
repository dff64d39 opened successfully, password is correct
enter new password:
enter password again:
saved new key as <Key of root@centos7, created on 2021-06-04 04:51:13.658184739 -0400 EDT m=+27.022974479>
[root@centos7 ~]# restic -r /restic/backup_dir/ key list
enter password for repository:
repository dff64d39 opened successfully, password is correct
 ID        User  Host     Created
---------------------------------------------
*a62168f6  root  centos7  2021-06-04 04:51:13
---------------------------------------------
#密码已更新完成,ID变化上可以看出来
常见问题
https://restic.readthedocs.io/en/latest/faq.html
更多相关的功能,及其操作,有兴趣的读者可以自行安装体验。民工哥我一圈体验下来,感觉这个restic 确实是一款非常强大、快速、安全高效的备份神器,关键的关键是开源免费,太香了,强裂推荐。


推荐阅读 点击标题可跳转


瓜分20万奖金 获得内推名额 丰厚实物奖励 易参与易上手
更多推荐


 0
0 0
0- 0


 已为社区贡献33条内容

所有评论(0)