
深度学习 — yolov5 自定义数据集训练
文章目录深度学习笔记8 ---- yolov5迁移学习深度学习笔记8 ---- yolov5迁移学习
文章目录
深度学习 — yolov5 自定义数据集训练
一、简介
本文介绍如何在自己的数据集上训练YOLO5目标检测模型,包括VOC格式的数据集和coco格式的数据集。
二、自定义数据集训练
yolov5训练时候代码中默认识别 images 和 labels 两个文件夹,将 images 作为输入的图像文件夹,labels作为标注文件夹,所以我们不管采用何种数据集格式,只要最终能够生成这两个文件夹即可。
(一) VOC格式数据集
1. 准备数据集
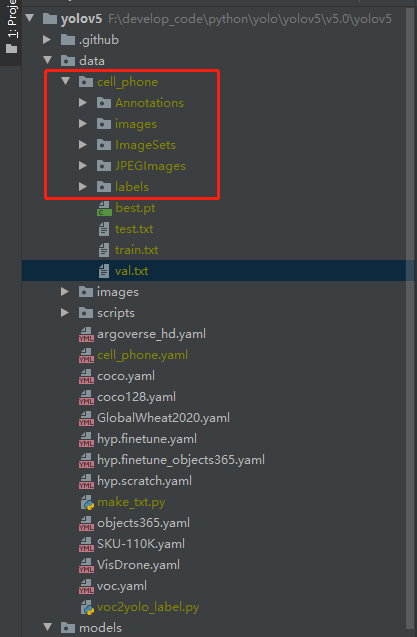
数据集目录如下,cell_phone为我自定义数据集文件夹名称:
└─cell_phone:		自定义数据集
    ├─Annotations	存放的是数据集标签文件,xml格式
    ├─images		yolov5将此文件夹当作训练图片的输入,直接将 JPEGImages 中的内容放进去
    ├─ImageSets		数据集的划分文件
    │  └─Main
    ├─JPEGImages	存放的是数据集图片
    └─labels		yolov5将此文件夹当作训练的标注文件夹
与默认的VOC数据格式不同的是,我们在这一步新建了 images 和 labels 文件夹,images 直接将 JPEGImages 中的图片复制进去即可。labels 作为后续保存标注文件的文件夹。建好的目录如下图所示:

2. 划分数据集
生成 ImageSets/Main/ 下的划分文件,train.txt、val.txt、trainval.txt、test.txt。
划分数据集的代码如下,直接执行下面代码,便可在 ImageSets / Main下生成 train.txt、val.txt、trainval.txt、test.txt四个文件
#!/usr/bin/env python
# encoding: utf-8
'''
@Author  : pentiumCM
@Email   : 842679178@qq.com
@Software: PyCharm
@File    : make_txt.py
@Time    : 2020/11/25 16:51
@desc	 : 划分数据集 ——
            生成:trainval.txt,train.txt,val.txt,test.txt
            为ImageSets文件夹下面Main子文件夹中的训练集+验证集、训练集、验证集、测试集的划分
'''

import os
import random


def ds_partition(annotation_filepath, ds_divide_save__path):
    """
    数据集划分:训练集,验证集,测试集,在ImageSets/Main/生成 train.txt,val.txt,trainval.txt,test.txt
    :param annotation_filepath: 标注文件的路径 Annotations
    :param ds_divide_save__path:   数据集划分保存的路径 ImageSets/Main/
    :return:
    """
    if not os.path.exists(ds_divide_save__path):
        os.mkdir(ds_divide_save__path)

    # train_percent:训练集占(训练集+验证集)的比例
    train_percent = 0.8

    # trainval_percent:(训练集+验证集)占总数据集的比例。测试集所占比例为:1-trainval_percent
    trainval_percent = 1

    temp_xml = os.listdir(annotation_filepath)
    total_xml = []
    for xml in temp_xml:
        if xml.endswith(".xml"):
            total_xml.append(xml)

    num = len(total_xml)
    list = range(num)
    tv = int(num * trainval_percent)
    tr = int(tv * train_percent)
    trainval = random.sample(list, tv)
    train = random.sample(trainval, tr)

    print("train and val size", tv)
    print("traub suze", tr)
    ftrainval = open(os.path.join(ds_divide_save__path, 'trainval.txt'), 'w')
    ftest = open(os.path.join(ds_divide_save__path, 'test.txt'), 'w')
    ftrain = open(os.path.join(ds_divide_save__path, 'train.txt'), 'w')
    fval = open(os.path.join(ds_divide_save__path, 'val.txt'), 'w')

    for i in list:
        name = total_xml[i][:-4] + '\n'
        if i in trainval:
            ftrainval.write(name)
            if i in train:
                ftrain.write(name)
            else:
                fval.write(name)
        else:
            ftest.write(name)

    ftrainval.close()
    ftrain.close()
    fval.close()
    ftest.close()


if __name__ == '__main__':
    # 自定义数据集文件夹的名称
    dataset_name = r'./cell_phone/'
    annotation_filepath = dataset_name + 'Annotations/'
    divide_save_path = dataset_name + 'ImageSets/Main/'

    ds_partition(annotation_filepath, divide_save_path)
3. 处理标注结果
VOC 的标注转为 yolo 标注结果
VOC的标注采用 xml 文件存放,其中 VOC 对应一个标注框的规则为:xmin ymin xmax ymax
yolo的标注采用 txt 文件存放,其中 yolo 对应一个标注框的规则为:class center_x center_y width height
转化代码如下,执行完代码之后会生成 lables 文件夹与 test.txt、train.txt、val.txt 文件:
- labels里面存放 VOC 解析成yolo的标注结果
- 另外三个txt文件为划分的对应数据集中图片的绝对路径
#!/usr/bin/env python
# encoding: utf-8
'''
@Author  : pentiumCM
@Email   : 842679178@qq.com
@Software: PyCharm
@File    : voc2yolo_label.py
@Time    : 2020/11/25 16:54
@desc	 : 类别文件格式转换 ——
            把数据集标注格式转换成yolo_txt格式,即将每个xml标注提取bbox信息为txt格式
'''

import xml.etree.ElementTree as ET
import os

sets = ['train', 'test', 'val']

# 改成自己训练所需要的类
classes = ['cell phone']


def convert(size, box):
    """
    将 VOC 的标注转为 yolo的标注,即 xyxy -> xywh
    :param size: 图片尺寸
    :param box: 标注框(xyxy)
    :return:
    """
    dw = 1. / size[0]
    dh = 1. / size[1]

    # 中心点坐标
    x = (box[0] + box[1]) / 2.0
    y = (box[2] + box[3]) / 2.0

    # 宽高
    w = box[1] - box[0]
    h = box[3] - box[2]

    # 归一化
    x = x * dw
    w = w * dw
    y = y * dh
    h = h * dh
    return (x, y, w, h)


def convert_annotation(annotation_filepath, label_dir, image_id):
    """
    VOC 标注的结果转为 yolo 数据集的标注结果
    :param annotation_filepath: VOC标注文件夹路径
    :param label_dir: 解析成 yolo 标注文件夹的路径
    :param image_id: 文件名
    :return:
    """
    in_file = open(annotation_filepath + '%s.xml' % (image_id))
    out_file = open(label_dir + '%s.txt' % (image_id), 'w')
    tree = ET.parse(in_file)
    root = tree.getroot()
    size = root.find('size')
    w = int(size.find('width').text)
    h = int(size.find('height').text)
    for obj in root.iter('object'):
        difficult = obj.find('difficult').text
        cls = obj.find('name').text
        if cls not in classes or int(difficult) == 1:
            continue
        cls_id = classes.index(cls)
        xmlbox = obj.find('bndbox')
        b = (float(xmlbox.find('xmin').text), float(xmlbox.find('xmax').text), float(xmlbox.find('ymin').text),
             float(xmlbox.find('ymax').text))
        bb = convert((w, h), b)
        out_file.write(str(cls_id) + " " + " ".join([str(a) for a in bb]) + '\n')


if __name__ == '__main__':

    # 当前文件的绝对路径
    abs_path = os.getcwd() + '/'

    # 自定义数据集文件夹的名称
    dataset_name = 'cell_phone'

    # VOC数据集标注文件
    annotation_filepath = dataset_name + '/Annotations/'

    # 数据集划分文件
    txtfile_dir = dataset_name + '/ImageSets/Main/'

    # coco训练图像输入的文件夹
    image_dir = dataset_name + '/images/'

    # 标注文件解析之后的文件夹路径
    label_dir = dataset_name + '/labels/'

    if not os.path.exists(label_dir):
        os.makedirs(label_dir)

    for image_set in sets:

        txtfile = txtfile_dir + '%s.txt' % (image_set)

        image_ids = open(txtfile).read().strip().split()
        list_file = open(dataset_name + '/%s.txt' % (image_set), 'w')
        for image_id in image_ids:
            list_file.write((abs_path + image_dir + '%s.jpg\n' % (image_id)).replace('\\', '/'))
            convert_annotation(annotation_filepath, label_dir, image_id)
        list_file.close()
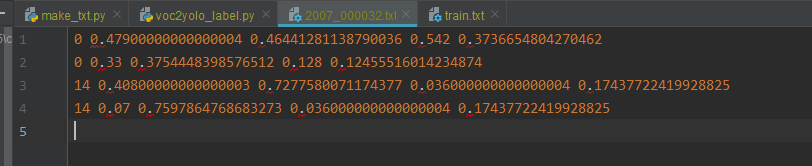
解析之后的labels文件夹中的标签文件内容如下图所示,每一行对应一个标注框,一行字第一个值对应类别号,后面四个值分别对应中心点坐标和标注框的宽高(归一化到0~1之间)。
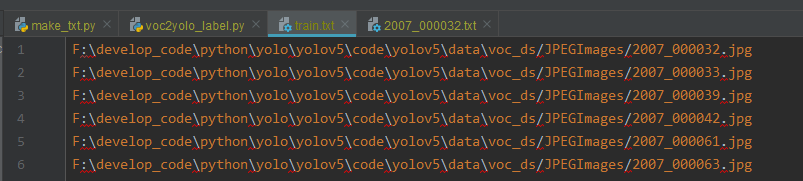
test.txt、train.txt、val.txt文件内容如下图所示,为每一中数据集中图片的路径:
4. 构建数据集配置文件
我们需要新建对应于我们自定义 VOC 数据集的yaml配置文件,如 vocds.yaml,内容主要为:
- train,val 为第 3 步中生成的 txt 文件路径
- nc:类别数(不需要 +1)
- names:类别名称
yaml文件内容如下:
# train2017 and val2017 data as 1) directory: path/images/, 2) file: path/images.txt, or 3) list: [path1/images/, path2/images/]
#train2017: ../VOC/images/train2017/  # 16551 images
#val2017: ../VOC/images/val2017/  # 4952 images

train: F:/develop_code/python/yolo/yolov5/v5.0/yolov5/data/cell_phone/train.txt
val: F:/develop_code/python/yolo/yolov5/v5.0/yolov5/data/cell_phone/val.txt


# number of classes:数据集的类别数
nc: 1

# class names
names: ['cell phone']
5. 自定义模型配置文件
想要训练哪一种模型,就修改对应的 model.yaml。
如,我们采用的预训练模型为 yolov5s ,我们就需要修改对应的配置文件,我是直接复制对应的配置文件,修改模型预测的类别数,类别数为我们自定义数据集的类被数,其他地方没有修改

6. 修改训练参数
修改train.py的训练参数:
–data:对应于 ‘data/cell_phone.yaml’
–cfg:对应于预训练的模型配置文件,‘models/cell_phone.yaml’
–weights:预训练模型权重文件,如 yolov5s.pt
–epochs,–batch-size:视自己电脑显卡配置而定,太大了会报显存不够
7. 开始训练
-
一般直接执行:python train.py ,即可。
但是如果是使用终端连接服务器训练,最好使用:nohup python train.py > train_nub.log 2>&1 &,好处是当我们与服务器断开时,训练也会继续在后台执行,不会终端。 -
.cache:训练的过程中会生成缓存文件,这是为了训练的过程中断,下次继续训练。(同样如果我们要重写训练,则需要清理该文件,以防止上次训练结果的干扰)
-
模型训练的结果在根目录的 runs 文件夹中
-
训练过程截图:

8. 性能评估
模型性能评估:
# 模型测试:
python test.py  --data ./data/vocds.yaml --weights runs/train/exp5/weights/best.pt --augment
(二) coco数据集
-
准备数据集
准备数据集文件夹coco,数据集和 yolov5 的代码同级,目录结构如下:├─coco: 数据集根目录 │ ├─images: 数据集图片 │ │ ├─train2017: 训练集 │ │ └─val2017: 验证集 │ └─labels: 数据集标签 │ ├─train2017 │ └─val2017 └─yolov5: yolov5源代码,(数据集和源代码同级) -
新建数据集的配置文件 yaml
我们新建 coco_custom.yaml文件,文件内容如下:# train2017 and val2017 data as 1) directory: path/images/, 2) file: path/images.txt, or 3) list: [path1/images/, path2/images/] train: ../coco/images/train2017/ val: ../coco/images/val2017/ # number of classes nc: 2 # class names names: ['person_legal', 'person_illegal'] -
修改预训练模型的配置文件
-
修改train.py的训练参数
-
开始训练
-
模型性能评估
以上内容同 上一节的步骤,在此就不赘述了。
三、训练结果解析
yolov5 每次 train 完成都会在run目录下生成 expi 目录(i 代表生成结果次数,第一次训练完成生成 exp0,第二次生成 exp1…以此类推)
expi 目录下会保存可视化的训练结果:confusion_matrix.png(混淆矩阵)、F1_curve.png(F1曲线)、P_curve.png(P曲线)、R_curve.png(R曲线)、PR_curve.png(PR曲线)、result.png、results.txt 以及训练权重weights(last.pt和best.pt);下面简单解释一下参数:
- result.png:
参考资料
- https://www.freesion.com/article/77231070357/
- https://zhouchen.blog.csdn.net/article/details/108122600
更多推荐

 9
9 0
0- 0


 已为社区贡献1条内容

所有评论(0)