
亚马逊 ec2 连接不上_在Amazon EC2上设置WordPress
亚马逊 ec2 连接不上The general consensus of opinion, is that self hosting a WordPress blog is the best way forward for blogging success. It provides the most flexibility and control over your writing platfor
亚马逊 ec2 连接不上
The general consensus of opinion, is that self hosting a WordPress blog is the best way forward for blogging success. It provides the most flexibility and control over your writing platform. The problem is, what happens if you don’t want to spend time setting up a hosted domain? What if you are not sure how?
普遍的共识是,自我托管WordPress博客是博客成功的最佳途径。 它为您的书写平台提供了最大的灵活性和控制力。 问题是,如果您不想花费时间来设置托管域,会发生什么? 如果不确定如何呢?
That might be the time to consider a hosted solution in the cloud. Hosting WordPress in the cloud means that all the server/database requirements are looked after for you. All you have to do is start creating your content. Well, nearly. There will be a small amount of setting up to do.
那可能是时候考虑在云中托管解决方案了。 将WordPress托管在云中意味着您可以满足所有服务器/数据库要求。 您要做的就是开始创建内容。 好吧,差不多。 将有少量设置要做。
In this article I’m going to show you how to set up a WordPress blog using the popular Amazon EC2 cloud, with a little help from BitNami.
在本文中,我将向您展示如何在BitNami的帮助下,使用流行的Amazon EC2云建立WordPress博客。
亚马逊什么? (The Amazon What?)
Here is what it says about EC2 on the Amazon Web Services web site:
这是有关 Amazon Web Services网站上EC2的内容:
“Amazon Elastic Compute Cloud (Amazon EC2) is a web service that provides resizable compute capacity in the cloud. It is designed to make web-scale computing easier for developers.”
“ Amazon Elastic Compute Cloud(Amazon EC2)是一项网络服务,可在云中提供可调整大小的计算能力。 它旨在使开发人员更容易进行Web规模的计算。”
Yes, and with some help from BitNami, you don’t even need to be a developer:
是的,在BitNami的帮助下,您甚至不必成为开发人员:
“BitNami provides free, ready to run environments for your favourite open source web applications and frameworks, including Drupal, Joomla!, WordPress, PHP, Rails, Django and many more.”
“ BitNami为您喜欢的开源Web应用程序和框架(包括Drupal,Joomla!,WordPress,PHP,Rails,Django等)提供免费的,随时可运行的环境。”
So what that means is, we can get ourselves an Amazon Web Services account, and then use that to host a Bitnami WordPress installation. Then you’ll be writing in the cloud in no time.
因此,这意味着,我们可以为自己获取一个Amazon Web Services帐户,然后使用该帐户托管Bitnami WordPress安装。 然后,您将立即在云中书写。
因此,首先,获得一个Amazon Web Services帐户-免费 (So first, get an Amazon Web Services Account – it’s free)
Point your browser at http://aws.amazon.com and click the “Sign Up” button. You can run a micro server for 1 year free at the moment, so be sure and choose the “I am a new user” option. Don’t confuse this Amazon account with your Amazon retail account. The AWS system is completely different.
将您的浏览器指向http://aws.amazon.com ,然后单击“注册”按钮。 您现在可以免费运行微型服务器1年,因此请确保并选择“我是新用户”选项。 请勿将此Amazon帐户与您的Amazon零售帐户混淆。 AWS系统完全不同。
You will then go through a typical sign up form, and you will be prompted to enter credit card information. However, you will not be charged for the first year if you run a single micro server.
然后,您将通过典型的注册表单,然后将提示您输入信用卡信息。 但是, 如果您运行一台微型服务器,则第一年无需付费。
The final part of the account sign up involves Amazon’s automated service phoning you on the number you provided in the contact details section. It will ask you to either type, or say the pin number that will appear in your browser window. I found typing it didn’t work, whereas speaking it worked immediately.
帐户注册的最后一部分涉及Amazon的自动化服务,该服务会通过您在“联系方式”部分中提供的电话号码给您打电话。 它将要求您输入或说出出现在浏览器窗口中的密码。 我发现键入不起作用,而说出来则立即起作用。
You will then receive an email welcoming you to the service. It will contain links to the AWS portal where you can find the access keys you will need to use the service. We’ll get back to those shortly. First, you need an account with the BitNami cloud.
然后,您将收到一封欢迎您使用该服务的电子邮件。 它将包含指向AWS门户的链接,您可以在其中找到使用该服务所需的访问密钥。 我们将尽快回复。 首先,您需要使用BitNami云帐户。
获取一个BitNami云帐户 (Get a BitNami cloud account)
Amazon EC2 in the raw is not for the faint-hearted. There is quite a lot to learn about: how to deploy to it, and config it. Enter BitNami. By deploying to your Amazon cloud via BitNami, all the technical pain is dealt with.
原始的Amazon EC2不适合胆小者。 有很多要学习的知识:如何对其进行部署和配置。 输入BitNami。 通过BitNami部署到您的Amazon云中,可以解决所有技术难题。
You get:
你得到:
- A properly configured server, with the operating system, and required software installed. 正确配置的服务器,带有操作系统和必需的软件。
- The application(s) you want to run installed just by clicking a button. 您想要运行的应用程序只需单击一个按钮即可安装。
- Any database requirements installed and configured for you. 为您安装和配置的任何数据库要求。
- Automatic backups 自动备份
Point your browser to http://bitnami.org/cloud and sign up for an account (free). The sign up process is just like any other sign up process until you get to near the end:
将浏览器指向http://bitnami.org/cloud并注册一个帐户(免费)。 注册过程就像其他注册过程一样,直到结束为止:
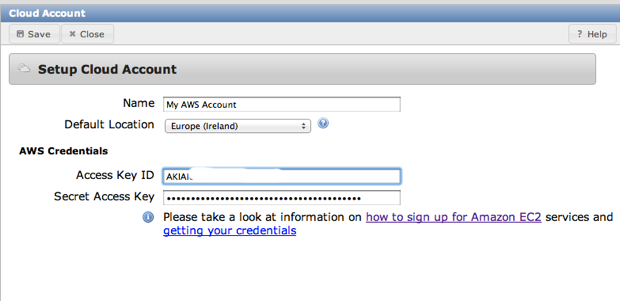
Following the link to add your AWS credentials provides you with another simple form:
单击添加您的AWS凭证的链接可以为您提供另一种简单形式:
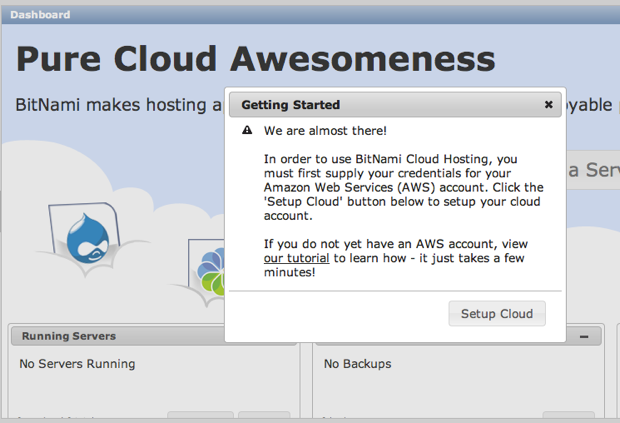
Once you have entered the required information you will be sent into the dashboard. The dashboard is where you do all of your setting up and configuring. We can now hit the big Create Server button:
输入所需的信息后,您将被发送到仪表板。 仪表板是您进行所有设置和配置的地方。 现在,我们可以点击“ 创建服务器”按钮:
Now we get to the important screen. The server configuration screen is where you choose all the settings that you require:
现在我们进入重要屏幕。 在服务器配置屏幕上,您可以选择所需的所有设置:
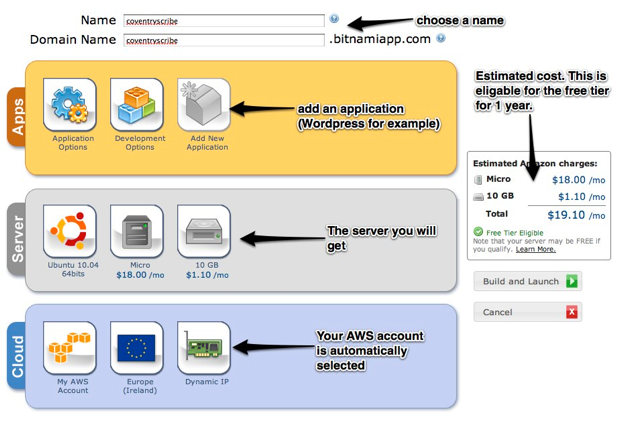
选择一个应用 (Choose an application)
The first option is to choose an application:
第一个选择是选择一个应用程序:
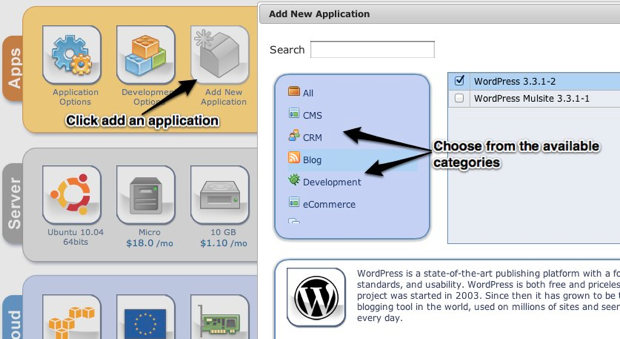
Since we are focusing on WordPress, that’s the application we’ll choose.
由于我们专注于WordPress,因此我们将选择该应用程序。
设置配置选项 (Set the configuration options)
You can now click on the application options button to set the WordPress credentials you want to use:
现在,您可以单击应用程序选项按钮来设置要使用的WordPress凭据:
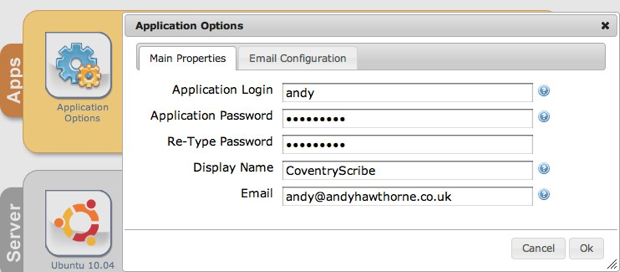
You should also add email credentials via the Email Configuration tab. This is so that you can receive emails from your WordPress site.
您还应该通过“电子邮件配置”选项卡添加电子邮件凭据。 这样,您就可以接收来自WordPress网站的电子邮件。
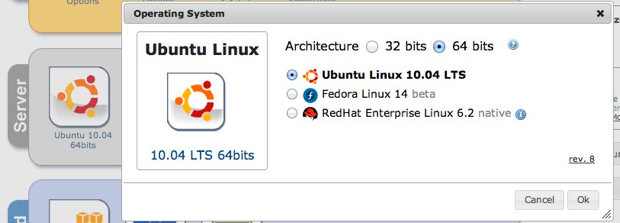
选择操作系统 (Choice of operating system)
If Ubuntu is not your thing, you can choose a different Linux OS too:
如果不是Ubuntu,那么您也可以选择其他Linux操作系统:
建立并启动 (Build and Launch)
Now you can hit the build and launch button, and go and have a cup of tea. Bitnami will now create your server and set it running for you. You even get a nice email from them once your server is up and running.
现在,您可以点击构建和启动按钮,然后去喝杯茶。 Bitnami现在将创建您的服务器并将其设置为运行。 一旦服务器启动并运行,您甚至会从他们那里收到一封不错的电子邮件。
访问您的服务器 (Access your server)
Click on view in the running servers section of your dashboard, and your new web site will open in a new browser tab:
在仪表板,和你的新网站将在新的浏览器标签页中打开的正在运行的服务器部分点击查看 :
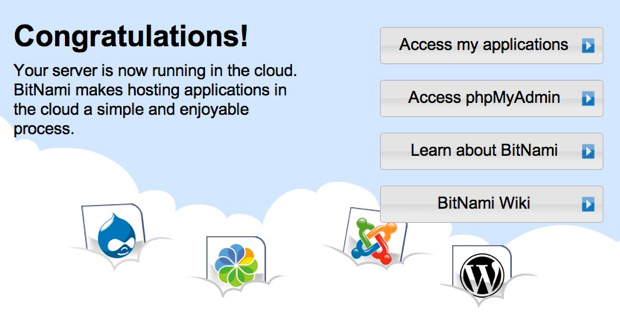
Click Access my applications and you will be presented with the installed applications page:
单击访问我的应用程序 ,将显示已安装的应用程序页面:
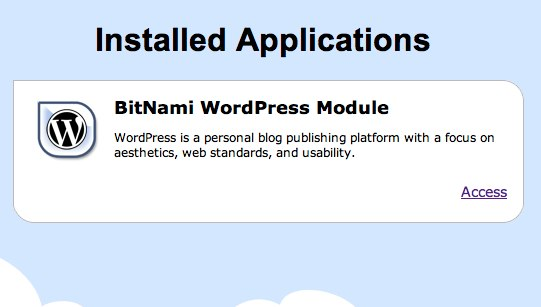
Click the Access link, and there, in all its glory, will be your WordPress installation. Add ‘wp-admin’ to the url in the address bar, and you can access the normal WordPress administration panel.
单击“ 访问”链接,就可以看到您的WordPress安装。 在地址栏中的网址中添加“ wp-admin”,即可访问普通的WordPress管理面板。
外壳访问 (Shell Access)
If you wish to access your server via SSH, you can, after you have completed a couple of import tasks:
如果您希望通过SSH访问服务器,则可以在完成几个导入任务之后:
1.获取密钥对 (1. Get your key pair)

Download your key pair from the manage server section of your Bitnami web admin area:
从Bitnami Web管理区域的“ 管理服务器”部分下载密钥对:
2.设置权限 (2. Set permissions)
You will need to set the permissions on the file you have downloaded, so in the console/terminal do:
您将需要对下载的文件设置权限,因此在控制台/终端中执行以下操作:
chmod 666 bitnami-hosting.pemThant will ensure that only you have read/write access.
Thant将确保只有您具有读/写访问权限。
If you are on Windows, follow the advice in the Bitnami wiki.
如果您使用Windows,请遵循Bitnami Wiki中的建议。
Make sure you put the .pem file somewhere easy to remember!
确保将.pem文件放在容易记住的地方!
3.通过SSH连接 (3. Connect over ssh)
In the console/terminal you can then connect with:
然后,您可以在控制台/终端中连接:
ssh -i bitnami-hosting.pem bitnami@your-chosen-site-name.bitnami.comYou will then have shell access to your server. Though, there is no particular reason that you need to do this as most of the common server management tasks can be carried out from the web admin area in your Bitnami account. But if you like to dabble in the more technical side of things, you have shell access to achieve that.
然后,您将具有对服务器的Shell访问权限。 但是,您并不需要这样做,因为大多数常见服务器管理任务都可以从Bitnami帐户的Web管理区域中执行。 但是,如果您喜欢涉猎更多技术方面的内容,则可以使用Shell来实现这一目标。
最后… (Finally…)
It is probably wise to take a breath and think through want we have here. A full WordPress installation hosted on Amazon EC2. Not only that, but it needed no real technical server knowledge to get up and running. It certainly isn’t the cheapest way to run a WordPress installation once the free year is up, but it has to be one of the most painless ways to get a fully configured Linux server up and running, and on a cloud hosting service too.
深吸一口气,想一想我们在这里,这可能是明智的。 在Amazon EC2上托管的完整WordPress安装。 不仅如此,而且不需要真正的服务器技术知识即可启动和运行。 一旦免费一年结束,它当然不是运行WordPress安装的最便宜的方法,但是它必须是使完全配置的Linux服务器并在云托管服务上运行的最轻松的方法之一。
翻译自: https://www.sitepoint.com/setting-up-wordpress-on-amazon-ec2/
亚马逊 ec2 连接不上

亚马逊云科技开发者 Build On 是由亚马逊团队策划、开发者社区联合打造的动手实操系列活动。
更多推荐
 0
0 0
0- 0


 已为社区贡献1条内容

所有评论(0)