kubernetes 机器_机器学习管道:设置本地Kubernetes
kubernetes 机器In this multi-part series, I’ll walk you through how I set up an on-premise machine learning pipeline with open-source tools and frameworks.在这个由多个部分组成的系列文章中,我将向您介绍如何使用开源工具和框架建立本地机器学习管道。..
kubernetes 机器
In this multi-part series, I’ll walk you through how I set up an on-premise machine learning pipeline with open-source tools and frameworks.
在这个由多个部分组成的系列文章中,我将向您介绍如何使用开源工具和框架建立本地机器学习管道。
序幕:模型培训只是很小的一部分 (Prologue: Model Training is Just A Tiny Part)
When most people think about machine learning, they imagine engineers and data scientists tweaking network architectures, loss functions, and tuning hyper-parameters, coupled with the constant retraining until the results are satisfactory.
当大多数人想到机器学习时,他们会想象工程师和数据科学家会调整网络体系结构,损失函数和调整超参数,再加上不断的重新训练,直到结果令人满意为止。
Indeed, training machine learning models takes a lot of hard work. A tremendous amount of time and resources are expended on research and experimentation.
确实,训练机器学习模型需要大量的努力。 研究和实验花费了大量时间和资源。
However, there comes a point in time when you need to start to productionize the model that you’ve lovingly trained and tuned. And oh, by the way, the model is expected to perform as well on next weeks’ batch of data.
但是,有时需要您开始生产经过精心培训和调整的模型。 哦,顺便说一句,该模型有望在下周的批量数据中表现良好。
It slowly dawns on you that Machine Learning is much bigger than models, hyper-parameters, and loss functions. It’s also what happens before, during, and after training. And it doesn’t end there, because you would also need to think about re-training, especially when you get new data, since there’s no guarantee that the model is going to generalize as well.
慢慢地,您会发现机器学习比模型,超参数和损失函数要大得多。 这也是在训练之前,之中和之后发生的事情。 而且它还没有结束,因为您还需要考虑重新训练,尤其是在获取新数据时,因为不能保证模型也将得到概括。
There’s a very well known diagram that succinctly illustrates the issue:
有一个非常著名的图表,它简要地说明了这个问题:
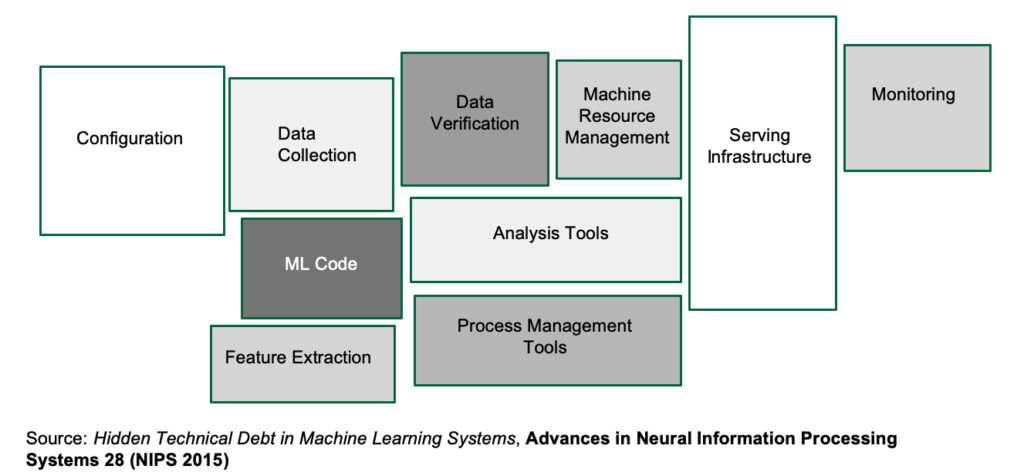
In short, you need to build a machine learning pipeline that can get you from raw data to the trained model in the shortest possible time. But here’s the catch: because you’re part of a scrappy startup and not flushed with VC money, you’re going to have to make do with the servers you have, and not rely on the paid cloud offerings of Amazon, Microsoft or Google, at least for the time being.
简而言之,您需要构建一个机器学习管道,以在最短的时间内将您从原始数据转移到经过训练的模型。 但这很重要:因为您是一家草率的创业公司的一部分,并且没有获得VC资金的充裕,所以您将不得不使用自己拥有的服务器,而不必依赖于Amazon,Microsoft或Google的付费云产品,至少目前是这样。
This is because you need a safe environment to learn and experiment in — one that won’t unexpectedly shock you with a nasty bill at the end of the month.
这是因为您需要一个安全的环境来进行学习和实验-在月底前,这不会出乎您意料的令人震惊的账单。
你是谁 (Who You Are)
You could be a software engineer at a company that’s starting to think about putting its machine learning models to production, or you could be running solo and curious about what “real-world” machine learning looks like. In both cases, you would need to know about machine learning pipelines.
您可能是一家开始考虑将其机器学习模型投入生产的公司的软件工程师,或者您可能独自运行并且对“实际”机器学习的外观感到好奇。 在这两种情况下,您都需要了解机器学习管道。
您需要知道的 (What You Need to Know)
You should be comfortable with Linux. The examples will assume Ubuntu Linux 18.04, though slightly dated or more recent versions shouldn’t cause any major issues.
您应该对Linux感到满意。 这些示例将假定使用Ubuntu Linux 18.04,尽管过时或较新的版本不会引起任何重大问题。
You should have some working knowledge of Docker. If you know how to build images in Docker, and how to execute containers, you should be good to go. If you don’t, you shouldn’t worry too much: I’ll guide you with enough background information, and code examples will be explained.
您应该对Docker有一定的了解。 如果您知道如何在Docker中构建映像以及如何执行容器,那么您应该一切顺利。 如果您不这样做,则不必担心太多:我将为您提供足够的背景信息,并会解释代码示例。
While this is an article about Machine Learning pipelines, this article is not about the intricacies involved in training a model.
尽管这是一篇有关机器学习管道的文章,但这篇文章并不涉及训练模型所涉及的复杂性。
We’re going to use Kubernetes. You don’t need to be an expert in it. If you are completely new to Kubernetes, that’s OK. By the end of the series, you’ll have at least some hands-on experience. On the other hand, I’m not going to go very deep into Kubernetes specifics. Some commands I’ll have to gloss over in the interests of brevity. Besides, the real objective here to help you deploy machine learning pipelines as efficiently as possible.
我们将使用Kubernetes。 您无需成为专家。 如果您完全不熟悉Kubernetes,那就可以了。 在本系列结束之前,您将至少有一些实际经验。 另一方面,我不会深入探讨Kubernetes的细节。 为了简洁起见,我将不得不掩盖一些命令。 此外,这里的真正目标是帮助您尽可能高效地部署机器学习管道。
Here are some other assumptions that I’m making about you, the astute reader:
这是我对您(机敏的读者)所做的一些其他假设:
- you’re not entirely clueless about Machine Learning 您并非对机器学习一无所知
- you have access to some relatively beefy servers (ideally more than one) that contain Nvidia GPUs 您可以访问一些包含Nvidia GPU的相对强大的服务器(最好是一台以上)
- you have an existing machine learning code base that’s written in Python 您已有使用Python编写的机器学习代码库
- you don’t work in a unicorn startup or Fortune 500 and therefore are not so flush with cash that you can happily spin up multiple V100s. 您无法在独角兽创业公司或《财富》 500强中工作,因此现金充裕,您可以愉快地启动多个V100。
我们会做什么? (What Are We Going to Do?)
Machine learning pipelines only recently have gotten more love and attention, and people are just only beginning to figure everything out. Put in another way, there are multiple ways to build machine learning pipelines, because every organization has unique requirements, and every team has their favorite tool.
机器学习管道直到最近才获得更多的关注和关注,人们才刚刚开始弄清一切。 换句话说,建立机器学习管道有多种方法,因为每个组织都有独特的要求,每个团队都有自己喜欢的工具。
What this series aims to offer is one possible way to do it, and that’s especially important when you’re starting out, because the amount of information is often very overwhelming. Also, installing Kubernetes is a daunting affair, littered with many roadblocks. I hope this article helps with smoothening that path.
本系列旨在提供一种可能的方法,并且当您入门时,这一点尤其重要,因为信息量通常非常庞大。 另外,安装Kubernetes是一项艰巨的任务,到处都是路障。 我希望本文能帮助您简化这条道路。
After you’ve learned a way to build a machine learning pipeline, you’ll then be equipped with enough skills and knowledge to go build one to suit your organization’s needs.
在学习了构建机器学习管道的方法之后,您将具备足够的技能和知识来构建满足组织需求的技能和知识。
Here’s a list of some of the tools I’ll cover in this series:
这是我将在本系列中介绍的一些工具的列表:
- Docker 码头工人
- Kubernetes Kubernetes
- Rancher Rancher
- KubeFlow/KubeFlow Pipelines KubeFlow / KubeFlow管道
- Minio 小野
- Tensorflow 张量流
在内部部署 (On On-premise)
As you’ll realize soon as you follow through the series, many of these tools assume that you have storage on Amazon S3 or Google Cloud Storage, which, to put it mildly, not a very good assumption. Thus this series shows how to work around some of these limitations without losing any of the functionality.
正如您将在完成本系列教程时很快意识到的那样,这些工具中的许多工具都假设您在Amazon S3或Google Cloud Storage上存储了存储,从某种程度上说,这并不是一个很好的假设。 因此,本系列文章展示了如何解决这些局限性而又不丢失任何功能。
Of course, at some point in time, you’ll outgrow and would need something more capable. However, especially when you’re starting (that is, you happen to be the first Data Engineer on the team), then on-premise would seem a more cost-effective and ultimately the more educational choice.
当然,在某个时间点上,您将长大,需要更强大的功能。 但是,尤其是当您刚开始时(也就是说,您刚好是团队中的第一位数据工程师),那么内部部署似乎更具成本效益,并且最终是更具教育意义的选择。
使用Rancher轻松安装Kubernetes (Installing Kubernetes the Easy Way with Rancher)
Let’s start immediately with one of the harder bits — Installing Kubernetes.
让我们立即开始比较困难的事情之一-安装Kubernetes。
The main thing you need to know about Kubernetes is that it’s a container-orchestration system for automating application deployment, scaling, and management.
您需要了解的有关Kubernetes的主要知识是,它是一个用于自动执行应用程序部署,扩展和管理的容器编排系统。
There are many ways to install Kubernetes, and it’s not a trivial process. Fortunately, that’s tools like Rancher make the installation process much more pleasant and less error-prone. In particular, we’re going to use the Rancher Kubernetes Engine (RKE) to help us install Kubernetes.
有很多安装Kubernetes的方法,这不是一个简单的过程。 幸运的是,Rancher之类的工具使安装过程更加轻松愉快,并且不易出错。 特别是,我们将使用Rancher Kubernetes引擎(RKE)来帮助我们安装Kubernetes。
At the point of this writing, the latest stable release of rke is 1.0.0.
在撰写本文时, rke的最新稳定版本是1.0.0 。
步骤0:准备机器 (Step 0: Prepare the Machines)
The following steps assume that you have access to two Linux machines that are connected to the same LAN.
以下步骤假定您可以访问连接到同一LAN的两台Linux计算机。
We’re going to set up a minimal cluster consisting of two machines, one named master and the other worker. Of course, you can name your machines whatever you want, as long as you designate one machine to be master, and the rest to be workers.
我们将建立一个最小的集群,该集群由两台机器组成,其中一台名为master ,另一台名为worker 。 当然,只要指定一台机器为主机,其余机器为工人,就可以随心所欲命名机器。
If you only have access to one machine, you can get by with creating two virtual machines, and make sure to enable Bridged Adapter. In fact, in preparation for this article, I’m testing everything out of Oracle’s VirtualBox. Here are my settings:
如果您只能访问一台计算机,则可以创建两个虚拟机,并确保启用桥接适配器。 实际上,在准备本文时,我正在测试Oracle VirtualBox中的所有内容。 这是我的设置:
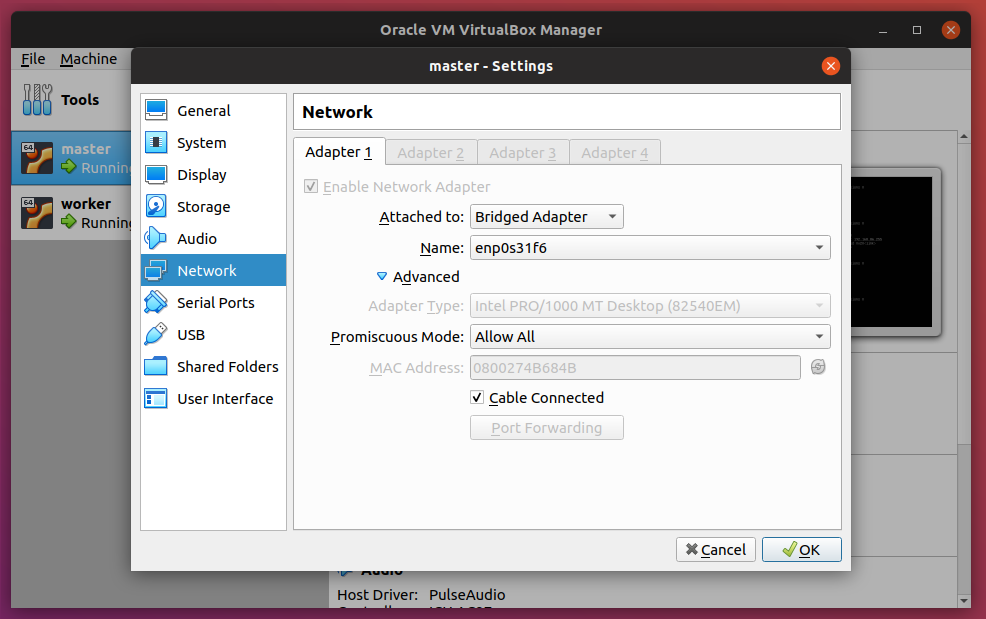
Notice here that I have two VMs: master and node. Enable the Bridged Adapter and also setting Promiscuous Mode to Allow All.
请注意,这里有两个VM: master和node 。 启用Bridged Adapter并将Promiscuous Mode设置为Allow All 。
The downside to that is that you wouldn’t be able to access the GPUs, and you would most likely notice that the performance won’t be ideal because Kubernetes tends to be quite demanding in terms of resources. Again, that’s OK if you’re trying this at home or have only access to a single machine at the moment.
不利的一面是您将无法访问GPU,并且您很可能会注意到性能并不理想,因为Kubernetes在资源方面往往要求很高。 同样,如果您在家中尝试此操作,或者目前只能访问一台计算机,也可以。
Here are some important details about the machines (you should have them on hand too for the configuration steps that follow):
以下是有关机器的一些重要详细信息(对于随后的配置步骤,您也应该拥有它们):
| Master | Worker | |
|---|---|---|
| IP | 192.168.86.36 | 192.168.86.35 |
| User | ubuntu | ubuntu |
| Hostname | master | worker |
| SSH Keys | ~/.ssh/id_rsa.pub | ~/.ssh/id_rsa.pub |
| Role | Control Plane, Etcd | Worker |
| 主 | 工人 | |
|---|---|---|
| 知识产权 | 192.168.86.36 | 192.168.86.35 |
| 用户 | ubuntu | ubuntu |
| 主机名 | 主 | 工人 |
| SSH密钥 | ~/.ssh/id_rsa.pub | ~/.ssh/id_rsa.pub |
| 角色 | 控制平面等 | 工人 |
DNS和负载平衡 (DNS and Load Balancing)
In a production environment, you would need a hostname to point to your Kubernetes cluster. However, in this article I’m assuming you don’t have one readily available, so we’re going to have to fake it.
在生产环境中,您需要一个主机名来指向您的Kubernetes集群。 但是,在本文中,我假设您没有现成的产品,因此我们将不得不对其进行伪造。
Another thing I won’t cover — to keep things simple — is load balancing when it comes to the Rancher installation.
为了简单起见,我不会介绍的另一件事是Rancher安装中的负载平衡。
For our purposes, I’m going to use rancher-demo.domain.test as the hostname.
为了我们的目的,我将使用rancher-demo.domain.test作为主机名。
In both machines, open /etc/hosts file:
在两台机器上,打开/etc/hosts文件:
sudo vim /etc/hostsEnter the following:
输入以下内容:
192.168.86.35 worker
192.168.86.35 rancher-demo.domain.test
192.168.86.36 master
127.0.0.1 localhost
Notice here that the worker node has the additional hostname of rancher-demo.domain.test. In a slightly more realistic environment, you’d have something like NGINX as a front-end to load balance between multiple worker nodes.
请注意,工作节点的附加主机名是rancher-demo.domain.test 。 在稍微现实一些的环境中,您将拥有类似于NGINX的前端作为在多个工作程序节点之间进行负载平衡的前端。
*Note: If you’re using a Virtual Machine, then most likely you’d be using the Ubuntu Server image, which typically doesn’t come with a desktop environment. Therefore, you should also have an entry in the host computer to include this:
*注意:如果您使用的是虚拟机,则很可能会使用Ubuntu Server映像,该映像通常不随台式机环境一起提供。 因此,您还应该在主机中包含一个条目,以包括以下内容:
192.168.86.35 rancher-demo.domain.testThat way, you’ll be able to access Rancher from a browser on the host computer.*
这样,您将能够从主机上的浏览器访问Rancher。*
步骤1:获取rke Binary (Step 1: Obtain the rke Binary)
Important!: This step should only be performed on master.
重要提示!:此步骤仅应在master上执行。
Head over to the GitHub page to download the rke binary. Next, rename the binary to rke, followed by making it executable. Finally, move the binary to a location in the PATH, where /usr/local/bin is usually a good choice.
前往GitHub页面下载rke二进制文件。 接下来,将二进制文件重命名为rke ,然后使其可执行。 最后,将二进制文件移动到PATH某个位置,通常在/usr/local/bin是一个不错的选择。
Important: make sure you select the right binary for your OS!
重要:请确保为您的操作系统选择正确的二进制文件!
$ wget https://github.com/rancher/rke/releases/download/v1.0.0/rke_linux-amd64
$ mv rke_linux-amd64 rke
$ chmod +x rke
$ sudo mv rke /usr/local/bin
Now let’s see if everything works:
现在让我们看看是否一切正常:
$ rkeThis should return:
这应该返回:
NAME:
   rke - Rancher Kubernetes Engine, an extremely simple, lightning fast Kubernetes installer that works everywhere

USAGE:
   rke [global options] command [command options] [arguments...]

VERSION:
   v1.0.0

AUTHOR(S):
   Rancher Labs, Inc.

COMMANDS:
     up       Bring the cluster up
     remove   Teardown the cluster and clean cluster nodes
     version  Show cluster Kubernetes version
     config   Setup cluster configuration
     etcd     etcd snapshot save/restore operations in k8s cluster
     cert     Certificates management for RKE cluster
     encrypt  Manage cluster encryption provider keys
     help, h  Shows a list of commands or help for one command

GLOBAL OPTIONS:
   --debug, -d    Debug logging
   --quiet, -q    Quiet mode, disables logging and only critical output will be printed
   --help, -h     show help
   --version, -v  print the version
步骤2.准备Linux主机 (Step 2. Preparing the Linux Hosts)
Important: these steps are to be performed on all of the machines.
重要:这些步骤将在 所有计算机上执行 。
a)安装Docker (a) Install Docker)
First, make sure that Docker 19.03 is installed on all the Linux hosts:
首先,确保在所有Linux主机上都安装了Docker 19.03:
$ curl -fsSL https://download.docker.com/linux/ubuntu/gpg | sudo apt-key add -
$ sudo add-apt-repository "deb [arch=amd64] https://download.docker.com/linux/ubuntu $(lsb_release -cs) stable edge"
$ sudo apt-get update
$ sudo apt-get install -y docker-ce
To make sure that the Docker service is running correctly, execute the following:
为了确保Docker服务正常运行,请执行以下操作:
$ sudo systemctl status dockerThis should return:
这应该返回:
● docker.service - Docker Application Container Engine
   Loaded: loaded (/lib/systemd/system/docker.service; enabled; vendor preset: enabled)
   Active: active (running) since Sat 2019-12-28 03:01:03 UTC; 27s ago
     Docs: https://docs.docker.com
 Main PID: 4118 (dockerd)
    Tasks: 8
   CGroup: /system.slice/docker.service
           └─4118 /usr/bin/dockerd -H fd:// --containerd=/run/containerd/containerd.sock

Dec 28 03:01:03 master dockerd[4118]: time="2019-12-28T03:01:03.179311453Z" level=warning msg="Your kernel does not support swap memory limit"
Dec 28 03:01:03 master dockerd[4118]: time="2019-12-28T03:01:03.179509363Z" level=warning msg="Your kernel does not support cgroup rt period"
Dec 28 03:01:03 master dockerd[4118]: time="2019-12-28T03:01:03.179608175Z" level=warning msg="Your kernel does not support cgroup rt runtime"
Now execute the following command so that you can use the docker command without sudo:
现在执行以下命令,以便您可以在没有sudo情况下使用docker命令:
$ sudo usermod -aG docker $USERLet’s try it out:
让我们尝试一下:
$ docker run hello-worldWhoops!
哎呀!
docker: Got permission denied while trying to connect to the Docker daemon socket at unix:///var/run/docker.sock: Post http://%2Fvar%2Frun%2Fdocker.sock/v1.40/containers/create: dial unix /var/run/docker.sock: connect: permission denied.
See 'docker run --help'.
The reason you are getting this is that you need to log out first:
得到这个的原因是您需要先注销 :
$ exitOnce you’re logged in, try again:
登录后,请重试:
$ docker run hello-worldYou should see this:
您应该看到以下内容:
Unable to find image 'hello-world:latest' locally
latest: Pulling from library/hello-world
1b930d010525: Pull complete
Digest: sha256:4fe721ccc2e8dc7362278a29dc660d833570ec2682f4e4194f4ee23e415e1064
Status: Downloaded newer image for hello-world:latest

Hello from Docker!
This message shows that your installation appears to be working correctly.
b)设置SSH密钥 (b) Set up SSH keys)
In case you haven’t had SSH keys set up, perform the following step on master:
如果您尚未设置SSH密钥,请在master上执行以下步骤:
$ ssh-keygen
$ eval "$(ssh-agent -s)"
$ ssh-add ~/.ssh/id_rsa
Then, copy the public key to all the worker nodes. Since we only have one worker node:
然后,将公钥复制到所有工作节点。 由于我们只有一个工作节点:
$ ssh-copy-id ubuntu@192.168.86.36You need to make sure that $USER can SSH into the nodes. For example, make sure you can access worker from master:
您需要确保$USER可以通过SSH进入节点。 例如,确保您可以从master访问worker :
ubuntu@master:~$ ssh ubuntu@192.168.86.36On both nodes, configure the SSH server to allow port-forwarding:
在两个节点上,将SSH服务器配置为允许端口转发:
% sudo vim /etc/ssh/sshd_configUncomment the following:
取消注释以下内容:
AllowTcpForwarding yesc)关闭交换 (c) Turn swap off)
To turn off swap:
要关闭交换:
$ sudo swapoff -aOpen /etc/fstab in your favorite editor and comment out the swap file entry :
在您喜欢的编辑器中打开/etc/fstab并注释掉交换文件条目:
$ sudo vim /etc/fstab d)应用sysctl设置 (d) Apply sysctl settings)
$ sudo sysctl net.bridge.bridge-nf-call-iptables=1e)Ubuntu 18.04上的DNS (e) DNS on Ubuntu 18.04)
In this version of Ubuntu onwards, the way DNS is set up has changed. To revert to the previous behavior:
从此版本的Ubuntu开始,DNS的设置方式已更改。 还原为以前的行为:
$ sudo apt install resolvconfEdit the nameserver settings:
编辑名称服务器设置:
sudo vim /etc/resolvconf/resolv.conf.d/headAdd the following entries:
添加以下条目:
nameserver 8.8.4.4
nameserver 8.8.8.8
Restart the resolveconf service:
重新启动resolveconf服务:
% sudo service resolvconf restart步骤3:创建群集配置文件 (Step 3: Creating the Cluster Configuration File)
Important: the following step should only be performed on master.
重要提示:以下步骤仅应在master上执行。
It’s time to finally install Kubernetes with rke!
现在是时候使用rke最终安装Kubernetes了!
Before doing this, make sure that you have a list of IPs and hostnames for the nodes. The table from Step 0 would be very helpful for this step.
在执行此操作之前,请确保您具有节点的IP和主机名的列表。 Step 0的表格对于此步骤将非常有帮助。
You’ll need to run rke config to create a cluster configuration file. It will present you with a bunch of questions that are used to generate the configuration file:
您需要运行rke config来创建集群配置文件。 它将向您提出一系列用于生成配置文件的问题:
$ rke configHere’s an example of the questions and answers based on the table. Remember to adapt it to your users, hostnames, IP addresses, and SSH key locations. Also note that the master node should have the role of control plane and etcd, while the worker nodes should have the role of worker. If you ever make a mistake, you can always start over with Ctrl + C and running the command again:
这是基于表格的问答示例。 请记住要使其适应您的用户,主机名,IP地址和SSH密钥位置。 另请注意, master节点应具有control plane和etcd的角色,而worker节点应具有worker的角色。 如果您输入有误,可以随时使用Ctrl + C重新开始并再次运行命令:
[+] Cluster Level SSH Private Key Path [~/.ssh/id_rsa]:
[+] Number of Hosts [1]: 2
[+] SSH Address of host (1) [none]: 192.168.86.36
[+] SSH Port of host (1) [22]:
[+] SSH Private Key Path of host (192.168.86.36) [none]: ~/.ssh/id_rsa
[+] SSH User of host (192.168.86.36) [ubuntu]: ubuntu
[+] Is host (192.168.86.36) a Control Plane host (y/n)? [y]: y
[+] Is host (192.168.86.36) a Worker host (y/n)? [n]: n
[+] Is host (192.168.86.36) an etcd host (y/n)? [n]: y
[+] Override Hostname of host (192.168.86.36) [none]: master
[+] Internal IP of host (192.168.86.36) [none]:
[+] Docker socket path on host (192.168.86.36) [/var/run/docker.sock]:
[+] SSH Address of host (2) [none]: 192.168.86.35
[+] SSH Port of host (2) [22]:
[+] SSH Private Key Path of host (192.168.86.35) [none]: ~/.ssh/id_rsa
[+] SSH User of host (192.168.86.35) [ubuntu]: ubuntu
[+] Is host (192.168.86.35) a Control Plane host (y/n)? [y]: n
[+] Is host (192.168.86.35) a Worker host (y/n)? [n]: y
[+] Is host (192.168.86.35) an etcd host (y/n)? [n]: n
[+] Override Hostname of host (192.168.86.35) [none]: worker
[+] Internal IP of host (192.168.86.35) [none]:
[+] Docker socket path on host (192.168.86.35) [/var/run/docker.sock]:
[+] Network Plugin Type (flannel, calico, weave, canal) [canal]: flannel
[+] Authentication Strategy [x509]:
[+] Authorization Mode (rbac, none) [rbac]:
[+] Kubernetes Docker image [rancher/hyperkube:v1.16.3-rancher1]:
[+] Cluster domain [cluster.local]:
[+] Service Cluster IP Range [10.43.0.0/16]:
[+] Enable PodSecurityPolicy [n]:
[+] Cluster Network CIDR [10.42.0.0/16]:
[+] Cluster DNS Service IP [10.43.0.10]:
[+] Add addon manifest URLs or YAML files [no]:
This generates cluster.yml, the RKE cluster configuration file:
这将生成RKE群集配置文件cluster.yml :
nodes:
- address: "192.168.86.36"
  port: "22"
  internal_address: ""
  role:
  - controlplane
  - etcd
  hostname_override: ""
  user: ubuntu
  docker_socket: /var/run/docker.sock
  ssh_key: ""
  ssh_key_path: ~/.ssh/id_rsa
  ssh_cert: ""
  ssh_cert_path: ""
  labels: {}
  taints: []
- address: "192.168.86.35"
  port: "22"
  internal_address: ""
  role:
  - worker
  hostname_override: ""
  user: ubuntu
  docker_socket: /var/run/docker.sock
  ssh_key: ""
  ssh_key_path: ~/.ssh/id_rsa
  ssh_cert: ""
  ssh_cert_path: ""
  labels: {}
  taints: []
services:
  etcd:
    image: ""
    extra_args: {}
    extra_binds: []
    extra_env: []
    external_urls: []
    ca_cert: ""
    cert: ""
    key: ""
    path: ""
    uid: 0
    gid: 0
    snapshot: null
    retention: ""
    creation: ""
    backup_config: null
  kube-api:
    image: ""
    extra_args: {}
    extra_binds: []
    extra_env: []
    service_cluster_ip_range: 10.43.0.0/16
    service_node_port_range: ""
    pod_security_policy: false
    always_pull_images: false
    secrets_encryption_config: null
    audit_log: null
    admission_configuration: null
    event_rate_limit: null
  kube-controller:
    image: ""
    extra_args: {}
    extra_binds: []
    extra_env: []
    cluster_cidr: 10.42.0.0/16
    service_cluster_ip_range: 10.43.0.0/16
  scheduler:
    image: ""
    extra_args: {}
    extra_binds: []
    extra_env: []
  kubelet:
    image: ""
    extra_args: {}
    extra_binds: []
    extra_env: []
    cluster_domain: cluster.local
    infra_container_image: ""
    cluster_dns_server: 10.43.0.10
    fail_swap_on: false
    generate_serving_certificate: false
  kubeproxy:
    image: ""
    extra_args: {}
    extra_binds: []
    extra_env: []
network:
  plugin: flannel
  options: {}
  node_selector: {}
authentication:
  strategy: x509
  sans: []
  webhook: null
addons: ""
addons_include: []
system_images:
  etcd: rancher/coreos-etcd:v3.3.15-rancher1
  alpine: rancher/rke-tools:v0.1.51
  nginx_proxy: rancher/rke-tools:v0.1.51
  cert_downloader: rancher/rke-tools:v0.1.51
  kubernetes_services_sidecar: rancher/rke-tools:v0.1.51
  kubedns: rancher/k8s-dns-kube-dns:1.15.0
  dnsmasq: rancher/k8s-dns-dnsmasq-nanny:1.15.0
  kubedns_sidecar: rancher/k8s-dns-sidecar:1.15.0
  kubedns_autoscaler: rancher/cluster-proportional-autoscaler:1.7.1
  coredns: rancher/coredns-coredns:1.6.2
  coredns_autoscaler: rancher/cluster-proportional-autoscaler:1.7.1
  kubernetes: rancher/hyperkube:v1.16.3-rancher1
  flannel: rancher/coreos-flannel:v0.11.0-rancher1
  flannel_cni: rancher/flannel-cni:v0.3.0-rancher5
  calico_node: rancher/calico-node:v3.8.1
  calico_cni: rancher/calico-cni:v3.8.1
  calico_controllers: rancher/calico-kube-controllers:v3.8.1
  calico_ctl: ""
  calico_flexvol: rancher/calico-pod2daemon-flexvol:v3.8.1
  canal_node: rancher/calico-node:v3.8.1
  canal_cni: rancher/calico-cni:v3.8.1
  canal_flannel: rancher/coreos-flannel:v0.11.0
  canal_flexvol: rancher/calico-pod2daemon-flexvol:v3.8.1
  weave_node: weaveworks/weave-kube:2.5.2
  weave_cni: weaveworks/weave-npc:2.5.2
  pod_infra_container: rancher/pause:3.1
  ingress: rancher/nginx-ingress-controller:nginx-0.25.1-rancher1
  ingress_backend: rancher/nginx-ingress-controller-defaultbackend:1.5-rancher1
  metrics_server: rancher/metrics-server:v0.3.4
  windows_pod_infra_container: rancher/kubelet-pause:v0.1.3
ssh_key_path: ~/.ssh/id_rsa
ssh_cert_path: ""
ssh_agent_auth: false
authorization:
  mode: rbac
  options: {}
ignore_docker_version: false
kubernetes_version: ""
private_registries: []
ingress:
  provider: ""
  options: {}
  node_selector: {}
  extra_args: {}
  dns_policy: ""
  extra_envs: []
  extra_volumes: []
  extra_volume_mounts: []
cluster_name: ""
cloud_provider:
  name: ""
prefix_path: ""
addon_job_timeout: 0
bastion_host:
  address: ""
  port: ""
  user: ""
  ssh_key: ""
  ssh_key_path: ""
  ssh_cert: ""
  ssh_cert_path: ""
monitoring:
  provider: ""
  options: {}
  node_selector: {}
restore:
  restore: false
  snapshot_name: ""
dns: null
Time to bring the cluster up!
是时候启动集群了!
% rke upWait as rke sets up the Kubernetes cluster:
等待rke建立Kubernetes集群:
INFO[0000] Running RKE version: v1.0.0
INFO[0000] Initiating Kubernetes cluster
INFO[0000] [certificates] Generating admin certificates and kubeconfig
INFO[0000] Successfully Deployed state file at [./cluster.rkestate]
INFO[0000] Building Kubernetes cluster
INFO[0000] [dialer] Setup tunnel for host [192.168.86.35]
INFO[0000] [dialer] Setup tunnel for host [192.168.86.36]
# Many more lines ...
INFO[0044] Finished building Kubernetes cluster successfully
A few more files would have been created at this point:
此时会创建更多文件:
$ ls
cluster.rkestate  cluster.yml  kube_config_cluster.yml
You should keep these files in a safe location if ever you need to recreate the cluster. You’ll need to copy kube_config_cluster.yml to a location where Kubernetes can find it:
如果需要重新创建群集,则应将这些文件保存在安全的位置。 您需要将kube_config_cluster.yml复制到Kubernetes可以找到它的位置:
$ mkdir ~/.kube
$ cp kube_config_cluster.yml $HOME/.kube/config
安装Kubectl (Install Kubectl)
Note: this step should only be done on the master node.
注意:此步骤仅应在master节点上执行。
Next, you should install the Kubernetes command-line tool, kubectl:
接下来,您应该安装Kubernetes命令行工具kubectl :
curl -s https://packages.cloud.google.com/apt/doc/apt-key.gpg | sudo apt-key add -
echo "deb https://apt.kubernetes.io/ kubernetes-xenial main" | sudo tee -a /etc/apt/sources.list.d/kubernetes.list
sudo apt-get update
sudo apt-get install -y kubectl
Once this step is completed, we can test it out by listing all the nodes that rke created:
完成此步骤后,我们可以通过列出rke创建的所有节点来rke :
% kubectl get nodes
NAME            STATUS   ROLES               AGE   VERSION
192.168.86.35   Ready    worker              53m   v1.16.3
192.168.86.36   Ready    controlplane,etcd   53m   v1.16.3
Success! Let’s do something else. We can inspect what containers were created:
成功! 让我们做点别的。 我们可以检查创建了哪些容器:
% kubectl get pods --all-namespaces
NAMESPACE       NAME                                      READY   STATUS      RESTARTS   AGE
ingress-nginx   default-http-backend-67cf578fc4-dk9l4     1/1     Running     0          49m
ingress-nginx   nginx-ingress-controller-bnwlv            1/1     Running     0          49m
kube-system     coredns-5c59fd465f-7gbff                  1/1     Running     0          49m
kube-system     coredns-5c59fd465f-mhzdb                  1/1     Running     0          49m
kube-system     coredns-autoscaler-d765c8497-p2zj4        1/1     Running     0          49m
kube-system     kube-flannel-vkxc6                        2/2     Running     0          54m
kube-system     kube-flannel-xjtst                        2/2     Running     0          54m
kube-system     metrics-server-64f6dffb84-hs99g           1/1     Running     0          49m
kube-system     rke-coredns-addon-deploy-job-kdwxm        0/1     Completed   0          49m
kube-system     rke-ingress-controller-deploy-job-rpvrq   0/1     Completed   0          49m
kube-system     rke-metrics-addon-deploy-job-x2m2j        0/1     Completed   0          49m
kube-system     rke-network-plugin-deploy-job-h5ffz       0/1     Completed   0          55m
Don’t worry about what pods are at this point. Just think of them as containers for now.
现在不必担心什么是豆荚。 暂时将它们视为容器。
安装头盔3 (Install Helm 3)
Note: this step should only be done on the master node.
注意:此步骤仅应在master节点上执行。
Helm is a Kubernetes package manager and is very handy for deploying applications and services onto Kubernetes clusters. We’ll use Helm to install Rancher and some other supporting services.
Helm是Kubernetes软件包管理器,非常适合在Kubernetes集群上部署应用程序和服务。 我们将使用Helm安装Rancher和其他一些支持服务。
$ curl https://raw.githubusercontent.com/helm/helm/master/scripts/get-helm-3 | bashhelm should be installed into the PATH:
helm应安装在PATH :
Downloading https://get.helm.sh/helm-v3.0.2-linux-amd64.tar.gz
Preparing to install helm into /usr/local/bin
helm installed into /usr/local/bin/helm
使用头盔安装Rancher (Install Rancher Using Helm)
Note: This step should only be done on the master node.
注意:此步骤仅应在master节点上执行。
$ helm repo add rancher-stable https://releases.rancher.com/server-charts/stableCreate a namespace for Rancher:
为Rancher创建名称空间:
$ kubectl create namespace cattle-system 安装cert-manager (Install cert-manager)
Note: this step should only be done on the master node.
注意:此步骤仅应在master节点上执行。
Cert Manager helps with automatically provisioning and managing TLS certificates in Kubernetes. There are options to use certificates from Let’s Encrypt for example, but for now, we shall keep things simple and use the default certificates generated by Rancher.
Cert Manager可帮助自动配置和管理Kubernetes中的TLS证书。 例如,有一些选项可以使用来自Let's Encrypt的证书,但是现在,我们将使事情变得简单,并使用Rancher生成的默认证书。
Note: here we are installing a slightly outdated version of cert-manager because the latest one (0.12) seems to have installation issues.
注意:这里我们正在安装cert-manager版本稍有过时,因为最新版本(0.12)似乎存在安装问题。
Follow these steps to install cert-manager onto the Kubernetes cluster:
请按照以下步骤将cert-manager安装到Kubernetes集群上:
$ kubectl apply -f https://raw.githubusercontent.com/jetstack/cert-manager/release-0.9/deploy/manifests/00-crds.yaml
$ kubectl create namespace cert-manager
$ kubectl label namespace cert-manager certmanager.k8s.io/disable-validation=true
$ helm repo add jetstack https://charts.jetstack.io
$ helm repo update
$ helm install --name cert-manager \
          --namespace cert-manager \
          --version v0.9.1 \
          jetstack/cert-manager
Check that everything went well:
检查一切是否顺利:
kubectl get pods --namespace cert-manager
NAME                                     READY   STATUS    RESTARTS   AGE
cert-manager-5b9ff77b7-x6vgn             1/1     Running   0          44s
cert-manager-cainjector-59d69b9b-nrgkf   1/1     Running   0          44s
cert-manager-webhook-cfd6587ff-8tcgt     1/1     Running   0          44s
Note that you might have to wait for some time (usually just a few minutes) for all the STATUS to turn to Running.
请注意,您可能需要等待一段时间(通常只需几分钟),所有STATUS才能变为正在Running 。
安装Rancher (Install Rancher)
Finally, you can install Rancher, which, among other things, provides a nice interface to manage your Kubernetes cluster(s):
最后,您可以安装Rancher,Rancher提供了一个不错的界面来管理Kubernetes集群:
$ helm install rancher rancher-stable/rancher \
  --namespace cattle-system \
  --set hostname=rancher.example.com
Check that everything went well:
检查一切是否顺利:
kubectl -n cattle-system rollout status deploy/rancherWaiting for deployment "rancher" rollout to finish: 0 of 3 updated replicas are available...Wait till all the replicates have been updated before performing the next step.
等待直到所有副本均已更新,然后再执行下一步。
Now, since we don’t have a load balancer, we need to perform an additional step to be able to access the Rancher UI. Create the following file an name it ingress.yml and fill it with the following (adapt the host to whatever you have picked):
现在,由于我们没有负载平衡器,因此我们需要执行一个额外的步骤才能访问Rancher UI。 创建一个名为ingress.yml的以下文件,并用以下内容填充(使host适应您选择的任何内容):
apiVersion: extensions/v1beta1
kind: Ingress
metadata:
  name: rancher-demo-ingress
spec:
  rules:
  - host: rancher-demo.domain.test
    http:
      paths:
      - path: /
        backend:
          serviceName: rancher-demo
          servicePort: 443
Then run:
然后运行:
$ kubectl apply -f ingress.ymlAfter that, Rancher should available at:
之后,Rancher应该在以下位置提供:
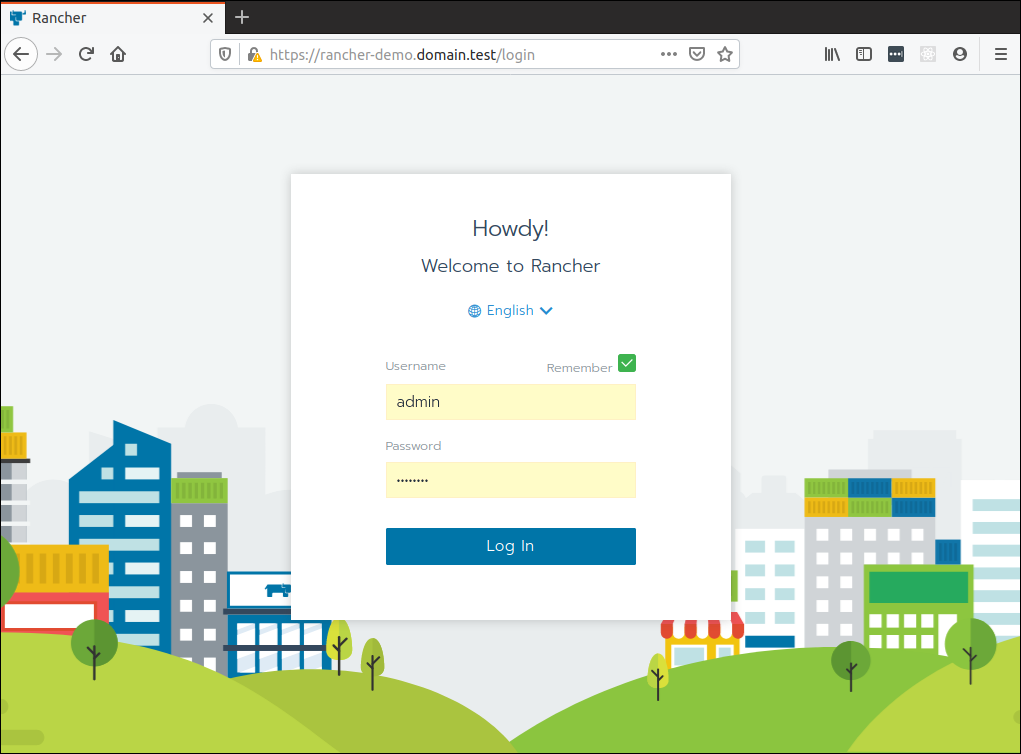
https://rancher-demo.domain.testAccept the security exception your browser might complain about and you should be greeted with the following screen with a prompt to create a password and set the domain name (already pre-filled). Go ahead and do that:
接受您的浏览器可能会抱怨的安全异常,然后会出现以下屏幕,提示您创建密码并设置域名(已预先填写)。 继续执行以下操作:
Give Rancher a few moments to set things up. Once done, you should get an overview of your cluster:
请让Rancher稍作设置。 完成后,您应该获得群集的概述:
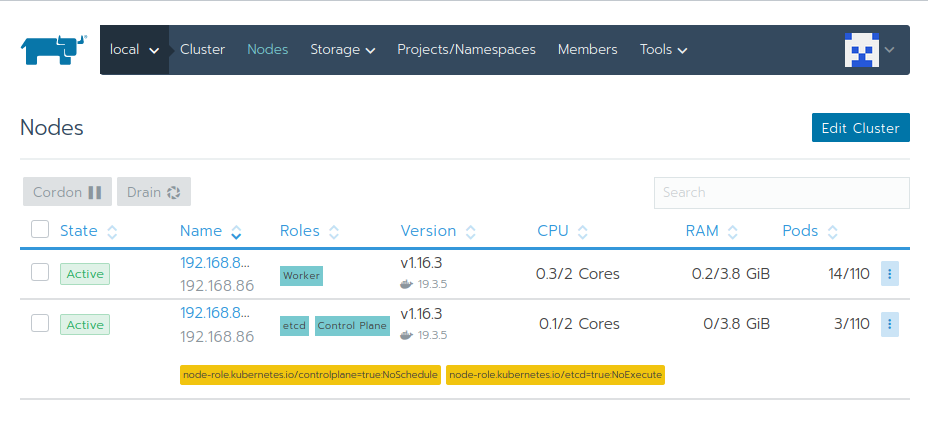
Go ahead and click around and revel in the fruits of your labor!
继续前进,四处浏览,尽情享受您的劳动成果!
摘要 (Summary)
If you’ve reached this stage, you should congratulate yourself on persevering. Installing a Kubernetes cluster isn’t for the faint of heart, even with tools like Rancher to somewhat ease the process.
如果您已达到此阶段,则应该祝贺自己坚持不懈。 即使使用Rancher之类的工具来稍微简化一下过程,安装Kubernetes集群也不是出于胆小。
Let’s review what we’ve done.
让我们回顾一下我们所做的。
We went through why training ML models are just the tip of the proverbial iceberg, and that a lot of other supporting software needs to come together to put these models into production.
我们讨论了为什么训练 ML模型只是众所周知的冰山一角,并且需要将许多其他支持软件整合在一起才能将这些模型投入生产。
More importantly, we set up a non-trivial Kubernetes cluster with the Rancher Kubernetes Engine and installed Rancher to manage the cluster. This is no mean feat. However, we still haven’t done any machine learning deployment yet! That will be the next article in the series, where we install Kubeflow, an open-source machine learning platform.
更重要的是,我们使用Rancher Kubernetes引擎建立了一个重要的Kubernetes集群,并安装了Rancher来管理该集群。 这绝非易事。 但是,我们尚未进行任何机器学习部署! 这将是该系列的下一篇文章,我们将在该文章中安装开源机器学习平台Kubeflow。
学分 (Credits)
Special thanks go to Sebastiaan van Steenis‘s article that showed how to set up an RKE cluster without a load balancer.
特别感谢Sebastiaan van Steenis的文章,该文章显示了如何在不使用负载均衡器的情况下设置RKE群集。
翻译自: https://www.sitepoint.com/setting-up-on-premise-kubernetes/
kubernetes 机器

开源、云原生的融合云平台
更多推荐
 0
0 0
0- 0


 已为社区贡献1条内容

所有评论(0)