使用 Nodejs 和 mongoDB 进行身份验证 - 第 1 部分
学习一门语言通常很容易,直到后来才忘记身份验证。然后你意识到你错过了一些重要的步骤。那是我的情况。
本教程只是身份验证系列的开始。在本系列课程中,我们将学习nodejs、bcrypt、jsonwebtoken、mongoDB和React等工具。让我们从获取入门代码开始。
起始码
- 请在此处克隆启动代码。
$ git clone -b starter-code https://github.com/EBEREGIT/auth-backend
进入全屏模式 退出全屏模式
-
在项目目录中,运行
npm install安装所有必要的依赖项 -
运行
nodemon index以在端口 3000 上为项目提供服务。在浏览器上检查http://localhost:3000/以确认
数据库设置
在这一部分中,我们将介绍数据库设置,我们使用mongoDB atlas。
前往网站并创建一个免费帐户
创建新数据库用户
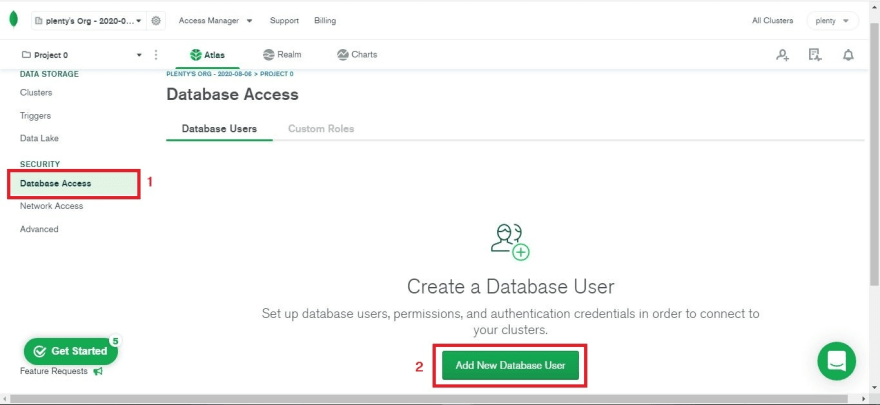
- 在您的仪表板上,单击左侧的
Database Access链接。 (这将提示您添加一个新的数据库用户)。
[ ](https://res.cloudinary.com/practicaldev/image/fetch/s--baMEOLfv--/c_limit%2Cf_auto%2Cfl_progressive%2Cq_auto%2Cw_880/https://dev-to -uploads.s3.amazonaws.com/i/j3jakvaahhes3hwifuyw.JPG)
- 点击按钮。 (
Add New Database User对话框打开)
[ ](https://res.cloudinary.com/practicaldev/image/fetch/s--1n4ijaQ7--/c_limit%2Cf_auto%2Cfl_progressive%2Cq_auto%2Cw_880/https:// dev-to-uploads.s3.amazonaws.com/i/3y63tqp3ama824jyjagg.JPG)
-
选择
Password作为验证方法 -
输入您选择的用户名
-
输入密码或自动生成安全密码。 (我建议您自动生成密码并将其存储在某个地方。您很快就会需要它)
-
单击
Add User以完成该过程。
[ ](https://res.cloudinary.com/practicaldev/image/fetch/s--iCtuSW86--/c_limit%2Cf_auto%2Cfl_progressive%2Cq_auto%2Cw_880/https://dev-to- uploads.s3.amazonaws.com/i/iv92tdfrqegxgnj1lwyz.JPG)
创建集群
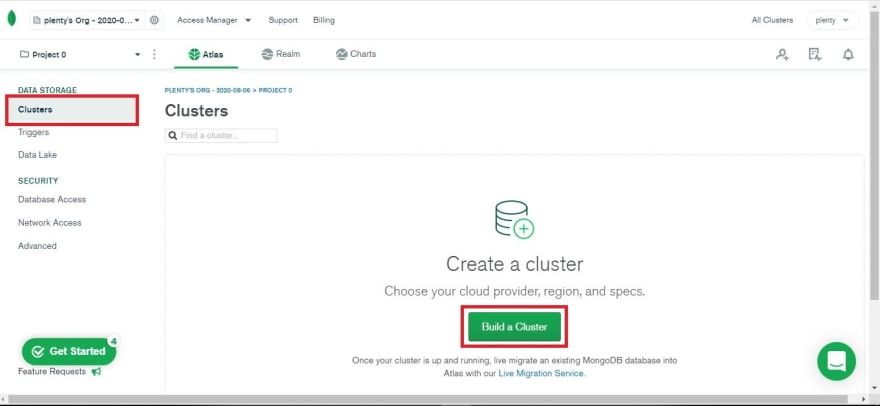
- 在侧链接上,单击
clusters。(这会将您带到带有按钮的集群页面:Build a Cluster)
[ ](https://res.cloudinary.com/practicaldev/image/fetch/s--ePCmxHK6--/c_limit%2Cf_auto%2Cfl_progressive%2Cq_auto%2Cw_880/https://dev- to-uploads.s3.amazonaws.com/i/s2mtfzhyrzkz79omckha.JPG)
-
单击按钮。 (又一页出现了)
-
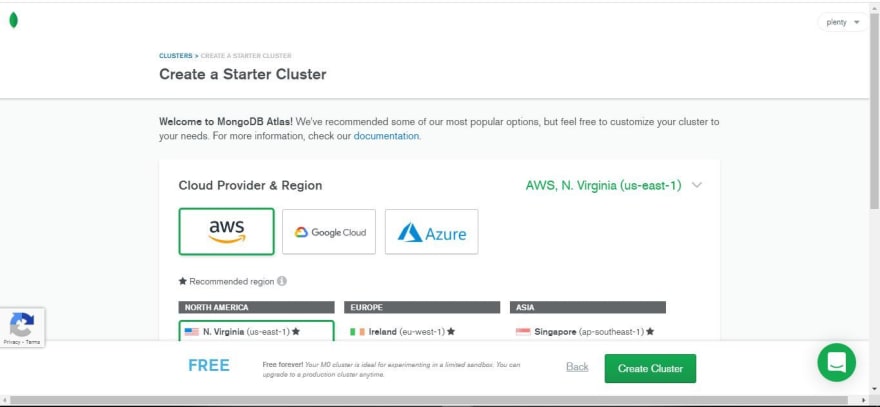
选择
free cluster。(设置页面打开。我们不会在此页面上进行任何更改)
[ ](https://res.cloudinary.com/practicaldev/image/fetch/s--Zawaw5zd--/c_limit%2Cf_auto%2Cfl_progressive%2Cq_auto%2Cw_880/https://dev- to-uploads.s3.amazonaws.com/i/zmitdioyw4io3vuuv7u2.JPG)
- 点击
Create Cluster(等待集群创建完成,完成后你的屏幕应该和我的一样)
[ ](https://res.cloudinary.com/practicaldev/image/fetch/s--7eYPfmk1--/c_limit%2Cf_auto%2Cfl_progressive%2Cq_auto%2Cw_880/https://dev- to-uploads.s3.amazonaws.com/i/whgefzv95dnmy2qo91xn.JPG)
将用户连接到集群
- 点击
connect按钮
[ ](https://res.cloudinary.com/practicaldev/image/fetch/s--XVHywu4W--/c_limit%2Cf_auto%2Cfl_progressive%2Cq_auto%2Cw_880/https://dev- to-uploads.s3.amazonaws.com/i/n92cm0ztfc55i66vwx8t.JPG)
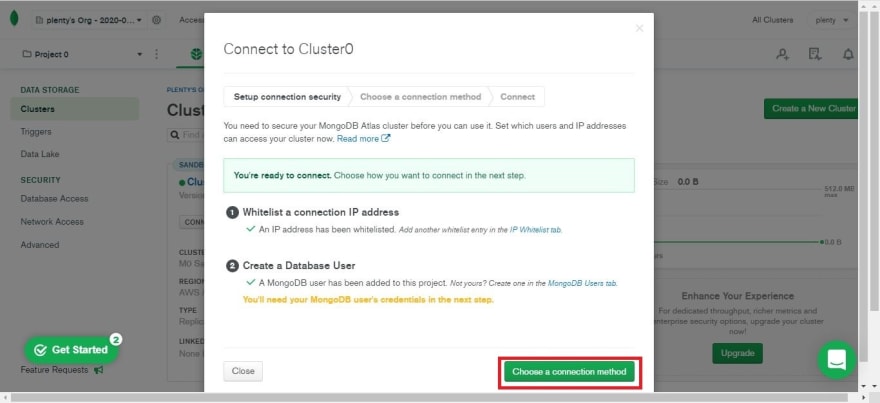
-
在出现的
Connect to Cluster0模态中,选择Connect from Anywhere并更新设置 -
点击
Choose a connection method按钮
[ ](https://res.cloudinary.com/practicaldev/image/fetch/s--PQQ0bcgR--/c_limit%2Cf_auto%2Cfl_progressive%2Cq_auto%2Cw_880/https://dev- to-uploads.s3.amazonaws.com/i/y42t9m2kzmkp3oon0bb7.JPG)
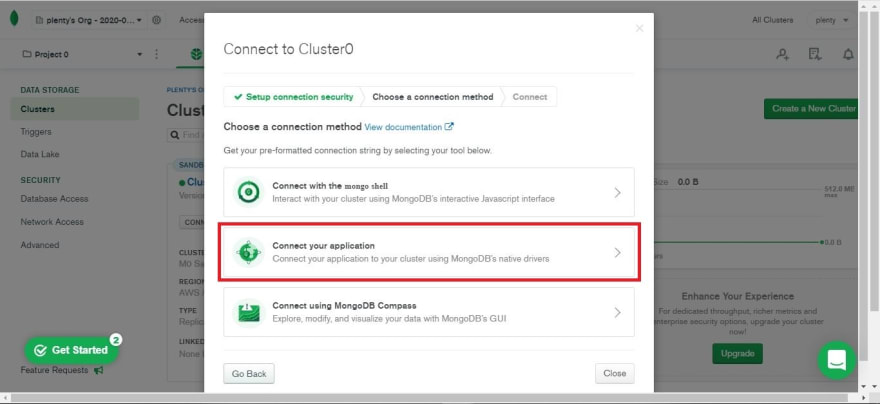
- 点击
Connect Your Application。(在打开的页面中,确保DRIVER为nodejs,VERSION为3.6 or later)
[ ](https://res.cloudinary.com/practicaldev/image/fetch/s--Zg008XpH--/c_limit%2Cf_auto%2Cfl_progressive%2Cq_auto%2Cw_880/https://dev- to-uploads.s3.amazonaws.com/i/9yrg7nknor2xhogwldoe.JPG)
- 复制连接字符串并存储在某处。你很快就会需要它。
[ ](https://res.cloudinary.com/practicaldev/image/fetch/s--dWFKw9OP--/c_limit%2Cf_auto%2Cfl_progressive%2Cq_auto%2Cw_880/https://dev- to-uploads.s3.amazonaws.com/i/jj816egjtx7jjsiixs1a.JPG)
应该和我的差不多
mongodb+srv://plenty:<password>@cluster0.z3yuu.mongodb.net/<dbname>?retryWrites=true&w=majority
进入全屏模式 退出全屏模式
- 关闭对话框
创建集合(表)
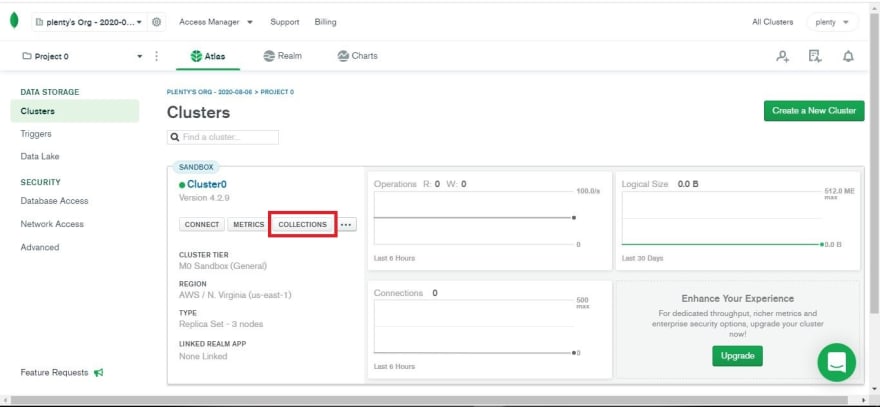
- 回到集群页面,点击
COLLECTIONS
[ ](https://res.cloudinary.com/practicaldev/image/fetch/s--tZhCD1d_--/c_limit%2Cf_auto%2Cfl_progressive%2Cq_auto%2Cw_880/https://dev- to-uploads.s3.amazonaws.com/i/gtk0xqwbcf7xgdef6d9p.JPG)
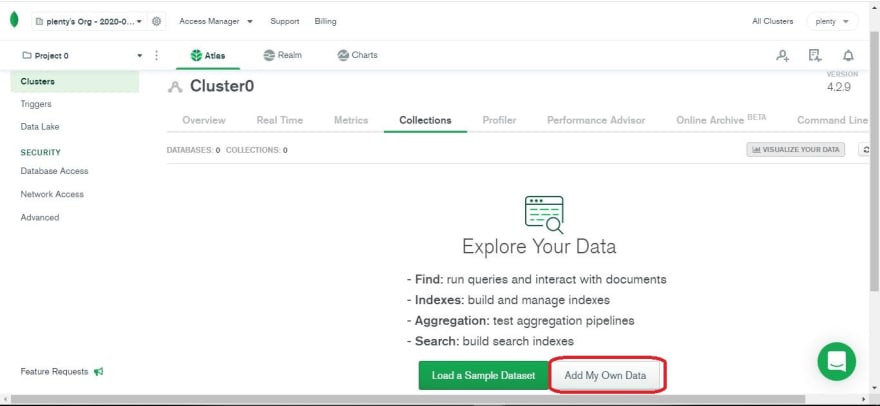
- 你应该在这个页面下面。点击
Add My Own Data按钮
[ ](https://res.cloudinary.com/practicaldev/image/fetch/s--LbLsxv8b--/c_limit%2Cf_auto%2Cfl_progressive%2Cq_auto%2Cw_880/https://dev- to-uploads.s3.amazonaws.com/i/b3itcf0383pvcuk7f8g7.JPG)
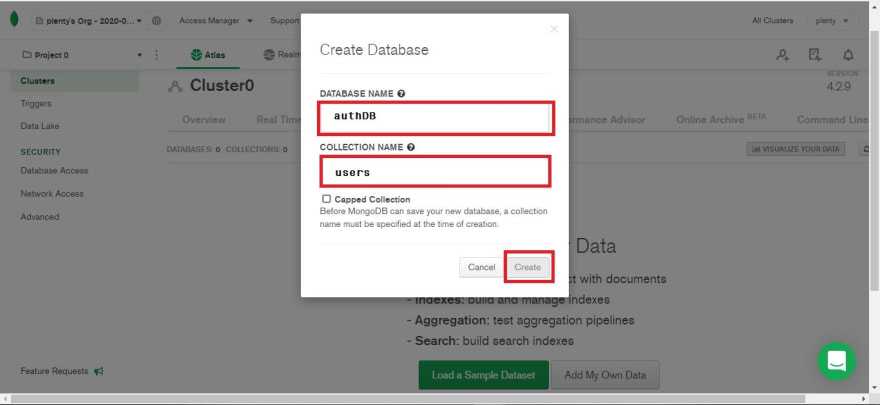
- 在出现的对话框中,输入一个
database name和一个collection name。(我的数据库名称是authDB,我的集合名称是users)
[ ](https://res.cloudinary.com/practicaldev/image/fetch/s--CqRKoOAA--/c_limit%2Cf_auto%2Cfl_progressive%2Cq_auto%2Cw_880/https://dev- to-uploads.s3.amazonaws.com/i/2bb2p5fm1kz3muma35ow.JPG)
- 点击
Create按钮
恭喜您创建了如下数据库和集合(表)
将Nodejs连接到MongoDB
-
让我们回到我们的启动代码
-
还记得你生成的数据库名称、连接字符串和密码吗?我们稍后会使用它们
-
将
<password>和<dbname>替换为您生成的密码和您创建的数据库名称,如下所示
mongodb+srv://plenty:RvUsNHBHpETniC3l@cluster0.z3yuu.mongodb.net/authDB?retryWrites=true&w=majority
进入全屏模式 退出全屏模式
- 在根文件夹中创建一个文件并命名为
.env
不知道.env?看看这篇文章
- 创建一个变量
DB_URL并将连接字符串分配给它,如下所示
DB_URL=mongodb+srv://plenty:RvUsNHBHpETniC3l@cluster0.z3yuu.mongodb.net/authDB?retryWrites=true&w=majority
进入全屏模式 退出全屏模式
-
创建一个文件夹并将其命名为
db -
在其中创建一个新文件并将其命名为
dbConnect.js -
安装猫鼬
npm i mongoose -s
进入全屏模式 退出全屏模式
[ ](https://res.cloudinary.com/practicaldev/image/fetch/s--ss3IFa-C--/c_limit%2Cf_auto%2Cfl_progressive%2Cq_auto%2Cw_880/https:// dev-to-uploads.s3.amazonaws.com/i/lsyp8s6sk30ke7g8x0ym.JPG)
- 在
dbConnect文件中,需要mongoose和env,代码如下
// external imports
const mongoose = require("mongoose");
require('dotenv').config()
进入全屏模式 退出全屏模式
- 创建并导出一个函数来容纳我们的连接,就像这样
async function dbConnect() {

}

module.exports = dbConnect;
进入全屏模式 退出全屏模式
- 在函数中,尝试使用
.evn文件中的连接字符串连接到我们创建的数据库
// use mongoose to connect this app to our database on mongoDB using the DB_URL (connection string)
  mongoose
    .connect(
        process.env.DB_URL,
      {
        //   these are options to ensure that the connection is done properly
        useNewUrlParser: true,
        useUnifiedTopology: true,
        useCreateIndex: true,
      }
    )
进入全屏模式 退出全屏模式
- 使用
then...catch...块显示连接是否成功
.then(() => {
      console.log("Successfully connected to MongoDB Atlas!");
    })
    .catch((error) => {
      console.log("Unable to connect to MongoDB Atlas!");
      console.error(error);
    });
进入全屏模式 退出全屏模式
dbConnect文件应如下所示:
// external imports
const mongoose = require("mongoose");
require('dotenv').config()

async function dbConnect() {
  // use mongoose to connect this app to our database on mongoDB using the DB_URL (connection string)
  mongoose
    .connect(
        process.env.DB_URL,
      {
        //   these are options to ensure that the connection is done properly
        useNewUrlParser: true,
        useUnifiedTopology: true,
        useCreateIndex: true,
      }
    )
    .then(() => {
      console.log("Successfully connected to MongoDB Atlas!");
    })
    .catch((error) => {
      console.log("Unable to connect to MongoDB Atlas!");
      console.error(error);
    });
}

module.exports = dbConnect;
进入全屏模式 退出全屏模式
- 在
app.js文件中,需要 dbConnect 函数并像这样执行它
// require database connection
const dbConnect = require("./db/dbConnect");

// execute database connection
dbConnect();
进入全屏模式 退出全屏模式
- 检查您的终端。如果您没有错过任何步骤,则应该打印
"Successfully connected to MongoDB Atlas!"。见下面我的
[ ](https://res.cloudinary.com/practicaldev/image/fetch/s--6IYtlbB6--/c_limit%2Cf_auto%2Cfl_progressive%2Cq_auto%2Cw_880/https://dev-to-uploads.s3.amazonaws .com/i/u36z3xyjtr6mpgyq6gty.JPG)
结论
在本文中,我们已经能够看到如何轻松地将我们的 nodejs 应用程序连接到我们在 mongoDB 上的数据库。
所有代码都是这里
 EBEREGIT/身份验证后端
本教程教授如何使用 nodejs 和 mongoDB 为用户创建身份验证
在下一篇文章中,我们将看为用户创建模型并注册用户
MongoDB社区为您提供最前沿的新闻资讯和知识内容
更多推荐
 0
0 0
0- 0


 已为社区贡献32862条内容

所有评论(0)