HarmonyNEXT实现的浮动的贴边小组件
摘要 本文介绍了在鸿蒙系统中实现一个可贴边浮动小组件的开发方法。该组件通过position属性相对父组件定位,不会影响后续页面布局。关键实现包括:1)使用PanGesture手势实现拖拽功能;2)通过计算组件位置实现自动贴边逻辑;3)设置组件有效区域边界限制。文中详细展示了组件代码结构,重点讲解了使用时必须传递的参数:父组件宽高、图标尺寸、初始位置等。组件支持拖拽结束后自动贴边到父组件左右两侧,并
鸿蒙实现的一个可以贴边的小组件
做了一个靠左靠右贴边的小组件,使用position属性相对于父组件的,不会影响后续的页面布局。这个浮动的组件上下不会超过父组件的边界,当距离左边小于父组件宽度1/4的时候贴左边,当距离大于父组件宽度3/4的时候贴左边这些都可以根据自己的实际清空调整。

一、贴边小组件
首先我把贴边小组件的代码贴上来,里面的注释也比较详细,就不再过的解释这一块代码的了,一会主要说下用使用这个小组件的时候必须要传的几个参数。
@ComponentV2
export struct FloatingAIAssistant {
  //这两个是图标的宽高
  @Require @Param floatIconWidth: number;
  @Require @Param floatIconHeight: number;
  //这两个是有效区域的宽高,图标不能超过这个区域
  @Require @Param effectiveWidth: number;
  @Require @Param effectiveHeight: number;
  //这两个是父组件传过来的图标相对于父组件的位置也就是150,150
  @Require @Param relativePositionWidth: number;
  @Require @Param relativePositionHeight: number;
  //这是图标以自身为坐标(0,0)偏移量, 最终通过该坐标确定图标的位置
  @Local offsetX: number = 0;
  @Local offsetY: number = 0;
  // 这是图标偏移之前的以自身为坐标的位置(0,0)
  private initialX: number = 0;
  private initialY: number = 0;
  build() {
    Column() {
      // AI小助手图标
      Image($r('app.media.ai_logo_icon')) // 请替换为你的图标资源
        .borderRadius((this.floatIconWidth - 10) / 2)
        .width(this.floatIconWidth - 10)
        .height(this.floatIconHeight - 10)
        .translate({ x: this.offsetX, y: this.offsetY, z: 0 })
        .gesture(
          // 拖动手势
          PanGesture()
            .onActionStart(() => {
              // 记录拖动开始时图标的位置
              this.initialX = this.offsetX;
              this.initialY = this.offsetY;
            })
            .onActionUpdate((event: GestureEvent) => {
              // 更新图标位置,跟随手指拖动
              this.offsetX = this.initialX + event.offsetX;
              this.offsetY = this.initialY + event.offsetY;
            })
            .onActionEnd(() => {
              // 拖动结束,计算贴边
              this.snapToEdge();
            })
        )
        .onClick(() => {
          // 这里可以添加打开AI助手主界面的逻辑
        })
    }
    .width(this.floatIconWidth)
    .height(this.floatIconHeight)
    .borderRadius(this.floatIconWidth / 2)
  }

  // 自动贴边逻辑
  private snapToEdge() {
    //先算出其在父组件中相对的位置吧
    const absoluteX = this.offsetX + this.relativePositionWidth;
    const absoluteY = this.offsetY + this.relativePositionHeight;
    //根据其在父组件中相对的位置划定范围
    //设置X轴位置
    if (absoluteX <= this.effectiveWidth * (1 / 4)) {
      this.offsetX = - this.relativePositionWidth - this.floatIconWidth / 2;
    } else if (absoluteX >= this.effectiveWidth * (3/4)) {
      this.offsetX = this.effectiveWidth - this.relativePositionWidth - this.floatIconWidth / 2;
    }
    //设置Y轴位置
    if (absoluteY <= 0) {
      //不能超过最上面
      this.offsetY = - this.relativePositionHeight;
    } else if (absoluteY + this.floatIconHeight >= this.effectiveHeight) {
      this.offsetY = this.effectiveHeight - this.relativePositionHeight - this.floatIconHeight;
    }
  }
}
二、使用的时候几个参数讲解
import { FloatingAIAssistant } from 'core';

@Entry
@ComponentV2
struct TestFloatingAIAssistantPage {
  @Local effectiveWidth: number = 0;
  @Local effectiveHeight: number = 0;
  @Local floatIconWidth: number = 60;
  @Local floatIconHeight: number = 60;
  @Local message: string = '一个贴边的小组件';
  build() {
    Column() {
      Column() {
        Text(this.message)
          .fontSize($r('app.float.page_text_font_size'))
          .fontWeight(FontWeight.Bold)
      }
      .width('100%')

      Row() {
        FloatingAIAssistant({
          effectiveWidth: this.effectiveWidth,   //父组件宽度
          effectiveHeight: this.effectiveHeight, //父组件高度
          floatIconWidth: this.floatIconWidth,   //悬浮可拖动Icon宽度
          floatIconHeight: this.floatIconHeight, //悬浮可拖动Icon高度
          /**
           * 默认让其靠父组件右贴边,上下居中
           */
          relativePositionWidth: this.effectiveWidth - this.floatIconWidth / 2,
          relativePositionHeight: (this.effectiveHeight - this.floatIconHeight)  / 2
        })
          /**
           * 必须设置FloatingAIAssistant组件的position属性,该属性设置了组件相对于父组件的位置,并且是浮动的
           * 不会影响后续组件的布局
           */
          .position({
            left: this.effectiveWidth - this.floatIconWidth / 2,
            top: (this.effectiveHeight - this.floatIconHeight)  / 2
          })
      }
      .width('60%')
      .height('65%')
      .onAreaChange((oldValue, newValue) => {
        this.effectiveWidth = parseInt(newValue.width.toString());
        this.effectiveHeight = parseInt(newValue.height.toString());
      })
      .backgroundColor(Color.Yellow)
    }
    .height('100%')
  }
}
1、获取父组件的实际宽高
在具体使用的过程中,贴边小组件一定要设置一个可拖动范围,我们一般使用onAreaChange获取包含FloatingAIAssistant组件的父组件的实际宽高,并且传递给FloatingAIAssistant组件,具体是通过下面代码实现的:
.onAreaChange((oldValue, newValue) => {
    this.effectiveWidth = parseInt(newValue.width.toString());
    this.effectiveHeight = parseInt(newValue.height.toString());
})
2、我们要设置浮动Icon宽高
这个具体的宽高大家根据自己的实际情况去设置,但是不建议太小,原因是太小贴边的话会和系统的返回后退手势冲突。
@Local floatIconWidth: number = 60;
@Local floatIconHeight: number = 60;
3、制定Icon相对父组件的初始位置
这个方便大家阅读FloatingAIAssistant组件里面贴边的代码,这里给大家啰嗦几句,首先我们设置position时相对于父组件的定位,最终的目视的效果要求也是要相对于父组件的偏移,但是FloatingAIAssistant内部拖动的时候的偏移量是相对于自身的,也就是说不管是设置的position相对父组件的位置是多少,在FloatingAIAssistant内部拖动计算偏移量的时候都是(0,0),所以才有一堆麻烦的计算,当然如果有大佬有简单方式的话还希望贴出来分享下:
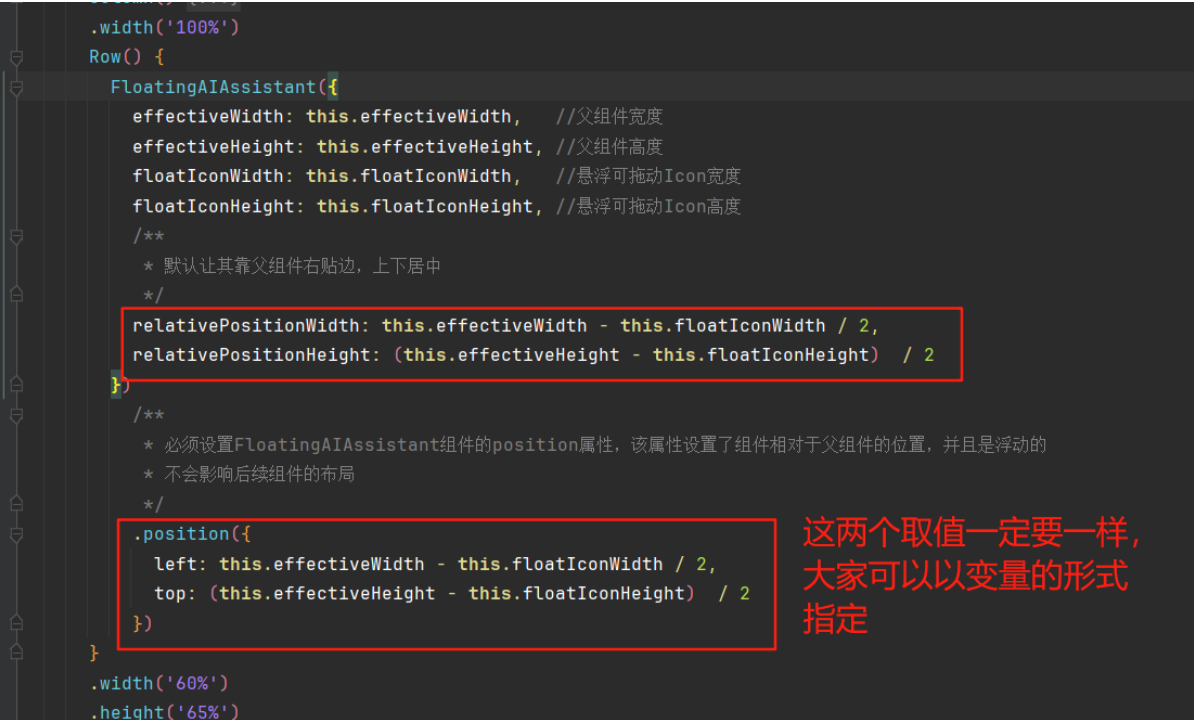
偏移量是相对于自身的,也就是说不管是设置的position相对父组件的位置是多少,在FloatingAIAssistant内部拖动计算偏移量的时候都是(0,0),所以才有一堆麻烦的计算,当然如果有大佬有简单方式的话还希望贴出来分享下:
[外链图片转存中…(img-ol1QKbJa-1756190983055)]

纵情码海钱塘涌,杭州开发者创新动! 属于杭州的开发者社区!致力于为杭州地区的开发者提供学习、合作和成长的机会;同时也为企业交流招聘提供舞台!
更多推荐


 4
4 0
0- 0


 已为社区贡献1条内容

所有评论(0)