如何使用 AWS CLI 创建 VPC、子网、路由表、安全组和实例
在本文中,我将演示如何在不离开终端的情况下创建 VPC、子网、路由表、安全组和实例。之后,我们将在实例上安装 Apache,但是,这是可选的。
目录
1.创建VPC
2.创建公私子网
3.[为VPC]创建互联网网关(#internet-gateway)
4.为NAT网关创建弹性IP地址
5.创建NAT网关
6.为每个子网创建路由表
7.创建路由
8.将路由表关联到子网
9.为VPC创建安全组
10.创建密钥对
11.运行实例
12.启动实例
先决条件
-
AWS 账户。您可以在此处注册并按照此教程进行设置。
-
AWS CLI。您可以使用此教程进行设置,并使用此文章进行配置。
如果你有这两个设置,那么你很高兴。现在,让我们开始吧!
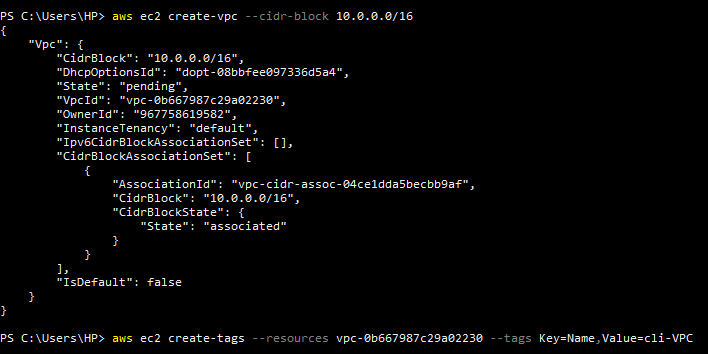
步骤 1 — 创建 VPC
VPC(虚拟私有云)是托管在公有云环境中的安全隔离私有云。使用 VPC,您可以设置子网、IP 范围,还可以为您的服务定义规则。
要创建 VPC,请打开终端并输入以下命令:
aws ec2 create-vpc --cidr-block 10.0.0.0/16
进入全屏模式 退出全屏模式
您的终端应该会响应一系列有关您刚刚创建的新 VPC 的信息。此信息的一部分应该是 VPC id。
您可以决定在您的 VPC 中添加一个标签,以便在您开始拥有多个 VPC 后轻松识别它,为此,请运行以下命令:
aws ec2 create-tags --resources <vpc-id> --tags Key=<tag-key>,Value=<tag-value>
进入全屏模式 退出全屏模式
cidr 代表无类域间路由。
[ ](https://res.cloudinary.com/practicaldev/image/fetch/s--ie_x8pCU--/c_limit%2Cf_auto%2Cfl_progressive%2Cq_auto%2Cw_880/https://user-images.githubusercontent .com/33374159/112991594-33170780-915f-11eb-8ebe-5cc12c4ddffd.png)
第 2 步 - 创建公有和私有子网
子网(Subnetwork)将大型网络拆分为一组较小的互连网络,以减少流量拥塞并提高路由效率。
我们将创建两个子网,一个私有子网和一个公共子网,然后为每个子网附加一个标签以区分它们。
要创建公共子网,请运行以下命令:
aws ec2 create-subnet --vpc-id <vpc-id> --cidr-block 10.0.1.0/24
进入全屏模式 退出全屏模式
同样,您的终端应该响应您刚刚创建的子网的信息。就像我们为 VPC 本身所做的那样,选择子网 id 并为其添加标签:
aws ec2 create-tags --resources <subnet-id> --tags Key=<tag-key>,Value=<tag-value>
进入全屏模式 退出全屏模式
对于私有子网:
aws ec2 create-subnet --vpc-id <vpc-id> --cidr-block 10.0.2.0/24
进入全屏模式 退出全屏模式
对于标签:
aws ec2 create-tags --resources <subnet-id> --tags Key=<tag-key>,Value=<tag-value>
进入全屏模式 退出全屏模式
这里还需要提一下,用于创建公共子网和私有子网的命令仅在--cidr-block参数上有所不同,因此请务必注意这一点。
[ ](https://res.cloudinary.com/practicaldev/image/fetch/s--DujO5FdV--/c_limit%2Cf_auto%2Cfl_progressive%2Cq_auto%2Cw_880/https://user-images.githubusercontent .com/33374159/112991951-9e60d980-915f-11eb-9fc0-5323faa8abc3.png)
第 3 步 - 为 VPC 创建 Internet 网关
Internet gateway (IGW) 只是用来将 VPC 连接到 Internet,以便 VPC 资源可以访问 Internet 并通过 Internet 访问。
要创建 Internet 网关,请使用以下命令:
aws ec2 create-internet-gateway
进入全屏模式 退出全屏模式
如果需要,您可以按照我们为所有其他资源创建的方式向刚刚创建的 Internet 网关添加标签:
aws ec2 create-tags --resources <internet-gateway-id> --tags Key=<tag-key>,Value=<tag-value>
进入全屏模式 退出全屏模式
然后将 Internet 网关连接到 VPC。
aws ec2 attach-internet-gateway --internet-gateway-id <internet-gateway-id> --vpc-id <vpc-id>
进入全屏模式 退出全屏模式
[ ](https://res.cloudinary.com/practicaldev/image/fetch/s--rrKNapP6--/c_limit%2Cf_auto%2Cfl_progressive%2Cq_auto%2Cw_880/https://user-images.githubusercontent .com/33374159/112992286-f26bbe00-915f-11eb-83f0-27ac89cbd686.png)
第 4 步 - 为 NAT 网关创建弹性 IP 地址
弹性 IP 地址是保留的 IPv4 公共地址,可分配给实例以启用与 Internet 的通信。
为了让我们创建一个 NAT 网关,我们需要一个弹性 IP 地址。运行以下命令创建弹性 IP 地址。
aws ec2 allocate-address --domain vpc
进入全屏模式 退出全屏模式
[ ](https://res.cloudinary.com/practicaldev/image/fetch/s--APrthu33--/c_limit%2Cf_auto%2Cfl_progressive%2Cq_auto%2Cw_880/https://user-images.githubusercontent .com/33374159/112992643-41b1ee80-9160-11eb-9166-4e819757d599.png)
步骤 5 - 创建 NAT 网关
NAT(网络地址转换)网关用于使私有子网中的实例能够连接到 Internet 或其他 AWS 服务,但会阻止 Internet 连接到这些实例。
要创建 NAT 网关,我们需要添加 NAT 网关所在的公共子网,并将弹性 IP 地址与 NAT 网关相关联。运行以下命令创建 NAT 网关。
aws ec2 create-nat-gateway --subnet-id <public-subnet-id> --allocation-id <elastic-ip-address-id>
进入全屏模式 退出全屏模式
然后将标签添加到 NAT 网关。
aws ec2 create-tags --resources <nat-gateway-id> --tags Key=<tag-key>,Value=<tag-value>
进入全屏模式 退出全屏模式
[ ](https://res.cloudinary.com/practicaldev/image/fetch/s--6x3XsK7Z--/c_limit%2Cf_auto%2Cfl_progressive%2Cq_auto%2Cw_880/https://user-images.githubusercontent .com/33374159/112992950-95243c80-9160-11eb-8f71-1d6b72549ad4.png)
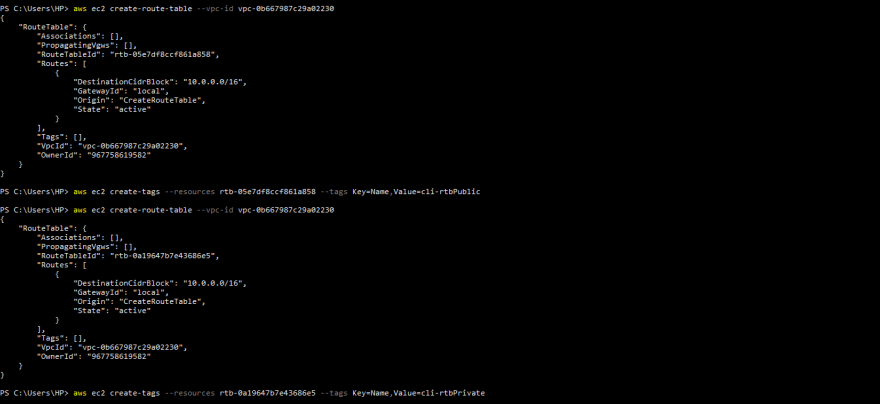
第 6 步 - 为每个子网创建路由表
路由表包含一组规则,用于确定来自子网或 Internet 网关的网络流量将被定向到何处。
现在,我们需要两个路由表,每个子网一个。路由表将以相同的方式创建,但每个路由表将使用不同的标签。
aws ec2 create-route-table --vpc-id <vpc-id>
进入全屏模式 退出全屏模式
为每个路由表添加一个标签。
您可以将第一个路由表标记为公共。
aws ec2 create-tags --resources <first-route-table-id> --tags Key=<tag-key>,Value=<tag-value>
进入全屏模式 退出全屏模式
然后将第二个路由表标记为私有。
aws ec2 create-tags --resources <second-route-table-id> --tags Key=<tag-key>,Value=<tag-value>
进入全屏模式 退出全屏模式
[ ](https://res.cloudinary.com/practicaldev/image/fetch/s--WZ0siN6H--/c_limit%2Cf_auto%2Cfl_progressive%2Cq_auto%2Cw_880/https://user-images.githubusercontent .com/33374159/112993513-327f7080-9161-11eb-8240-5b106464aff3.png)
第 7 步 - 创建路线
我们现在将为之前创建的路由表创建路由。
我们首先将为公共子网创建的路由表附加到 Internet 网关。该路由匹配所有 IPv4 流量 (0.0.0.0/0) 并将其路由到指定的 Internet 网关。
aws ec2 create-route --route-table-id <public-route-table-id> --destination-cidr-block 0.0.0.0/0 --gateway-id <internet-gateway-id>
进入全屏模式 退出全屏模式
然后将为私有子网创建的路由表附加到 NAT 网关。该路由匹配所有 IPv4 流量 (0.0.0.0/0) 并将其路由到指定的 NAT 网关。
aws ec2 create-route --route-table-id <private-route-table-id> --destination-cidr-block 0.0.0.0/0 --gateway-id <nat-gateway-id>
进入全屏模式 退出全屏模式
[ ](https://res.cloudinary.com/practicaldev/image/fetch/s--QHZIE9A3--/c_limit%2Cf_auto%2Cfl_progressive%2Cq_auto%2Cw_880/https://user-images.githubusercontent .com/33374159/112994445-2942d380-9162-11eb-909f-edde596a6d12.png)
步骤 8 - 将路由表关联到子网
将公共路由表关联到公共子网。
aws ec2 associate-route-table --route-table-id <public-route-table-id> --subnet-id <public-subnet-id>
进入全屏模式 退出全屏模式
将私有路由表关联到私有子网。
aws ec2 associate-route-table --route-table-id <private-route-table-id> --subnet-id <private-subnet-id>
进入全屏模式 退出全屏模式
[ ](https://res.cloudinary.com/practicaldev/image/fetch/s--kx66spyv--/c_limit%2Cf_auto%2Cfl_progressive%2Cq_auto%2Cw_880/https://user-images.githubusercontent .com/33374159/112994633-5beccc00-9162-11eb-85a9-b1e8d387d7ba.png)
步骤 9 - 为 VPC 创建安全组
安全组充当实例的虚拟防火墙,以控制传入和传出流量。入站规则控制传入实例的流量,出站规则控制来自实例的传出流量。
我们可以使用以下命令创建一个安全组:
aws ec2 create-security-group --group-name <security-group-name> --description "<description>" --vpc-id <vpc-id>
进入全屏模式 退出全屏模式
为安全组添加标签。
aws ec2 create-tags --resources <security-group-id> --tags Key=<tag-key>,Value=<tag-value>
进入全屏模式 退出全屏模式
然后我们为创建的安全组指定规则。端口 80 允许来自所有 IPv4 地址的入站 HTTP 访问,端口 22 允许来自网络中 IPv4 IP 地址的实例的入站 SSH 访问。
aws ec2 authorize-security-group-ingress --group-id <security-group-id> --protocol tcp --port 22 --cidr 0.0.0.0/0
进入全屏模式 退出全屏模式
aws ec2 authorize-security-group-ingress --group-id <security-group-id> --protocol tcp --port 80 --cidr 0.0.0.0/0
进入全屏模式 退出全屏模式
[ ](https://res.cloudinary.com/practicaldev/image/fetch/s--c1Q_2Rmx--/c_limit%2Cf_auto%2Cfl_progressive%2Cq_auto%2Cw_880/https://user-images.githubusercontent .com/33374159/112995026-b9811880-9162-11eb-9a9a-5f1121300792.png)
步骤 10 - 创建密钥对
在我们可以运行一个实例之前,我们需要一个密钥对。运行以下命令创建密钥对。cli-keyPair是密钥的名称,可以更改为任何名称。--output text用于将您的私钥直接通过管道传输到文件中。
aws ec2 create-key-pair --key-name cli-keyPair --query 'KeyMaterial' --output text > cli-keyPair.pem
进入全屏模式 退出全屏模式
如果您使用的是 PowerShell,请改为运行以下命令。
aws ec2 create-key-pair --key-name cli-keyPair --query 'KeyMaterial' --output text | out-file -encoding ascii -filepath cli-keyPair.pem
进入全屏模式 退出全屏模式
运行以下命令来保护您的密钥。
chmod 400 cli-keyPair.pem
进入全屏模式 退出全屏模式
步骤 11 - 运行实例
ec2 实例只是 Amazon 弹性计算云 (EC2) 中的虚拟服务器,用于在 Amazon Web 服务基础设施上运行应用程序。
让我们使用以下命令创建一个实例。
aws ec2 run-instances --image-id ami-0533f2ba8a1995cf9 --instance-type t2.micro --count 1 --subnet-id <public-subnet-id> --security-group-ids <security-group-id> --associate-public-ip-address --key-name cli-keyPair
进入全屏模式 退出全屏模式
为创建的实例添加标签。
aws ec2 create-tags --resources <instance-id> --tags Key=<tag-key>,Value=<tag-value>
进入全屏模式 退出全屏模式
在我们可以打印实例公共 DNS 名称之前,我们必须为 VPC 启用 DNS 主机名。在 AWS 控制台中,转到 VPC,单击 Your VPC,选择您从 AWS CLI 创建的 VPC,然后单击 Actions。从下拉列表中,单击编辑 DNS 主机名。在 DNS 主机名 下,选择 Enable 并单击 Save changes。
[ ](https://res.cloudinary.com/practicaldev/image/fetch/s--UrV8szZ0--/c_limit%2Cf_auto%2Cfl_progressive%2Cq_auto%2Cw_880/https://user-images. githubusercontent.com/33374159/112998519-04505f80-9166-11eb-992e-cc571c6d8de3.png)
使用以下命令打印出实例公共 dns 名称:
aws ec2 describe-instances --instance-ids <instance-id> --query 'Reservations[].Instances[].PublicDnsName'
进入全屏模式 退出全屏模式
ami-0533f2ba8a1995cf9是启动实例时使用的 AMI ID。
t2.micro是实例类型。你可以在这里阅读更多关于它的信息。
--count用于指定要启动的实例数。
[ ](https://res.cloudinary.com/practicaldev/image/fetch/s--KuOjl6XP--/c_limit%2Cf_auto%2Cfl_progressive%2Cq_auto%2Cw_880/https://user-images.githubusercontent .com/33374159/112995768-76737500-9163-11eb-879b-8022bca145c7.png)
步骤 12 - 启动实例
使用以下命令登录实例:
ssh -i "cli-keyPair.pem" ec2-user@<instance-public-dns-name>
进入全屏模式 退出全屏模式
ec2-user是 AMI 用户名。
[ ](https://res.cloudinary.com/practicaldev/image/fetch/s--ySn_KCaH--/c_limit%2Cf_auto%2Cfl_progressive%2Cq_auto%2Cw_880/https://user-images.githubusercontent .com/33374159/112999090-8c366980-9166-11eb-9b25-df80fccbf6e6.png)
[可选的]
登录后,使用以下命令安装 Apache Web 服务器:
sudo yum install httpd -y
进入全屏模式 退出全屏模式
使用以下命令启动 Web 服务器:
sudo service httpd start
进入全屏模式 退出全屏模式
现在,让我们进入 Apache 默认根文件夹并创建 index.html
cd /var/www/html
进入全屏模式 退出全屏模式
使用您选择的任何文本编辑器写入 index.html 文件夹。我将使用vim。
sudo vim index.html
进入全屏模式 退出全屏模式
输入任何文本。
<h1>Hello there!</h1>
进入全屏模式 退出全屏模式
在浏览器上打开**http://public_ipv4_dns或http://public_ipv4**进行验证。
[ ](https://res.cloudinary.com/practicaldev/image/fetch/s--48maae3l--/c_limit%2Cf_auto%2Cfl_progressive%2Cq_auto%2Cw_880/https://user-images.githubusercontent .com/33374159/113000354-a6bd1280-9167-11eb-8f58-52ba7efd5423.png)
您可以从此指南中了解更多 AWS CLI 命令。
如果你觉得这篇文章有帮助,请留下一个心或评论。如果您有任何问题,请在评论部分告诉我。
另外,不要忘记关注我以获取更多文章。谢谢你。

CI/CD社区为您提供最前沿的新闻资讯和知识内容
更多推荐
 0
0 0
0- 0


 已为社区贡献22908条内容

所有评论(0)