
【大模型本地部署的调用与运用】从零打造本地区块链 AI 知识问答系统:FastAPI + LangChain + React + Ollama(deepseek-coder 6.7B)
作者:尘一不染
来源:个人项目
标签:FastAPI / LangChain / React / Ollama / RAG / 本地大模型(deepseek-coder 6.7B)
前言
最近在做一个 AI 驱动的区块链知识助手项目,核心需求是:
- 上传文档:支持 PDF、Markdown、TXT 等格式
- 智能问答:基于文档内容回答问题,带引用来源
- 本地部署:使用 Ollama 跑本地大模型,保护隐私
整个技术栈:
li-WWS/
├── backend/
│   └── app/
│       ├── main.py
│       ├── config.py
│       ├── routers/
│       └── services/
│
└── frontend/
    └── src/
        ├── components/
        │   ├── ChatWindow.jsx
        │   ├── ChatMessage.jsx
        │   └── ChatInput.jsx
        └── api/
└── index.js- 前端:React + Vite
- 后端:FastAPI (Python)
- AI 引擎:LangChain + RAG
- 大模型:Ollama (deepseek-coder:6.7b)
今天先实现第一版:对话界面 + Ollama 本地模型接入。
一、项目整体架构
plaintext
┌─────────────────────────────────────────────────────────────┐
│                         用户界面                              │
│                     (React + Vite)                          │
│                    http://localhost:5173                     │
└─────────────────────────────────────────────────────────────┘
                              │
                              │ HTTP POST /chat
                              ▼
┌─────────────────────────────────────────────────────────────┐
│                       FastAPI 后端                           │
│                     http://localhost:8000                    │
│  ┌─────────────────────────────────────────────────────┐     │
│  │                    /chat POST                        │     │
│  │                   问答接口                            │     │
│  └─────────────────────────────────────────────────────┘     │
└─────────────────────────────────────────────────────────────┘
                              │
                              │ API 调用
                              ▼
┌─────────────────────────────────────────────────────────────┐
│                      Ollama 本地模型                         │
│                  deepseek-coder:6.7b                        │
│                    http://localhost:11434                    │
└─────────────────────────────────────────────────────────────┘
二、前端实现
2.1 项目初始化
bash
# 使用 Vite 创建 React 项目
npm create vite@latest frontend -- --template react
cd frontend
npm install
为什么用 Vite?
Vite 是新一代前端构建工具,相比 Create-React-App 启动更快(无需打包),热更新体验更好。面试时可以提一嘴:"用过 Vite,了解其基于 ESM 的开发模式原理"。
2.2 API 调用层
frontend/src/api/index.jsjavascript
const API_BASE = 'http://localhost:8000';

export async function sendMessage(question, session_id = 'default') {
    const res = await fetch(`${API_BASE}/chat/`, {
        method: 'POST',
        headers: {'Content-Type':'application/json'},
        body: JSON.stringify({ question, session_id})
    });
    return res.json();
}

export async function getHistory(session_id = 'default') {
    const res = await
fetch(`${API_BASE}/chat/getHistory/${session_id}`);
    return res.json();
}知识点拆解:
fetch是浏览器原生 API,用于发送 HTTP 请求JSON.stringify()将 JavaScript 对象转成 JSON 字符串res.json()解析响应体为 JSONsession_id用于区分不同用户的对话上下文- sendMessage 向聊天服务器(后端)发送用户问题
- getHistory 获取指定的聊天记录
2.3 消息气泡组件
frontend/src/components/ChatMessage.jsxjsx
export default function ChatMessage({ message, isUser }) {
    return (
        <div style={{
            display: 'flex',
            justifyContent: isUser ? 'flex-end' : 'flex-start',
            animation: 'fadeIn 0.3s ease'
        }}>
            {!isUser && (
                <div style={{
                    width: '32px',
                    height: '32px',
                    borderRadius: '50%',
                    background: 'linear-gradient(135deg, #667eea 0%, #764ba2 100%)',
                    display: 'flex',
                    alignItems: 'center',
                    justifyContent: 'center',
                    fontSize: '14px',
                    marginRight: '10px',
                    flexShrink: 0
                }}>
                    🤖
                </div>
            )}

            <div style={{
                maxWidth: '70%',
                padding: '14px 18px',
                borderRadius: isUser ? '18px 18px 4px 18px' : '18px 18px 18px 4px',
                background: isUser
                    ? 'linear-gradient(135deg, #667eea 0%, #764ba2 100%)'
                    : 'rgba(255, 255, 255, 0.08)',
                color: isUser ? '#fff' : 'rgba(255, 255, 255, 0.9)',
                fontSize: '14px',
                lineHeight: '1.5',
                boxShadow: isUser ? 'none' : '0 2px 8px rgba(0, 0, 0, 0.2)',
                wordBreak: 'break-word',
                whiteSpace: 'pre-wrap'
            }}>
                {message}
            </div>

            {isUser && (
                <div style={{
                    width: '32px',
                    height: '32px',
                    borderRadius: '50%',
                    background: 'linear-gradient(135deg, #10b981 0%, #059669 100%)',
                    display: 'flex',
                    alignItems: 'center',
                    justifyContent: 'center',
                    fontSize: '14px',
                    marginLeft: '10px',
                    flexShrink: 0
                }}>
                    👤
                </div>
            )}

            <style>{`
                @keyframes fadeIn {
                    from { opacity: 0; transform: translateY(10px); }
                    to { opacity: 1; transform: translateY(0); }
                }
            `}</style>
        </div>
    );
}
CSS 技巧:
whiteSpace: 'pre-wrap'让 AI 返回的带换行的文本正常显示- 渐变背景用
linear-gradient实现组件功能:
- 显示单条聊天消息,区分用户消息和机器人消息
- 根据消息发送者显示不同的布局和样式
2.4 主窗口组件
frontend/src/components/ChatWindow.jsxjsx
import { useState, useRef, useEffect } from 'react';
import ChatMessage from './ChatMessage';
import ChatInput from './ChatInput';
import { sendMessage } from '../api';
export default function ChatWindow() {
const [messages, setMessages] = useState([]);
const [loading, setLoading] = useState(false);
const messagesEndRef = useRef(null);
const scrollToBottom = () => {
messagesEndRef.current?.scrollIntoView({ behavior: 'smooth' });
};
useEffect(() => {
scrollToBottom();
}, [messages]);
const handleSend = async (text) => {
setMessages(prev => [...prev, { text, isUser: true }]);
setLoading(true);
try {
const res = await sendMessage(text);
setMessages(prev => [...prev, {
text: res.answer || '暂无回答',
isUser: false,
sources: res.sources || []
}]);
} catch (err) {
setMessages(prev => [...prev, {
text: '请求失败,请检查后端是否运行',
isUser: false
}]);
}
setLoading(false);
};
return (
<div style={{
width: '100vw',
height: '100vh',
background: 'linear-gradient(135deg, #0f0f23 0%, #1a1a2e 50%, #16213e 100%)',
display: 'flex',
flexDirection: 'column',
fontFamily: "'Inter', -apple-system, BlinkMacSystemFont, sans-serif"
}}>
{/* 顶部导航 */}
<div style={{
padding: '20px 30px',
background: 'rgba(255, 255, 255, 0.03)',
borderBottom: '1px solid rgba(255, 255, 255, 0.1)',
backdropFilter: 'blur(10px)'
}}>
<div style={{ display: 'flex', alignItems: 'center', gap: '12px' }}>
<div style={{
width: '40px',
height: '40px',
borderRadius: '12px',
background: 'linear-gradient(135deg, #667eea 0%, #764ba2 100%)',
display: 'flex',
alignItems: 'center',
justifyContent: 'center',
fontSize: '20px'
}}>
🔗
</div>
<div>
<h1 style={{
margin: 0,
color: '#fff',
fontSize: '20px',
fontWeight: 600
}}>
ChainMind
</h1>
<div style={{
display: 'flex',
alignItems: 'center',
gap: '6px',
marginTop: '2px'
}}>
<div style={{
width: '8px',
height: '8px',
borderRadius: '50%',
background: '#10b981'
}} />
<span style={{
color: 'rgba(255, 255, 255, 0.6)',
fontSize: '12px'
}}>
deepseek-coder 6.7B
</span>
</div>
</div>
</div>
</div>
{/* 消息区域 */}
<div style={{
flex: 1,
overflowY: 'auto',
padding: '20px 30px',
display: 'flex',
flexDirection: 'column',
gap: '16px'
}}>
{messages.length === 0 && (
<div style={{
display: 'flex',
flexDirection: 'column',
alignItems: 'center',
justifyContent: 'center',
flex: 1,
textAlign: 'center'
}}>
<div style={{
width: '80px',
height: '80px',
borderRadius: '50%',
background: 'linear-gradient(135deg, rgba(102, 126, 234, 0.2) 0%, rgba(118, 75, 162, 0.2) 100%)',
display: 'flex',
alignItems: 'center',
justifyContent: 'center',
fontSize: '36px',
marginBottom: '20px'
}}>
🤖
</div>
<h2 style={{
color: '#fff',
margin: '0 0 8px',
fontSize: '24px',
fontWeight: 600
}}>
欢迎使用 ChainMind
</h2>
<p style={{
color: 'rgba(255, 255, 255, 0.5)',
margin: 0,
fontSize: '14px'
}}>
一个基于本地大模型的区块链知识助手
</p>
{/* 快捷提示 */}
<div style={{
display: 'flex',
gap: '10px',
marginTop: '30px',
flexWrap: 'wrap',
justifyContent: 'center'
}}>
{['什么是区块链?', '共识机制有哪些?', 'Solidity 入门'].map((tip) => (
<div
key={tip}
onClick={() => handleSend(tip)}
style={{
padding: '8px 16px',
background: 'rgba(255, 255, 255, 0.05)',
border: '1px solid rgba(255, 255, 255, 0.1)',
borderRadius: '20px',
color: 'rgba(255, 255, 255, 0.7)',
fontSize: '13px',
cursor: 'pointer',
transition: 'all 0.2s'
}}
onMouseEnter={(e) => {
e.target.style.background = 'rgba(102, 126, 234, 0.3)';
e.target.style.borderColor = 'rgba(102, 126, 234, 0.5)';
}}
onMouseLeave={(e) => {
e.target.style.background = 'rgba(255, 255, 255, 0.05)';
e.target.style.borderColor = 'rgba(255, 255, 255, 0.1)';
}}
>
{tip}
</div>
))}
</div>
</div>
)}
{messages.map((msg, i) => (
<ChatMessage key={i} message={msg.text} isUser={msg.isUser} />
))}
{loading && (
<div style={{
display: 'flex',
alignItems: 'center',
gap: '10px',
padding: '16px 20px',
background: 'rgba(255, 255, 255, 0.05)',
borderRadius: '16px',
maxWidth: '320px'
}}>
<div style={{ display: 'flex', gap: '4px' }}>
<div style={{
width: '8px',
height: '8px',
borderRadius: '50%',
background: '#667eea',
animation: 'bounce 1.4s infinite ease-in-out both'
}} />
<div style={{
width: '8px',
height: '8px',
borderRadius: '50%',
background: '#667eea',
animation: 'bounce 1.4s infinite ease-in-out 0.16s both'
}} />
<div style={{
width: '8px',
height: '8px',
borderRadius: '50%',
background: '#667eea',
animation: 'bounce 1.4s infinite ease-in-out 0.32s both'
}} />
</div>
<span style={{ color: 'rgba(255, 255, 255, 0.6)', fontSize: '14px' }}>
AI 思考中...
</span>
</div>
)}
<div ref={messagesEndRef} />
</div>
{/* 底部输入框 */}
<div style={{
padding: '20px 30px',
background: 'rgba(255, 255, 255, 0.03)',
borderTop: '1px solid rgba(255, 255, 255, 0.1)'
}}>
<div style={{
maxWidth: '800px',
margin: '0 auto',
position: 'relative'
}}>
<input
type="text"
placeholder="问我任何关于区块链的问题..."
onKeyDown={(e) => {
if (e.key === 'Enter' && !e.shiftKey) {
e.preventDefault();
const input = e.target;
if (input.value.trim()) {
handleSend(input.value);
input.value = '';
}
}
}}
style={{
width: '100%',
padding: '16px 60px 16px 24px',
background: 'rgba(255, 255, 255, 0.08)',
border: '1px solid rgba(255, 255, 255, 0.15)',
borderRadius: '16px',
color: '#fff',
fontSize: '15px',
outline: 'none',
transition: 'all 0.2s',
boxSizing: 'border-box'
}}
onFocus={(e) => {
e.target.style.borderColor = '#667eea';
e.target.style.background = 'rgba(255, 255, 255, 0.12)';
}}
onBlur={(e) => {
e.target.style.borderColor = 'rgba(255, 255, 255, 0.15)';
e.target.style.background = 'rgba(255, 255, 255, 0.08)';
}}
/>
<button
onClick={(e) => {
const input = e.target.parentElement.querySelector('input');
if (input.value.trim()) {
handleSend(input.value);
input.value = '';
}
}}
style={{
position: 'absolute',
right: '8px',
top: '50%',
transform: 'translateY(-50%)',
width: '40px',
height: '40px',
borderRadius: '12px',
background: 'linear-gradient(135deg, #667eea 0%, #764ba2 100%)',
border: 'none',
color: '#fff',
fontSize: '18px',
cursor: 'pointer',
display: 'flex',
alignItems: 'center',
justifyContent: 'center',
transition: 'all 0.2s'
}}
onMouseEnter={(e) => {
e.target.style.transform = 'translateY(-50%) scale(1.05)';
}}
onMouseLeave={(e) => {
e.target.style.transform = 'translateY(-50%) scale(1)';
}}
>
➤
</button>
</div>
<p style={{
textAlign: 'center',
color: 'rgba(255, 255, 255, 0.3)',
fontSize: '11px',
marginTop: '12px'
}}>
由 deepseek-coder 6.7B 提供支持 · 本地运行,保护隐私
</p>
</div>
{/* 动画样式 */}
<style>{`
@keyframes bounce {
0%, 80%, 100% { transform: scale(0); }
40% { transform: scale(1); }
}
::-webkit-scrollbar {
width: 6px;
}
::-webkit-scrollbar-track {
background: transparent;
}
::-webkit-scrollbar-thumb {
background: rgba(255, 255, 255, 0.2);
border-radius: 3px;
}
::-webkit-scrollbar-thumb:hover {
background: rgba(255, 255, 255, 0.3);
}
`}</style>
</div>
);
}
React Hooks 详解:
- useState:存储需要触发重新渲染的数据
messages:所有对话消息loading:控制加载动画- useEffect:副作用处理
- 依赖
[messages]:当消息变化时执行- 用于自动滚动到底部
- useRef:获取 DOM 元素或存储不变的值
messagesEndRef:指向页面底部 div,调用scrollIntoView
2.5 主入口
作用:作为整个应用的入口组件,渲染ChatWindow聊天窗口组件
frontend/src/App.jsxjsx
import ChatWindow from "./components/ChatWindow";

function App() {
  return <ChatWindow />
}

export default App;
三、后端实现
3.1 项目结构
plaintext
├── backend/
│   ├── app/
│   │   ├── routers/
│   │   │   ├── __init__.py
│   │   │   ├── blockchain.py
│   │   │   └── chat.py
│   │   ├── services/
│   │   │   ├── __init__.py
│   │   │   └── blockchain_tools.py
│   │   ├── __init__.py
│   │   ├── config.py
│   │   └── main.py
│   ├── .env
│   ├── .gitignore
│   └── requirements.txt
3.2 聊天接口核心代码
backend/app/routers/chat.pypython
from fastapi import APIRouter
from pydantic import BaseModel
import httpx
import json

router = APIRouter(prefix="/chat",tags=["聊天"])

chat_history = {}

class ChatRequest(BaseModel):
    question: str
    session_id: str = "default"

class ChatResponse(BaseModel):
    answer: str
    sources: list

@router.post("/",response_model=ChatResponse)
async def chat(request: ChatRequest):
    """"
    聊天问答接口
    使用 Ollama 本地模型
    """
    try:
        # 调用 Ollama API
        async with httpx.AsyncClient(timeout=120.0) as client:
            response = await client.post(
                "http://localhost:11434/api/generate",
                json={
                    "model": "deepseek-coder:6.7b",
                    "prompt": f"你是一个区块链知识助手,请回答用户的问题。如果问题与区块链无关,也可以回答。\n\n问题:{request.question}",
                    "stream": False
                }
            )
            result = response.json()
            answer = result.get("response", "抱歉,暂时无法回答")
    except Exception as e:
        answer = f"抱歉,AI 服务暂时不可用:{str(e)}"

     # 保存历史
    if request.session_id not in chat_history:
        chat_history[request.session_id] = []
    chat_history[request.session_id].append({
        "question": request.question,
        "answer": answer
    })

    return ChatResponse(
        answer=answer,
        sources=[
            {"title": "FISCO BCOS白皮书", "page":10},
            {"title": "区块链术语表","page": 3}
        ]
    )

@router.get("/history/{session_id}")
async def get_history(session_id: str):
    """ 获取聊天历史 """
return {"session_id": session_id,"messages":chat_history.get(session_id, [])}代码详解:
- Pydantic BaseModel:自动验证前端传来的 JSON 数据
question: str:必填字符串session_id: str = "default":可选字符串,默认值"default"- async/await:异步编程,提升性能
async def:定义异步函数await:等待异步操作完成- httpx.AsyncClient:异步 HTTP 客户端
timeout=120.0:超时时间 2 分钟(本地模型可能较慢)- Ollama API 调用:
- 端点:
/api/generate- 参数:
model:模型名称prompt:提示词stream:是否流式返回
请注意:下面这一块你需要换为你本地部署的模型,这样AI助手才有本地模型接入。
    try:
        # 调用 Ollama API
        async with httpx.AsyncClient(timeout=120.0) as client:
            response = await client.post(
                # Ollama API 的生成响应接口,用ollama部署的本地模型默认接口都是这个
                "http://localhost:11434/api/generate",
                json={
                    "model": "你本地部署的模型名称",
                    "prompt": f"你想要的功能提示词。\n\n问题:{request.question}",
                    "stream": False # 是否流式返回
                }
            )
            result = response.json()
            answer = result.get("response", "抱歉,暂时无法回答")
    except Exception as e:
        answer = f"抱歉,AI 服务暂时不可用:{str(e)}"
3.3 FastAPI 主入口
backend/app/main.pypython
from fastapi import FastAPI
from fastapi.middleware.cors import CORSMiddleware
from app.routers import chat, blockchain

app = FastAPI(
    title="ChainMind-Blockchain",
    description="AI驱动的区块链知识助手",
    version="1.0.0"
)

# CORS 配置
app.add_middleware(
    CORSMiddleware,
    allow_origins=["*"],
    allow_credentials=True,
    allow_methods=["*"],
    allow_headers=["*"],
)

# 注册路由
app.include_router(chat.router)
app.include_router(blockchain.router)

@app.get("/")
def root():
    return {"message": "ChainMind-Blockchain API", "docs": "/docs"}

@app.get("/health")
def health():
    return {"status": "healthy"}
CORS 详解:
浏览器的同源策略会阻止不同端口/域名的请求。CORS 就是告诉浏览器:"允许这个来源的请求"。
allow_origins=["*"]:生产环境应该指定具体域名,*是允许所有的意思
3.4 区块链模拟数据(可写可不写,不影响)这是给后续功能准备的。
backend/app/routers/blockchain.pyfrom fastapi import APIRouter
from app.services.blockchain_tools import (
get_block_info,
decode_transaction,
verify_smart_contract
)
router = APIRouter(prefix="/blockchain", tags=["区块链"])
@router.get("/block/{chain}/{block_number}")
async def get_block(chain: str, block_number: int):
"""查询区块信息 """
return get_block_info(chain,block_number)
@router.get("/transaction/{tx_hash}")
async def get_transaction(tx_hash: str):
""" 查询交易信息 """
return decode_transaction(tx_hash)
@router.get("/contract/{address}/verify")
async def verify_contract(address: str):
"""验证合约"""
return verify_smart_contract(address)backend/app/services/blockchain_tools.pydef get_block_info(chain: str, block_number: int) -> dict:
"""
模拟查询区块信息
实际项目中可以接入真实区块链节点
"""
return {
"chain": chain,
"block_number": block_number,
"hash": f"0x{'a' * 64}",
"timestamp": 1700000000,
"transactions_count": 42,
"difficulty": 1000000000000
}
def decode_transaction(tx_hash: str) -> dict:
"""模拟解析交易数据"""
return {
"hash": tx_hash,
"from": "0x1234...abcd",
"to": "0x5678...efgh",
"value": "1.5 ETH",
"status": "success"
}
def verify_smart_contract(address: str) -> dict:
"""模拟验证合约"""
return {
"address": address,
"name": "SampleToken",
"compiler_version": "v0.8.20",
"verified": True
}backend/app/config.pyfrom dotenv import load_dotenv
import os
load_dotenv()
# API配置
API_TITLE = "ChainMind-Blockchain"
API_VERSION = "1.0.0"
# 通义千问
QWEN_API_KEY = os.getenv("QWEN_API_KEY","")
# 可选: qwen-turbo, qwen-plus, qwen-max
QWEN_MODEL= "qwen-turbo"
# DashScope API(阿里云通义千问)
DASHSCOPE_API_KEY = os.getenv("DASHSCOPE_API_KEY", "")
# 向量数据库路径
VECTOR_DB_PATH = "./data/vector_dp"
# 支持的文档类型
SUPPORTED_EXTENSIONS = [".txt",".md",".pdf"]四、本地模型配置
4.1 安装 Ollama
bash
# macOS/Linux
curl -fsSL https://ollama.com/install.sh | sh

# Windows: 去 https://ollama.com 下载安装包
4.2 下载并运行模型
注意在下载模型的时候应该看看自身电脑的配置,用最合适自身电脑的模型,不然运行不起来。当然我电脑的配置比较低,只能运行deepseek-coder:6.7b这个模型。还是那句话,合适自己的才是最好的。
bash
# 下载 deepseek-coder 模型(约 4GB)
ollama pull deepseek-coder:6.7b

# 运行模型(默认端口 11434)
ollama run deepseek-coder:6.7b

# 或者后台运行
ollama serve
演示效果: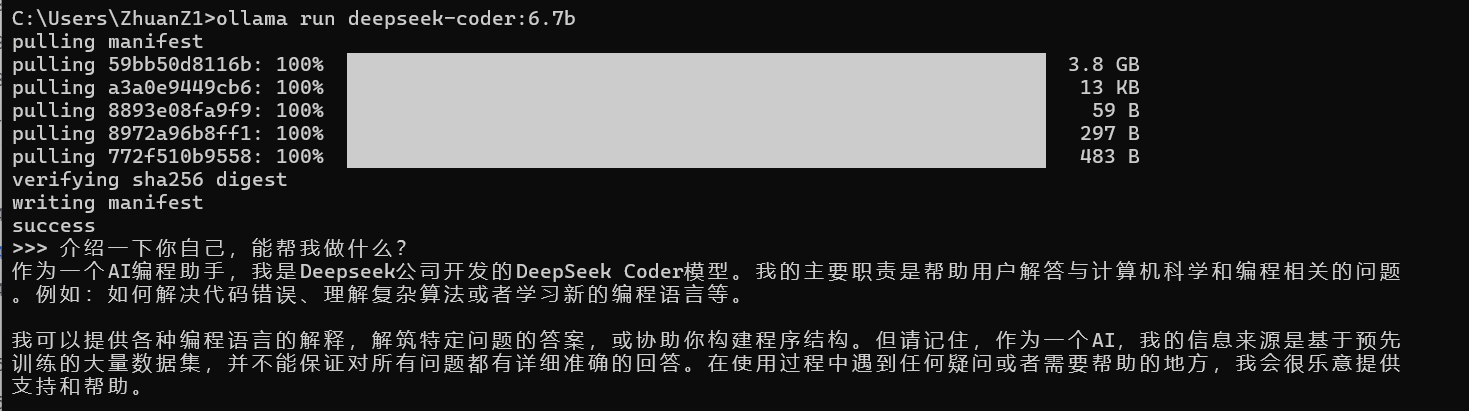
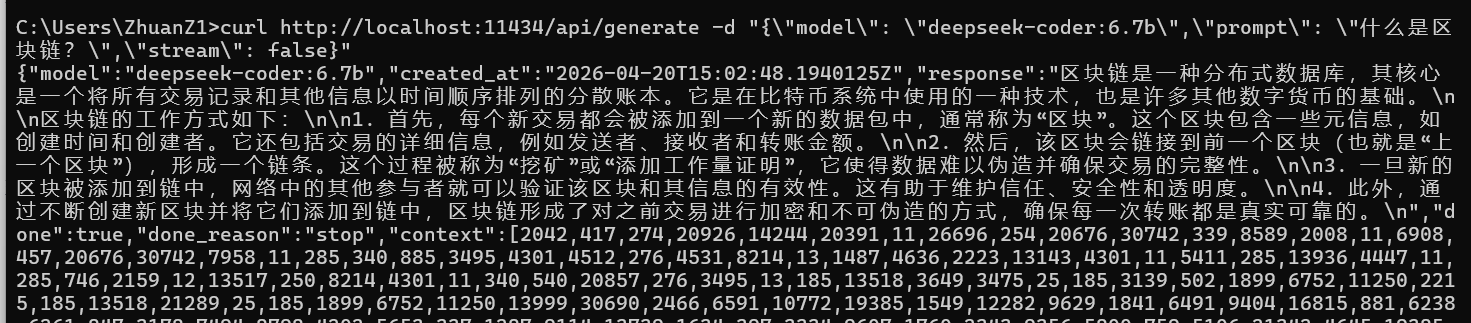
4.3 测试 API
bash
# 测试 Ollama 是否正常运行
curl http://localhost:11434/api/generate -d "{\"model\": \"deepseek-coder:6.7b\",\"prompt\": \"什么是区块链?\",\"stream\": false}"
验示结果:
五、运行项目
5.1 启动后端
环境依赖:
在路径backend下创建requirements.txt,把下面代码弄进去(规范的方法)
# 路径 backend/requirements.txt
fastapi==0.109.0
uvicorn[standard]==0.27.0
python-dotenv==1.0.0
pydantic==2.5.3
httpx==0.26.0

# LangChain + 通义千问
langchain==0.1.0
langchain-community==0.0.10
dashscope==1.14.0 # 通义千问 SDK

#向量数据库
chromadb==0.4.22

# 文档处理
pypdf==3.17.0
bash
# 终端1
cd backend
pip install -r requirements.txt
或者可以直接:
bash
# 终端1
cd backend
pip install fastapi uvicorn httpx python-dotenv pydantic
两个运行都运行也没关系
启动:
bash
python -m uvicorn app.main:app --reload
# 运行在 http://localhost:8000
5.2 启动 Ollama
bash
# 终端2
# 查看 Ollama 进程
tasklist | findstr ollama
# 查看已部署的模型
ollama list
# 换为你部署的模型
ollama run 模型名称
5.3 启动前端
bash
# 终端3
cd frontend
npm run dev
# 运行在 http://localhost:5173
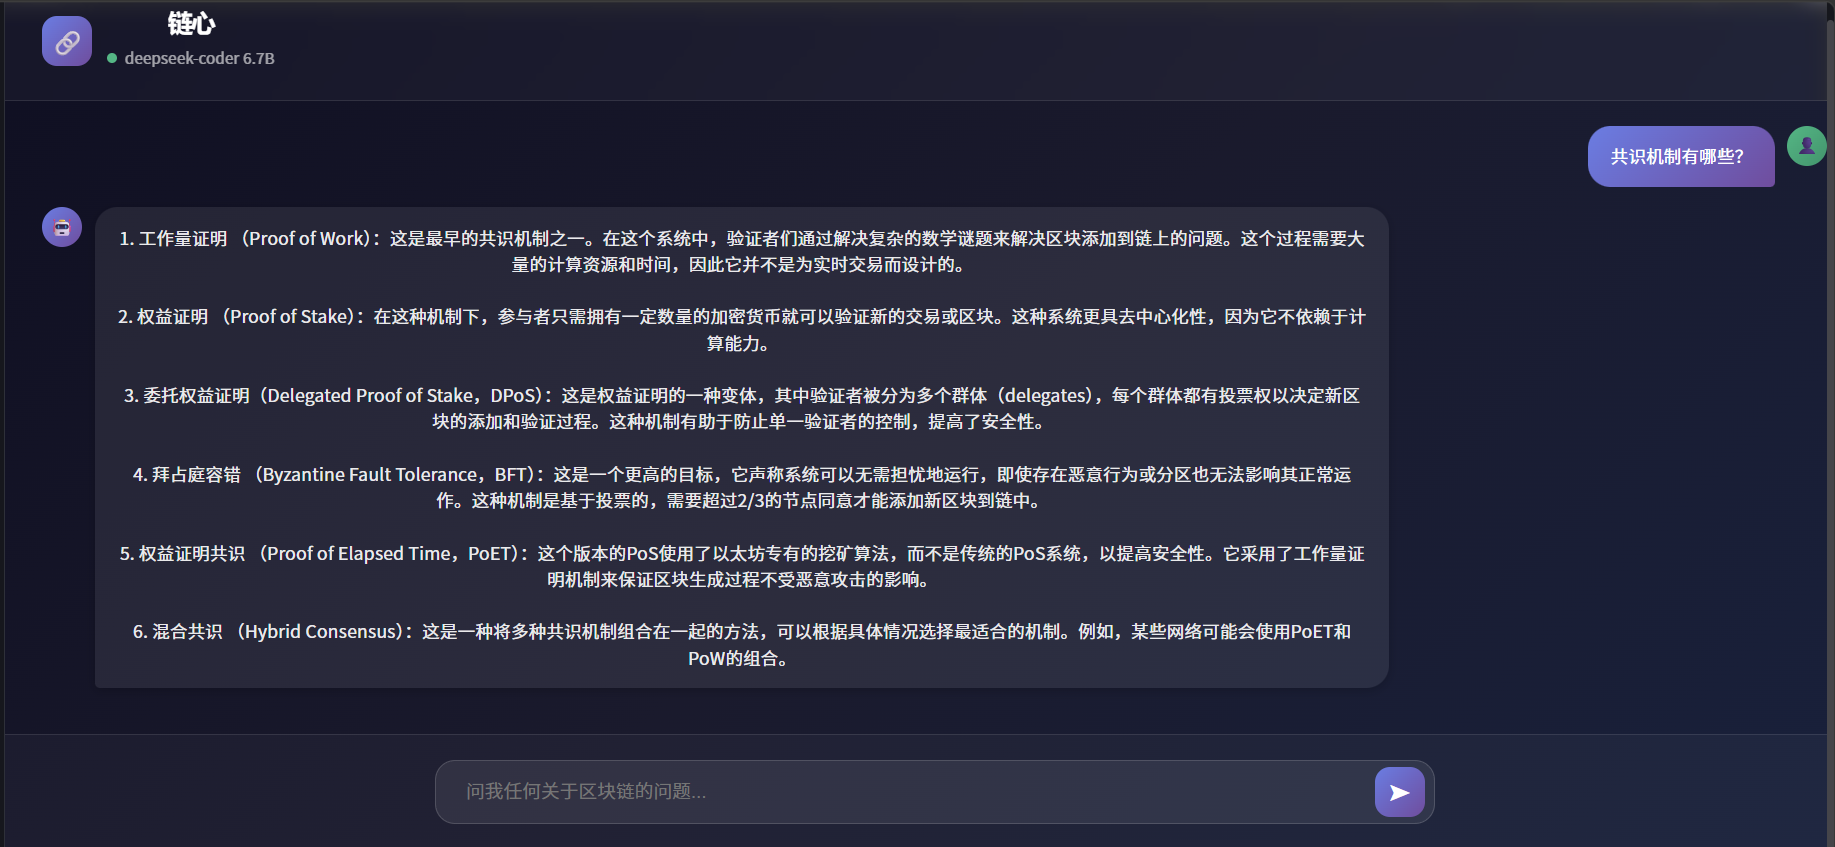
六、效果展示
思考状态: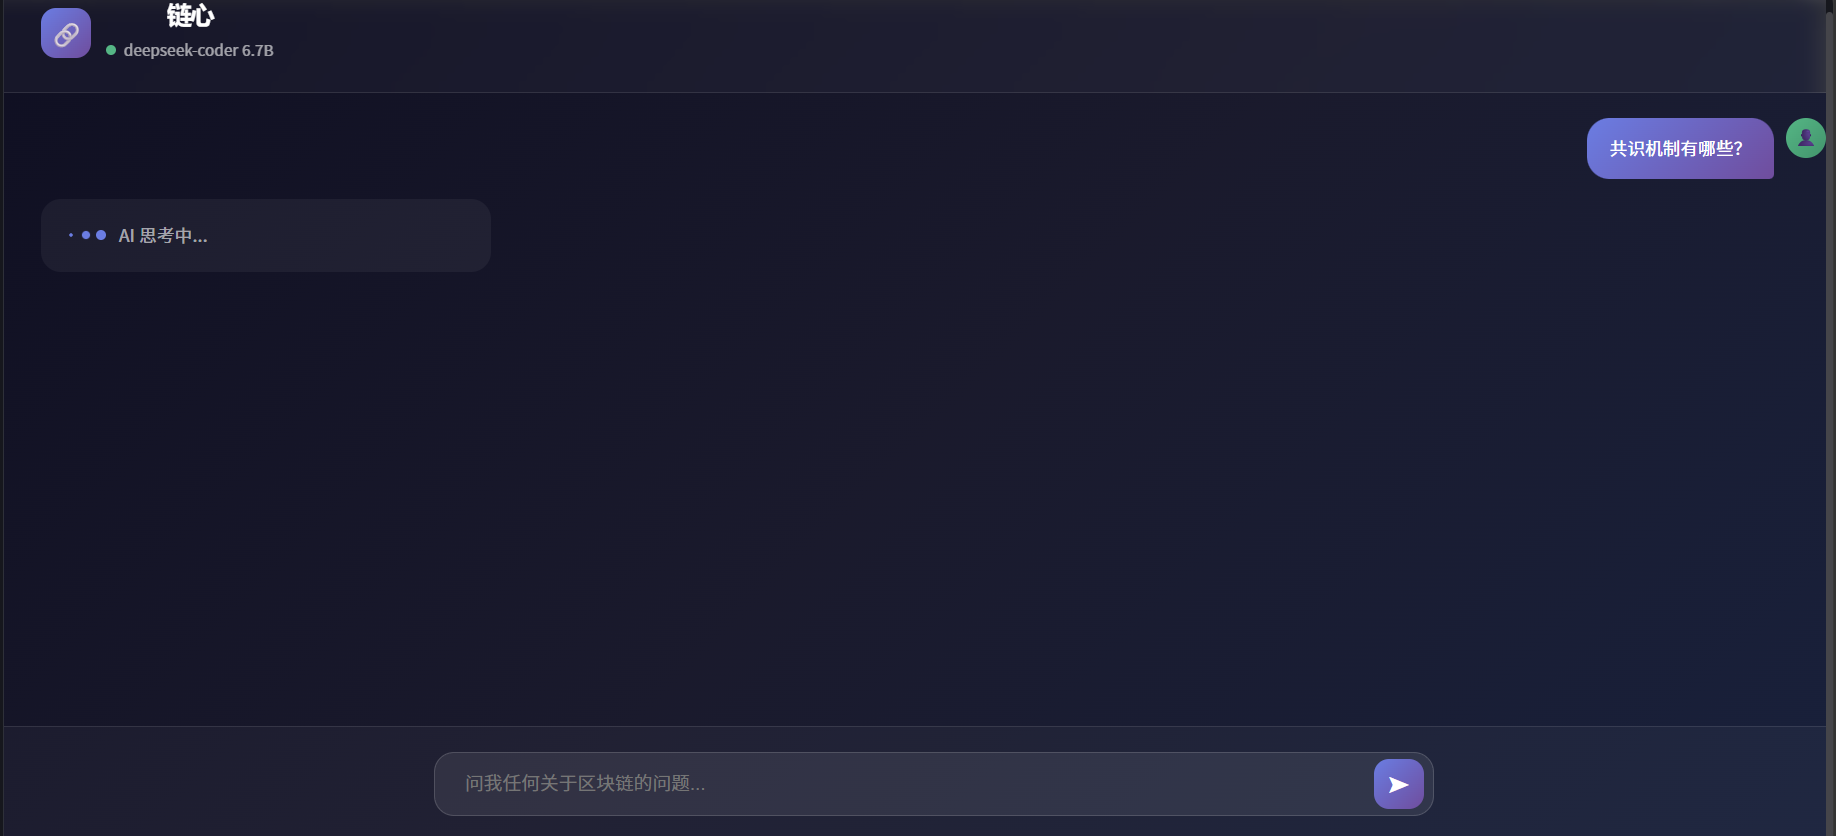
回答状态:
七、下一步计划
| 阶段 | 功能 | 技术 |
|---|---|---|
| ✅ 当前 | 对话界面 + Ollama 接入 | React + FastAPI + Ollama |
| 📋 下一阶段 | RAG 知识库 | LangChain + Chroma |
| 📋 后续 | 文档上传 | PDF/MD/TXT 解析 |
| 📋 后续 | 多轮对话 | Memory 模块 |
八、总结
实现了一个最小可用的本地 AI 对话系统,包含:
- 前端:React 组件化开发 + Hooks 使用
- 后端:FastAPI 路由设计 + Pydantic 数据验证
- AI:Ollama 本地模型接入 + HTTP API 调用
关键收获:
- 前后端分离的开发模式
- async/await 异步编程
- CORS 跨域原理
- 本地部署大模型的流程
完整代码已开源到 GitHub:AiW520/li-WWS https://github.com/AiW520/li-WWS
相关认证:FISCO BCOS 区块链工程师 · 金砖国家职业技能大赛区块链赛项一等奖,广东省职业技能大赛一等奖
更多推荐
 6
6 0
0- 0


 已为社区贡献4条内容

所有评论(0)