
OpenCV联合C++/Qt 学习笔记(十六)----图像细化、轮廓检测、轮廓信息统计及轮廓外接多边形
·
一、图像细化
1、图像细化原理
作用:图像细化是将图像的线条从多像素宽度减少到单位像素宽度的过程,又称为“骨架化”。
细化过程:
细化判断依据:
- 内部点不能删除:防止目标整体消失
- 孤立点不能删除:防止噪声断裂
- 端点不能删除:防止线条越来越短
- 删除后保持连通:防止目标断开
ZS细化流程:
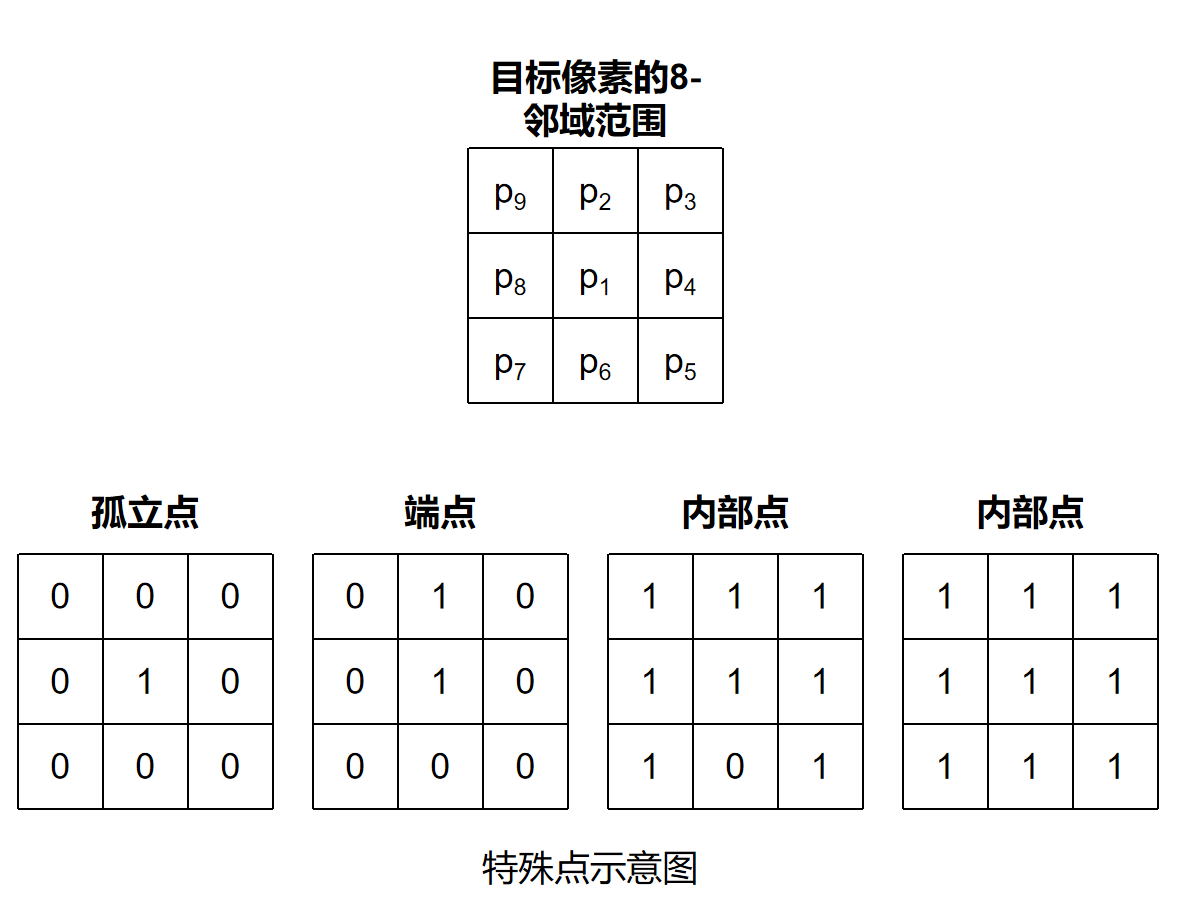
1、输入二值图像:首先对图像进行二值化处理,然后建立目标点 P1 的8邻域(如上图所示)
2、第一次迭代:遍历图像中的所有前景像素点,对每个像素点 P1 进行如下判断:
(1)判断是否为边界点
计算P2+P3+P4+P5+P6+P7+P8+P9。若满足:2 ≤ 和 ≤ 6,则说明:不是孤立点、不是内部点、属于边界点,才允许继续判断。
(2)判断连通性
计算S(P1),即统计8邻域顺时针方向:0 → 1变化的次数。若S(P1)=1,说明删除 P1 后图像仍保持连通。
(3)判断结构保持条件
满足:P2 × P4 × P6 = 0 和 P4 × P6 × P8 = 0,说明不会破坏骨架结构。
(4)删除像素点
将P1置为0,即删除该边界像素。
3、第二次迭代:再次遍历图像中的所有前景像素。
满足:条件(1)、条件(2)并且满足:P2 × P4 × P8 = 0 和 P2 × P6 × P8 = 0,则删除该像素点。
4、重复迭代:不断重复,第一次迭代→ 第二次迭代→ 继续循环,直到图像中没有新的像素被删除。此时说明:骨架已经稳定,图像细化完成。
5、输出结果
2、相关函数
/* 用途:用于对二值图像进行骨架化(细化)处理,
       将较宽的目标区域逐步收缩为单像素宽度的中心骨架线,
       同时尽可能保持原有目标的拓扑结构和连通性不变 */
void cv::ximgproc::thinning(InputArray src, OutputArray dst,
                            int thinningType = THINNING_ZHANGSUEN);
/*
src:输入待细化图像,必须是CV_8U单通道图像(前景为255,背景为0)
dst:细化后的输出图像,与src具有相同尺寸和数据类型
thinningType:细化算法类型,
               THINNING_ZHANGSUEN 表示 Zhang-Suen 细化算法
               THINNING_GUOHALL 表示 Guo-Hall 细化算法
*/
3、示例代码
    QString imgPath = QApplication::applicationDirPath() + "/Images";
    cv::String s_imgPath = imgPath.toLocal8Bit().data();
    Mat img = imread(s_imgPath + "/LearnCV_black.png", IMREAD_GRAYSCALE);
    if (img.empty())
    {
        qDebug() << "图片加载失败, 请确认图像文件名称是否正确";
        return;
    }
    /*英文字+实心圆和圆环细化*/
    Mat words = Mat::zeros(100, 200, CV_8UC1);/*创建一个圆形的背景图片*/
    putText(words, "Learn", Point(30, 30), 2, 1, Scalar(255), 2);/*添加英文*/
    putText(words, "OpenCV 4", Point(30, 60), 2, 1, Scalar(255), 2);
    circle(words, Point(80, 75), 10, Scalar(255), -1);/*添加实心圆*/
    circle(words, Point(130, 75), 10, Scalar(255), 3);/*添加圆环*/

    /*进行细化*/
    Mat thin1, thin2;

    ximgproc::thinning(img,thin1,0);
    ximgproc::thinning(words,thin2,0);

    imshow("img", img);
    imshow("thin1", thin1);

    namedWindow("words", WINDOW_NORMAL);
    imshow("words", words);
    namedWindow("thin2", WINDOW_NORMAL);
    imshow("thin2", thin2);

    waitKey(0);
    destroyAllWindows();
二、轮廓检测
1、轮廓概念介绍
轮廓是图像中连续的、具有相同颜色或灰度值的像素点所组成的曲线,用于描述目标物体的边界形状。通常情况下,轮廓检测是在二值图像上进行的,即图像中的像素值只有:0:背景,255:前景目标。
常用4个参数来描述不同层级之间的结构关系,分别是:[同层下一个轮廓索引, 同层上一个轮廓索引, 下一层第一个子轮廓索引, 上层父轮廓索引]。
| 对比项 | 边缘(Edge) | 轮廓(Contour) |
|---|---|---|
| 定义 | 图像中灰度值发生突变的位置 | 由连续点组成的目标边界曲线 |
| 本质 | 像素级变化 | 区域级边界 |
| 表现形式 | 离散的像素点 | 连续、有序的点集 |
| 是否连续 | 不一定连续 | 通常是连续闭合的 |
| 产生原因 | 灰度、颜色突变 | 目标区域与背景分离 |
| 输入图像 | 灰度图即可 | 通常基于二值图 |
| 输出结果 | 边缘点集合 | 边界曲线 |
| 常用算法 | Sobel、Canny、Laplacian | findContours() |
| 是否具有方向顺序 | 一般没有 | 有顺序,可形成曲线 |
| 应用场景 | 边缘检测、特征提取 | 形状分析、目标检测、面积计算 |
2、轮廓检测与绘制
2.1.1 相关函数
- 轮廓检测
/* 用途:用于从二值图像中检测目标轮廓,
       提取图像中物体边界的连续点集信息。
       该函数不仅能够获取目标外轮廓,还可以分析轮廓之间的层级关系 */
void cv::findContours( InputArray image, OutputArrayOfArrays contours,
                              OutputArray hierarchy, int mode,
                              int method, Point offset = Point());
/*
image:输入图像,数据类型为CV_8U的单通道灰度图像或者二值化图像
contours:检测到的轮廓,每个轮廓中存放着像素的坐标
hierarchy:轮廓层级关系信息
mode:轮廓检测模式标志
method:轮廓逼近方法标志
offset:每个轮廓点移动的可选偏移量,这个函数主要用在从ROI图像中找出的轮廓
        并基于整个图像分析轮廓的场景中
*/- 轮廓绘制
/* 用途:用于将检测得到的轮廓绘制到图像中,
       可以绘制单个轮廓、多个轮廓以及层级轮廓结构 */
void cv::drawContours( InputOutputArray image, InputArrayOfArrays contours,
                              int contourIdx, const Scalar& color,
                              int thickness = 1, int lineType = LINE_8,
                              InputArray hierarchy = noArray(),
                              int maxLevel = INT_MAX, Point offset = Point() );
/*
image:绘制轮廓的目标图像
contours:轮廓集合,通常由findContours()获取
contourIdx:需要绘制的轮廓索引,
             大于等于0表示绘制指定轮廓,
             小于0表示绘制所有轮廓
color:轮廓颜色(如 Scalar(B,G,R))
thickness:轮廓线宽,负值表示填充轮廓内部
lineType:轮廓边界线类型
hierarchy:轮廓层级关系信息,通常由findContours()返回
maxLevel:绘制轮廓层级的最大深度
offset:轮廓整体坐标偏移量
*/
2.1.1 示例代码
    QString imgPath = QApplication::applicationDirPath() + "/Images";
    cv::String s_imgPath = imgPath.toLocal8Bit().data();
    Mat img = imread(s_imgPath + "/keys.png");
    if (img.empty())
    {
        qDebug() << "图片加载失败, 请确认图像文件名称是否正确";
        return;
    }
    imshow("Original keys", img);

    Mat gray, binary;
    cvtColor(img, gray, COLOR_BGR2GRAY);/*转化成灰度图*/
    GaussianBlur(gray, gray, Size(13, 13), 4, 4);/*平滑滤波*/
    threshold(gray, binary, 170, 255, THRESH_BINARY | THRESH_OTSU);/*自适应二值化*/

    vector<vector<Point>> contours;/*轮廓*/
    vector<Vec4i> hierarchy;/*存放轮廓结构变量*/
    findContours(binary, contours, hierarchy, RETR_TREE, CHAIN_APPROX_SIMPLE, Point());

    /*绘制轮廓*/
    for (int i = 0; i < hierarchy.size(); i++)
    {
        cout << hierarchy[i] << endl;
    }

    for (int t = 0; t < contours.size(); t++)
    {
        drawContours(img, contours, t, Scalar(0, 0, 255), 2, 8);
        imshow("Contour detection result",img);
        waitKey(0);
    }

    destroyAllWindows();
三、轮廓信息统计
1、轮廓面积
/* 用途:用于计算轮廓所包围区域的面积大小 */
double cv::contourArea( InputArray contour, bool oriented = false );
/*
contour:轮廓的像素点
oriented:区域面积是否具有方向的标志,true表示面积具有方向性,false表示不具有方向性,
        默认值为不具有方向性的false
*/
2、轮廓长度
/* 用途:用于计算轮廓或曲线的周长(弧长),
       即所有相邻像素点之间距离的总和 */
double cv::arcLength( InputArray curve, bool closed );
/*
curve:轮廓或者曲线的2D像素点
closed:轮廓或者曲线是否闭合标志,true表示闭合
*/
3、示例代码
    vector<Point> contour;
    contour.push_back(Point2f(0, 0));
    contour.push_back(Point2f(10, 0));
    contour.push_back(Point2f(10, 10));
    contour.push_back(Point2f(5, 5));
    double area = contourArea(contour);
    cout << "area = " << area << endl;

    double length0 = arcLength(contour, true);
    double length1 = arcLength(contour, false);
    cout << "length0 = " << length0 << endl;
    cout << "length1 = " << length1 << endl;

    QString imgPath = QApplication::applicationDirPath() + "/Images";
    cv::String s_imgPath = imgPath.toLocal8Bit().data();
    Mat img = imread(s_imgPath + "/keys.png");
    if (img.empty())
    {
        qDebug() << "图片加载失败, 请确认图像文件名称是否正确";
        return;
    }
    Mat gray, binary;
    cvtColor(img, gray, COLOR_BGR2GRAY);/*转化成灰度图*/
    GaussianBlur(gray, gray, Size(13, 13), 4, 4);/*平滑滤波*/
    threshold(gray, binary, 170, 255, THRESH_BINARY | THRESH_OTSU);/*自适应二值化*/

    vector<vector<Point>> contours;/*轮廓*/
    vector<Vec4i> hierarchy;/*存放轮廓结构变量*/
    findContours(binary, contours, hierarchy, RETR_TREE, CHAIN_APPROX_SIMPLE, Point());

    /*输出轮廓面积*/
    for (int t = 0; t < contours.size(); t++)
    {
        double area1 = contourArea(contours[t]);
        cout << t << " area: " << area1 << endl;
    }
    /*输出轮廓长度*/
    for (int t = 0; t < contours.size(); t++)
    {
        double length2 = arcLength(contours[t],true);
        cout << t << " length: " << length2 << endl;
    }
四、轮廓外接多边形
1、轮廓外接最大矩形
/* 用途:用于计算能够完整包围目标区域的最小正矩形(水平矩形),
       返回一个与图像坐标轴平行的矩形区域 */
Rect cv::boundingRect( InputArray array );
/*
array:输入的二维点集,可以是轮廓点、非零像素点集合等,数据类型为vector<Point>或者Mat
*/
2、轮廓外接最小矩形
/* 用途:用于计算能够包围目标区域的最小面积旋转矩形,
       与boundingRect()不同,该矩形允许旋转角度,
       因此更加贴合目标真实方向 */
RotatedRect cv::minAreaRect( InputArray points );
/*
points:输入二维点集,通常为轮廓点集合
*/
3、轮廓外接多边形
/* 用途:用于对轮廓或曲线进行多边形逼近,
       在尽量保持原始形状的前提下,
       减少轮廓中的点数量 */
void cv::approxPolyDP( InputArray curve,
                                OutputArray approxCurve,
                                double epsilon, bool closed );
/*
curve:输入曲线或轮廓点集
approxCurve:多边形逼近后的输出点集
epsilon:逼近精度,
          值越小越接近原轮廓,
          值越大点数越少
closed:曲线是否闭合
*/
4、示例代码
void drawapp(Mat result, Mat img2)
{
    for (int i = 0; i < result.rows; i++)
    {
        /*最后一个坐标点与第一个坐标点连接*/
        if (i == result.rows - 1)
        {
            Vec2i point1 = result.at<Vec2i>(i);
            Vec2i point2 = result.at<Vec2i>(0);
            line(img2, point1, point2, Scalar(0, 255, 0), 2, 8, 0);
            break;
        }
        Vec2i point1 = result.at<Vec2i>(i);
        Vec2i point2 = result.at<Vec2i>(i + 1);
        line(img2, point1, point2, Scalar(0, 255, 0), 2, 8, 0);
    }
}
/*************************************************************************/
    QString imgPath = QApplication::applicationDirPath() + "/Images";
    cv::String s_imgPath = imgPath.toLocal8Bit().data();
    Mat img = imread(s_imgPath + "/stuff.jpg");
    if (img.empty())
    {
        qDebug() << "图片加载失败, 请确认图像文件名称是否正确";
        return;
    }

    Mat img1, img2;
    img.copyTo(img1);/*深拷贝用来绘制最大外接矩形*/
    img.copyTo(img2);/*深拷贝用来绘制最小外接矩形*/

    imshow("img", img);

    /*去噪声与二值化*/
    Mat canny;
    Canny(img, canny, 80, 160, 3, false);
    imshow("canny", canny);
    /*膨胀运算,将细小缝隙填补上*/
    Mat kernel = getStructuringElement(0, Size(3, 3));
    dilate(canny, canny, kernel);
    /*轮廓发现与绘制*/
    vector<vector<Point>> contours;
    vector<Vec4i> hierarchy;
    findContours(canny, contours, hierarchy, RETR_EXTERNAL, CHAIN_APPROX_SIMPLE, Point());
    /*寻找轮廓的外接矩形*/
    for (int n = 0; n < contours.size(); n++)
    {
        /*最大外接矩形*/
        Rect rect = boundingRect(contours[n]);
        rectangle(img1, rect, Scalar(0, 0, 255), 2, 8);
        /*最小外接矩形*/
        RotatedRect rrect = minAreaRect(contours[n]);
        Point2f points[4];
        rrect.points(points);/*读取最小外接矩形的四个顶点*/
        Point2f cpt = rrect.center;/*最小外接矩形的中心*/
        /*绘制旋转矩形与中心位置*/
        for (int i = 0; i < 4; i++)
        {
            if (i == 3)
            {
                line(img2, points[i], points[0], Scalar(0, 255, 0), 2, 8, 0);
                break;
            }
            line(img2, points[i], points[i + 1], Scalar(0, 255, 0), 2, 8, 0);

        }
        /*绘制矩形的中心*/
        circle(img2, cpt, 4, Scalar(255, 0, 0), -1, 8, 0);

    }
    imshow("Max", img1);
    imshow("Min", img2);

    Mat approx = imread(s_imgPath + "/approx.png");
    if (approx.empty())
    {
        qDebug() << "图片加载失败, 请确认图像文件名称是否正确";
        return;
    }
    /*边缘检测*/
    Mat canny2;
    Canny(approx, canny2, 80, 160, 3, false);
    /*膨胀运算*/
    Mat kernel2 = getStructuringElement(0, Size(3, 3));
    dilate(canny2, canny2, kernel2);
    /*轮廓发现与绘制*/
    vector<vector<Point>> contours2;
    vector<Vec4i> hierarchy2;
    findContours(canny2, contours2, hierarchy2, RETR_EXTERNAL, CHAIN_APPROX_SIMPLE, Point());
    /*绘制多边形*/
    for (int t = 0; t < contours2.size(); t++)
    {
        /*用最小外接矩形求取轮廓中心*/
        RotatedRect rrect = minAreaRect(contours2[t]);
        Point2f center = rrect.center;
        /*绘制矩形的中心*/
        circle(approx, center, 4, Scalar(255, 0, 0), -1, 8, 0);

        Mat result;
        approxPolyDP(contours2[t], result, 4, true);/*多边形拟合*/
        drawapp(result, approx);
        cout << "corners: " << result.rows << endl;
        /*判断形状和绘制轮廓*/
        if (result.rows == 3)
        {
            putText(approx, "triangle", center, 0, 1, Scalar(0, 255, 0), 1, 8);
        }
        if (result.rows == 4)
        {
            putText(approx, "rectangle", center, 0, 1, Scalar(0, 255, 0), 1, 8);
        }
        if (result.rows == 6)
        {
            putText(approx, "poly-6", center, 0, 1, Scalar(0, 255, 0), 1, 8);
        }
        if (result.rows > 12)
        {
            putText(approx, "circle", center, 0, 1, Scalar(0, 255, 0), 1, 8);
        }
    }
    imshow("result", approx);
    waitKey(0);
destroyAllWindows();更多推荐
 7
7 0
0- 0


 已为社区贡献12条内容

所有评论(0)