
W55RP20-EVB-MKR MicroPython Tutorial (5):Quick UDP Communication
This is Part 5 of the WIZnet W55RP20 MicroPython tutorial series, written based on the latest official firmware. All code has been tested and verified, and can be flashed and run directly.
Copyright Notice: This article is an original WIZnet technical article. Please credit the source when reprinting.
Introduction
In the previous tutorial, we completed the development of a TCP Server, achieving connection-oriented, stable, and reliable TCP data exchange. In scenarios such as fast device communication within a LAN or low-latency command delivery, the UDP protocol—with its lighter weight and higher efficiency—becomes an essential choice for embedded development.
When combined with the WIZnet W5500 network module, the development potential of MicroPython and the Raspberry Pi Pico is further amplified. The W5500 module features a built-in hardware TCP/IP stack, eliminating the burden of protocol stack porting and parsing on the MCU, enabling rapid connectionless UDP data exchange.
UDP, with its low latency, lightweight nature, and high efficiency, is widely used in IoT scenarios such as sensor data reporting, LAN device interaction, and industrial short-command communication. This article will use the W55RP20-EVB-MKR development board to quickly build a UDP server using minimal wrapper code, implementing data reception and automatic reply functionality.
This article will walk you through the UDP communication practice for the W55RP20 chip. After completing this article, you will master:
- Core principles of the UDP protocol and its connectionless workflow
- Rapid setup of the W55RP20-EVB-MKR development environment
- Minimal code implementation for UDP server send/receive communication
- Joint debugging and testing with a network debugging tool
- One-stop troubleshooting for UDP communication and network issues
- Core advantages of the WIZnet hardware protocol stack in short-packet communication
Series Tutorial Learning Path
This series consists of 16 parts, progressively covering everything from basic networking to industrial-grade applications:
- Part 1: Static IP Configuration and Network Basics
- Part 2: DHCP Automatic Networking and Network Diagnostics
- Part 3: TCP Client Communication
- Part 4: TCP Server Communication
- Part 5: UDP Unicast Data Communication (this article)
- Part 6: UDP Multicast/Broadcast Data Communication
- Part 7: DNS Domain Name Resolution
- Part 8: NTP — Getting Time from the Network
- Part 9: HTTP Client Requests
- Part 10: HTTP Server Setup
- Part 11: HTTP Protocol & OneNET Cloud Data Upload
- Part 12: MQTT Protocol Basic Communication Verification
- Part 13: MQTT Protocol & Alibaba Cloud Integration
- Part 14: MQTT Protocol & OneNET Platform Integration
- Part 15: MQTT Protocol & ThingSpeak Integration
- Part 16: Modbus Industrial Protocol Communication
We recommend bookmarking this series and following along step by step. All code will be synchronized to the official Gitee repository.
Table of Contents
- 1 UDP Communication Principles
- 2 Preparation
- 3 Flashing the W55RP20-EVB-MKR Dedicated MicroPython Firmware
- 4 Hardware Connections & Development Environment Setup
- 5 Core Code Analysis
- 6 Running Results & Test Verification
- 7 One-Stop Troubleshooting Guide
- 8 WIZnet Hardware Protocol Stack — Core Advantage Comparison
- 9 Typical Application Scenarios
- 10 Summary
- 11 Series Preview & Resources
1. UDP Communication Principles
1.1 Introduction to UDP
UDP (User Datagram Protocol) is a connectionless transport-layer communication protocol. Unlike TCP’s connection-oriented nature, UDP requires no three-way handshake and does not need to maintain a connection state; it sends and receives data in the form of independent datagrams.
The protocol structure is streamlined with minimal header overhead, sacrificing some reliability in exchange for ultra-low latency and high-speed transmission, making it the preferred protocol for short-message interaction in embedded IoT applications.
Compared to TCP, UDP has no handshake process for connection establishment and teardown. Each packet is sent independently; the receiver does not need to acknowledge, and the sender does not wait for a response, resulting in lower latency and higher efficiency.
1.2 UDP Workflow
The complete workflow for implementing UDP communication on the W55RP20-EVB-MKR module is as follows:
- Board powers on → Initialize SPI interface → Activate the W55RP20-EVB-MKR network module
- Complete network access via DHCP / static IP
- Create a UDP datagram socket and bind a fixed listening port
- Continuously block and listen, waiting for client data from the LAN
- Receive data packets, simultaneously obtaining the client’s IP and port information
- Package reply data and send it directionally back to the sender
- Loop listening, continuously handling multiple rounds of UDP interaction
1.3 Core Advantages of UDP
- Connectionless communication — no handshake required, fast response
- Lightweight protocol — minimal network bandwidth and MCU resource usage
- Supports unicast, broadcast, and multicast communication modes
- Suitable for short-frame, high-frequency, real-time data transmission
- Simple code implementation, low debugging cost in embedded development
1.4 Typical Application Scenarios
| Scenario | Description |
|---|---|
| IoT sensor periodic data reporting | Low latency, low power consumption, suitable for frequent short-packet reporting |
| LAN device discovery & batch control | Supports broadcast mode — one send, multiple devices respond |
| Industrial device lightweight command interaction | Strong real-time performance, suitable for bidirectional short-command communication |
| Smart home real-time status synchronization | Multi-device multicast communication, efficient status sync |
| Embedded network protocol introductory learning | Clean code, suitable for rapid network functionality verification |
2. Preparation

2.1 Software Preparation
| Software | Version Requirement | Download Link | Description |
|---|---|---|---|
| Thonny | 4.0 or later | Thonny Official Download | Lightweight MicroPython IDE supporting code editing, flashing, and serial debugging — beginner-friendly |
| W55RP20-EVB-MKR MicroPython Firmware | Latest stable version | WIZnet Official Firmware Download | Specifically written for the W55RP20-EVB-MKR module, with WIZnet hardware drivers and protocol stack integrated |
2.2 Hardware Preparation
The following hardware is required:
- W55RP20-EVB-MKR development board × 1
- Micro USB cable (must support data transfer; charging-only cables will not work) × 1
- Standard Ethernet cable × 1
- Router/switch with DHCP enabled × 1
Tip: The W55RP20-EVB-MKR module already integrates all Ethernet-related components — no additional soldering or jumper wires are needed. Combined with the RP2040 board, you can quickly set up the development environment, greatly reducing the probability of wiring errors and hardware failures.
3. Flashing the W55RP20-EVB-MKR Dedicated MicroPython Firmware
Before running the UDP example, you need to flash the corresponding MicroPython firmware onto the W55RP20-EVB-MKR.
The W55RP20-EVB-MKR module is fully compatible with the Raspberry Pi Pico UF2 firmware flashing method. The steps are as follows:
- Press and hold the
BOOTSELbutton on the RP2040 board - Connect the board to your computer using the Micro USB cable
- Once the computer recognizes a USB drive named
RPI-RP2, release the BOOTSEL button - Drag the downloaded
.uf2firmware file into theRPI-RP2USB drive - The board will automatically restart, and the firmware flashing is complete
Note: If the computer does not recognize the
RPI-RP2USB drive, try reconnecting the USB cable, use a different USB cable that supports data transfer, or switch to a different USB port (preferably a USB 2.0 port).
4. Hardware Connections & Development Environment Setup
4.1 Hardware Connections
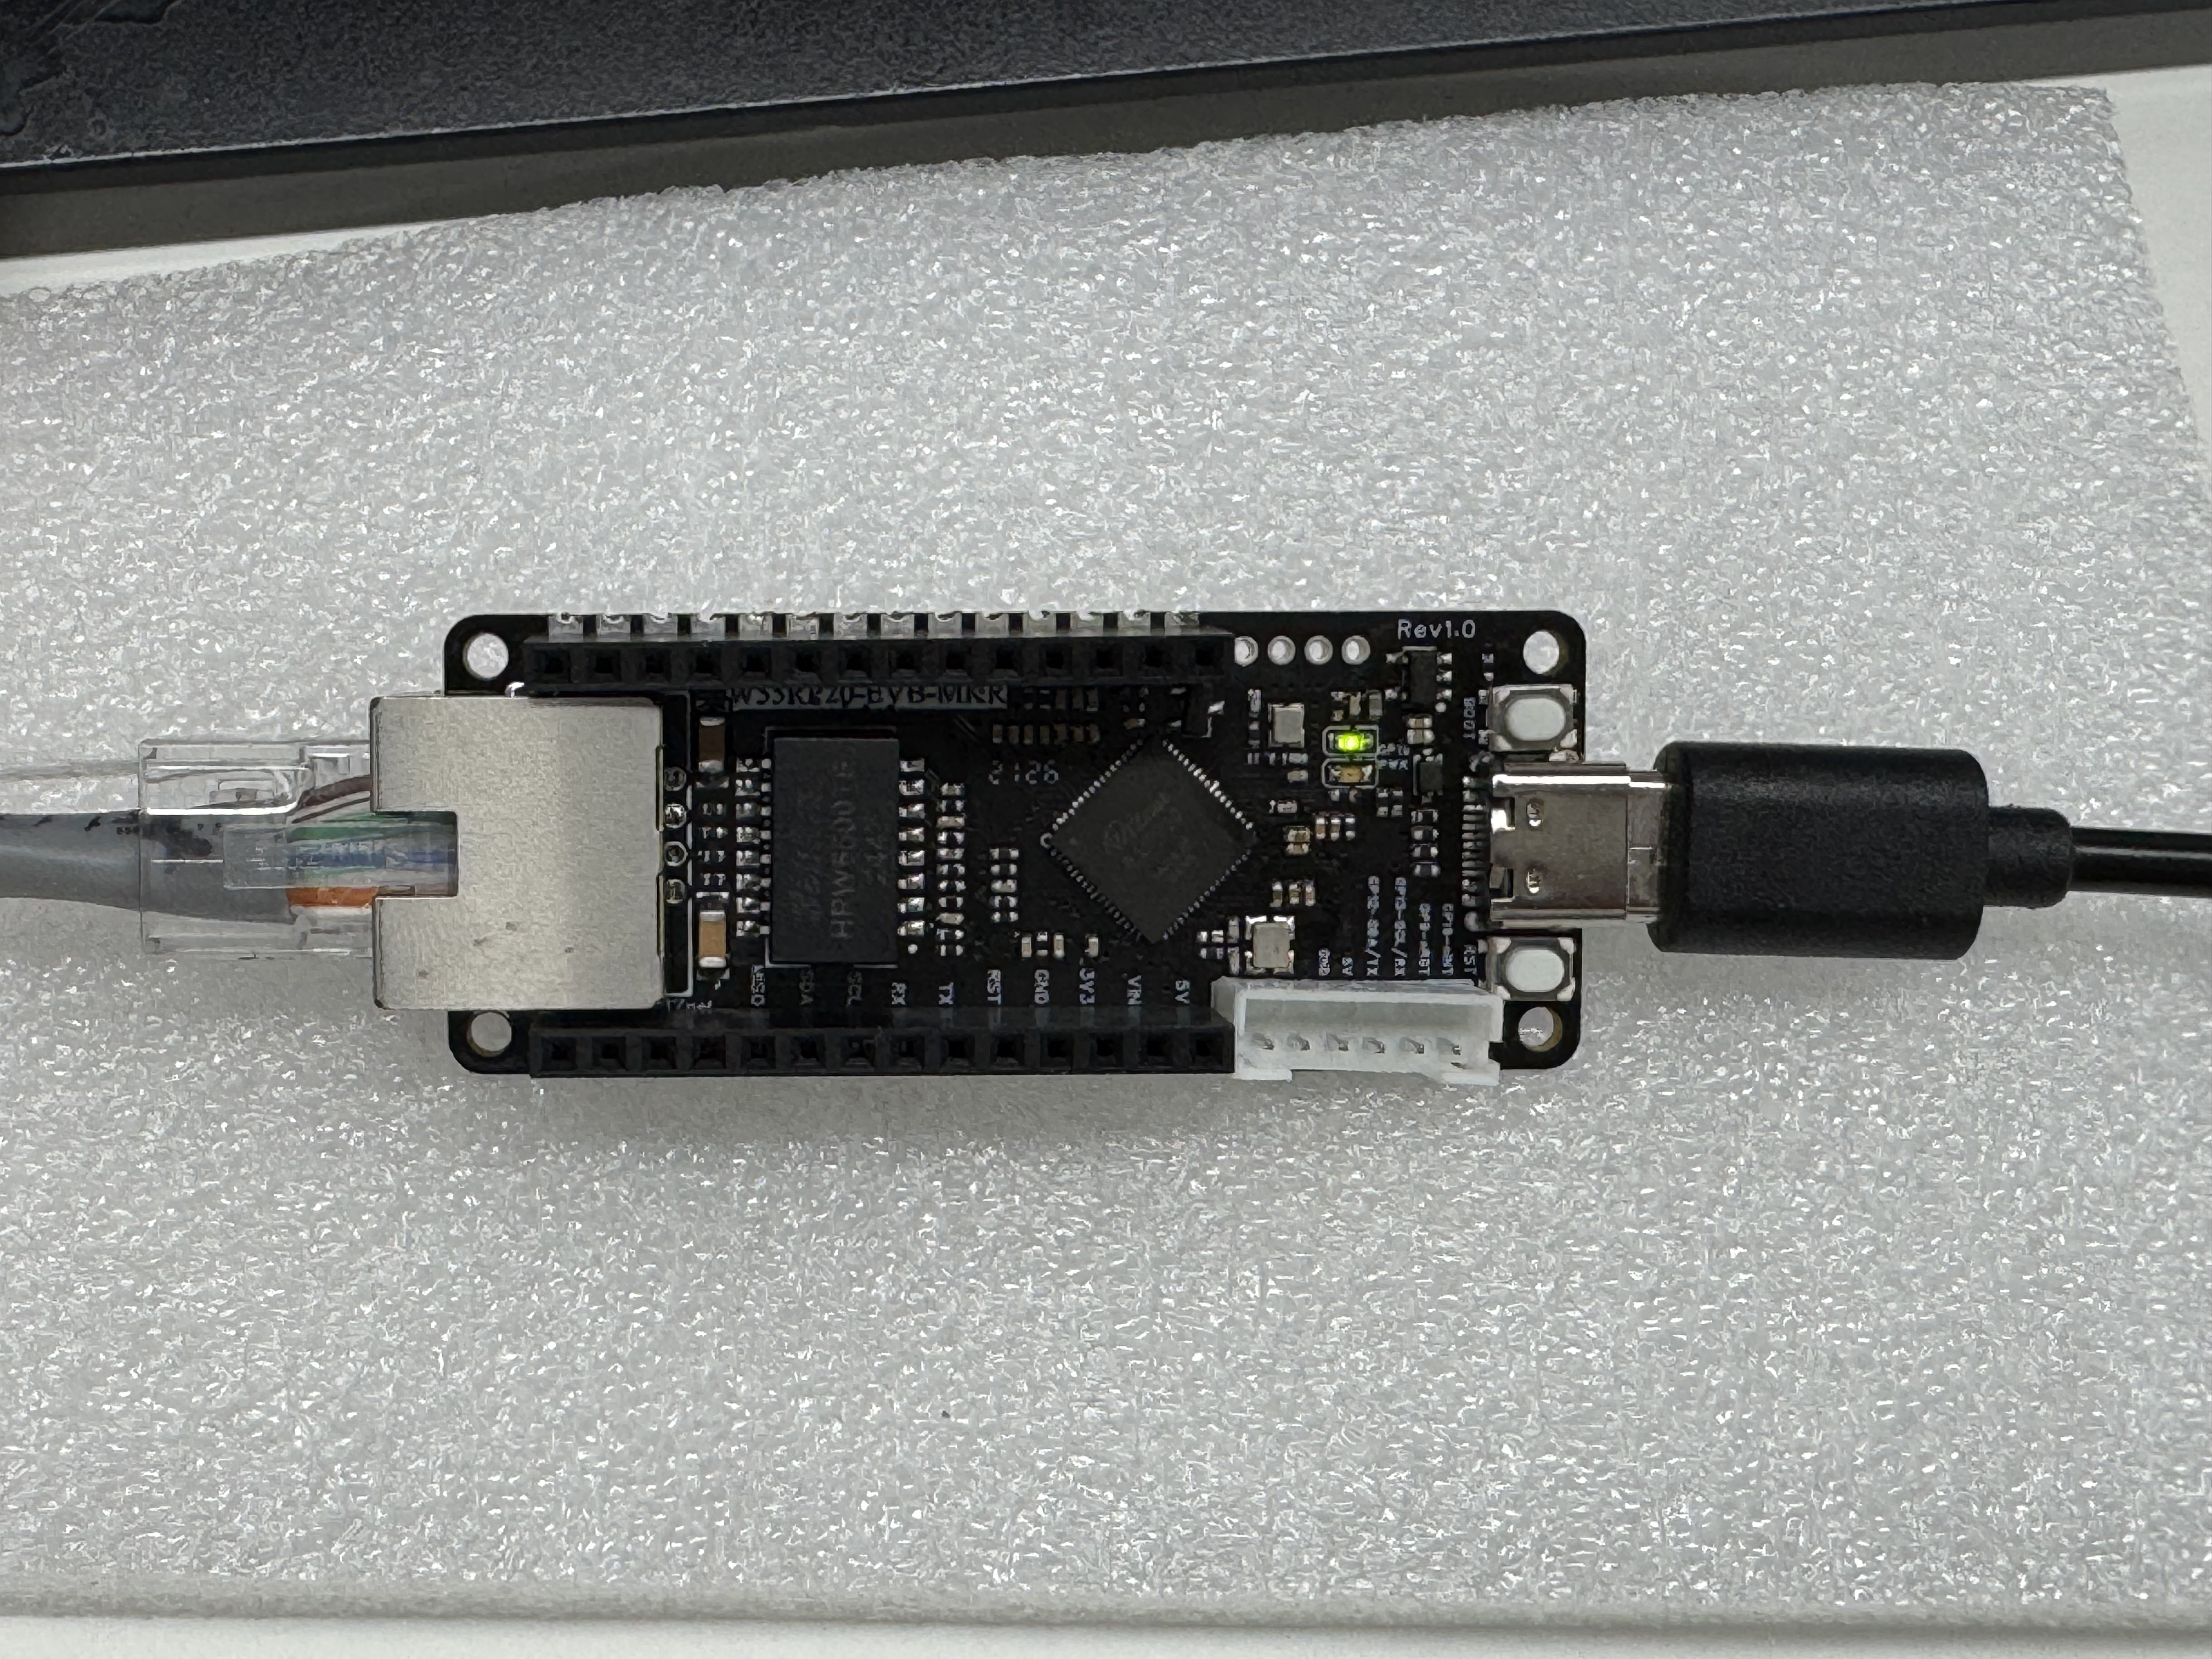
Connecting the W55RP20-EVB-MKR is extremely simple — just two steps:
-
Use the Micro USB cable to connect the RP2040 board to the computer (for power, code flashing, and serial debugging)
-
Use the Ethernet cable to connect the W55RP20-EVB-MKR module’s Ethernet port to the router’s LAN port
4.2 Thonny IDE Configuration
-
Open Thonny, click the top menu bar: “Run” → “Configure Interpreter”
-
Switch to the “Interpreter” tab
-
In the “Interpreter” dropdown, select
MicroPython (Generic) -
In the “Port” dropdown, select the serial port corresponding to the W55RP20-EVB-MKR (usually displayed as
Board CDC @ COMx) -
Check “Restart interpreter before running code” and “Sync device’s real-time clock”
-
Click “OK” to complete the configuration
If the board does not appear in the port list, try:
- Re-plugging the USB cable
- Using a different USB cable that supports data transfer
- Closing other software that occupies the serial port (e.g., serial monitor, Arduino IDE, etc.)
- Re-flashing the MicroPython firmware
- Installing the Raspberry Pi Pico USB driver
5. Core Code Analysis
The W55RP20-EVB-MKR module’s MicroPython library has already encapsulated all low-level details. Implementing UDP communication requires only a small amount of core code — no need to write complex low-level drivers or protocol parsing logic.
5.1 Complete Code
Open the UDP example file, or enter the following code in Thonny:
from wiznet_init import wiznet
import usocket as socket
import time

# Initialize network
nic = wiznet("W55RP20-EVB-MKR", dhcp=True)
local_ip = nic.ifconfig()[0]
local_port = 8087

print("==================================")
print(" UDP Server Started")
print(" Local IP:", local_ip)
print(" Local Port:", local_port)
print("==================================")

# Create UDP socket
s = socket.socket(socket.AF_INET, socket.SOCK_DGRAM)
s.bind(("0.0.0.0", local_port))  # Bind to all addresses

# Loop receive & reply
while True:
    data, addr = s.recvfrom(1024)  # Wait for data from the computer
    print("Received from", addr, ":", data)

    # Reply to the computer
    s.sendto(b"UDP Server reply: " + data, addr)
5.2 Key Code Explanation
- Network Initialization: Based on the officially wrapped
wiznetutility library, a single line of code completes W55RP20-EVB-MKR hardware driver loading, Ethernet activation, and DHCP automatic networking — avoiding complex low-level SPI and register configuration. - UDP Socket Creation: Uses
SOCK_DGRAMto declare datagram mode for dedicated UDP communication, distinguishing it from TCP stream sockets and adapting to UDP’s connectionless nature. - Port Binding Configuration: Binds to
0.0.0.0to listen on all network segments, ensuring any device on the LAN can access the W55RP20-EVB-MKR module’s UDP server port. - Bidirectional Communication Logic:
recvfromblocks waiting to receive data, automatically carrying the client address;sendtosends a directional reply based on the target address, achieving a request-response closed-loop communication suitable for embedded short-message interaction scenarios.
5.3 Extension: Static IP Manual Configuration
In environments without a DHCP router, you can disable automatic networking and manually set a fixed IP, gateway, and DNS:
# Disable DHCP, manually configure static network parameters (W55RP20-EVB-MKR module)
nic = wiznet("W55RP20-EVB-MKR", dhcp=False)
nic.ifconfig(("192.168.1.100","255.255.255.0","192.168.1.1","114.114.114.114"))
Note: The static IP must be in the same subnet as your computer/server; otherwise, UDP communication and network interaction will not be possible.
6. Running Results & Test Verification
Once the hardware connections and Thonny IDE are configured, you can run the UDP example program and check whether the W55RP20-EVB-MKR successfully sends and receives UDP data.
6.1 Serial Output Results
Click the Run button in Thonny, or press F5 to run the program.
After running, the Shell window will output something similar to:
Waiting for the network to connect...
MAC Address: 02:90:86:88:4d:56
IP Address: ('192.168.1.118', '255.255.255.0', '192.168.1.1', '202.96.134.33')
==================================
 UDP Server Started
 Local IP: 192.168.1.118
 Local Port: 8087
==================================
Received from ('192.168.1.141', 8087) : b'Hello WIZnet\r\n'
Received from ('192.168.1.141', 8087) : b'Hello WIZnet\r\n'
Note: The resolved IP address may vary slightly depending on the network environment and router configuration — this is normal. If no IP address is displayed, check the network connection and firmware configuration.
The actual running result is shown below:
UDP
6.2 UDP Joint Debugging Method
- Open a network debugging tool and select UDP Client Mode
- Enter the local IP printed by the W55RP20-EVB-MKR module and port
8087 - Manually enter test data and click Send
- Thonny’s serial monitor prints the received content in real time, while the debugging tool simultaneously receives the module’s reply
- If data sending and receiving are normal, the W55RP20-EVB-MKR UDP communication setup is complete
7. One-Stop Troubleshooting Guide
7.1 Flashing & Port Issues
| Issue | Troubleshooting Steps |
|---|---|
Computer cannot recognize RPI-RP2 USB drive |
1. Confirm you are holding BOOTSEL before connecting USB2. Use a different USB cable that supports data transfer 3. Try a different USB port on the computer 4. Try another computer |
| Board port not found in Thonny | 1. Re-plug the USB cable 2. Use a different USB cable that supports data transfer 3. Close other software occupying the serial port 4. Check Device Manager for a new serial device 5. Re-flash the MicroPython firmware |
7.2 Network Connectivity Issues
| Issue | Troubleshooting Steps |
|---|---|
| Ethernet port LED not lit | 1. Check Ethernet cable integrity 2. Try a different router LAN port 3. Re-plug the Ethernet cable to ensure a secure connection |
| DHCP acquisition failed | 1. Switch to static IP configuration with same-subnet parameters 2. Confirm the router has DHCP enabled 3. Restart the router and W55RP20-EVB-MKR module |
| IP address is 0.0.0.0 | 1. Re-flash the W55RP20-EVB-MKR dedicated firmware 2. Restart the device 3. Check network connection and wiring |
7.3 UDP Send/Receive Issues
| Issue | Troubleshooting Steps |
|---|---|
| Client cannot connect | 1. Confirm both devices are on the same LAN 2. Ensure server and client use the same port number 3. Disable the computer’s firewall |
| Data received is empty | 1. Limit single-packet size to within 1024 bytes 2. Check that the receive logic in the code is correct 3. Re-flash the code and restart the module |
| Severe packet loss | 1. Disable the computer’s firewall to reduce network interference 2. Use a high-quality Ethernet cable 3. Reduce high-frequency continuous sending; add short delays |
8. WIZnet Hardware Protocol Stack — Core Advantage Comparison
To give you a clearer picture of the W55RP20’s value, we compare the three mainstream embedded Ethernet solutions:
| Dimension | W5500 Hardware Stack Solution | External PHY Chip Solution | Serial-to-Ethernet Module Solution |
|---|---|---|---|
| BOM Cost | Medium (MCU + network module, no extra components) |
Medium-High (MCU + PHY chip + peripheral components) |
High |
| PCB Footprint | Small (high module integration, only needs space for the module) |
Large (requires chip, trace space, and peripheral circuits) |
High |
| Development Difficulty | Low (MicroPython firmware already encapsulates the low level; minimal code for UDP communication) |
Medium-High (requires debugging the protocol stack and writing low-level drivers; high R&D capability needed) |
Low |
| Network Stability | Extremely high (WIZnet has focused on hardware TCP/IP stacks for 25 years; strong anti-interference, low UDP packet loss) |
Variable (depends on the developer’s mastery of the protocol stack and network development; UDP is prone to packet loss) |
Variable (depends on the vendor’s capability) |
| CPU Resource Usage | 0% (protocol stack fully handled by hardware; no MCU resources consumed; does not affect data send rate) |
50%+ (protocol stack runs on the MCU, consuming significant CPU and memory, impacting UDP send efficiency) |
0% |
| Hardware Socket Count | W5500: 8 independent hardware sockets, supporting simultaneous multicast/broadcast | Depends on MCU capability; theoretically supports multiple channels, but limited by CPU resources in practice | Generally single-channel pass-through |
| Network Throughput | W5500: up to 15 Mbps, smooth UDP data transfer with no noticeable latency | Depends on MCU capability; generally lower than hardware stack solutions; multi-device communication prone to stuttering | approx. 3–5 Mbps |
| Interface Usability | SPI interface — simple wiring, compatible with most MCUs, supports high-speed communication | Requires MCU with MII/RMII dedicated interfaces — limited compatibility | TTL interface |
| Deployment Difficulty | Low (mature MicroPython firmware, libraries for application-layer protocols, rapid multi-device networking) |
High (application-layer protocols require manual porting of open-source libraries for adaptation; high debugging cost) |
Depends on module integration; functionality not built-in requires custom packet assembly/disassembly |
The W55RP20-EVB-MKR development board already has an onboard Ethernet interface, making it ideal for rapid Ethernet functionality verification.
For the UDP example, the advantage of the W55RP20-EVB-MKR development board is that you don’t need to connect an external Ethernet module or manually configure complex low-level drivers — just a few lines of MicroPython example code are enough to complete UDP communication testing.
9. Typical Application Scenarios
The W55RP20-EVB-MKR module, combining MicroPython’s rapid development advantages with the stability of the WIZnet hardware protocol stack, is well-suited for the following scenarios:
- Periodic sensor data collection and reporting in industrial field sites
- Rapid discovery and unified control of multiple devices within a LAN
- Bidirectional interaction of embedded lightweight control commands
- Short-message communication for IoT low-power nodes
- Embedded networking hands-on teaching cases for universities and enterprises
In these scenarios, UDP’s low latency and lightweight characteristics allow the development board to perform data exchange more efficiently, reducing the extra overhead of network communication.
10. Summary
Starting from UDP protocol principles, this article systematically demonstrated how to quickly implement UDP communication using the W55RP20-EVB-MKR development board. With the WIZnet hardware TCP/IP stack, only a small amount of MicroPython code is needed to build a UDP server and handle data transmission and reception.
Key takeaways from this article:
- UDP Protocol Principles: Understood UDP’s core characteristics — connectionless, lightweight, low-latency — as well as unicast, broadcast, and multicast operating modes
- Development Environment Setup: Completed the W55RP20-EVB-MKR dedicated firmware flashing and Thonny IDE configuration
- UDP Server Implementation: Used
socket.SOCK_DGRAMto create a UDP socket, bound the listening port, and implemented data reception with automatic reply - Joint Debugging & Testing: Verified bidirectional communication between a UDP client and server using a network debugging tool
- Troubleshooting: Summarized troubleshooting methods for three major categories — flashing, network connectivity, and UDP send/receive issues
- Solution Comparison: Compared the W5500 hardware protocol stack, external PHY chip, and serial-to-Ethernet module solutions; the W55RP20 demonstrates significant advantages in development convenience, CPU resource usage, and network stability
The W55RP20-EVB-MKR development board combines WIZnet’s 25 years of hardware protocol stack expertise with MicroPython’s rapid development advantages, making embedded network development simpler than ever. After mastering the UDP communication fundamentals in this article, you will be able to easily extend to more advanced network applications — such as multicast communication, HTTP services, and MQTT cloud integration covered in subsequent tutorials.
11. Series Preview & Resources
11.1 Series Preview
The next tutorial will cover UDP Multicast & Broadcast Communication with the W55RP20-EVB-MKR Module using MicroPython, taking you through:
- Multicast address configuration
- Broadcast command sending
- Key mechanisms like multi-device synchronized response
- Mastering core capabilities for multi-device cluster control within a LAN
11.2 Resources
- Complete code for this article: WIZnet Pico MicroPython Example Project
- W55RP20 Chip Datasheet: WIZnet Official Resources Page
If this article was helpful, feel free to like, bookmark, and follow — your support is our motivation to keep updating!
If you have any questions, please leave a comment, and we will respond as soon as possible.
更多推荐
 5
5 0
0- 0


 已为社区贡献3条内容

所有评论(0)