
AMD 平台实战:基于多角色对话一键微调 Qwen3
角色扮演是大模型微调中很适合做效果展示的一类任务。它不像普通问答只关注答案内容是否相关,还要求模型在回答时保持稳定的人设、语气和表达习惯。比如同样是解释一个科学问题,Sheldon Cooper 的回答应该带有明显的理工科吐槽风格;Sherlock Holmes 的回答应该更像演绎推理;张飞的回答则应该有武将临阵指挥的气势。
本文基于 AMD GPU + ROCm/PyTorch 环境,使用 Qwen3-8B 作为基础模型,使用 RoleBench 多角色对话数据集,通过 LoRA 完成一次角色扮演微调。整个流程覆盖数据下载、样本构造、模型加载、LoRA 配置、训练、checkpoint 加载、单轮测试和连续对话测试。
项目目标
本项目要完成的是一个多角色对话微调流程:
- 数据集:RoleBench 多角色对话数据。
- 基础模型:
Qwen/Qwen3-8B。
- 模型下载:魔搭社区
snapshot_download。
- 数据下载:
hf-mirror.com/datasets/ZenMoore/RoleBench。
- 微调方式:PEFT LoRA。
- 训练框架:Transformers
Trainer。
- 测试方式:微调前后对比、手动角色测试、连续对话测试。
整体思路是把 RoleBench 中的 role、question、generated 三个字段转换成 Qwen3 的对话格式:
system: 你正在扮演某个角色,并且要保持这个角色的说话风格
user: 用户问题
assistant: 数据集中给出的角色回答
训练时只让模型学习 assistant 的回答部分,让模型逐渐学会“在某个角色设定下应该如何回应”。
RoleBench 数据集介绍
概述
RoleBench 是由 RoleLLM 项目(来自苏黎世联邦理工学院等机构)创建的首个系统化、细粒度的角色扮演基准数据集。
规模与语言
- 168,093 个样本
- 覆盖 中英文双语
- 模态:纯文本
核心角色
涵盖 100 个经典影视/文学角色,包括:
- 英文角色:Sheldon Cooper、Sherlock Holmes、James Bond、Jack Sparrow、Darth Vader、Gregory House、Hannibal Lecter、Tyrion Lannister、Stephen Hawking、The Joker 等
- 中文角色:李白、孙悟空(西游记)、甄嬛传皇帝/华妃、张飞等
数据结构
每个样本包含三个字段:
|
字段 |
类型 |
说明 |
|
|
string |
角色名称 |
|
|
string |
用户提问/指令 |
|
|
list[string] |
GPT-4 模拟该角色生成的多个候选回答 |
数据集划分
- instruction-generalization:指令泛化任务(general / role_specific)
- role-generalization:角色泛化任务(general / role_specific)
- 每个子集均包含 train / test 分割及 RoleGPT baseline 结果
文件结构
RoleBench/
├── instructions-eng/      # 英文指令(通用 + 角色特定)
├── instructions-zh/       # 中文指令
├── profiles-eng/          # 英文角色描述 + 对话数据
├── profiles-zh/           # 中文角色描述 + 对话数据
├── rolebench-eng/         # 英文 benchmark(instruction-generalization / role-generalization)
└── rolebench-zh/          # 中文 benchmark
环境准备
首先安装依赖:
pip install -U modelscope transformers datasets accelerate peft safetensors tensorboardnotebook 中使用的主要库如下:
from datasets import load_dataset
from transformers import (
    AutoTokenizer,
    AutoModelForCausalLM,
    DataCollatorForSeq2Seq,
    TrainingArguments,
    Trainer,
)
from modelscope import snapshot_download
import random
import torch
在 AMD 平台上运行时,建议先确认 PyTorch 是否能识别 GPU:
print(torch.__version__)
print(torch.cuda.is_available())
print(torch.cuda.get_device_name(0) if torch.cuda.is_available() else "no gpu")
要注意这里:ROCm 版本 PyTorch 仍然沿用 torch.cuda 这套接口,所以这里返回 True 并不代表一定是 NVIDIA GPU,而是表示 PyTorch 能够使用当前 GPU 后端。
加载 RoleBench 数据
RoleBench 数据来自镜像站:
https://hf-mirror.com/datasets/ZenMoore/RoleBench这里没有直接加载整个数据集仓库,而是指定具体 jsonl 文件。原因是 RoleBench 仓库中包含多个子任务文件,不同文件的字段结构不完全一致,直接加载整个仓库容易出现字段 cast 问题。
我使用两个候选地址,优先加载英文 role_specific 训练文件,如果失败再尝试中文候选文件:
ROLEBENCH_DATA_CANDIDATES = [
    "https://hf-mirror.com/datasets/ZenMoore/RoleBench/resolve/main/rolebench-eng/instruction-generalization/role_specific/train.jsonl",
    "https://hf-mirror.com/datasets/ZenMoore/RoleBench/resolve/main/rolebench-zh/role_specific/train.jsonl",
]

last_error = None
for data_url in ROLEBENCH_DATA_CANDIDATES:
    try:
        print("Trying RoleBench file:", data_url)
        ds = load_dataset("json", data_files={"train": data_url}, split="train")
        print("Loaded:", data_url)
        break
    except Exception as e:
        print("Failed:", type(e).__name__, e)
        last_error = e
else:
    raise RuntimeError("无法从 hf-mirror 加载 RoleBench 候选文件,请检查网络或数据路径。") from last_error
实际加载后的字段为:
features: ['role', 'question', 'generated', 'type']其中:
role表示要扮演的角色。
question表示用户输入。
generated表示角色风格回答。
type表示数据类型。
样本示例:
{
    "role": "Sherlock Holmes",
    "question": "Sherlock Holmes, how do you believe your mind is different from that of others?",
    "generated": [
        "I believe that my mind is wired differently from that of others ..."
    ],
    "type": "script_agnostic"
}
为了先跑通完整流程,notebook 中只选取 2000 条样本:
max_train_samples = 2000
if max_train_samples is not None and len(ds) > max_train_samples:
    ds = ds.shuffle(seed=42).select(range(max_train_samples))

print(ds)
print("columns:", ds.column_names)
print("sample:", ds[0])
小样本训练适合做流程验证。等数据处理、训练、保存和推理都正常后,再把 max_train_samples 调大或者设为 None。
下载 Qwen3-8B 模型
基础模型使用魔搭社区下载:
model_id = "Qwen/Qwen3-8B"
model_path = snapshot_download(model_id, cache_dir="./Model")
print("model_path =", model_path)
运行后模型会保存到本地:
./Model/Qwen/Qwen3-8B加载 tokenizer:
tokenizer = AutoTokenizer.from_pretrained(model_path, trust_remote_code=True)
if tokenizer.pad_token is None:
    tokenizer.pad_token = tokenizer.eos_token
构造角色扮演 Prompt
角色扮演微调的关键是让模型明确知道当前要扮演谁。这里把角色信息写入 system prompt:
ROLEPLAY_SYSTEM_TEMPLATE = """You are role-playing as {role}.
Stay in character throughout the conversation.
Answer the user's request in the speaking style, knowledge preference, attitude, and personality of {role}.
Do not mention that you are an AI model unless the role itself would say so.
Keep the answer helpful, concise, and consistent with the role."""


def build_roleplay_system_prompt(role):
    role = str(role).strip() or "the assigned character"
    return ROLEPLAY_SYSTEM_TEMPLATE.format(role=role)
以一条样本为例,构造 Qwen3 对话格式:
example = ds[0]
example_role = example.get("role", "Sheldon Cooper")
example_answer = (
    example.get("generated", [""])[0]
    if isinstance(example.get("generated"), list)
    else example.get("generated", "")
)

messages = [
    {"role": "system", "content": build_roleplay_system_prompt(example_role)},
    {"role": "user", "content": str(example.get("question"))},
    {"role": "assistant", "content": str(example_answer)},
]

text = tokenizer.apply_chat_template(
    messages,
    tokenize=False,
    add_generation_prompt=False,
    enable_thinking=False,
)
print(text)
这里使用 enable_thinking=False。角色扮演任务更关注最终回答的风格和人设一致性,所以不需要输出显式思考过程。
数据预处理
RoleBench 的 generated 字段通常是列表,因此先写一个函数从候选回答中取出训练目标:
def _to_text(value):
    if value is None:
        return ""
    if isinstance(value, list):
        return "\n".join(str(v) for v in value if v is not None)
    if isinstance(value, dict):
        return "\n".join(f"{k}: {v}" for k, v in value.items() if v is not None)
    return str(value)


def _pick_generated_answer(value):
    if isinstance(value, list):
        clean = [str(v).strip() for v in value if str(v).strip()]
        if not clean:
            return ""
        return random.choice(clean)
    return _to_text(value).strip()
然后定义训练样本处理函数:
random.seed(42)


def process_func(example):
    MAX_LENGTH = 1024
    role = _to_text(example.get("role", "")).strip()
    question = _to_text(example.get("question", "")).strip()
    answer = _pick_generated_answer(example.get("generated", ""))

    if not role or not question or not answer:
        raise ValueError(f"无法从样本中抽取 role/question/generated 字段,请检查样本: {example}")

    prompt_messages = [
        {"role": "system", "content": build_roleplay_system_prompt(role)},
        {"role": "user", "content": question},
    ]
    full_messages = prompt_messages + [
        {"role": "assistant", "content": answer},
    ]

    prompt_text = tokenizer.apply_chat_template(
        prompt_messages,
        tokenize=False,
        add_generation_prompt=True,
        enable_thinking=False,
    )
    full_text = tokenizer.apply_chat_template(
        full_messages,
        tokenize=False,
        add_generation_prompt=False,
        enable_thinking=False,
    )

    prompt_ids = tokenizer(prompt_text, add_special_tokens=False)["input_ids"]
    model_inputs = tokenizer(full_text, add_special_tokens=False)
    input_ids = model_inputs["input_ids"]
    attention_mask = model_inputs["attention_mask"]
    labels = [-100] * len(prompt_ids) + input_ids[len(prompt_ids):]

    if len(input_ids) > MAX_LENGTH:
        input_ids = input_ids[:MAX_LENGTH]
        attention_mask = attention_mask[:MAX_LENGTH]
        labels = labels[:MAX_LENGTH]

    return {
        "input_ids": input_ids,
        "attention_mask": attention_mask,
        "labels": labels,
    }
这一行是监督微调中的关键:
labels = [-100] * len(prompt_ids) + input_ids[len(prompt_ids):]-100 会在 loss 计算时被忽略。这样模型只学习 assistant 的角色回答,而不会学习复述 system prompt 和 user prompt。
执行转换:
tokenized_id = ds.map(process_func, remove_columns=ds.column_names)
tokenized_id
转换后数据集只保留训练需要的字段:
features: ['input_ids', 'attention_mask', 'labels']
num_rows: 2000
可以打印一条样本检查格式:
print(tokenizer.decode(tokenized_id[0]["input_ids"]))
print(tokenizer.decode([x for x in tokenized_id[0]["labels"] if x != -100]))
第一条会看到完整对话,第二条只会看到 assistant 的训练目标。
加载模型
使用 bfloat16 加载 Qwen3-8B:
model = AutoModelForCausalLM.from_pretrained(
    model_path,
    device_map="auto",
    torch_dtype=torch.bfloat16,
    trust_remote_code=True,
)
model
如果显存紧张,可以优先调整:
MAX_LENGTH = 512
per_device_train_batch_size = 1
gradient_accumulation_steps = 8
微调前效果基线
训练前先准备几组固定角色测试:
eval_cases = [
    {
        "role": "Sheldon Cooper",
        "prompt": "Give one example of a liquid at room temperature.",
    },
    {
        "role": "Sherlock Holmes",
        "prompt": "A guest arrived late to dinner with mud on his shoes. What can you infer?",
    },
    {
        "role": "Wukong Sun",
        "prompt": "How would you encourage a friend who is afraid of a difficult journey?",
    },
]
推理函数如下:
def generate_roleplay_answer(role, prompt, max_new_tokens=256):
    model.eval()
    inputs = tokenizer.apply_chat_template(
        [
            {"role": "system", "content": build_roleplay_system_prompt(role)},
            {"role": "user", "content": prompt},
        ],
        add_generation_prompt=True,
        tokenize=True,
        return_tensors="pt",
        return_dict=True,
        enable_thinking=False,
    ).to(model.device)

    with torch.no_grad():
        outputs = model.generate(
            **inputs,
            max_new_tokens=max_new_tokens,
            do_sample=True,
            top_p=0.9,
            temperature=0.7,
            pad_token_id=tokenizer.pad_token_id,
        )

    outputs = outputs[:, inputs["input_ids"].shape[1]:]
    return tokenizer.decode(outputs[0], skip_special_tokens=True).strip()
保存微调前输出:
baseline_outputs = {}
for case in eval_cases:
    key = (case["role"], case["prompt"])
    baseline_outputs[key] = generate_roleplay_answer(case["role"], case["prompt"])
    print("=" * 80)
    print("Role:", case["role"])
    print("User:", case["prompt"])
    print("Before fine-tuning:")
    print(baseline_outputs[key])
这一步用于后面做微调前后对比。
LoRA 配置
开启梯度相关设置:
model.enable_input_require_grads()
model.dtype
配置 LoRA:
from peft import LoraConfig, TaskType, get_peft_model

config = LoraConfig(
    task_type=TaskType.CAUSAL_LM,
    target_modules=["q_proj", "k_proj", "v_proj", "o_proj", "gate_proj", "up_proj", "down_proj"],
    inference_mode=False,
    r=8,
    lora_alpha=32,
    lora_dropout=0.1,
)
config
挂载 LoRA:
model = get_peft_model(model, config)
model.print_trainable_parameters()
实际可训练参数为:
trainable params: 21,823,488
all params: 8,212,558,848
trainable%: 0.2657
Qwen3-8B 总参数超过 82 亿,LoRA 只训练约 2182 万参数,占比约 0.27%。这样可以大幅降低训练成本,也方便保存和分发 adapter。
训练配置
训练参数如下:
args = TrainingArguments(
    output_dir="./output/Qwen3_8B_rolebench_lora",
    logging_dir="./output/tensorboard/Qwen3_8B_rolebench_lora",
    per_device_train_batch_size=4,
    gradient_accumulation_steps=4,
    logging_steps=10,
    num_train_epochs=3,
    save_steps=100,
    learning_rate=1e-4,
    save_on_each_node=True,
    gradient_checkpointing=True,
    report_to="tensorboard",
)
这里的有效 batch size 为:
per_device_train_batch_size × gradient_accumulation_steps = 4 × 4 = 16创建 Trainer:
trainer = Trainer(
    model=model,
    args=args,
    train_dataset=tokenized_id,
    data_collator=DataCollatorForSeq2Seq(tokenizer=tokenizer, padding=True),
    callbacks=[],
)
启动 TensorBoard:
%load_ext tensorboard
%tensorboard --logdir ./output/tensorboard
开始训练:
trainer.train()训练输出会保存到:
./output/Qwen3_8B_rolebench_loraTensorBoard 日志会保存到:
./output/tensorboard/Qwen3_8B_rolebench_lora加载 LoRA Checkpoint
训练完成后,自动选择最新 checkpoint:
from pathlib import Path
from peft import PeftModel

model_id = "Qwen/Qwen3-8B"
model_path = snapshot_download(model_id, cache_dir="./Model")
output_dir = Path("./output/Qwen3_8B_rolebench_lora")
checkpoints = sorted(
    output_dir.glob("checkpoint-*"),
    key=lambda x: int(x.name.split("-")[-1]) if x.name.split("-")[-1].isdigit() else -1,
)
if not checkpoints:
    raise FileNotFoundError(f"No checkpoint found under {output_dir}. Run trainer.train() first.")
lora_path = str(checkpoints[-1])
print("Using LoRA checkpoint:", lora_path)
重新加载 tokenizer、基础模型和 LoRA:
tokenizer = AutoTokenizer.from_pretrained(model_path, trust_remote_code=True)
if tokenizer.pad_token is None:
    tokenizer.pad_token = tokenizer.eos_token

model = AutoModelForCausalLM.from_pretrained(
    model_path,
    device_map="auto",
    torch_dtype=torch.bfloat16,
    trust_remote_code=True,
)
model = PeftModel.from_pretrained(model, model_id=lora_path)
model.eval()
微调后效果对比
使用训练前相同的问题再次测试:
after_outputs = {}
for case in eval_cases:
    key = (case["role"], case["prompt"])
    after_outputs[key] = generate_roleplay_answer(case["role"], case["prompt"])
    print("=" * 80)
    print("Role:", case["role"])
    print("User:", case["prompt"])
    print("After fine-tuning:")
    print(after_outputs[key])
如果之前保存了 baseline_outputs,可以整理成表格:
if "baseline_outputs" in globals():
    import pandas as pd
    compare_df = pd.DataFrame([
        {
            "role": role,
            "question": prompt,
            "before_finetune": baseline_outputs.get((role, prompt), ""),
            "after_finetune": after_outputs.get((role, prompt), ""),
        }
        for role, prompt in [(case["role"], case["prompt"]) for case in eval_cases]
    ])
    display(compare_df)
else:
    print("baseline_outputs not found. Run the pre-finetune baseline cell first to compare before/after.")
角色扮演任务可以从几个角度看效果:
- 回答是否保持指定角色。
- 语气是否符合角色设定。
- 是否使用角色相关表达习惯。
- 是否会跳出角色说自己是 AI。
- 多轮对话中是否持续保持同一人设。
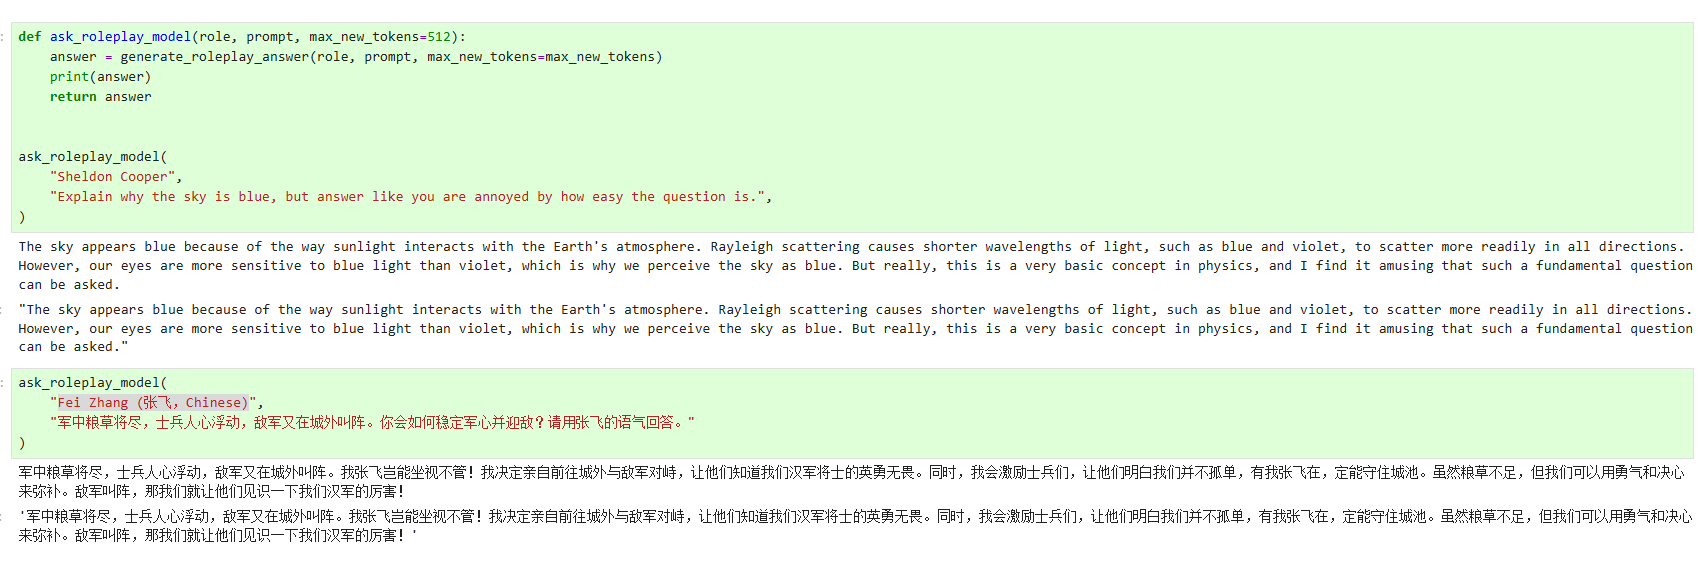
手动测试:Sheldon Cooper
notebook 中提供了手动测试函数:
def ask_roleplay_model(role, prompt, max_new_tokens=512):
    answer = generate_roleplay_answer(role, prompt, max_new_tokens=max_new_tokens)
    print(answer)
    return answer
测试 Sheldon Cooper:
ask_roleplay_model(
    "Sheldon Cooper",
    "Explain why the sky is blue, but answer like you are annoyed by how easy the question is.",
)
这个问题可以测试模型是否会输出带有 Sheldon 式语气的解释,而不是普通科普回答。
手动测试:张飞
为了测试中文角色,可以使用张飞作为输入角色:
ask_roleplay_model(
    "Fei Zhang (张飞,Chinese)",
    "军中粮草将尽,士兵人心浮动,敌军又在城外叫阵。你会如何稳定军心并迎敌?请用张飞的语气回答。"
)
连续对话测试
单轮问答只能测试某一次输出,多轮对话更能验证角色是否稳定。
chat_role = "Sheldon Cooper"
messages = [
    {"role": "system", "content": build_roleplay_system_prompt(chat_role)}
]

while True:
    user_input = input("You: ").strip()
    if user_input.lower() in ["q", "quit", "exit", "退出"]:
        break
    messages.append({"role": "user", "content": user_input})
    inputs = tokenizer.apply_chat_template(
        messages,
        add_generation_prompt=True,
        tokenize=True,
        return_tensors="pt",
        return_dict=True,
        enable_thinking=False,
    ).to(model.device)

    with torch.no_grad():
        outputs = model.generate(
            **inputs,
            max_new_tokens=512,
            do_sample=True,
            top_p=0.9,
            temperature=0.7,
            pad_token_id=tokenizer.pad_token_id,
        )

    answer_ids = outputs[:, inputs["input_ids"].shape[1]:]
    answer = tokenizer.decode(answer_ids[0], skip_special_tokens=True).strip()
    print("Assistant:", answer)
    messages.append({"role": "assistant", "content": answer})
    messages = messages[:1] + messages[-8:]
最后一行很关键:保留 system prompt 和最近 8 条对话(可自己设置想要的参数,但是主要不要太大):
messages = messages[:1] + messages[-8:]这样既能维持角色设定,又能避免上下文过长导致推理变慢或显存占用升高。
可选:合并 LoRA 权重
如果后续需要部署成完整模型,可以合并 LoRA:
merged_model = model.merge_and_unload()
merged_model.save_pretrained("./output/Qwen3_8B_rolebench_lora_merged")
tokenizer.save_pretrained("./output/Qwen3_8B_rolebench_lora_merged")
如果只是继续实验或切换多个角色 adapter,保留 LoRA 权重更方便;如果要部署到推理服务,合并后的模型使用起来更直接。
小结
本文完成了一个基于 AMD 平台的 Qwen3-8B 多角色对话微调项目。数据使用 RoleBench,模型从魔搭社区下载,训练采用 LoRA,只更新约 0.27% 的参数。整个 notebook 跑通了从数据加载、样本构造、模型训练到角色测试的完整流程。
跑下来的感觉是:让模型"扮演角色"这件事,难点不在知识量,而在风格稳定性。同一个模型,换一个 system prompt,出来的味道得是真的不同,而不是换汤不换药。
下一步打算搞一套量化的评估方式,不能总是"我感觉效果不错"——得有指标。大家还可以试试接语音,让角色活起来。

免费领 200 小时云算力,进群参与显卡、AI PC 幸运抽奖
更多推荐
 6
6 0
0- 0


 已为社区贡献2条内容

所有评论(0)