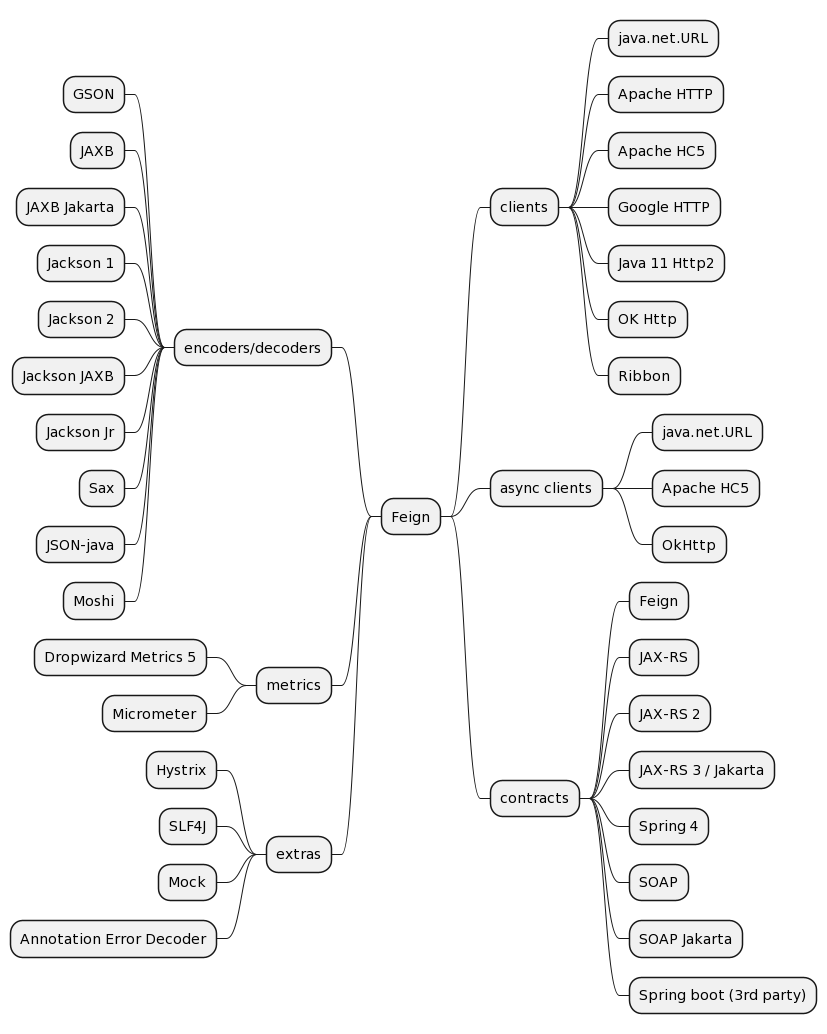
Spring Cloud OpenFeign官方文档学习
Feign是一个声明式的web服务客户端,让编写web服务客户端变得非常容易,只需创建一个接口并在接口上添加注解即可。Feign也支持可拔插式的编码器和解码器。Spring Cloud对Feign进行了封装,使其支持了Spring MVC标准注解和HttpMessageConverters。Feign可以与Eureka和Ribbon组合使用以支持负载均衡(也可以配合Spring Cloud Cir
文章目录
- 推荐
- 一、OpenFeign简介
- 二、Springboot集成OpenFeign
- 三、覆盖默认配置
- 四、手动创建feign客户端
- 五、Feign的SpringCloud断路器
- 六、Feign的继承重用
- 七、Feign请求响应的压缩
- 八、Feign Capability 的支持
- 九、Feign Metrics
- 十、开启Feign的缓存
- 十、@SpringQueryMap注解支持
- 十一、HATEOAS 的支持
- 十二、Spring @MatrixVariable 的支持
- 十三、FeignCollectionFormat的支持
- 十四、响应式的支持
- 十五、Spring Data 的支持
- 十六、Spring@RefreshScope的支持
- 十七、==支持向 Feign 客户端提供URL的方法==
- 十八、FeignClient的参数传递给服务提供方的方式
- 十九、feign实践
推荐
SpringCloud-OpenFeign官方文档使用大全详解
SpringCloud OpenFeign 全功能配置详解(一文吃透OpenFeign)
下面文档基本就是官方文档的翻译,源自:spring cloud openfeign官方文档介绍,做了一丢丢的补充
一、OpenFeign简介
github:https://github.com/spring-cloud/spring-cloud-openfeign
官方文档:https://docs.spring.io/spring-cloud-openfeign/docs/current/reference/html/#spring-cloud-feign
Feign 是一个声明式的 Web Service 客户端。它使编写 Web Service 客户端更容易。
要使用 Feign,需要创建一个接口并对其进行注解。
它有可插拔的注解支持,包括 Feign 注解和 JAX-RS 注解。Feign 还支持可插拔的编码器和解码器。
Spring Cloud 增加了对 Spring MVC 注解的支持,并支持使用 Spring Web 中默认使用的 HttpMessageConverters。
Spring Cloud 集成了 Eureka、Spring Cloud CircuitBreaker以及Spring Cloud LoadBalancer,以便在使用Feign时提供一个负载均衡的http客户端。
OpenFeign利用Ribbon维护了服务列表信息,并且通过轮询实现了客户端的负载均衡。而与Ribbon不同的是,通过feign只需要定义服务绑定接口且以声明式的方法,优雅而简单的实现了服务调用。
二、Springboot集成OpenFeign
1、引入starter
<!--openfeign-->
<dependency>
    <groupId>org.springframework.cloud</groupId>
    <artifactId>spring-cloud-starter-openfeign</artifactId>
</dependency>
在引入具体的版本之前,可以看下spring-cloud与springboot对应版本的兼容性
| Release Train | Spring Boot Generation |
|---|---|
| 2023.0.x aka Leyton | 3.2.x |
| 2022.0.x aka Kilburn | 3.0.x, 3.1.x (Starting with 2022.0.3) |
| 2021.0.x aka Jubilee | 2.6.x, 2.7.x (Starting with 2021.0.3) |
| 2020.0.x aka Ilford | 2.4.x, 2.5.x (Starting with 2020.0.3) |
| Hoxton | 2.2.x, 2.3.x (Starting with SR5) |
| Greenwich | 2.1.x |
| Finchley | 2.0.x |
| Edgware | 1.5.x |
| Dalston | 1.5.x |
2、在启动类或者配置类上加@EnableFeignClients注解:
@SpringBootApplication
@EnableFeignClients
public class Application {


    public static void main(String[] args) {

        SpringApplication.run(Application.class, args);
    }
}
3、声明Feign接口
@FeignClient("stores")
public interface StoreClient {

    @RequestMapping(method = RequestMethod.GET, value = "/stores")
    List<Store> getStores();

    @RequestMapping(method = RequestMethod.GET, value = "/stores")
    Page<Store> getStores(Pageable pageable);

    @RequestMapping(method = RequestMethod.POST,
                    value = "/stores/{storeId}",
                    consumes = "application/json")
    Store update(@PathVariable("storeId") Long storeId, Store store);

    @RequestMapping(method = RequestMethod.DELETE, value = "/stores/{storeId:\\d+}")
    void delete(@PathVariable Long storeId);
}
@FeignClient注解用于创建1个feign客户端,它在容器中的bean的名称就是接口的全限定名(可以通过@FeignClient注解的qualifiers属性来修改);
@FeignClient的value值为客户端的名称(此时可以做到负载均衡),当然也可以写完整的主机名或者是ip端口值;
可以通过@FeignClient的url属性来指定要访问的url(可以是全路径名,也可以是主机名);
上面例子中的feign客户端会去寻找stores服务对应的物理地址,如果你使用了Eureka作为注册中心,那么它就会从Eureka中服务列表中解析stores服务。如果你不想使用Eureka,你可以通过SimpleDiscoveryClient 配置stores服务列表。
4、@EnableFeignClients属性解析
@EnableFeignClients用于开启Feign自动配置。
@Retention(RetentionPolicy.RUNTIME)
@Target(ElementType.TYPE)
@Documented
@Import(FeignClientsRegistrar.class)
public @interface EnableFeignClients {

	// basePackages的别名,允许更简洁的注释声明,
    // 例如:@ComponentScan("org.my.pkg"), 而不是@ComponentScan(basePackages="org.my.pkg")
	String[] value() default {};

	// 用户扫描Feign客户端的包,也就是@FeignClient标注的类,与value同义,并且互斥
	String[] basePackages() default {};

	// basePackages()的类型安全替代方案,用于指定要扫描带注释的组件的包。每个指定类所在的包都将被扫描。
    // 考虑在每个包中创建一个特殊的无操作标记类或接口,除了被该属性引用之外没有其他用途。
	Class<?>[] basePackageClasses() default {};

	// 为所有扫描到的客户端定制@Configuration,默认配置都在FeignClientsConfiguration中,可以自己定制
	Class<?>[] defaultConfiguration() default {};

	// 可以指定@FeignClient标注的类,如果不为空,就会禁用类路径扫描
	Class<?>[] clients() default {};

}
5、@FeignClient属性解析
@FeignClient用于标注Feign客户端。
@Target(ElementType.TYPE)
@Retention(RetentionPolicy.RUNTIME)
@Documented
@Inherited
public @interface FeignClient {


	// name和value属性用于标注客户端名称,也可以用${propertyKey}获取配置属性
	@AliasFor("name")
	String value() default "";

	// 该类的Bean名称
	String contextId() default "";

	// name和value属性用于标注客户端名称,也可以用${propertyKey}获取配置属性
	@AliasFor("value")
	String name() default "";

	// 弃用 被qualifiers()替代。
	@Deprecated
	String qualifier() default "";

	// 模拟客户端的@Qualifiers值。
    // 如果qualifier()和qualifiers()都存在,我们将使用后者,
    // 除非qualifier()返回的数组为空或只包含空值或空白值,
    // 在这种情况下,我们将首先退回到qualifier(),
    // 如果也不存在,则使用default = contextId + "FeignClient"。
	String[] qualifiers() default {};

	// 绝对URL或可解析主机名
	String url() default "";

	// 是否应该解码404而不是抛出FeignExceptions
	boolean decode404() default false;

	// 用于模拟客户端的自定义配置类。可以包含组成客户端部分的覆盖@Bean定义,
    // 默认配置都在FeignClientsConfiguration类中,可以指定FeignClientsConfiguration类中所有的配置
	Class<?>[] configuration() default {};

	// 指定失败回调类
	Class<?> fallback() default void.class;

	// 为指定的假客户端接口定义一个fallback工厂。
    // fallback工厂必须生成fallback类的实例,这些实例实现了由FeignClient注释的接口。
	Class<?> fallbackFactory() default void.class;

	// 所有方法级映射使用的路径前缀
	String path() default "";

	// 是否将虚拟代理标记为主bean。默认为true。
	boolean primary() default true;
}
可以通过以下任何一种方式向Feign客户端提供URL:
三、覆盖默认配置
1、覆盖默认配置
在spring cloud feign中的1个核心概念就是命名客户端,每1个feign客户端都由各种组件,按照协议要求从远程服务器发起请求完成功能,每个这样的feign客户端都使用@FeignClient注解来标识。
spring cloud 会为每1个feign客户端使用FeignClientsConfiguration这个配置类创建1个spring容器,FeignClientsConfiguration类中定义的组件有:feign.Decoder、feign.Encoder、feign.Contract,并且可以使用@FeignClient注解的contextId属性来覆盖spring容器的名字。
在FeignClientsConfiguration类中,OpenFeign为我们做了很多默认配置,其中所有的配置我们都可以自定义并且覆盖。
@FeignClient(name = "stores", configuration = FooConfiguration.class)
public interface StoreClient {

    //..
}
在指定了我们自定义的FooConfiguration配置类之后,FooConfiguration配置类中自定义的配置会与FeignClientsConfiguration中的配置合并,并且FooConfiguration中的配置的组件的优先级会更高(覆盖FeignClientsConfiguration配置类中给我们的默认配置)。
注意!FooConfiguration类并不需要@Configuration注解,如果加上了@Configuration,就会全局生效,那么它里面定义的feign.Decoder, feign.Encoder, feign.Contract, etc.等组件就会成为默认配置(如果不想要FooConfiguration类中定义的组件成为默认组件,但是FooConfiguration上又加了@Configuration注解,那么就需要排除它,不让它被扫描到)。如果只在==@FeignClient中指定,那么就会只在该@FeignClient标注的类中生效==。@EnableFeignClients注解也可以指定配置类,它会在由该注解扫描到的客户端中应用指定配置类中定义的组件。
注意!@FeignClient4.0.2以版本前,使用url属性时,不需要name属性。现在name属性是必需的。
// name属性和url属性支持占位符表达式
@FeignClient(name = "${feign.name}", url = "${feign.url}")
public interface StoreClient {

    //..
}
2、配置列表
Spring Cloud OpenFeign默认为Feign提供了以下bean配置:
- Decoder feign解码器: 是一个ResponseEntityDecoder (被包装成了SpringDecoder)
- Encoder feign编码器: 是一个SpringEncoder
- Logger feign的Logger: 是一个Slf4jLogger
- MicrometerObservationCapability micrometerObservationCapability: 如果feign-micrometer在类路径中并且ObservationRegistry可用
- CachingCapability cachingCapability:如果使用了@EnableCaching注解会使用。可以通过spring.cloud.openfeign.cache.enabled配置禁用。
- Contract feignContract: 是一个==SpringMvcContract ==
- Feign.Builder feignBuilder: 是一个FeignCircuitBreaker.Builder
- Client feignClient: 如果Spring Cloud LoadBalancer在类路径上,则使用FeignBlockingLoadBalancerClient。如果它们都不在类路径中,则使用默认的feign客户端。
spring-cloud-starter-openfeign支持spring-cloud-starter-loadbalancer,但是因为后者是个可选依赖,如果想使用这个依赖的话,那么就需要自己引入它。
可以通过设置feign.okhttp.enabled、feign.httpclient.enabled、feign.httpclient.hc5.enabled为true,来分别开启对应的OkHttpClient、ApacheHttpClient 、ApacheHC5 客户端,并且要把它们的依赖放在类路径上。或者在容器中定义1个org.apache.http.impl.client.CloseableHttpClient、或者okhttp3.OkHttpClient、或者org.apache.hc.client5.http.impl.classic.CloseableHttpClient的客户端bean来切换不同的客户端实现。
Spring Cloud OpenFeign没有为Feign默认提供以下bean,但仍然从应用程序上下文中查找这些类型的bean来创建feign客户端:
- Logger.Level
- Retryer
- ErrorDecoder
- Request.Options
- Collection<RequestInterceptor>
- SetterFactory
- QueryMapEncoder
- Capability (MicrometerObservationCapability and CachingCapability are provided by default)
其中Retryer 默认是Retryer.NEVER_RETRY,这将禁止重试。请注意,这种重试行为不同于openfeign默认行为,它将自动重试IOExceptions,将它们视为暂时的网络相关异常,以及从ErrorDecoder抛出的任何RetryableException。
我们可以自定义以上任意一个Bean,来覆盖默认的配置:
@Configuration
public class FooConfiguration {

    @Bean
    public Contract feignContract() {
        return new feign.Contract.Default();
    }

    @Bean
    public BasicAuthRequestInterceptor basicAuthRequestInterceptor() {
        return new BasicAuthRequestInterceptor("user", "password");
    }
}
这个配置会使用feign.Contract.Default替换默认的SpringMvcContract,并且会将定义的BasicAuthRequestInterceptor这个bean添加到RequestInterceptor集合当中去。
3、使用配置文件进行配置
@FeignClient的配置也可以在配置文件中进行配置,其中feignName就是@FeignClient的value值、name值和contextId值,同时,在使用负载均衡时,这里的feignName也会被用来查询服务实例。
在如下配置中指定的类,必须在容器中有定义1个或者有1个默认的构造器。
feign:
    client:
        config:
            feignName:
                connectTimeout: 5000
                readTimeout: 5000
                loggerLevel: full
                errorDecoder: com.example.SimpleErrorDecoder
                retryer: com.example.SimpleRetryer
                defaultQueryParameters:
                    query: queryValue
                defaultRequestHeaders:
                    header: headerValue
                requestInterceptors:
                    - com.example.FooRequestInterceptor
                    - com.example.BarRequestInterceptor
                decode404: false
                encoder: com.example.SimpleEncoder
                decoder: com.example.SimpleDecoder
                contract: com.example.SimpleContract
                capabilities:
                    - com.example.FooCapability
                    - com.example.BarCapability
                queryMapEncoder: com.example.SimpleQueryMapEncoder
                metrics.enabled: false
也可以通过@EnableFeignClient注解的defaultConfiguration属性根据上面类似的方式来指定1个配置类,区别在于这种方式将会应用到所有的feign客户端。
也可以通过设置名为default的feignName来作全局的配置,并且配置文件优先(相比于配置类的方式,但是如果你想更改这个优先级,可以把feign.client.default-to-properties设置为false):
spring:
    cloud:
        openfeign:
            client:
                config:
                    default:
                        connectTimeout: 5000
                        readTimeout: 5000
                        loggerLevel: basic
4、创建多个相同名称客户端
如果我们想要创建多个具有相同name或url的feign客户端,以便它们指向相同的服务器,但是每个客户端都具有不同的自定义配置,那么我们必须使用@FeignClient的contextId属性,以避免这些配置beans的名称冲突。
@FeignClient(contextId = "fooClient", name = "stores", configuration = FooConfiguration.class)
public interface FooClient {

    //..
}

@FeignClient(contextId = "barClient", name = "stores", configuration = BarConfiguration.class)
public interface BarClient {

    //..
}
5、配置FeignClient不从父上下文继承beans
可以通过配置1个FeignClientConfigurer的bean,并且重写这个bean的inheritParentConfiguration(),并且返回false,来配置feign客户端不从父容器中拿bean组件
@Configuration
public class CustomConfiguration {

    @Bean
    public FeignClientConfigurer feignClientConfigurer() {
        return new FeignClientConfigurer() {
            @Override
            public boolean inheritParentConfiguration() {
                 return false;
            }
        };
    }
}
提示:默认情况下,feign客户端不会对/编码,可以通过设置feign.client.decodeSlash为false来更改这个行为。
6、SpringEncoder 的配置
在我们提供的SpringEncoder中,我们为二进制内容类型设置空字符集,为所有其他内容类型设置UTF-8。
您可以通过将spring.cloud.openfeign.encoder.charset-from-content-type的值设置为true来修改此行为,以从Content-Type头字符集派生字符集。
7、Feign拦截器的配置及使用
拦截器是OpenFeign可用的一种强大的工具,它可以被用来在请求和响应前后进行一些额外的处理。要使用OpenFeign拦截器,可以通过以下步骤进行配置:
public class MyInterceptor implements RequestInterceptor {

    @Override
    public void apply(RequestTemplate requestTemplate) {

        // 在这里添加额外的处理逻辑,添加请求头
        RequestAttributes requestAttributes = RequestContextHolder.getRequestAttributes();
        if (requestAttributes instanceof ServletRequestAttributes) {

            ServletRequestAttributes attributes = (ServletRequestAttributes) requestAttributes;
            HttpServletRequest request = attributes.getRequest();
            String value = request.getHeader(headerName);
            template.header(headerName, headerValue);
        }
    }
}
将拦截器注册到OpenFeign:
@Configuration
public class MyFeignConfiguration {

    @Bean
    public MyInterceptor myInterceptor() {
        return new MyInterceptor();
    }

    // 非必须
    @Bean
    public Feign.Builder feignBuilder() {
        return Feign.builder().requestInterceptor(myInterceptor());
    }
}
8、OpenFeign超时时间设置
我们可以配置默认的超时时间,也可以为指定的feign客户端配置超时时间。
Open Feign提供了2个超时参数供设置:connectTimeout(防止由于服务器处理时间过长而阻塞调用者)、readTimeout(从连接建立开始到响应花费时间)
(1)使用配置文件配置
在应用程序的配置文件(application.yml或application.properties)中,可以使用以下属性设置超时时间:
# YAML
feign:
  client:
    config:
      default:
        connectTimeout: 5000  # 连接超时时间
        readTimeout: 10000    # 读取超时时间

# Properties
feign.client.config.default.connectTimeout=5000  # 连接超时时间
feign.client.config.default.readTimeout=10000    # 读取超时时间
上述代码中,我们使用feign.client.config.default属性来配置全局默认的超时时间。connectTimeout属性设置连接超时时间,readTimeout属性设置读取超时时间。单位是毫秒。
(2)通过Java代码设置超时时间
如果你更喜欢使用Java代码来配置openfeign,可以通过以下方式设置超时时间:
import feign.Request;

// 创建一个Request.Options对象来设置超时时间
Request.Options options = new Request.Options(connectTimeoutMillis, readTimeoutMillis);

// 在创建Feign客户端时指定Options对象
MyApi myApi = Feign.builder().options(options).target(MyApi.class, "https://example.com");
在上述代码中,我们创建了一个Request.Options对象,该对象包含连接超时时间和读取超时时间。然后将Options对象传递给Feign客户端。
(3)使用@FeignClient设置超时时间
使用@FeignClient注解的configuration属性来指定配置类。
首先,创建一个配置类,继承自feign.Request.Options类,并重写connectTimeoutMillis和readTimeoutMillis方法,以设置超时时间。
import feign.Request;
public class MyApiConfiguration extends Request.Options {

    public MyApiConfiguration(int connectTimeoutMillis, int readTimeoutMillis) {
        super(connectTimeoutMillis, readTimeoutMillis);
    }

    @Override
    public Integer connectTimeoutMillis() {
        return 5000;  // 设置连接超时时间为5秒
    }

    @Override
    public Integer readTimeoutMillis() {
        return 10000; // 设置读取超时时间为10秒
    }
}
然后,在使用@FeignClient注解进行声明时,使用configuration属性指定该配置类。
@FeignClient(name = "my-service", configuration = MyApiConfiguration.class)
public interface MyApi {

    // 接口定义
}
这样,只有针对MyApi接口的请求会使用这个配置类中的超时时间,级别更加细致。当然,你也可以在上述配置类中加入其它一些针对MyApi接口的配置,比如重试次数等等。
(4)使用拦截器设置超时时间
要为单独请求设置超时时间,可以通过实现RequestInterceptor接口,并在其中为请求添加超时时间信息。具体方法如下:
import feign.RequestInterceptor;
import feign.RequestTemplate;
public class TimeoutRequestInterceptor implements RequestInterceptor {

    private final int connectTimeoutMillis;
    private final int readTimeoutMillis;

    public TimeoutRequestInterceptor(int connectTimeoutMillis, int readTimeoutMillis) {

        this.connectTimeoutMillis = connectTimeoutMillis;
        this.readTimeoutMillis = readTimeoutMillis;
    }

    @Override
    public void apply(RequestTemplate template) {
        template.options(new Request.Options(connectTimeoutMillis, readTimeoutMillis));
    }
}
在上述代码中,我们创建了一个TimeoutRequestInterceptor类,实现了RequestInterceptor接口,并重写了其中的apply方法。在该方法中,将请求的超时时间信息添加到请求模板中。
然后,在实际使用Feign客户端时,创建该拦截器对象并加入到Feign客户端的拦截器链中。
例如,我们想要对一个名为MyApi的Feign客户端接口的某个请求设置超时时间,可以这样:
MyApi myApi = Feign.builder()
    .requestInterceptor(new TimeoutRequestInterceptor(3000, 5000)) // 为该客户端指定一个拦截器
    .target(MyApi.class, "https://example.com");
在上述代码中,我们创建了一个TimeoutRequestInterceptor对象,并使用requestInterceptor方法将其加入到Feign客户端的拦截器链中。这样,在名为MyApi的Feign客户端中发出的所有请求都会使用该超时时间。
如果只想为某些请求设置超时时间,而不是所有请求,可以在该拦截器中添加一些判断逻辑,根据请求的条件来判断是否要添加超时时间信息。
(5)使用@Headers设置超时时间
通过在接口方法上加上@Headers注解,将超时时间信息直接加在请求头中,从而实现为单独请求设置超时时间。
例如,我们想要针对MyApi接口的someMethod方法单独设置超时时间,可以这样:
@Headers({"connect-timeout:5000", "read-timeout:10000"})
@GET("/someMethod")
String someMethod();
在上述代码中,我们在@Headers注解中添加了connect-timeout和read-timeout两个请求头信息,用于设置连接超时时间和读取超时时间。这样,在调用someMethod方法时,会使用这些请求头信息中指定的超时时间设置。
需要注意的是,这种方法需要在每个接口方法上都进行设置,因此比较麻烦。但它的优点是灵活性比较高,可以为不同的接口方法设置不同的超时时间。同时,也可以在其他注解中添加相应的超时信息,如@PostMapping、@PutMapping等。
(6)为单独接口设置超时时间
在feign接口里加入Request.Options这个参数就可以单独为接口单独设置超时时间了
@PostMapping("test/")
ResponseVO<?> test(Request.Options options, @RequestBody TestRequestEntity entity);
调用的时候new 一下Options对象
ResponseVO<?> resp = client.test(
        new Request.Options(70, TimeUnit.SECONDS, 70, TimeUnit.SECONDS, true),
        entity);
9、OpenFeign设置重试次数
(1)一般写法
定义一个继承自 Retryer 接口的类:
public class CustomRetryer implements Retryer {

    private final int maxAttempts;
    private final long backoff;

    int attempt;

    public CustomRetryer() {

        this(5, 1000);
    }

    public CustomRetryer(int maxAttempts, long backoff) {

        this.maxAttempts = maxAttempts;
        this.backoff = backoff;
        this.attempt = 1;
    }

    @Override
    public void continueOrPropagate(RetryableException e) {

        if (attempt++ >= maxAttempts) {

            throw e;
        }
        try {

            Thread.sleep(backoff);
        } catch (InterruptedException ignored) {

            Thread.currentThread().interrupt();
            throw e;
        }
    }

    @Override
    public Retryer clone() {

        return new CustomRetryer();
    }
}
在 FeignClient 中使用上一步定义的重试器:
@FeignClient(name = "demo", url = "${demo.base-url}", configuration = CustomRetryer.class)
public interface DemoFeignClient {

    //...
}
在这个例子中,使用的是自定义的重试器 CustomRetryer,它重试 5 次,在每次重试之间休眠 1000 毫秒。如果重试次数超限,则抛出 RetryableException 异常。
(2)简单写法
除了使用自定义的 Retryer 之外,OpenFeign 还提供了另外一种设置重试次数的方式,那就是通过 Feign 的配置项进行设置。具体操作如下:
在 FeignClient 中引入 Feign 的默认配置:
@FeignClient(name = "demo", url = "${demo.base-url}", configuration = FeignConfiguration.class)
public interface DemoFeignClient {

    //...
}
自定义 FeignConfiguration 类:
@Configuration
public class FeignConfiguration {

    @Bean
    public Retryer retryer() {
        return new Retryer.Default(500, 5000, 3);
    }
}
在这里,我们使用 Retryer.Default 类生成一个默认的重试器,它会在当前请求失败后重试 3 次,并会在第一次重试前等待 500 毫秒,在第二次重试前等待 1000 毫秒,在第三次重试前等待 2000 毫秒,以此类推。
通过这两个步骤,我们就可以为每个 FeignClient 设置默认的重试次数了。
(3)为每个请求设置重试次数
如果我们需要为特定的请求设置不同的重试策略,则可以在对应的方法上加上 @Retryable 注解,并指定对应的 Retryer 类型,如下所示:
@FeignClient(name = "demo", url = "${demo.base-url}", configuration = FeignConfiguration.class)
public interface DemoFeignClient {

    @RequestMapping(method = RequestMethod.GET, value = "/get")
    @Retryable(maxAttempts = 2, value = {SomeRetryer.class })
    String getDemo();

}
在这个例子中,我们使用了自定义的重试器 SomeRetryer,并指定了最大重试次数为 2。注意,为了使用 @Retryable 注解,我们需要引入 Spring Retry 库的依赖:
<dependency>
    <groupId>org.springframework.retry</groupId>
    <artifactId>spring-retry</artifactId>
    <version>1.2.5.RELEASE</version>
</dependency>
使用上述方式,我们可以为每个请求设置不同的重试策略,从而更加灵活地处理重试问题。
10、Feign请求日志级别设置
每1个feign客户端都会创建1个logger,默认情况下,logger的名字就是接口的全类名,feign日志只会对debug级别才打印出来。
Feign提供了日志打印功能,我们可以通过配置来调整日志级别,从而了解Feign中Http请求的细节。默认显示的是DEBUG级别日志。
// 设置指定客户端的日志
logging.level.com.zzhua.user.UserClient: DEBUG
就是对Feign接口的调用情况进行监控和输出。
总共有以下日志级别:
-
NONE:默认的,不显示任何日志。
-
BASIC:仅记录请求方法、URL、响应状态码、执行时间。
-
HEADERS:除了BASIC中定义的信息之外,还有请求和响应头。
-
FULL:除了HEADERS中定义的信息之外,还有请求和响应的正文及元数据。
// 代码设置日志级别(修改默认的日志级别)
@Configuration
public class FooConfiguration {

    @Bean
    Logger.Level feignLoggerLevel() {
        return Logger.Level.FULL;
    }
}
四、手动创建feign客户端
可以使用Feign Builder API创建客户端来进行定制。
// 手动创建两个Feign客户端并配置其拦截器和name属性,FeignClientsConfiguration.class仍然是它们的默认配置
// FeignClientsConfiguration是Spring Cloud OpenFeign提供的默认配置类
@Import(FeignClientsConfiguration.class)
class FooController {


    private FooClient fooClient;

    private FooClient adminClient;

    @Autowired
    public FooController(Client client,
                         Encoder encoder,
                         Decoder decoder,
                         Contract contract,
                         MicrometerObservationCapability micrometerObservationCapability) {

        this.fooClient = Feign.builder().client(client)
                .encoder(encoder)
                .decoder(decoder)
            	// Contract 定义了在接口上能够使用的注解, 这里自动注入的Contract支持springmvc注解,
            	// 而不是feign的原始注解
                .contract(contract)
                .addCapability(micrometerObservationCapability)
                .requestInterceptor(new BasicAuthRequestInterceptor("user", "user"))
             	// PROD-SVC是请求的服务名
                .target(FooClient.class, "https://PROD-SVC");

        this.adminClient = Feign.builder().client(client)
                .encoder(encoder)
                .decoder(decoder)
                .contract(contract)
                .addCapability(micrometerObservationCapability)
                .requestInterceptor(new BasicAuthRequestInterceptor("admin", "admin"))
                .target(FooClient.class, "https://PROD-SVC");
    }
}
还可以使用Builder 来配置FeignClient不从父上下文继承beans。可以通过在生成器上重写调用“inheritParentContext(false)”来实现这一点。
五、Feign的SpringCloud断路器
如果Spring Cloud CircuitBreaker在classpath,并且spring.cloud.openfeign.circuitbreaker.enabled=true,Feign将使用断路器包装所有方法。
要在每个客户端的基础上禁用Spring Cloud CircuitBreaker支持,请创建一个普通的Feign.Builder。具有“prototype”范围的构建器,例如:
@Configuration
public class FooConfiguration {

    @Bean
    @Scope("prototype")
    public Feign.Builder feignBuilder() {
        return Feign.builder();
    }
}
断路器的名字遵循这样的格式:<feign客户端类名>#<被调用的方法名>(<参数类型>)。比如当调用1个FooClient接口的bar方法,并且这个方法没有参数时,断路器的名字就是:FooClient#bar()
注意:从2020.0.2开始,circuit breaker 名称模式已经从 <feignClientName>_<calledMethod> 改变。使用2020.0.4中引入的 CircuitBreakerNameResolver,circuit breaker 名称可以保留旧模式。
通过提供CircuitBreakerNameResolver的bean,可以更改断路器名称模式,如下所示。
@Configuration
public class FooConfiguration {

    @Bean
    public CircuitBreakerNameResolver circuitBreakerNameResolver() {
        return (String feignClientName, Target<?> target, Method method) ->
            feignClientName + "_" + method.getName();
    }
}
要启用Spring Cloud CircuitBreaker组,请将spring.cloud.openfeign.circuitbreaker.group.enabled属性设置为true(默认为false)。
1、使用配置属性配置断路器
假如说有一个Feign客户端:
@FeignClient(url = "http://localhost:8080")
public interface DemoClient {

    @GetMapping("demo")
    String getDemo();
}
可以通过执行以下操作,使用配置属性对其进行配置:
spring:
  cloud:
    openfeign
      circuitbreaker:
        enabled: true
        alphanumeric-ids:
          enabled: true
resilience4j:
  circuitbreaker:
    instances:
      DemoClientgetDemo:
        minimumNumberOfCalls: 69
  timelimiter:
    instances:
      DemoClientgetDemo:
        timeoutDuration: 10s
如果你想切换回 Spring Cloud 2022.0.0 之前使用的 circuit breaker name,你可以将 spring.cloud.openfeign.circuitbreaker.alphanumeric-ids.enabled 设置为 false。
2、fallback
fallback降级处理
Spring Cloud CircuitBreaker支持fallback的概念:当电路断开或出现错误时,执行的默认代码路径。要为给定的@FeignClient启用降级,请将fallback属性设置为实现降级的类名。并且还需要将其定义为Spring bean。
@FeignClient(name = "test", url = "http://localhost:${server.port}/", fallback = Fallback.class)
protected interface TestClient {

    @RequestMapping(method = RequestMethod.GET, value = "/hello")
    Hello getHello();

    @RequestMapping(method = RequestMethod.GET, value = "/hellonotfound")
    String getException();

}

@Component
static class Fallback implements TestClient {

    @Override
    public Hello getHello() {
        throw new NoFallbackAvailableException("Boom!", new RuntimeException());
    }

    @Override
    public String getException() {
        return "Fixed response";
    }

}
fallbackFactory降级处理
如果有需要知道触发fallback的原因,可以使用@FeignClient中的fallbackFactory属性。
@FeignClient(name = "testClientWithFactory",
             url = "http://localhost:${server.port}/",
             // 使用fallbackFactory属性指定TestFallbackFactory(它要实现FallbackFactory)
             fallbackFactory = TestFallbackFactory.class)
protected interface TestClientWithFactory {


    @RequestMapping(method = RequestMethod.GET, value = "/hello")
    Hello getHello();

    @RequestMapping(method = RequestMethod.GET, value = "/hellonotfound")
    String getException();

}

@Component // 实现FallbackFactory接口, 在create(Throwable)方法种返回1个实现了feign接口的对象
static class TestFallbackFactory implements FallbackFactory<FallbackWithFactory> {

    @Override
    public FallbackWithFactory create(Throwable cause) {
        return new FallbackWithFactory();
    }

}

static class FallbackWithFactory implements TestClientWithFactory {


    @Override
    public Hello getHello() {

        throw new NoFallbackAvailableException("Boom!", new RuntimeException());
    }

    @Override
    public String getException() {

        return "Fixed response";
    }

}
3、Feign客户端的primary属性
(要知道有这回事)
当使用Feign和Spring Cloud CircuitBreaker 降级功能时,在ApplicationContext中有多个相同类型的beans。这将导致@Autowired不起作用,因为没有确切的一个bean,或者一个被标记为@Primary注解的bean。
为了解决这个问题,Spring Cloud OpenFeign将所有的Feign实例都标记为了@Primary,因此Spring Framework将知道要注入哪个bean。在某些情况下,这可能并不理想。要关闭此行为,请将@FeignClient的primary属性设置为false(默认为true)。
@FeignClient(name = "hello", primary = false)
public interface HelloClient {

    // methods here
}
六、Feign的继承重用
Feign通过单一继承接口支持样板API。这允许将常见操作分组到方便的基本接口中。
// 共用接口实例
public interface UserService {

    @RequestMapping(method = RequestMethod.GET, value ="/users/{id}")
    User getUser(@PathVariable("id") long id);
}

// 提供(方)服务
@RestController
public class UserResource implements UserService {


}

// 调用(方)服务
@FeignClient("users")
public interface UserClient extends UserService {

}
注意:@FeignClient接口不应在服务端和客户端之间共享,并且不再支持在类级别上同时使用@RequestMapping和@FeignClient注解。
七、Feign请求响应的压缩
可以考虑为您的feign请求启用请求或响应GZIP压缩。您可以通过启用以下属性之一来实现这一点:
spring.cloud.openfeign.compression.request.enabled=true
spring.cloud.openfeign.compression.response.enabled=true
Feign请求压缩为您提供了类似于您可能为web服务器的设置:
spring.cloud.openfeign.compression.request.enabled=true
spring.cloud.openfeign.compression.request.mime-types=text/xml,application/xml,application/json
spring.cloud.openfeign.compression.request.min-request-size=2048
以上这些属性压缩的媒体类型和最小请求阈值长度都是可选的。
注意!由于OkHttpClient使用“透明”压缩,如果存在content-encoding或accept-encoding头,则该压缩将被禁用,因此当feign.okhttp.OkHttpClient存在于classpath中并且spring.cloud.openfeign.okhttp.enabled设置为true时,我们不启用压缩。
八、Feign Capability 的支持
Feign Capability 暴露了Feign的核心组件,因此这些组件可以被修改。例如,这些功能可以接受客户端,对其进行装饰,并将装饰后的实例反馈给 Feign。对 Micrometer 的支持就是一个很好的现实生活中的例子。参见 [micrometer-support]。
创建一个或多个 Capability Bean并将其置于 @FeignClient 配置中,可以让你注册它们并修改相关客户端的行为
@Configuration
public class FooConfiguration {
    @Bean
    Capability customCapability() {
        return new CustomCapability();
    }
}
九、Feign Metrics
如果以下所有条件为 true,就会创建并注册一个 MicrometerCapability Bean,这样你的 Feign 客户端就可以被 Micrometer 观察到:
- feign-micrometer 在 classpath 上。
- MeterRegistry bean 可用。
- feign micrometer 属性设置为 true (默认)
- spring.cloud.openfeign.micrometer.enabled=true (针对所有客户)
- spring.cloud.openfeign.client.config.feignName.micrometer.enabled=true (针对单个客户端)
如果你的应用程序已经使用了 Micrometer,启用这个功能就像把 feign-micrometer 放到你的classpath上一样简单。
你也可以通过以下两种方式禁用该功能:
- 从你的 classpath 中排除 feign-micrometer。
- 将 feign micrometer 一个属性设置为 false
- spring.cloud.openfeign.micrometer.enabled=false
- spring.cloud.openfeign.client.config.feignName.micrometer.enabled=false
注意:spring.cloud.openfeign.micrometer.enabled=false 禁用所有 Feign 客户端的 Micrometer 支持,而不考虑客户端级标志的值:spring.cloud.openfeign.client.config.feignName.micrometer.enabled。如果你想启用或禁用每个客户端的 Micrometer 支持,不要设置 spring.cloud.openfeign.micrometer.enabled 并使用 spring.cloud.openfeign.client.config.feignName.micrometer.enabled。
你也可以通过注册你自己的bean来自定义 MicrometerObservationCapability:
@Configuration
public class FooConfiguration {
    @Bean
    public MicrometerObservationCapability micrometerObservationCapability(ObservationRegistry
                                                                           registry) {
        return new MicrometerObservationCapability(registry);
    }
}
仍然可以在 Feign 中使用 MicrometerCapability(仅支持指标),你需要禁用 Micrometer 支持(spring.cloud.openfeign.micrometer.enabled=false)并创建一个 MicrometerCapability Bean:
@Configuration
public class FooConfiguration {
    @Bean
    public MicrometerCapability micrometerCapability(MeterRegistry meterRegistry) {
        return new MicrometerCapability(meterRegistry);
    }
}
十、开启Feign的缓存
如果使用了@EnableCaching注释,将创建并注册一个CachingCapability bean,这样您的Feign客户端能够识别其接口上的@Cache*注解:
public interface DemoClient {

    @GetMapping("/demo/{filterParam}")
    @Cacheable(cacheNames = "demo-cache", key = "#keyParam")
    String demoEndpoint(String keyParam, @PathVariable String filterParam);
}
还可以通过属性spring.cloud.openfeign.cache.enabled=false禁用该功能。
十、@SpringQueryMap注解支持
Spring Cloud OpenFeign提供了一个等价的@SpringQueryMap注释,用于将POJO或Map参数注释为查询参数Map。
例如,Params类定义了参数param1和param2:
// Params.java
public class Params {

    private String param1;
    private String param2;

    // [Getters and setters omitted for brevity]
}
下面的feign客户端通过使用@SpringQueryMap注解来使用Params类:
@FeignClient("demo")
public interface DemoTemplate {

    @GetMapping(path = "/demo")
    String demoEndpoint(@SpringQueryMap Params params);
}
如果您需要对生成的查询参数映射进行更多的控制,您可以实现一个自定义的QueryMapEncoder bean。
十一、HATEOAS 的支持
Spring提供了一些API来创建遵循 HATEOAS 原则的REST表示, Spring Hateoas 和 Spring Data REST。
如果你的项目使用 org.springframework.boot:spring-boot-starter-hateoas starter 或 org.springframework.boot:spring-boot-starter-data-rest starter,Feign HATEOAS 支持被默认启用。
当HATEOAS支持被启用时,Feign 客户端被允许序列化和反序列化 HATEOAS 表示模型: EntityModel、 CollectionModel 和 PagedModel.。
@FeignClient("demo")
public interface DemoTemplate {

    @GetMapping(path = "/stores")
    CollectionModel<Store> getStores();
}
十二、Spring @MatrixVariable 的支持
Spring Cloud OpenFeign提供对Spring @MatrixVariable 注解的支持。
如果一个 map 被作为方法参数传递,@MatrixVariable 的路径片段是通过用 = 连接 map 中的键值对来创建的。
如果传递了一个不同的对象,那么在 @MatrixVariable 注解中提供的 name(如果定义了的话)或者注解的变量名称将使用 = 与提供的方法参数结合起来。
尽管在服务器端,Spring 并不要求用户将路径段占位符的名称与 matrix variable 的名称相同,因为这在客户端太模糊了,Spring Cloud OpenFeign要求你添加一个路径段占位符,其名称要与 @MatrixVariable 注解(如果定义了)中提供的 name 或注解的变量名称相符。例如:
@GetMapping("/objects/links/{matrixVars}")
Map<String, List<String>> getObjects(@MatrixVariable Map<String, List<String>> matrixVars);
注意,变量名和 path 段占位符都被称为 matrixVars。
@FeignClient("demo")
public interface DemoTemplate {

    @GetMapping(path = "/stores")
    CollectionModel<Store> getStores();
}
十三、FeignCollectionFormat的支持
我们通过提供 @CollectionFormat 注解来支持 feign.CollectionFormat。你可以通过传递所需的 feign.CollectionFormat 作为注解值,用它来注解一个 Feign 客户端方法(或整个类来影响所有方法)。
在下面的例子中,使用 CSV 格式而不是默认的 EXPLODED 来处理这个方法。
@FeignClient(name = "demo")
protected interface DemoFeignClient {

    @CollectionFormat(feign.CollectionFormat.CSV)
    @GetMapping(path = "/test")
    ResponseEntity performRequest(String test);

}
十四、响应式的支持
由于 OpenFeign项目 目前不支持响应式客户端,如 Spring WebClient,Spring Cloud OpenFeign也不支持。一旦核心项目中可用,我们将在这里添加对它的支持。
初始化错误
根据你使用 Feign 客户端的方式,你可能会在启动你的应用程序时看到初始化错误。为了解决这个问题,你可以在自动连接客户端时使用一个 ObjectProvider。
@Autowired
ObjectProvider<TestFeignClient> testFeignClient;
十五、Spring Data 的支持
如果 Jackson Databind 和 Spring Data Commons 在classpath上,org.springframework.data.domain.Page 和 org.springframework.data.domain.Sort 的 converter 将被自动添加。
要禁用这种行为,请设置:
spring.cloud.openfeign.autoconfiguration.jackson.enabled=false
详见 org.springframework.cloud.openfeign.FeignAutoConfiguration.FeignJacksonConfiguration。
十六、Spring@RefreshScope的支持
如果启用了Feign客户端刷新,每个Feign客户端的创建都有:
- feign.Request.Options 作为一个 refresh scope 的bean。这意味着诸如 connectTimeout 和 readTimeout 等属性可以针对任何Feign客户端实例进行刷新。
- 在 org.springframework.cloud.openfeign.RefreshableUrl 下包装的url。这意味着如果用 spring.cloud.openfeign.client.config.{feignName}.url 属性定义 Feign 客户端的URL,可以针对任何 Feign 客户端实例进行刷新。
你可以通过 POST /actuator/refresh 刷新这些属性。
默认情况下,Feign 客户端的刷新行为是禁用的。使用以下属性来启用刷新行为:
spring.cloud.openfeign.client.refresh-enabled=true
注意:不要在@FeignClient 接口上使用 @RefreshScope 注解
十七、支持向 Feign 客户端提供URL的方法
你可以通过以下任何一种方式向Feign客户端提供一个URL:
| 场景 | 例子 | 细节 |
|---|---|---|
| URL是在 @FeignClient 注解中提供的。 | @FeignClient(name=“testClient”, url=“http://localhost:8081”) | URL是从注解的 url 属性中解析出来的,没有负载均衡。 |
| URL是在 @FeignClient 注解和配置属性中提供的。 | @FeignClient(name=“testClient”, url=“http://localhost:8081”) 和定义在 application.yml 中的属性 spring.cloud.openfeign.client.config.testClient.url=http://localhost:8081 | URL是从注解的 url 属性中解析出来的,没有负载均衡。在配置属性中提供的URL仍未使用。 |
| URL没有在 @FeignClient 注解中提供,而是在配置属性中提供。 | @FeignClient(name=“testClient”) 和定义在 application.yml 中的属性 spring.cloud.openfeign.client.config.testClient.url=http://localhost:8081 | URL 从配置属性中解析,没有负载均衡。如果 spring.cloud.openfeign.client.refresh-enabled=true,那么配置属性中定义的 URL 可以被刷新,如 Spring RefreshScope 的支持 中所述。 |
| 在 @FeignClient 注解中和配置属性中都没有提供这个URL。 | @FeignClient(name=“testClient”) | URL是从注解的 name 属性中解析出来的,具有负载均衡性。 |
十八、FeignClient的参数传递给服务提供方的方式
1、path路径上携带参数
/**
 * 服务提供方:path路径上携带参数
 */
@GetMapping("/test1/{myId}")
public String test1(@PathVariable String myId) {

    System.out.println("LiveRoomController.test1");
    System.out.println(myId);
    return "success";
}

/**
 * FeignClient:path路径上携带参数
 */
@GetMapping("/test1/{myId}")
String test1(@PathVariable("myId") String myId);
2、单个简单数据类型
/**
 * 服务提供方:单个简单数据类型
 */
@GetMapping("/test2")
public String test2(String test2Str) {

    System.out.println("LiveRoomController.test2");
    System.out.println(test2Str);
    return "success";
}

/**
 * FeignClient:单个简单数据类型
 */
@GetMapping("/test2")
String test2(@RequestParam("test2Str") String test2Str);
3、多个简单数据类型
/**
  * 服务提供方:多个简单数据类型
  */
@GetMapping("/test3")
public String test3(String test3Str1, String test3Str2) {
    System.out.println("LiveRoomController.test3");
    System.out.println(test3Str1 + "||" + test3Str2);
    return "success";
}

/**
  * FeignClient:多个简单数据类型
  */
@GetMapping("/test3")
String test3(@RequestParam("test3Str1") String test3Str1,
             @RequestParam("test3Str2")  String test3Str2);
4、Path + 多个简单数据类型
/**
  * 服务提供方:Path  + 多个简单数据类型
  */
@GetMapping("/test4/{myId}")
public String test4(@PathVariable String myId, String test4Str1, String test4Str2) {
    System.out.println("LiveRoomController.test4");
    System.out.println(myId + "||" + test4Str1 + "||" + test4Str2);
    return "success";
}

/**
  * FeignClient:Path  + 多个简单数据类型
  */
@GetMapping("/test4/{myId}")
String test4(@PathVariable("myId") String myId,
             @RequestParam("test4Str1") String test4Str1,
             @RequestParam("test4Str2") String test4Str2);
5、JavaBean对象
/**
 * 服务提供方:JavaBean对象
 */
@GetMapping("/test5/{myId}")
public String test5(@PathVariable String myId, Student student) {

    System.out.println("LiveRoomController.test5");
    System.out.println(myId + "||" + student);
    return "success";
}

/**
 * FeignClient:JavaBean对象、Map
 */
@GetMapping("/test5/{myId}")
String test5(@PathVariable("myId") String myId, Student student);
6、多path路径上携带参数
/**
 * 服务提供方:多path路径上携带参数
 */
@GetMapping("/test6/{myId}/test66/{myId2}")
public String test6(@PathVariable("myId") String myId, @PathVariable("myId2") String myId2) {

    System.out.println("LiveRoomController.test6");
    System.out.println(myId + "||" + myId2);
    return "success";
}

/**
 * FeignClient:多path路径上携带参数
 */
@GetMapping("/test6/{myId}/test66/{myId2}")
String test6(@PathVariable("myId") String myId, @PathVariable("myId2") String myId2);
7、post获取请求体
/**
 * 服务提供方:post获取请求体
 */
@PostMapping("/test7/{myId}")
public String test7(@PathVariable("myId") String myId, @RequestBody Student student){

    System.out.println("LiveRoomController.test7");
    System.out.println(myId + "||" + student);
    return "success";
}

/**
 * FeignClient:post获取请求体
 */
@PostMapping("/test7/{myId}")
String test7(@PathVariable("myId") String myId, @RequestBody Student student);
测试一下吧
System.out.println(commonSurface.test1("this is test1"));
System.out.println("-------------");

System.out.println(commonSurface.test2("this is test2"));
System.out.println("-------------");

System.out.println(commonSurface.test3("this is test3", "this is test3-2"));
System.out.println("-------------");

System.out.println(commonSurface.test4("this is myId", "this is test4", "this is test4-2"));
System.out.println("-------------");

Student s = new Student();
s.setId(1);
s.setName("张三");
System.out.println(commonSurface.test5("this is myId", s));
System.out.println("-------------");

System.out.println(commonSurface.test6("this is myId", "this is myId2"));
System.out.println("-------------");

System.out.println(commonSurface.test7("this is myId", s));
System.out.println("-------------");
十九、feign实践
demo-learn-feign
pom.xml
<?xml version="1.0" encoding="UTF-8"?>
<project xmlns="http://maven.apache.org/POM/4.0.0"
         xmlns:xsi="http://www.w3.org/2001/XMLSchema-instance"
         xsi:schemaLocation="http://maven.apache.org/POM/4.0.0
                             http://maven.apache.org/xsd/maven-4.0.0.xsd">

    <parent>
        <groupId>org.springframework.boot</groupId>
        <artifactId>spring-boot-starter-parent</artifactId>
        <version>2.3.9.RELEASE</version>
        <relativePath/>
    </parent>

    <modelVersion>4.0.0</modelVersion>

    <groupId>com.zzhua</groupId>
    <artifactId>demo-learn-feign</artifactId>
    <version>1.0-SNAPSHOT</version>

    <properties>
        <project.build.sourceEncoding>UTF-8</project.build.sourceEncoding>
        <project.reporting.outputEncoding>UTF-8</project.reporting.outputEncoding>
        <java.version>1.8</java.version>
        <spring-cloud.version>Hoxton.SR8</spring-cloud.version>
        <alibaba.version>2.2.5.RELEASE</alibaba.version>
    </properties>

    <dependencies>

        <dependency>
            <groupId>org.springframework.cloud</groupId>
            <artifactId>spring-cloud-starter-openfeign</artifactId>
        </dependency>

        <dependency>
            <groupId>org.springframework.retry</groupId>
            <artifactId>spring-retry</artifactId>
        </dependency>

        <dependency>
            <groupId>org.springframework.boot</groupId>
            <artifactId>spring-boot-starter-web</artifactId>
        </dependency>

        <dependency>
            <groupId>com.alibaba.cloud</groupId>
            <artifactId>spring-cloud-starter-alibaba-nacos-discovery</artifactId>
        </dependency>

        <dependency>
            <groupId>org.projectlombok</groupId>
            <artifactId>lombok</artifactId>
        </dependency>


    </dependencies>

    <dependencyManagement>
        <dependencies>
            <dependency>
                <groupId>com.alibaba.cloud</groupId>
                <artifactId>spring-cloud-alibaba-dependencies</artifactId>
                <version>${alibaba.version}</version>
                <type>pom</type>
                <scope>import</scope>
            </dependency>
            <!-- springCloud -->
            <dependency>
                <groupId>org.springframework.cloud</groupId>
                <artifactId>spring-cloud-dependencies</artifactId>
                <version>${spring-cloud.version}</version>
                <type>pom</type>
                <scope>import</scope>
            </dependency>
        </dependencies>
    </dependencyManagement>

    <build>
        <plugins>
            <plugin>
                <groupId>org.springframework.boot</groupId>
                <artifactId>spring-boot-maven-plugin</artifactId>
            </plugin>
        </plugins>
    </build>

</project>
application.yml
server:
  port: 8095
spring:
  application:
    name: feign-service
  cloud:
    nacos:
      server-addr: localhost:8848
hystrix:
  command:
    default:
      circuitBreaker:
        # 触发熔断的最小请求次数,默认20  每10s
        requestVolumeThreshold: 2
        # 熔断多少秒后再次去尝试请求
        sleepWindowInMilliseconds: 10000
        # 触发熔断的失败请求最小占比,默认50%
        errorThresholdPercentage: 10
feign:
  hystrix:
    # 开启服务降级
    enabled: true
  client:
    config:
      # (配置文件的优先级高于代码中的配置)
      # 所有feign客户端的默认配置
      #default:
        # 全局设置连接超时时间
        #connectTimeout: 2000
        # 全局设置读取响应超时时间
        #readTimeout: 3000
      # 仅针对name为configN的feign客户端(优先级高于default配置)
      configN:
        # 设置日志级别, 但前提是feign客户端日志级别必须是debug才会打印出来
        loggerLevel: BASIC
        # 设置读取响应超时时间, 超过5s将会抛出异常SocketTimeoutException: Read timed out
        readTimeout: 5000
      retryN:
        # 自定义错误解码器
        errorDecoder: com.zzhua.feign03.CustomErrorDecoder
        # 设置重试器为Retryer.Default(默认的重试器), 或 Retryer.NEVER_RETRY(不重试)
        retryer: feign.Retryer.Default
        # 开启重试条件
        retryable: true
        # 最多重试4次
        #maxAttempts: 4
        #backoff:
          # 开启退避算法
          #enabled: true
          # 初始重试间隔时间为1秒
          #delay: 1000
          # 最大重试间隔时间为5秒
          #maxDelay: 5000
          # 重试间隔时间按2的指数增长
          #multiplier: 2.0
logback.xml
<?xml version="1.0" encoding="UTF-8"?>
<configuration debug="false">
    <!--定义日志文件的存储地址 勿在 LogBack 的配置中使用相对路径-->
    <property name="LOG_BASE_PATH" value="logs/" />
    <property name="maxFileSize" value="5MB"/>
    <property name="maxHistory" value="30"/>
    <property name="commonPattern" value="%d{HH:mm:ss.SSS}-${PID}-[%thread] %-5level %logger{30} - %msg%n"/>

    <!--控制台日志, 控制台输出 -->
    <appender name="STDOUT" class="ch.qos.logback.core.ConsoleAppender">
        <encoder class="ch.qos.logback.classic.encoder.PatternLayoutEncoder">
            <!--格式化输出:%d表示日期,%thread表示线程名,%-5level:级别从左显示5个字符宽度,%msg:日志消息,%n是换行符-->
            <pattern>${commonPattern}</pattern>
        </encoder>
    </appender>

    <!--文件日志, 按照每天生成日志文件 -->
    <appender name="FILE" class="ch.qos.logback.core.rolling.RollingFileAppender">
        <file>${LOG_BASE_PATH}/feignApp.log</file>
        <rollingPolicy class="ch.qos.logback.core.rolling.TimeBasedRollingPolicy">
            <!--日志文件输出的文件名-->
            <FileNamePattern>${LOG_BASE_PATH}/%d/xxx.log.%d{yyyy-MM-dd}-%i.log</FileNamePattern>
            <!--日志文件保留天数-->
            <MaxHistory>${maxHistory}</MaxHistory>
            <timeBasedFileNamingAndTriggeringPolicy class="ch.qos.logback.core.rolling.SizeAndTimeBasedFNATP">
                <maxFileSize>${maxFileSize}</maxFileSize>
            </timeBasedFileNamingAndTriggeringPolicy>
        </rollingPolicy>
        <encoder class="ch.qos.logback.classic.encoder.PatternLayoutEncoder">
            <!--格式化输出:%d表示日期,%thread表示线程名,%-5level:级别从左显示5个字符宽度%msg:日志消息,%n是换行符-->
            <pattern>${commonPattern}</pattern>
        </encoder>
    </appender>

    <!-- 在这里单独配置某个feign客户端, 让Feign能够打印日志, 至于打印多少日志, 就要设置Logger.Level了;
         这里的name不能使用通配符哦, 但是可以设置为: com.zzhua.feign02, 它会将这个包下的所有类都设置为指定的日志级别
     -->
    <logger name="com.zzhua.feign02.ConfigFeignClient" level="DEBUG" additivity="false">
        <appender-ref ref="STDOUT"/>
    </logger>

    <logger name="com.zzhua.feign03.RetryFeignClient" level="DEBUG" additivity="false">
        <appender-ref ref="STDOUT"/>
    </logger>

    <!-- 日志输出级别 -->
    <root level="DEBUG">
        <appender-ref ref="STDOUT" />
        <appender-ref ref="FILE"/>
    </root>

</configuration>
FeignApp
@SpringBootApplication
@EnableFeignClients
public class FeignApp {

    public static void main(String[] args) {
        SpringApplication.run(FeignApp.class, args);
    }

}
feign01
IndexController
@RestController
public class IndexController {

    @Autowired
    private StaticRemoteFeignClient remoteFeignClient;

    @GetMapping("findPerson")
    public Person findPerson() {
        Person person = remoteFeignClient.findPerson("zzhua",26);
        return person;
    }

    @GetMapping("getPerson")
    public Person getPerson() {
        Person person = remoteFeignClient.getPerson(new Person("zzhua", 26, new Address("CN", "HN")));
        return person;
    }

    @GetMapping("getPerson1")
    public Person getPerson1() {
        Person person = remoteFeignClient.getPerson1("zzhua", 26, new Address("CN", "HN"));
        return person;
    }

    @GetMapping("getPerson2")
    public Person getPerson2() {
        HashMap<String, Object> map = new HashMap<>();
        map.put("name", "zzhua");
        map.put("age", 26);
        map.put("address", new Address("CN", "HN"));
        Person person = remoteFeignClient.getPerson2(map);
        return person;
    }

    @GetMapping("addPerson")
    public Person addPerson() {
        Person person = remoteFeignClient.addPerson(new Person("zzhua", 26, new Address("CN", "HN")), 2);
        return person;
    }

    @GetMapping("addPerson2")
    public Person addPerson2() {
        Person person = remoteFeignClient.addPerson2(new Person("zzhua", 26, new Address("CN", "HN")),
                new Address("CN2", "HN2"));
        return person;
    }

    @GetMapping("checkPerson")
    public Person checkPerson() {
        return remoteFeignClient.checkPerson(new Person("zzhua", 26, new Address("CN", "HN")),
                new Integer[]{1,2,3});
    }

    @GetMapping("checkPerson2")
    public Person checkPerson2() {
        return remoteFeignClient.checkPerson2(new Person("zzhua", 26, new Address("CN", "HN")),
                Arrays.asList(1,2,3));
    }

}
StaticRemoteFeignClient
/* 重点是测试参数写法 */
@FeignClient(name = "remote",url = "http://localhost:8084",path = "/orderService/remote")
public interface StaticRemoteFeignClient {

    // 接口提供方: http://localhost:8084/orderService/remote/findPerson?pName=zzhua&pAge=26 能通
    @GetMapping("findPerson") // 多于1个参数,则必须写@RequestParam注解(并且必须写value)
    Person findPerson(@RequestParam(name = "pName") String name,
                      @RequestParam(name = "pAge") Integer age);

    @GetMapping("getPerson")  // @RequestParam后面是自定义参数类型将不会封装到接口的方法参数中
    Person getPerson(@RequestParam("person") Person person);

    @GetMapping("getPerson1") // feign将会把url拼接成url?name=xx&age=yy&address=zz(address字符串形式)
                              //   这个address将会导致接口那边在获取address时,不能正常封装成Address对象而导致报错
    Person getPerson1(@RequestParam(name = "name") String name,
                      @RequestParam(name = "age") Integer age
                   ,@RequestParam(name = "address") Address address);

    @PostMapping("getPerson2")  // 可以使用Map封装(远程接口使用@RequestBody Map来接收(address属性能正常接收到))
    Person getPerson2(Map<String,Object> map);

    @PostMapping("addPerson") // 不能使用超过1个@RequestBody
    Person addPerson(@RequestBody Person person, @RequestParam("pAge") Integer age);

    @PostMapping("addPerson2") // @RequestParam后面是自定义参数Address将不会封装到接口的方法参数中
    Person addPerson2(@RequestBody Person person,@RequestParam("addr") Address addr);

    @PostMapping("checkPerson") // 多于1个参数,则必须写@RequestParam注解(并且必须写value)
                                // feign拼接url?ids=1%2C2%2C3 (%2C,即逗号)
    Person checkPerson(@RequestBody Person person, @RequestParam("ids") Integer[] ids);

    @PostMapping("checkPerson2") // 多于1个参数,则必须写@RequestParam注解(并且必须写value)
                                 // feign拼接url?ids=1&ids=2&ids=3
    Person checkPerson2(@RequestBody Person person, @RequestParam("ids") List<Integer> ids);
}
Person
@Data
@ToString
@AllArgsConstructor
@NoArgsConstructor
public class Person {
    private String name;
    private Integer age;
    private Address address;
}
Address
@Data
@NoArgsConstructor
@AllArgsConstructor
public class Address {
    private String country;
    private String province;
}
feign02
ConfigController
@RestController
public class ConfigController {

    @Autowired
    private ConfigFeignClient configFeignClient;

    // 测试日志配置
    // (需要先配置对应的feign客户端的日志器的日志级别为DEBUG,
    //  然后再通过java代码的方式配置1个Logger.Level的bean到@FeignClient注解指定的配置类中即可,
    //  或者通过配置文件的方式配置:
    //      在配置文件中配置feign.client.config.{feignName}.loggerLevel: BASIC
    //      或者在配置文件中配置feign.client.config.default.loggerLevel: BASIC(全局))
    @GetMapping("testLog")
    public Object testLog() {
        return configFeignClient.testLog();
    }

    // 测试响应超时配置
    // (在配置文件中配置: 可以全局配置, 也可以给单个指定的feign客户端配置;
    //  在代码中配置: 可以给全局配置, 也可以给单个指定的feign客户端配置;
    //  在代码中给feign接口中的单个方法指定超时时间(如下面的testTimeout2方法所示);
    //  当超过指定的时间还没有返回时, 就会抛出异常;
    //  默认情况下(在配置文件和代码中都不配置超时时间), 默认的读取响应超时时间为60秒, 连接超时时间为10s,
    //          也就是说, 如果发起响应后, 60秒之内还没有给出响应, 就会抛出异常了;)
    @GetMapping("testTimeout")
    public Object testTimeout(Long sec) {
        return configFeignClient.testTimeout(sec);
    }

    @GetMapping("testTimeout2")
    public Object testTimeout2(Long sec) {
        Request.Options options = new Request.Options(2, TimeUnit.SECONDS, 3, TimeUnit.SECONDS, true);
        return configFeignClient.testTimeout2(options, sec);
    }


}
ConfigFeignClient
/* 重点是验证各种配置 */
@FeignClient(name = "configN", url = "http://localhost:8084", path = "/orderService/config",
        configuration = {ConfigFeignClientConfig.class})
public interface ConfigFeignClient {

    // 访问: http://localhost:8084/orderService/config/testLog 能通
    @GetMapping("/testLog")
    String testLog();

    // 访问: http://localhost:8084/orderService/config/testTimeout?sec=1 能通
    @GetMapping("/testTimeout")
    String testTimeout(@RequestParam("sec") Long sec);

    @GetMapping("/testTimeout")
    String testTimeout2(Request.Options options, @RequestParam("sec") Long sec);

}
ConfigFeignClientConfig
public class ConfigFeignClientConf {

    /* 配置feign客户端打印日志的注意点:
         1. feign客户端只有在配置feign客户端全类名对应的日志级别为debug的时候, 才有可能输出日志
         2. 我们需要在配置类中如下定义1个Logger.Level的bean即可。
            或者, 在配置文件中配置feign.client.config.{feignName}.loggerLevel: BASIC
            或者, 在配置文件中配置feign.client.config.{feignName}.loggerLevel: BASIC(全局)
     */
    @Bean
    Logger.Level feignLoggerLevel() {
        // return Logger.Level.NONE;
        // return Logger.Level.BASIC;
        // return Logger.Level.HEADERS;
        return Logger.Level.FULL;
    }

    /* 也可以通过代码的方式配置超时时间 */
    /*@Bean
    public Request.Options requestOptions() {
        return new Request.Options(2, TimeUnit.SECONDS, 3, TimeUnit.SECONDS, true);
    }*/


}
feign03
RetryController
@RestController
public class RetryController {

    @Autowired
    private RetryFeignClient retryFeignClient;

    // 测试重试机制(默认不会重试)
    // Feign的重试机制主要包括以下几个方面:
    //      1. 配置重试次数和重试间隔时间
    //      2. 配置重试条件和重试策略
    //      3. 实现重试回退机制(这个不包括当前示例中)
    // 什么情况下会重试?
    //      默认情况下只有超时的情况下才会重试, 而如果被调用方抛出了其它异常, 则不会重试
    //         (其实是否重试, 不是由被调用方来决定的, 而是由调用方来确定的;
    //         【默认情况下超时会引起重试】: 发起feign调用后, SynchronousMethodHandler#executeAndDecode 执行请求时,
    //         会由于被调用方一直没有响应而抛出IO异常,捕获到IO异常后,转而抛出 RetryException,
    //         抛出的RetryException在 SynchronousMethodHandler#invoke 的while(true)循环中又被捕捉到,从而交给retryer继续重试;
    //         【被调用方抛出其它异常不会引起重试】: 发起feign调用后, SynchronousMethodHandler#executeAndDecode执行请求时,
    //         会获得响应对象, 并将此响应对象交给 AsyncResponseHandler#handleResponse处理, 其中会根据响应状态码作不同处理,
    //         如果状态码是200到300之间, 那么正常处理, 如果不是, 则会交给ErrorDecoder处理返回1个异常, 然后以异常结束, 然后返回到
    //         SynchronousMethodHandler#invoke 的while(true)循环中, 如果这个异常是 RetryException, 则交给retryer继续重试, 如果不是, 则跳出while循环;
    //         【因此, 我们如果要重试就需要自己实现ErrorDecoder, 在需要重试的时候, 返回1个RetryException即可】)
    // 如何配置重试?
    //      可以通过配置文件的方式配置errorDecoder和retryer;
    //      可以通过代码的方式配置1个errorDecoder的bean和1个Retryer的bean(这里的retryer可以配置重试次数)
    //     (使用配置文件配置的无效backoff无效、使用@Retryable注解配置的也无效, 后面再看)
    @GetMapping("testRetry")
    public Object testRetry(Integer flag, Integer sec) {
        return retryFeignClient.testRetry(flag, sec);
    }

    @GetMapping("testRetry2")
    public Object testRetry2(Integer flag, Integer sec) {
        return retryFeignClient.testRetry2(flag, sec);
    }

}
RetryFeignClient
@FeignClient(name = "retryN", url = "http://localhost:8084", path = "/orderService/config",
        configuration = {RetryConfig.class})
public interface RetryFeignClient {

    // 访问: http://localhost:8084/orderService/config/testRetry?flag=1 能通
    @GetMapping("/testRetry")
    String testRetry(@RequestParam("flag") Integer flag, @RequestParam("sec") Integer sec);

    // 访问: http://localhost:8084/orderService/config/testRetry?flag=1 能通
    @GetMapping("/testRetry")
    // @Retryable(value = {IOException.class}, maxAttempts = 3, backoff = @Backoff(delay = 1000, maxDelay = 5000, multiplier = 2))
    String testRetry2(@RequestParam("flag") Integer flag, @RequestParam("sec") Integer sec);

}
RetryConfig
public class RetryConfig {

    @Bean
    Logger.Level feignLoggerLevel() {
        // return Logger.Level.NONE;
        return Logger.Level.BASIC;
        // return Logger.Level.HEADERS;
        // return Logger.Level.FULL;
    }

    /* 设置5s的超时时间, 以测定什么情况下会重试 */
    @Bean
    public Request.Options requestOptions() {
        return new Request.Options(2, TimeUnit.SECONDS, 5, TimeUnit.SECONDS, true);
    }

    /*
        使用 Retryer.Default 类生成一个默认的重试器,
        它会在当前请求失败后重试 3 次,并会在第一次重试前等待 500 毫秒,
        在第二次重试前等待 1000 毫秒,第三次重试前等待 2000 毫秒,以此类推
    */
    /*@Bean
    public Retryer retryer() {
        return new Retryer.Default(500, 5000, 3); // 最多请求3次
    }*/

    /*@Bean
    public CustomErrorDecoder customErrorDecoder() {
        return new CustomErrorDecoder();
    }*/


}
CustomErrorDecoder
@Slf4j
public class CustomErrorDecoder implements ErrorDecoder {

    @Override
    public Exception decode(String methodKey, Response response) {

        if (response.status() == 500) {

            log.info("重试一波...");

            // 认为有必要重试就返回RetryableException
            return new RetryableException(
                    500,
                    "",
                    response.request().httpMethod(),
                    null,
                    response.request());
        }

        log.info("认为没必要重试...");

        return new RuntimeException("Unknown error");
    }
}
feign04
FallbackController
@RestController
public class FallbackController {

    @Autowired
    private FallbackFeignClient fallbackFeignClient;

    // 测试降级、熔断
    // 需要配置feign.hystrix.enabled: true, 来开启hystrix, 否则被调用方抛出异常后, 不会走指定的降级逻辑
    //      访问1: http://localhost:8095/testFallback?flag=1&sec=0 正常返回 "ok"
    //      访问2: http://localhost:8095/testFallback?flag=-1&sec=0 首先发1个请求给被调用方, 返回500状态码, 然后走降级逻辑 正常返回 "ojdk"
    //      测试:  当在浏览器上多次快速点击访问2时, 刚开始, 请求会发起远程调用, 当多次后就会直接熔断, 然后直接走降级的方法, 多次都熔断之后, 我再访问1, 也是直接熔断走了降级方法。
    //            但是熔断结束的时间很短, 稍微停一下, 就会发起远程调用。熔断的目的是为了保护下游服务, 在统计到下游服务多次响应失败后, 就会熔断一段时间, 等过会儿再去访问。
    //            我们可以通过 hystrix.command.default.circuitBreaker.xxx来配置熔断相关的东西(如配置文件中所示)
    // 降级:
    //    可以使用@FeignClient的fallback来直接指定降级的类, 必须定义为bean且实现feign接口
    //    也可以使用@FeignClient的fallbackFactory来直接指定降级的工厂类, 必须定义为bean且实现FallbackFactory, 并且在重写的方法中返回feign接口的实现类, 好处是可以拿到发生错误的异常
    //    fallback与fallbackFactory之间只能使用1个
    @GetMapping("testFallback")
    public Object testFallback(Integer flag, Integer sec) {
        return fallbackFeignClient.testFallback(flag, sec);
    }
}
FallbackFeignClient
@FeignClient(name = "fallbackN", url = "http://localhost:8084", path = "/orderService/config",
        configuration = {FallbackConfig.class}
        ,fallback = FallbackFeignClientImpl.class
        // ,fallbackFactory = FallbackFeignClientFactory.class
)
public interface FallbackFeignClient {

    // 访问: http://localhost:8084/orderService/config/testFallback?flag=1 能通
    @GetMapping("/testFallback")
    String testFallback(@RequestParam("flag") Integer flag, @RequestParam("sec") Integer sec);

}
FallbackConfig
public class FallbackConfig {

    @Bean
    Logger.Level feignLoggerLevel() {
        // return Logger.Level.NONE;
        // return Logger.Level.BASIC;
        // return Logger.Level.HEADERS;
        return Logger.Level.FULL;
    }

}
FallbackFeignClientImpl
// 容器中同时存在FallbackFeignClient接口实现的2个bean, 其中1个是feign的动态代理, 1个就是当前这个类
// 而feign的动态代理具有primary, 所以注入时, 会优先
@Slf4j
@Component
public class FallbackFeignClientImpl implements FallbackFeignClient {

    @Override
    public String testFallback(Integer flag, Integer sec) {
        log.info("降级使用fallback...");
        return "ojdk";
    }
}
FallbackFeignClientFactory
@Slf4j
@Component
public class FallbackFeignClientFactory implements FallbackFactory<FallbackFeignClient> {

    @Override
    public FallbackFeignClient create(Throwable throwable) {
        log.info("获取到异常: {}", throwable.toString());
        return new FallbackFeignClient() {
            @Override
            public String testFallback(Integer flag, Integer sec) {
                log.info("FallbackFeignClientFactory$1处理异常了...");
                return "nook";
            }
        };
    }
}
feign05
LbController
@RestController
public class LbController {

    @Autowired
    private LbFeignClient lbFeignClient;

    // 测试负载均衡
    // 访问: http://localhost:8095/testLb,
    // 当没有服务时, 直接走的降级;
    // 当启动1个order-service服务时, 立即访问, 仍然走的是降级, 过了一小段时间后, 成功调用到服务;
    // 当再启动1个order-service服务时, 立即访问, 仍然调用的是第1个服务, 过了一小段时间后, 才会轮询访问;
    // 当其中1个服务挂掉的时候, 还是会走降级逻辑(一直走降级方法), 过了一小段时间后, 一直成功调用到还存活的服务
    // (这个是开启了feign.hystrix.enabled: true时的现象, 大概是因为只要有1个服务挂了, 就认为服务不可用, 然后直接熔断走的降级。
    //  然后, 又试着关闭feign.hystrix.enabled: false, 再测试一遍, 负载均衡访问后, 关闭1个order-service, 在轮询到关闭的服务时, 稍微会等待一小会儿,
    //  就把请求打到了还存活的服务上。);
    @GetMapping("testLb")
    public Object testLb() {
        return lbFeignClient.testLb();
    }

    // 测试降级、熔断
    // 需要配置feign.hystrix.enabled: true, 来开启hystrix, 否则被调用方抛出异常后, 不会走指定的降级逻辑
    //      访问1: http://localhost:8095/testLb2?flag=1&sec=0    正常
    //      访问2: http://localhost:8095/testLb2?flag=-1&sec=0   故意报错
    // 行为同FallbackController中一致
    @GetMapping("testLb2")
    public Object testLb2(Integer flag, Integer sec) {
        return lbFeignClient.testLb2(flag, sec);
    }

}
LbFeignClient
@FeignClient(name = "order-service", path = "/orderService/config",
        fallback = LbFeignClientImpl.class,
        configuration = LbConfig.class)
public interface LbFeignClient {

    @GetMapping("testLb")
    String testLb();


    @GetMapping("testLb2")
    String testLb2(@RequestParam("flag") Integer flag, @RequestParam("sec") Integer sec);

}
LbConfig
public class LbConfig {

    @Bean
    Logger.Level feignLoggerLevel() {
        // return Logger.Level.NONE;
        return Logger.Level.BASIC;
        // return Logger.Level.HEADERS;
        // return Logger.Level.FULL;
    }

}
LbFeignClientImpl
@Slf4j
@Component
public class LbFeignClientImpl implements LbFeignClient{
    @Override
    public String testLb() {
        log.info("lb2降级...");
        return "lb~ok-降级";
    }

    @Override
    public String testLb2(Integer flag, Integer sec) {
        log.info("lb2降级...");
        return "lb2~ok-降级";
    }
}
order-service
pom.xml
<?xml version="1.0" encoding="UTF-8"?>
<project xmlns="http://maven.apache.org/POM/4.0.0"
         xmlns:xsi="http://www.w3.org/2001/XMLSchema-instance"
         xsi:schemaLocation="http://maven.apache.org/POM/4.0.0 http://maven.apache.org/xsd/maven-4.0.0.xsd">

    <parent>
        <groupId>org.springframework.boot</groupId>
        <artifactId>spring-boot-starter-parent</artifactId>
        <version>2.3.9.RELEASE</version>
        <relativePath/>
    </parent>

    <modelVersion>4.0.0</modelVersion>

    <groupId>com.zzhua</groupId>
    <artifactId>order-service</artifactId>
    <version>1.0-SNAPSHOT</version>

    <properties>
        <project.build.sourceEncoding>UTF-8</project.build.sourceEncoding>
        <project.reporting.outputEncoding>UTF-8</project.reporting.outputEncoding>
        <java.version>1.8</java.version>
        <spring-cloud.version>Hoxton.SR8</spring-cloud.version>
        <alibaba.version>2.2.5.RELEASE</alibaba.version>
    </properties>

    <dependencies>

        <dependency>
            <groupId>org.springframework.boot</groupId>
            <artifactId>spring-boot-starter-web</artifactId>
        </dependency>

        <dependency>
            <groupId>com.alibaba.cloud</groupId>
            <artifactId>spring-cloud-starter-alibaba-nacos-discovery</artifactId>
        </dependency>

        <dependency>
            <groupId>org.projectlombok</groupId>
            <artifactId>lombok</artifactId>
        </dependency>

    </dependencies>

    <dependencyManagement>
        <dependencies>
            <dependency>
                <groupId>com.alibaba.cloud</groupId>
                <artifactId>spring-cloud-alibaba-dependencies</artifactId>
                <version>${alibaba.version}</version>
                <type>pom</type>
                <scope>import</scope>
            </dependency>
            <!-- springCloud -->
            <dependency>
                <groupId>org.springframework.cloud</groupId>
                <artifactId>spring-cloud-dependencies</artifactId>
                <version>${spring-cloud.version}</version>
                <type>pom</type>
                <scope>import</scope>
            </dependency>
        </dependencies>
    </dependencyManagement>

    <build>
        <plugins>
            <plugin>
                <groupId>org.springframework.boot</groupId>
                <artifactId>spring-boot-maven-plugin</artifactId>
            </plugin>
        </plugins>
    </build>

</project>
application.yml
server:
  port: 8084
  servlet:
    context-path: /orderService
spring:
  application:
    name: order-service
  cloud:
    nacos:
      server-addr: localhost:8848
RemoteController
@RestController
@RequestMapping("remote")
public class RemoteController {

    @GetMapping("findPerson")
    Person findPerson(String pName, Integer pAge) {
        return new Person(pName, pAge, new Address("CN", "HN"));
    }

    @GetMapping("getPerson")
    Person getPerson(Person person) {
        System.out.println(person);
        return person;
    }

    @PostMapping("getPerson2")
    Person getPerson2(@RequestBody Map<String,Object> cMap) {
        System.out.println(cMap);
        return new Person();
    }

    @PostMapping("addPerson")
    Person addPerson(@RequestBody Person person,Integer pAge) {
        System.out.println(person);
        System.out.println(pAge);
        if (person.getAge() != null) {
            person.setAge( person.getAge() + 1);
        }
        return person;
    }

    @PostMapping("addPerson2")
    Person addPerson2(@RequestBody Person person,Address addr) {
        System.out.println(person);
        System.out.println(addr);
        if (person != null) {
            person.setAddress(addr);
        }
        return person;
    }

    @PostMapping("checkPerson")
    Person checkPerson(@RequestBody Person person, Integer[] ids) {
        System.out.println(person);
        System.out.println(StringUtils.arrayToCommaDelimitedString(ids));
        return person;
    }

    @PostMapping("checkPerson2") // List<Integer> ids必须要带@RequestParam注解才能接收到
    Person checkPerson2(@RequestBody Person person, @RequestParam("ids") List<Integer> ids) {
        System.out.println(person);
        System.out.println(ids);
        return person;
    }
}
ConfigController
@Slf4j
@RestController
@RequestMapping("config")
public class ConfigController {

    @GetMapping("testLog")
    String testLog() {
        return "ok";
    }

    @GetMapping("/testTimeout")
    String testTimeout(Long sec){
        try {
            TimeUnit.SECONDS.sleep(sec);
        } catch (InterruptedException e) {
            e.printStackTrace();
        }
        return "ok";
    }

    @GetMapping("/testRetry")
    String testRetry(Integer flag, @RequestParam(required = false, defaultValue = "0") Integer sec) throws Exception{
        log.info("testRetry请求: {}", flag);
        if (sec == 0) {
            if (flag >= 0) {
                return "ok";
            } else if (Objects.equals(flag, -1)) {
                throw new RuntimeException("flag为-1");
            } else if (Objects.equals(flag, -2)) {
                throw new NullPointerException("flag为-2");
            } else if (Objects.equals(flag, -3)) {
                throw new IOException("flag为-3");
            }
            throw new IndexOutOfBoundsException("越界异常");
        } else {
            TimeUnit.SECONDS.sleep(sec);
            return "ok2";
        }

    }

    @GetMapping("/testFallback")
    String testFallback(Integer flag, @RequestParam(required = false, defaultValue = "0") Integer sec) throws Exception{
        log.info("testFallback请求: {}", flag);
        if (sec == 0) {
            if (flag >= 0) {
                return  "ok";
            } else if (Objects.equals(flag, -1)) {
                throw new RuntimeException("flag为-1");
            } else if (Objects.equals(flag, -2)) {
                throw new NullPointerException("flag为-2");
            } else if (Objects.equals(flag, -3)) {
                throw new IOException("flag为-3");
            }
            throw new IndexOutOfBoundsException("越界异常");
        } else {
            TimeUnit.SECONDS.sleep(sec);
            return "ok2";
        }

    }

    @Value("${lb.name:unknown}")
    private String lbName;

    @GetMapping("testLb")
    String testLb() {
        return "loadBalance~" + lbName;
    }

    @GetMapping("/testLb2")
    String testLb2(Integer flag, @RequestParam(required = false, defaultValue = "0") Integer sec) throws Exception{
        log.info("testLb2请求: {}", flag);
        if (sec == 0) {
            if (flag >= 0) {
                return  "ok";
            } else if (Objects.equals(flag, -1)) {
                throw new RuntimeException("flag为-1");
            } else if (Objects.equals(flag, -2)) {
                throw new NullPointerException("flag为-2");
            } else if (Objects.equals(flag, -3)) {
                throw new IOException("flag为-3");
            }
            throw new IndexOutOfBoundsException("越界异常");
        } else {
            TimeUnit.SECONDS.sleep(sec);
            return "ok2";
        }

    }

}
OrderApp
@SpringBootApplication
public class OrderApp {
    public static void main(String[] args) {
        SpringApplication.run(OrderApp.class, args);
    }
}
测试
启动nacos,再启动order-service,再启动demo-learn-feign即可

一起探索未来云端世界的核心,云原生技术专区带您领略创新、高效和可扩展的云计算解决方案,引领您在数字化时代的成功之路。
更多推荐


 21
21 0
0- 0


 已为社区贡献1条内容

所有评论(0)