
Vision Transformer(vit)原理分析以及特征可视化
Vision Transformer(ViT)是一种基于架构的深度学习模型,用于图像识别和计算机视觉任务。与传统的卷积神经网络(CNN)不同,ViT直接,并利用自注意力机制来处理图像中的像素关系。ViT通过将图像分成一系列的,并。然后,这些向量将通过多层的Transformer编码器进行处理,其中包含了。这样可以。最后,通过对Transformer编码器输出进行分类或回归,可以完成特定的视觉任务。
目录
Vit简介
Vision Transformer(ViT)是一种基于Transformer架构的深度学习模型,用于图像识别和计算机视觉任务。与传统的卷积神经网络(CNN)不同,ViT直接将图像视为一个序列化的输入,并利用自注意力机制来处理图像中的像素关系。
ViT通过将图像分成一系列的图块(patches),并将每个图块转换为向量表示作为输入序列。然后,这些向量将通过多层的Transformer编码器进行处理,其中包含了自注意力机制和前馈神经网络层。这样可以捕捉到图像中不同位置的上下文依赖关系。最后,通过对Transformer编码器输出进行分类或回归,可以完成特定的视觉任务。
vit代码参考:神经网络学习小记录67——Pytorch版 Vision Transformer(VIT)模型的复现详解_vit复现_Bubbliiiing的博客-CSDN博客
为什么不能直接将transformer直接应用于图像处理中呢?这是因为transformer本身是用来处理序列任务的(比如NLP),但图像是二维或三维的,像素之间存在一定的结构关系,如果单纯的将transformer之间应用于图像中,像素和像素之间需要一定的关联性,那么这个计算量是相当大的。因此vit就诞生了。
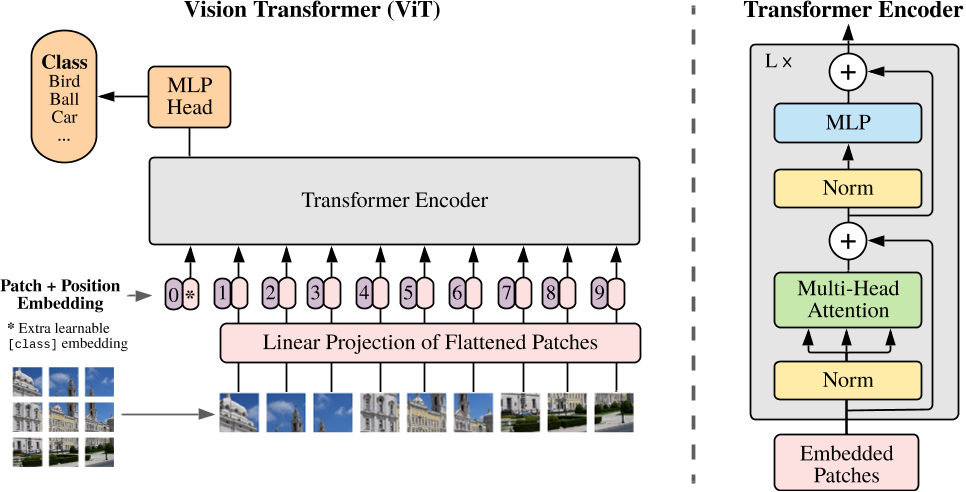
Vit model结构图
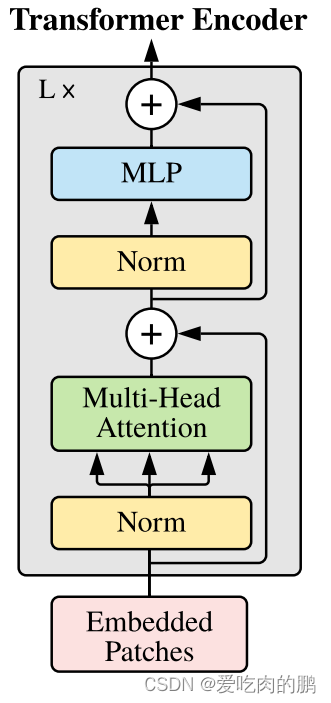
Vit的模型结构如下图所示。vit是将图像块应用于transformer。CNN是以滑窗的思想用卷积核在图像上进行卷积得到特征图。为了可以使图像仿照NLP的输入序列,我们可以先将图像分成块(patch),再将这些图像块进行平铺后输入到网络中(这样就变成了图像序列),然后通过transformer进行特征提取,最后再通过MLP对这些特征进行分类【其实就可以理解为在以往的CNN分类任务中,将backbone替换为transformer】。
vit输入处理
图像分块
图像分块就是上述vit图中的patch,position Embedding就是位置嵌入(可以得出图像块的位置信息)。那么如何对图像进行分块呢?最简单的就是可以通过卷积来实现,我们可以通过设置卷积核大小以及步长来控制图像块的分辨率以及分多少块。
在代码中是如何来实现的呢?可以看下面的代码。
class PatchEmbed(nn.Module):
    def __init__(self, input_shape = [224,224], patch_size = 16, in_channels = 3, num_features = 768, norm_layer = None, flatten = True):
        super().__init__()
        self.num_patch = (input_shape[0] // patch_size) * (input_shape[1] // patch_size)  # 14*14的patch = 196
        self.flatten = flatten

        self.proj = nn.Conv2d(in_channels, num_features, kernel_size=patch_size, stride=patch_size)
        self.norm = norm_layer(num_features) if norm_layer else nn.Identity()

    def forward(self, x):
        x = self.proj(x)  # 先进行卷积 [1,3,224,224] ->[1,768,14,14]
        if self.flatten:
            x = x.flatten(2).transpose(1, 2)  # x.flatten.transpose(1, 2) shape:[1,768,196]
        x = self.norm(x)
return x上述代码中,num_patch就是可以划分多少个图像块。proj就是对输入图像进行卷积分块,进行特征映射,假设输入大小为1,3,224,224,通过该卷积操作后得到1,768,14,14【表明通过卷积分成了768个分辨率大小为14×14的图像块】。
ps:这里多说一下,由于评论区某些人嘴硬喷我误人子弟,非要说我这里有问题,还说抛开卷积不谈。在做分块的时候又不是像截图一样,实践中应该想用代码怎么实现理论部分,这里用的是卷积进行的patch操作,卷积核大小为16x16,步长也为16(这里为什么要做步长为16而不是其他数值,这是为了避免对某些特征点重复卷积),那针对一个224x224大小的图像卷积后特征图的h和w是不是14x14?这不就是用代码的方法实现理论的物理意义么,还抛开卷积不谈。同时我这里直接附上pytorch官方提供的Vit代码看看我是不是误人子弟:
from transformers import ViTModel
.......
.......
class ViTPatchEmbeddings(nn.Module):
"""
This class turns `pixel_values` of shape `(batch_size, num_channels, height, width)` into the initial
`hidden_states` (patch embeddings) of shape `(batch_size, seq_length, hidden_size)` to be consumed by a
Transformer.
"""
def __init__(self, config):
super().__init__()
image_size, patch_size = config.image_size, config.patch_size
num_channels, hidden_size = config.num_channels, config.hidden_size
image_size = image_size if isinstance(image_size, collections.abc.Iterable) else (image_size, image_size)
patch_size = patch_size if isinstance(patch_size, collections.abc.Iterable) else (patch_size, patch_size)
num_patches = (image_size[1] // patch_size[1]) * (image_size[0] // patch_size[0])
self.image_size = image_size
self.patch_size = patch_size
self.num_channels = num_channels
self.num_patches = num_patches
self.projection = nn.Conv2d(num_channels, hidden_size, kernel_size=patch_size, stride=patch_size)
def forward(self, pixel_values: torch.Tensor, interpolate_pos_encoding: bool = False) -> torch.Tensor:
batch_size, num_channels, height, width = pixel_values.shape
if num_channels != self.num_channels:
raise ValueError(
"Make sure that the channel dimension of the pixel values match with the one set in the configuration."
)
if not interpolate_pos_encoding:
if height != self.image_size[0] or width != self.image_size[1]:
raise ValueError(
f"Input image size ({height}*{width}) doesn't match model"
f" ({self.image_size[0]}*{self.image_size[1]})."
)
embeddings = self.projection(pixel_values).flatten(2).transpose(1, 2)
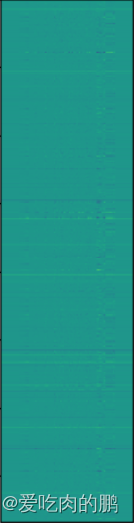
return embeddings每个图像块都是经过一次特征提取的,可以对其中的一个图像块可视化一下看看:

然后再进行flatten平铺操作。就会变成【1,768,196】,最后再经过一个layernorm层得到最终的输出。

class token与position的添加
通过上述的操作,我们可以得到平铺后的特征序列(shape 为1,768,196)。接着会在该序列上添加class token,这个token会与前面的特征序列一起送入网络中进行特征提取。该class token就是图中的0*,因此原本长度为196的序列就会变成长度为197的序列。
然后会在添加Position embedding,可以为所有的特征序列添加位置信息。通过生成一个[197,768]的矩阵加到原来的特征序列中。至此,网络输入的预处理patch+position embedding就完成了。
# class token的定义
self.cls_token      = nn.Parameter(torch.zeros(1, 1, num_features))
# position embedding定义
self.pos_embed = nn.Parameter(torch.zeros(1, num_patches + 1, num_features))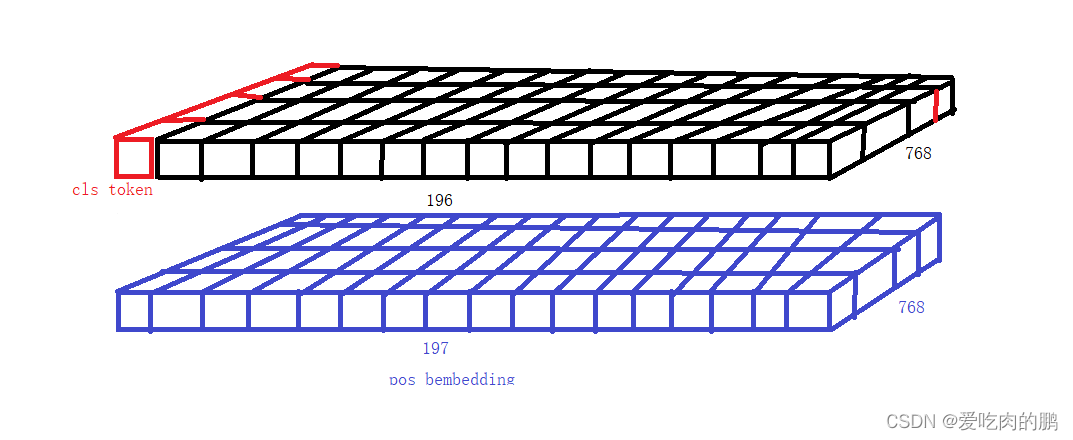
代码:
class VisionTransformer(nn.Module):
    def __init__(
            self, input_shape=[224, 224], patch_size=16, in_chans=3, num_classes=1000, num_features=768,
            depth=12, num_heads=12, mlp_ratio=4., qkv_bias=True, drop_rate=0.1, attn_drop_rate=0.1, drop_path_rate=0.1,
            norm_layer=partial(nn.LayerNorm, eps=1e-6), act_layer=GELU
        ):
        """
        输入大小为224,以16*16的卷积核分块14*14
        :param input_shape: 网络输入大小
        :param patch_size:  分块大小
        :param in_chans:  输入通道
        :param num_classes:  类别数量
        :param num_features: 特征图维度
        :param num_heads:  多头注意力机制head的数量
        :param mlp_ratio: MLP ratio
        :param qkv_bias: qkv的bias
        :param drop_rate: dropout rate
        :param norm_layer: layernorm
        :param act_layer: 激活函数
        """
        super().__init__()
        #-----------------------------------------------#
        #   224, 224, 3 -> 196, 768
        #-----------------------------------------------#
        self.patch_embed    = PatchEmbed(input_shape=input_shape, patch_size=patch_size, in_channels=in_chans, num_features=num_features)
        num_patches         = (224 // patch_size) * (224 // patch_size)
        self.num_features   = num_features
        self.new_feature_shape = [int(input_shape[0] // patch_size), int(input_shape[1] // patch_size)]
        self.old_feature_shape = [int(224 // patch_size), int(224 // patch_size)]

        self.cls_token = nn.Parameter(torch.zeros(1, 1, num_features))  # shape [1,1,768]
        self.pos_embed = nn.Parameter(torch.zeros(1, num_patches + 1, num_features))  # shape [1, 197, 768]

    def forward_features(self, x):
        x = self.patch_embed(x)  # 先分块 [1,196, 768]
        cls_token = self.cls_token.expand(x.shape[0], -1, -1)  # [1,1,768]
        x = torch.cat((cls_token, x), dim=1)  # [1,197,768]
        cls_token_pe = self.pos_embed[:, 0:1, :]  # 获取class token pos_embed 【类位置信息】
        img_token_pe = self.pos_embed[:, 1:, :]  # 后196维度是图像特征的位置信息

        img_token_pe = img_token_pe.view(1, *self.old_feature_shape, -1).permute(0, 3, 1, 2)  # [1,768,14,14]
        img_token_pe = F.interpolate(img_token_pe, size=self.new_feature_shape, mode='bicubic', align_corners=False)
        img_token_pe = img_token_pe.permute(0, 2, 3, 1).flatten(1, 2)  # [1,196,768]
        pos_embed = torch.cat([cls_token_pe, img_token_pe], dim=1)  # [1,197,768]

        x = self.pos_drop(x + pos_embed)
特征提取
与CNN网络一样,在做特征提取的时候也需要一个backbone做特征提取。而在vit中是利用transformer encoder进行特征提取。
我们的输入是一个[197,768]的序列,这里的197包含了class token【可学习的】,图像序列以及pos_embed【可学习的】。将这个序列输入到我们的编码器中进行特征提取,而transformer中特征提取的重要组件就是multi-head attention。
上面的图中,可以看到输入图像先经过了Norm层,然后分成了三份,这三份就是q,k,v,再同时输入多头注意力机制中,这也就是自注意力机制。然后在和残差边的输入进行相加,再经过Norm和MLP进行输出即可。
q就是我们的查询序列,q和k的相乘就是让q中的每个查询向量和k中的特征向量求相关性,或者说是重要度。然后我们再和原始输入向量v相乘,得到每个序列的贡献度【其实和通道注意力机制是有些像的】。
通过搭建很多个self-attention去提取特征。如果和CNN相比,transformer的基本组成单元是self-attention,CNN的基本组成单元是卷积核。
自注意力机制代码:
代码中的qkv:
# 几何意义:q,k,v分布在num_heads个head中(每个head中均有qkv),每个head上还有197*64的特征序列
class Attention(nn.Module):
    def __init__(self, dim, num_heads=8, qkv_bias=False, attn_drop=0., proj_drop=0.):
        super().__init__()
        self.num_heads  = num_heads
        self.scale      = (dim // num_heads) ** -0.5

        self.qkv        = nn.Linear(dim, dim * 3, bias=qkv_bias)
        self.attn_drop  = nn.Dropout(attn_drop)
        self.proj       = nn.Linear(dim, dim)
        self.proj_drop  = nn.Dropout(proj_drop)

    def forward(self, x):
        B, N, C     = x.shape
        qkv         = self.qkv(x).reshape(B, N, 3, self.num_heads, C // self.num_heads).permute(2, 0, 3, 1, 4)
        q, k, v     = qkv[0], qkv[1], qkv[2]

        attn = (q @ k.transpose(-2, -1)) * self.scale
        attn = attn.softmax(dim=-1)
        attn = self.attn_drop(attn)

        x = (attn @ v).transpose(1, 2).reshape(B, N, C)
        x = self.proj(x)
        x = self.proj_drop(x)
        return x
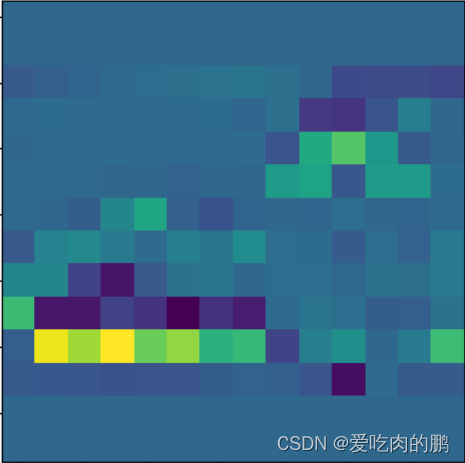
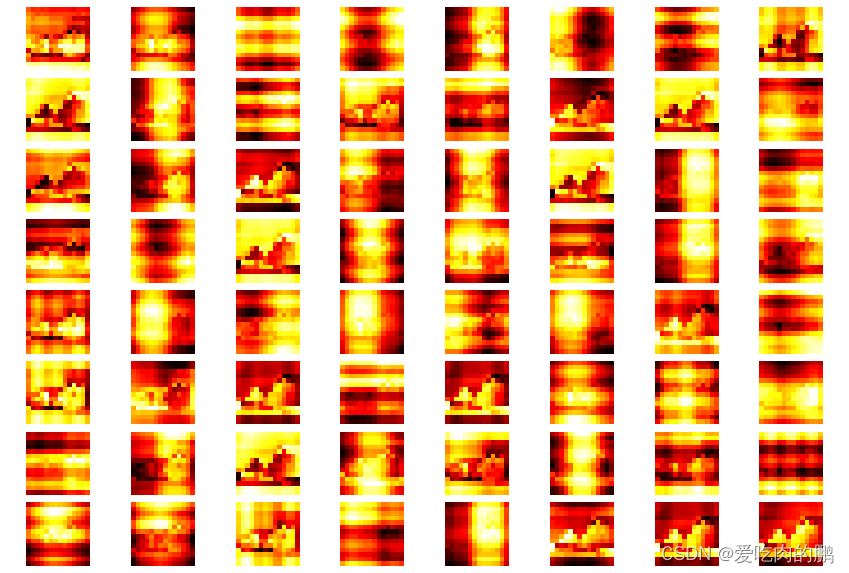
同理,我们可以qkv进行特征可视化看看q,k,v里到底是什么。我们的q,k,v的shape是一样的,shape为[batch_size, num_heads, 197, 768//num_heads].我们对q的第一个head的输入进行可视化(像这种图有12个heads,每个head上提取了64种特征)。
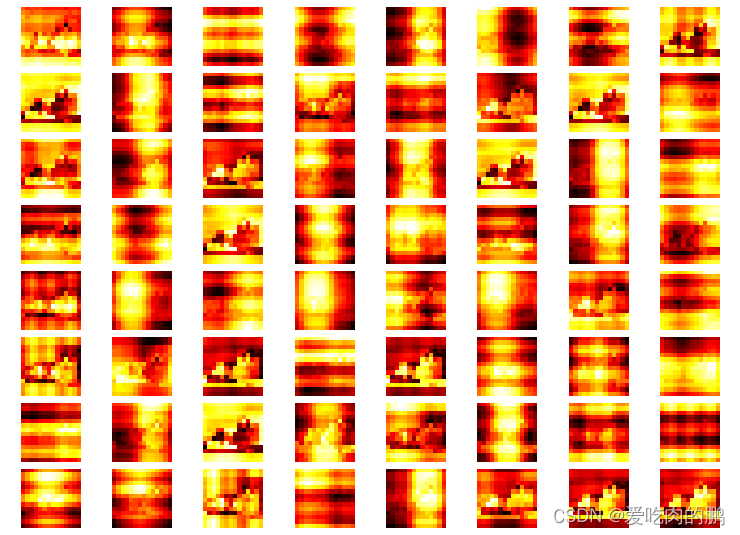
然后再来看下第一个head上的k的特征。
然后再通过q和k矩阵乘积获得注意力权重。
ps:代码中的q和k的成绩为什么是q @ k.transpose(-2,-1)呢?为什么不是k.T?这是因为我们再做两个矩阵成绩的时候,是对最后两个维度做成绩即可,每个头的q和k之间的点积操作需要在最后两个维度上进行。因此仅互换最后两个维度即可。
通过q和k的矩阵乘后得到注意力特征图如下,我们还是仅对第一个head可视化【一共有12个head,每个head的注意力特征图是不同的】:

然后再通过sofmax去计算所有head上的注意力分数。
第一个head的注意力分数为:
tensor([[9.9350e-01, 2.5650e-05, 2.6444e-05, ..., 3.7445e-05, 3.3614e-05,
2.7365e-05],
[3.7948e-01, 2.3743e-01, 8.7877e-02, ..., 2.2976e-05, 1.2177e-04,
6.6991e-04],
[3.7756e-01, 1.2583e-01, 1.4249e-01, ..., 1.0860e-05, 3.4743e-05,
1.1384e-04],
...,
[4.1151e-01, 3.6945e-05, 9.8513e-06, ..., 1.5886e-01, 1.1042e-01,
4.4855e-02],
[4.0967e-01, 1.7754e-04, 2.8480e-05, ..., 1.0884e-01, 1.4333e-01,
1.2111e-01],
[4.1888e-01, 6.8779e-04, 6.7465e-05, ..., 3.5659e-02, 9.4098e-02,
2.2174e-01]], device='cuda:0')
再将得到的注意力分数与v相乘,得到每个通道的贡献度。
然后是添加MLP层,最后可以得到我们的Transformer Block。
class Mlp(nn.Module):
    """ MLP as used in Vision Transformer, MLP-Mixer and related networks
    """

    def __init__(self, in_features, hidden_features=None, out_features=None, act_layer=GELU, drop=0.):
        super().__init__()
        out_features = out_features or in_features
        hidden_features = hidden_features or in_features
        drop_probs = (drop, drop)

        self.fc1 = nn.Linear(in_features, hidden_features)
        self.act = act_layer()
        self.drop1 = nn.Dropout(drop_probs[0])
        self.fc2 = nn.Linear(hidden_features, out_features)
        self.drop2 = nn.Dropout(drop_probs[1])

    def forward(self, x):
        x = self.fc1(x)
        x = self.act(x)
        x = self.drop1(x)
        x = self.fc2(x)
        x = self.drop2(x)
        return x


class Block(nn.Module):
    def __init__(self, dim, num_heads, mlp_ratio=4., qkv_bias=False, drop=0., attn_drop=0.,
                 drop_path=0., act_layer=GELU, norm_layer=nn.LayerNorm):
        super().__init__()
        self.norm1 = norm_layer(dim)
        self.attn = Attention(dim, num_heads=num_heads, qkv_bias=qkv_bias, attn_drop=attn_drop, proj_drop=drop)
        self.norm2 = norm_layer(dim)
        self.mlp = Mlp(in_features=dim, hidden_features=int(dim * mlp_ratio), act_layer=act_layer, drop=drop)
        self.drop_path = DropPath(drop_path) if drop_path > 0. else nn.Identity()

    def forward(self, x):
    def forward(self, x):
        '''
        :param x: 输入序列
        x --> layer_norm --> mulit head attention --> + --> x --> layer_norm --> mlp --> +-->x
        |____________________________________________|     |_____________________________|

        '''
        x = x + self.drop_path(self.attn(self.norm1(x)))
        x = x + self.drop_path(self.mlp(self.norm2(x)))
        return x
        x = x + self.drop_path(self.attn(self.norm1(x)))
        x = x + self.drop_path(self.mlp(self.norm2(x)))
        return x
vit代码
class VisionTransformer(nn.Module):
    def __init__(
            self, input_shape=[224, 224], patch_size=16, in_chans=3, num_classes=1000, num_features=768,
            depth=12, num_heads=12, mlp_ratio=4., qkv_bias=True, drop_rate=0.1, attn_drop_rate=0.1, drop_path_rate=0.1,
            norm_layer=partial(nn.LayerNorm, eps=1e-6), act_layer=GELU
        ):
        """
        输入大小为224,以16*16的卷积核分块14*14
        :param input_shape: 网络输入大小
        :param patch_size:  分块大小
        :param in_chans:  输入通道
        :param num_classes:  类别数量
        :param num_features: 特征图维度
        :param num_heads:  多头注意力机制head的数量
        :param mlp_ratio: MLP ratio
        :param qkv_bias: qkv的bias
        :param drop_rate: dropout rate
        :param norm_layer: layernorm
        :param act_layer: 激活函数
        """
        super().__init__()
        #-----------------------------------------------#
        #   224, 224, 3 -> 196, 768
        #-----------------------------------------------#
        self.patch_embed    = PatchEmbed(input_shape=input_shape, patch_size=patch_size, in_channels=in_chans, num_features=num_features)
        num_patches         = (224 // patch_size) * (224 // patch_size)
        self.num_features   = num_features
        self.new_feature_shape = [int(input_shape[0] // patch_size), int(input_shape[1] // patch_size)]
        self.old_feature_shape = [int(224 // patch_size), int(224 // patch_size)]

        self.cls_token = nn.Parameter(torch.zeros(1, 1, num_features))  # shape [1,1,768]
        self.pos_embed = nn.Parameter(torch.zeros(1, num_patches + 1, num_features))  # shape [1, 197, 768]

        # -----------------------------------------------#
        #   197, 768 -> 197, 768  12次
        # -----------------------------------------------#
        dpr = [x.item() for x in torch.linspace(0, drop_path_rate, depth)]
        self.blocks = nn.Sequential(
            *[
                Block(
                    dim=num_features,
                    num_heads=num_heads,
                    mlp_ratio=mlp_ratio,
                    qkv_bias=qkv_bias,
                    drop=drop_rate,
                    attn_drop=attn_drop_rate,
                    drop_path=dpr[i],
                    norm_layer=norm_layer,
                    act_layer=act_layer
                ) for i in range(depth)
            ]
        )
        self.norm = norm_layer(num_features)
        self.head = nn.Linear(num_features, num_classes) if num_classes > 0 else nn.Identity()


    def forward_features(self, x):
        x = self.patch_embed(x)  # 先分块 [1,196, 768]
        cls_token = self.cls_token.expand(x.shape[0], -1, -1)  # [1,1,768]
        x = torch.cat((cls_token, x), dim=1)  # [1,197,768]
        cls_token_pe = self.pos_embed[:, 0:1, :]  # 获取class token pos_embed 【类位置信息】
        img_token_pe = self.pos_embed[:, 1:, :]  # 后196维度是图像特征的位置信息

        img_token_pe = img_token_pe.view(1, *self.old_feature_shape, -1).permute(0, 3, 1, 2)  # [1,768,14,14]
        img_token_pe = F.interpolate(img_token_pe, size=self.new_feature_shape, mode='bicubic', align_corners=False)
        img_token_pe = img_token_pe.permute(0, 2, 3, 1).flatten(1, 2)  # [1,196,768]
        pos_embed = torch.cat([cls_token_pe, img_token_pe], dim=1)  # [1,197,768] 获得最终的位置信息

        x = self.pos_drop(x + pos_embed)  # 将位置信息和图像序列相加

        x = self.blocks(x)  # 特征提取
        x = self.norm(x)
        return x[:, 0]

    def forward(self, x):
        x = self.forward_features(x)
        x = self.head(x)
        return x

    def freeze_backbone(self):
        backbone = [self.patch_embed, self.cls_token, self.pos_embed, self.pos_drop, self.blocks[:8]]
        for module in backbone:
            try:
                for param in module.parameters():
                    param.requires_grad = False
            except:
                module.requires_grad = False

    def Unfreeze_backbone(self):
        backbone = [self.patch_embed, self.cls_token, self.pos_embed, self.pos_drop, self.blocks[:8]]
        for module in backbone:
            try:
                for param in module.parameters():
                    param.requires_grad = True
            except:
                module.requires_grad = True
旨在为数千万中国开发者提供一个无缝且高效的云端环境,以支持学习、使用和贡献开源项目。
更多推荐


 10
10 1
1- 0


 已为社区贡献4条内容

所有评论(0)