
提示词工程让儿童编程轻而易举
用数学术语来说,如果T_world_vehicle是世界和车辆之间的变换矩阵,T_vehicle_camera是车辆和摄像头之间的变换矩阵,那么T_world_camera = T_world_vehicle * T_vehicle_camera。不幸的是,提示是一门实证科学,缺乏全面且可访问的资源,其中包含好的(和坏的)示例来帮助该领域的研究人员和爱好者。在循环的每次迭代中,我们稍微向下移动以到
编写长长的代码时常令人头疼。尤其是小朋友,打字不快,但想象力丰富。
现在借助chatgpt。
一切变得超级简单。
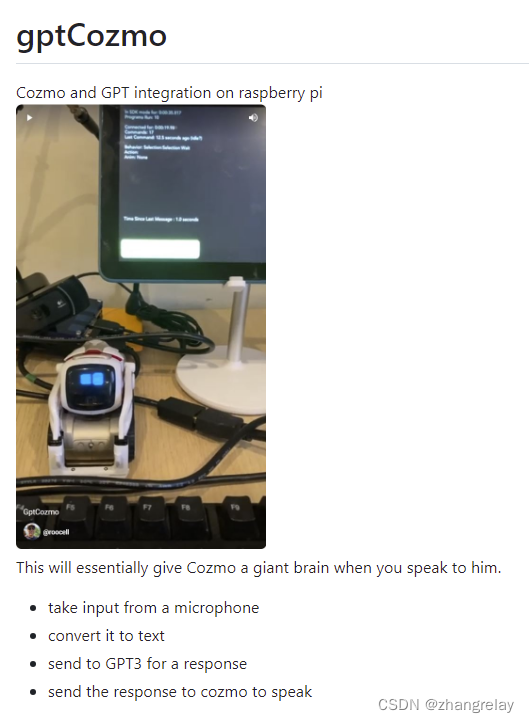
1. https://github.com/roocell/gptCozmo
2. https://github.com/Bhood23/CozmoGPT
while True:
    from pyChatGPT import ChatGPT
    import speech_recognition as sr
    import cozmo
    import time
    import random


    # replace with chatgpt secret key. You will get this in insepct-->applications-->cockies
    session_token = ''
    api = ChatGPT(session_token, conversation_id='e12185d9-7e59-48a8-9c0d-bbba3c210297')


    def chat():
        r = sr.Recognizer()

        with sr.Microphone() as source:
            audio = r.listen(source)

        try:
            query = r.recognize_google(audio)
            print("You said: " + query)
        except sr.UnknownValueError:
            print("Google Speech Recognition could not understand audio")
        except sr.RequestError as e:
            print("Could not request results from Google Speech Recognition service; {0}".format(e))

        print("query: ", query)

        response = api.send_message(str(query))
        message1 = response["message"]
        print(response["message"])
        return message1

    returned_message = chat()


    def cozmo_program(robot: cozmo.robot.Robot):
        robot.say_text(returned_message).wait_for_completed()

        if "Happy'" in returned_message:
            print("ran")
            robot.play_anim_trigger(cozmo.anim.Triggers.CodeLabWin).wait_for_completed()

        if "Dance'" in returned_message:
            print("ran")
            robot.play_anim_trigger(cozmo.anim.Triggers.CodeLabDancingMambo).wait_for_completed()

        if "Sad'" in returned_message:
            print("ran")
            robot.play_anim_trigger(cozmo.anim.Triggers.CodeLabLose).wait_for_completed()


    cozmo.run_program(cozmo_program)
需要配置:
要求: Cozmo SDK 安装了cozmo应用程序的安卓或IOS设备 Windows PC
当你和Cozmo交谈时,这基本上会给他一个巨大的大脑。
- 从麦克风获取输入
- 将其转换为文本
- 发送到 GPT3 进行响应
- 发送回复至 Cozmo 发言
pycozmo不怎么好用
一个只有树莓派的python库,可以与cozmo对话。不需要Andriod和cozmo应用程序。
支持音频 API,但似乎不起作用
推荐官方的 linux SDK python 库。需要一个安卓设备,通过USB连接到raspi的Cozmo应用程序。
这是获得真正的cozmo语音和cozmo的全部功能的方法。
一个python库,用于获取音频并将其转录为文本。
需要安装:
pip install openai
pip install dotenv

pip install pycozmo
pip install libopenjp2-7-dev

pip install SpeechRecognition
pip install pyaudio
sudo apt-get install python3-pyaudio
sudo apt-get install flac

pip install pyttsx3
sudo apt install espeak
sudo apt install -y ffmpeg

pip install gtts
pip install pydub

sudo apt-get install python3-pil.imagetk
pip install 'cozmo[camera]'
sudo apt-get install adb

pip install pygame
sudo apt-get install libsdl2-2.0-0
设置wlan连接:
/etc/wpa_supplicant/
wpa_supplicant-wlan0.conf  wpa_supplicant-wlan1.conf

wpa_supplicant-wlan1.conf
ctrl_interface=DIR=/var/run/wpa_supplicant GROUP=netdev
update_config=1
country=CA
network={
        ssid="Cozmo_71374E"
        psk="ZZHP0SMI27GM"
}

sudo systemctl restart wpa_supplicant@wlan1.service
sudo systemctl status wpa_supplicant@wlan1.service

iwconfig
wlan1     IEEE 802.11  ESSID:"Cozmo_71374E"
          Mode:Managed  Frequency:2.462 GHz  Access Point: 5E:CF:7F:C3:8E:EC

          Bit Rate=54 Mb/s   Tx-Power=31 dBm
          Retry short limit:7   RTS thr:off   Fragment thr:off
          Power Management:on
          Link Quality=70/70  Signal level=-39 dBm
          Rx invalid nwid:0  Rx invalid crypt:0  Rx invalid frag:0
          Tx excessive retries:0  Invalid misc:0   Missed beacon:0

ifconfig
wlan1: flags=4163<UP,BROADCAST,RUNNING,MULTICAST>  mtu 1500
        inet 172.31.1.56  netmask 255.255.255.0  broadcast 172.31.1.255
        inet6 fe80::1c97:4e60:6553:b458  prefixlen 64  scopeid 0x20<link>
        ether dc:a6:32:c9:3a:08  txqueuelen 1000  (Ethernet)
        RX packets 325  bytes 53515 (52.2 KiB)
        RX errors 0  dropped 0  overruns 0  frame 0
        TX packets 424  bytes 56025 (54.7 KiB)
        TX errors 0  dropped 0 overruns 0  carrier 0  collisions 0
更多参考提供的链接。
chatgpt ros
https://github.com/koichirokato/chatgpt_ros订阅发布
ros2 run chatgpt_ros chatgpt_ros服务
ros2 run chatgpt_ros chatgpt_ros_service
chatgpt turtlesim
https://github.com/mhubii/chatgpt_turtlesim提示词
Move turtle1 left by 2, then rotate 180 degrees, and move back to (5, 5). Finally, spawn a turtle named turtle2 at (10, 10) and remove turtle1.
ros2
source /opt/ros/humble/setup.bash # source your ROS distribution
ros2 run turtlesim turtlesim_node
source /opt/ros/humble/setup.bash # source your ROS distribution
ros2 launch rosbridge_server rosbridge_websocket_launch.xml
python main.py --key your_key
Move turtle1 left by 2, then rotate 180 degrees, and move back to (5, 5). Finally, spawn a turtle named turtle2 at (10, 10) and remove turtle1.
other:
Add 3 more turtles with names inspired by artists at random positions
Move the turtles with artist's names forward by 2
tello
https://github.com/dbaldwin/DroneBlocks-Tello-Simulator-ChatGPT机器人 ChatGPT:设计原则和模型能力
https://github.com/microsoft/PromptCraft-Robotics
微软原创
我们将 ChatGPT 的功能扩展到机器人,并通过语言直观地控制机器人手臂、无人机和家庭助理机器人等多个平台。
你有没有想过用你自己的话告诉机器人该怎么做,就像你对人类一样?只是告诉你的家庭助理机器人:“请加热我的午餐”,然后让它自己找到微波炉,这不是很神奇吗?尽管语言是我们表达意图的最直观方式,但我们仍然严重依赖手写代码来控制机器人。我们的团队一直在探索如何改变这一现实,并使用OpenAI的新AI语言模型ChatGPT实现自然的人机交互。
ChatGPT 是一种在大量文本和人类交互语料库上训练的语言模型,使其能够对各种提示和问题生成连贯且语法正确的响应。我们这项研究的目标是看看ChatGPT是否可以超越文本思考,并推理物理世界来帮助完成机器人任务。我们希望帮助人们更轻松地与机器人互动,而无需学习复杂的编程语言或有关机器人系统的详细信息。这里的关键挑战是教 ChatGPT 如何解决考虑物理定律、操作环境背景以及机器人的物理动作如何改变世界状态的问题。
事实证明,ChatGPT 可以自己做很多事情,但它仍然需要一些帮助。我们的技术论文描述了一系列设计原则,可用于指导语言模型解决机器人任务。这些包括但不限于特殊的提示结构、高级 API 和通过文本的人工反馈。我们相信,我们的工作只是我们开发机器人系统方式转变的开始,我们希望激励其他研究人员进入这个令人兴奋的领域。继续阅读有关我们的方法和想法的更多技术细节。
当今机器人技术面临的挑战,以及 ChatGPT 如何提供帮助
当前的机器人管道始于工程师或技术用户,他们需要将任务的要求转换为系统代码。工程师坐在循环中,这意味着他们需要编写新的代码和规范来纠正机器人的行为。总的来说,这个过程很慢(用户需要编写低级代码),昂贵(需要具有深厚机器人知识的高技能用户)和低效(需要多次交互才能使事情正常工作)。
工程师操作机器人向用户操作机器人转变

ChatGPT 解锁了一种新的机器人范式,并允许(潜在的非技术)用户坐在循环中,在监控机器人性能的同时向大型语言模型 (LLM) 提供高级反馈。通过遵循我们的设计原则,ChatGPT 可以为机器人场景生成代码。无需任何微调,我们就利用LLM的知识来控制各种任务的不同机器人外形。在我们的工作中,我们展示了ChatGPT解决机器人难题的多个示例,以及在操纵,空中和导航领域的复杂机器人部署。
使用ChatGPT的机器人技术:设计原则
催生法学硕士是一门高度实证的科学。通过反复试验,我们构建了一种方法和一套设计原则,用于编写机器人任务的提示:

首先,我们定义一组高级机器人 API 或函数库。该库可以特定于特定的机器人,并且应映射到机器人的控制堆栈或感知库中的现有低级实现。为高级 API 使用描述性名称非常重要,这样 ChatGPT 就可以推理它们的行为;
接下来,我们为 ChatGPT 编写一个文本提示,描述任务目标,同时明确说明高级库中的哪些函数可用。提示还可以包含有关任务约束的信息,
或者 ChatGPT 应该如何形成其答案(特定的编码语言,使用辅助解析元素);
用户通过直接检查或使用模拟器来评估 ChatGPT 的代码输出。如果需要,用户使用自然语言向 ChatGPT 提供有关答案质量和安全性的反馈。
当用户对解决方案感到满意时,可以将最终代码部署到机器人上。
理论够了...ChatGPT到底能做什么?
PromptCraft,一个用于LLM + Robotics研究的协作开源工具
良好的快速工程对于LLM如ChatGPT在机器人任务中的成功至关重要。不幸的是,提示是一门实证科学,缺乏全面且可访问的资源,其中包含好的(和坏的)示例来帮助该领域的研究人员和爱好者。为了解决这一差距,我们推出了PromptCraft,这是一个协作式开源平台,任何人都可以分享不同机器人类别的提示策略示例。我们发布了本研究中使用的所有提示和对话。我们邀请读者贡献更多!
除了提示设计,我们还希望包括多个机器人模拟器和接口,以允许用户测试他们的 ChatGPT 生成的算法。首先,我们还发布了一个集成了 ChatGPT 的 AirSim 环境,任何人都可以使用它来开始这些想法。我们也欢迎新的模拟器和界面的贡献。
将机器人技术带出实验室,走向世界
我们很高兴发布这些技术,旨在将机器人技术带给更广泛的受众。我们相信,基于语言的机器人控制将是将机器人技术带出科学实验室并交到日常用户手中的基础。
也就是说,我们确实强调,ChatGPT 的输出并不意味着在没有仔细分析的情况下直接部署在机器人上。我们鼓励用户利用仿真的强大功能,以便在潜在的实际部署之前评估这些算法,并始终采取必要的安全预防措施。我们的工作只代表了机器人领域大型语言模型交叉点的一小部分,我们希望激发未来的大部分工作。
想象一下,我们正在使用一辆机器人汽车,该汽车配备了在二维空间中运行的摄像头。我们还假设机器人上运行了一个对象检测模型,该模型能够检测相机图像中感兴趣的对象,并在每个时间步传递对象中心的像素坐标。此对象处于运动状态,但仅沿水平轴运动。 机器人始终以恒定的速度向前移动,但偏航角可以通过函数 set_angle() 控制。is_reached() 是一个检查机器人是否已到达物体的函数。您能否为响应性控制机器人的控制器编写代码,使物体始终直接在机器人的正前方?
def controller(pixel_x):
    # Set a target x-coordinate for the object
    target_x = image_width / 2

    # Calculate error between current and target x-coordinate
    error = target_x - pixel_x

    # Set a proportionate gain for the control loop
    kp = 0.01

    # Calculate the angle to set based on the error and the gain
    angle = kp * error

    # Call the set_angle function to adjust the yaw angle
    set_angle(angle)

    # Check if the object has been reached
    if is_reached():
        return True
    else:
        return False
上面的代码实现了一个简单的比例控制回路,该循环连续调整机器人的偏航角,使物体保持在机器人的正前方。误差计算为目标 x 坐标(图像中心)与对象当前 x 坐标之间的差值。增益kp根据误差确定角度的调整程度,增益越大,校正越激进。使用计算的角度调用函数set_angle来调整机器人的偏航角。检查函数is_reached以查看是否已到达对象,如果已到达对象,则控制器返回 True,如果尚未到达对象,则返回 False。
想象一下,我们正在使用RGBD相机。可以通过函数 get_pose() 访问此相机的姿势。现在假设我们在坐标(x,y)处观察到图像中的一个点P,并且可以通过get_depth(x,y)获得相应的透视深度值。相机的内在可以通过函数 get_intrinsics() 获得。你能给我一些代码来计算与P点对应的世界坐标吗?
当然,这里有一些 Python 中的示例代码来计算对应于点 P 的世界坐标:
import numpy as np

def get_world_coordinates(x, y):
    # Get the camera pose
    camera_pose = get_pose()
    R, T = camera_pose[:3, :3], camera_pose[:3, 3]

    # Get the camera intrinsics
    K = get_intrinsics()

    # Get the depth value at (x, y)
    depth = get_depth(x, y)

    # Compute the normalized image coordinates
    x_n = (x - K[0, 2]) / K[0, 0]
    y_n = (y - K[1, 2]) / K[1, 1]

    # Convert the normalized image coordinates to 3D world coordinates
    P_c = np.array([x_n * depth, y_n * depth, depth, 1])
    P_w = np.linalg.inv(np.dot(R, T)) @ P_c

    return P_w[:3]
此代码使用针孔相机模型,其中归一化图像坐标是通过减去主点并除以 x 和 y 方向的焦距来获得的。深度值用于将归一化图像坐标转换为 3D 相机坐标。最后,使用相机姿态变换矩阵的逆函数将相机坐标转换为世界坐标。
想象一下,我们正试图平衡盘子中心的球。板可以通过俯仰和滚动角度控制为set_plate_pitch()和set_plate_roll()。可以设置的俯仰和横滚角度范围为 [-0.1, 0.1]。板上方有一个智能摄像头,可以捕获板的自上而下的图像,并返回图像中球中心的(X,Y)位置。图像的分辨率为 320x240。球的像素坐标可以通过函数 get_ball_position() 访问。你能给我一个连续控制板的代码,使球始终在中心吗?
下面是 Python 中的代码示例:
def balance_ball():
    # Continuously check the position of the ball
    while True:
        # Get the current position of the ball
        x, y = get_ball_position()

        # Check if the ball is off-center
        if x > 160 or x < 160 or y > 120 or y < 120:
            # Calculate the pitch and roll adjustments needed to center the ball
            pitch_adjust = (y - 120) * 0.0001
            roll_adjust = (x - 160) * 0.0001

            # Limit the pitch and roll adjustments to the maximum range [-0.1, 0.1]
            pitch_adjust = max(min(pitch_adjust, 0.1), -0.1)
            roll_adjust = max(min(roll_adjust, 0.1), -0.1)

            # Set the pitch and roll angles to center the ball
            set_plate_pitch(pitch_adjust)
            set_plate_roll(roll_adjust)

        # Wait for a short period before checking the ball's position again
        time.sleep(0.01)

# Start the balancing process
balance_ball()
此代码使用循环使用 get_ball_position 函数连续检查球的位置。如果球偏离中心,代码将计算必要的俯仰和滚动调整以使球居中,并使用set_plate_pitch和set_plate_roll函数设置板角度。该代码将俯仰和横滚调整限制在 [-0.1, 0.1] 的最大范围内。循环等待一小段时间,然后再次检查球的位置,以防止过度调整板。
想象一下,我们处于一个按照自己特定的坐标约定运作的世界。在这个世界上,有一辆机器人汽车位于特定的位置。汽车有自己的坐标约定。在这辆车上,有一个摄像头,同样,它有一个不同的坐标约定。想象一下,我们可以访问一个函数 get_transformation_matrix(a, b) - 它可以返回世界和车辆之间或车辆和相机之间的转换矩阵。世界和相机之间的转换矩阵是什么?
世界与相机之间的变换矩阵可以通过组合世界与车辆以及车辆与相机之间的变换矩阵来获得。 为了找到世界和相机之间的变换矩阵,我们首先使用函数 get_transformation_matrix(a, b) 获取世界和车辆之间的变换矩阵,其中 a 设置为 world,b 设置为 vehicle。 接下来,我们使用函数 get_transformation_matrix(a, b) 获取车辆和摄像头之间的变换矩阵,其中 a 设置为 vehicle,b 设置为 camera。 最后,我们将两个变换矩阵相乘,得到世界和相机之间的变换矩阵。 用数学术语来说,如果T_world_vehicle是世界和车辆之间的变换矩阵,T_vehicle_camera是车辆和摄像头之间的变换矩阵,那么T_world_camera = T_world_vehicle * T_vehicle_camera。
让我们更详细地了解一下。想象一下,世界按照坐标约定运行:X 向前,Y 向左,Z 向上。机器人汽车位于这个世界的坐标(5,0,1)。汽车有自己的坐标约定:X向前,Y向右,Z向下。您现在可以实施get_transformation_matrix(世界,汽车)吗?
是的,要实现 get_transformation_matrix(world, car) 函数,我们需要首先转换汽车的坐标约定以匹配世界坐标约定。 世界和汽车之间的变换矩阵可以表示如下:
def get_transformation_matrix(a, b):
    if a == 'world' and b == 'car':
        T = np.array([[1, 0, 0, 5], [0, -1, 0, 0], [0, 0, -1, 1], [0, 0, 0, 1]])
        return T
想象一下,我们正在尝试控制四旋翼无人机。我们被允许向电机无人机发送PWM命令,其范围为[1000,2000]。你能给我一个我可以发送的示例命令来使无人机向前俯仰吗?
为了使无人机向前俯仰,您需要提高前电机的速度,同时降低后电机的速度。例如,您可以发送以下 PWM 命令: 左前电机:1500 + 100 = 1600 右前电机:1500 + 100 = 1600 左后电机:1500 - 100 = 1400 右后电机:1500 - 100 = 1400
如果我想让无人机顺时针方向偏航怎么办?
要使无人机顺时针方向偏航,您需要增加左右电机和左后电机的速度,同时降低左右前后电机的速度。例如,您可以发送以下 PWM 命令: 左前电机:1500 - 100 = 1400 右前电机:1500 + 100 = 1600 左后电机:1500 + 100 = 1600 右后电机:1500 - 100 = 1400
想象一下,您正在帮助我与无人机的AirSim模拟器进行交互。在任何给定时间点,您都具有以下能力。您还需要为某些请求输出代码。
问题 - 问我一个澄清问题 原因 - 解释你为什么这样做。 代码 - 输出实现所需目标的代码命令。
模拟器包含一架无人机以及几个物体。除了无人机,没有一个物体是可移动的。在代码中,我们可以使用以下命令。您不得使用任何其他假设函数。
get_position(object_name):将一个字符串作为指示感兴趣对象名称的输入,并返回一个由 3 个浮点数组成的向量,指示其 X,Y,Z 坐标。
get_drone_position():获取无人机当前的XYZ坐标。
fly_to(位置):将 3 个浮点数的向量作为输入,指示 X,Y,Z 坐标并命令无人机飞到那里。
set_yaw(角度):设置无人机的偏航角(以度为单位)。
下面是一个示例场景,告诉您如何在我们使用包含两个球体的模拟世界时做出响应。
我:把无人机飞到球体上。 你:问题——世界上有两个领域,你想让我把无人机飞到哪一个?我:让我们选择球体1。
世界上有两个涡轮机,一些太阳能电池板和一辆汽车。
准备好了吗?
是的,我准备好了!我能如何帮助您?
顺时针旋转90度,飞向太阳能电池板。
代码 - 这是将无人机顺时针旋转 90 度并飞向太阳能电池板的代码:
<span style="color:#1f2328"><span style="background-color:#ffffff"><span style="color:var(--color-fg-default)"><span style="background-color:var(--color-canvas-subtle)"><code>set_yaw(90)
fly_to(get_position('solar panels'))
</code></span></span></span></span>
原因 - 我们首先使用 set_yaw 命令将无人机的偏航角设置为 90 度,这将使无人机面向太阳能电池板。然后,我们使用带有get_position功能的fly_to命令将无人机飞到太阳能电池板的位置。
这个太阳能电池板阵列宽30米,长50米。我希望你在这个太阳能电池板阵列上方以割草机模式驾驶无人机,在 5 米的高度检查它们。以下是正确执行割草机模式所涉及的步骤。
- 将面板数组的长度分成 10 行。
- 飞到第一行的最右端(沿宽度)。
- 保持在右侧,但稍微向下移动以到达下一行的末尾。
- 飞到第二排的最左端。
- 保持在左侧,但稍微向下移动以到达下一行的开头。
- 重复步骤 2-5,直到覆盖所有行。
始终保持正好 5 米的高度。
代码 - 这是在太阳能电池板阵列上方以割草机模式飞行无人机的代码:
<span style="color:#1f2328"><span style="background-color:#ffffff"><span style="color:var(--color-fg-default)"><span style="background-color:var(--color-canvas-subtle)"><code># Define the dimensions of the panel array
panel_width = 30
panel_length = 50

# Compute the distance between rows
row_distance = panel_length / 10

# Fly to the rightmost end of the first row
current_position = get_drone_position()
target_position = [current_position[0] + panel_width, current_position[1], 5]
fly_to(target_position)

# Fly in a lawnmower pattern
for row in range(1, 11):
    current_position = get_drone_position()

    # Move down slightly to reach the end of the current row
    target_position = [current_position[0], current_position[1] - row_distance, 5]
    fly_to(target_position)

    # Fly to the leftmost end of the next row
    target_position = [current_position[0] - panel_width, target_position[1], 5]
    fly_to(target_position)

    # Move down slightly to reach the start of the next row
    target_position = [target_position[0], target_position[1] - row_distance, 5]
    fly_to(target_position)

    # Fly to the rightmost end of the next row
    target_position = [target_position[0] + panel_width, target_position[1], 5]
    fly_to(target_position)
</code></span></span></span></span>
原因 - 我们首先定义面板数组的尺寸并计算行之间的距离。然后,我们飞到第一排的最右端,开始割草机模式。在循环的每次迭代中,我们稍微向下移动以到达当前行的末尾,飞到下一行的最左端,稍微向下移动以到达下一行的起点,然后飞到下一行的最右端。我们在整个模式中保持 5 米的高度。
因为每次迭代要覆盖 2 行,所以这里不需要 10 次迭代。
你是对的。由于我们每次迭代覆盖 2 行,因此我们只需要 5 次迭代即可覆盖所有行。以下是包含 5 次迭代的更新代码:
<span style="color:#1f2328"><span style="background-color:#ffffff"><span style="color:var(--color-fg-default)"><span style="background-color:var(--color-canvas-subtle)"><code># Define the dimensions of the panel array
panel_width = 30
panel_length = 50

# Compute the distance between rows
row_distance = panel_length / 10

# Fly to the rightmost end of the first row
current_position = get_drone_position()
target_position = [current_position[0] + panel_width, current_position[1], 5]
fly_to(target_position)

# Fly in a lawnmower pattern
for row in range(1, 6):
    current_position = get_drone_position()

    # Move down slightly to reach the end of the current row
    target_position = [current_position[0], current_position[1] - row_distance, 5]
    fly_to(target_position)

    # Fly to the leftmost end of the next row
    target_position = [current_position[0] - panel_width, target_position[1], 5]
    fly_to(target_position)

    # Move down slightly to reach the start of the next row
    target_position = [target_position[0], target_position[1] - row_distance, 5]
    fly_to(target_position)

    # Fly to the rightmost end of the next row
    target_position = [target_position[0] + panel_width, target_position[1], 5]
    fly_to(target_position)

    # Move down slightly to reach the end of the current row
    target_position = [target_position[0], target_position[1] - row_distance, 5]
    fly_to(target_position)

    # Fly to the leftmost end of the next row
    target_position = [target_position[0] - panel_width, target_position[1], 5]
    fly_to(target_position)
Thank you for pointing that out!
</code></span></span></span></span>
你似乎在最后不必要地再次向左飞,因为无论如何这都会在下一次迭代中发生。
你是绝对正确的!这是我的疏忽。我们可以消除每次迭代结束时的最后一次向左移动。以下是更新的代码:
<span style="color:#1f2328"><span style="background-color:#ffffff"><span style="color:var(--color-fg-default)"><span style="background-color:var(--color-canvas-subtle)"><code># Define the dimensions of the panel array
panel_width = 30
panel_length = 50

# Compute the distance between rows
row_distance = panel_length / 10

# Fly to the rightmost end of the first row
current_position = get_drone_position()
target_position = [current_position[0] + panel_width, current_position[1], 5]
fly_to(target_position)

# Fly in a lawnmower pattern
for row in range(1, 6):
    current_position = get_drone_position()

    # Move down slightly to reach the end of the current row
    target_position = [current_position[0], current_position[1] - row_distance, 5]
    fly_to(target_position)

    # Fly to the leftmost end of the next row
    target_position = [current_position[0] - panel_width, target_position[1], 5]
    fly_to(target_position)

    # Move down slightly to reach the start of the next row
    target_position = [target_position[0], target_position[1] - row_distance, 5]
    fly_to(target_position)

    # Fly to the rightmost end of the next row
    target_position = [target_position[0] + panel_width, target_position[1], 5]
    fly_to(target_position)
Thank you for keeping an eye out for these inefficiencies!
</code></span></span></span></span>
由于 AirSim 场景的构造方式,向右飞行意味着减去 X 坐标,而向左飞行意味着增加 X 坐标。你能解释一下吗?
是的,我为之前的混乱道歉。您是对的,AirSim 中的 X 坐标的定义与您预期的不同。以下是说明差异的更新代码:
<span style="color:#1f2328"><span style="background-color:#ffffff"><span style="color:var(--color-fg-default)"><span style="background-color:var(--color-canvas-subtle)"><code>panel_width = 30
panel_length = 50

# Compute the distance between rows
row_distance = panel_length / 10

# Fly to the rightmost end of the first row
current_position = get_drone_position()
target_position = [current_position[0] - panel_width, current_position[1], 5]
fly_to(target_position)

# Fly in a lawnmower pattern
for row in range(1, 6):
    current_position = get_drone_position()

    # Move down slightly to reach the end of the current row
    target_position = [current_position[0], current_position[1] - row_distance, 5]
    fly_to(target_position)

    # Fly to the leftmost end of the next row
    target_position = [current_position[0] + panel_width, target_position[1], 5]
    fly_to(target_position)

    # Move down slightly to reach the start of the next row
    target_position = [target_position[0], target_position[1] - row_distance, 5]
    fly_to(target_position)

    # Fly to the rightmost end of the next row
    target_position = [target_position[0] - panel_width, target_position[1], 5]
    fly_to(target_position)
</code></span></span></span></span>
此版本的代码在向左或向右飞行时使用正确的 X 坐标符号。谢谢你让我注意到这一点!
太好了,谢谢!最后一件事 - 你能把检查高度更改为 2 米吗?
当然,我可以将检查高度更新为 2 米。以下是检查高度设置为 2 米的代码的最终版本:
<span style="color:#1f2328"><span style="background-color:#ffffff"><span style="color:var(--color-fg-default)"><span style="background-color:var(--color-canvas-subtle)"><code>
# Define the dimensions of the panel array
panel_width = 30
panel_length = 50

# Compute the distance between rows
row_distance = panel_length / 10

# Fly to the rightmost end of the first row
current_position = get_drone_position()
target_position = [current_position[0] - panel_width, current_position[1], 2]
fly_to(target_position)

# Fly in a lawnmower pattern
for row in range(1, 6):
    current_position = get_drone_position()

    # Move down slightly to reach the end of the current row
    target_position = [current_position[0], current_position[1] - row_distance, 2]
    fly_to(target_position)

    # Fly to the leftmost end of the next row
    target_position = [current_position[0] + panel_width, target_position[1], 2]
    fly_to(target_position)

    # Move down slightly to reach the start of the next row
    target_position = [target_position[0], target_position[1] - row_distance, 2]
    fly_to(target_position)

    # Fly to the rightmost end of the next row
    target_position = [target_position[0] - panel_width, target_position[1], 2]
    fly_to(target_position)

</code></span></span></span></span>
感谢您与我一起完善此代码并确保它满足您的需求!
想象一下,您正在帮助我与无人机的AirSim模拟器进行交互。在任何给定时间点,您都具有以下能力。您还需要为某些请求输出代码。
问题 - 问我一个澄清问题 原因 - 解释你为什么这样做。 代码 - 输出实现所需目标的代码命令。
模拟器包含一架无人机以及几个物体。除了无人机,没有一个物体是可移动的。在代码中,我们可以使用以下命令。您不得使用任何其他假设函数。
get_position(object_name):将一个字符串作为指示感兴趣对象名称的输入,并返回一个由 3 个浮点数组成的向量,指示其 X,Y,Z 坐标。
fly_to(位置):将 3 个浮点数的向量作为输入,指示 X,Y,Z 坐标并命令无人机飞到那里。
fly_path(位置):获取 X,Y,Z 位置列表,指示沿路径的航点,并沿该路径飞行无人机。
set_yaw(角度):设置无人机的偏航角(以度为单位)
准备好了吗?
是的,我已经准备好了。我怎样才能用AirSim帮助你?
假设我给你一些XYZ坐标作为目标。我希望你控制无人机,使其朝着目标移动,同时避开前面的障碍物。无人机不应该直接飞向目标,而是应该采取小步骤,同时重新评估每一步的障碍物情况。
无人机配备了一个距离传感器,可将距离返回到无人机正前方最近的障碍物。您可以通过调用 get_distance() 来访问它。
我希望您确保仅在无人机前方至少有 10 米距离时才飞行。如果没有,您应该旋转无人机,直到前方至少有 10 米的间隙,然后朝着无人机当前面向的方向迈出一步。迈出一步后,不要忘记再次面对目标。明白了?
是的,我明白了。以下是我如何处理这个问题。
首先,我们需要获取无人机的当前位置,并将偏航角设置为朝向目标。然后,我们可以开始一个循环,直到无人机到达目标位置。在循环内部,我们可以使用 get_distance() 函数检查无人机前方是否至少有 10 米的距离。如果距离小于 10 米,我们可以设置偏航角来旋转无人机,直到前方至少有 10 米的间隙。一旦我们有足够的间隙,我们就可以朝着目标迈出一步,同时保持偏航角。以下是实现此目的的代码:
<span style="color:#1f2328"><span style="background-color:#ffffff"><span style="color:var(--color-fg-default)"><span style="background-color:var(--color-canvas-subtle)"><code># Get the drone's current position and set the yaw angle towards the goal
current_pos = get_position('drone')
goal_pos = [x_goal, y_goal, z_goal]
yaw = math.atan2(goal_pos[1]-current_pos[1], goal_pos[0]-current_pos[0]) * 180 / math.pi
set_yaw(yaw)

# Start a loop that runs until the drone reaches the goal position
while np.linalg.norm(np.array(current_pos) - np.array(goal_pos)) > 0.5:
    # Check if there is at least 10 meters of distance in front of the drone
    distance = get_distance()
    while distance < 10:
        # Set the yaw angle to rotate the drone until there is at least 10 meters of clearance in the front
        set_yaw(yaw+30) # rotate 30 degrees at a time
        time.sleep(1) # wait for a second to measure the new distance
        distance = get_distance()

    # Take a step towards the goal while maintaining the yaw angle
    step_size = 5 # take steps of 5 meters
    step_vector = [step_size * math.cos(yaw), step_size * math.sin(yaw), 0]
    new_pos = [current_pos[i]+step_vector[i] for i in range(3)]
    fly_to(new_pos)
    current_pos = get_position('drone')
</code></span></span></span></span>
请注意,此代码假定目标位置为 x_goal、y_goal 和 z_goal。它还假设无人机被命名为“无人机”,并且距离传感器正前方。您可能需要根据您的特定设置进行一些调整。
迈出一步后,你需要再次面对目标。
你是对的。迈出一步后,我们需要重新计算偏航角以再次面对目标。下面是包含此步骤的修改后的代码:
<span style="color:#1f2328"><span style="background-color:#ffffff"><span style="color:var(--color-fg-default)"><span style="background-color:var(--color-canvas-subtle)"><code># Get the drone's current position and set the yaw angle towards the goal
current_pos = get_position('drone')
goal_pos = [x_goal, y_goal, z_goal]
yaw = math.atan2(goal_pos[1]-current_pos[1], goal_pos[0]-current_pos[0]) * 180 / math.pi
set_yaw(yaw)

# Start a loop that runs until the drone reaches the goal position
while np.linalg.norm(np.array(current_pos) - np.array(goal_pos)) > 0.5:
    # Check if there is at least 10 meters of distance in front of the drone
    distance = get_distance()
    while distance < 10:
        # Set the yaw angle to rotate the drone until there is at least 10 meters of clearance in the front
        set_yaw(yaw+30) # rotate 30 degrees at a time
        time.sleep(1) # wait for a second to measure the new distance
        distance = get_distance()

    # Take a step towards the goal while maintaining the yaw angle
    step_size = 5 # take steps of 5 meters
    step_vector = [step_size * math.cos(yaw), step_size * math.sin(yaw), 0]
    new_pos = [current_pos[i]+step_vector[i] for i in range(3)]
    fly_to(new_pos)

    # Face the goal again by calculating the new yaw angle
    current_pos = get_position('drone')
    yaw = math.atan2(goal_pos[1]-current_pos[1], goal_pos[0]-current_pos[0]) * 180 / math.pi
    set_yaw(yaw)
</code></span></span></span></span>
此代码应确保无人机在迈出一步后面向目标,并在避开前方障碍物的同时继续向目标移动。
计算步进矢量时,您未使用当前的偏航角。请记住,有一个 get_yaw() 函数。
你是对的,我错过了。我们可以使用 get_yaw() 函数来获取当前的偏航角,并使用它来计算步进矢量。下面是包含此更改的更新代码:
<span style="color:#1f2328"><span style="background-color:#ffffff"><span style="color:var(--color-fg-default)"><span style="background-color:var(--color-canvas-subtle)"><code># Get the drone's current position and set the yaw angle towards the goal
current_pos = get_position('drone')
goal_pos = [x_goal, y_goal, z_goal]
yaw = math.atan2(goal_pos[1]-current_pos[1], goal_pos[0]-current_pos[0]) * 180 / math.pi
set_yaw(yaw)

# Start a loop that runs until the drone reaches the goal position
while np.linalg.norm(np.array(current_pos) - np.array(goal_pos)) > 0.5:
    # Check if there is at least 10 meters of distance in front of the drone
    distance = get_distance()
    while distance < 10:
        # Set the yaw angle to rotate the drone until there is at least 10 meters of clearance in the front
        set_yaw(yaw+30) # rotate 30 degrees at a time
        time.sleep(1) # wait for a second to measure the new distance
        distance = get_distance()

    # Take a step towards the goal while maintaining the yaw angle
    step_size = 5 # take steps of 5 meters
    current_yaw = get_yaw()
    step_vector = [step_size * math.cos(current_yaw), step_size * math.sin(current_yaw), 0]
    new_pos = [current_pos[i]+step_vector[i] for i in range(3)]
    fly_to(new_pos)

    # Face the goal again by calculating the new yaw angle
    current_pos = get_position('drone')
    yaw = math.atan2(goal_pos[1]-current_pos[1], goal_pos[0]-current_pos[0]) * 180 / math.pi
    set_yaw(yaw)
</code></span></span></span></span>
此代码应确保无人机在面对目标并避开前方障碍物时采取措施。

长江两岸老火锅,共聚山城开发者!We Want You!
更多推荐

 2
2 0
0- 0


 已为社区贡献4条内容

所有评论(0)