
android 13 WMS/AMS系统开发-窗口层级相关DisplayArea,WindowContainer第二节
接着上一节课学习,我们已经清楚的知道了层级结构应该怎么看,根据dumpsys的输出可以完美复原出层级结构树,也理解了结构树对于层级结构的控制作用。但还没有从源码部分对这个结构树进行一个分析,即分析生成这个结构树的源码部分。
接着上一节课学习,我们已经清楚的知道了层级结构应该怎么看,根据dumpsys的输出可以完美复原出层级结构树,也理解了结构树对于层级结构的控制作用。但还没有从源码部分对这个结构树进行一个分析,即分析生成这个结构树的源码部分。
1、DisplayContent中启动层级树的构建
    /**
     * Create new {@link DisplayContent} instance, add itself to the root window container and
     * initialize direct children.
     * @param display May not be null.
     * @param root {@link RootWindowContainer}
     */
    DisplayContent(Display display, RootWindowContainer root) {
        super(root.mWindowManager, "DisplayContent", FEATURE_ROOT);

    //ignore
    //实际调用这里surface相关图层配置,因为显示东西都需要Surfaceflinger
        configureSurfaces(pendingTransaction);
    //ignore
    }
    private void configureSurfaces(Transaction transaction) {
     //ignore

        if (mDisplayAreaPolicy == null) {
            // Setup the policy and build the display area hierarchy.
            // Build the hierarchy only after creating the surface so it is reparented correctly
            //实际调用这里进行DisplayArea构建
            mDisplayAreaPolicy = mWmService.getDisplayAreaPolicyProvider().instantiate(
                    mWmService, this /* content */, this /* root */,
                    mImeWindowsContainer);
        }
//ignore
    }
结下来调用是实现类DefaultProvider的instantiate
frameworks/base/services/core/java/com/android/server/wm/DisplayAreaPolicy.java
 public DisplayAreaPolicy instantiate(WindowManagerService wmService,
                DisplayContent content, RootDisplayArea root,
                DisplayArea.Tokens imeContainer) {
                //创建特殊的TaskDisplayArea,这里我们前面讲过它是专门来装Activity相关的容器
            final TaskDisplayArea defaultTaskDisplayArea = new TaskDisplayArea(content, wmService,
                    "DefaultTaskDisplayArea", FEATURE_DEFAULT_TASK_CONTAINER);
            final List<TaskDisplayArea> tdaList = new ArrayList<>();
            tdaList.add(defaultTaskDisplayArea);

            // Define the features that will be supported under the root of the whole logical
            // display. The policy will build the DisplayArea hierarchy based on this.
            final HierarchyBuilder rootHierarchy = new HierarchyBuilder(root);
            // Set the essential containers (even if the display doesn't support IME).
 //这里同时setImeContainer进行输入法直接容器设置
 rootHierarchy.setImeContainer(imeContainer).setTaskDisplayAreas(tdaList);
            if (content.isTrusted()) {//主屏幕肯定进入,也是构成层级关键
                // Only trusted display can have system decorations.
                configureTrustedHierarchyBuilder(rootHierarchy, wmService, content);
            }

             return new DisplayAreaPolicyBuilder().setRootHierarchy(rootHierarchy).build(wmService);
        }
上面可以看出主要有以下部分
1、构建HierarchyBuilder对象
2、准备TaskDisplayArea
3、准备好imeContainer
4、识别屏幕情况,进入configureTrustedHierarchyBuilder
5、配置完成进入build
先看configureTrustedHierarchyBuilder
private void configureTrustedHierarchyBuilder(HierarchyBuilder rootHierarchy,
                WindowManagerService wmService, DisplayContent content) {
            // WindowedMagnification should be on the top so that there is only one surface
            // to be magnified.
            rootHierarchy.addFeature(new Feature.Builder(wmService.mPolicy, "WindowedMagnification",
                    FEATURE_WINDOWED_MAGNIFICATION)
                    .upTo(TYPE_ACCESSIBILITY_MAGNIFICATION_OVERLAY)
                    .except(TYPE_ACCESSIBILITY_MAGNIFICATION_OVERLAY)
                    // Make the DA dimmable so that the magnify window also mirrors the dim layer.
                    .setNewDisplayAreaSupplier(DisplayArea.Dimmable::new)
                    .build());
            if (content.isDefaultDisplay) {
                // Only default display can have cutout.
                // See LocalDisplayAdapter.LocalDisplayDevice#getDisplayDeviceInfoLocked.
                rootHierarchy.addFeature(new Feature.Builder(wmService.mPolicy, "HideDisplayCutout",
                        FEATURE_HIDE_DISPLAY_CUTOUT)
                        .all()
                        .except(TYPE_NAVIGATION_BAR, TYPE_NAVIGATION_BAR_PANEL, TYPE_STATUS_BAR,
                                TYPE_NOTIFICATION_SHADE)
                        .build())
                        .addFeature(new Feature.Builder(wmService.mPolicy, "OneHanded",
                                FEATURE_ONE_HANDED)
                                .all()
                                .except(TYPE_NAVIGATION_BAR, TYPE_NAVIGATION_BAR_PANEL,
                                        TYPE_SECURE_SYSTEM_OVERLAY)
                                .build());
            }
            rootHierarchy
                    .addFeature(new Feature.Builder(wmService.mPolicy, "FullscreenMagnification",
                            FEATURE_FULLSCREEN_MAGNIFICATION)
                            .all()
                            .except(TYPE_ACCESSIBILITY_MAGNIFICATION_OVERLAY, TYPE_INPUT_METHOD,
                                    TYPE_INPUT_METHOD_DIALOG, TYPE_MAGNIFICATION_OVERLAY,
                                    TYPE_NAVIGATION_BAR, TYPE_NAVIGATION_BAR_PANEL)
                            .build())
                    .addFeature(new Feature.Builder(wmService.mPolicy, "ImePlaceholder",
                            FEATURE_IME_PLACEHOLDER)
                            .and(TYPE_INPUT_METHOD, TYPE_INPUT_METHOD_DIALOG)
                            .build());
        }
    }
看到这个大家是否觉得这些名字和dumpsys的很熟悉,对的其实就是这里设置的这些Feature名字
先来看Feature类:
    /**
     * A feature that requires {@link DisplayArea DisplayArea(s)}.
     */
    static class Feature {
        private final String mName;
        private final int mId;
        private final boolean[] mWindowLayers;
        private final NewDisplayAreaSupplier mNewDisplayAreaSupplier;

        private Feature(String name, int id, boolean[] windowLayers,
                NewDisplayAreaSupplier newDisplayAreaSupplier) {
            mName = name;
            mId = id;
            mWindowLayers = windowLayers;
            mNewDisplayAreaSupplier = newDisplayAreaSupplier;
        }
           //注意这里排除36层
     Feature build() {
                if (mExcludeRoundedCorner) {
                    // Always put the rounded corner layer to the top most layer.
                    mLayers[mPolicy.getMaxWindowLayer()] = false;
                }
                return new Feature(mName, mId, mLayers.clone(), mNewDisplayAreaSupplier);
            }
首先Feature代表的是DisplayArea的一个特征,可以根据Feature来对不同的DisplayArea进行划分。
mName:这个Feature的名字,如上面的“WindowedMagnification”,“HideDisplayCutout”之类的,后续DisplayArea层级结构建立起来后,每个DisplayArea的名字用的就是当前DisplayArea对应的那个Feature的名字。
mId:Feature的ID,如上面的FEATURE_WINDOWED_MAGNIFICATION和FEATURE_HIDE_DISPLAY_CUTOUT,虽说是Feature的ID,因为Feature又是DisplayArea的特征
mWindowLayers:代表了这个DisplayArea可以包含哪些层级对应的窗口,后续会分析到。
看看其中一个Feature:
   rootHierarchy.addFeature(new Feature.Builder(wmService.mPolicy, "WindowedMagnification",
                    FEATURE_WINDOWED_MAGNIFICATION)
                    .upTo(TYPE_ACCESSIBILITY_MAGNIFICATION_OVERLAY)
                    .except(TYPE_ACCESSIBILITY_MAGNIFICATION_OVERLAY)
                    // Make the DA dimmable so that the magnify window also mirrors the dim layer.
                    .setNewDisplayAreaSupplier(DisplayArea.Dimmable::new)
                    .build());
//typeInclusive代表一个windowType,一般可以通过windowType获取对应的windowLayer,获取方法layerFromType,upTo代表逻辑就是把层级范围到typeInclusive
  Builder upTo(int typeInclusive) {
                final int max = layerFromType(typeInclusive, false);
                for (int i = 0; i < max; i++) {
                    mLayers[i] = true;
                }
                set(typeInclusive, true);
                return this;
            }
  /**
             * Set that the feature does not apply to the given window types.
             */
             //简单说就是把人家types排除
            Builder except(int... types) {
                for (int i = 0; i < types.length; i++) {
                    int type = types[i];
                    set(type, false);
                }
                return this;
            }
            //留下types
             Builder and(int... types) {
                for (int i = 0; i < types.length; i++) {
                    int type = types[i];
                    set(type, true);
                }
                return this;
            }
             private int layerFromType(int type, boolean internalWindows) {
                return mPolicy.getWindowLayerFromTypeLw(type, internalWindows);
            }
这里调用了getWindowLayerFromTypeLw来实现窗口类型到层级数的转化:
 default int getWindowLayerFromTypeLw(int type, boolean canAddInternalSystemWindow,
            boolean roundedCornerOverlay) {
        // Always put the rounded corner layer to the top most.
        if (roundedCornerOverlay && canAddInternalSystemWindow) {
            return getMaxWindowLayer();
        }
        if (type >= FIRST_APPLICATION_WINDOW && type <= LAST_APPLICATION_WINDOW) {
            return APPLICATION_LAYER;
        }

        switch (type) {
            case TYPE_WALLPAPER:
                // wallpaper is at the bottom, though the window manager may move it.
                return  1;
            case TYPE_PRESENTATION:
            case TYPE_PRIVATE_PRESENTATION:
            case TYPE_DOCK_DIVIDER:
            case TYPE_QS_DIALOG:
            case TYPE_PHONE:
                return  3;
            case TYPE_SEARCH_BAR:
                return  4;
            case TYPE_INPUT_CONSUMER:
                return  5;
            case TYPE_SYSTEM_DIALOG:
                return  6;
            case TYPE_TOAST:
                // toasts and the plugged-in battery thing
                return  7;
            case TYPE_PRIORITY_PHONE:
                // SIM errors and unlock.  Not sure if this really should be in a high layer.
                return  8;
            case TYPE_SYSTEM_ALERT:
                // like the ANR / app crashed dialogs
                // Type is deprecated for non-system apps. For system apps, this type should be
                // in a higher layer than TYPE_APPLICATION_OVERLAY.
                return  canAddInternalSystemWindow ? 12 : 9;
            case TYPE_APPLICATION_OVERLAY:
                return  11;
            case TYPE_INPUT_METHOD:
                // on-screen keyboards and other such input method user interfaces go here.
                return  13;
            case TYPE_INPUT_METHOD_DIALOG:
                // on-screen keyboards and other such input method user interfaces go here.
                return  14;
            case TYPE_STATUS_BAR:
                return  15;
            case TYPE_STATUS_BAR_ADDITIONAL:
                return  16;
            case TYPE_NOTIFICATION_SHADE:
                return  17;
            case TYPE_STATUS_BAR_SUB_PANEL:
                return  18;
            case TYPE_KEYGUARD_DIALOG:
                return  19;
            case TYPE_VOICE_INTERACTION_STARTING:
                return  20;
            case TYPE_VOICE_INTERACTION:
                // voice interaction layer should show above the lock screen.
                return  21;
            case TYPE_VOLUME_OVERLAY:
                // the on-screen volume indicator and controller shown when the user
                // changes the device volume
                return  22;
            case TYPE_SYSTEM_OVERLAY:
                // the on-screen volume indicator and controller shown when the user
                // changes the device volume
                return  canAddInternalSystemWindow ? 23 : 10;
            case TYPE_NAVIGATION_BAR:
                // the navigation bar, if available, shows atop most things
                return  24;
            case TYPE_NAVIGATION_BAR_PANEL:
                // some panels (e.g. search) need to show on top of the navigation bar
                return  25;
            case TYPE_SCREENSHOT:
                // screenshot selection layer shouldn't go above system error, but it should cover
                // navigation bars at the very least.
                return  26;
            case TYPE_SYSTEM_ERROR:
                // system-level error dialogs
                return  canAddInternalSystemWindow ? 27 : 9;
            case TYPE_MAGNIFICATION_OVERLAY:
                // used to highlight the magnified portion of a display
                return  28;
            case TYPE_DISPLAY_OVERLAY:
                // used to simulate secondary display devices
                return  29;
            case TYPE_DRAG:
                // the drag layer: input for drag-and-drop is associated with this window,
                // which sits above all other focusable windows
                return  30;
            case TYPE_ACCESSIBILITY_OVERLAY:
                // overlay put by accessibility services to intercept user interaction
                return  31;
            case TYPE_ACCESSIBILITY_MAGNIFICATION_OVERLAY:
                return 32;
            case TYPE_SECURE_SYSTEM_OVERLAY:
                return  33;
            case TYPE_BOOT_PROGRESS:
                return  34;
            case TYPE_POINTER:
                // the (mouse) pointer layer
                return  35;
            default:
                Slog.e("WindowManager", "Unknown window type: " + type);
                return 3;
        }
    }
看到上面是不是看到和我们熟悉的窗口类型,如TYPE_WALLPAPER,TYPE_NAVIGATION_BAR等,其实他们都是有固定的一个层级的。即windowType的值并不是真正层级数目,都是需要通过这个方法进行转化才是真正层级数
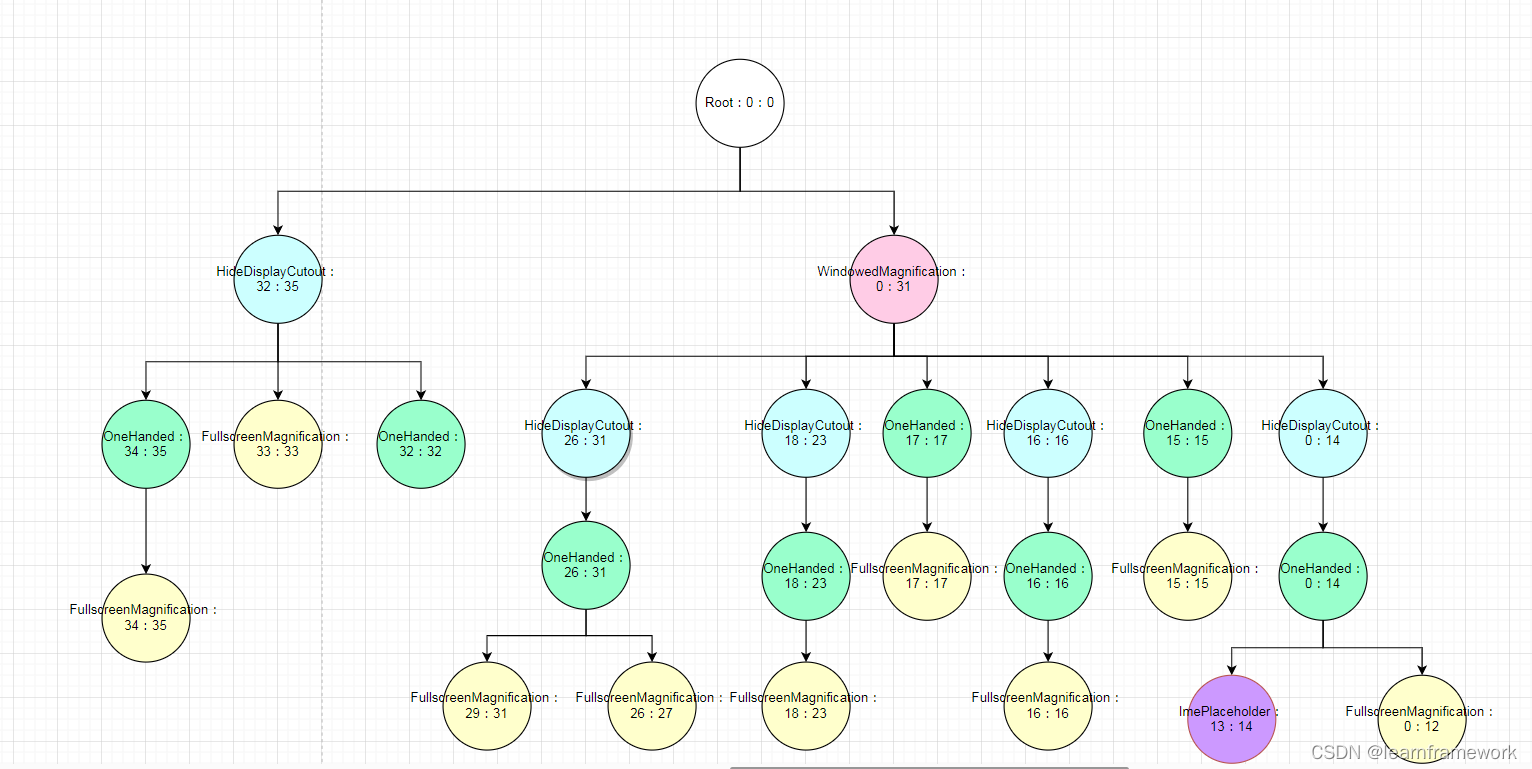
那么我们再回到addFeature部分,通过以上的层级获取及相关upTo方法后我们可以得出各个Feature的一个层级情况
Feature名字 层级情况
WindowedMagnification 0-31
HideDisplayCutout 0-14 16 18-23 26-35
OneHanded 0-23 26-32 34-35
FullscreenMagnification 0-12 15-23 26-27 29-31 33-35
ImePlaceholder 13-14
也就是每个Feature对应层级已经清楚了
再接下来就要进入正式的树构建了
frameworks/base/services/core/java/com/android/server/wm/DisplayAreaPolicyBuilder.java
Result build(WindowManagerService wmService) {
        validate();

        // Attach DA group roots to screen hierarchy before adding windows to group hierarchies.
        mRootHierarchyBuilder.build(mDisplayAreaGroupHierarchyBuilders);//关键的进行build
       //ignore
        return new Result(wmService, mRootHierarchyBuilder.mRoot, displayAreaGroupRoots,
                mSelectRootForWindowFunc, mSelectTaskDisplayAreaFunc);
    }
来看看build方法:
 /**
         * Builds the {@link DisplayArea} hierarchy below root. And adds the roots of those
         * {@link HierarchyBuilder} as children.
         */
        private void build(@Nullable List<HierarchyBuilder> displayAreaGroupHierarchyBuilders) {
//ignore
            PendingArea[] areaForLayer = new PendingArea[maxWindowLayerCount];
            //搞默认的PendingArea作为root部分
            final PendingArea root = new PendingArea(null, 0, null);
            //给areaForLayer填满都是默认new PendingArea(null, 0, null);
            Arrays.fill(areaForLayer, root);
		       //创建features相关的树
            // Create DisplayAreas to cover all defined features.
            final int size = mFeatures.size();
            for (int i = 0; i < size; i++) {
                // Traverse the features with the order they are defined, so that the early defined
                // feature will be on the top in the hierarchy.
                final Feature feature = mFeatures.get(i);
                PendingArea featureArea = null;
                for (int layer = 0; layer < maxWindowLayerCount; layer++) {
                    if (feature.mWindowLayers[layer]) {
                        // This feature will be applied to this window layer.
                        //
                        // We need to find a DisplayArea for it:
                        // We can reuse the existing one if it was created for this feature for the
                        // previous layer AND the last feature that applied to the previous layer is
                        // the same as the feature that applied to the current layer (so they are ok
                        // to share the same parent DisplayArea).
                        if (featureArea == null || featureArea.mParent != areaForLayer[layer]) {
                            // No suitable DisplayArea:
                            // Create a new one under the previous area (as parent) for this layer.
                            featureArea = new PendingArea(feature, layer, areaForLayer[layer]);
                            areaForLayer[layer].mChildren.add(featureArea);
                        }
                        areaForLayer[layer] = featureArea;
                    } else {
                        // This feature won't be applied to this window layer. If it needs to be
                        // applied to the next layer, we will need to create a new DisplayArea for
                        // that.
                        featureArea = null;
                    }
                }
            }
					//创建叶子相关
            // Create Tokens as leaf for every layer.
            PendingArea leafArea = null;
            int leafType = LEAF_TYPE_TOKENS;
            for (int layer = 0; layer < maxWindowLayerCount; layer++) {
                int type = typeOfLayer(policy, layer);
                // Check whether we can reuse the same Tokens with the previous layer. This happens
                // if the previous layer is the same type as the current layer AND there is no
                // feature that applies to only one of them.
                if (leafArea == null || leafArea.mParent != areaForLayer[layer]
                        || type != leafType) {
                    // Create a new Tokens for this layer.
                    leafArea = new PendingArea(null /* feature */, layer, areaForLayer[layer]);
                    areaForLayer[layer].mChildren.add(leafArea);
                    leafType = type;
                    if (leafType == LEAF_TYPE_TASK_CONTAINERS) {
                        // We use the passed in TaskDisplayAreas for task container type of layer.
                        // Skip creating Tokens even if there is no TDA.
                        addTaskDisplayAreasToApplicationLayer(areaForLayer[layer]);
                        addDisplayAreaGroupsToApplicationLayer(areaForLayer[layer],
                                displayAreaGroupHierarchyBuilders);
                        leafArea.mSkipTokens = true;
                    } else if (leafType == LEAF_TYPE_IME_CONTAINERS) {
                        // We use the passed in ImeContainer for ime container type of layer.
                        // Skip creating Tokens even if there is no ime container.
                        leafArea.mExisting = mImeContainer;
                        leafArea.mSkipTokens = true;
                    }
                }
                leafArea.mMaxLayer = layer;
            }
            root.computeMaxLayer();//会计算出每个节点最大layer值

            // We built a tree of PendingAreas above with all the necessary info to represent the
            // hierarchy, now create and attach real DisplayAreas to the root.
            root.instantiateChildren(mRoot, displayAreaForLayer, 0, featureAreas);//这里会对把PendingArea生成DisplayArea

            // Notify the root that we have finished attaching all the DisplayAreas. Cache all the
            // feature related collections there for fast access.
            mRoot.onHierarchyBuilt(mFeatures, displayAreaForLayer, featureAreas);
        }
这里主要分两个部分,逻辑稍微难理解:
1、根据上面的几个Feature的配置来构造
 // Create DisplayAreas to cover all defined features.
            final int size = mFeatures.size();
            for (int i = 0; i < size; i++) {//针对5个Feature进行遍历,按照add先后顺序,意味最先add在最顶层
                // Traverse the features with the order they are defined, so that the early defined
                // feature will be on the top in the hierarchy.
                final Feature feature = mFeatures.get(i);
                PendingArea featureArea = null;
                for (int layer = 0; layer < maxWindowLayerCount; layer++) {
                    if (feature.mWindowLayers[layer]) {
                        // This feature will be applied to this window layer.
                        //
                        // We need to find a DisplayArea for it:
                        // We can reuse the existing one if it was created for this feature for the
                        // previous layer AND the last feature that applied to the previous layer is
                        // the same as the feature that applied to the current layer (so they are ok
                        // to share the same parent DisplayArea).
                        //条件1:如果featureArea为空,一般每个Feature第一次进入都为null
                        //条件2:如果featureArea不为空,featureArea的父节点不一样,即如果兄弟层级featureArea的父节点是同一个那就不需要新创建
                        if (featureArea == null || featureArea.mParent != areaForLayer[layer]) {
                            // No suitable DisplayArea:
                            // Create a new one under the previous area (as parent) for this layer.
                            featureArea = new PendingArea(feature, layer, areaForLayer[layer]);//以areaForLayer[layer]为父节点创建一个新的节点
                            areaForLayer[layer].mChildren.add(featureArea);//老容器节点添加新节点
                        }
                        areaForLayer[layer] = featureArea;//更新当前layer的容器节点变成新的PendingArea
                    } else {
                        // This feature won't be applied to this window layer. If it needs to be
                        // applied to the next layer, we will need to create a new DisplayArea for
                        // that.
                        //如果这一层不支持显示,那么就把featureArea设置为null
                        featureArea = null;
                    }
                }
            }
那么我们来一个个Feature进行分析进行树图绘制:
Feature名字 层级情况
WindowedMagnification 0-31
第一个Feature从0层就需要创建PeadingArea,父节点是Root:0:0,一直到31都是共用一个Parent

(注意这里其实还没有最大层级,因为还没有对最大层级进行计算,这个要到最后才会结算,这里为了方便写的)
HideDisplayCutout 0-14 16 18-23 26-35
到达第二个Feature开始从0时候肯定新建一个PendingArea,他的0-31层,父节点就会变成WindowedMagnification:0:31
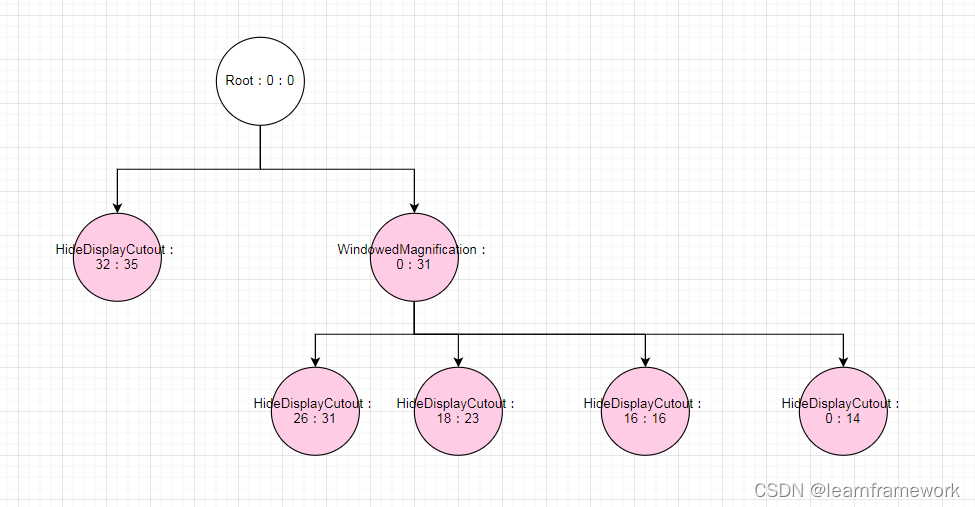
因为32-35层上一个Feature并没有覆盖
OneHanded 0-23 26-32 34-35
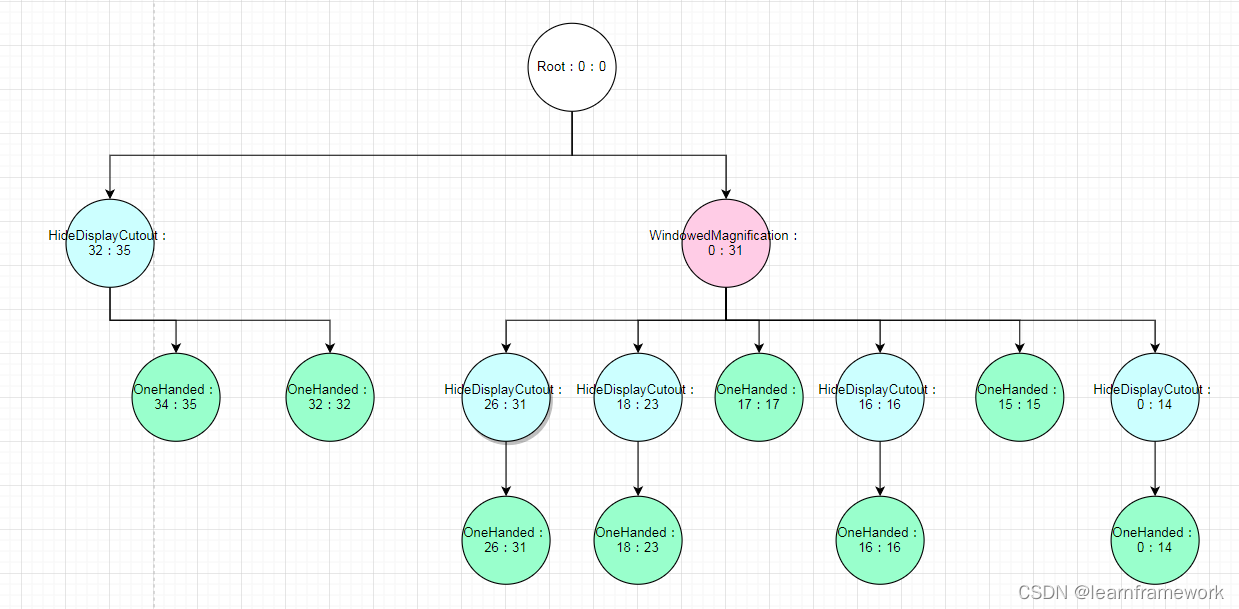
FullscreenMagnification 0-12 15-23 26-27 29-31 33-35
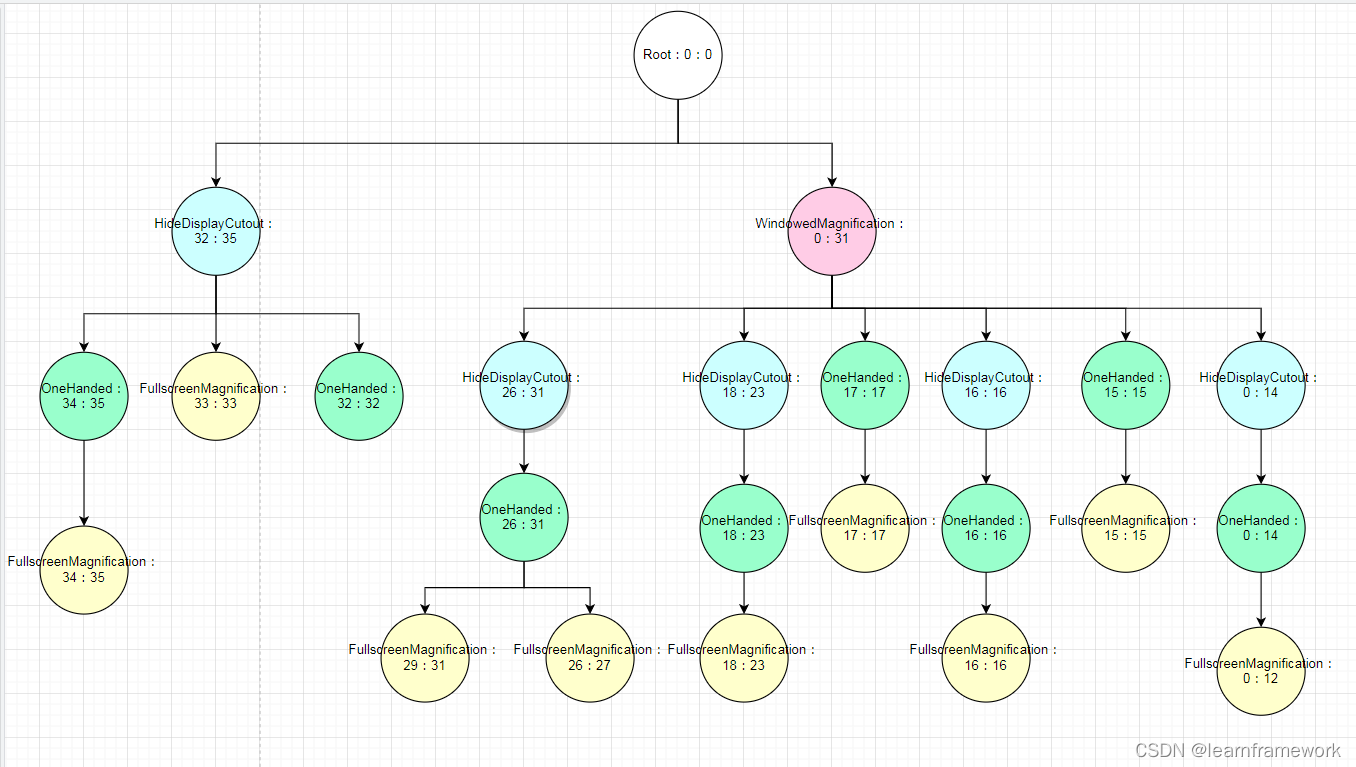
ImePlaceholder 13-14
2、Feature构造完成也要对应的一些特殊的进行配置,除了TaskDisplayArea和ImeContainer特殊外,其他的给每个后面都给个Tokens
这个部分较为简单一些,基于上面已经根据Feature构建的树统一需要加上一个Tokens节点,但是要除去TaskDisplayArea和ImeContainer的两个部分
 // Create Tokens as leaf for every layer.
            PendingArea leafArea = null;
            int leafType = LEAF_TYPE_TOKENS;//统一初始中为LEAF_TYPE_TOKENS
            for (int layer = 0; layer < maxWindowLayerCount; layer++) {//遍历36层
                int type = typeOfLayer(policy, layer);//获取每层的type是什么
                // Check whether we can reuse the same Tokens with the previous layer. This happens
                // if the previous layer is the same type as the current layer AND there is no
                // feature that applies to only one of them.
                //条件1针对leafArea空,或者leafArea本身不和这个layer共用一个父节点
                //条件2针对属于TYPE_INPUT_METHOD  APPLICATION_LAYER特殊处理
                if (leafArea == null || leafArea.mParent != areaForLayer[layer]
                        || type != leafType) {
                    // Create a new Tokens for this layer.
                    //以下代码相应想给每一层都挂载一个PendingArea
                    leafArea = new PendingArea(null /* feature */, layer, areaForLayer[layer]);//创建新的PendingArea,并挂载到areaForLayer[layer]下面
                    areaForLayer[layer].mChildren.add(leafArea);
                    leafType = type;
                    if (leafType == LEAF_TYPE_TASK_CONTAINERS) {
                    //APPLICATION_LAYER单独处理,就是前面设置过的TaskDisplayArea
                        // We use the passed in TaskDisplayAreas for task container type of layer.
                        // Skip creating Tokens even if there is no TDA.
                        addTaskDisplayAreasToApplicationLayer(areaForLayer[layer]);//设置本身已经设置过的TaskDisplayArea单独处理
                        addDisplayAreaGroupsToApplicationLayer(areaForLayer[layer],
                                displayAreaGroupHierarchyBuilders);
                        leafArea.mSkipTokens = true;//设置跳过
                    } else if (leafType == LEAF_TYPE_IME_CONTAINERS) {
                        // We use the passed in ImeContainer for ime container type of layer.
                        // Skip creating Tokens even if there is no ime container.
                        leafArea.mExisting = mImeContainer;//设置本身已经设置过的mImeContainer
                        leafArea.mSkipTokens = true;//设置跳过
                    }
                }
                leafArea.mMaxLayer = layer;
            }
            //根据层级获取type,这里只对特殊的APPLICATION_LAYER和TYPE_INPUT_METHOD有特殊,其他都是LEAF_TYPE_TOKENS
            private static int typeOfLayer(WindowManagerPolicy policy, int layer) {
              if (layer == APPLICATION_LAYER) {
                  return LEAF_TYPE_TASK_CONTAINERS;
              } else if (layer == policy.getWindowLayerFromTypeLw(TYPE_INPUT_METHOD)
                      || layer == policy.getWindowLayerFromTypeLw(TYPE_INPUT_METHOD_DIALOG)) {
                  return LEAF_TYPE_IME_CONTAINERS;
              } else {
                  return LEAF_TYPE_TOKENS;
              }
          }
           /** Adds all {@link TaskDisplayArea} to the application layer. */
          private void addTaskDisplayAreasToApplicationLayer(PendingArea parentPendingArea) {
              final int count = mTaskDisplayAreas.size();//这里一般等于1
              for (int i = 0; i < count; i++) {
                  PendingArea leafArea =
                          new PendingArea(null /* feature */, APPLICATION_LAYER, parentPendingArea);//创建新的APPLICATION_LAYER的PendingArea,并挂载到parentPendingArea下面
                  leafArea.mExisting = mTaskDisplayAreas.get(i);//和前面IME一样把容器设置进去
                  leafArea.mMaxLayer = APPLICATION_LAYER;//设置最大Layer
                  parentPendingArea.mChildren.add(leafArea);//添加为父节点的孩子
              }
          }
      }
上面代码执行完成后基本Pending树就构造完成,但这个时候还是PendingArea还不是真正DisplayArea,而且当前根节点只是个Root:0:0,根本不是我们DisplayContent,继续看build还剩下以下几步
 root.computeMaxLayer();//会计算出每个节点最大layer值

 // We built a tree of PendingAreas above with all the necessary info to represent the
 // hierarchy, now create and attach real DisplayAreas to the root.
 root.instantiateChildren(mRoot, displayAreaForLayer, 0, featureAreas);//这里会对把PendingArea生成DisplayArea,这里的参数mRoot就是我们的DisplayContent,root是Root:0:0这个PendingArea
这里重点看看 root.instantiateChildren(mRoot, displayAreaForLayer, 0, featureAreas);
  void instantiateChildren(DisplayArea<DisplayArea> parent, DisplayArea.Tokens[] areaForLayer,
912                  int level, Map<Feature, List<DisplayArea<WindowContainer>>> areas) {
913              mChildren.sort(Comparator.comparingInt(pendingArea -> pendingArea.mMinLayer));
914              for (int i = 0; i < mChildren.size(); i++) {
915                  final PendingArea child = mChildren.get(i);
916                  final DisplayArea area = child.createArea(parent, areaForLayer);
                     //这里可能create出来为null情况,比如前面说的ImeContainer,和DefaultTaskDisplayArea
917                  if (area == null) {
918                      // TaskDisplayArea and ImeContainer can be set at different hierarchy, so it can
919                      // be null.
920                      continue;
921                  }
922                  parent.addChild(area, WindowContainer.POSITION_TOP);//把返回的area设置为Child
923                  if (child.mFeature != null) {
924                      areas.get(child.mFeature).add(area);//同时也放入一下Feature集合
925                  }
926                  child.instantiateChildren(area, areaForLayer, level + 1, areas);//迭代子节点
927              }
928          }
929
930          @Nullable
931          private DisplayArea createArea(DisplayArea<DisplayArea> parent,
932                  DisplayArea.Tokens[] areaForLayer) {
933              if (mExisting != null) {//Ime和DefaultTaskDisplayArea可以进入,针对已经存在mExisting直接使用它返回
934                  if (mExisting.asTokens() != null) {//判断是否属于Tokens类型,其实就是ImeContainer
935                      // Store the WindowToken container for layers
936                      fillAreaForLayers(mExisting.asTokens(), areaForLayer);//给对应覆盖的层级都需要赋值为mExisting
937                  }
938                  return mExisting;//返回之前设置的
939              }
940              if (mSkipTokens) {//如果被设置了跳过的直接返回null
941                  return null;
942              }
943              DisplayArea.Type type;
944              if (mMinLayer > APPLICATION_LAYER) {
945                  type = DisplayArea.Type.ABOVE_TASKS;
946              } else if (mMaxLayer < APPLICATION_LAYER) {
947                  type = DisplayArea.Type.BELOW_TASKS;
948              } else {
949                  type = DisplayArea.Type.ANY;
950              }
951              if (mFeature == null) {
952                  final DisplayArea.Tokens leaf = new DisplayArea.Tokens(parent.mWmService, type,
953                          "Leaf:" + mMinLayer + ":" + mMaxLayer);//构造对应Tokens
954                  fillAreaForLayers(leaf, areaForLayer);//给对应覆盖的层级都需要赋值为leaf
955                  return leaf;
956              } else {
957                  return mFeature.mNewDisplayAreaSupplier.create(parent.mWmService, type,
958                          mFeature.mName + ":" + mMinLayer + ":" + mMaxLayer, mFeature.mId);//这里一般是构造对应DisplayArea
959              }
960          }
对于代码都给予了详细注释,这里就只做个总结:
1、根据窗口层级37层,每一层进行遍历,挂载一个新的叶子TOKENS节点,规则和前面Feature一样,如果同一个父亲则不需要新生成
2、针对TYPE_INPUT_METHOD APPLICATION_LAYER需要进行特殊处理
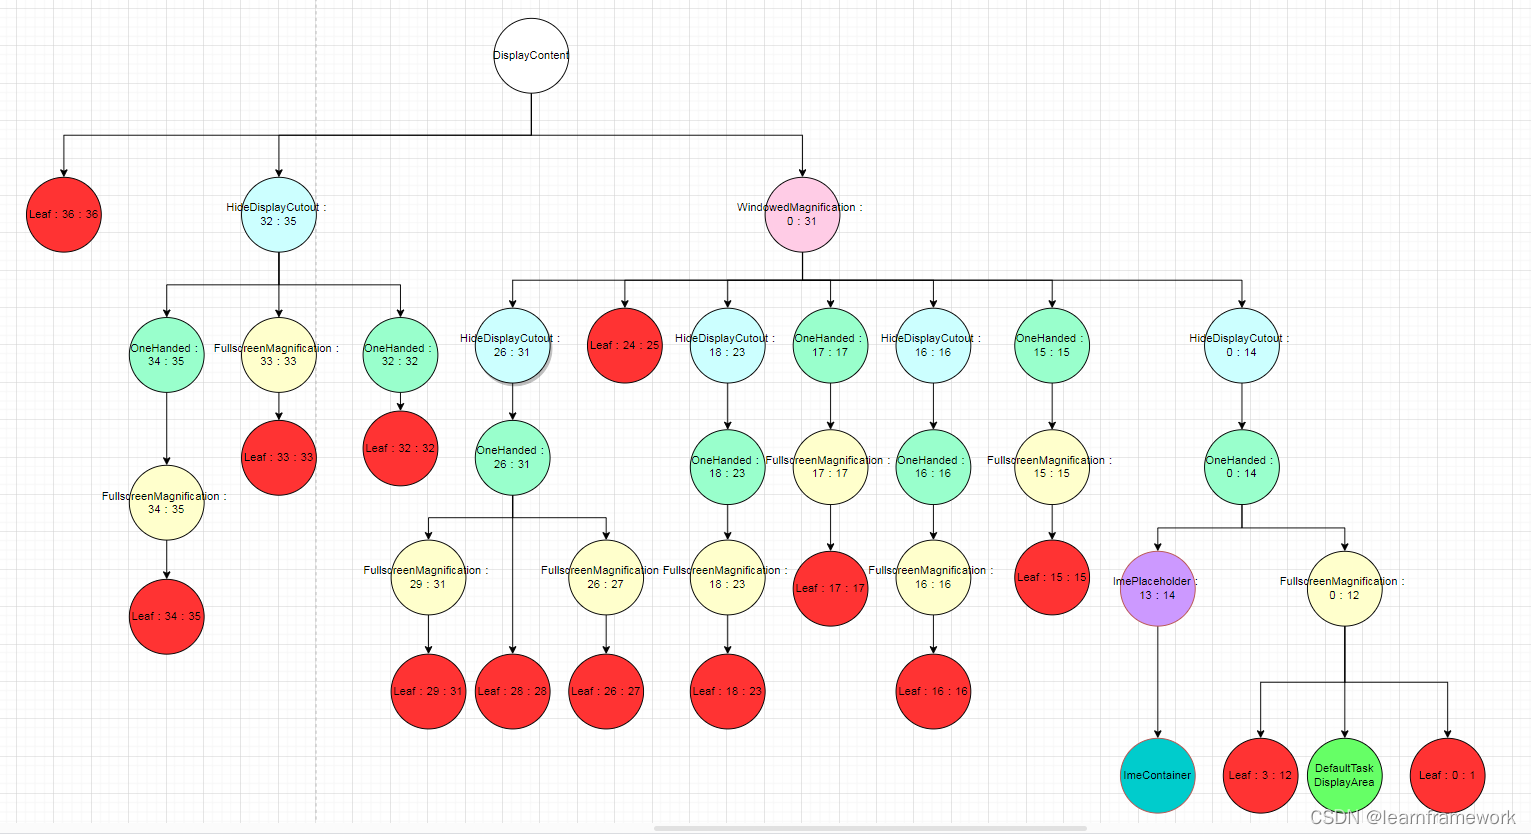
那么综上其实可以得出以下图(红色的Leaf就是新添加的,还有ImeContainer和DefaultTaskDisplayArea):

鸿蒙生态一站式服务平台。
更多推荐
 14
14 0
0- 0


 已为社区贡献4条内容

所有评论(0)