vue项目中通过js实现分页,模糊搜索,表格、文件的下载,时间戳格式转换,数据小数点保留两位,电话号码、手机号码、邮箱号,url地址的正则处理等方法,屏幕适配,axios拦截器!
前端通过js实现分页,模糊搜索,表格、文件的下载,时间戳格式转换,数据小数点保留两位,电话号码、手机号码、邮箱号,url地址的正则处理等方法,屏幕适配,axios拦截器
·
使用下列公共方法的操作步骤:
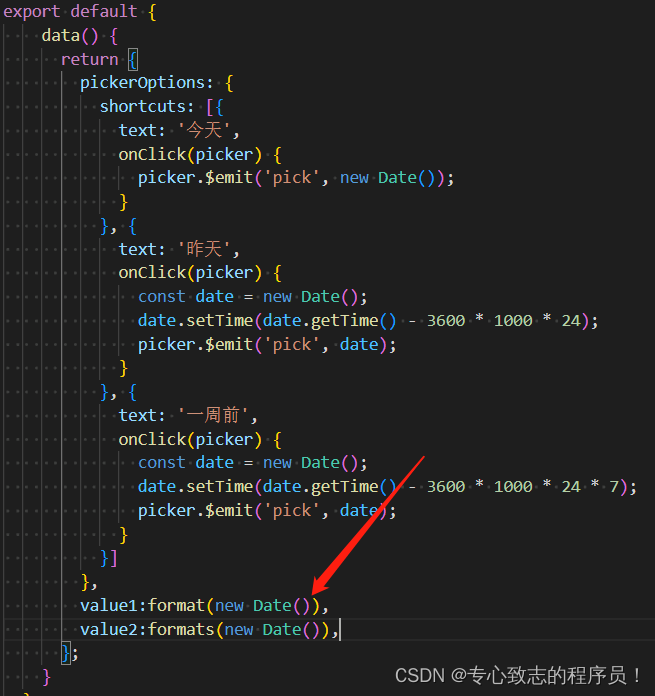
注意:下面我写的分页和模糊搜索方法只需在对应的页面文件直接使用,具体操作下面有截图,无需模仿我的举例,剩下的方法都可借鉴我的写法即可实现!
举例:
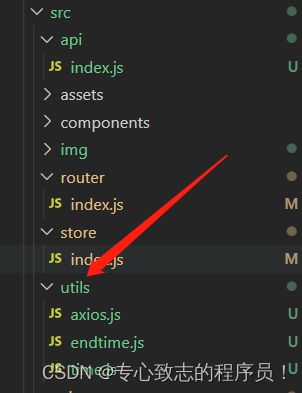
一、创建utils公共文件夹:
二、在公共文件夹下创建对应js:
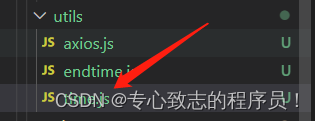
三、在对应文件夹放入对应的代码逻辑:
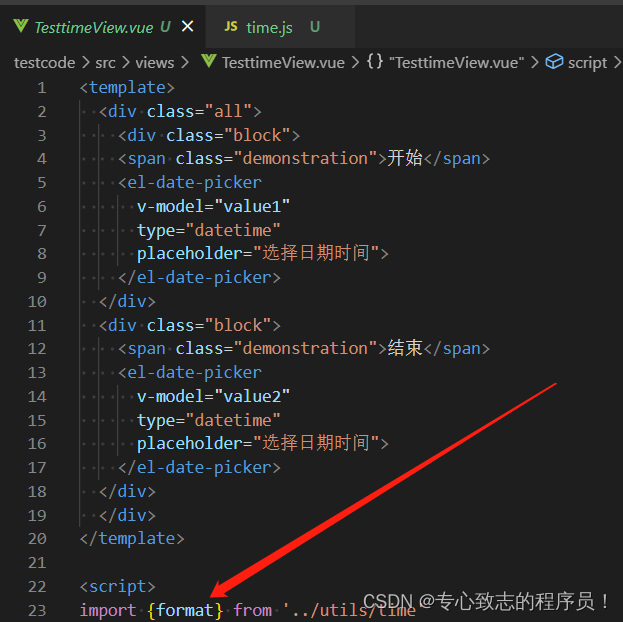
四、在需要用到此方法的页面引入对应js文件里的方法名:
五、在数据需要此方法改变的地方去使用引入的公共方法:
公共方法:
1、前端对后端接口返回总数据进行处理实现分页的功能:
这个是对后端返回的数据进行处理!
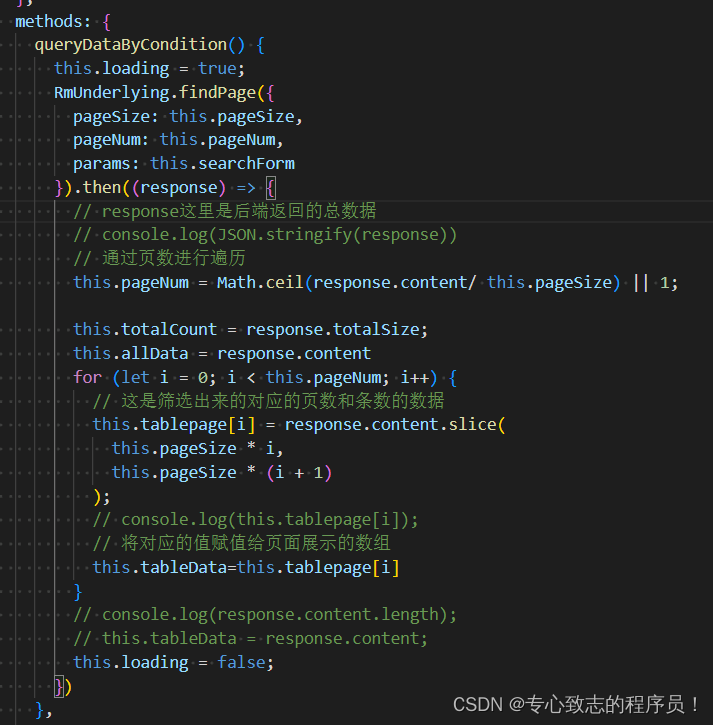
this.pageNum = Math.ceil(response.content/ this.pageSize) || 1;

        this.totalCount = response.totalSize;
        this.allData = response.content
        for (let i = 0; i < this.pageNum; i++) {
          // 这是筛选出来的对应的页数和条数的数据
          this.tablepage[i] = response.content.slice(
            this.pageSize * i,
            this.pageSize * (i + 1)
          );
          // console.log(this.tablepage[i]);
          // 将对应的值赋值给页面展示的数组
          this.tableData=this.tablepage[i]
        }
        // console.log(response.content.length);
        // this.tableData = response.content;
        this.loading = false;
这个是对输入指定页数跳转到总数据处理后对应的页数!
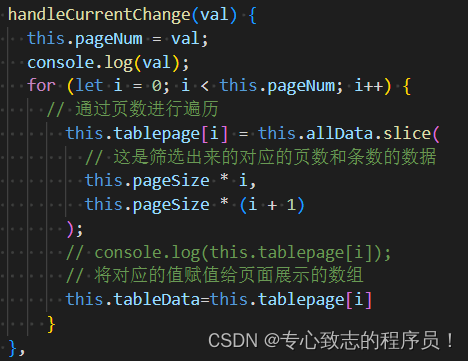
handleCurrentChange(val) {
      this.pageNum = val;
      console.log(val);
      for (let i = 0; i < this.pageNum; i++) {
        // 通过页数进行遍历
          this.tablepage[i] = this.allData.slice(
            // 这是筛选出来的对应的页数和条数的数据
            this.pageSize * i,
            this.pageSize * (i + 1)
          );
          // console.log(this.tablepage[i]);
          // 将对应的值赋值给页面展示的数组
          this.tableData=this.tablepage[i]
        }
    },
2、前端对后端返回总数据进行模糊处理实现模糊搜索功能:
这是对后端返回的数据进行模糊处理!
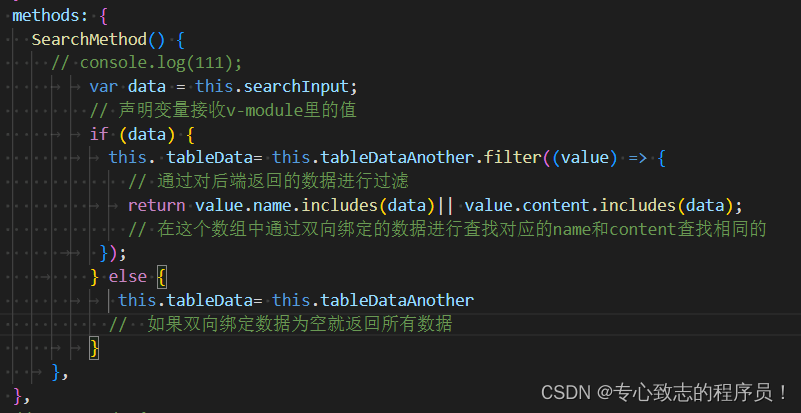
SearchMethod() {
      // console.log(111);
      		var data = this.searchInput;
          // 声明变量接收v-module里的值
      		if (data) {
        		this. tableData= this.tableDataAnother.filter((value) => {
              // 通过对后端返回的数据进行过滤
          		return value.name.includes(data)|| value.content.includes(data);
              // 在这个数组中通过双向绑定的数据进行查找对应的name和content查找相同的
       		 });
     	    } else {
        		 this.tableData= this.tableDataAnother
            //  如果双向绑定数据为空就返回所有数据
      		}
    	},
3、前端实现对后端返回文件流进行处理实现表格和文件的下载:
①表格的下载:
按照我的举例实现即可:
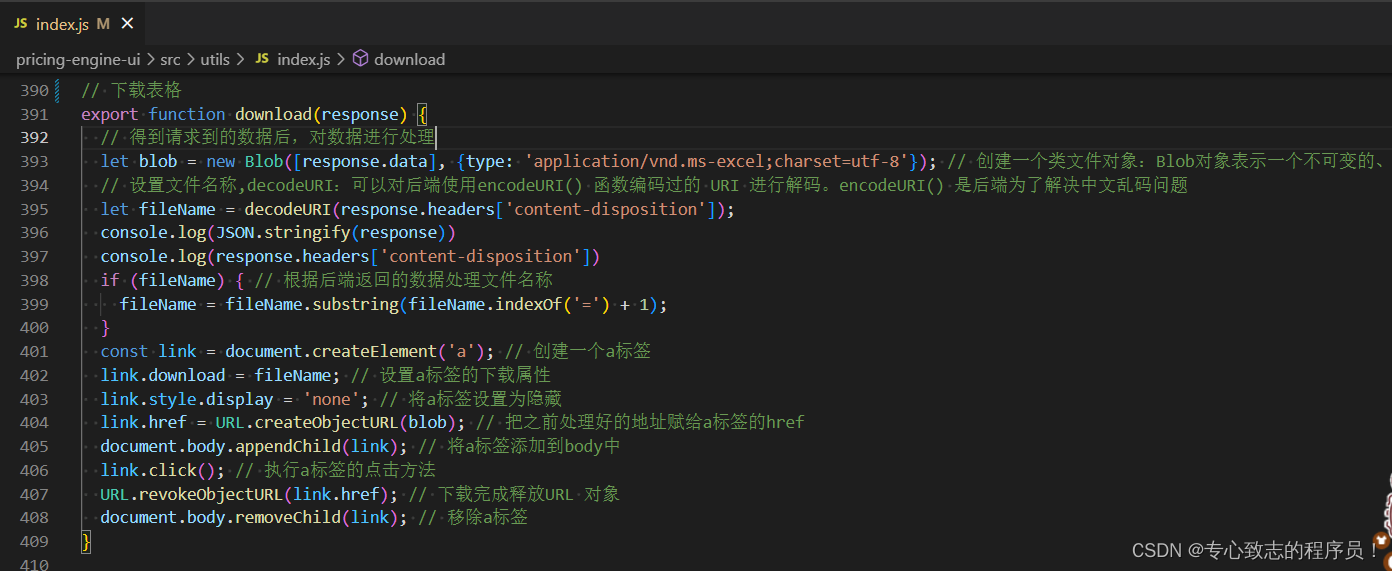
// 下载表格
export function download(response) {
  // 得到请求到的数据后,对数据进行处理
  let blob = new Blob([response.data], {type: 'application/vnd.ms-excel;charset=utf-8'}); // 创建一个类文件对象:Blob对象表示一个不可变的、原始数据的类文件对象
  // 设置文件名称,decodeURI:可以对后端使用encodeURI() 函数编码过的 URI 进行解码。encodeURI() 是后端为了解决中文乱码问题
  let fileName = decodeURI(response.headers['content-disposition']);
  console.log(JSON.stringify(response))
  console.log(response.headers['content-disposition'])
  if (fileName) { // 根据后端返回的数据处理文件名称
    fileName = fileName.substring(fileName.indexOf('=') + 1);
  }
  const link = document.createElement('a'); // 创建一个a标签
  link.download = fileName; // 设置a标签的下载属性
  link.style.display = 'none'; // 将a标签设置为隐藏
  link.href = URL.createObjectURL(blob); // 把之前处理好的地址赋给a标签的href
  document.body.appendChild(link); // 将a标签添加到body中
  link.click(); // 执行a标签的点击方法
  URL.revokeObjectURL(link.href); // 下载完成释放URL 对象
  document.body.removeChild(link); // 移除a标签
}
②文件实现下载:

// 下载文件
export function downloadFile(obj, name, suffix) {
const url = window.URL.createObjectURL(new Blob([obj]))
const link = document.createElement('a')
link.style.display = 'none'
link.href = url
const fileName = parseTime(new Date()) + '-' + name + '.' + suffix
link.setAttribute('download', fileName)
document.body.appendChild(link)
link.click()
document.body.removeChild(link)
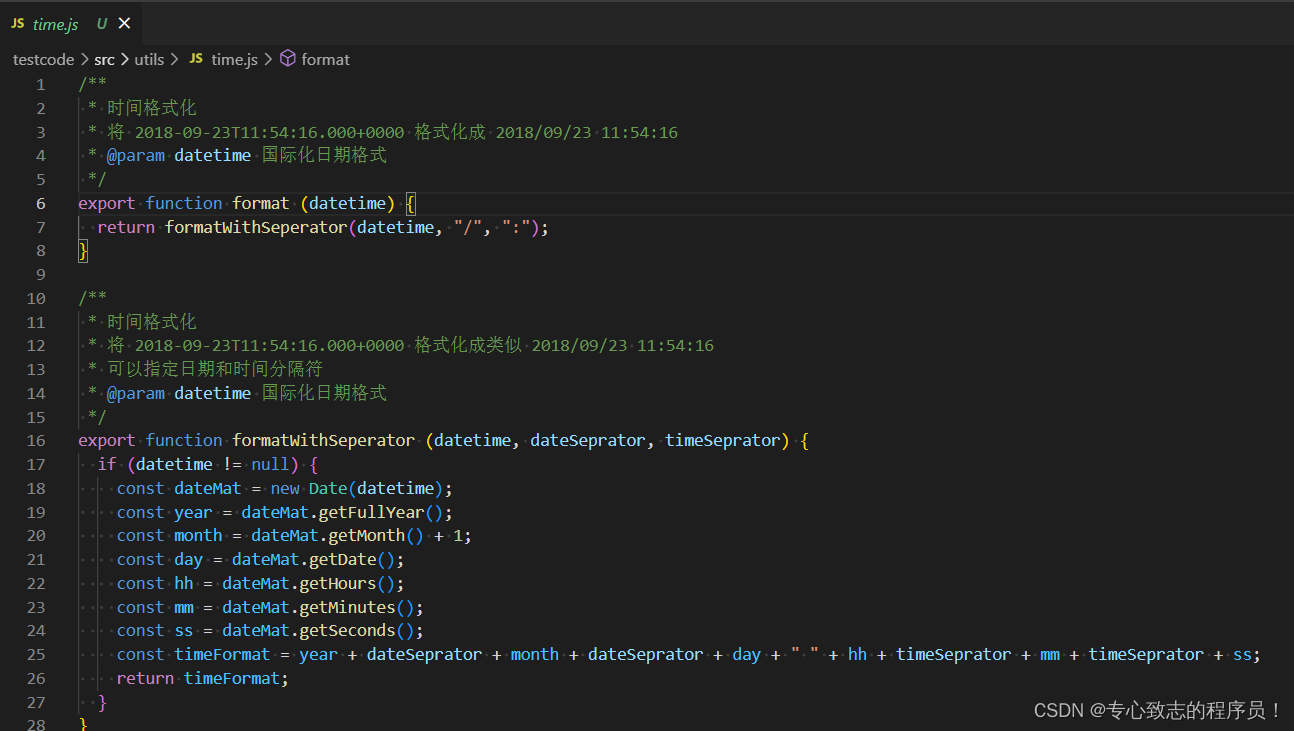
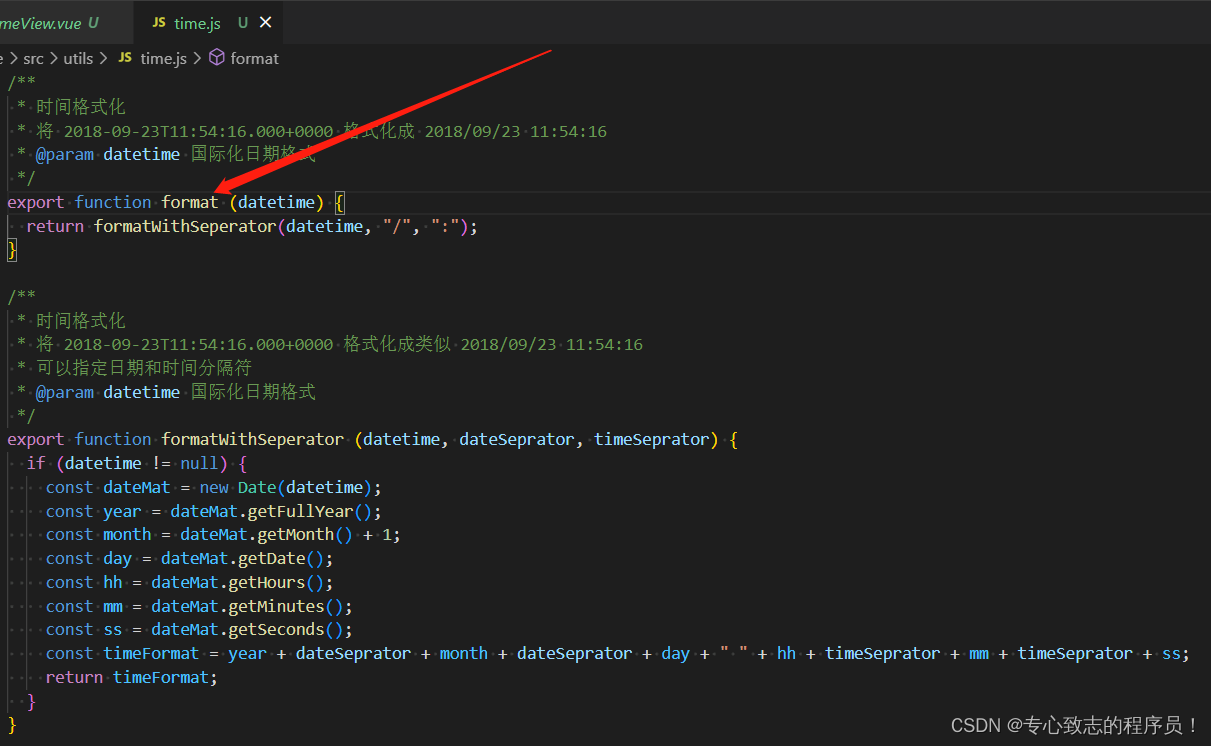
}4、 前端实现时间戳格式转换:
例如:2023/02/06 16:41:16或2023-02-06 16:41:16!

/**
 * 时间格式化
 * 将 2018-09-23T11:54:16.000+0000 格式化成 2018/09/23 11:54:16
 * @param datetime 国际化日期格式
 */
export function format (datetime) {
  return formatWithSeperator(datetime, "/", ":");
}

/**
 * 时间格式化
 * 将 2018-09-23T11:54:16.000+0000 格式化成类似 2018/09/23 11:54:16
 * 可以指定日期和时间分隔符
 * @param datetime 国际化日期格式
 */
export function formatWithSeperator (datetime, dateSeprator, timeSeprator) {
  if (datetime != null) {
    const dateMat = new Date(datetime);
    const year = dateMat.getFullYear();
    const month = dateMat.getMonth() + 1;
    const day = dateMat.getDate();
    const hh = dateMat.getHours();
    const mm = dateMat.getMinutes();
    const ss = dateMat.getSeconds();
    const timeFormat = year + dateSeprator + month + dateSeprator + day + " " + hh + timeSeprator + mm + timeSeprator + ss;
    return timeFormat;
  }
}
例如:将 2023-02-06 格式化成类似 20230206!
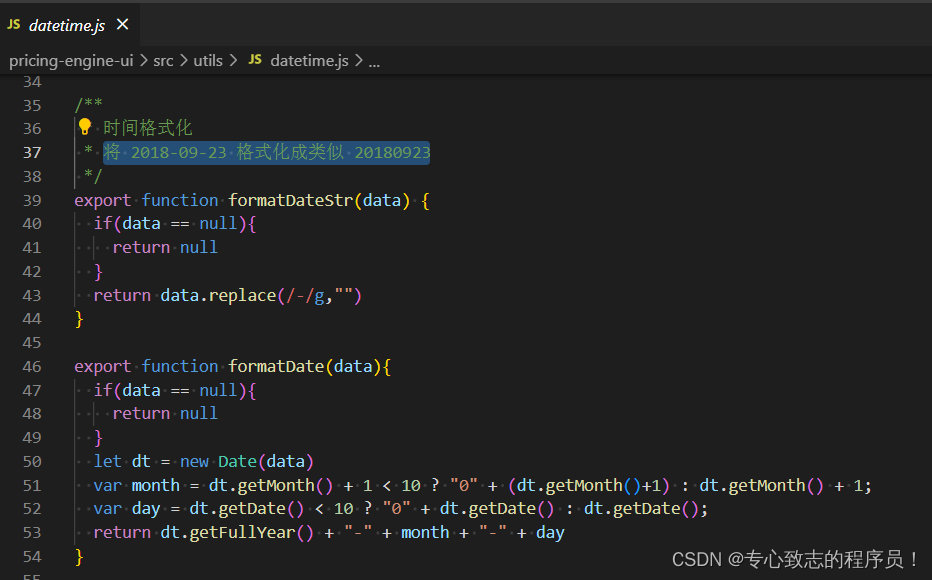
/**
 * 时间格式化
 * 将 2018-09-23 格式化成类似 20180923
 */
export function formatDateStr(data) {
  if(data == null){
    return null
  }
  return data.replace(/-/g,"")
}

export function formatDate(data){
  if(data == null){
    return null
  }
  let dt = new Date(data)
  var month = dt.getMonth() + 1 < 10 ? "0" + (dt.getMonth()+1) : dt.getMonth() + 1;
  var day = dt.getDate() < 10 ? "0" + dt.getDate() : dt.getDate();
  return dt.getFullYear() + "-" + month + "-" + day
}
5、对后端返回的数据进行小数点保留两位的操作:
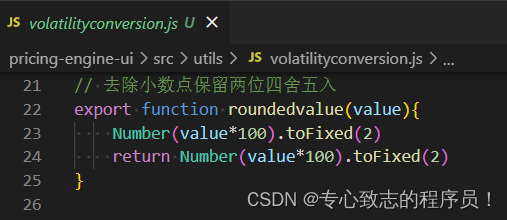
// 去除小数点保留两位四舍五入
export function roundedvalue(value){
    Number(value*100).toFixed(2)
    return Number(value*100).toFixed(2)
}
6、前端对输入框里的电话号码、手机号码、邮箱号,url地址进行正则处理:
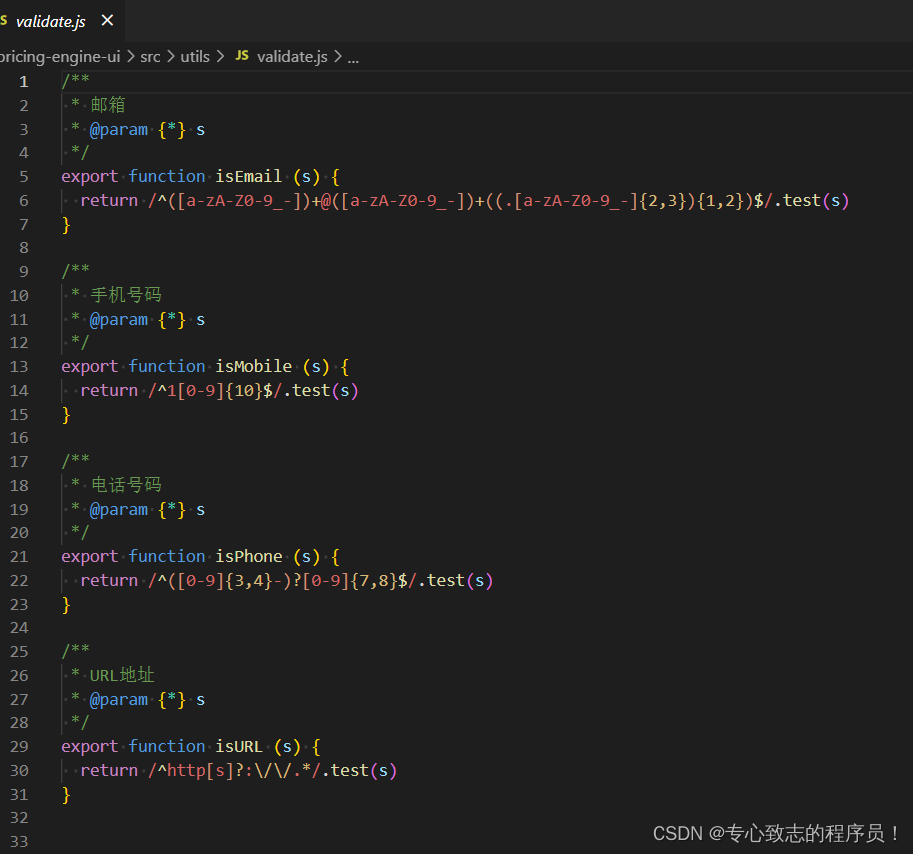
/**
 * 邮箱
 * @param {*} s
 */
export function isEmail (s) {
  return /^([a-zA-Z0-9_-])+@([a-zA-Z0-9_-])+((.[a-zA-Z0-9_-]{2,3}){1,2})$/.test(s)
}

/**
 * 手机号码
 * @param {*} s
 */
export function isMobile (s) {
  return /^1[0-9]{10}$/.test(s)
}

/**
 * 电话号码
 * @param {*} s
 */
export function isPhone (s) {
  return /^([0-9]{3,4}-)?[0-9]{7,8}$/.test(s)
}

/**
 * URL地址
 * @param {*} s
 */
export function isURL (s) {
  return /^http[s]?:\/\/.*/.test(s)
}
7、前端实现屏幕适配 mixin 函数的使用:
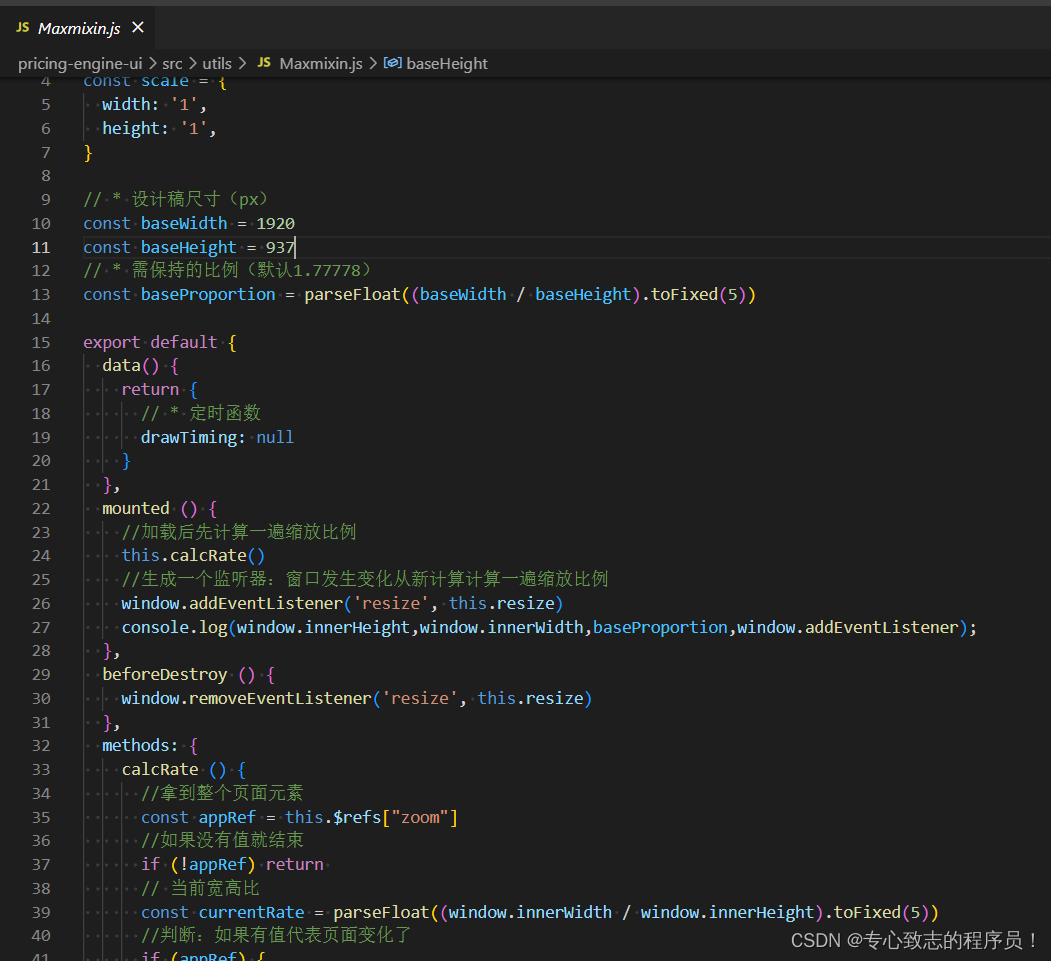
// 屏幕适配 mixin 函数

// * 默认缩放值
const scale = {
  width: '1',
  height: '1',
}

// * 设计稿尺寸(px)
const baseWidth = 1920
const baseHeight = 937
// * 需保持的比例(默认1.77778)
const baseProportion = parseFloat((baseWidth / baseHeight).toFixed(5))

export default {
  data() {
    return {
      // * 定时函数
      drawTiming: null
    }
  },
  mounted () {
    //加载后先计算一遍缩放比例
    this.calcRate()
    //生成一个监听器:窗口发生变化从新计算计算一遍缩放比例
    window.addEventListener('resize', this.resize)
    console.log(window.innerHeight,window.innerWidth,baseProportion,window.addEventListener);
  },
  beforeDestroy () {
    window.removeEventListener('resize', this.resize)
  },
  methods: {
    calcRate () {
      //拿到整个页面元素
      const appRef = this.$refs["zoom"]
      //如果没有值就结束
      if (!appRef) return
      // 当前宽高比
      const currentRate = parseFloat((window.innerWidth / window.innerHeight).toFixed(5))
      //判断:如果有值代表页面变化了
      if (appRef) {
        //判断当前宽高比例是否大于默认比例
        if (currentRate > baseProportion) {
          scale.width = ((window.innerHeight * baseProportion) / baseWidth).toFixed(5)
          scale.height = (window.innerHeight / baseHeight).toFixed(5)
          //整个页面的元素样式,缩放宽高用当前同比例放大的宽高
          appRef.style.transform = `scale(${scale.width}, ${scale.height}) translate(-50%, -50%)`
          console.log(scale.height,scale.width,appRef.style.transform);
        } else {
          scale.height = ((window.innerWidth / baseProportion) / baseHeight).toFixed(5)
          scale.width = (window.innerWidth / baseWidth).toFixed(5)
          appRef.style.transform = `scale(${scale.width}, ${scale.height}) translate(-50%, -50%)`
          console.log(scale.height,scale.width,appRef.style.transform);
        }
      }
    },
    resize () {
      //先清除计时器
      clearTimeout(this.drawTiming)
      //开启计时器
      this.drawTiming = setTimeout(() => {
        this.calcRate()
      }, 200)
    }
  },
}
如何在页面上使用mixins:
在需要的页面vue文件中引入并注册!

<script>
import Maxmixin from "@/utils/Maxmixin"
export default {
  mixins:[Maxmixin],
}
</script>
8、实现一个简易的axios拦截器:
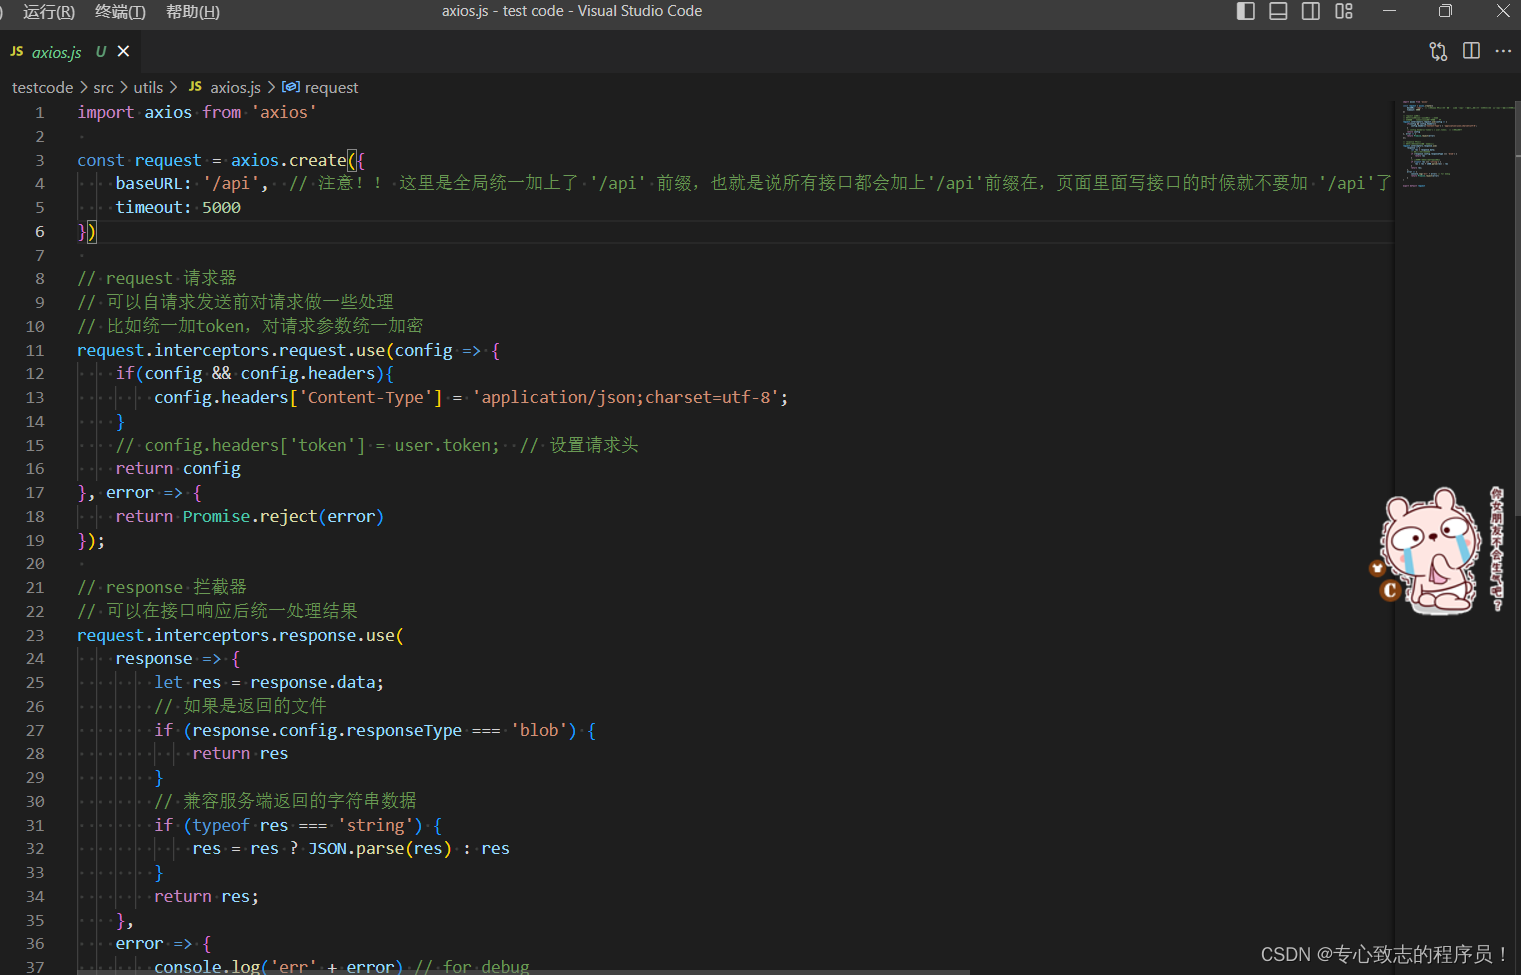
使用axios拦截器要准备:
①下载axios
npm i axios -s②引入到对应的接口文件中
③baseURL: '/api', // 注意!! 这里是全局统一加上了 '/api' 前缀,也就是说所有接口都会加上'/api'前缀在,页面里面写接口的时候就不要加 '/api'了,否则会出现2个'/api',类似 '/api/api/user'这样的报错,切记!!!

import axios from 'axios'

const request = axios.create({
    baseURL: '/api',  // 注意!! 这里是全局统一加上了 '/api' 前缀,也就是说所有接口都会加上'/api'前缀在,页面里面写接口的时候就不要加 '/api'了,否则会出现2个'/api',类似 '/api/api/user'这样的报错,切记!!!
    timeout: 5000
})

// request 请求器
// 可以自请求发送前对请求做一些处理
// 比如统一加token,对请求参数统一加密
request.interceptors.request.use(config => {
    if(config && config.headers){
        config.headers['Content-Type'] = 'application/json;charset=utf-8';
    }
    // config.headers['token'] = user.token;  // 设置请求头
    return config
}, error => {
    return Promise.reject(error)
});

// response 拦截器
// 可以在接口响应后统一处理结果
request.interceptors.response.use(
    response => {
        let res = response.data;
        // 如果是返回的文件
        if (response.config.responseType === 'blob') {
            return res
        }
        // 兼容服务端返回的字符串数据
        if (typeof res === 'string') {
            res = res ? JSON.parse(res) : res
        }
        return res;
    },
    error => {
        console.log('err' + error) // for debug
        return Promise.reject(error)
    }
)


export default request好了以上就是我的总结!
祝大家在新的一年里开开心心,快快乐乐,健健康康,财源广进,步步高升!!!

为开发者提供学习成长、分享交流、生态实践、资源工具等服务,帮助开发者快速成长。
更多推荐


 2
2 0
0- 0


 已为社区贡献5条内容

所有评论(0)