记一次安卓部署torch模型(一)
torch模型转ncnn部署安卓
目录
基础知识(个人理解,感谢纠正)
1、pth模型的输入可以动态变化,一次输入一张图就传[1,3,224,224],一次输入多张图就传[n,3,224,224],但是onnx不行,它只支持固定输入(虽然有方法改,这里先不讲😅,因为我没试过)。所以要确定你的onnx模型的输入尺寸。
大致流程
.pth模型——.onnx文件——.param文件和.bin文件(NCNN)——安卓部署
一、pth转onnx
需要准备pth权重、模型的代码。在一般训练torch模型的环境的基础上,安装onnx-simplifier(这是一个精简onnx模型的库)
pip install onnx-simplifier然后进行转换,下面的代码根据自己的需求进行改动。
import torch
import numpy as np
import onnx
from PIL import Image
import matplotlib.pyplot as plt
from models.efficientnet_cbam import mymodel
from onnxsim import simplify


def softmax_2D(X):
    """
    针对二维numpy矩阵每一行进行softmax操作
    X: np.array. Probably should be floats.
    return: 二维矩阵
    """
    # looping through rows of X
    #   循环遍历X的行
    ps = np.empty(X.shape)
    for i in range(X.shape[0]):
        ps[i, :] = np.exp(X[i, :])
        ps[i, :] /= np.sum(ps[i, :])
    return ps


def model_convert_onnx(model, input_shape, output_path, device):
    dummy_input = torch.randn(1, 3, input_shape[0], input_shape[1])
    dummy_input = dummy_input.to(device)
    input_names = ["input1"]
    output_names = ["output1"]

    torch.onnx.export(
        model,
        dummy_input,
        output_path,
        verbose=True,
        keep_initializers_as_inputs=True,
        do_constant_folding=True,  # 是否执行常量折叠优化
        opset_version=11,  # 版本通常为10 or 11
        input_names=input_names,
        output_names=output_names,
    )


def check_onnx_2(model, ort_session, input_shape, device):
    # -----------------------------------#
    # 给个模型输入,分辨率要对
    # -----------------------------------#
    x = torch.randn(size=(1, 3, input_shape[0], input_shape[1]), dtype=torch.float32)

    # -----------------------------------#
    # torch模型推理
    # -----------------------------------#
    with torch.no_grad():
        torch_out = model(x.to(device))
    # print(torch_out)            # tensor([[-0.5728,  0.1695, -0.3256,  1.1357, -0.4081]])
    # print(type(torch_out))      # <class 'torch.Tensor'>

    # -----------------------------------#
    # onnx模型推理
    # -----------------------------------#
    ort_inputs = {ort_session.get_inputs()[0].name: x.numpy()}  # 初始化数据,注意这儿的x是上面的输入数据x,后期应该是img
    ort_outs = ort_session.run(None, ort_inputs)  # 推理得到输出
    # print(ort_outs)             # [array([[-0.5727689 ,  0.16947027, -0.32555276,  1.13574   , -0.40812433]], dtype=float32)]
    # print(type(ort_outs))       # <class 'list'>,里面是个numpy矩阵
    # print(type(ort_outs[0]))    # <class 'numpy.ndarray'>
    ort_outs = ort_outs[0]  # 因此这儿需要把内部numpy矩阵取出来,这一步很有必要

    # print(torch_out.numpy().shape)      # (1, 5),1张图片,该图片属于5个类别的概率
    # print(ort_outs.shape)               # (1, 5)

    # ---------------------------------------------------------#
    # 比较实际值与期望值的差异,通过没啥事,不通过引发AssertionError
    # 这儿需要两个numpy输入
    # ---------------------------------------------------------#
    # 如果想把CUDA tensor格式的数据改成numpy时,需要先将其转换成cpu float-tensor随后再转到numpy格式。
    # numpy不能读取CUDA tensor 需要将它转化为 CPU tensor
    # 解决方法:将报错代码self.numpy()改为self.cpu().numpy()即可
    np.testing.assert_allclose(torch_out.cpu().numpy(), ort_outs, rtol=1e-03, atol=1e-05)


def check_onnx_3(ort_session, img, input_shape):
    # ----------------------------------------------------------------#
    # 图像预处理,包括resize,归一化,减均值,除方差,HWC变为CHW,添加batch维度
    # ----------------------------------------------------------------#
    img = img.convert('RGB')
    img_resize = img.resize(input_shape, Image.BICUBIC)  # PIL.Image类型
    # PIL.Image类型无法直接除以255,需要先转成array
    img_resize = np.array(img_resize, dtype='float32') / 255.0
    img_resize -= [0.485, 0.456, 0.406]
    img_resize /= [0.229, 0.224, 0.225]
    img_CHW = np.transpose(img_resize, (2, 0, 1))
    # ---------------------------------------------------------#
    #   添加batch_size维度,缺少这个维度,网络没法预测
    # ---------------------------------------------------------#
    img = np.expand_dims(img_CHW, 0)

    # -----------------------------------#
    #   class_indict用于可视化类别
    # -----------------------------------#

    # -----------------------------------#
    # onnx模型推理
    # 初始化数据,注意此时img是numpy格式
    # -----------------------------------#
    ort_inputs = {ort_session.get_inputs()[0].name: img}
    ort_outs = ort_session.run(None, ort_inputs)  # 推理得到输出
    # print(ort_outs)     # [array([[-4.290639  , -2.267056  ,  7.666328  , -1.4162455 ,  0.57391334]], dtype=float32)]

    # -----------------------------------#
    # 经过softmax转化为概率
    # softmax_2D按行转化,一行一个样本
    # -----------------------------------#
    predict_probability = softmax_2D(ort_outs[0])
    # print(predict_probability)  # array([[0.1],[0.2],[0.3],[0.3],[0.1]])

    # -----------------------------------#
    # argmax得到最大概率索引,也就是类别对应索引
    # -----------------------------------#
    predict_cla = np.argmax(predict_probability, axis=-1)
    # print(predict_cla)        # array([2])

    print_res = "class: {}   prob: {:.3}".format(str(predict_cla[0]),
                                                 predict_probability[0][predict_cla[0]])
    plt.title(print_res)
    for i in range(len(predict_probability[0])):
        print("class: {:10}   prob: {:.3}".format(str(i),
                                                  predict_probability[0][i]))
    plt.show()


def model_sim(output_path):
    onnx_model = onnx.load(output_path)  # load onnx model
    model_simp, check = simplify(onnx_model)
    assert check, "Simplified ONNX model could not be validated"
    sim_name = output_path.replace(".onnx", "_sim.onnx")
    onnx.save(model_simp, sim_name)
    print('finished exporting onnx')


if __name__ == '__main__':
    # # -------------------------#
    # #   转换模型
    # # -------------------------#
    # # onnx模型输出到哪里去
    output_path = './output/mymodel.onnx'
    # # 导出onnx模型的输入尺寸,要和pytorch模型的输入尺寸一致
    input_shape = (480, 480)
    # create model
    # device = torch.device('cuda' if torch.cuda.is_available() else 'cpu')
    device = torch.device("cpu")
    #构建自己的模型
    model = mymodel()
    # 分布式训练的模型需要改名称
    # model.load_state_dict({k.replace('module.', ''): v for k, v in torch.load("weights/netCrnn_pj.pth").items()})
    # 加载自己的权重
    model.load_state_dict(torch.load("weights/mymodel.pth", map_location=device))
    # print(model)
    # 因为BN、dropout的存在,所以这儿要转成eval()模式
    model.eval()
    # # ------------------------------------------#
    # #   pth模型转换为onnx模型,转换完成后,可注释掉
    model_convert_onnx(model, input_shape, output_path, device)
    print("model convert onnx finsh.")

    # -------------------------#
    #   第一轮验证
    onnx_model = onnx.load(output_path)
    onnx.checker.check_model(onnx_model)
    print("第一轮验证:onnx model check_1 finsh.")

    # # -------------------------#
    # #   第二轮验证
    # # 初始化onnx模型
    # ort_session_1 = onnxruntime.InferenceSession(output_path)
    # check_onnx_2(model, ort_session_1, input_shape, device)
    # print("onnx model check_2 finsh.")

    # -------------------------#
    #   第三轮验证
    # # load image
    # img_path = "./data/bird1.jpg"
    # assert os.path.exists(img_path), "file: '{}' dose not exist.".format(img_path)
    # img = Image.open(img_path)
    # plt.imshow(img)
    # # 加载onnx模型
    # ort_session_2 = onnxruntime.InferenceSession(output_path)
    # check_onnx_3(ort_session_2, img, input_shape)
    # print("onnx model check_3 finsh.")

    # -------------------------#
    #   进行模型精简
    model_sim(output_path)
有以下注意的地方:
- 修改保存onnx的目录
- 设计模型的输入
- 如果模型是分布式训练的,需要修改模型的名称,以load权重。
- 有三轮验证,一二轮都是检查,第三轮是调用onnx进行一次推理。
- 进行模型精简是为了解决一些shape not supported yet! unknown data type 0之类的问题。
以上你就得到了onnx模型。
二、onnx转ncnn
这一步有两个目的,一是获得onnx2ncnn.exe这个转换工具,二是获得编译好的ncnn库文件。
1、准备一个cmake环境
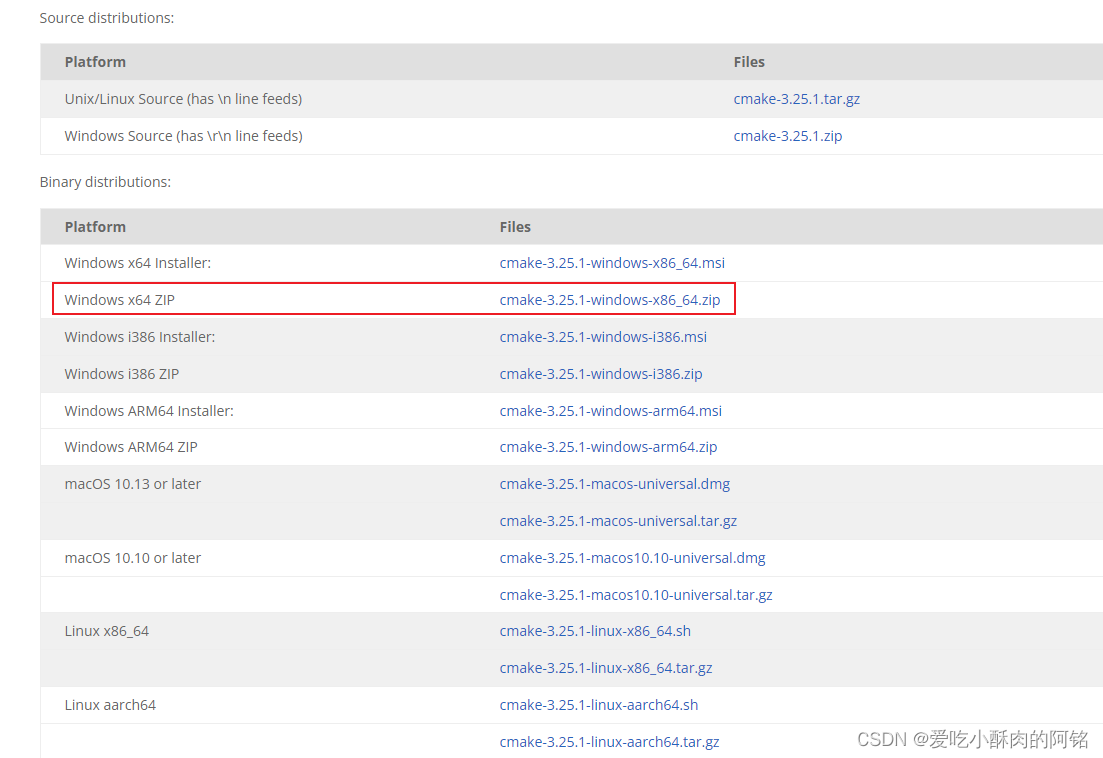
win平台下载这个,然后解压。

把bin目录添加到环境变量,比如
D:\cmake\bin
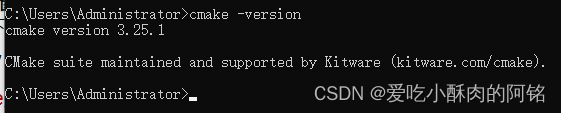
测试安装
cmake -version
2、编译protobuf
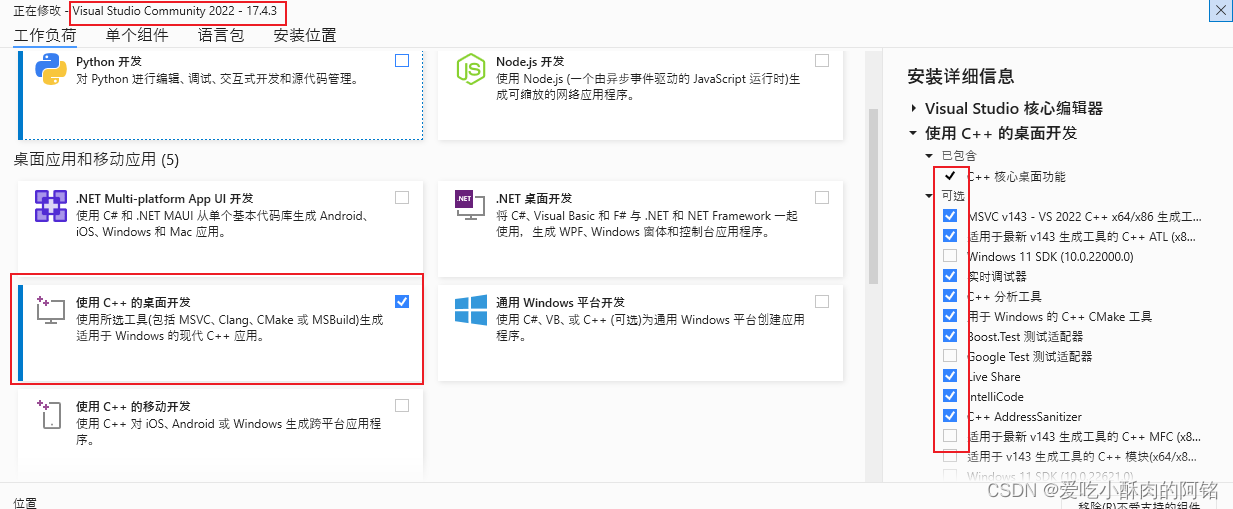
下载安装visio studio,我装的最新社区版,C盘空间有限只装了一点点东西。
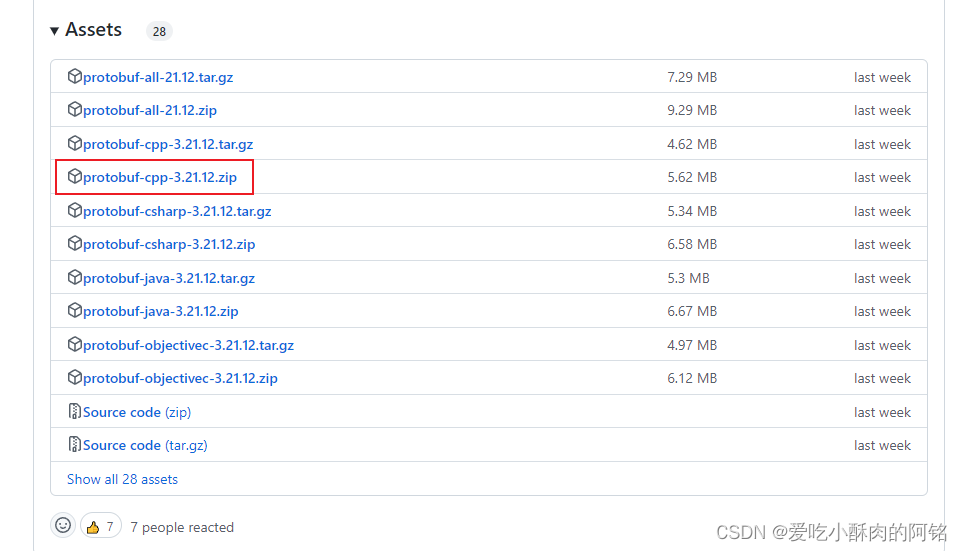
克隆或下载protobuf。我是直接在release里下载的源码,win就下-cpp就好了,下载并解压。
打开这个VS2022下的 x64 Native Tools Command Prompt for VS 2022

1、进入protobuf目录
> cd <protobuf-root-dir>
2、创建build-vs文件夹并进入
> mkdir build-vs
> cd build-vs3、运行一下命令
> cmake -G"NMake Makefiles" -DCMAKE_BUILD_TYPE=Release -DCMAKE_INSTALL_PREFIX=%cd%/install -Dprotobuf_BUILD_TESTS=OFF -Dprotobuf_MSVC_STATIC_RUNTIME=OFF ../cmake
4、nmake和nmake install(注意是nmake不是cmake)
> nmake
> nmake install
以上3和4都是有进度条的,100%算成功。成功后在<protobuf-root-dir>下的build-vs文件夹里会出现很多东西,而且整个build-vs大小为200多M。
3、编译NCNN
官网克隆或下载源码,我是直接克隆到本地。
同样使用x64 Native Tools Command Prompt for VS 2022
1、进入ncnn目录
> cd <ncnn-root-dir>
2、创建build-vs文件夹并进入
> mkdir build-vs
> cd build-vs3、将下列代码的<protobuf-root-dir>改为刚刚编译好的protobuf的绝对路径
> cmake -G"NMake Makefiles" -DCMAKE_BUILD_TYPE=Release -DCMAKE_INSTALL_PREFIX=%cd%/install -DProtobuf_INCLUDE_DIR=<protobuf-root-dir>/build-vs/install/include -DProtobuf_LIBRARIES=<protobuf-root-dir>/build-vs/install/lib/libprotobuf.lib -DProtobuf_PROTOC_EXECUTABLE=<protobuf-root-dir>/build-vs/install/bin/protoc.exe -DNCNN_VULKAN=OFF ..
4、nmake和nmake install(注意是nmake不是cmake)
> nmake
> nmake install
同样3和4都是有进度条的,100%算成功。成功后在<ncnn-root-dir>\build-vs\tools\onnx里得到onnx2ncnn.exe工具。在<ncnn-root-dir>\install里得到库文件。
4、使用onnx2ncnn.exe工具
弄个文件夹,把onnx2ncnn.exe拷进去,把你的pth模型拷进去。使用以下命令得到param和bin文件。
.\onnx2ncnn mymodel.onnx mymodel.param mymodel.bin
以上就完成了onnx到ncnn的转换。
踩坑
1、protobuf用了别人3点几的版本,报错NMAKE : fatal error U1077: “D:\cmake\bin\cmake.exe”: 返回代码“0x2” Stop.找不到cmake.exe,明明环境变量有,而且cmake -version测试也有,后来直接官网下最新的代码,一次通过。
2、我在linux系统上编译时遇到了Could NOT find CUDA: Found unsuitable version "10.2", but required is exact version "9.0" (found /usr/local/cuda)的错误,用nvcc-V查看是9.0,用nvidia-smi查看是10.2,懒得折腾环境了就改在win下编译了。
预告
部署安卓!

为开发者提供学习成长、分享交流、生态实践、资源工具等服务,帮助开发者快速成长。
更多推荐


 1
1 0
0- 0


 已为社区贡献2条内容

所有评论(0)