给网站添加一个邮件反馈(django+vue)
邮件反馈功能

前言
大家好,我是yma16,本文分享django vue 给网站添加一个邮件反馈(django+vue)
背景
之前看着邮件的小按钮,只能展示邮箱,不能发消息
如图

虽然这个简陋的网站也没人访问,但是如果我是游客进来也不会去发送邮件反馈,打开邮箱去编辑消息,太繁琐,很消耗体力。
于是我就想着可以编辑消息发送给我。由于邮箱免费
所以反馈的信息我这边就通过自己发送给自己。
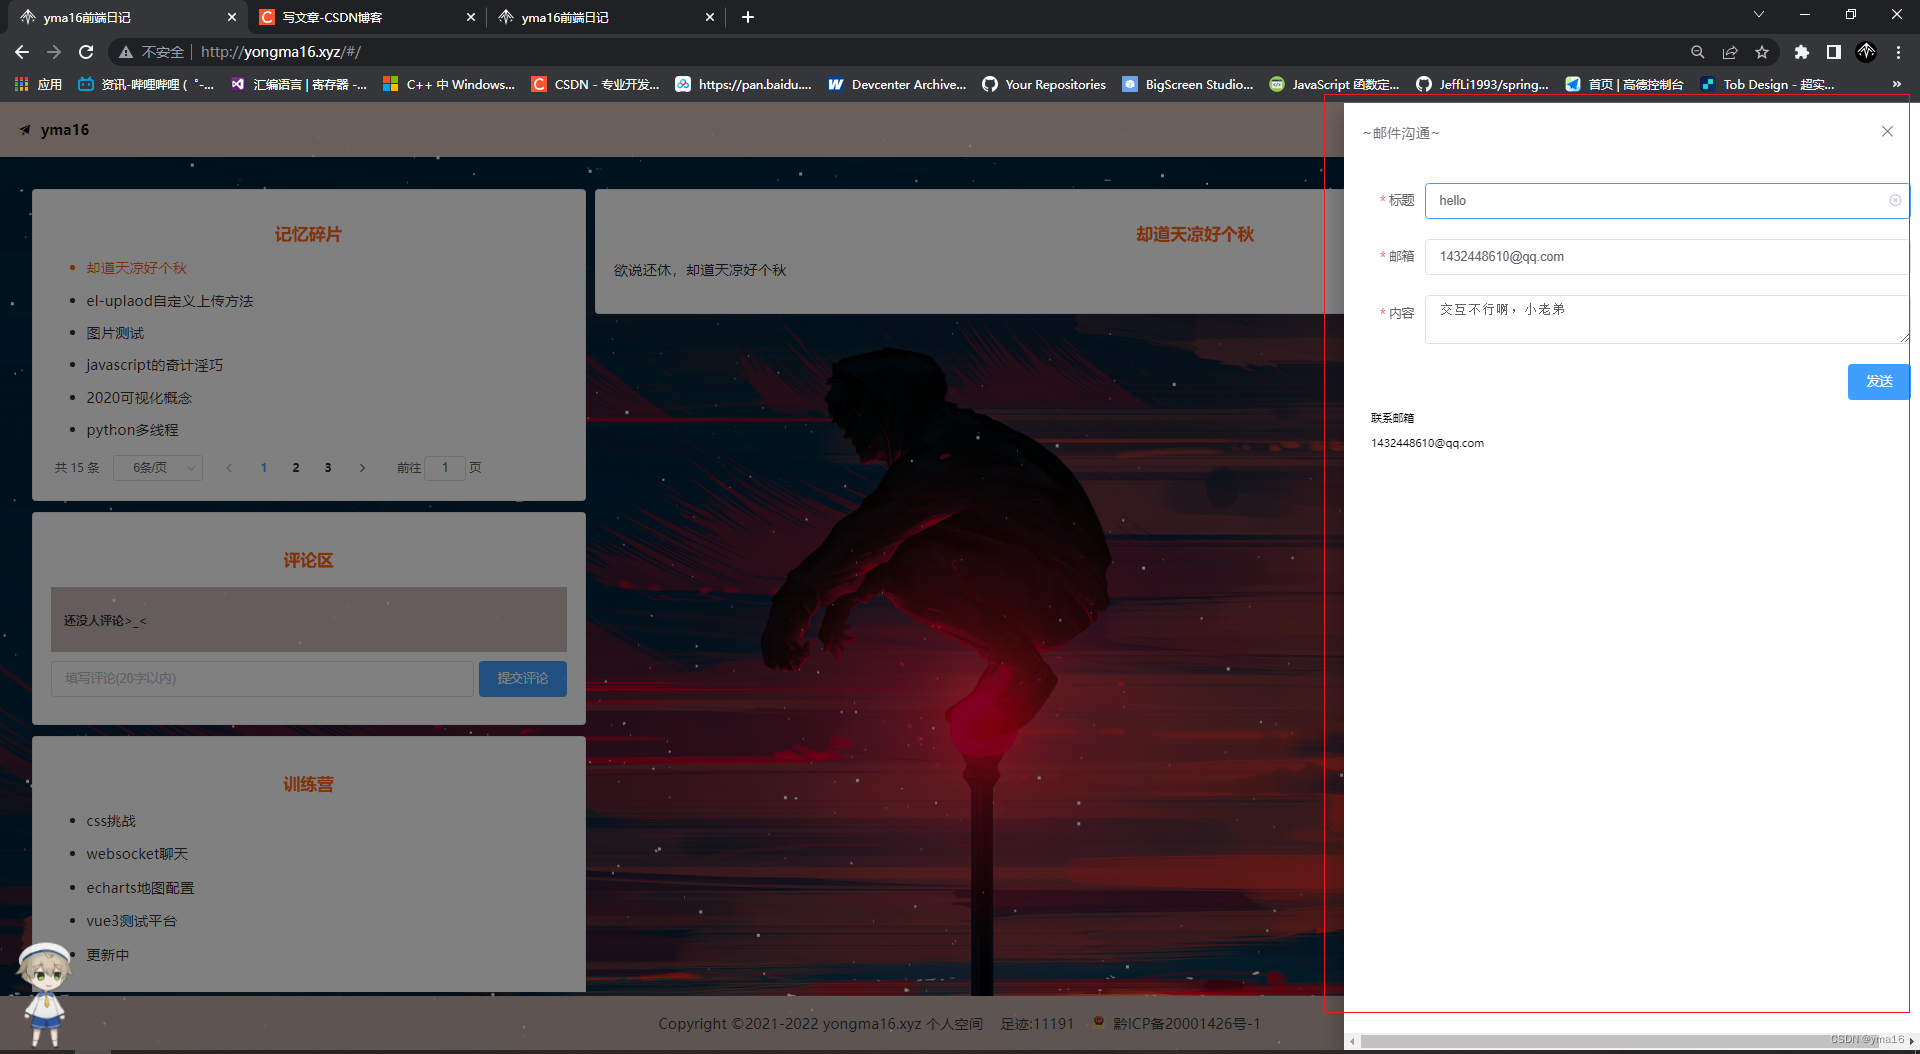
效果
前端
Drawer 的内容是懒渲染的,即在第一次被打开之前,传入的默认 slot 不会被渲染到 DOM 上。因此,如果需要执行 DOM 操作,或通过 ref 获取相应组件,请在 open 事件回调中进行。
Drawer 提供一个 destroyOnClose API, 用来在关闭 Drawer 时销毁子组件内容, 例如清理表单内的状态, 在必要时可以将该属性设置为 true 用来保证初始状态的一致性
如果 visible 属性绑定的变量位于 Vuex 的 store 内,那么 .sync 不会正常工作。此时需要去除 .sync 修饰符,同时监听 Drawer 的 open 和 close 事件,在事件回调中执行 Vuex 中对应的 mutation 更新 visible 属性绑定的变量的值。
需要设置 visible 属性,它的类型是 boolean,当为 true 时显示 Drawer。Drawer 分为两个部分:title 和 body,title 需要具名为 title 的 slot, 也可以通过 title 属性来定义,默认值为空。需要注意的是, Drawer 默认是从右往左打开, 当然可以设置对应的 direction
传递一个object给抽屉子组件,控制打开关闭,添加一个表单的非空校验即可。
<template>
  <!--  测试-->
  <!--      抽屉-->
  <el-drawer
    :title="msgDrawTitle"
    :visible.sync="drawObj.show"
    :direction="direction"
    v-loading="loading"
    element-loading-text="正在发送邮件..."
    element-loading-spinner="el-icon-loading"
    :before-close="handleDrawClose"
  >
    <div class="email-container">
      <div class="email-content">
        <el-form
          ref="emailForm"
          :model="emailForm"
          :rules="emailForm.rules"
          label-width="80px"
        >
          <el-form-item label="标题" prop="title">
            <el-input placeholder="标题" v-model="emailForm.title" clearable>
            </el-input>
          </el-form-item>
          <el-form-item label="邮箱" prop="email">
            <el-input placeholder="邮箱" v-model="emailForm.email" clearable>
            </el-input>
          </el-form-item>
          <el-form-item label="内容" prop="content">
            <el-input
              type="textarea"
              :autosize="{ minRows: 2, maxRows: 4 }"
              placeholder="请输入邮件内容"
              v-model="emailForm.content"
              clearable
            >
            </el-input>
          </el-form-item>
          <div class="email-submit">
            <el-button type="primary" @click="sendEmail('emailForm')"
              >发送</el-button
            >
          </div>
        </el-form>
      </div>
      <div class="email-footer">
        <p>联系邮箱</p>
        <p>1432448610@qq.com</p>
      </div>
    </div>
  </el-drawer>
</template>
<script>
//
import axios from "axios";
export default {
  props: {
    drawObj: Object,
  },
  data() {
    return {
      msgDrawTitle: "~邮件沟通~",
      direction: "rtl",
      msgDraw: false,
      baseUrl: "/api/",
      basePath: "send-email/",
      loading: false,
      emailForm: {
        title: "",
        email: "",
        content: "",
        rules: {
          title: [
            {
              type: "string",
              required: true,
              message: "标题不能为空",
              trigger: "blur",
            },
          ],
          email: [
            {
              type: "string",
              required: true,
              message: "邮件不能为空",
              trigger: "blur",
            },
            {
              validator: (callback, value) => {
                if (value) {
                  //  验证邮箱
                  let patter =
                    /^([a-zA-Z]|[0-9])(\w|\-)+@[a-zA-Z0-9]+\.([a-zA-Z]{2,4})$/;
                  let testEmail = patter.test(value);
                  if (!testEmail) {
                    return Promise.reject("邮箱格式有误");
                  }
                }
                return Promise.resolve("");
              },
              trigger: "blur",
            },
          ],
          content: [
            {
              type: "string",
              required: true,
              message: "内容不能为空",
              trigger: "blur",
            },
          ],
        },
      },
    };
  },
  methods: {
    //关闭抽屉
    handleDrawClose() {
      const that = this;
      that.drawObj.show = false;
    },
    //  发送消息
    sendEmail(formName) {
      //  发送email内容
      try {
        const that = this;
        that.loading = true;
        that.$refs[formName].validate((valid) => {
          if (valid) {
            const params = {
              title: that.emailForm.title,
              email: that.emailForm.email,
              content: that.emailForm.content,
            };
            try {
              axios.post(that.baseUrl + that.basePath, params).then((res) => {
                console.log(res);
                if (
                  res &&
                  res.data &&
                  res.data.code &&
                  res.data.code === 20000
                ) {
                  that.loading = false;
                  that.$message({
                    message: "邮件发送成功!",
                    type: "success",
                  });
                  that.drawObj.show = false;
                } else {
                  that.loading = false;
                  that.$message({
                    message: "邮件发送失败!",
                    type: "warning",
                  });
                }
              });
            } catch (r) {
              that.loading = false;
              throw Error(r);
            }
          } else {
            that.loading = false;
          }
        });
      } catch (r) {
        that.loading = false;
        throw Error(r);
      }
    },
  },
};
</script>
<style>
.email-container {
}
.email-content {
  margin: 10px;
}
.email-submit {
  float: right;
}
.email-title,
.email-email {
  width: 50%;
  margin: 10px;
  display: block;
}
.email-footer {
  float: left;
  width: 100%;
  margin-left: 30px;
  text-align: left;
  font-size: 12px;
}
</style>
后端
前提需要去qq邮箱获取smtp的授权码,在qq邮箱界面中开启smtp。
代码块如下:
from django.http import JsonResponse
from email.mime.text import MIMEText
from email.utils import formataddr
from email.header import Header
import smtplib,json

def postEmialMsg(request):#发送邮件
    if request.method=='POST':
        try:
            reqData=json.loads(request.body.decode('utf-8'))
            title=reqData['title']#获取page
            email=reqData['email']
            content=reqData['content']
            if sendEmail(title,email,content):
                return JsonResponse({'code': 20000, 'msg': '发送成功',"data":reqData})
            return JsonResponse({'code': 0, 'msg': '发送失败',"data":""})  # 返回json数据
        except Exception as e:
            print(e)
            data = {'code': 0, 'msg': str(e),"data":""}
            return JsonResponse(data)  # 返回json数据
    else:
        return JsonResponse({
            "code":50000,
            "data":"",
            "msg":'this is a get request'
        })  # 返回json数据
# 发送邮箱
def sendEmail(title,email,content):# 发送
    ret = True
    my_sender = '****'  # 发件人邮箱账号
    my_pass = '******'  # 授权码
    my_user = '***'  # 收件人邮箱账号,我这边发送给自己
    try:
        msg = MIMEText(content, 'html', 'utf-8')
        msg['From'] = formataddr([email, my_sender])  # 括号里的对应发件人邮箱昵称、发件人邮箱账号
        msg['To'] = formataddr(["网站邮箱", my_user])  # 括号里的对应收件人邮箱昵称、收件人邮箱账号
        msg['Subject'] = Header(title, 'utf-8') # 邮件的主题,也可以说是标题
        server = smtplib.SMTP_SSL("smtp.qq.com", 465)  # 发件人邮箱中的SMTP服务器,端口是25
        server.login(my_sender, my_pass)  # 括号中对应的是发件人邮箱账号、授权码
        server.sendmail(my_sender, [my_user, ], msg.as_string())  # 括号中对应的是发件人邮箱账号、收件人邮箱账号、发送邮件
        server.quit()  # 关闭连接
    except Exception as e:  # catch
        print(e)
        ret = False
    return ret
仓库
前端:https://gitcode.net/qq_38870145/myblogvue_django
后端:https://gitcode.net/qq_38870145/myblog_back_django

结束
本文分享到这结束,如有错误或者不足之处欢迎指出,感谢大家的阅读!

更多推荐
 已为社区贡献32条内容


所有评论(0)