vue3编写插件并发布到npm
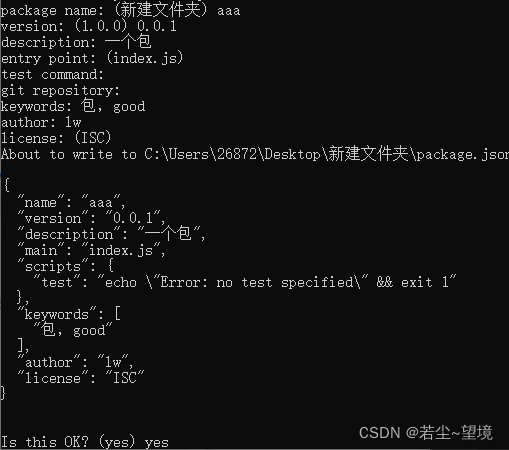
vue插件:https://v3.cn.vuejs.org/guide/plugins.html按照官网的指引初始化一个包 npm init 按照顺序填写内容命名版本描述初始文件 (默认index.js,设置可以更改)测试,(这里没有直接enter跳过)git 地址,(同样没有)关键词 (谁便写俩)作者 : 例如 lw开放协议,enter+yes,同意写初始文件 index.js创建compone
·
vue插件:https://v3.cn.vuejs.org/guide/plugins.html
按照官网的指引
- 初始化一个包
npm init按照顺序填写内容
- 命名
- 版本
- 描述
- 初始文件 (默认index.js,设置可以更改)
- 测试,(这里没有直接enter跳过)
- git 地址,(同样没有)
- 关键词 (谁便写俩)
- 作者 : 例如 lw
- 开放协议,enter+yes,同意

- 写初始文件 index.js
- 创建components文件夹,包含两个vue组件:如lwButton.vue

<template>
  <button>老王的按钮</button>
</template>

<script lang='ts'>
export default {
  name: "LwButton",
};
</script>
- 把写的vue 文件引入暴露
import lwButton from "./components/lwButton.vue";
import lwSwiper from "./components/lwSwiper.vue";

// 放置到数组中
const components = [lwButton, lwSwiper];
export default {
  // 传入两个参数,app是实例,options是app.use(bao,options)的时候,传入的第二个值
  install: (app: any, options: any) => {
    components.forEach(item => {
      // 循环一个个导入组件
      app.component(item.name, item)
    });
  }
}
- 在官网https://www.npmjs.com/ 注册npm 账号 + 邮箱验证
- 解决git代理依赖
- 配置npm代理
npm config set proxy=http://127.0.0.1:8580 - npm login 进行登录
- 登录的时候需要使用npm的本地镜像来登录
npm set registry https://registry.npmjs.org/ - 使用nrm:
nrm use npm
npm publish发布- 更新发布,修改package.js 的 version 版本号,重新
npm publish - 从新复原npm config set proxy null
- npm config set https-proxy null,
- nrm use taobao
使用
- 像正常一样,
npm i +包名 - 在main.ts 当中 .use();
- 在页面中可以使用组件了,
- 名字就是export default {name: “LwButton”,}; 当中的name
- 使用就是 或者
更多推荐
 已为社区贡献1条内容


所有评论(0)