
github 命令行_GitHub CLI:命令行指南
github 命令行In this quickstart guide, you’ll learn GitHub CLI. Find out what the GitHub CLI tool is used for, how to set it up, and how to use it.在此快速入门指南中,您将学习GitHub CLI 。 找出GitHub CLI工具的用途,如何设置以及如何使..
github 命令行
In this quickstart guide, you’ll learn GitHub CLI. Find out what the GitHub CLI tool is used for, how to set it up, and how to use it.
在此快速入门指南中,您将学习GitHub CLI 。 找出GitHub CLI工具的用途,如何设置以及如何使用它。
If you’re already familiar with Git commands, you’re obviously aware that you need to switch to the web browser in order to perform various actions on your GitHub repository. With the new GitHub CLI tool, you can execute many of these actions without leaving the command-line interface.
如果您已经熟悉Git命令 ,那么您显然已经知道需要切换到Web浏览器才能在GitHub存储库上执行各种操作。 使用新的GitHub CLI工具,您无需离开命令行界面即可执行许多此类操作。
GitHub CLI设置 (GitHub CLI Setup)
To get started, simply visit the installation page and find instructions on how to install GitHub CLI for your operating system. For Windows and macOS, you can use package managers to install and keep GitHub CLI up to date. For Linux users, you’ll need to download the package from the latest release page. There are Signed MSI installers for Windows users too, but be aware you have to re-download and update the tool manually if you opt for this. The easiest way for Windows users is to use the scoop package manager.
首先,只需访问安装页面并找到有关如何为您的操作系统安装GitHub CLI的说明。 对于Windows和macOS,您可以使用程序包管理器来安装并保持GitHub CLI为最新。 对于Linux用户,您需要从最新版本的页面下载软件包。 也有Windows用户的Signed MSI安装程序,但是请注意,如果您选择这样做,则必须手动重新下载并更新该工具。 Windows用户最简单的方法是使用独家包管理器。
Below are snapshots of install instructions for each supported platform:
以下是每个受支持平台的安装说明的快照:
Windows:
视窗:
scoop bucket add github-gh https://github.com/cli/scoop-gh.git
scoop install gh
macOS:
苹果系统:
brew install githubDebian/Ubuntu Linux:
Debian / Ubuntu Linux:
sudo apt install git && sudo dpkg -i gh_*_linux_amd64.debFedora/Centos Linux:
Fedora / Centos Linux:
sudo yum localinstall gh_*_linux_amd64.rpmArch Linux:
Arch Linux:
yay -S github-cli
On Windows, I would recommend the use of the Git Bash terminal. This interface will allow you to access common Linux commands and Bash features such as autocompletion. It’s also officially supported by Visual Studio Code via terminal integration.
在Windows上,我建议使用Git Bash终端。 该界面将允许您访问常见的Linux命令和Bash功能,例如自动完成功能。 Visual Studio Code也通过终端集成正式支持它。
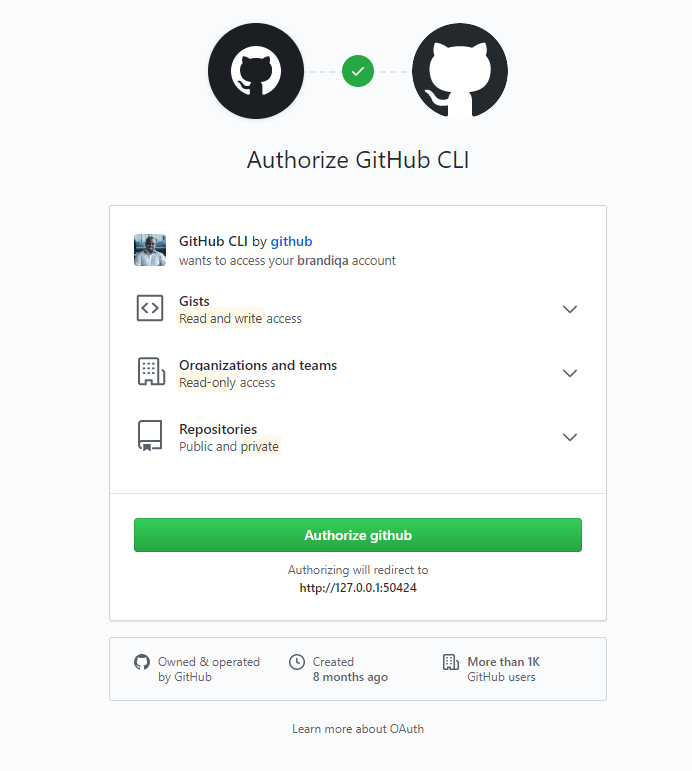
After installing GitHub CLI, you’ll need to authenticate your account. Running any command will trigger this authentication process. For example, try gh repo view cli/cli. For first-time users, you’ll be prompted with the following:
安装GitHub CLI后,您需要对您的帐户进行身份验证。 运行任何命令将触发此身份验证过程。 例如,尝试gh repo view cli/cli 。 对于初次使用的用户,系统将提示您以下内容:

Simply press the Enter key to start the process as illustrated below:
只需按Enter键即可开始该过程,如下所示:
Once you provide your password, you’ll get a “Successfully authenticated GitHub CLI” message. You’re now able to interact with the GitHub platform via the command-line terminal. The next step is to implement autocomplete, which is optional. Simply add this line to your ~/.bash_profile:
提供密码后,您将收到“成功通过身份验证的GitHub CLI”消息。 现在,您可以通过命令行终端与GitHub平台进行交互。 下一步是实现自动完成功能,这是可选的。 只需将此行添加到您的~/.bash_profile :
eval "$(gh completion -s bash)"You can also run the above command in your current terminal to get the autocomplete feature without restarting your terminal. To confirm it’s working, type gh repo, then press tab twice. It should show you four different commands you can append to the current repo command.
您也可以在当前终端中运行上述命令以获取自动完成功能,而无需重新启动终端。 要确认它是否正常运行,请输入gh repo ,然后按两次tab键。 它应该显示四个可以附加到当前repo命令的命令。
GitHub CLI命令结构 (GitHub CLI Command Structure)
The gh command structure is tree-like and easy to remember. There are basically two levels of commands. The first level only consists of six commands:
gh命令结构像树一样,易于记忆。 基本上有两个级别的命令。 第一层仅包含六个命令:
configconfigreporepoissueissueprprgistgistcreditscredits
Each command has a second level of command where you can specify the operation you want to perform — such as gh repo view or gh pr list. The credits command has no second-level command, though. When executed, it simply lists the names of a repository’s contributors. Here’s a quick example you can try out yourself:
每个命令都有第二级命令,您可以在其中指定要执行的操作-例如gh repo view或gh pr list 。 但是credits命令没有二级命令。 执行后,它仅列出存储库贡献者的名称。 这是一个简单的示例,您可以自己尝试:
$ gh credits cli/cliWe’ll look at the rest of the commands in more detail in the upcoming sections.
我们将在接下来的部分中详细介绍其余命令。
GitHub存储库命令 (GitHub Repository Commands)
Cloning a repo with the gh command is easier than using the git command. To clone, all you have to do is execute the command in the following format:
使用gh命令克隆存储库比使用git命令容易。 要克隆,您所要做的就是以以下格式执行命令:
gh repo clone OWNER/REPOThis format makes it easier to clone from memory. You no longer need to type or copy-paste the long Git URL to clone. Below is an example:
这种格式使从内存克隆变得更容易。 您不再需要键入或复制粘贴长Git URL来进行克隆。 下面是一个示例:
$ gh repo clone tailwindcss/tailwindcssYou can also fork existing repositories to your account easily from the command line. Try:
您也可以从命令行轻松地将现有存储库派生到您的帐户中。 尝试:
$ gh repo fork cli/cliDuring the forking process, the tool will ask you if you want to clone as well. If you say “yes”, it will do the cloning, set up the remote upstream branch and perform an update for you automatically. That’s pretty convenient. You can confirm this by checking the repository’s config via your command line: git config -e. Below is how my output looks:
在分叉过程中,该工具会询问您是否也要克隆。 如果您说“是”,它将进行克隆,设置远程上游分支并自动为您执行更新。 那很方便。 您可以通过以下命令行检查存储库的配置来确认这一点: git config -e 。 以下是我的输出结果:
[core]
    repositoryformatversion = 0
    filemode = false
    bare = false
    logallrefupdates = true
    symlinks = false
    ignorecase = true
[remote "origin"]
    url = https://github.com/brandiqa/cli.git
    fetch = +refs/heads/*:refs/remotes/origin/*
[branch "trunk"]
    remote = origin
    merge = refs/heads/trunk
[remote "upstream"]
    url = https://github.com/cli/cli.git
    fetch = +refs/heads/*:refs/remotes/upstream/*
For this project, trunk is the default branch. You’ll need to use the git command to sync your forked repo as usual. In the case of the cli repo:
对于此项目, trunk是默认分支。 您需要像往常一样使用git命令来同步您的分叉存储库 。 如果是cli repo:
# Make sure you’re in the default branch
$ git checkout trunk

# Fetch updates
$ git fetch upstream

# Merge
$ git merge upstream/trunk

# Update your remote repo
$ git push
You can also view the description and README of a project hosted on GitHub using the gh repo view command. Try this command:
您还可以使用gh repo view命令gh repo view GitHub上托管的项目的描述和自述文件。 试试这个命令:
$ gh repo view facebook/reactSo far, you’ve learned how you can clone, fork and view using the gh repo commands. Let’s create a new GitHub repository from the command line. First, we need to create a new project. Let’s quickly generate a Next.js project. When asked, use the “default starter app” template:
到目前为止,您已经了解了如何使用gh repo命令进行clone , fork和view 。 让我们从命令行创建一个新的GitHub存储库。 首先,我们需要创建一个新项目。 让我们快速生成一个Next.js项目。 出现提示时,请使用“默认入门应用”模板:
$ npx create-next-app example-next
...
# navigate to project folder after creation process is completed
$ cd example-next
You’ll find that the local Git repo for the project has already been initialized. To create a repo from the command line, just run the following:
您会发现该项目的本地Git存储库已被初始化。 要从命令行创建存储库,只需运行以下命令:
$ gh repo create --public
✓ Created repository brandiqa/example-next on GitHub
✓ Added remote https://github.com/brandiqa/example-next.git

# Push your project code to your new remote repository
$ git push -u origin master
If you don’t specify the --public option, a private repository will be created by default. Here’s a full list of flags you can specify:
如果不指定--public选项,则默认情况下将创建一个私有存储库。 您可以指定标志的完整列表:
-d, --description string    Description of repository
      --enable-issues        Enable issues in the new repository (default true)
      --enable-wiki          Enable wiki in the new repository (default true)
  -h, --homepage string      Repository home page URL
      --public               Make the new repository public (default: private)
  -t, --team string          The name of the organization team to be granted access
If you’d like to create the repo under a different organization, you’ll need to use the following to create the repo syntax: gh repo create org/repo.
如果要在其他组织下创建存储库,则需要使用以下内容创建存储库语法: gh repo create org/repo 。
拉取请求命令 (Pull Request Commands)
Creating a pull request (PR) for your team to review can now be done on the terminal. Right after you’ve committed a feature or bug branch, you can do execute gh pr create. This will create the pull request interactively:
现在可以在终端上创建供团队审核的拉取请求(PR)。 提交功能或错误分支后,就可以立即执行gh pr create 。 这将以交互方式创建拉取请求:
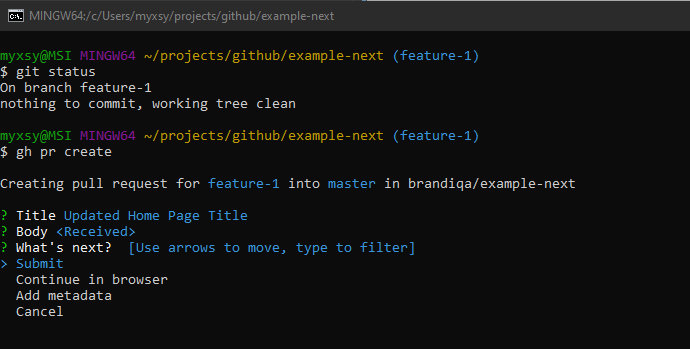
Here’s the full output:
这是完整的输出:
$ gh pr create
Creating pull request for feature-1 into master in brandiqa/example-next
? Title Updated Home Page Title
? Body <Received>
? What is  next? Submit
Enumerating objects: 7, done.
Counting objects: 100% (7/7), done.
Delta compression using up to 8 threads
Compressing objects: 100% (4/4), done.
Writing objects: 100% (4/4), 398 bytes | 398.00 KiB/s, done.
Total 4 (delta 2), reused 0 (delta 0), pack-reused 0
remote: Resolving deltas: 100% (2/2), completed with 2 local objects.
remote:
remote: Create a pull request for 'feature-1' on GitHub by visiting:
remote:      https://github.com/brandiqa/example-next/pull/new/feature-1
remote:
To https://github.com/brandiqa/example-next.git
* [new branch]      HEAD -> feature-1
Branch 'feature-1' set up to track
remote branch 'feature-1' from 'origin'.
https://github.com/brandiqa/example-next/pull/1
You can also run the create command with flags like this:
您还可以使用以下标志运行create命令:
gh pr create --title "Pull request title" --body "Pull request body"To confirm the pull request has been created on GitHub platform, you can execute the command gh pr list to list all pull requests. Below is the output:
要确认在GitHub平台上已创建拉取请求,您可以执行命令gh pr list列出所有拉取请求。 以下是输出:
$ gh pr list
Showing 1 of 1 pull request in brandiqa/example-next
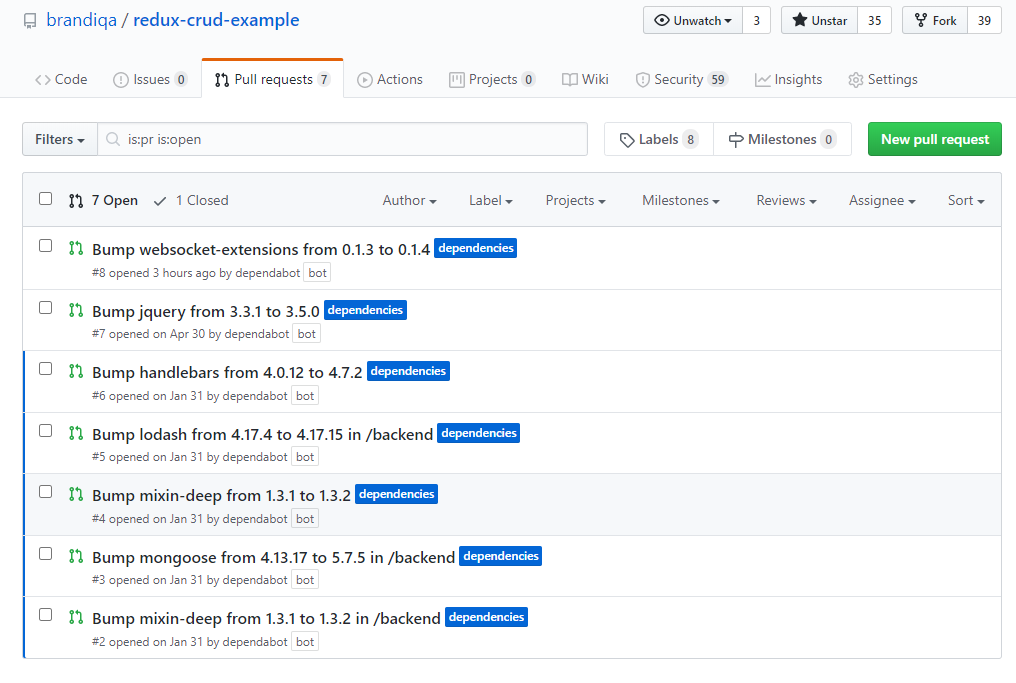
#1 Updated Home Page Title feature-1For a more active project such as TailwindCSS, you’ll get a longer list of active PRs:
对于更活跃的项目(例如TailwindCSS) ,您将获得更长的活跃PR列表:
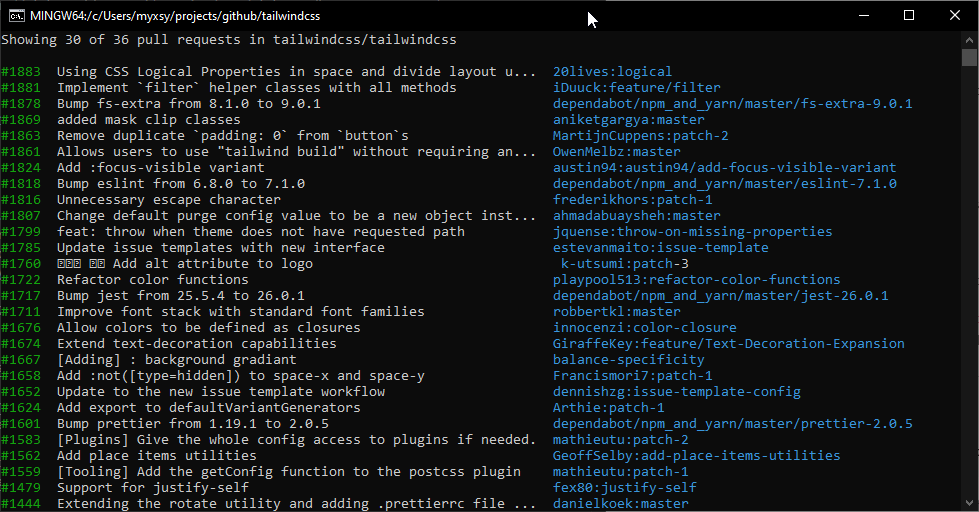
The columns as shown above are:
上面显示的列是:
- PR number 公关号码
- PR description 公关说明
- PR branch 公关部
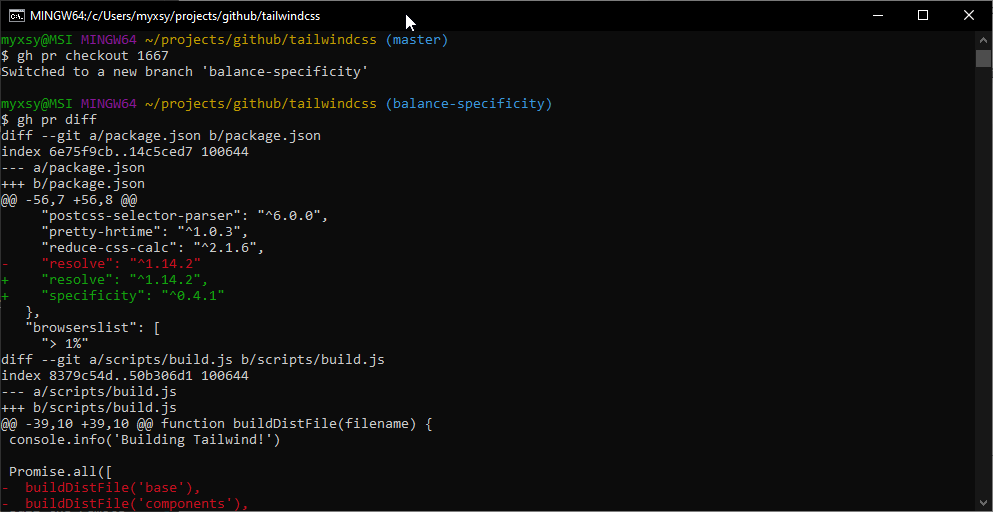
You can use the command gh pr checkout <number> to checkout a pull request. This command will pull the remote feature branch and switch to it. While there, you can also do a gh pr diff to view what’s changed:
您可以使用命令gh pr checkout <number>来检出拉取请求。 该命令将拉动远程功能分支并切换到该分支。 在此期间,您还可以进行gh pr diff来查看更改内容:
Let’s take a look at the gh pr merge command. As you’re probably aware, GitHub checks for vulnerabilities in your code and provides solutions via bump pull requests. Here’s an example:
让我们看一下gh pr merge命令。 如您所知,GitHub检查代码中的漏洞,并通过碰撞请求提供解决方案。 这是一个例子:
Merging these PRs one by one might be cumbersome for you, especially on a slow internet connection. However, you can hasten the process using the terminal via the gh pr merge command. Below is a screenshot of the command in action:
一对一地合并这些PR对您来说很麻烦,尤其是在互联网连接速度较慢的情况下。 但是,您可以通过gh pr merge命令使用终端来加快此过程。 下面是该命令的屏幕截图:

After doing a merge, it’s best to do a pull right after. If you want to do all that in a single step without running the command interactively, you can use flags:
合并后,最好在之后进行拉动。 如果要一步完成所有操作而又不交互式运行命令,则可以使用标志:
gh pr merge -m -d <number> && git pullThere are other highly useful gh pr commands we won’t cover here, but I’ll mention them quickly:
还有其他一些非常有用的gh pr命令,我们将不在这里介绍,但我将快速提及它们:
gh pr view: display the title, body, and other information about a pull request.gh pr view:显示标题,正文和有关拉取请求的其他信息。gh pr status: show status of relevant pull requests.gh pr status:显示相关拉取请求的状态。gh pr ready: make a pull request as ready for review.gh pr ready:发出拉动请求,准备进行审查。gh pr review: add a review to a pull request.gh pr review:将gh pr review添加到拉取请求中。gh pr close: close a pull request.gh pr close:关闭拉取请求。gh pr reopen: reopen a pull request.gh pr reopen:重新打开拉取请求。
发出命令 (Issue Commands)
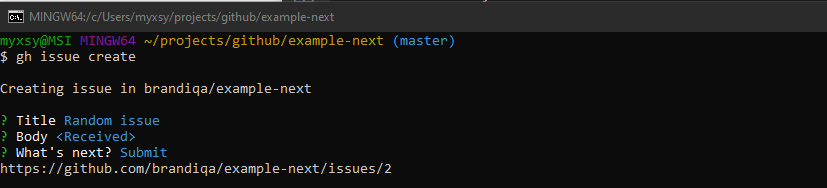
Issues are how we keep track of bugs, tasks and feature requests on a GitHub project repository. We can use the command gh issue create to create a new issue via the terminal:
问题是我们如何跟踪GitHub项目存储库上的错误,任务和功能请求。 我们可以使用gh issue create命令通过终端创建一个新的issue:
There’s also gh issue list command that lists all issues. Below is an example screenshot of the command in use:
还有gh issue list命令,列出所有问题。 下面是正在使用的命令的示例屏幕截图:

The rest of the gh issue commands are quite similar to gh pr commands. Below is a quick summary:
其余的gh issue命令与gh pr命令非常相似。 以下是快速摘要:
gh issue view: display the title, body, and other information about an issue.gh issue view:显示有关gh issue view的标题,正文和其他信息。gh issue status: show status of relevant issues.gh issue status:显示相关问题的状态。gh issue close: close an issue.gh issue close:关闭一个问题。gh issue reopen: reopen an issue.gh issue reopen:重新打开一个问题。
要点命令 (Gist Commands)
Creating a gist on GitHub can now easily be done via the console terminal using the command gh gist create <file>. Here’s an example of the command with the --public flag option:
现在可以使用gh gist create <file>命令通过控制台终端轻松地在GitHub上创建gist 。 这是带有--public标志选项的命令示例:
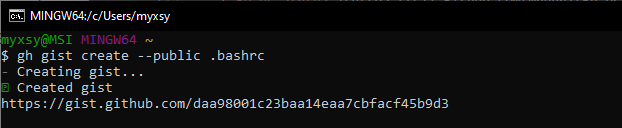
By default, a private gist will be created if you don’t specify the --public flag. Here is a link to the gist I just created. It contains a list of common Linux command aliases that I use on a regular basis.
默认情况下,如果您未指定--public标志,则会创建一个私有--public 。 这是我刚刚创建的要点的链接 。 它包含我经常使用的常见Linux命令别名的列表。
There are no other gist commands, but there’s one more flag I haven’t mentioned:
没有其他要点命令,但是还有一个我没有提到的标志:
-d,--descstring: a description for this gist.-d,----desc字符串:对此要点的描述。
GitHub CLI摘要 (GitHub CLI Summary)
I hope you’ve learned how to use the new gh command-line tool. I would recommend you integrate the tool into your workflow and make it a habit, as it clearly does save some time managing your repository. Please do note that the tool is still under development and new commands may appear after this article has been published. You can refer to the manual for new features and information on using the existing tools.
希望您已经学会了如何使用新的gh命令行工具。 我建议您将该工具集成到您的工作流程中并养成习惯,因为它显然确实节省了一些时间来管理您的存储库。 请注意,该工具仍在开发中,在发布本文之后,可能会出现新命令。 您可以参考手册以获取新功能以及有关使用现有工具的信息。
The one command I haven’t covered is gh config. That’s because there’s not much documentation about using it at the time of writing. Keep an eye on the manual and the release page for the latest updates.
我没有介绍的一个命令是gh config 。 这是因为在撰写本文时,没有太多有关使用它的文档。 请密切注意手册和发行页面以获取最新更新。
github 命令行

瓜分20万奖金 获得内推名额 丰厚实物奖励 易参与易上手
更多推荐

 5
5 0
0- 0


 已为社区贡献5条内容

所有评论(0)