
yolov5配置、训练和测试
YOLOv5使用安装环境准备相关依赖项内容相关checkpoints下载推理过程数据集准备训练过程安装环境准备$ conda create -n yolov5 python=3.7$ source activate yolov5$ git clone https://github.com/ultralytics/yolov5$ cd yolov5pip install -U -r requirem
一键AI生成摘要,助你高效阅读
问答
·
安装
环境准备
$ conda create -n yolov5 python=3.7
$ source activate yolov5
$ git clone https://github.com/ultralytics/yolov5
$ cd yolov5
pip install -U -r requirements.txt
相关依赖项内容
$ pip install -U -r requirements.txt, 内容如下
# pip install -U -r requirements.txt
Cython
numpy>=1.18.5
opencv-python
torch>=1.5.1
matplotlib
pillow
tensorboard
PyYAML>=5.3
torchvision>=0.6
scipy
tqdm
pycocotools>=2.0

# 如果支持Nvidia Apex
# Nvidia Apex (optional) for mixed precision training --------------------------
# git clone https://github.com/NVIDIA/apex && cd apex && pip install -v --no-cache-dir --global-option="--cpp_ext" --global-option="--cuda_ext" . --user && cd .. && # rm -rf apex

# Conda commands (in place of pip) ---------------------------------------------
# conda update -yn base -c defaults conda
# conda install -yc anaconda numpy opencv matplotlib tqdm pillow ipython
# conda install -yc conda-forge scikit-image pycocotools tensorboard
# conda install -yc spyder-ide spyder-line-profiler
# conda install -yc pytorch pytorch torchvision
# conda install -yc conda-forge protobuf numpy && pip install onnx==1.6.0  # https://github.com/onnx/onnx#linux-and-macos
相关checkpoints下载
推理过程
python detect.py --source 0  # webcam
                            file.jpg  # image
                            file.mp4  # video
                            path/  # directory
                            path/*.jpg  # glob
                            rtsp://170.93.143.139/rtplive/470011e600ef003a004ee33696235daa  # rtsp stream
                            http://112.50.243.8/PLTV/88888888/224/3221225900/1.m3u8  # http stream

# demo
python detect.py --source ./inference/images/ --weights yolov5s.pt --conf 0.4

Namespace(agnostic_nms=False, augment=False, classes=None, conf_thres=0.4, device='', fourcc='mp4v', half=False, img_size=640, iou_thres=0.5, output='inference/output', save_txt=False, source='./inference/images/', view_img=False, weights='yolov5s.pt')
Using CUDA device0 _CudaDeviceProperties(name='Tesla P100-PCIE-16GB', total_memory=16280MB)

Downloading https://drive.google.com/uc?export=download&id=1R5T6rIyy3lLwgFXNms8whc-387H0tMQO as yolov5s.pt... Done (2.6s)

image 1/2 inference/images/bus.jpg: 640x512 3 persons, 1 buss, Done. (0.009s)
image 2/2 inference/images/zidane.jpg: 384x640 2 persons, 2 ties, Done. (0.009s)
Results saved to /content/yolov5/inference/output
数据集准备
纯粹的bbox检测器,数据标注只需要包含bbox坐标的信息。
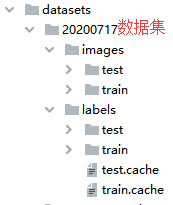
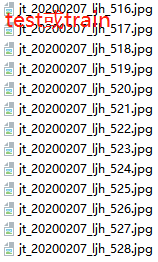
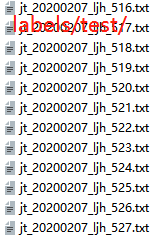
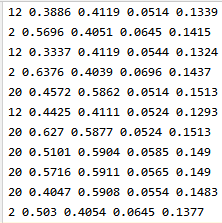
数据集结构如下图(左);images/train和images/test里边的图片格式如下图(中1);labels/train和labels/test里边的标注数据如下图(中2),标注文件与图片文件名字对应一致;标注文件里的信息如下图(右),第一列为bbox类别,后四列为归一化的(x, y, w, h);
将coco数据标注(json)转化为yolov5数据集(txt),
import json
import os
import shutil

from tqdm import tqdm


def load_ann(ann_dir):
    with open(ann_dir, 'r') as fp:
        return json.load(fp)

# 定义坐标转换函数
def convert(size, box):
    # box = [x1, y1, x2, y2]
    dw = 1. / (size[0])
    dh = 1. / (size[1])
    x = (box[0] + box[2]) / 2.0 #- 1
    y = (box[1] + box[3]) / 2.0 #- 1
    width = box[2] - box[0]
    height = box[3] - box[1]
    x = x * dw
    width = width * dw
    y = y * dh
    height = height * dh
    return (x, y, width, height)

def run(txt_root, ann_dir):
    ann = load_ann(ann_dir)
    images = ann['images']
    annotations = ann['annotations']
    print()

    if os.path.exists(txt_root):
        shutil.rmtree(txt_root)
    os.makedirs(txt_root)

    for ann in tqdm(annotations):
        image_id = ann['image_id']
        bbox = ann['bbox']
        bbox[2] = bbox[0] + bbox[2]
        bbox[3] = bbox[1] + bbox[3]
        category_id = ann['category_id']
        file_name = images[image_id]['file_name']
        height = float(images[image_id]['height'])
        width = float(images[image_id]['width'])
        size = (width, height)
        bbox = convert(size, bbox)
        with open(f'{txt_root}/{os.path.basename(file_name).split(".")[0]}.txt', 'a+') as fp:
            fp.write(str(category_id) + " " + " ".join([str(round(a, 4)) for a in bbox]) + '\n')


if __name__ == '__main__':
    run(txt_root='/home/yolov5/datasets/20200717/labels/test',
        ann_dir='/data/data/jt/mask/20200717_train/annotations/test.json')
    run(txt_root='/home/yolov5/datasets/20200717/labels/train',
        ann_dir='/data/data/jt/mask/20200717_train/annotations/train.json')
voc数据集标注(json)转换成yolov5(txt),
# 导入相关的包
import os
import cv2
import xml.etree.ElementTree as ET
from os import listdir, getcwd
import pdb

# 设置类别,这里假设有4个类,分别是'holothurian', 'echinus', 'scallop', 'starfish'
classes = ['__ignore__', 'yl_jt_jt_560ESS', 'yl_jt_jt_560', 'yl_jt_bss_570LLB',
           'yl_jt_jt_1500SEP', 'yl_jt_jt_1500', 'yl_jt_bss_348LLB', 'yl_jt_bss_570X', 'yl_jt_jt_560SEP',
           'yl_jt_bss_348X', 'yl_jt_jt_560X', 'yl_jt_jt_1500X', 'yl_jt_bss_348', 'yl_jt_bss_1000X',
           'yl_jt_jt_360', 'yl_jt_bss_1000', 'yl_jt_jt_4600X', 'yl_jt_jt_360SEP', 'yl_jt_jt_4600',
           'yl_jt_jt_360X', 'yl_jt_bss_570', 'yl_jt_jt_360ESS']


# 定义坐标转换函数
def convert(size, box):
    dw = 1. / (size[0])
    dh = 1. / (size[1])
    x = (box[0] + box[2]) / 2.0 - 1
    y = (box[1] + box[3]) / 2.0 - 1
    width = box[2] - box[0]
    height = box[3] - box[1]
    x = x * dw
    width = width * dw
    y = y * dh
    height = height * dh
    return (x, y, width, height)


# 读图片文件名文件,将其成列表存入image_ids
# image_ids = open('image/image.txt').read().strip().split()
list_file = open('file.txt', 'w')

# 循环,批量操作
path = '/mnt/f/Dataset/20200721_BP'
for f in os.listdir(path):
    image_id = os.path.join(path, f)
    if not image_id.endswith('.xml'):
        xmlfile = image_id.split('.')[0] + '.xml'
        in_file = open('%s' % xmlfile)
        print(image_id)
        out_file = open('txt/%s.txt' % f, 'w')
        tree = ET.parse(in_file)
        root = tree.getroot()
        # pdb.set_trace()
        # 获取图片信息(高和宽)
        # 假如xml文件中有图片信息,则直接找到那一行调用数值即可,就不用读图了
        img = cv2.imread('%s' % image_id)

        size = img.shape
        width = size[0]
        height = size[1]
        # 判断所寻找类别在xml文件中存不存在
        for obj in root.iter('object'):
            cls = obj.find('name').text
            if cls not in classes:
                continue
            cls_id = classes.index(cls)
            # 如果存在类名,则继续找到bndbox里的内容
            xmlbox = obj.find('bndbox')
            box = (float(xmlbox.find('xmin').text), float(xmlbox.find('ymin').text), float(xmlbox.find('xmax').text),
                   float(xmlbox.find('ymax').text))
            # 调用转换函数完成坐标转换
            bb = convert((width, height), box)
            # 将新坐标输出到txt文件中
            out_file.write(str(cls_id) + " " + " ".join([str(a) for a in bb]) + '\n')

list_file.close()
训练过程
1.准备数据集的配置文件,如data/jt21.yaml, 给定训练和验证集的路径,以及类别名称(注意,yolov5不需要background和ignore)
train: ./datasets/20200717/images/train/
val: ./datasets/20200717/images/test/

# number of classes
nc: 21

# class names
names: ['yl_jt_jt_560ESS', 'yl_jt_jt_560',
        'yl_jt_bss_570LLB', 'yl_jt_jt_1500SEP', 'yl_jt_jt_1500',
        'yl_jt_bss_348LLB', 'yl_jt_bss_570X', 'yl_jt_jt_560SEP', 'yl_jt_bss_348X',
        'yl_jt_jt_560X', 'yl_jt_jt_1500X', 'yl_jt_bss_348', 'yl_jt_bss_1000X', 'yl_jt_jt_360',
        'yl_jt_bss_1000', 'yl_jt_jt_4600X', 'yl_jt_jt_360SEP', 'yl_jt_jt_4600',
        'yl_jt_jt_360X', 'yl_jt_bss_570', 'yl_jt_jt_360ESS']
2.超参数配置
# Hyperparameters
hyp = {'optimizer': 'SGD',  # ['adam', 'SGD', None] if none, default is SGD
       'lr0': 0.01,  # initial learning rate (SGD=1E-2, Adam=1E-3)
       'momentum': 0.937,  # SGD momentum/Adam beta1
       'weight_decay': 5e-4,  # optimizer weight decay
       'giou': 0.05,  # giou loss gain
       'cls': 0.58,  # cls loss gain
       'cls_pw': 1.0,  # cls BCELoss positive_weight
       'obj': 1.0,  # obj loss gain (*=img_size/320 if img_size != 320)
       'obj_pw': 1.0,  # obj BCELoss positive_weight
       'iou_t': 0.20,  # iou training threshold
       'anchor_t': 4.0,  # anchor-multiple threshold
       'fl_gamma': 0.0,  # focal loss gamma (efficientDet default is gamma=1.5)
       'hsv_h': 0.014,  # image HSV-Hue augmentation (fraction)
       'hsv_s': 0.68,  # image HSV-Saturation augmentation (fraction)
       'hsv_v': 0.36,  # image HSV-Value augmentation (fraction)
       'degrees': 0.0,  # image rotation (+/- deg)
       'translate': 0.0,  # image translation (+/- fraction)
       'scale': 0.5,  # image scale (+/- gain)
       'shear': 0.0}  # image shear (+/- deg)
3.训练配置
    parser = argparse.ArgumentParser()
    # 给定模型配置路径
    parser.add_argument('--cfg', type=str, default='models/yolov5x.yaml', help='model.yaml path')
    # 给定数据集配置路径
    parser.add_argument('--data', type=str, default='data/jt21raw.yaml', help='data.yaml path')
    # 给定超参数配置路径,也可直接在train.py里边改
    parser.add_argument('--hyp', type=str, default='', help='hyp.yaml path (optional)')
    parser.add_argument('--epochs', type=int, default=200) # 300
    parser.add_argument('--batch-size', type=int, default=8, help="Total batch size for all gpus.") # 16
    parser.add_argument('--img-size', nargs='+', type=int, default=[960, 960], help='train,test sizes')
    parser.add_argument('--rect', action='store_true', help='rectangular training')
    parser.add_argument('--resume', nargs='?', const='get_last', default=False,
                        help='resume from given path/to/last.pt, or most recent run if blank.')
    parser.add_argument('--nosave', action='store_true', default=False, help='only save final checkpoint')
    parser.add_argument('--notest', action='store_true', default=False, help='only test final epoch')
    # 是否开启自动学习anchor
    parser.add_argument('--noautoanchor', action='store_true', default=False, help='disable autoanchor check')
    parser.add_argument('--evolve', action='store_true', default=False, help='evolve hyperparameters')
    parser.add_argument('--bucket', type=str, default='', help='gsutil bucket')
    # 是否将数据缓存,以方便更快加载
    parser.add_argument('--cache-images', action='store_true', default=True, help='cache images for faster training')
    # 是否加载预训练权重
    parser.add_argument('--weights', type=str, default='', help='initial weights path')
    # 训练过程的预测结果保存的名字
    parser.add_argument('--name', default='', help='renames results.txt to results_name.txt if supplied')
    # 指定显卡设备ID
    parser.add_argument('--device', default='0,1,2,3', help='cuda device, i.e. 0 or 0,1,2,3 or cpu')
    # 多尺度输入训练
    parser.add_argument('--multi-scale', action='store_true', default=True, help='vary img-size +/- 50%%')
    # 物体检测器?
    parser.add_argument('--single-cls', action='store_true', default=False, help='train as single-class dataset')
    parser.add_argument("--sync-bn", action="store_true", default=False, help="Use sync-bn, only avaible in DDP mode.")
    # Parameter For DDP.
    # 单机多卡并行时使用-1;分布式使用0;
    parser.add_argument('--local_rank', type=int, default=-1,
                        help="Extra parameter for DDP implementation. Don't use it manually.")
4.OK,开始训练吧
$ python train.py
# 传入参数(不同模型大小对应的batch_size参考)
$ python train.py --data coco.yaml --cfg yolov5s.yaml --weights '' --batch-size 64
                                         yolov5m                                48
                                         yolov5l                                32
                                         yolov5x                                16

旨在为数千万中国开发者提供一个无缝且高效的云端环境,以支持学习、使用和贡献开源项目。
更多推荐


 1
1 0
0- 0


 已为社区贡献1条内容

所有评论(0)