Python - 从旋转角度对 OpenCV 进行透视变换
回答问题
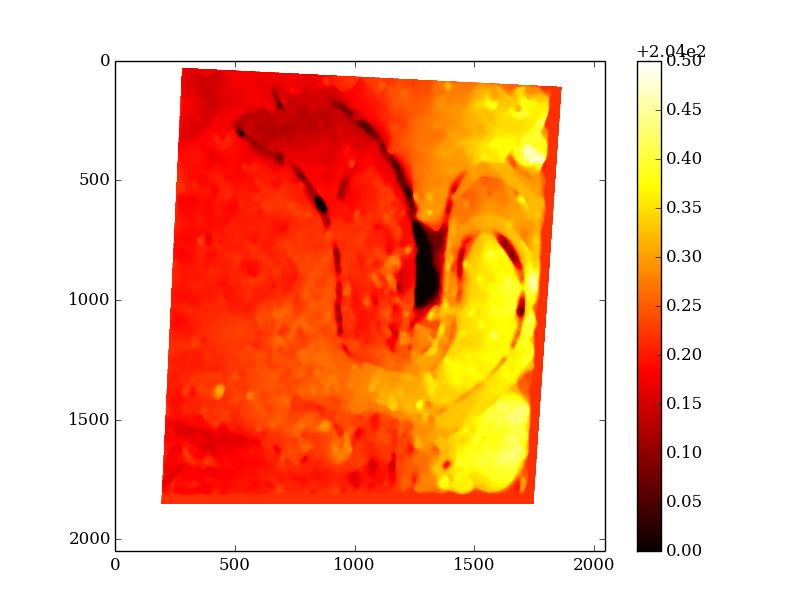
我正在研究depth map with OpenCV。我可以得到它,但它是从左相机原点重建的,后者有一点倾斜,如图所示,深度“偏移”(深度应该接近且没有水平梯度):
我想用零角度来表达它,我尝试使用扭曲透视功能,如下所示,但我获得了一个空字段......
P = np.dot(cam,np.dot(Transl,np.dot(Rot,A1)))

dst = cv2.warpPerspective(depth, P, (2048, 2048))
和 :
#Projection 2D -> 3D matrix
A1 = np.zeros((4,3))
A1[0,0] = 1
A1[0,2] = -1024
A1[1,1] = 1
A1[1,2] = -1024
A1[3,2] = 1

#Rotation matrice around the Y axis
theta = np.deg2rad(5)
Rot = np.zeros((4,4))
Rot[0,0] = np.cos(theta)
Rot[0,2] = -np.sin(theta)
Rot[1,1] = 1
Rot[2,0] = np.sin(theta)
Rot[2,2] = np.cos(theta)
Rot[3,3] = 1

#Translation matrix on the X axis
dist = 0
Transl = np.zeros((4,4))
Transl[0,0] = 1
Transl[0,2] = dist
Transl[1,1] = 1
Transl[2,2] = 1
Transl[3,3] = 1

#Camera Intrisecs matrix 3D -> 2D
cam = np.concatenate((C1,np.zeros((3,1))),axis=1)
cam[2,2] = 1
P = np.dot(cam,np.dot(Transl,np.dot(Rot,A1)))

dst = cv2.warpPerspective(Z0_0, P, (2048*3, 2048*3))
稍后编辑:
您可以在此处下载 32MB 字段数据集:https://filex.ec-lille.fr/get?ku003dcCBoyoV4tbmkzSV5bi6。然后,使用以下命令加载并查看图像:
from matplotlib import pyplot as plt
import numpy as np

img = np.load('testZ0.npy')
plt.imshow(img)
plt.show()
Answers
我有一个粗略的解决方案。您可以稍后对其进行修改。
我使用 OpenCV 中可用的鼠标处理操作来裁剪给定热图中的感兴趣区域。
(我刚才是不是说我用鼠标来裁剪该区域?)是的,我做到了。要了解有关 OpenCV中鼠标功能的更多信息,请参阅此。此外,还有许多其他 SO 问题可以在这方面为您提供帮助。:)
使用这些功能,我能够获得以下信息:
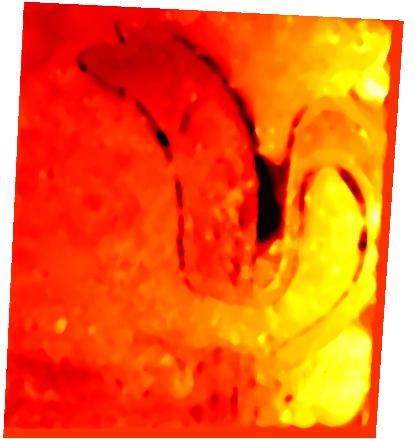
现在到您消除倾斜的问题。我通过取上图的角点并将其用于确定大小的“白色”图像来使用单应性原理。我为此使用了cv2.findHomography()函数。
现在使用 OpenCV 中的cv2.warpPerspective()函数,我能够获得以下内容:
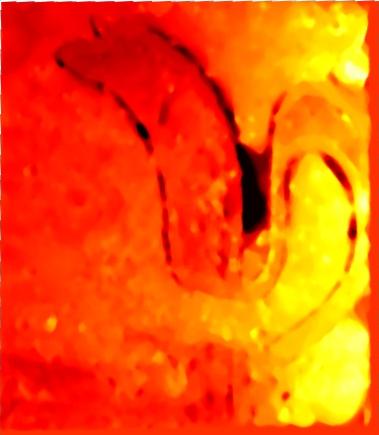
现在,您可以根据需要对该图像进行所需的缩放。
代码:
我还附上了一些代码片段供您阅读:
#First I created an image of white color of a definite size
back = np.ones((435, 379, 3)) # size
back[:] = (255, 255, 255)     # white color
接下来,我在下面的倾斜图像上获得了角点pts_src:
pts_src = np.array([[25.0, 2.0],[403.0,22.0],[375.0,436.0],[6.0,433.0]])
我希望将上面的点映射到下面给出的点“pts_dst”:
pts_dst = np.array([[2.0, 2.0], [379.0, 2.0], [379.0, 435.0],[2.0, 435.0]])
现在我使用了单应性原理:
h, status = cv2.findHomography(pts_src, pts_dst)
最后,我使用透视变换将原始图像映射到白色图像。
fin = cv2.warpPerspective(img, h, (back.shape[1],back.shape[0]))
# img -> original tilted image.
# back -> image of white color.
希望这可以帮助!我也从这个问题中学到了很多东西。
注意: 提供给 'cv2.findHomography()' 的点必须在float中。有关 Homography 的更多信息,请访问本页

Python社区为您提供最前沿的新闻资讯和知识内容
更多推荐

 0
0 0
0- 0


 已为社区贡献126440条内容

所有评论(0)