Python虚拟环境教程使用Virtualenv和Poetry
一个迷你指导教程,展示了如何使用虚拟环境以及为什么它在 virtualenv 和诗歌插图示例中很重要。
-
简介
-
什么是虚拟环境
-
为什么要使用虚拟环境
-
如何使用虚拟环境
*虚拟环境
*诗歌
-
链接
-
致谢
-
结论
-
Outro
简介
这篇博文是关于什么的
这篇博文主要针对没有使用它的人。在这里你会发现这_不是一个完整的_Python虚拟环境参考,它是一个关于以下内容的迷你指导教程:
-
什么是 Python 虚拟环境
-
为什么要使用它
-
使用方法
...带有两个流行模块的示例过程:virtualenv和poetry以及通过Python插件和ByCharm社区终端的IntelliJ IDE等软件。
如果您使用的是 JetBrains 产品,您还需要从虚拟环境索引安装的站点包。
索引是 JetBrains 的核心功能:代码完成、检查、查找用法、导航、语法突出显示、重构等。
什么是虚拟环境?
隔离其他事物的事物
Python 虚拟环境基本上是一个单独的文件夹,创建一组独立的已安装包,Python 二进制文件在它自己的目录中,它隔离了您计算机上的任何其他 Python 安装。
防止冲突的东西
Python 虚拟环境用于防止干扰其他应用程序的行为。因此,当处理在同一系统上运行的不同项目时,它将防止包或 Python 版本冲突。
[ ](https://res.cloudinary.com/practicaldev/image/fetch/s--pbUMqWMQ--/c_limit%2Cf_auto%2Cfl_progressive%2Cq_auto%2Cw_880/https://user-images .githubusercontent.com/78694043/145010258-2ad35301-b0a0-4fd7-b8be-c44a0df28483.png)
为什么要用虚拟环境?
为避免 Python 版本冲突
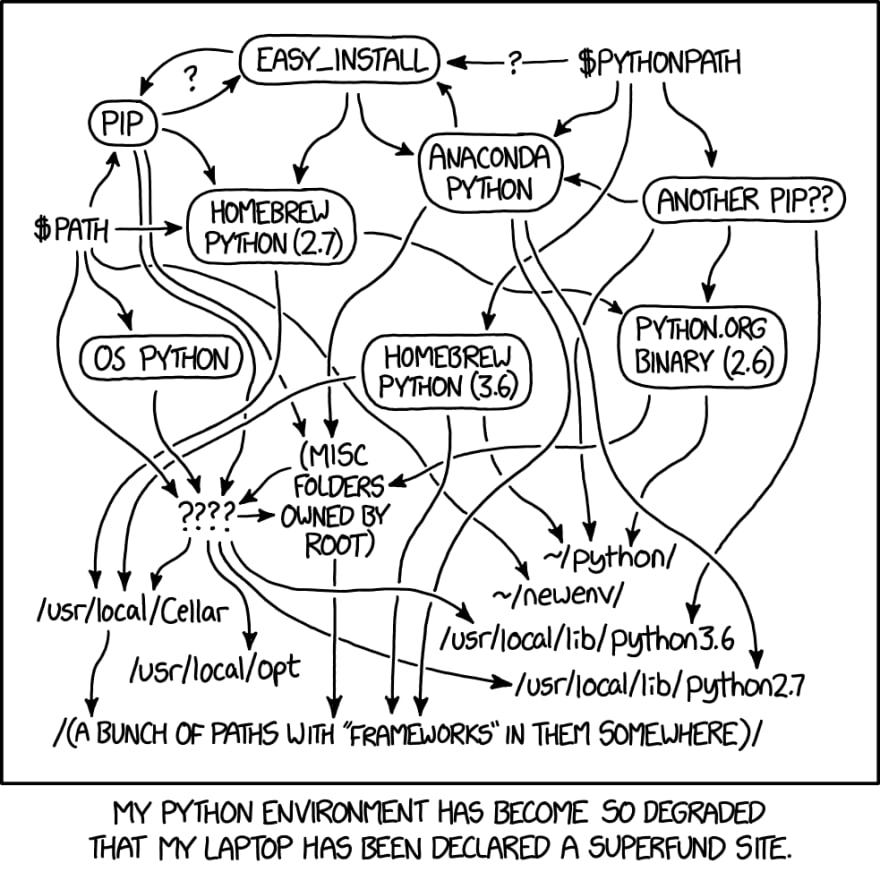
Python 虚拟环境允许多个版本的 Python 相互共存。在同一系统上安装新版本后,它将让您使用旧版本的 Python。
如果您尝试在没有分离的虚拟环境的情况下执行此操作,那么事情将很快中断:
[ 的插图](https://res.cloudinary.com/practicaldev/image/fetch/s--64GesQLu--/c_limit%2Cf_auto%2Cfl_progressive%2Cq_auto%2Cw_880/https://user-images .githubusercontent.com/78694043/145189874-1686744d-8498-4eb1-a144-2e86e59df7f8.png)
Python环境-xkcd.com
避免包版本冲突
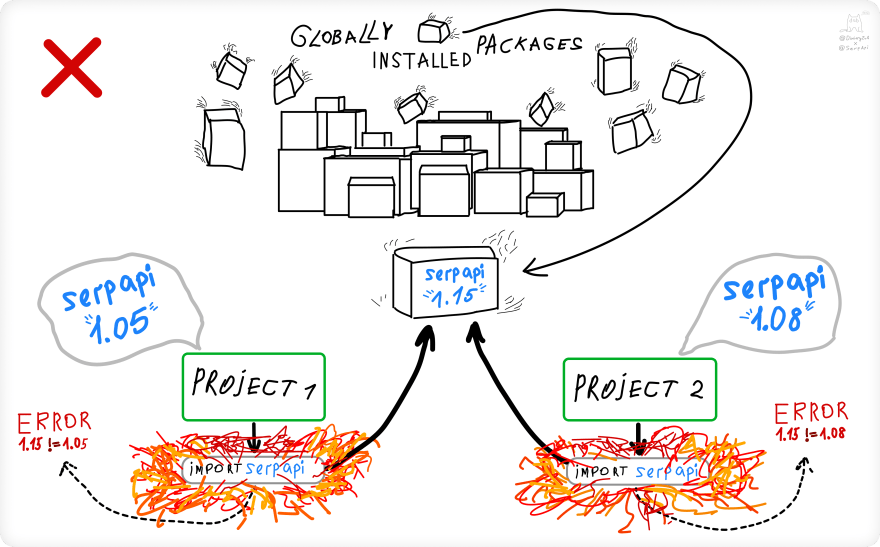
假设您在两个项目中,其中两个正在使用serpapi库,该库以 1.15 版本全局(系统范围)安装。
Project_1 取决于 1.05 版本,Project_2 取决于 1.08 版本。如果每个项目都尝试import一个serpapi库会发生什么...
没有虚拟环境的例子
由于 Python 不区分/site-packages目录下同一个库的不同版本,当你有两个项目需要同一个库的不同版本并且全局安装的库具有完全不同的版本时,这会导致问题。
[ ](https://res.cloudinary.com/practicaldev/image/fetch/s--0QZXsf88--/c_limit%2Cf_auto%2Cfl_progressive%2Cq_auto%2Cw_880/https://user- images.githubusercontent.com/78694043/145010290-2eeabc7a-d22b-4b5b-ad98-5bebc5ae8b46.png)
虚拟环境示例
使用 Python 虚拟环境时,您可以使用同一库的不同版本或由不同虚拟环境(文件夹)分隔的不同版本的 Python。
[ ](https://res.cloudinary.com/practicaldev/image/fetch/s--AoD6nC-H--/c_limit%2Cf_auto%2Cfl_progressive%2Cq_auto%2Cw_880/https:// user-images.githubusercontent.com/78694043/145010310-aadd8463-100e-495a-ad26-61fc7c03b502.png)
📌注意:您可以安装全局不同版本的站点包并使用它们,但如前所述,它会很快变得一团糟,并可能破坏系统工具或其他项目。
如何使用虚拟环境?
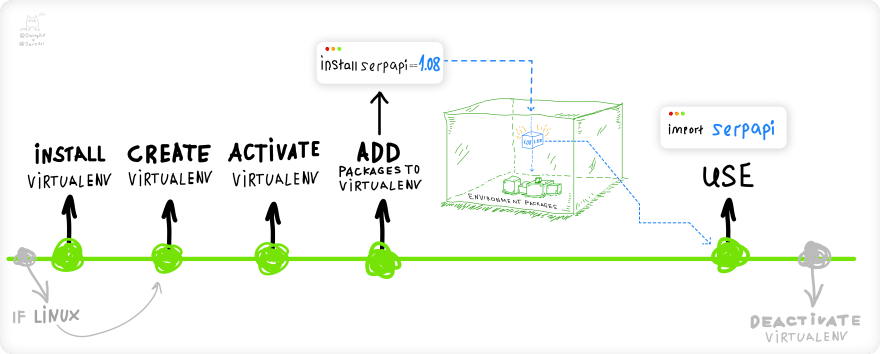
让我们看一下如何使用 Python 虚拟环境的示例,从初始安装、创建和激活环境、使用virtualenv和poetry模块添加依赖项以及完成后停用虚拟环境。
[ ](https://res.cloudinary.com/practicaldev/image/fetch/s--yxBTtVwD--/c_limit%2Cf_auto%2Cfl_progressive%2Cq_auto%2Cw_880/https://user- images.githubusercontent.com/78694043/145010188-0e11d33a-521f-4684-894b-fc0669820b34.png)
Virtualenv使用示例流程
安装virtualenv:
$ pip install virtualenv
进入全屏模式 退出全屏模式
在当前包/项目目录中创建环境文件夹:
$ virtualenv env
进入全屏模式 退出全屏模式
- env 是
virtualenv模块创建的文件夹。
激活环境:
# On Windows
source env/Scripts/activate

(env)
进入全屏模式 退出全屏模式
# On Linux
$ source env/bin/activate

(env) $
进入全屏模式 退出全屏模式
(env)表示你在虚拟环境中。
将站点包(第三方库)添加到激活的环境。
添加最新版本:
(env) $ pip install google-search-results
进入全屏模式 退出全屏模式
使用等于==符号添加特定版本:
(env) $ pip install 'google-search-results==1.3.0'
进入全屏模式 退出全屏模式
📌注意:如果您在 Windows 上并使用命令行提示符,请在指定版本时使用双引号":
pip install 'google-search-results==1.3.0'
ERROR: Invalid requirement: "'google-search-results==1.3.0'"
进入全屏模式 退出全屏模式
添加特定版本而不覆盖较低版本:
(env) $ pip install -I 'google-search-results==1.3.0'
进入全屏模式 退出全屏模式
-I参数将忽略已安装的软件包。
快速了解如何安装 site-package (virtualenv) 并为特定 Python 版本创建虚拟环境:
# install package for specific Python version (https://bit.ly/3pXtHng)

# For Windows:
$ py -3.6 -m pip install virtualenv

# For Linux
$ python3.6 -m pip install virtualenv

# create venv for specific Python version (https://bit.ly/3EjH0ni)
$ virtualenv -p python3.6 test_env
进入全屏模式 退出全屏模式
在 IDE 中使用和索引添加的站点包
请参阅激活和索引已安装的软件包部分以及使用poetry示例的图解过程PyCharm、IntelliJ和(#intellij)和]zw4 zvscode。
一切都几乎相同除了您不需要通过命令行查找poetry缓存文件夹来查找python.exe文件的路径,因为env文件夹已经在您之前创建的项目目录中_以上_。
完成后停用虚拟环境:
(env) $ deactivate
$
进入全屏模式 退出全屏模式
使用诗歌的示例流程
安装poetry:
$ pip install poetry
进入全屏模式 退出全屏模式
快速了解如何为特定 Python 版本安装站点包 (poetry):
# For Windows:
$ py -3.6 -m pip install poetry

# For Linux:
$ python3.6 -m pip install poetry
进入全屏模式 退出全屏模式
在_current_包/项目目录中创建(初始化)poetry:
$ poetry init
进入全屏模式 退出全屏模式
init命令将“初始化”现有目录,创建一个pyproject.toml,它将管理您的项目及其依赖项:
pyproject.toml 文件
[工具.诗歌]
名称 u003d “虚拟环境”
版本 u003d “0.1.0”
描述 u003d ""
作者 u003d [“Dimitry Zub dimitryzub@gmail.com”]
[tool.poetry.dependencies]
python u003d "^3.9"
谷歌搜索结果 u003d "^2.4.0"
其他站点包将出现在这里..
[tool.poetry.dev-依赖项]
开发依赖会出现在这里..
[构建系统]
需要 u003d ["诗歌核心>u003d1.0.0"]
构建后端 u003d "poetry.core.masonry.api"
pyproject.toml到底是什么?
In short,
pyproject.tomlis the new unified Python project settings file that contains build system requirements and information, which are used bypipto build the package/project, and it is almost a replacement forsetup.py.
在创建pyproject.toml之前,$ poetry init将交互地要求您填写有关您的包/项目的字段:
*
--name:包/包的名称。
*
--description:包说明。
*
--author:包的作者。
*
--python兼容的 Python 版本。
*
--dependency:需要版本约束的包。格式应为package:1.0.0(版本)。
*
--dev-dependency:开发要求,见--require。
添加依赖项到您的包/项目:
$ poetry add google-search-results
进入全屏模式 退出全屏模式
...
Creating virtualenv PROJECT-9SrbZw5z-py3.9 in C:\Users\USER\AppData\Local\pypoetry\Cache\virtualenvs

Using version ^2.4.0 for google-search-results

Updating dependencies
Resolving dependencies...

Writing lock file

Package operations: 1 install, 0 updates, 0 removals

  • Installing google-search-results (2.26.0)
进入全屏模式 退出全屏模式
*
add命令添加依赖到pyproject.toml和poetry.lock并安装它们。
*
Creating virtualenv将使用显示的路径创建一个虚拟环境。环境创建将完成一次。
*
Writing lock file会将依赖关系写入poetry.lock文件。
poetry.lock阻止自动获取最新版本的依赖项。
可以显式地写写
lock命令来锁定列在pyproject.toml中的依赖关系
添加特定版本:
# multiple ways
# double quotes ("foo") for Windows CMD

$ poetry add google-search-results@^2.1.0

$ poetry add 'google-search-results>=1.8.5'

$ poetry add 'google-search-results==1.8.5'

$ poetry add google-search-results@latest
进入全屏模式 退出全屏模式
如果您指定了一个约束(
@或>=),则将使用指定的约束更新依赖关系。
否则,如果你尝试添加一个已经存在的包,你会得到一个错误。
(optional)从现有的项目/包依赖项安装。
如果您正在使用已创建的项目,其中包含poetry.lock或pyproject.toml文件,则可以将这些依赖项安装到虚拟环境:
$ poetry install
进入全屏模式 退出全屏模式
install命令读取pyproject.toml或poetry.lock文件并安装所有列出的依赖项。
如果有
poetry.lock文件:
- 诗歌使用
poetry.lock中列出的确切版本。
如果没有
poetry.lock文件:
- Poetry 将从
pyproject.toml文件中解析所有依赖项 并下载其文件的最新版本。
(optional) 要不安装开发依赖项,请使用--no-dev参数:
$ poetry install --no-dev
进入全屏模式 退出全屏模式
在 IDE 中使用添加的站点包
如果使用poetry,首先通过config --list命令](https://python-poetry.org/docs/cli#config)找到初始化环境的位置[。在输出中查找virtualenvs.path:
$ poetry config --list

cache-dir = "C:\\Users\\USER\\AppData\\Local\\pypoetry\\Cache"
experimental.new-installer = true
installer.parallel = true
virtualenvs.create = true
virtualenvs.in-project = null
👉virtualenvs.path = "{cache-dir}\\virtualenvs"  👉👉👉# C:\Users\USER\AppData\Local\pypoetry\Cache\virtualenvs
进入全屏模式 退出全屏模式
还有几个步骤:
-
转到
virtualenvs.path文件夹并打开创建的环境文件夹(在我的例子中是:PROJECT-9SrbZw5z-py3.9)。 -
进入
Scripts(Windows)或bin(Linux)文件夹,复制完整路径并在路径末尾添加python.exe:
C:\Users\USER\AppData\Local\pypoetry\Cache\virtualenvs\PROJECT-9SrbZw5z-py3.9\Scripts\python.exe
进入全屏模式 退出全屏模式
virtualenvs.path需要在创建的虚拟环境中找到到python.exe的路径,这将让 JetBrains 或 VSCode 到索引安装的站点包。
如果使用virtualenv,请转到项目中的env\Scripts\python.exe文件夹并将完整路径复制到python.exe文件并在 IDE 中将其作为系统解释器输入。
激活和索引已安装的包
目前,如果你在 IDE 中运行脚本,它会查看全局安装的包(例如serpapi)并会抛出错误,因为全局没有安装这样的库(如果安装它不会抛出错误):
Traceback (most recent call last):
  File "C:\Users\USER\PyCharmProjects\PROJECT\environment.py", line 1, in <module>
    from serpapi import GoogleSearch
ModuleNotFoundError: No module named 'serpapi'
进入全屏模式 退出全屏模式
VSCode 版本
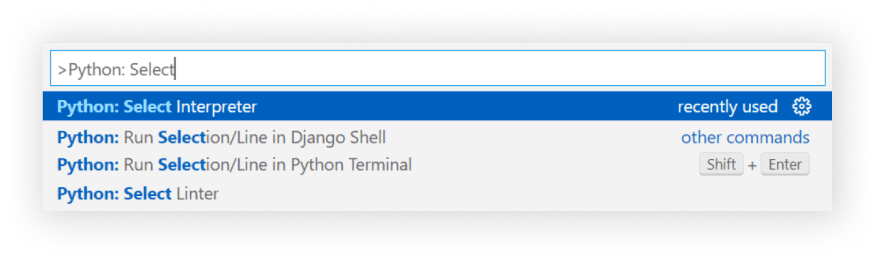
要在 VSCode 中解决这个问题,我们需要选择一个虚拟环境 Python Interpreter 并将其设置为 System Interpreter。
打开命令面板CTRL+SHIFT+P并输入:Python: System Interpreter(应安装Python 扩展)。
[ ](https://res.cloudinary.com/practicaldev/image/fetch/s--1ny_aYns--/c_limit%2Cf_auto%2Cfl_progressive%2Cq_auto%2Cw_880/https://user-images.githubusercontent .com/78694043/145968033-cdb91765-f6b2-4ec4-be9e-0fe892e1b7e6.png)
对于virtualenv和poetry,VSCode 应该自动从虚拟环境中检测到正确的python.exe文件。
如果您在虚拟环境中没有看到到python.exe的正确路径,那么您需要找到并输入它。
[ ](https://res.cloudinary.com/practicaldev/image/fetch/s--IFg5UM-o--/c_limit%2Cf_auto%2Cfl_progressive%2Cq_auto%2Cw_880/https://user-images .githubusercontent.com/78694043/145968041-14b6d7c1-7b40-4b62-9b25-9feb408f66c9.png)
现在,您可以通过命令行或使用VSCode Code Runner 扩展从虚拟环境运行 Python 脚本。
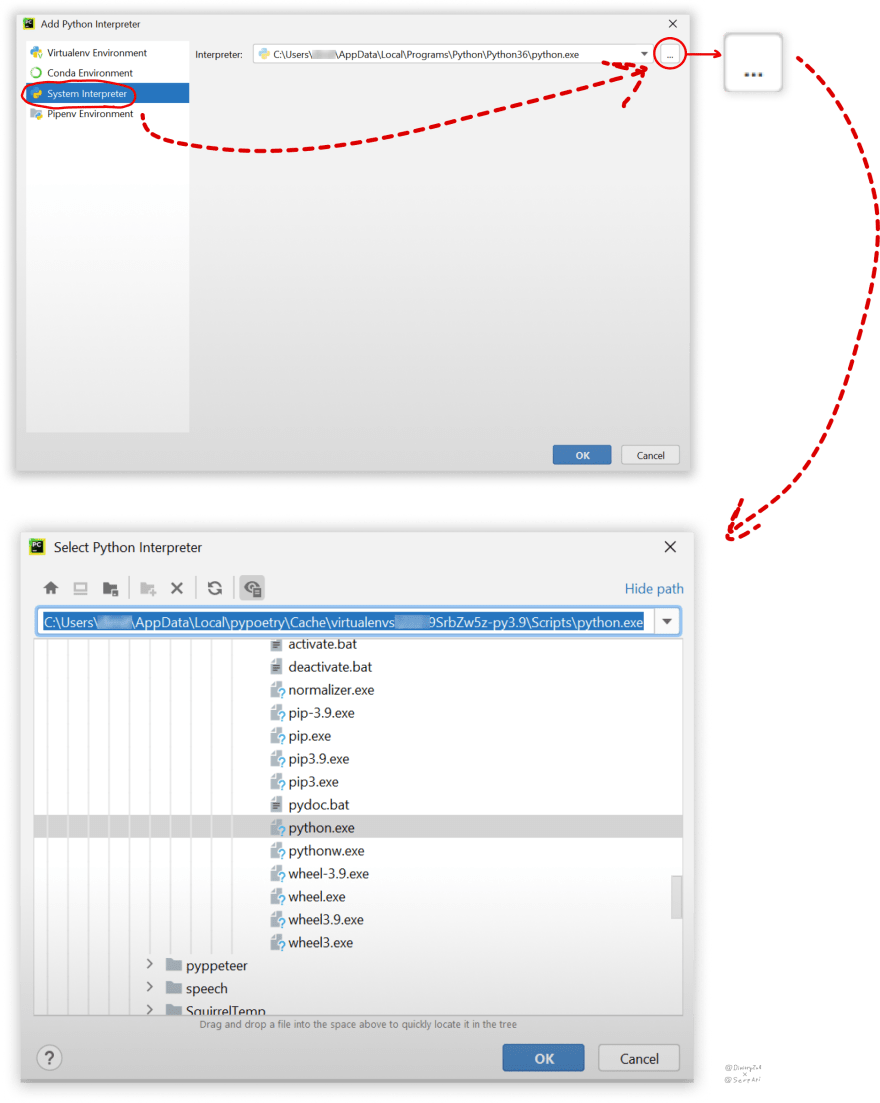
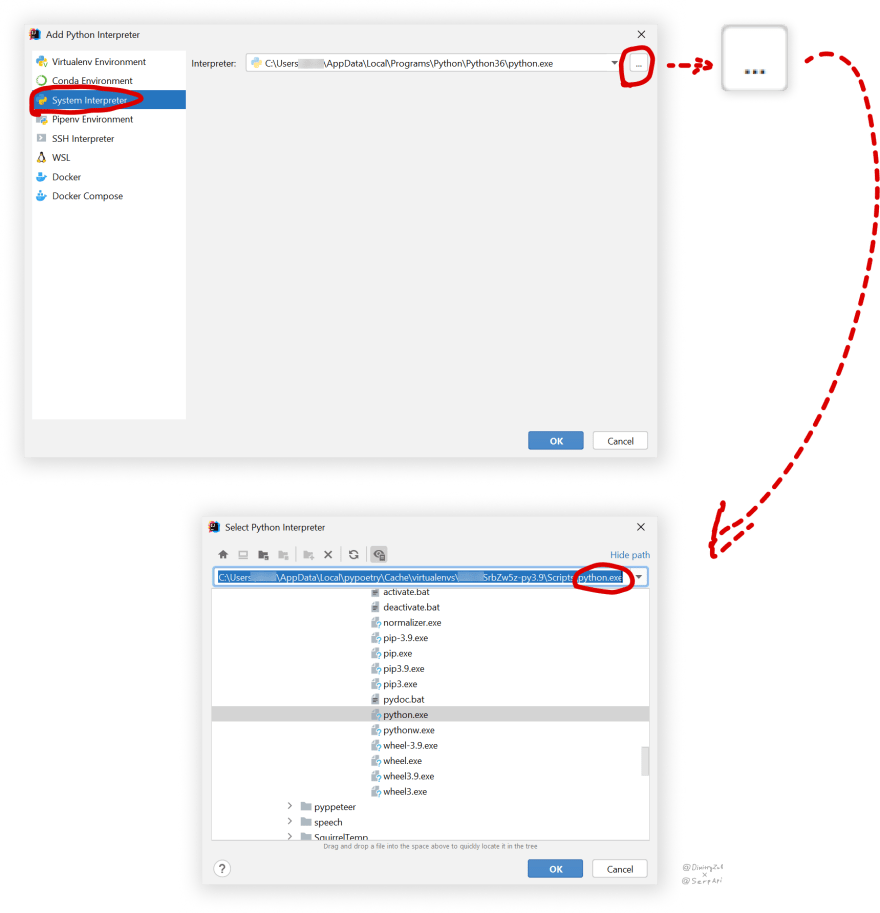
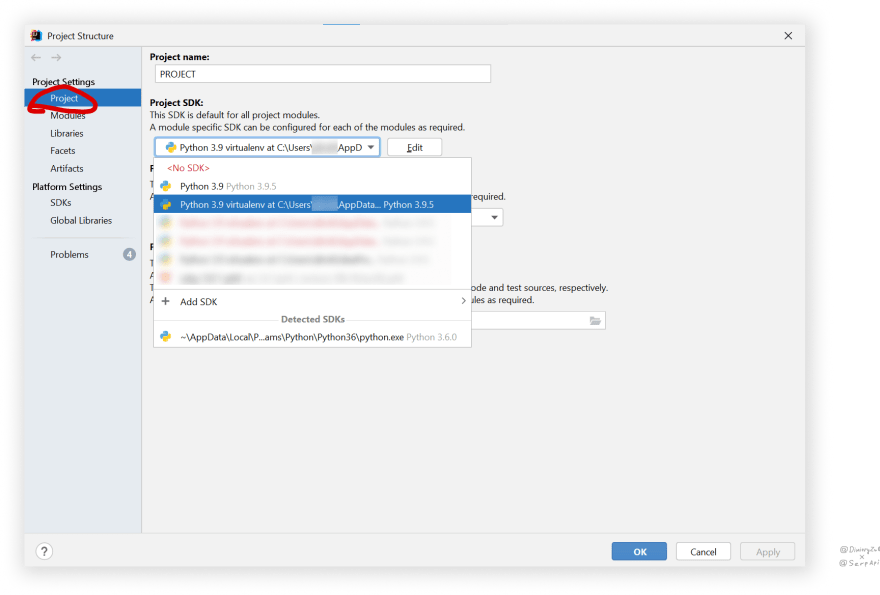
PyCharm 版本
要在 PyCharm 中解决这个问题,我们需要从virtualenv文件夹添加到python.exe的路径,并将其设置为PyCharm System Interpreter它将索引来自虚拟环境的所有站点包:
[ ](https://res.cloudinary.com/practicaldev/image/fetch/s--_uPJJ6rx--/c_limit%2Cf_auto%2Cfl_progressive%2Cq_auto%2Cw_880/https://user-images.githubusercontent .com/78694043/144842354-86bc5461-3c23-44c8-b158-50d442556df9.png)
[ ](https://res.cloudinary.com/practicaldev/image/fetch/s--S2XFrjLq--/c_limit%2Cf_auto%2Cfl_progressive%2Cq_auto%2Cw_880/https://user-images.githubusercontent .com/78694043/144844623-98b9588d-bbc7-4cb2-9c18-ef25d091f619.png)
[ ](https://res.cloudinary.com/practicaldev/image/fetch/s--SLWqQEWe--/c_limit%2Cf_auto%2Cfl_progressive%2Cq_auto%2Cw_880/https://user-images.githubusercontent .com/78694043/144848170-4483e721-d3ad-44e5-8383-2d37b7f1dc4a.png)
[ ](https://res.cloudinary.com/practicaldev/image/fetch/s--WAg4iZbA--/c_limit%2Cf_auto%2Cfl_progressive%2Cq_auto%2Cw_880/https://user-images.githubusercontent .com/78694043/145018801-b10a3548-6377-45d2-9370-b39306b86bb9.png)
IntelliJ IDEA 版
要在 IntelliJ IDEA 中解决此问题,我们还需要从virtualenv文件夹添加到python.exe的路径,并将其设置为PyCharm System Interpreter并进行一些额外的调整,这些调整将从虚拟环境中索引所有站点包:
[ ](https://res.cloudinary.com/practicaldev/image/fetch/s--NHse8Mp3--/c_limit%2Cf_auto%2Cfl_progressive%2Cq_auto%2Cw_880/https://user-images.githubusercontent .com/78694043/144851324-bad5ae7c-f294-433c-aac3-e341ec2d24de.png)
[ ](https://res.cloudinary.com/practicaldev/image/fetch/s--cSCjJ7Er--/c_limit%2Cf_auto%2Cfl_progressive%2Cq_auto%2Cw_880/https://user-images.githubusercontent .com/78694043/144851331-a3ecb5a1-4eb1-4978-962b-10284d930343.png)
[ ](https://res.cloudinary.com/practicaldev/image/fetch/s--CQIcjYHm--/c_limit%2Cf_auto%2Cfl_progressive%2Cq_auto%2Cw_880/https://user-images.githubusercontent .com/78694043/144851349-7bb66743-422f-4ddd-ba60-413b31769a8e.png)
[ ](https://res.cloudinary.com/practicaldev/image/fetch/s--a1Nk8tPb--/c_limit%2Cf_auto%2Cfl_progressive%2Cq_auto%2Cw_880/https://user-images.githubusercontent .com/78694043/144851356-9d7dbf34-f19b-44c8-ac82-78a6e244adbc.png)
[ ](https://res.cloudinary.com/practicaldev/image/fetch/s--jDxVDzJb--/c_limit%2Cf_auto%2Cfl_progressive%2Cq_auto%2Cw_880/https://user-images.githubusercontent .com/78694043/145018901-b538bf67-eef0-4c26-aa94-29a75e9c6f72.png)
完成后停用虚拟环境
要停用虚拟环境_以便在 PyCharm、IntelliJ IDEA 和 VSCode 中使用系统 Python_,您需要将 Python System Interpreter 设置回不带virtualenv前缀的默认环境,例如:“Python 3.9 virtualenv..”u003du003d>“_Python 3.9 _”,上面显示的逆过程。
结论
不同的项目 - 不同的环境
简而言之,如果您需要同时处理多个项目,最好使用虚拟环境:
-
使用不同的库版本。
-
使用不同的 Python 版本。
全局安装将变得一团糟
为不同的项目安装全局不同版本的同一个库很快就会变得一团糟,没有顺序,或者如果需要安装不同版本的 Python,它会变成一团糟:
[ ](https://res.cloudinary.com/practicaldev/image/fetch/s--3GK_4tgM--/c_limit%2Cf_auto%2Cfl_progressive%2Cq_auto%2Cw_880/https://user-images.githubusercontent .com/78694043/145216823-7f2c8c4f-d469-4315-a852-6f817e5fe10d.png)
友情链接
-
Virtualenv
-
诗歌
-
SerpApi 库
-
xkcd.com 的黑白插图
致谢
非常感谢这些人帮助提供有关插图的反馈:
-
伊利亚 Z.
-
Yevhen M.
-
Oleh V.
-
Yehor T.
祖兹 100275 * *
其他
如果您有任何要分享的内容、对此博文的任何问题或建议,请随时在下方发表评论或通过 Twitter 联系@dimitryzub或@serp_api。
你的,
Dimitry 和 SerpApi 团队的其他成员。
加入我们Reddit|Twitter|YouTube
添加功能请求💫 或错误🐞

Python社区为您提供最前沿的新闻资讯和知识内容
更多推荐

 0
0 0
0- 0


 已为社区贡献126442条内容

所有评论(0)