Greenplum数据库(一)Greenplum简介及安装
Greenplum6.20超详细安装教程
1. Greenplum数据库简介
Greenplum是基于开源PostgreSQL的分布式数据库,采用shared-nothing架构,即主机、操作系统、内存、存储都是每台服务器独立自我控制,不存在共享。
Greenplum本质上是一个关系型数据库集群,实际上是由多个独立的数据库服务组合而成的一个逻辑数据库。与Oracle的RAC不同,这种数据库集群采取的是MPP(Massively Parallel Processing)架构。
Greenplum最大的特点就是基于低成本的开放平台基础上提供强大的并行数据计算性能和海量数据管理能力。这个能力主要指的是并行计算能力,是对大任务、复杂任务的快速高效计算。
2. 安装前环境准备
2.1 环境规划
本次实验环境规划:
硬件:3台虚拟机(每台4核、8G内存、50G存储)
操作系统:CentOS 64-bit 7.x
数据库节点安装规划:一台master节点, 无standby节点,2台segment节点(分为4个segment,4个mirror)
主机名配置及节点规划如下:
| 主机IP | 主机名 | 节点规划 |
|---|---|---|
| 192.168.11.101 | mdw | master节点 |
| 192.168.11.102 | sdw1 | seg1,seg2,mirror3,mirror4 |
| 192.168.11.103 | sdw2 | seg3,seg4,mirror1,mirror2 |
修改每台主机的名称、host文件:
[root@mdw ~]# hostnamectl set-hostname mdw
[root@mdw ~]# cat /etc/hostname
mdw
[root@mdw ~]# cat /etc/hosts
127.0.0.1   localhost localhost.localdomain localhost4 localhost4.localdomain4
::1         localhost localhost.localdomain localhost6 localhost6.localdomain6

192.168.11.101  mdw
192.168.11.102  sdw1
192.168.11.103  sdw2
如果是个人学习使用,可以用Vmware虚拟机进行安装。VMware安装Linux虚拟机的详细步骤,可以参考本公众号这篇文章:
[VMware安装Linux虚拟机详细步骤]
2.2 下载rmp安装包
官网下载地址:https://network.pivotal.io/products/vmware-tanzu-greenplum
当前最新版本是: 6.21.0,本次选择下载 6.20.5版本 (greenplum-db-6.20.5-rhel7-x86_64.rpm)
安装步骤参考官方文档:https://gpdb.docs.pivotal.io/6-20/install_guide/install_guide.html
3.3 检查安装依赖包
GP6.X RPM版本安装前需要检查软件依赖包,确保如下的依赖包都已安装:
yum install -y apr apr-util bash bzip2 curl krb5 libcurl libevent libxml2 libyaml zlib openldap openssh-client openssl openssl-libs perl readline rsync R sed tar zip krb5-devel
3.4 关闭SElinux
依次关闭3台主机的SElinux, 分别修改/etc/selinux/config文件,设置SELINUX=disabled
[root@mdw ~]# setenforce 0
[root@mdw ~]# vi /etc/selinux/config
[root@mdw ~]# cat /etc/selinux/config |grep ^SELINUX=
SELINUX=disabled
3.5 关闭防火墙
依次关闭3台主机的防火墙
[root@mdw ~]# systemctl stop firewalld.service
[root@mdw ~]# systemctl disable firewalld.service
[root@mdw ~]# systemctl status firewalld
● firewalld.service - firewalld - dynamic firewall daemon
   Loaded: loaded (/usr/lib/systemd/system/firewalld.service; disabled; vendor preset: enabled)
   Active: inactive (dead)
     Docs: man:firewalld(1)
3.6 操作系统参数配置
修改操作系统参数(/etc/sysctl.conf)
共享内存参数的计算:
kernel.shmall = _PHYS_PAGES / 2 ,系统可用的内存页总量的一半,可以用getconf _PHYS_PAGES查看系统可用的内存页总量
[root@mdw ~]# echo $(expr $(getconf _PHYS_PAGES) / 2)
1001229
kernel.shmmax = kernel.shmall * PAGE_SIZE ,命令getconf PAGE_SIZE或者页大小
[root@mdw ~]# echo $(expr $(getconf _PHYS_PAGES) / 2 \* $(getconf PAGE_SIZE))
4101033984
系统内存设置:
系统内存大于64G ,建议以下配置
vm.dirty_background_ratio = 0
vm.dirty_ratio = 0
vm.dirty_background_bytes = 1610612736 # 1.5GB
vm.dirty_bytes = 4294967296 # 4GB
系统内存小于等于 64GB,移除vm.dirty_background_bytes 设置,并设置以下参数
vm.dirty_background_ratio = 3
vm.dirty_ratio = 10
同时增加 vm.min_free_kbytes ,确保网络和存储驱动程序PF_MEMALLOC得到分配。这对内存大的系统尤其重要。
一般系统上,默认值通常太低。可以使用awk命令计算vm.min_free_kbytes的值,通常是建议的系统物理内存的3%
[root@mdw ~]# awk 'BEGIN {OFMT = "%.0f";} /MemTotal/ {print "vm.min_free_kbytes =", $2 * .03;}' /proc/meminfo
vm.min_free_kbytes = 240295
最后,本次系统参数配置如下(主机CentOS 64-bit 7.x,8G内存),三台主机都需修改:
[root@mdw ~]# vi /etc/sysctl.conf
[root@mdw ~]# sysctl -p
kernel.shmall = 1001229
kernel.shmmax = 4101033984
kernel.shmmni = 4096
vm.overcommit_memory = 2 # See Segment Host Memory                              # 主机内存
vm.overcommit_ratio = 95 # See Segment Host Memory                              # 主机内存
net.ipv4.ip_local_port_range = 10000 65535 # See Port Settings                  #端口范围设置
kernel.sem = 250 2048000 200 8192
kernel.sysrq = 1
kernel.core_uses_pid = 1
kernel.msgmnb = 65536
kernel.msgmax = 65536
kernel.msgmni = 2048
net.ipv4.tcp_syncookies = 1
net.ipv4.conf.default.accept_source_route = 0
net.ipv4.tcp_max_syn_backlog = 4096
net.ipv4.conf.all.arp_filter = 1
net.core.netdev_max_backlog = 10000
net.core.rmem_max = 2097152
net.core.wmem_max = 2097152
vm.swappiness = 10
vm.zone_reclaim_mode = 0
vm.dirty_expire_centisecs = 500
vm.dirty_writeback_centisecs = 100
vm.dirty_background_ratio = 3 # See System Memory                               # 系统内存
vm.dirty_ratio = 10
vm.min_free_kbytes = 240295
3.7 系统资源限制
修改系统资源限制配置文件(/etc/security/limits.conf),3台主机同步修改,都添加以下参数:
*       soft    nofile  524288
*       hard    nofile  524288
*       soft    nproc   131072
*       hard    nproc   131072
“*” 星号表示所有用户
noproc 是代表最大进程数
nofile 是代表最大文件打开数
同时,RHEL / CentOS 7操作系统,还需修改:/etc/security/limits.d/20-nproc.conf 文件的nproc 为131072
如果是RHEL / CentOS 6 ,则修改:/etc/security/limits.d/90-nproc.conf 文件的nproc 为131072
[root@mdw limits.d]# cat /etc/security/limits.d/20-nproc.conf
# Default limit for number of user's processes to prevent
# accidental fork bombs.
# See rhbz #432903 for reasoning.

*          soft    nproc     131072
root       soft    nproc     unlimited
退出重新登陆,ulimit -u 命令显示每个用户可用的最大进程数max user processes。验证返回值为131072
3.8 XFS挂载选项
由于本次虚拟机只有一块盘,并且是系统盘,无法再改文件系统。此处略过挂载xfs。
但生产环境必须挂载,步骤如下:
root用户登录所有服务器
将mount命令与以下推荐用于 RHEL 和 CentOS 系统的 XFS 挂载选项一起使用如:rw,nodev,noatime,nobarrier,inode64
XFS 选项也可以在/etc/fstab文件中设置。此文件中的示例条目fstab指定 XFS 选项:
[root@mdw ~]# cat /etc/fstab
/dev/data  /data  xfs rw,nodev,noatime,nobarrier,inode64 0 0
/dev/tabdata /tabdata xfs rw,nodev,noatime,nobarrier,inode64 0 0
/dev/tmpdata /tmpdata xfs rw,nodev,noatime,nobarrier,inode64 0 0
使配置生效:
mount -o remount /data
mount -o remount /tabdata
mount -o remount /tmpdata
3.9 磁盘I/O设置
每台主机的磁盘文件预读统一设置为:16384
不同主机或系统的磁盘目录不一定一样,可以先使用 lsblk 查看磁盘挂在情况,接着使用/sbin/blockdev --setra命令进行设置,使用/sbin/blockdev --getra进行查看设置是否生效。
[root@mdw ~]# lsblk
NAME   MAJ:MIN RM  SIZE RO TYPE MOUNTPOINT
sda      8:0    0   50G  0 disk
├─sda1   8:1    0    1G  0 part /boot
├─sda2   8:2    0   45G  0 part /
└─sda3   8:3    0    4G  0 part [SWAP]
sr0     11:0    1  4.4G  0 rom
[root@mdw ~]# /sbin/blockdev --getra /dev/sda
8192
[root@mdw ~]# /sbin/blockdev --setra 16384 /dev/sda
[root@mdw ~]# /sbin/blockdev --getra /dev/sda
16384
注意:该blockdev --setra命令不是持久的,所以必须确保在系统重新启动时设置预读值。
可以将设置命令添加到/etc/rc.d/rc.local文件中,并将该文件设置为可执行,使得系统重启自动执行。
[root@mdw ~]# vi  /etc/rc.d/rc.local
[root@mdw ~]# cat /etc/rc.d/rc.local
touch /var/lock/subsys/local
/sbin/blockdev --setra 16384 /dev/sda
修改rc.local 权限,将该文件设置为可执行:
3.10 设置磁盘IO调度策略
磁盘IO的调度策略,根据官方文档,建议设置为:deadline,设置命令如下:
[root@mdw ~]# echo deadline > /sys/block/sda/queue/scheduler
[root@mdw ~]# cat /sys/block/sda/queue/scheduler
noop [deadline] cfq
对于RHEL 7.x or CentOS 7.x操作系统,使用grub2 ,可以使用系统工具grubby来修改:
[root@mdw ~]# grubby --update-kernel=ALL --args="elevator=deadline"
[root@mdw ~]# grubby --info=ALL
index=0
kernel=/boot/vmlinuz-3.10.0-1160.el7.x86_64
args="ro rhgb quiet LANG=zh_CN.UTF-8 elevator=deadline"
root=UUID=cc11ae0d-7eb4-4938-abd4-9fa4181e04f4
initrd=/boot/initramfs-3.10.0-1160.el7.x86_64.img
title=CentOS Linux (3.10.0-1160.el7.x86_64) 7 (Core)
index=1
kernel=/boot/vmlinuz-0-rescue-a7ea1f1a702d4a33a30f30e0ff1f434d
args="ro rhgb quiet elevator=deadline"
root=UUID=cc11ae0d-7eb4-4938-abd4-9fa4181e04f4
initrd=/boot/initramfs-0-rescue-a7ea1f1a702d4a33a30f30e0ff1f434d.img
title=CentOS Linux (0-rescue-a7ea1f1a702d4a33a30f30e0ff1f434d) 7 (Core)
index=2
non linux entry
这样做并不能永久生效,每次重启都需要重新设置,可以将grubby设置命令添加到/etc/rc.d/rc.local文件,使得系统重启自动执行。
3.11 禁用Transparent Huge Pages (THP)
禁用透明大页面 (THP),因为它会降低 Greenplum 数据库的性能。
RHEL 6.x or CentOS 6.x 或更高版本默认情况下启用THP。在RHEL 6.x上禁用THP的一种方法是添加参数 transparent_hugepage=never 到配置文件:/boot/grub/grub.conf,即 GRUB 引导加载程序配置文件。
RHEL 7.x or CentOS 7.x, 使用 grub2 ,可以使用系统工具grubby来修改,修改完成,重启系统。
[root@mdw ~]# grubby --update-kernel=ALL --args="transparent_hugepage=never"
[root@mdw ~]# cat /sys/kernel/mm/*transparent_hugepage/enabled
[always] madvise never
3.12 IPC对象移除
禁用 RHEL 7.2 或 CentOS 7.2 或 Ubuntu 的 IPC 对象删除。
默认systemd设置RemoveIPC=yes会在非系统用户帐户注销时删除 IPC 连接。这会导致 Greenplum 数据库实用程序gpinitsystem因信号量错误而失败。执行以下操作之一以避免此问题。
在创建 Greenplum 管理用户中将gpadmin操作系统用户帐户添加到主节点时,将用户创建为系统帐户。
在 Greenplum 数据库主机,修改配置文件: /etc/systemd/logind.conf,设置RemoveIPC=no
[root@mdw ~]# echo RemoveIPC=no >> /etc/systemd/logind.conf
[root@mdw ~]# cat /etc/systemd/logind.conf
RemoveIPC=no
systemd-login重启服务或重启系统后设置生效。要重新启动服务,用root用户执行:
[root@mdw ~]# systemctl restart systemd-logind
3.13 SSH连接阈值
Greenplum数据库管理程序中的gpexpand‘ gpinitsystem、gpaddmirrors,使用 SSH连接来执行任务。在规模较大的Greenplum集群中,程序的ssh连接数可能会超出主机的未认证连接的最大阈值。发生这种情况时,会收到以下错误:ssh_exchange_identification: Connection closed by remote host。
为避免这种情况,可以更新 /etc/ssh/sshd_config 或者 /etc/sshd_config 文件的 MaxStartups 和 MaxSessions 参数
root用户登陆所有服务器,编辑配置文件:/etc/ssh/sshd_config,修改完成,重启sshd服务,使参数生效。
[root@mdw ~]# vi /etc/ssh/sshd_config
[root@mdw ~]# cat /etc/ssh/sshd_config |grep ^Max
MaxSessions 200
MaxStartups 100:30:1000
[root@mdw ~]# systemctl restart sshd    #重启sshd服务
3.14 同步集群时钟(NTP)
Greenplum数据库系统可以使用NTP(网络时间协议)同步构成所有主机上的系统时钟。master主机应配置为集群主机的主要时间源,其他segment主机NTP配置为指向master服务器,保持跟master主机时间一致。
为了保证集群各个服务的时间一致,首先在master 服务器上,编辑 /etc/ntp.conf,配置时钟服务器为数据中心的ntp服务器。再修改其他节点的 /etc/ntp.conf,让他们跟随master服务器的时间。
先确认系统是否安装了ntp服务,如没有安装,则先安装: yum -y install ntp
并确认当前每台服务器的时间、时区是一致的。
在master主机上,以root用户登陆,编辑文件:/etc/ntp.conf
[root@mdw ~]# vi /etc/ntp.conf
# 配置ntp服务器地址,选master节点为ntp服务
server 192.168.11.101
在其他segment主机上,以root用户登陆,编辑文件:/etc/ntp.conf,设置第一个server参数指向master主机,第二个server参数指向standby master主机(如果有设置standby master主机)
server mdw prefer
server smdw
在standby master主机上,以root用户登陆,编辑文件:/etc/ntp.conf
server mdw prefer
server xx.xx.xx   #standby master主机IP
启动ntp服务,并设置开机启动启动
systemctl enable ntpd
systemctl start ntpd
3.15 修改字符集
检查主机的字符集,字符集必须是 en_US.UTF-8,查看LANG环境变量或者通过locale命令:
[root@mdw ~]# echo $LANG
en_US.UTF-8
[root@mdw ~]# locale
LANG=en_US.UTF-8
LC_CTYPE="en_US.UTF-8"
LC_NUMERIC="en_US.UTF-8"
LC_TIME="en_US.UTF-8"
LC_COLLATE="en_US.UTF-8"
LC_MONETARY="en_US.UTF-8"
LC_MESSAGES="en_US.UTF-8"
LC_PAPER="en_US.UTF-8"
LC_NAME="en_US.UTF-8"
LC_ADDRESS="en_US.UTF-8"
LC_TELEPHONE="en_US.UTF-8"
LC_MEASUREMENT="en_US.UTF-8"
LC_IDENTIFICATION="en_US.UTF-8"
LC_ALL=
如果不是 en_US.UTF-8字符集,则用root用户进行设置,退出重新登陆后,再进行查询设置是否生效。
localectl set-locale LANG=en_US.UTF-8
3. 集群软件安装
gp6.2 开始不提供zip格式压缩包,仅提供rpm包,安装主要分为以下4步:
- 安装master(rpm -ivh / yum install -y),不可以指定安装目录,默认安装到/usr/local/
- gp6没有gpseginstall工具,所以需要自己从安装好的master节点上拷贝gp安装目录分发到其他segment节点上,或者各个节点单独安装rpm包。
- 集群性能校验
- gpinitsystem集群初始化
3.1 创建gpadmin组及用户
在每个节点上创建gpadmin组及用户,用于管理和运行gp集群,官网建议最好给与sudo权限。
[root@mdw ~]# groupadd gpadmin
[root@mdw ~]# useradd gpadmin -r -m -g gpadmin
[root@mdw ~]# passwd gpadmin
Changing password for user gpadmin.
New password:
Retype new password:
3.2 执行安装程序
先把下载的rpm安装包(greenplum-db-6.20.5-rhel7-x86_64.rpm)上传服务器,可以上传到(/opt/install 目录)
执行安装程序:
[root@mdw install]# rpm -ivh greenplum-db-6.20.5-rhel7-x86_64.rpm
Preparing...                          ################################# [100%]
Updating / installing...
   1:greenplum-db-6-6.20.5-1.el7      ################################# [100%]
[root@mdw install]#
3.3 创建hostfile_exkeys
安装程序执行完成后,gp默认安装路径是 : /usr/local/greenplum-db (实际这个目录是个软链接,指向同目录的实际安装目录:greenplum-db-6.20.5)
进入安装目录 : /usr/local/greenplum-db,在该目录下创建两个host文件(all_host,seg_host),用于后续使用gpssh,gpscp等脚本读取host列表的参数文件。
- all_host: 集群内所有的主机名或ip,包含master,segment,standby等
- seg_host: 集群内所有segment节点的主机名或ip
[root@mdw ~]# cd /usr/local/greenplum-db
[root@mdw greenplum-db]# vi all_host
[root@mdw greenplum-db]# vi seg_host
[root@mdw greenplum-db]# cat all_host
mdw
sdw1
sdw2
[root@mdw greenplum-db]# cat seg_host
sdw1
sdw2
因为刚才执行安装程序是用root用户,所以修改下安装目录的所属用户及组,让gp安装目录归属于gpadmin用户及组:
[root@mdw ~]# cd /usr/local
[root@mdw local]# chown -R gpadmin:gpadmin greenplum*

#修改完成后,权限如下:
lrwxrwxrwx   1 gpadmin gpadmin   30 Aug 20 09:55 greenplum-db -> /usr/local/greenplum-db-6.20.5
drwxr-xr-x  11 gpadmin gpadmin 4096 Aug 20 10:08 greenplum-db-6.20.5
3.4 建立集群之间ssh免密登陆
在master节点上,切换到gpadmin用户,首先生成ssh免密登陆的公钥和私钥,然后把公钥拷贝到其他节点,步骤如下:
[root@mdw ]# su - gpadmin
[gpadmin@mdw ~]$ ssh-keygen -t rsa -b 4096
Generating public/private rsa key pair.
Enter file in which to save the key (/home/gpadmin/.ssh/id_rsa):
Enter passphrase (empty for no passphrase):
Enter same passphrase again:
Your identification has been saved in /home/gpadmin/.ssh/id_rsa.
Your public key has been saved in /home/gpadmin/.ssh/id_rsa.pub.
The key fingerprint is:
SHA256:YOBpnR9DTgo3a9JNlUs7TiWK165oa2tIETXITUoEKZ4 gpadmin@mdw
The key's randomart image is:
+---[RSA 4096]----+
|  .===* +...     |
|. .o+O.%  + .    |
|... *.X.=+ =     |
| E ..+.ooo*      |
|     . .S+ .     |
|    .     o      |
|   . . . .       |
|    . = .        |
|     +oo         |
+----[SHA256]-----+
把公钥拷贝到集群内的其他节点:
[gpadmin@mdw ~]$ ssh-copy-id gpadmin@sdw1
/bin/ssh-copy-id: INFO: Source of key(s) to be installed: "/home/gpadmin/.ssh/id_rsa.pub"
The authenticity of host 'sdw1 (192.168.11.102)' can't be established.
ECDSA key fingerprint is SHA256:/rmoFHcFSiCHdXZR4+z7/lWPa05Xiow8TXUiqRrdbJM.
ECDSA key fingerprint is MD5:33:04:27:a8:08:f9:3d:7a:08:f0:2e:3f:74:3e:4a:38.
Are you sure you want to continue connecting (yes/no)? yes
/bin/ssh-copy-id: INFO: attempting to log in with the new key(s), to filter out any that are already installed
/bin/ssh-copy-id: INFO: 1 key(s) remain to be installed -- if you are prompted now it is to install the new keys
gpadmin@sdw1's password:

Number of key(s) added: 1

Now try logging into the machine, with:   "ssh 'gpadmin@sdw1'"
and check to make sure that only the key(s) you wanted were added.
[gpadmin@mdw ~]$
[gpadmin@mdw ~]$ ssh-copy-id gpadmin@sdw2
/bin/ssh-copy-id: INFO: Source of key(s) to be installed: "/home/gpadmin/.ssh/id_rsa.pub"
The authenticity of host 'sdw2 (192.168.11.103)' can't be established.
ECDSA key fingerprint is SHA256:/rmoFHcFSiCHdXZR4+z7/lWPa05Xiow8TXUiqRrdbJM.
ECDSA key fingerprint is MD5:33:04:27:a8:08:f9:3d:7a:08:f0:2e:3f:74:3e:4a:38.
Are you sure you want to continue connecting (yes/no)? yes
/bin/ssh-copy-id: INFO: attempting to log in with the new key(s), to filter out any that are already installed
/bin/ssh-copy-id: INFO: 1 key(s) remain to be installed -- if you are prompted now it is to install the new keys
gpadmin@sdw2's password:

Number of key(s) added: 1

Now try logging into the machine, with:   "ssh 'gpadmin@sdw2'"
and check to make sure that only the key(s) you wanted were added.
现在只是实现了master节点,可以免密登陆集群内其他segment节点。还需要实现集群内任意两台主机之间都可以免密登陆,可以使用gp提供的工具gpssh-exkeys,打通n-n之间的免密登陆:
[gpadmin@mdw ~]$ source /usr/local/greenplum-db/greenplum_path.sh
[gpadmin@mdw local]$ cd $GPHOME
[gpadmin@mdw greenplum-db-6.20.5]$ gpssh-exkeys -f all_host
[STEP 1 of 5] create local ID and authorize on local host
  ... /home/gpadmin/.ssh/id_rsa file exists ... key generation skipped

[STEP 2 of 5] keyscan all hosts and update known_hosts file

[STEP 3 of 5] retrieving credentials from remote hosts
  ... send to sdw1
  ... send to sdw2

[STEP 4 of 5] determine common authentication file content

[STEP 5 of 5] copy authentication files to all remote hosts
  ... finished key exchange with sdw1
  ... finished key exchange with sdw2

[INFO] completed successfully
用gpssh工具验证下,是否可以免密登陆。从以下执行结果看到,可以把命令发送到其他主机执行,并返回执行结果:
[gpadmin@mdw greenplum-db-6.20.5]$ gpssh -f /usr/local/greenplum-db/all_host -e 'free'
[sdw1] free
[sdw1]               total        used        free      shared  buff/cache   available
[sdw1] Mem:        8009836     2208188     2108164      123268     3693484     5306020
[sdw1] Swap:       5242876      304640     4938236
[ mdw] free
[ mdw]               total        used        free      shared  buff/cache   available
[ mdw] Mem:        8009828     2382440     4044244      160252     1583144     5110476
[ mdw] Swap:       5242876       31488     5211388
[sdw2] free
[sdw2]               total        used        free      shared  buff/cache   available
[sdw2] Mem:        8009836     2283328     3443536      160640     2282972     5201332
[sdw2] Swap:       5242876       16648     5226228
3.5 gp安装目录分发到其他节点
在gp6之前,有提供gpseginstall工具 , 可以安装各个节点的gp软件。但gp6没有提供这个工具,需要手工拷贝。
主节点安装目录(/usr/local/greenplum-db-6.20.5),通过scp命令,拷贝到各个seg节点的/usr/local/目录下,同时,在/usr/local/目录下创建软链接 greenplum-db,指向 /usr/local/greenplum-db-6.20.5 目录。
当然,也可以拷贝rpm安装包到各个seg节点,然后进行安装。步骤参见 3.2 执行安装程序。
同时,要注意安装目录的归属用户及组,必须修改成gpadmin
[root@sdw1 install]# yum install -y greenplum-db-6.20.5-rhel7-x86_64.rpm
[root@sdw1 install]# cd /usr/local
[root@sdw1 local]# chown -R gpadmin:gpadmin greenplum*
#修改完成后,权限如下:
lrwxrwxrwx   1 gpadmin gpadmin   30 Aug 20 11:33 greenplum-db -> /usr/local/greenplum-db-6.20.5
drwxr-xr-x  11 gpadmin gpadmin 4096 Aug 20 11:33 greenplum-db-6.20.5
3.6 配置集群环境变量
gp安装后,在安装目录下,有个脚本: greenplum_path.sh,是gp的相关环境变量配置脚本,需要配置到gpadmin用户的环境变量中:
[gpadmin@mdw local]$ cat >> /home/gpadmin/.bash_profile << EOF
> source /usr/local/greenplum-db/greenplum_path.sh
> EOF
[gpadmin@mdw local]$ cat /home/gpadmin/.bash_profile |grep greenplum
source /usr/local/greenplum-db/greenplum_path.sh

[gpadmin@mdw local]$ cat >> /home/gpadmin/.bashrc << EOF
> source /usr/local/greenplum-db/greenplum_path.sh
> EOF
[gpadmin@mdw local]$ cat /home/gpadmin/.bashrc |grep greenplum
source /usr/local/greenplum-db/greenplum_path.sh

[gpadmin@sdw1 ~]$ source /usr/local/greenplum-db/greenplum_path.sh
[gpadmin@sdw2 ~]$ source /usr/local/greenplum-db/greenplum_path.sh
3.7 创建集群数据目录
在master节点用root用户执行:
[root@mdw greenplum-db]# mkdir -p /opt/greenplum/data/master
[root@mdw greenplum-db]# chown -R gpadmin:gpadmin /opt/greenplum
在每台segment节点用root用户执行:
[root@sdw1 local]# mkdir -p /opt/greenplum/data1/primary
[root@sdw1 local]# mkdir -p /opt/greenplum/data1/mirror
[root@sdw1 local]# mkdir -p /opt/greenplum/data2/primary
[root@sdw1 local]# mkdir -p /opt/greenplum/data2/mirror
[root@sdw1 local]# chown -R gpadmin:gpadmin /opt/greenplum
本次规划,每个主机安装两个 segment,两个mirror。
3.8 集群性能测试
集群性能主要是针对集群的网络性能、磁盘I/O性能进行测试。
集群的网络性能测试:
[gpadmin@mdw ~]$ gpcheckperf -f /usr/local/greenplum-db/seg_host -r N -d /tmp
/usr/local/greenplum-db-6.20.5/bin/gpcheckperf -f /usr/local/greenplum-db/seg_host -r N -d /tmp

-------------------
--  NETPERF TEST
-------------------

====================
==  RESULT 2022-08-20T15:21:47.747177
====================
Netperf bisection bandwidth test
sdw1 -> sdw2 = 486.160000
sdw2 -> sdw1 = 417.560000

Summary:
sum = 903.72 MB/sec
min = 417.56 MB/sec
max = 486.16 MB/sec
avg = 451.86 MB/sec
median = 486.16 MB/sec
磁盘I/O性能测试,本次单机装两个seg,但是本次实验室采用虚拟机,只有一块盘,因此测试一个目录即可。
测试月产生32G的数据,需要留有足够的磁盘空间。因本次环境是采用虚拟机,就不测试了,生产环境必须测试,测试命令如下:
gpcheckperf -f /usr/local/greenplum-db/seg_host -r ds -D -d /opt/greenplum/data1/primary
4. 集群初始化
4.1 创建初始化配置文件
配置gpinitsystem_config配置文件,用户数据库集群初始化,配置内容如下:
[root@mdw ~]# su - gpadmin
[gpadmin@mdw ~]$ source /usr/local/greenplum-db/greenplum_path.sh
[gpadmin@mdw ~]$ mkdir -p /home/gpadmin/gpconfigs
[gpadmin@mdw ~]$ cp $GPHOME/docs/cli_help/gpconfigs/gpinitsystem_config /home/gpadmin/gpconfigs/gpinitsystem_config
[gpadmin@mdw ~]$ vi /home/gpadmin/gpconfigs/gpinitsystem_config
[gpadmin@mdw ~]$ cat /home/gpadmin/gpconfigs/gpinitsystem_config|grep -v ^#|grep -v ^$
ARRAY_NAME="Greenplum Data Platform"
SEG_PREFIX=gpseg
PORT_BASE=6000
declare -a DATA_DIRECTORY=(/opt/greenplum/data1/primary /opt/greenplum/data2/primary)
MASTER_HOSTNAME=mdw
MASTER_DIRECTORY=/opt/greenplum/data/master
MASTER_PORT=5432
TRUSTED_SHELL=ssh
CHECK_POINT_SEGMENTS=8
ENCODING=UNICODE
MIRROR_PORT_BASE=7000
declare -a MIRROR_DATA_DIRECTORY=(/opt/greenplum/data1/mirror /opt/greenplum/data2/mirror)
DATABASE_NAME=gpdw
Greenplum最低需要一个Master instance、两个Segment instance
DATA_DIRECTORY参数决定了每台主机创建多少个segment instance,每个segment相当于一个独立的postgresql实例。
参数中指定PORT_BASE、MIRROR_PORT_BASE, 不能使用/etc/sysctl.conf中net.ipv4.ip_local_port_range参数设定范围。
4.2 集群初始化
使用master节点初始化集群,初始化命令如下:
gpinitsystem -c /home/gpadmin/gpconfigs/gpinitsystem_config -h /usr/local/greenplum-db/seg_host
集群初始化成功完成,会提示:Greenplum Database instance successfully created。
gpinitsystem:mdw:gpadmin-[WARN]:-*******************************************************
gpinitsystem:mdw:gpadmin-[INFO]:-Greenplum Database instance successfully created
gpinitsystem:mdw:gpadmin-[INFO]:-------------------------------------------------------
gpinitsystem:mdw:gpadmin-[INFO]:-To complete the environment configuration, please
gpinitsystem:mdw:gpadmin-[INFO]:-update gpadmin .bashrc file with the following
gpinitsystem:mdw:gpadmin-[INFO]:-1. Ensure that the greenplum_path.sh file is sourced
gpinitsystem:mdw:gpadmin-[INFO]:-2. Add "export MASTER_DATA_DIRECTORY=/opt/greenplum/data/master/gpseg-1"
gpinitsystem:mdw:gpadmin-[INFO]:-   to access the Greenplum scripts for this instance:
gpinitsystem:mdw:gpadmin-[INFO]:-   or, use -d /opt/greenplum/data/master/gpseg-1 option for the Greenplum scripts
gpinitsystem:mdw:gpadmin-[INFO]:-   Example gpstate -d /opt/greenplum/data/master/gpseg-1
gpinitsystem:mdw:gpadmin-[INFO]:-Script log file = /home/gpadmin/gpAdminLogs/gpinitsystem_20220823.log
gpinitsystem:mdw:gpadmin-[INFO]:-To remove instance, run gpdeletesystem utility
gpinitsystem:mdw:gpadmin-[INFO]:-To initialize a Standby Master Segment for this Greenplum instance
gpinitsystem:mdw:gpadmin-[INFO]:-Review options for gpinitstandby
gpinitsystem:mdw:gpadmin-[INFO]:-------------------------------------------------------
gpinitsystem:mdw:gpadmin-[INFO]:-The Master /opt/greenplum/data/master/gpseg-1/pg_hba.conf post gpinitsystem
gpinitsystem:mdw:gpadmin-[INFO]:-has been configured to allow all hosts within this new
gpinitsystem:mdw:gpadmin-[INFO]:-array to intercommunicate. Any hosts external to this
gpinitsystem:mdw:gpadmin-[INFO]:-new array must be explicitly added to this file
gpinitsystem:mdw:gpadmin-[INFO]:-Refer to the Greenplum Admin support guide which is
gpinitsystem:mdw:gpadmin-[INFO]:-located in the /usr/local/greenplum-db-6.20.5/docs directory
gpinitsystem:mdw:gpadmin-[INFO]:-------------------------------------------------------
对于有Standby Master的集群,则初始化需要参数-s指定Standby Master的主机,命令如下:
gpinitsystem -c gpconfigs/gpinitsystem_config -h gpconfigs/hostfile_gpinitsystem -s <standby_master_hostname> --mirror-mode=spread
如果初始化有误,可以使用命令gpdeletesystem进行删除,重新初始化:
gpdeletesystem -d /opt/greenplum/data/master/gpseg-1 -f
参数-d 后面跟 MASTER_DATA_DIRECTORY(master 的数据目录),会清除master,segment所有的数据目录。
参数-f force, 终止所有进程,进行强制删除。
4.3 初始化后续操作
初始化的日志文件,会生成到 /home/gpadmin/gpAdminLogs/ 目录下,命名规则: gpinitsystem_${安装日期}.log
根据日志提示安装成功后,后续还有一些步骤需要操作。
设置环境变量,分别修改2个配置文件:/home/gpadmin/.bash_profile 、/home/gpadmin/.bashrc , 添加以下环境变量:
export MASTER_DATA_DIRECTORY=/opt/greenplum/data/master/gpseg-1
export PGPORT=5432
export PGUSER=gpadmin
export PGDATABASE=gpdw
用gpscp命令,把2个环境配置文件分发到集群其他节点,并执行source命令,让变量生效。
[gpadmin@mdw ~]$ gpscp -f /usr/local/greenplum-db/seg_host /home/gpadmin/.bash_profile  gpadmin@=:/home/gpadmin/.bash_profile
[gpadmin@mdw ~]$ gpscp -f /usr/local/greenplum-db/seg_host /home/gpadmin/.bashrc gpadmin@=:/home/gpadmin/.bashrc
[gpadmin@mdw ~]$ gpssh -f /usr/local/greenplum-db/all_host -e 'source /home/gpadmin/.bash_profile;source /home/gpadmin/.bashrc;'
[sdw2] source /home/gpadmin/.bash_profile;source /home/gpadmin/.bashrc;
[sdw1] source /home/gpadmin/.bash_profile;source /home/gpadmin/.bashrc;
[ mdw] source /home/gpadmin/.bash_profile;source /home/gpadmin/.bashrc;
5. 登陆数据库
5.1 psql登陆
psql 命令登录gp,psql命令用法可以通过 psql --help 查看帮助信息
psql 命令格式为:psql -h hostname -p port -d database -U user -W password
-h后面接对应的master或者segment主机名,默认是本机。
-p后面接master或者segment的端口号,默认5432(master节点)。
如果登陆segment节点,则需要指定segment端口6000.
-d后面接数据库名,默认gpdw,可将上述参数配置到用户环境变量中。
-U登陆用户名,默认gpadmin。
[gpadmin@mdw ~]$ psql
psql (9.4.26)
Type "help" for help.

gpdw=# ALTER USER gpadmin WITH PASSWORD 'gpadmin';
ALTER ROLE
gpdw=# \l
                               List of databases
   Name    |  Owner  | Encoding |  Collate   |   Ctype    |  Access privileges
-----------+---------+----------+------------+------------+---------------------
 gpdw      | gpadmin | UTF8     | en_US.utf8 | en_US.utf8 |
 postgres  | gpadmin | UTF8     | en_US.utf8 | en_US.utf8 |
 template0 | gpadmin | UTF8     | en_US.utf8 | en_US.utf8 | =c/gpadmin         +
           |         |          |            |            | gpadmin=CTc/gpadmin
 template1 | gpadmin | UTF8     | en_US.utf8 | en_US.utf8 | =c/gpadmin         +
           |         |          |            |            | gpadmin=CTc/gpadmin
(4 rows)
gpdw=# \q
[gpadmin@mdw ~]$
5.2 远程客户端登陆配置
配置其他用户或者客户端远程登陆gp,需要配置以下2个文件:
配置 /opt/greenplum/data/master/gpseg-1/pg_hba.conf,新增一条规则,则允许任意ip及密码登陆pg
host all gpadmin 0.0.0.0/0 md5
配置 /opt/greenplum/data/master/gpseg-1/postgresql.conf,确认是否允许监听任意ip, gp6 默认会设置为运行监听任意IP
listen_addresses='*'
配置修改完成后,重新加载配置文件:
gpstop -u #重新加载配置文件 postgresql.conf 和 pg_hba.conf
到此,已全部安装完成。接着可用客户端管理软件登录。
5.3 客户端工具登陆
目前gp常用的客户端工具,有Datagrip、Navicat、DBeaver等。
DataGrip能够很好支持gp,只有商业版,有条件的建议优先选用。如果已经在使用JetBrains了,则直接安装一个数据库插件即可。
如果要用开源的,推荐选用DBeaver,也能较好支持gp。
Datagrip工具使用,File -> New -> DataSource -> Greenplum,进入gp的数据源配置界面:
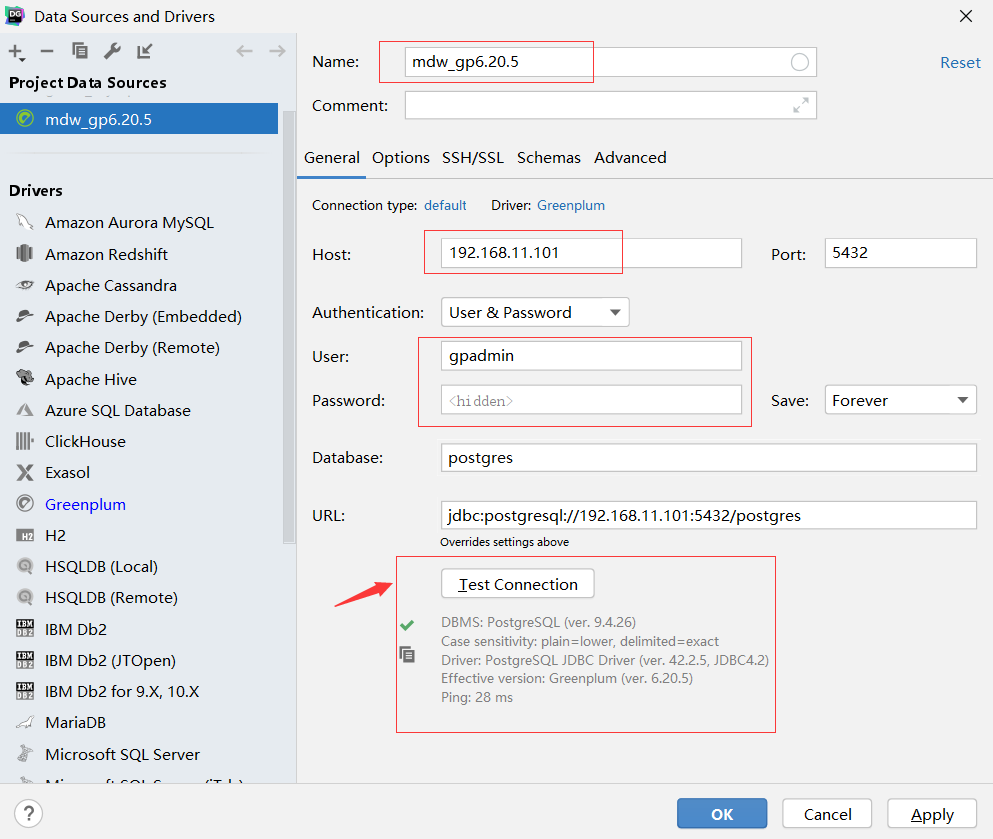
配置完成,点击测试连接,出现绿色打钩标志,则数据库连接成功,即可登陆数据库进行操作。


本社区面向用户介绍CSDN开发云部门内部产品使用和产品迭代功能,产品功能迭代和产品建议更透明和便捷
更多推荐

 10
10 0
0- 0


 已为社区贡献1条内容

所有评论(0)