

101,102 Machines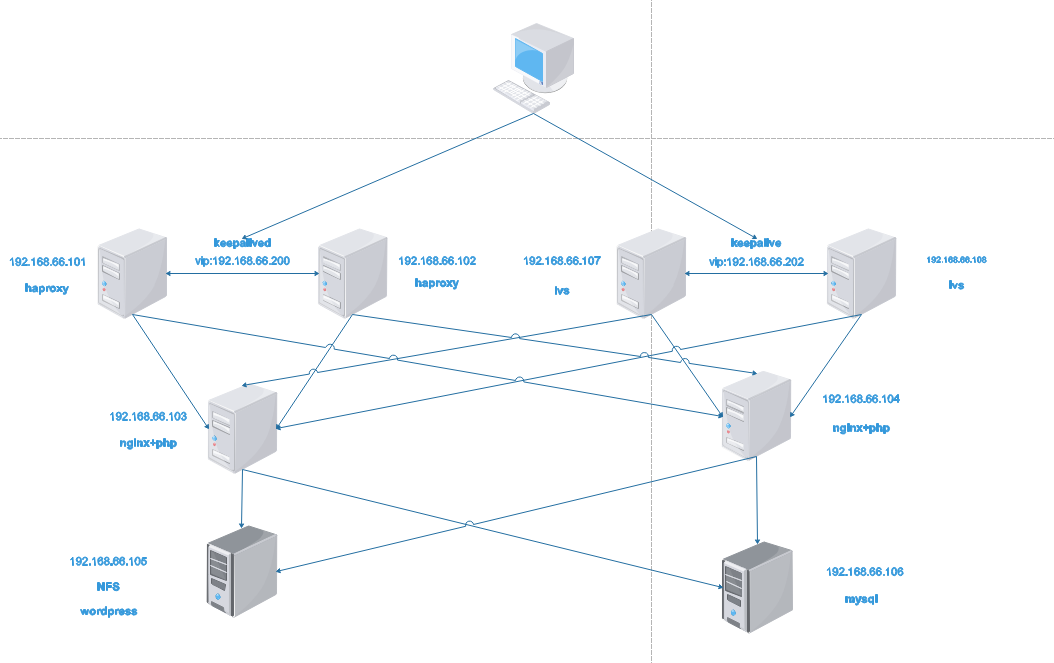
haproxy settings
1. Unzip the file and enter the unzipped folder
tar xvf haproxy-1.9.8.tar.gz
cd haproxy-1.9.8
2. Compile and install haproxy, compile parameters
make ARCH=x86_64 TARGET=linux2628 USE_PCRE=1 USE_OPENSSL=1 USE_ZLIB=1 USE_SYSTEMD=1 USE_CPU_AFFINITY=1 PREFIX=/usr/local/haproxy
make install PREFIX=/usr/local/haproxy
4. Copy binary execution files into PATH path
cp haproxy /usr/sbin/
5. Modify the systemctl startup file
vim /usr/lib/systemd/system/haproxy.service
[Unit]
Description=HAProxy Load Banlancer
After=syslog.target network.target

[Service]
ExecStartPre=/usr/sbin/haproxy -f /etc/haproxy/haproxy.cfg -c -q
ExecStart=/usr/sbin/haproxy -Ws -f /etc/haproxy/haproxy.cfg -p /run/haproxy.pid
ExecReload=/bin/kill -USR2 $MAINPID

[Install]
WantedBy=multi-user.target
6. Create configuration and pid folders and authorize
mkdir /etc/haproxy
useradd -r -s /sbin/nologin haproxy
mkdir /var/lib/haproxy
chown haproxy.haproxy /var/lib/haproxy -R
7. Modify the configuration file as follows
vim /etc/haproxy/haproxy.cfg
global
maxconn 65536
chroot /usr/local/haproxy
stats socket /var/lib/haproxy/haproxy.sock mode 600 level admin (open socket File, or comment out without opening)
uid 1000
gid 1000
daemon
nbproc 1
cpu-map 1 0
#cpu-map 2 1
#cpu-map 3 2
#cpu-map 4 3
spread-checks 5
pidfile /run/haproxy.pid
#log 127.0.0.1 local3 info

defaults
option http-keep-alive
option forwardfor
maxconn 65536
mode http
timeout connect 300000ms
timeout client 300000ms
timeout server 300000ms

#HTTP Access Entry==========================================================================
listen web_http
bind 192.168.66.101:80
mode tcp
#log global
balance roundrobin
server web1 192.168.66.103:80 check inter 3000 fall 2 rise 5
server web2 192.168.66.104:80 check inter 3000 fall 2 rise 5
Keepalivedsettings
1. Install keepalived software
yum install keepalived
2. Modify the configuration file
vim /etc/keepalived/keepalived.conf
! Configuration File for keepalived

global_defs {
   notification_email {
     root@magedu.com
   }
   notification_email_from Alexandre.Cassen@firewall.loc
   smtp_server 127.0.0.1
   smtp_connect_timeout 30
   router_id s2.pengbo.com (To prevent name conflicts, it is recommended that two machines be changed to machines with different names)
   vrrp_skip_check_adv_addr
   #vrrp_strict
   vrrp_iptables
   vrrp_garp_interval 0
   vrrp_gna_interval 0
}

vrrp_instance VIP1 {
    state MASTER   (102 Machine changed to BACKUP)
    interface eth0
    virtual_router_id 66 (Make sure the values do not conflict within the same segment)
    priority 100 (102 Machine should be changed to a value less than 100)
    advert_int 2
    unicast_src_ip 192.168.66.102  (Fill in your local address here)
    unicast_peer {
        192.168.66.101  (Fill in the monitored together keepalive Machine)
    }
    authentication {
        auth_type PASS
        auth_pass linux36
    }
    virtual_ipaddress {
        192.168.66.200 dev eth0 label eth0:0 (Set up a virtual vip Address)
    }
}
Modify Kernel Parameters
1. Modify the configuration file
vim /etc/sysctl.conf
   net.ipv4.ip_forward = 1 (turn on forwarding)
   net.ipv4.ip_nonlocal_bind = 1 (enables it to listen for IP addresses it does not have)
2. Make profile parameters work
sysctl -p
3. Start the service
systemctl start haproxy keepalived
103, 104 machines
Compile and Install nginx
1. Compile and install nginx
tar xf nginx-1.16.0.tar.gz
./configure --prefix=/apps/nginx --user=nginx --group=nginx --with-http_ssl_module --with-http_v2_module --with-http_realip_module --with-http_stub_status_module --with-http_gzip_static_module --with-pcre --with-stream --with-stream_ssl_module --with-stream_realip_module
make
make install
2. Create system user nginx
useradd -r -s /usr/sbin/nologin nginx
3. Modify nginx's systemctl service file
vim nginx.service
[Unit]
Description=nginx - high performance web server
Documentation=http://nginx.org/en/docs/
After=network-online.target remote-fs.target nss-lookup.target
Wants=network-online.target

[Service]
Type=forking
PIDFile=/apps/nginx/logs/nginx.pid
ExecStart=/apps/nginx/sbin/nginx -c /apps/nginx/conf/nginx.conf
ExecReload=/bin/kill -s HUP $MAINPID
ExecStop=/bin/kill -s TERM $MAINPID

[Install]
WantedBy=multi-user.target
mv nginx.service /usr/lib/systemd/system/
4. Create soft links to add nginx binaries to PATH variables
ln -sv /apps/nginx/sbin/nginx /usr/sbin/
5. Modify nginx configuration file
vim /apps/nginx/conf/nginx.conf
user  nginx;
worker_processes  auto;
pid        logs/nginx.pid;
//Create a separate access path for wordpress
location /wordpress {
            root   html;
            index  index.php index.htm;
        }
//Turn on PHP functionality
location ~ \.php$ {
            root           /apps/nginx/html;
            fastcgi_pass   127.0.0.1:9000;
            fastcgi_index  index.php;
            fastcgi_param  SCRIPT_FILENAME  $document_root$fastcgi_script_name;
            include        fastcgi_params;
        }
6. Start the service
nginx
7. Create a folder to mount nfs
mkdir /apps/nginx/html/wordpress
Compile and install php-fpm
1. Install the Development Package
yum install libxml2-devel bzip2-devel libmcrypt-devel bzip2
2. Compile installation parameters
tar xvf php-7.3.5
./configure --prefix=/app/php --enable-mysqlnd --with-mysqli=mysqlnd --with-pdo-mysql=mysqlnd --with-openssl --with-freetype-dir --with-jpeg-dir --with-png-dir --with-zlib --with-libxml-dir=/usr --with-config-file-path=/etc --with-config-file-scan-dir=/etc/php.d --enable-mbstring --enable-xml --enable-sockets --enable-fpm --enable-maintainer-zts --disable-fileinfo
make && make install
3. Copy Configuration File
cp php.ini-production /etc/php.ini
4. Modify profile time zone
vim /etc/php.ini
[Date]
; Defines the default timezone used by the date functions
; http://php.net/date.timezone
date.timezone = "Asia/Shanghai"
5. Mobile service startup script
cp php-7.3.5/sapi/fpm/init.d.php-fpm /etc/init.d/php-fpm
chmod +x /etc/init.d/php-fpm
Or CP php-7.3.5/sapi/fpm/php-fpm.service/usr/lib/systemd/system/
6. Copy master profile
cp /app/php/etc/php-fpm.conf.default /app/php/etc/php-fpm.conf
cp /app/php/etc/php-fpm.d/www.conf.default /app/php/etc/php-fpm.d/www.conf
7. Modify the group of the owner in the main profile
vim /app/php/etc/php-fpm.d/www.conf
   user = nginx
   group = nginx
8. Start Services
systemctl start php-fpm or service php-fpm start
105 Machines
wordpress File Unzip
1. Unzip (place the unzipped package in / data / directory)
unzip wordpress-5.2.1.zip
cd wordpress
2. Modify the master profile template to connect to the database
cp wp-config-sample.php wp-config.php
vim wp-config.php
define( 'DB_NAME', 'wordpress' );

/** MySQL database username */
define( 'DB_USER', 'wordpress' );

/** MySQL database password */
define( 'DB_PASSWORD', '123456' );

/** MySQL hostname */
define( 'DB_HOST', '192.168.66.106' );

/** Database Charset to use in creating database tables. */
define( 'DB_CHARSET', 'utf8' );

/** The Database Collate type. Don't change this if in doubt. */
define( 'DB_COLLATE', '' );
Storage Server nfs
1. Start the service (usually installed by default)
systemctl start nfs
2. Modify the configuration file
vim /etc/exports
/data/wordpress *(rw,no_root_squash)
3. Reload the configuration file
exportfs -r
Mount Files
Mount 192.168.66.105:/data/wordpress/apps/nginx/html/wordpress/ (operated on 103,104 machines)
Chown-R nginx.nginx/apps/nginx/html/wordpress/ (operated on 103,104 machines)
106 Machines
Binary Compile Install mariadb
1. Install Environment Development Kit
yum install bison bison-devel zlib-devel libcurl-devel libarchive-devel boostdevel gcc gcc-c++ cmake ncurses-devel gnutls-devel libxml2-devel openssldevel libevent-devel libaio-devel
2. Unzip binaries
tar xvf mariadb-10.2.23-linux-x86_64.tar.gz -C /usr/local/
3. Enter the unzipped folder, create soft links and modify permissions
cd /usr/local
ln -sv mariadb-10.2.23-linux-x86_64/ mysql
chown -R root.root mysql/
4. Create system accounts for mysql data use
useradd -r -s /sbin/nologin mysql -d /data/mysql
mkdir /data/mysql
chown mysql.mysql /data/mysql
5. Enter the mysql home folder and execute the installation script
cd mysql/
scripts/mysql_install_db --user=mysql --datadir=/data/mysql
6. Create a configuration folder and modify the configuration file
mkdir /etc/mysql
cp support-files/my-huge.cnf /etc/mysql/my.cnf
vim /etc/mysql/my.cnf
[mysqld]
    datadir=/data/mysql
    port            = 3306
    socket          = /tmp/mysql.sock
    skip-external-locking
    key_buffer_size = 384M
    max_allowed_packet = 1M
    table_open_cache = 512
    sort_buffer_size = 2M
    read_buffer_size = 2M
    read_rnd_buffer_size = 8M
    myisam_sort_buffer_size = 64M
    thread_cache_size = 8
    query_cache_size = 32M
7. Add mysql to the startup service script
cp support-files/mysql.server /etc/init.d/mysqld
chkconfig --add mysqld
chkconfig --list
8. Set up environment variable file and work
vim /etc/profile.d/lamp.sh
PATH=/usr/local/mysql/bin:$PATH
. /etc/profile.d/lamp.sh
9. Start Services
service mysqld start
10. Create a wordpress database and an account to use with wordpress
mysql
create database wordpress;
grant all on wordpress.* to wordpress@'192.168.66.%' identified by '123456';
107, 108 Machines
1. Install keepalived
yum install keepalived
2. Modify the configuration file
vim /etc/keepalived/keepalived.conf
! Configuration File for keepalived

global_defs {
   notification_email {
     acassen@firewall.loc
     failover@firewall.loc
     sysadmin@firewall.loc
   }
   notification_email_from Alexandre.Cassen@firewall.loc
   smtp_server 127.0.0.1
   smtp_connect_timeout 30
   router_id s3.pengbo.com
   vrrp_skip_check_adv_addr
   vrrp_iptables
  #vrrp_strict
   vrrp_garp_interval 0
   vrrp_gna_interval 0
}
vrrp_instance VIP2 {
    state MASTER (Distinguish between master and slave)
    interface eth0
    virtual_router_id 99
    priority 100   (Primary and secondary priorities are different)
    advert_int 2
    unicast_src_ip 192.168.66.107  (Fill in your local address here)
    unicast_peer {
        192.168.66.108              (Fill in another surveillance address here)
    }
    authentication {
        auth_type PASS
        auth_pass linux36
    }
    virtual_ipaddress {
        192.168.66.202 dev eth0 label eth0:0
    }
}
include /etc/keepalived/conf/*.conf (Import Subprofile)
3. Create a sub-profile and write rules
mkdir /etc/keepalived/conf
vim /etc/keepalived/conf/lvs.conf
virtual_server 192.168.66.202 80 {
    delay_loop 6
    lb_algo wrr
    lb_kind DR
    #persistence_timeout 20
    protocol TCP
    sorry_server 192.168.66.105 80

  real_server 192.168.66.103 80 {
      weight 1
      TCP_CHECK {
      connect_timeout 5
      nb_get_retry
      delay_before_retry 3
      connect_port 80
      }
   }

   real_server 192.168.66.104 80 {
       weight 1
       TCP_CHECK {
       connect_timeout 5
       nb_get_retry 3
       delay_before_retry 3
       connect_port 80
       }
   }
}
4. Start the service and view the rules
systemctl start keepalived
ipvsadm -Ln
IP Virtual Server version 1.2.1 (size=4096)
Prot LocalAddress:Port Scheduler Flags
  -> RemoteAddress:Port           Forward Weight ActiveConn InActConn
TCP  192.168.66.202:80 wrr
  -> 192.168.66.103:80            Route   1      0          0
  -> 192.168.66.104:80            Route   1      0          0
5. Bind vip addresses to loopback network cards on machines 103 and 104 and modify kernel parameters
echo 1 > /proc/sys/net/ipv4/conf/all/arp_ignore
echo 1 > /proc/sys/net/ipv4/conf/lo/arp_ignore
echo 2 > /proc/sys/net/ipv4/conf/all/arp_announce
echo 2 > /proc/sys/net/ipv4/conf/lo/arp_announce
ifconfig lo:1 192.168.66.202 netmask 255.255.255.255


 已为社区贡献15557条内容

所有评论(0)