微服务技术栈储备-SpringCloudNetflix_Day03服务网关Gateway&& 配置中心Config
在微服务架构中,API网关扮演着极其重要的角色,它不仅作为系统的单一入口点,还负责请求的路由、负载均衡、安全控制等。Zuul和Gateway是两种常用于构建API网关的解决方案。如果项目已经建立在SpringCloud生态之上,建议优先考虑使用Gateway,因为它提供了更多的特性和更好的性能。对于一些小型或者不需要太高吞吐量的系统,Zuul仍然是一个可行的选择。在选择API网关解决方案时,应综合
服务网关SpringCloudGateway前言
Zuul与Gateway
在微服务架构中,API网关扮演着极其重要的角色,它不仅作为系统的单一入口点,还负责请求的路由、负载均衡、安全控制等。Zuul和Gateway是两种常用于构建API网关的解决方案。
如果项目已经建立在SpringCloud生态之上,建议优先考虑使用Gateway,因为它提供了更多的特性和更好的性能。对于一些小型或者不需要太高吞吐量的系统,Zuul仍然是一个可行的选择。在选择API网关解决方案时,应综合考虑技术栈、性能需求、开发成本和维护难度等因素。
- 在使用Zuul和Gateway时,需要注意以下几点:
- 考虑系统的可维护性和未来的迁移成本。
- 评估系统的性能需求,选择合适的网关产品。
- 注意网关的安全性配置,避免潜在的安全风险。
- 监控网关的运行状态,及时发现并解决可能的问题。
Spring Cloud Gateway的核心概念简化概括
- Spring Cloud Gateway的核心概念简化概括为路由(Route)、断言(Predicate)和过滤器(Filter)。
具体如下:- 路由(Route):路由是构建网关的基础模块,由ID、目标URI以及一系列断言和过滤器组成。路由定义了如何将进来的请求匹配到特定的处理程序,并
转发到相应的目标URL。- 断言(Predicate):断言
用于匹配HTTP请求的条件,基于Java8的Predicate接口实现。它允许根据请求的不同属性,如请求头、请求参数等进行匹配。当一个请求满足所有预设的断言条件时,相应的路由才会被选中进行处理。- 过滤器(Filter):过滤器在Spring CloudGateway中扮演着重要的角色。它能够在请求被路由之前或之后
执行一些自定义的逻辑,比如进行请求头的添加、修改响应数据等。过滤器分为前置过滤器(pre-filters)和后置过滤器(post-filters),前者在路由匹配前执行,后者在路由匹配后执行。
Spring Cloud Gateway的工作方式
Spring Cloud Gateway 的工作原理跟 Zuul 的差不多,最大的区别就是 Gateway 的 Filter 只有 pre 和 post 两种,下面是官方的执行流程图:
Spring Cloud Gateway的执行流程可以概括为接收请求、路由匹配、执行“pre”阶段过滤器、路由到目标服务、执行“post”阶段过滤器和返回响应这几个主要步骤

Spring Cloud Gateway入门
思路步骤
- 创建工程导入依赖
- 主配置类
- yml配置
- 访问测试
创建工程导入依赖
工程名:springcloud-gateway-server-1070,导入gataway基础依赖
<!--服务注册与发现-->
<dependency>
    <groupId>org.springframework.cloud</groupId>
    <artifactId>spring-cloud-starter-netflix-eureka-client</artifactId>
</dependency>
<!--gataway基础依赖:包含了Spring Boot Web 依赖-->
<dependency>
  <groupId>org.springframework.cloud</groupId>
  <artifactId>spring-cloud-starter-gateway</artifactId>
</dependency>
主配置类
@EnableEurekaClient:
这个注解是 Spring Cloud Netflix Eureka 项目的特例,它只能与 Eureka 注册中心一起工作。
@EnableDiscoveryClient:
这个注解是一个更通用的注解,它不仅仅限于 Eureka,还可以与其他服务发现组件一起工作,如 Consul、Zookeeper 等。
@SpringBootApplication
@EnableDiscoveryClient
public class GatewayServerApp {
    public static void main(String[] args) {
        SpringApplication.run(GatewayServerApp.class);
    }
}
yml配置
server:
  port: 1070

spring:
  application:
    name: gateway-server
  cloud:
    gateway:
      discovery:
        locator:
          enabled: false #开放服务名访问方式
          lower-case-service-id: true #服务名小写
      routes:
        - id: application-user #指定服务名 用于区分
          uri: lb://user-server #去注册中心找这个服务名
          predicates: #断言,匹配访问的路径
            - Path=/user/**    #服务访问路径
          filters:
            - StripPrefix=1    #请求转发的时候会去掉 /user服务访问路径
        - id: application-order#指定服务名 用于区分
          uri: lb://order-server #去注册中心找这个服务名
          predicates: #断言,匹配访问的路径
            - Path=/order/**    #服务访问路径
          filters:
            - StripPrefix=1    #请求转发的时候会去掉 /user服务访问路径

eureka:
  client:
    serviceUrl:
      defaultZone: http://localhost:1010/eureka/
  instance:
    prefer-ip-address: true #使用ip地址进行注册
    instance-id: gateway-server:1070    #实例ID
访问测试
启动注册中心,启动用户服务,启动网关访问:
http://localhost:1070/user/user/getUser/1,请求将会打到用户服务上,并返回用户数据。
Predicate断言工厂
断言工厂就是用来判断http请求的匹配方式。比如我们再上面案例中配置的:“
Path=/user/**” ,就是使用的是 “Path Route Predicate Factory” 路径匹配工厂,意思是http请求的资源地址必须是 /user 才会被匹配到对应的路由,然后继续执行对应的服务获取资源。
- 在Spring Cloud Gateway中,针对不同的场景内置的路由断言工厂,比如
Query Route Predicate Factory:根据查询参数来做路由匹配Path Route Predicate Factory: 根据path断言 常用RemoteAddr Route Predicate Factory:根据ip来做路由匹配Header Route Predicate Factory:根据请求头中的参数来路由匹配Host Route Predicate Factory:根据主机名来进行路由匹配Method Route Predicate Factory:根据方法来路由匹配Cookie Route Predicate Factory:根据cookie中的属性值来匹配Before Route Predicate Factory:指定时间之间才能匹配After Route Predicate Factory: 指定时间之前才能匹配Weight Route Predicate Factory: 根据权重把流量分发到不同的主机
Gateway 的 Filter 过滤器
Gateway的Filter的zuul的Filter有相似之处,与zuul不同的是,Gateway的filter从生命周期上可以为“pre”和“post”类型。根据作用范围可分为
针对于单个路由的gateway filter,和针对于所有路由的Global Filer。
自定义Gateway Filter:针对于单个路由
在Spring CloudGateway自定义过滤器,过滤器需要实现GatewayFilter和Ordered这两个接口。我们下面来演示自定义filter计算请求的耗时。
package org.example.config;

import org.springframework.cloud.gateway.filter.GatewayFilter;
import org.springframework.cloud.gateway.filter.GatewayFilterChain;
import org.springframework.core.Ordered;
import org.springframework.web.server.ServerWebExchange;
import reactor.core.publisher.Mono;

/**
 * 演示自定义filter计算请求的耗时 也可以模拟一个登陆检查
 * 过滤器需要实现GatewayFilter和Ordered这两个接口
 */
public class RequestTimeFilter implements GatewayFilter, Ordered {
    private static final String COUNT_Start_TIME = "countStartTime";

    /**
     * 演示自定义filter计算请求的耗时 也可以模拟一个登陆检查
     * @param exchange
     * @param chain
     * @return
     */
    @Override
    public Mono<Void> filter(ServerWebExchange exchange, GatewayFilterChain chain) {
        //开始时间
        exchange.getAttributes().put(COUNT_Start_TIME, System.currentTimeMillis());
        //执行完成之后
        return chain.filter(exchange).then(
                Mono.fromRunnable(() -> {
                    //开始时间
                    Long startTime = exchange.getAttribute(COUNT_Start_TIME);
                    //结束时间
                    Long endTime=(System.currentTimeMillis() - startTime);
                    if (startTime != null) {
                        System.out.println(exchange.getRequest().getURI().getRawPath() + ": " + endTime + "ms");
                    }
                })
        );
    }

    /**
     * getOrder返回filter的优先级,越大的值优先级越低
     * @return
     */
    @Override
    public int getOrder() {
        return Ordered.LOWEST_PRECEDENCE;
    }
}
最后我们还需要把该Filter配置在对应的路由上
根据Filter配置的path测试访问http://localhost:1070/services/user/user/getUser/1
配置如下:
@Configuration
public class FilterConfig {

    //配置Filter作用于那个访问规则上
    @Bean
    public RouteLocator customerRouteLocator(RouteLocatorBuilder builder) {

        return builder.routes().route(r -> r.path("/services/user/**")
                //去掉2个前缀
                        .filters(f -> f.stripPrefix(2)
                        .filter(new RequestTimeFilter())
                        .addResponseHeader("X-Response-test", "test"))
                        .uri("lb://user-server")
                        .order(0)
                        .id("test-RequestTimeFilter")
                ).build();
    }

}
自定义GlobalFilter全局
GlobalFilter:全局过滤器,不需要在配置文件中配置,作用在所有的路由上,最终通过GatewayFilterAdapter包装成GatewayFilterChain可识别的过滤器,它为请求业务以及路由的URI转换为真实业务服务的请求地址的核心过滤器,不需要配置,系统初始化时加载,并作用在每个路由上。
package org.example.config;

import com.alibaba.fastjson.JSON;
import org.springframework.cloud.gateway.filter.GatewayFilterChain;
import org.springframework.cloud.gateway.filter.GlobalFilter;
import org.springframework.core.Ordered;
import org.springframework.core.io.buffer.DataBuffer;
import org.springframework.http.HttpStatus;
import org.springframework.http.server.reactive.ServerHttpResponse;
import org.springframework.stereotype.Component;
import org.springframework.web.server.ServerWebExchange;
import reactor.core.publisher.Mono;

import java.io.UnsupportedEncodingException;
import java.util.HashMap;
import java.util.List;

@Component
public class TimeGlobleFilter implements GlobalFilter, Ordered {

    @Override
    public Mono<Void> filter(ServerWebExchange exchange, GatewayFilterChain chain) {
		//获取token
        List<String> token = exchange.getRequest().getHeaders().get("token");

		//非空验证
        if(token == null || token.isEmpty()){
            //响应对象
            ServerHttpResponse response = exchange.getResponse();
            //构建错误结果
            HashMap<String,Object> data = new HashMap<>();
            data.put("code",401);
            data.put("message","未登录");

			//返回给客户端固定格式
            DataBuffer buffer = null;
            try {
                byte[] bytes = JSON.toJSONString(data).getBytes("utf-8");
                buffer = response.bufferFactory().wrap(bytes);

                //设置完成相应,不会继续执行后面的filter
                //response.setComplete();
                response.setStatusCode(HttpStatus.UNAUTHORIZED);
                response.getHeaders().add("Content-Type","application/json;charset=UTF-8");
            } catch (UnsupportedEncodingException e) {
                e.printStackTrace();
            }

            //把结果写给客户端
            return response.writeWith(Mono.just(buffer));
        }

		//相等验证
        String list = token.get(0);
        if (!"123".equalsIgnoreCase(list)) {
            //响应对象
            ServerHttpResponse response = exchange.getResponse();
            //构建错误结果
            HashMap<String,Object> data = new HashMap<>();
            data.put("code",401);
            data.put("message","token错误");

            DataBuffer buffer = null;
            try {
                byte[] bytes = JSON.toJSONString(data).getBytes("utf-8");
                buffer = response.bufferFactory().wrap(bytes);

                //设置完成相应,不会继续执行后面的filter
                //response.setComplete();
                response.setStatusCode(HttpStatus.UNAUTHORIZED);
                response.getHeaders().add("Content-Type","application/json;charset=UTF-8");
            } catch (UnsupportedEncodingException e) {
                e.printStackTrace();
            }

            //把结果写给客户端
            return response.writeWith(Mono.just(buffer));
        }

        return chain.filter(exchange);
    }

    @Override
    public int getOrder() {
        return 0;
    }
}
//获取token具体值
List token = exchange.getRequest().getHeaders().get(“token”);
String list = token.get(0);

Gateway跨域配置
所谓的跨域是因为浏览器的同源(同一个域)策略限制,其实就是同源策略会阻止一个域的javascript脚本和另外一个域的内容进行交互,在前后端分离的项目架构中就会出现跨域问题,因为Gateway 网关是微服务的访问入口,所以我们只需要在Gateway配置跨域即可
server:
  port: 1070

spring:
  application:
    name: gateway-server
  cloud:
    gateway:
      discovery:
        locator:
          enabled: false #开放服务名访问方式
          lower-case-service-id: true #服务名小写
      routes:
        - id: application-user #指定服务名 用于区分
          uri: lb://user-server #去注册中心找这个服务名
          predicates: #断言,匹配访问的路径
            - Path=/user/**    #服务访问路径
          filters:
            - StripPrefix=1    #请求转发的时候会去掉 /user服务访问路径
    globalcors: #跨域配置
      cors-configurations:
        '[/**]':
          allowedOrigins: "https://docs.spring.io" #允许的站点
          allowedMethods: #允许的请求方式
            - GET
            - POST
            - DELETE
            - PUT
            - HEAD
            - CONNECT
            - TRACE
            - OPTIONS
          allowHeaders: #允许的请求头
            - Content-Type

eureka:
  client:
    serviceUrl:
      defaultZone: http://localhost:1010/eureka/
  instance:
    prefer-ip-address: true #使用ip地址进行注册
    instance-id: gateway-server:1070    #实例ID
配置中心Spring Cloud Config
什么是配置中心
在分布式系统中,由于服务数量很多,为了方便服务配置文件统一管理我们需要用到置中心组件。在Spring Cloud中,分布式配置中心组件spring cloud config 它可以帮我们集中管理配置文件,修改配置无需重启服务 等,它支持配置文件放在配置服务的本地,也支持放在远程如Git仓库中集中管理。
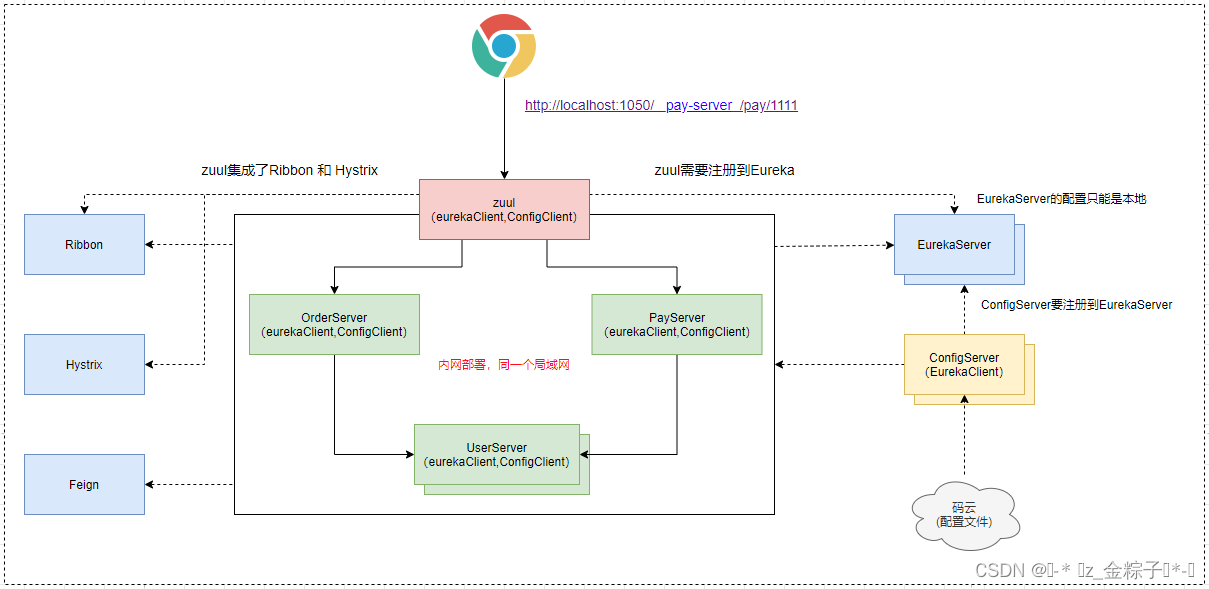
配置中心工作流程

根据上图我们知道,如果要实现配置文件统一管理,我们需要创建自己的远程仓库(当然也可以本地,或者其他仓库),我这里选择“码云”,然后将配置文件上传上去 ,然后我们需要
搭建自己的配置中心服务ConfigServer,配置上码云的仓库地址和相关账号,最后我们需要去修改我们的微服务如:zuul网关,支付服务等集成ConfigClient。
远程仓库
创建zuul配置 在仓库中创建文件 ,我们先将zuul的配置文件复制到码云上修改端口1061
搭建配置中心$导入依赖
搭建工程 springcloud-config-server-1011 ,作为配置中心服务端
<!-- Eureka 客户端,用于服务注册与发现 -->
<dependency>
    <groupId>org.springframework.cloud</groupId>
    <artifactId>spring-cloud-starter-netflix-eureka-client</artifactId>
</dependency>

<!-- Spring Boot Web 依赖,用于构建 Web 应用程序 -->
<dependency>
    <groupId>org.springframework.boot</groupId>
    <artifactId>spring-boot-starter-web</artifactId>
</dependency>

<!-- Spring Cloud Config Server,用于集中管理应用程序配置 -->
<dependency>
    <groupId>org.springframework.cloud</groupId>
    <artifactId>spring-cloud-config-server</artifactId>
</dependency>
开启配置中心
/**
 * 配置中心的启动类
 * @EnableConfigServer:开启配置中心
 */
@SpringBootApplication
// 启用服务发现客户端功能,用于与服务注册中心(如Eureka、Consul等)交互
@EnableDiscoveryClient
// 启用Spring Cloud Config Server功能,使应用程序成为配置服务器
@EnableConfigServer
public class ConFigServerApp {
    public static void main(String[] args) {
        SpringApplication.run(ConFigServerApp.class);
    }
}
配置文件
server:
  port: 1011

eureka:
  client:
    serviceUrl:
      defaultZone: http://127.0.0.1:1010/eureka/ #注册中心地址
  instance:
    prefer-ip-address: true #使用ip地址注册
    instance-id: config-server:1011  #指定服务的id

spring:
  application:
    name: config-server
  cloud:
    config:
      server:
        git:
          #配置远程仓库地址,去仓库中复制
          uri: https://gitee.com/zjin-xuanyu/spring-cloud-config-1011.git
          #仓库是私有的需要账号
          #username: 你的账号
          #password: 你的密码
          #search-paths: 路径 #如果配置文件不再仓库的根目录,需要配置查找路径
Zuul集成ConfigClient
浏览器访问:http://localhost:1011/application-zuul-dev.yml你可以看到ConfigServer从Git仓库获取到的zuul的配置文件内容如下:

集成ConfigClient
上一步骤我们已经可以通过ConfigServer从码云上获取到配置文件,我们的最终目的是能够让我们的微服务,zuul-server,order-server等都可以从ConfigServer拉取到配置文件,这里功能我们需要给微服务集成ConfigClient来实现。修改“springcloud-zuul-server-1060” zuul工程如下:
导入依赖
<!-- Spring Cloud Config客户端,用于从Config Server加载配置 -->
<dependency>
    <groupId>org.springframework.cloud</groupId>
    <artifactId>spring-cloud-config-client</artifactId>
</dependency>
创建bootstrap.yml配置文件
bootstrap.yml的优先级高于application.yml或者其他配置来源,我们得让微服务优先从码云上拉取配置文件后才能做其他的事情。创建配置文件 resources/
bootstrap.yml,添加如下内容
#配置中心的地址
spring:
  cloud:
    config:
      uri: http://127.0.0.1:1011 #zuul要从配置中心拉取文件
      #你要拉取具体的哪个配置文件
      name: application-zuul  #配置文件名字   dev是环境
      profile: dev #环境  组成完整的文件名:application-zuul-dev.yml
      label: master #主分支

测试zuul
启动zuul,观察启动的端口如果是1061说明已经从Git仓库拉取到了配置文件了,如果启动的端口是1060,说明配置文件拉取失败,这个时候需要检查你的集成步骤。

一起探索未来云端世界的核心,云原生技术专区带您领略创新、高效和可扩展的云计算解决方案,引领您在数字化时代的成功之路。
更多推荐


 34
34 0
0- 0


 已为社区贡献1条内容

所有评论(0)